In most cases, a Linux instance has a limited amount of disk space. When applications are deployed on a Linux instance, the available disk space decreases as the applications continue to run and the number of stored files increases. If the Linux instance has insufficient disk space, services cannot continue to write files to the disk, which may cause service exceptions. This topic describes the method of checking for the insufficient disk space issue and how to resolve the issue.
Problem description
If the No space left on device error message is returned when you create a file or application on a Linux Elastic Compute Service (ECS) instance, the disk space on the instance is insufficient. In this case, you must identify the causes of disk space insufficiency and take corresponding measures to resolve the issue.
Causes
In most cases, the issue of insufficient disk space occurs due to the following causes:
The space usage of disk partitions reaches 100%.
The inode usage of disk partitions reaches 100%.
Leftover files (zombies) exist.
NoteA deleted file may fail to free up file space when the file is deleted because its file handle was open before it was deleted.
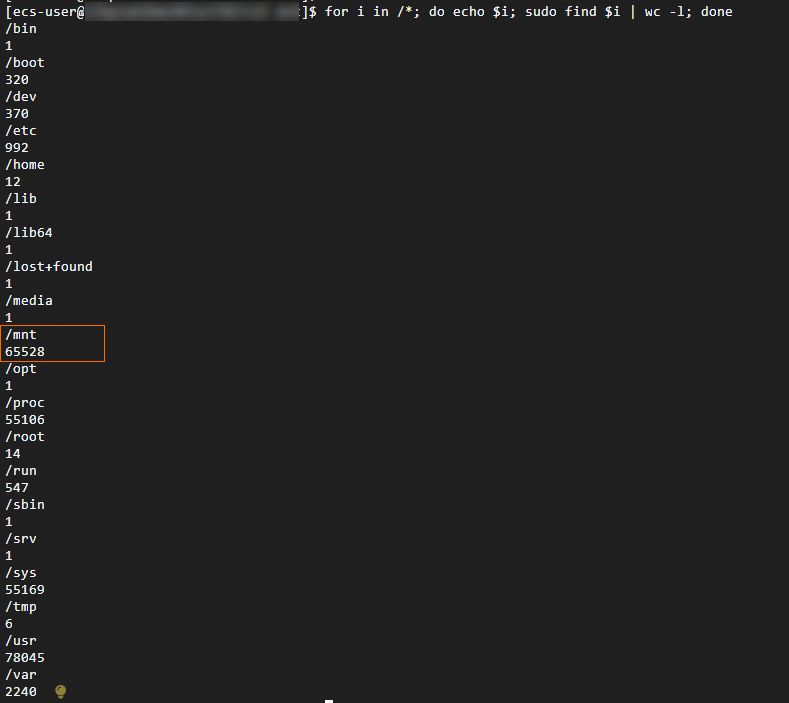
Mount points are overwritten.
NoteFor example, the file system of a disk partition that manages a large number of files is mounted on a directory. The directory is considered a mount point. If the file system of another disk partition is mounted on the mount point, the mount point is overwritten by the new file system. However, your application may continue to read data from and write data to the original file system space. In this case, an error message that indicates the issue of insufficient disk space may be returned. If you run the
dforducommand to check the disk space usage of files and directories, no information is returned. This is because thedforducommand returns information about the space usage of the disk partition that corresponds to the current mount point.Docker files occupy a large amount of memory space.
The upper limit on inotify watches is reached.
NoteThe inotify API provides a mechanism for monitoring file system events in Linux. You can use inotify to monitor file changes in file systems in real time. The error is not caused by insufficient disk space. This topic describes the error to help you troubleshoot issues.
Identification methods and solutions
To resolve the No space left on device error, perform the following operations based on the cause of the issue:
You must connect to the ECS instance on which you can troubleshoot the issue. For more information, see Use Workbench to connect to a Linux instance over SSH.
In the following operations, if you want to release disk space by deleting a file, make sure that the file is no longer needed before you delete it. This prevents data loss or impacts on your business. We recommend that you perform a disk backup before you manually delete the files. You can copy the files or use snapshots to back up data. For information about how to create a snapshot, see Create a snapshot for a disk.
The space usage of disk partitions reaches 100%.
Identification methods
Query the current usage of disk space and find files that consume a large amount of disk space.
Run the following command to query the usage of disk space:
df -hThe following command output is returned. In the example, the usage of the
/dev/vda3partition reaches 100%.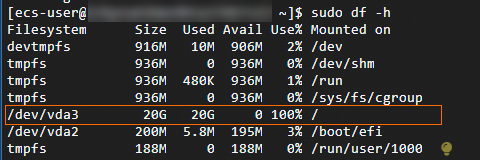
Run the following command to go to the root directory and identify which directory consumes the largest amount of disk space:
sudo du -sh /* | sort -rh | head -n 10The following command output is returned. As shown in the figure, the
/homedirectory consumes the largest amount of disk space. Therefore, check which file or directory in the/homedirectory occupies the largest amount of disk space. Perform the following operations based on your business requirements.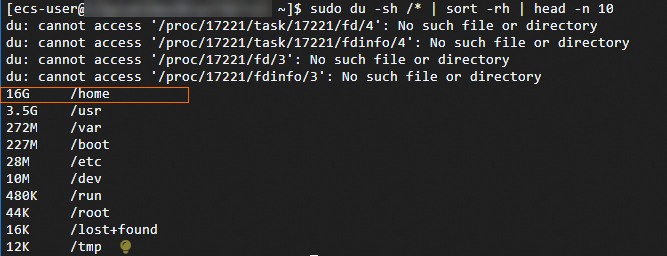
Run the following command to identify which directory consumes the largest amount of disk space.
For example, the command output indicates that the
/homedirectory consumes the largest amount of disk space. Then, identify which file or directory consumes the largest amount of disk space in the/homedirectory.sudo du -sh /home/* | sort -rh | head -n 10The following command output is returned. The
ecs-userdirectory consumes the largest amount of disk space. You can further check the specific files or subdirectories in the ecs-user directory to determine which items consume a large amount of sace.
Repeat the preceding process. In this example, you can find a large number of files that can be deleted in the
/home/ecs-user/directory.
Solutions
Check for possible causes based on your business scenario and take appropriate measures based on the specific cause.
Delete files or directories that consume a large amount of disk space and are no longer needed based on your business requirements.
Resize existing disks or create more disks based on your business requirements if your business does not allow you to delete files from disks or if disk space cannot be released after you delete files. For more information, see Overview of disk resizing, Create an empty data disk, and Attach a data disk.
The inode usage of disk partitions reaches 100%
Each file or directory in a file system is identified by a unique inode. A specific number of inodes are pre-allocated to a disk partition for files and directories when the disk partition is formatted. However, if the file system of the disk partition stores a large number of small files or directories, inode resources may become insufficient. If all inodes of a disk partition are allocated to files or directories, no new files or directories can be created on the disk partition, regardless of whether the disk partition has free space. To resolve the issue, you can delete unnecessary files or directories to release inodes or increase the number of inodes.
Identification methods
Run the following command to query the inode usage:
df -i
Solutions
If the inode usage reaches or is about to reach 100%, use one of the following methods to resolve the issue.
Leftover files (zombies) exist
If the disk partition capacity and inode capacity are both normal, a large number of deleted files (deleted) may exist in the system. These files are still occupied by processes in the system, causing the system to fail to release the corresponding disk space. These files have been marked as deleted and cannot be counted by running the df or du command. An excessively large number of leftover files occupy a large amount of disk space. Perform the following operations to query and delete leftover files:
Identification methods
If lsof is not installed in the operating system, run one of the following commands to install lsof based on the operating system.
Alibaba Cloud Linux and CentOS
sudo yum install -y lsofDebian and Ubuntu
sudo apt install -y lsofRun the following command to query the disk space usage of leftover files:
sudo lsof | grep delete | sort -k7 -rn | moreThe sample command output shown in the following figure is returned. The sizes (in bytes) of files that are in the deleted state are displayed in the seventh column. Check whether the sum of the sizes is close to the unexpected usage of disk space. If the sum is close to the unexpected usage, leftover files consume the disk space.

Solutions
If leftover files exist, use one of the following methods to release the file handles and clear the leftover files to release the disk space:
Restart the instance
After the instance is restarted, the system terminates running processes and releases the handles of deleted files.
WarningInstance restarts may interrupt services. We recommend that you restart instances during an appropriate period of time.
Run the kill command
After you run the
lsofcommand, obtain the process IDs (PIDs) of running processes that correspond to the leftover files in the second column. You can specify a PID in thekillcommand to terminate the corresponding process.Run the following command to query the PIDs of processes:
lsof | grep deleteRun the following command to terminate a process that corresponds to a leftover file based on your business requirements:
kill <PID>WarningWhen processes are terminated, services that run on instances may be affected. Proceed with caution.
Mount points are overwritten
If you cannot determine the cause of insufficient disk space after the preceding three causes are eliminated, the mount point may be overwritten. You can use the following methods to troubleshoot the issue.
Identification methods
Run the following command to view the mount information of the data disk:
mountThe following command output is returned.
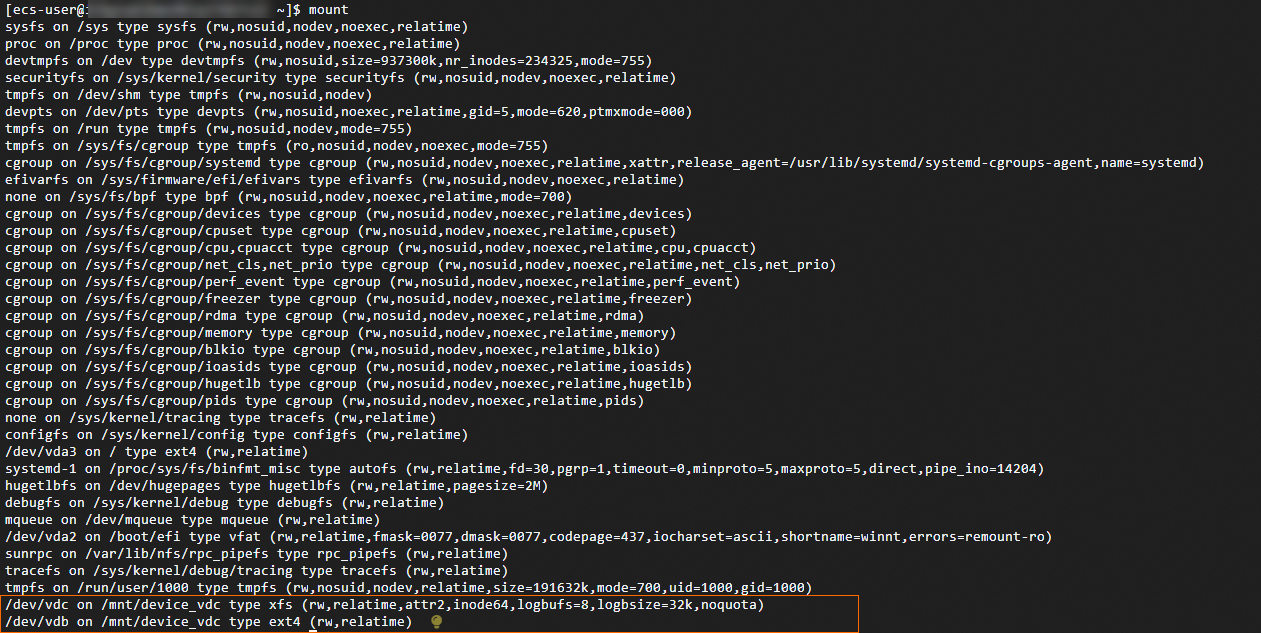
Two devices are mounted to the /mnt/device_vdc directory. Mount points may be overwritten in the directory.
Run the following command to view information about the partitions:
df -hThe following command output is returned.
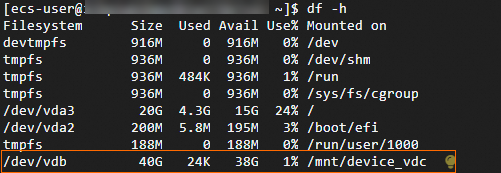
Solution
To resolve this issue, unmount the disk partition and check the space usage of the original mount point.
Run the following command to unmount the file system. In this example, the /mnt/device_vdc file system is uninstalled.
To increase the number of inodes, you must unmount the file systems from mount points. However, this may interrupt your applications. We recommend that you unmount the file systems during an appropriate period of time.
sudo umount /mnt/device_vdcAfter you cancel the mounting of a disk partition, you must check the space usage of the original mount directory and take appropriate measures based on the actual situation.
Docker files consume a large amount of memory space
If you run the Docker service on ECS instances, you may encounter the issue that the number of running containers increases, and images and containers that are unused or no longer used in Docker occupy disk space. If your disk space is insufficient, you can use the following methods to clean up files that are no longer used in Docker to reduce disk usage.
The following methods apply only to the instances that run Docker and instances whose disk space is full because Docker-related services occupy a large amount of memory space.
You can run the following command to check whether Docker is installed on the instance:
sudo docker -vThe following sample command output shows that the instance runs Docker.
Docker version 26.1.3, build b72abbbIdentification methods
Run the following command to query the disk space:
sudo df -hThe following sample command output shows that the disk space usage reached 100%.

Run the following command to view the file disk usage related to
Docker:sudo docker system dfThe following sample command output is returned.

The
Dockerimage occupies a large amount of space (the reclaimed space accounts for 76%). Useless images can be cleaned to release disk space.NoteIf the output of the
sudo docker system dfcommand indicates that only a few Docker-related files can be cleared, check for and clean up unnecessary files that occupy a large amount of space. For more information, see the Disk partition space usage reaches 100% section of this topic.
Solution
If Docker files occupy excessive amount of space, you can use the following method to clear the files:
Run the following command to clear unnecessary files:
sudo docker system pruneIf the following sample command output is returned, enter Y to delete the files.

The sudo docker system prune command deletes the following items. Before you perform the operation, check whether the content needs to be cleared.
All stopped containers
All networks that are not currently used by the containers
All dangling images that have no tags
Build cache that is no longer in use
The upper limit on inotify watches is reached
If an error message similar to tail: cannot watch '...': No space left on device is returned when you run commands such as tail -f, the upper limit on inotify watches is reached. To resolve the issue, you can increase the upper limit on inotify watches.
Identification methods
Run the following command to view the upper limit on inotify watches:
cat /proc/sys/fs/inotify/max_user_watchesSolution
Run the following command to change the upper limit on inotify watches:
sudo sysctl fs.inotify.max_user_watches=<New upper limit>Replace <New upper limit> with the value of the upper limit that you want to specify for inotify watches.
If you increase the upper limit on inotify watches, inotify watches may occupy a larger amount of system memory. When you change the upper limit on inotify watches, evaluate the memory, performance of the system, and possible impact. You can run the man 7 inotify command to learn more about inotify watches and the related settings.
References
If your disk space is often insufficient or your data storage requirements increase, we recommend that you optimize the storage solution based on your business requirements. For more information, see the following optimization suggestions.
If your disk space stores a large number of files, such as images and videos, and no high-concurrency read or write operations are performed on the disks, you can use Object Storage Service (OSS) to store the files. OSS is a large-capacity, secure, cost-effective, and highly reliable cloud storage service that can automatically expand storage space based on the volume of data. You can use ossfs to mount OSS buckets to ECS instances. Applications can manage objects in OSS buckets in the same manner as on-premises files without the need to modify code. For information about how to use ossfs to mount an OSS bucket to a local directory on a Linux system, see ossfs.
If your business requires high-concurrency read and write operations and data sharing, you can use Apsara File Storage NAS (NAS) to store files. NAS provides simple and scalable file systems that allow high-performance and high-concurrency shared storage, and can be used together with ECS. NAS can automatically expand the storage space as the data volume increases without the need for manual operations. For more information, see Mount a file system on a Linux ECS instance.
If you store a large number of log files on disks, you can transfer the log files to Simple Log Service. This facilitates log query and reduces disk usage. For more information, see Getting Started.
