This topic describes how to create a General-purpose NFS file system and mount it on a Linux ECS instance (CentOS 7.9) using the one-click mount feature in the NAS console. After completing these steps, upload and download data between your ECS instance and the file system.
Prerequisites
-
NAS is activated.
When you first visit the NAS product page, follow the on-screen instructions to activate the service.
-
You have an ECS instance running CentOS 7.9 in the Singapore region. For more information, see Create an ECS instance.
Step 1: Create an NFS file system
-
Log on to the NAS console.
-
In the File System Selection Guide section of the Overview page, click Create below General-purpose NAS.
-
On the General-purpose NAS (Pay-as-you-go) page, configure the following parameters. Use the default values for parameters not listed below.
For more information, see Create a file system.
Parameter
Description
Region
Select Singapore.
Zone
Select the zone that matches your ECS instance zone.
Storage Class
Select Capacity.
Protocol Type
Select NFS.
Network Type
Select VPC.
VPC
Select the VPC where the ECS instance resides.
vSwitch
Select a vSwitch that resides in the VPC.
-
Click Buy Now and complete the purchase.
Note-
By default, each Alibaba Cloud account has a "VPC default permission group (all allowed)" that allows all IP addresses in the VPC to access the file system through its mount target. To create custom permission groups based on your security requirements, see Manage permission groups.
-
A mount target is automatically created for General-purpose NAS file systems with the "VPC default permission group (all allowed)" attached. For Extreme NAS file systems, you need to manually create a mount target. For more information, see Create a mount target.
-
Step 2: Mount the file system in the NAS console
-
In the left-side navigation pane, choose .
-
In the top navigation bar, select the resource group and region where your file system resides.

-
Locate the file system you just created and click Mount in the Actions column.
NoteWhen you use the one-click mount feature for the first time, you need to authorize NAS to access your ECS resources by granting the AliyunServiceRoleForNasEcsHandler service-linked role. Follow the prompts in the dialog box to complete the authorization. For more information, see Service-linked roles of NAS.
-
In the Mount panel, configure the mount settings:
-
Select a mount target and click Next.
-
Select an ECS instance and click Next.
Make sure to select an ECS instance in the same VPC as your NAS file system. If they are in different VPCs, the connection may fail.
Note-
If you don't see your newly created ECS instance in the dropdown list, refresh the page and try again.
-
Only one ECS instance can be selected at a time. To mount the file system on multiple ECS instances, see Mount an NFS file system on multiple ECS instances at a time.
-
-
Configure the mount settings:
Parameter
Description
Mount Path
Specify the local directory path on your ECS instance where you want to mount the file system.
Automatic Mount
By default, Automatic Mount at Startup is selected. This ensures the file system automatically remounts when you restart your ECS instance.
Protocol Type
Choose the protocol version for your file system:
-
General-purpose NAS supports both NFSv3 and NFSv4. We recommend NFSv3 for optimal performance, especially if you don't need to edit the same file from multiple ECS instances simultaneously.
-
Extreme NAS file systems support only NFSv3.
NAS Directory
Specify which directory of the NAS file system to mount.
Valid values: the root directory / or a subdirectory such as /abc.
NoteIf the directory doesn't exist, select Confirm New Directory to create it. Optionally, configure the UID, GID, and POSIX permissions for the new directory. If not specified, the system uses default values.
Mount Parameters
Use the default mount parameters. For more information, see the mount parameters described in Mount an NFS file system on a Linux ECS instance.
-
-
-
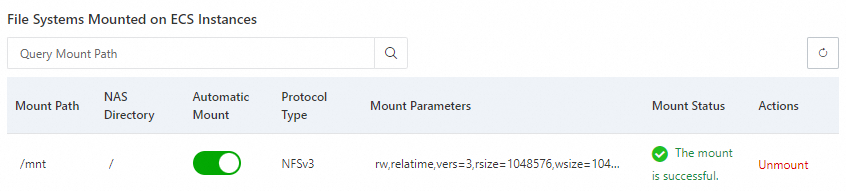
Click Complete.
The mount operation takes about 1-2 minutes. When the status shows mount successful, your NAS file system is ready to use on the ECS instance.
If the mount fails, use the built-in troubleshooting tool to diagnose the issue. For more information, see Mount an NFS file system on a Linux ECS instance.
After mounting, connect to your ECS instance and run
mount -lordf -hto verify the mount and check the file system capacity.
Step 3: Use the file system
Once mounted, the file system functions as a local directory on your ECS instance. Here's a quick example:
-
Remotely connect to the ECS instance by referring to Connection methods, and run the following commands to access the file system:
mkdir /mnt/dir1 mkdir /mnt/dir2 touch /mnt/file1 echo 'some file content' > /mnt/file2 ls /mnt -
If you see output similar to the screenshot below, you've successfully accessed your General-purpose Capacity NFS file system:

References
-
To mount a NAS file system using mount commands instead of the console, see Mount a file system on an ECS instance.
-
To mount a NAS file system on a container, see Mount a file system on a container.