All Products
Search
Document Center

Elastic Compute Service:Deploy open source RabbitMQ

Last Updated:Feb 27, 2025

RabbitMQ is an open source message broker that supports multiple messaging protocols, including Advanced Message Queuing Protocol (AMQP), Message Queuing Telemetry Transport (MQTT), Streaming Text Oriented Messaging Protocol (STOMP), HTTP, and WebSockets. RabbitMQ is easy to use, extensible, and highly available. RabbitMQ coordinates and manages communication in distributed systems, and implements asynchronous messaging to improve system decoupling, scalability, concurrent processing capabilities, and fault tolerance. RabbitMQ is widely used in messaging and task processing of enterprise-level applications because of its stable performance, diverse features, and active community support. This topic describes how to deploy open source RabbitMQ on an Elastic Compute Service (ECS) instance.

Deploy RabbitMQ

  • Manual deployment: This method is suitable for users who have a basic knowledge of Linux commands and can perform custom RabbitMQ deployment.

  • Quick deployment: This method eliminates the need to install and configure RabbitMQ and greatly reduces the deployment time.

Manual deployment

This example describes how to install the latest version of RabbitMQ. For information about how to install other versions of RabbitMQ, see Installing RabbitMQ.

Prerequisites

An ECS instance that meets the following requirements is created:

  • The instance is assigned a public IP address by the system or is associated with an elastic IP address (EIP). For more information, see EIPs.

  • The instance runs Ubuntu 20.04, Ubuntu 22.04, or a Debian version of Debian 11.0 to Debian 12.5.

    For information about other supported operating systems and installation methods, see Installing RabbitMQ.

  • Inbound rules are added to the security groups of the instance to allow traffic on ports 22, 80, and 15672.

    Note

    To connect to the RabbitMQ server by using a Message Queue (MQ) tool, you must also open port 5672.

Procedure

  1. Connect to an ECS instance on which you want to deploy RabbitMQ.

    For more information, see Use Workbench to connect to a Linux instance over SSH.

  2. Install RabbitMQ.

    1. Install basic RabbitMQ dependencies.

      sudo apt-get install curl gnupg apt-transport-https -y
    2. Download the GNU Privacy Guard (GPG) public keys for RabbitMQ and Erlang and add the public key information to the trust keyring of the operating system.

      curl -1sLf "https://keys.openpgp.org/vks/v1/by-fingerprint/0A9AF2115F4687BD29803A206B73A36E6026DFCA" | sudo gpg --dearmor | sudo tee /usr/share/keyrings/com.rabbitmq.team.gpg > /dev/null
      curl -1sLf https://github.com/rabbitmq/signing-keys/releases/download/3.0/cloudsmith.rabbitmq-erlang.E495BB49CC4BBE5B.key | sudo gpg --dearmor | sudo tee /usr/share/keyrings/rabbitmq.E495BB49CC4BBE5B.gpg > /dev/null
      curl -1sLf https://github.com/rabbitmq/signing-keys/releases/download/3.0/cloudsmith.rabbitmq-server.9F4587F226208342.key | sudo gpg --dearmor | sudo tee /usr/share/keyrings/rabbitmq.9F4587F226208342.gpg > /dev/null
    3. Add the official Advanced Packaging Tool (APT) repositories for RabbitMQ and Erlang to the /etc/apt/sources.list.d/rabbitmq.list file.

      sudo tee /etc/apt/sources.list.d/rabbitmq.list <<EOF
      deb [signed-by=/usr/share/keyrings/rabbitmq.E495BB49CC4BBE5B.gpg] https://ppa1.novemberain.com/rabbitmq/rabbitmq-erlang/deb/ubuntu jammy main
      deb-src [signed-by=/usr/share/keyrings/rabbitmq.E495BB49CC4BBE5B.gpg] https://ppa1.novemberain.com/rabbitmq/rabbitmq-erlang/deb/ubuntu jammy main
      deb [signed-by=/usr/share/keyrings/rabbitmq.E495BB49CC4BBE5B.gpg] https://ppa2.novemberain.com/rabbitmq/rabbitmq-erlang/deb/ubuntu jammy main
      deb-src [signed-by=/usr/share/keyrings/rabbitmq.E495BB49CC4BBE5B.gpg] https://ppa2.novemberain.com/rabbitmq/rabbitmq-erlang/deb/ubuntu jammy main
      deb [signed-by=/usr/share/keyrings/rabbitmq.9F4587F226208342.gpg] https://ppa1.novemberain.com/rabbitmq/rabbitmq-server/deb/ubuntu jammy main
      deb-src [signed-by=/usr/share/keyrings/rabbitmq.9F4587F226208342.gpg] https://ppa1.novemberain.com/rabbitmq/rabbitmq-server/deb/ubuntu jammy main
      deb [signed-by=/usr/share/keyrings/rabbitmq.9F4587F226208342.gpg] https://ppa2.novemberain.com/rabbitmq/rabbitmq-server/deb/ubuntu jammy main
      deb-src [signed-by=/usr/share/keyrings/rabbitmq.9F4587F226208342.gpg] https://ppa2.novemberain.com/rabbitmq/rabbitmq-server/deb/ubuntu jammy main
      EOF
    4. Update the local package indexes.

      sudo apt-get update -y
    5. Install Erlang-related packages.

      sudo apt-get install -y erlang-base \
                              erlang-asn1 erlang-crypto erlang-eldap erlang-ftp erlang-inets \
                              erlang-mnesia erlang-os-mon erlang-parsetools erlang-public-key \
                              erlang-runtime-tools erlang-snmp erlang-ssl \
                              erlang-syntax-tools erlang-tftp erlang-tools erlang-xmerl
    6. Install RabbitMQ.

      sudo apt-get install rabbitmq-server -y --fix-missing
  3. Configure RabbitMQ.

    1. Configure RabbitMQ to start on instance startup and start RabbitMQ.

      sudo systemctl enable rabbitmq-server
      sudo systemctl start rabbitmq-server
    2. To ensure security, we recommend that you run the following command to delete the default account of RabbitMQ.

      The default username and password of RabbitMQ are both guest.

      sudo rabbitmqctl delete_user guest
    3. Create a RabbitMQ administrator user.

      1. Create a user.

        sudo rabbitmqctl add_user <Username> <Password>

        Specify the <Username> and <Password> parameters.

      2. Set the new user as an administrator.

        sudo rabbitmqctl set_user_tags <Username> administrator
      3. Grant all permissions to the new user.

        sudo rabbitmqctl set_permissions -p / <Username> ".*" ".*" ".*"
  4. Start RabbitMQ and go to the open source RabbitMQ console.

    sudo rabbitmq-plugins enable rabbitmq_management

Quick deployment

Deploy RabbitMQ by using an Alibaba Cloud Marketplace image

You can use Alibaba Cloud Marketplace images to deploy RabbitMQ. This eliminates the need to install and configure RabbitMQ and greatly reduces the deployment time. The prices displayed on the Pricing tab of the image details page in Alibaba Cloud Marketplace shall prevail.

  1. Click Cloud Native MQ for Apache RabbitMQ Powered by Websoft9 to go to the image details page.

    You can obtain the image information and user guide on the image details page.

  2. Click Choose Your Plan.

  3. On the Custom Launch tab on the ECS instance buy page, configure and purchase an ECS instance as prompted.

    Take note of the following parameters. Configure other parameters based on your business requirements. For information about other parameters, see Create an instance on the Custom Launch tab.

    • Image: The image that you purchased is automatically selected in the Image section.

    • Public IP Address: Select Assign Public IPv4 Address.

    • Security Group: Configure inbound security group rules that allow traffic on ports 22, 80, and 15672.

  4. Obtain the username and password that you use to log on to the RabbitMQ server.

    1. Connect to the RabbitMQ server.

      For more information, see Use Workbench to connect to a Linux instance over SSH.

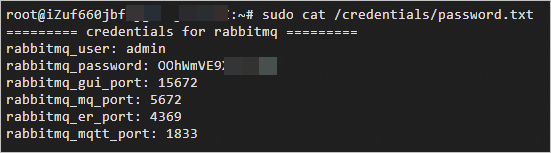
    2. Run the following command to obtain the username and password for logon to the RabbitMQ server:

      sudo cat /credentials/password.txt

      The command output shown in the following figure is returned.

      • rabbitmq_user: the username for logon to the RabbitMQ server.

      • rabbitmq_password: the password for logon to the RabbitMQ server.

      • rabbitmq_gui_port: the web server port of RabbitMQ.

      • rabbitmq_mq_port: the remote connection port of RabbitMQ.

      • rabbitmq_er_port: the internal port used by the RabbitMQ server for inter-process communication in Erlang.

      • rabbitmq_mqtt_port: the listening port of the MQTT service provided by the RabbitMQ server.

      image

Deploy RabbitMQ by using Terraform

Terraform is an Infrastructure as Code (IaC) tool that helps developers and O&M teams automate the creation, deployment, and management of cloud infrastructure. Terraform allows you to write simple code to define and configure cloud infrastructure without the need for manual operations or configurations.

Procedure

  1. Click here to go to the Terraform Explorer page to automatically load the following Terraform code.

    View the complete Terraform code

    provider "alicloud" {
      region = var.region
    }
    
    variable "region" {
      default = "cn-beijing"
    }
    
    variable "common_name" {
      description = "Common name for resources."
      type        = string
      default     = "deploy_rabbitmq_by_tf"
    }
    
    variable "system_disk_category" {
      default     = "cloud_essd"
      description = "The category of the system disk."
    }
    
    variable "instance_password" {
      description = "Server login password, length 8-30, must contain three (Capital letters, lowercase letters, numbers, `~!@#$%^&*_-+=|{}[]:;'<>?,./ Special symbol in)"
      type        = string
      default     = "Test@123456"
    }
    
    variable "image_id" {
      description = "Image of instance. Supported only on Ubuntu."
      type        = string
      default     = "ubuntu_22_04_x64_20G_alibase_20241224.vhd"
    }
    
    variable "instance_type" {
      description = "Instance type."
      type        = string
      default     = "ecs.e-c1m2.large"
    }
    
    variable "access_ip" {
      description = "The IP address you used to access the ECS."
      type        = string
      default     = "0.0.0.0/0"
    }
    
    variable "rabbitmq_user_name" {
      description = "Create a new user for RabbitMQ."
      type        = string
      default     = "rabbitmq@new_user"
    }
    
    variable "rabbitmq_user_password" {
      description = "Password for a new RabbitMQ user."
      type        = string
      default     = "rabbitmq@pw12345"
    }
    
    # Query the zones that match the specified conditions.
    data "alicloud_zones" "default" {
      available_disk_category     = var.system_disk_category
      available_resource_creation = "VSwitch"
      available_instance_type     = var.instance_type
    }
    
    resource "alicloud_vpc" "rabbitmq_vpc" {
      vpc_name   = "${var.common_name}-vpc"
      cidr_block = "192.168.0.0/16"
    }
    
    resource "alicloud_vswitch" "rabbitmq_vsw" {
      vpc_id       = alicloud_vpc.rabbitmq_vpc.id
      vswitch_name = "${var.common_name}-vsw"
      cidr_block   = "192.168.0.0/24"
      zone_id      = data.alicloud_zones.default.zones.0.id
    }
    
    resource "alicloud_security_group" "rabbitmq_sg" {
      security_group_name = "${var.common_name}-sg"
      vpc_id              = alicloud_vpc.rabbitmq_vpc.id
    }
    
    resource "alicloud_security_group_rule" "allow_tcp_22" {
      type              = "ingress"
      ip_protocol       = "tcp"
      nic_type          = "intranet"
      policy            = "accept"
      port_range        = "22/22"
      priority          = 1
      security_group_id = alicloud_security_group.rabbitmq_sg.id
      cidr_ip           = var.access_ip
    }
    
    resource "alicloud_security_group_rule" "allow_tcp_80" {
      type              = "ingress"
      ip_protocol       = "tcp"
      nic_type          = "intranet"
      policy            = "accept"
      port_range        = "80/80"
      priority          = 1
      security_group_id = alicloud_security_group.rabbitmq_sg.id
      cidr_ip           = var.access_ip
    }
    
    resource "alicloud_security_group_rule" "allow_tcp_15672" {
      type              = "ingress"
      ip_protocol       = "tcp"
      nic_type          = "intranet"
      policy            = "accept"
      port_range        = "15672/15672"
      priority          = 1
      security_group_id = alicloud_security_group.rabbitmq_sg.id
      cidr_ip           = var.access_ip
    }
    
    resource "alicloud_security_group_rule" "allow_icmp_all" {
      type              = "ingress"
      ip_protocol       = "icmp"
      nic_type          = "intranet"
      policy            = "accept"
      port_range        = "-1/-1"
      priority          = 1
      security_group_id = alicloud_security_group.rabbitmq_sg.id
      cidr_ip           = "0.0.0.0/0"
    }
    
    resource "alicloud_instance" "rabbitmq_ecs" {
      availability_zone          = data.alicloud_zones.default.zones.0.id
      security_groups            = [alicloud_security_group.rabbitmq_sg.id]
      instance_type              = var.instance_type
      system_disk_category       = var.system_disk_category
      image_id                   = var.image_id
      instance_name              = "${var.common_name}-ecs"
      vswitch_id                 = alicloud_vswitch.rabbitmq_vsw.id
      internet_max_bandwidth_out = 10
      password                   = var.instance_password
    }
    
    locals {
      command_content = <<SHELL
    #!/bin/sh
    
    sudo apt-get install curl gnupg apt-transport-https -y
    
    ## Team RabbitMQ's main signing key
    curl -1sLf "https://keys.openpgp.org/vks/v1/by-fingerprint/0A9AF2115F4687BD29803A206B73A36E6026DFCA" | sudo gpg --dearmor | sudo tee /usr/share/keyrings/com.rabbitmq.team.gpg > /dev/null
    ## Community mirror of Cloudsmith: modern Erlang repository
    curl -1sLf https://github.com/rabbitmq/signing-keys/releases/download/3.0/cloudsmith.rabbitmq-erlang.E495BB49CC4BBE5B.key | sudo gpg --dearmor | sudo tee /usr/share/keyrings/rabbitmq.E495BB49CC4BBE5B.gpg > /dev/null
    ## Community mirror of Cloudsmith: RabbitMQ repository
    curl -1sLf https://github.com/rabbitmq/signing-keys/releases/download/3.0/cloudsmith.rabbitmq-server.9F4587F226208342.key | sudo gpg --dearmor | sudo tee /usr/share/keyrings/rabbitmq.9F4587F226208342.gpg > /dev/null
    
    ## Add apt repositories maintained by Team RabbitMQ
    sudo tee /etc/apt/sources.list.d/rabbitmq.list <<EOF
    ## Provides modern Erlang/OTP releases
    deb [arch=amd64 signed-by=/usr/share/keyrings/rabbitmq.E495BB49CC4BBE5B.gpg] https://ppa1.rabbitmq.com/rabbitmq/rabbitmq-erlang/deb/ubuntu jammy main
    deb-src [signed-by=/usr/share/keyrings/rabbitmq.E495BB49CC4BBE5B.gpg] https://ppa1.rabbitmq.com/rabbitmq/rabbitmq-erlang/deb/ubuntu jammy main
    
    # another mirror for redundancy
    deb [arch=amd64 signed-by=/usr/share/keyrings/rabbitmq.E495BB49CC4BBE5B.gpg] https://ppa2.rabbitmq.com/rabbitmq/rabbitmq-erlang/deb/ubuntu jammy main
    deb-src [signed-by=/usr/share/keyrings/rabbitmq.E495BB49CC4BBE5B.gpg] https://ppa2.rabbitmq.com/rabbitmq/rabbitmq-erlang/deb/ubuntu jammy main
    
    ## Provides RabbitMQ
    deb [arch=amd64 signed-by=/usr/share/keyrings/rabbitmq.9F4587F226208342.gpg] https://ppa1.rabbitmq.com/rabbitmq/rabbitmq-server/deb/ubuntu jammy main
    deb-src [signed-by=/usr/share/keyrings/rabbitmq.9F4587F226208342.gpg] https://ppa1.rabbitmq.com/rabbitmq/rabbitmq-server/deb/ubuntu jammy main
    
    # another mirror for redundancy
    deb [arch=amd64 signed-by=/usr/share/keyrings/rabbitmq.9F4587F226208342.gpg] https://ppa2.rabbitmq.com/rabbitmq/rabbitmq-server/deb/ubuntu jammy main
    deb-src [signed-by=/usr/share/keyrings/rabbitmq.9F4587F226208342.gpg] https://ppa2.rabbitmq.com/rabbitmq/rabbitmq-server/deb/ubuntu jammy main
    EOF
    
    ## Update package indices
    sudo apt-get update -y
    
    ## Install Erlang packages
    sudo apt-get install -y erlang-base \
                            erlang-asn1 erlang-crypto erlang-eldap erlang-ftp erlang-inets \
                            erlang-mnesia erlang-os-mon erlang-parsetools erlang-public-key \
                            erlang-runtime-tools erlang-snmp erlang-ssl \
                            erlang-syntax-tools erlang-tftp erlang-tools erlang-xmerl
    
    ## Install rabbitmq-server and its dependencies
    sudo apt-get install rabbitmq-server -y --fix-missing
    
    sudo systemctl enable rabbitmq-server
    sudo systemctl start rabbitmq-server
    
    sudo rabbitmqctl delete_user guest
    sudo rabbitmqctl add_user ${var.rabbitmq_user_name} ${var.rabbitmq_user_password}
    sudo rabbitmqctl set_user_tags ${var.rabbitmq_user_name} administrator
    sudo rabbitmqctl set_permissions -p / ${var.rabbitmq_user_name} ".*" ".*" ".*"
    sudo rabbitmq-plugins enable rabbitmq_management
    
    SHELL
    }
    
    resource "alicloud_ecs_command" "deploy_rabbitmq" {
      name            = "DeploydRabbitMQ"
      type            = "RunShellScript"
      command_content = base64encode(local.command_content)
      timeout         = 3600
      working_dir     = "/root"
    }
    
    
    resource "alicloud_ecs_invocation" "invocation" {
      instance_id = [alicloud_instance.rabbitmq_ecs.id]
      command_id  = alicloud_ecs_command.deploy_rabbitmq.id
      timeouts {
        create = "5m"
      }
    }
    
    output "rabbitmq-login_url" {
      value = format("http://%s:15672", alicloud_instance.rabbitmq_ecs.public_ip)
    }
  2. By default, one virtual private cloud (VPC), one vSwitch, one security group, and one pay-as-you-go ECS instance are created in the cn-beijing region. Replace the parameter values with actual values based on your business requirements. For information about the billing of ECS instances, see Billing overview.

  3. Click Initiate Debugging to preview the details of the resources that you want to create. If the resource information is correct, click Plan & Apply to create the resources. If the task status is Successful, the deployment task is complete.

Log on to the open source RabbitMQ console

  1. Open your on-premises browser and enter http://<Public IP address of the Linux instance>:15672 in the address bar.

    The following figure shows that RabbitMQ is installed.RabbitMQ登录页

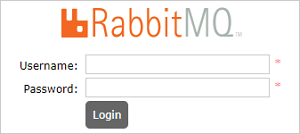
  2. Enter the username and password of the RabbitMQ administrator user that you created and click Login to access the open source RabbitMQ console.

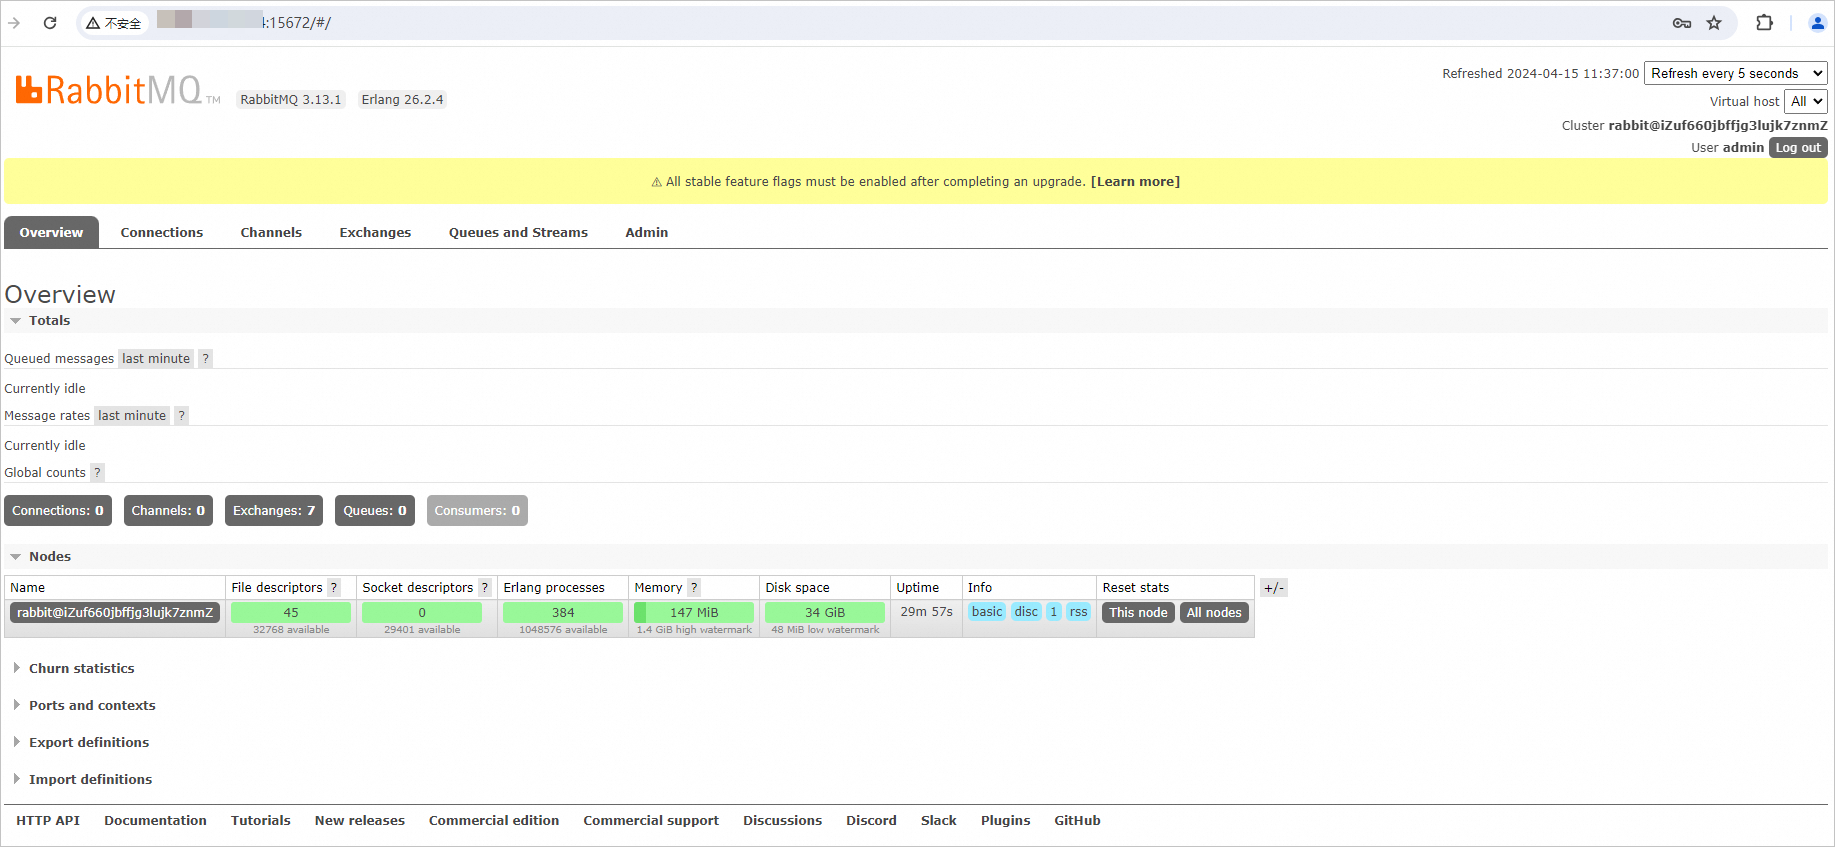
    The following figure shows the open source RabbitMQ console.RabbitMQ主页

Migrate open source RabbitMQ clusters to ApsaraMQ for RabbitMQ instances

If you want to resolve various stability issues, such as message accumulation and split-brain issues, and implement high-concurrency, distributed, and flexible scaling, you can migrate an open source RabbitMQ cluster to ApsaraMQ for RabbitMQ. For more information, see Migrate open source RabbitMQ clusters to ApsaraMQ for RabbitMQ instances.