You can configure UUIDs in the fstab file of a Linux Elastic Compute Service (ECS) instance to identify file systems. This way, even if the sequence in which data disks are attached to the Linux ECS instance is changed, the disks can be automatically and correctly mounted and the instance can run as expected after restart. This topic describes how to configure UUIDs in the fstab file to automatically mount the file systems of data disks.
The fstab file allows you to identify a file system by using a disk partition name such as /dev/vdb1 or by using a UUID. The two methods differ in the following aspects:
If you use disk partition names to identify file systems in the fstab file, the disk partitions may not be mounted to the original mount points when the sequence in which the data disks are attached is changed. In this case, applications that run on your ECS instance may be affected.
If you use UUIDs to identify file systems in the fstab file, the disk partitions are mounted to the original mount points even when the sequence in which the data disks are attached is changed. We recommend that you use UUIDs to identify file systems.
Procedure
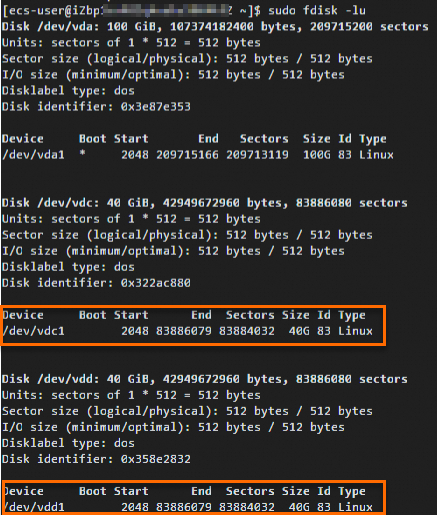
In this example, the following data disks on a Linux ECS instance are used: /dev/vdc, on which the /dev/vdc1 partition is created, and /dev/vdd, on which the /dev/vdd1 partition is created.
Connect to a Linux ECS instance.
For more information, see Connect to a Linux instance by using a password or key.
Run the following command to view information about the disks on the instance:
sudo fdisk -luThe following command output is returned.

Run the following command to query the UUIDs, partition names, and file system types of the data disks:
sudo blkidThe following command output is returned.

(Conditionally required) If no file systems are mounted on the partitions of your data disk, create mount points for and mount file systems on the partitions.
You can use existing directories as mount points or create mount points to mount data disk partitions. In this example, mount points are created.
To create the /test01 mount point for the /dev/vdc1 partition, run the following command:
sudo mkdir /test01To create the /test02 mount point for the /dev/vdd1 partition, run the following command:
sudo mkdir /test02
(Conditionally required) Mount the file systems on data disk partitions.
To mount the /dev/vdc1 partition, run the following command:
sudo mount /dev/vdc1 /test01To mount the /dev/vdd1 partition, run the following command:
sudo mount /dev/vdd1 /test02
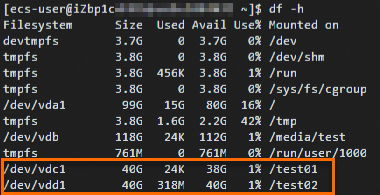
Run the following command to check whether file systems are mounted on the data disk partitions:
df -hThe following command output is returned.

Add mount information for data disk partitions to the fstab file to automatically mount the partitions on instance startup.
Run the following command to open the /etc/fstab file:
sudo vi /etc/fstabPress the
Ikey to enter Insert mode.Add the following mount information:
UUID=d18698d2-61ea-4992-a8a9-26ee214e****   /test01     ext4    defaults     0   0
UUID=6c5b3eea-930f-477d-abc6-42aa413d****   /test02     xfs     defaults     0   0
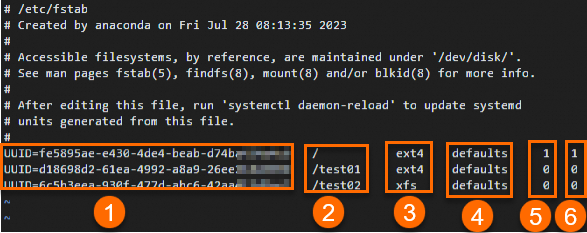
The following figure shows an example of the mount information.

No.
Field
Description
①
<file system>
The file system on the partition to mount.
We recommend that you use the UUIDs of the file systems. You can run the
blkidcommand to query the UUIDs of file systems on the partitions.②
<dir>
The mount point of the file system.
You can use the /test01 and /test02 mount points that you created or run the
df -Thcommands to query the mount points of file systems.③
<type>
The type of the file system on the partition to mount.
You can run the
blkidcommand to query the types of file systems.④
<options>
The mount parameters. Typically, the defaults parameter is used. If you specify multiple parameters, separate the parameters with commas (,). Example:
defaults,noatime.For more information about the <options> parameters, see fstab.
To mount Ext4 file systems, you can specify different mount parameters based on your data security and performance requirements for file systems. For more information, see Mount Ext4 file systems with mount command options.
⑤
<dump>
Specifies whether the dump tool backs up the file system. Valid values:
0: The dump tool does not back up the file system.
1: The dump tool backs up the file system.
In most cases, the dump tool is not used. In this case, this field is set to 0.
⑥
<pass>
Specifies whether fsck checks the file system. Valid values:
0: The file system is not checked.
1: The file system corresponding to root directory (/) is checked.
2: All file systems except the file system corresponding to root directory (/) are checked.
In most cases, this field is set to 0.
Press the
Esckey to exit Insert mode.Enter
:wqand press theEnterkey to save and close the file.
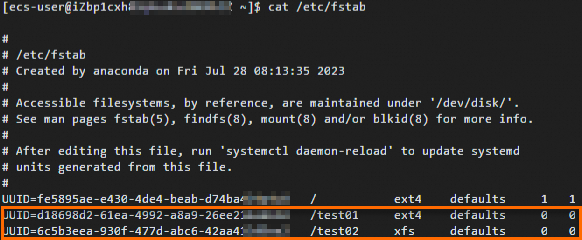
Run the following command to view the fstab file:
cat /etc/fstabThe following command output is returned.

Run the following command to read the fstab file and automatically mount file systems based on the configurations in the file. If the command output does not contain errors, the fstab file is correctly configured.
sudo mount -a
After you configure the fstab file, the system automatically mounts the data disks when you restart the ECS instance.
References
If your ECS instance cannot be started because block devices that do not exist are configured in the fstab file, resolve the issue by performing the operations described in How do I remove a block device that does not exist in the /etc/fstab file of a Linux instance?
If your Linux ECS instance cannot be started due to incorrect configurations in the
fstabfile, resolve the issue by performing the operations described in System startup exceptions caused by incorrect configuration of the /etc/fstab file of a Linux instance.