This topic describes how to create tables in the DataWorks console and upload data from your on-premises machine to the tables. The bank_data and result_table tables are used in the examples.
Prerequisites
A MaxCompute data source is added to a workspace and the computing resource is associated with the DataStudio service in the workspace. In this case, you can see the MaxCompute folder on the DataStudio page.
A MaxCompute data source is added to a workspace. For more information, see Add a MaxCompute data source.
The computing resource is associated with the DataStudio service in the workspace. You can click Computing Resource in the left-side navigation pane of the DataStudio page in a workspace and associate a computing resource with the DataStudio service in the workspace.
The resource groups used by tasks of different compute engine types are configured on the System Management page of DataAnalysis. For more information, see System management.
If no resource groups used by tasks of different compute engine types are configured on the System Management page of DataAnalysis, the error message "The current file source or target engine needs to configure a resource group for data upload. Contact the space administrator to configure the resource group" appears.
Background information
The bank_data table is used to store business data and the result_table table is used to store data analytics results.
Create the bank_data table
Go to the DataStudio page.
Log on to the DataWorks console. In the top navigation bar, select the desired region. In the left-side navigation pane, choose . On the page that appears, select the desired workspace from the drop-down list and click Go to Data Development.
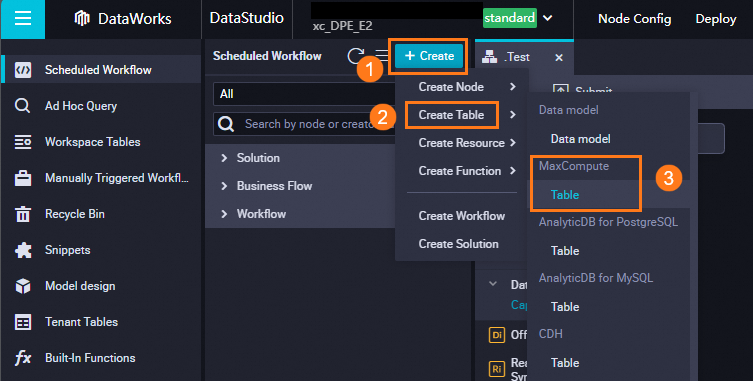
In the Scheduled Workflow pane of the DataStudio page, move the pointer over the
 icon and choose .
Alternatively, you can click the desired workflow in the Business Flow section, right-click MaxCompute, and then select Create Table.
In the Create Table dialog box, specify a path, set the Name to bank_data, and then click Create.
On the table configuration tab, click DDL.
In the DDL dialog box, enter the following statement and click Generate Table Schema:
CREATE TABLE IF NOT EXISTS bank_data
(
 age             BIGINT COMMENT 'Age',
 job             STRING COMMENT 'Job type',
 marital         STRING COMMENT 'Marital status',
 education       STRING COMMENT 'Education level',
 default         STRING COMMENT 'Credit card',
 housing         STRING COMMENT 'Mortgage',
 loan            STRING COMMENT 'Loan',
 contact         STRING COMMENT 'Contact information',
 month           STRING COMMENT 'Month',
 day_of_week     STRING COMMENT 'Day of the week',
 duration        STRING COMMENT 'Duration',
 campaign        BIGINT COMMENT 'Number of contacts during the campaign',
 pdays           DOUBLE COMMENT 'Interval from the last contact',
 previous        DOUBLE COMMENT 'Number of contacts with the customer',
 poutcome        STRING COMMENT 'Result of the previous marketing campaign',
 emp_var_rate    DOUBLE COMMENT 'Employment change rate',
 cons_price_idx  DOUBLE COMMENT 'Consumer price index',
 cons_conf_idx   DOUBLE COMMENT 'Consumer confidence index',
 euribor3m       DOUBLE COMMENT 'Euro deposit rate',
 nr_employed     DOUBLE COMMENT 'Number of employees',
 y               BIGINT COMMENT 'Time deposit available or not'
);
For more information about the SQL syntax for creating tables, see Create tables.
In the Confirm message, click Confirmation.
Configure the Display Name parameter in the General section and click Commit to Development Environment and Commit to Production Environment respectively.
NoteA workspace in standard mode is used in the example. If you are using a workspace in basic mode, you need to only click Commit to Production Environment.
In the left-side navigation pane, click the Workspace Tables icon.
In the Workspace Tables pane, double-click the name of the created table to view the table information.
Create the result_table table
In the Scheduled Workflow pane of the DataStudio page, move the pointer over the
 icon and choose .
 Alternatively, you can click the desired workflow in the Business Flow section, right-click MaxCompute, and then select Create Table.
In the Create Table dialog box, specify a path, set the Name to result_table, and then click Create.
In the DDL dialog box, enter the following statement and click Generate Table Schema:
CREATE TABLE IF NOT EXISTS result_table
(
 education   STRING COMMENT 'Education level',
 num         BIGINT COMMENT 'Number of persons'
);
In the Confirm message, click Confirmation.
Configure the Display Name parameter in the General section and click Commit to Development Environment and Commit to Production Environment respectively.
In the left-side navigation pane, click the Workspace Tables icon.
In the Workspace Tables pane, double-click the name of the created table to view the table information.
Upload a file from your on-premises machine to the bank_data table
DataWorks allows you to perform the following operations:
Upload a text file from your on-premises machine to a table in a workspace.
Use Data Integration to import business data from various data sources to a workspace.
You must take note of the following items when you upload a file from your on-premises machine:
File format: The file must be in the .txt, .csv, or .log format.
File size: The size of the file cannot exceed 30 MB.
If you need to upload a file that is greater than 30 MB in size, use one of the following methods:
Upload the file to Object Storage Service (OSS) and import the object data to a MaxCompute table by using an external table of MaxCompute. For more information about how to upload a file to OSS, see Upload objects. For more information about how to use external tables of MaxCompute, see External tables.
Upload the file to OSS and synchronize the object data to a MaxCompute table by using Data Integration. For more information about how to upload a file to OSS, see Upload objects. For more information about how to synchronize data from OSS to MaxCompute, see Configure a batch synchronization task by using the codeless UI.
Use the data upload feature provided by DataAnalysis.
Table type: You can import data from a file to a partitioned table or a non-partitioned table. If you import data from a file to a partitioned table, values in the partition columns cannot contain special characters such as ampersands (&) and asterisks (*).
In this example, the file banking.txt is uploaded from an on-premises machine to the bank_data table. To upload the file, perform the following steps:
Click the
 icon on the DataStudio page.
In the Import Local Data to Table in Development Environment dialog box, enter at least three letters in the search box to search for tables, select the bank_data from the search results, and then click Next.
NoteIf you cannot find the table that you created, you can manually synchronize the table to Data Map in DataWorks. Then, you can search for the table by keyword in the dialog box again. For more information about how to manually synchronize a table, see Manually refresh table metadata.
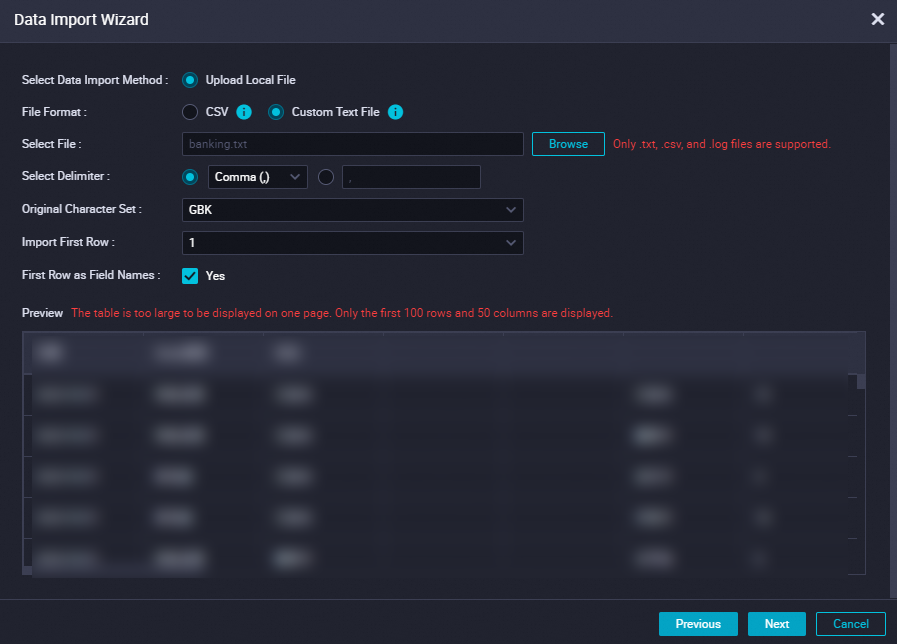
In the dialog box that appears, click Browse next to Select File to select the desired file. The value of the Select Data Import Method parameter is Upload Local File and cannot be changed. Then, configure the other parameters.

Parameter
Description
Select Data Import Method
The method that can be used to upload data. Default value: Upload Local File. The default value cannot be changed.
File Format
Valid values: CSV and Custom Text File.
Select File
The file that you want to upload. To upload a file, click Browse and select the file to upload.
Select Delimiter
The delimiter used in the file. Valid values: Comma (,), Tab, Semicolon (;), Space, |, #, and &. In this example, Comma (,) is selected.
Original Character Set
The character set of the file. Valid values: GBK, UTF-8, CP936, and ISO-8859. In this example, GBK is selected.
Import First Row
The row from which data is to be imported. In this example, 1 is selected.
First Row as Field Names
Specifies whether to use the first row as the header row. In this example, Yes is not selected.
Preview
The preview result of the data that you want to upload.
Click Next.
Select a matching mode for the fields in the source file and destination table. In this example, By Location is selected.
Click Import Data.
What to do next
You have learned how to create tables and upload data from your on-premises machine to the created tables. You can proceed with the next tutorial. In the next tutorial, you will learn how to create, configure, and commit a workflow, and perform data computing and analytics in the workspace. For more information, see Create a workflow.