CPU limits restrict how much CPU a container can use. When actual usage reaches this limit, the kernel throttles the container. Throttling degrades service quality. The CPU Burst feature detects throttling and automatically adjusts container parameters. During bursts of load, CPU Burst provides containers with additional CPU resources. This alleviates CPU-related performance bottlenecks and improves service quality—especially for latency-sensitive applications.
To better understand this document and use this feature, first learn about the CFS Scheduler and node CPU management policies.
Why enable CPU Burst
Kubernetes clusters use CPU limits to cap how much CPU a container can consume. This ensures fair resource sharing across containers and prevents one container from starving others.
CPU is a time-shared resource. Multiple processes or containers share CPU time slices. When you set a CPU limit, the operating system kernel uses the Completely Fair Scheduler (CFS) to control how much CPU time a container gets in each scheduling cycle. The cycle length is set by cpu.cfs_period_us. The allowed CPU time per cycle is set by cpu.cfs_quota_us. For example, if a container has a CPU limit of 4, the kernel limits it to 400 ms of CPU time per 100-ms scheduling cycle.
Benefits
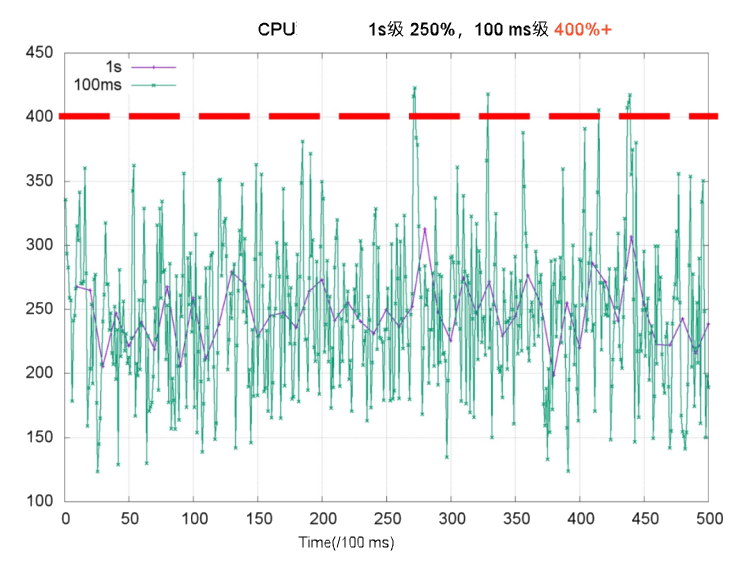
CPU usage is a key metric for monitoring container health. Cluster administrators often use it to set CPU limits. Compared to second-level metrics, millisecond-level CPU usage shows more pronounced spikes and short-term fluctuations. In the chart below, CPU usage measured per second (purple line) appears well below 4 cores. But at the millisecond level (green line), usage exceeds 4 cores during some periods. If the CPU limit is set to 4 cores, throttling suspends threads—and increases response latency (RT). This is a major cause of long-tail RT issues.
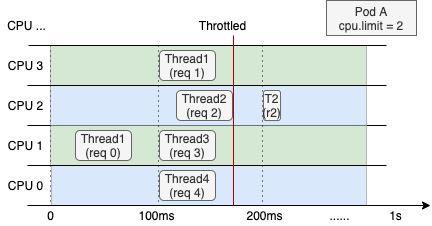
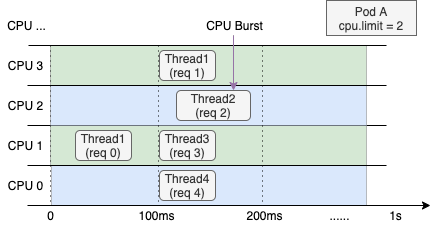
The next image shows CPU resource allocation for a web service container with a CPU limit of 2 on a 4-core node. The left side shows normal behavior. The right side shows behavior after enabling CPU Burst.
Even when overall CPU usage over the last second is low, throttling forces Thread 2 to wait for the next scheduling cycle to finish processing req 2. This increases request RT. This is a common cause of long-tail RT. | After enabling CPU Burst, the container accumulates unused CPU time. It uses that time during bursts. This boosts performance and lowers latency. |
CPU Burst also helps when CPU demand spikes suddenly. For example, if service traffic surges, ack-koordinator resolves CPU bottlenecks within seconds—while keeping total node load safe.
ack-koordinator adjusts only the cfs quota parameter in the node cgroup. It does not change the CPU limit field in the Pod spec.
Scenarios
Typical use cases for CPU Burst include the following:
CPU usage stays below the CPU limit most of the time—but throttling still occurs and hurts application performance. Enabling CPU Burst lets the container use accumulated CPU time during bursts. This solves throttling and improves service quality.
The container uses high CPU during startup and loading. After loading completes, CPU usage drops to a low, steady level. With CPU Burst enabled, you do not need to set an overly high CPU limit. The container uses extra CPU time during startup—and starts faster.
Pricing
You can install and use the ack-koordinator component at no cost. However, extra charges may apply in the following cases.
ack-koordinator is an unmanaged component. After installation, it consumes worker node resources. You can configure resource requests for each module during installation.
By default, ack-koordinator exposes monitoring metrics for resource profiling and fine-grained scheduling in Prometheus format. If you enable the Enable Prometheus monitoring metrics for ACK-Koordinator option and use Alibaba Cloud Prometheus, these metrics count as custom metrics and incur charges. Costs depend on cluster size and number of applications. Before enabling this feature, read the Alibaba Cloud Prometheus Prometheus instance pricing to understand free quotas and billing rules. Use usage queries to monitor and manage your resource usage.
Prerequisites
Create an ACK managed cluster Pro edition with Kubernetes version 1.18 or later. See Create an ACK managed cluster and Manually upgrade a cluster.
NoteWe recommend using Alibaba Cloud Linux as the operating system. See Do I need to use Alibaba Cloud Linux to enable the CPU Burst policy?.
Install the ack-koordinator component. Use version 0.8.0 or later. See ack-koordinator.
Configuration
You can enable CPU Burst for specific pods using pod annotations. Or you can enable it cluster-wide or namespace-wide using a ConfigMap.
Enable CPU Burst for a specific pod using annotations
Add the CPU Burst annotation under the metadata field in the pod YAML. This applies only to that pod.
To apply configurations to a workload, such as a deployment, set the appropriate annotations for the pod in the template.metadata field.
annotations:
  # Set to auto to enable CPU Burst for this pod.
  koordinator.sh/cpuBurst: '{"policy": "auto"}'
  # Set to none to disable CPU Burst for this pod.
  koordinator.sh/cpuBurst: '{"policy": "none"}'
Enabling at the cluster dimension using a ConfigMap
A ConfigMap configures CPU Burst for the entire cluster by default.
Create a file named configmap.yaml using the following ConfigMap example.
apiVersion: v1
data:
  cpu-burst-config: '{"clusterStrategy": {"policy": "auto"}}'
  #cpu-burst-config: '{"clusterStrategy": {"policy": "cpuBurstOnly"}}'
  #cpu-burst-config: '{"clusterStrategy": {"policy": "none"}}'
kind: ConfigMap
metadata:
  name: ack-slo-config
  namespace: kube-system
Check whether the ConfigMap
ack-slo-configexists in the kube-system namespace.If it exists, update it using PATCH to avoid changing other settings.
kubectl patch cm -n kube-system ack-slo-config --patch "$(cat configmap.yaml)"If it does not exist, create it using this command.
kubectl apply -f configmap.yaml
Enable via ConfigMap at the Namespace Dimension
You can configure a CPU Burst policy for pods in a namespace by specifying the namespace. The policy then applies to that namespace.
Create a file named configmap.yaml using the following ConfigMap example.
apiVersion: v1
kind: ConfigMap
metadata:
  name: ack-slo-pod-config
  namespace: koordinator-system # Create this namespace manually before first use.
data:
  # Enable or disable CPU Burst for selected namespaces.
  cpu-burst: |
    {
      "enabledNamespaces": ["allowed-ns"],
      "disabledNamespaces": ["blocked-ns"]
    }
  # Enables CPU Burst for all pods in the allowed-ns namespace. Policy is auto.
  # Disables CPU Burst for all pods in the blocked-ns namespace. Policy is none.
Check whether the ConfigMap
ack-slo-configexists in the kube-system namespace.If it exists, update it using PATCH to avoid changing other settings.
kubectl patch cm -n kube-system ack-slo-config --patch "$(cat configmap.yaml)"If it does not exist, create it using this command.
kubectl apply -f configmap.yaml
Procedure
This example uses a web service application to show how CPU Burst reduces access latency—and proves its performance benefits.
Verification steps
Create a file named apache-demo.yaml using the YAML below.
Add the CPU Burst annotation under the
metadatafield to enable CPU Burst for this pod.apiVersion: v1 kind: Pod metadata: name: apache-demo annotations: koordinator.sh/cpuBurst: '{"policy": "auto"}' # Enable CPU Burst. spec: containers: - command: - httpd - -D - FOREGROUND image: registry.cn-zhangjiakou.aliyuncs.com/acs/apache-2-4-51-for-slo-test:v0.1 imagePullPolicy: Always name: apache resources: limits: cpu: "4" memory: 10Gi requests: cpu: "4" memory: 10Gi nodeName: $nodeName # Replace with the actual node name. hostNetwork: False restartPolicy: Never schedulerName: default-schedulerDeploy the Apache HTTP Server as the test application.
kubectl apply -f apache-demo.yamlUse wrk2 to send requests.
# Download and extract the open-source wrk2 tool. See https://github.com/giltene/wrk2. # The Apache image has Gzip compression enabled to simulate server-side request processing. # Run the load test. Replace $target_ip_address with the IP address of the Apache pod. ./wrk -H "Accept-Encoding: deflate, gzip" -t 2 -c 12 -d 120 --latency --timeout 2s -R 24 http://$target_ip_address:8010/static/file.1m.testNoteReplace the target address in the command with the Apache pod’s IP address.
Adjust the QPS pressure by changing the
-Rparameter.
Results analysis
The tables below compare performance on Alibaba Cloud Linux and community CentOS—with and without CPU Burst.
All disabled means the CPU Burst policy is set to
none.All enabled means the CPU Burst policy is set to
auto.
The values below are theoretical. Actual results depend on your environment.
Alibaba Cloud Linux | Shutdown All | All enabled |
apache RT-p99 | 107.37 ms | 67.18 ms (-37.4%) |
CPU Throttled Ratio | 33.3% | 0% |
Average Pod CPU utilization | 31.8% | 32.6% |
CentOS | Shut Down All | All enabled |
apache RT-p99 | 111.69 ms | 71.30 ms (-36.2%) |
CPU Throttled Ratio | 33% | 0% |
Average Pod CPU utilization | 32.5% | 33.8% |
These results show:
Enabling CPU Burst significantly improves the p99 RT metric.
Enabling CPU Burst greatly reduces CPU throttling. Average Pod CPU utilization stays nearly unchanged.
Advanced configuration
You can configure advanced CPU Burst parameters in a ConfigMap or in pod annotations. If both are set, pod annotations take precedence. If no annotation is set, ack-koordinator checks the namespace-level ConfigMap. If no namespace-level ConfigMap is set, ack-koordinator uses the cluster-level ConfigMap.
Examples:
# Example ConfigMap ack-slo-config.
data:
  cpu-burst-config: |
    {
      "clusterStrategy": {
        "policy": "auto",
        "cpuBurstPercent": 1000,
        "cfsQuotaBurstPercent": 300,
        "sharePoolThresholdPercent": 50,
        "cfsQuotaBurstPeriodSeconds": -1
      }
    }

# Example pod annotation.
  koordinator.sh/cpuBurst: '{"policy": "auto", "cpuBurstPercent": 1000, "cfsQuotaBurstPercent": 300, "cfsQuotaBurstPeriodSeconds": -1}'
The following table lists advanced CPU Burst parameters:
The Annotation and ConfigMap columns indicate whether each parameter supports configuration via pod annotation or ConfigMap. ![]() means supported.
means supported. ![]() means not supported.
means not supported.
Parameter | Type | Description | Annotation | ConfigMap |
| string |
|
|
|
| int | Default: For Alibaba Cloud Linux kernel-level CPU Burst elasticity, this sets how much CPU Burst amplifies beyond the CPU limit. Maps to the cgroup parameter For example, with the default setting, |
|
|
| int | Default: When CFS quota elasticity is enabled, this sets the maximum allowed increase for the cgroup parameter |
|
|
| int | Default: When CFS quota elasticity is enabled, this sets how long a pod can consume CPU at the increased quota ( |
|
|
| int | Default: When CFS quota elasticity is enabled, this sets the safe CPU usage threshold for the node. If usage exceeds this threshold, all pods with increased |
|
|
When you enable automatic CFS quota adjustment (
policyset tocfsQuotaBurstOnlyorauto), thecpu.cfs_quota_usparameter for the pod changes dynamically based on throttling events.During pod stress testing, monitor the pod’s CPU usage—or temporarily disable automatic CFS quota adjustment (
policyset tocpuBurstOnlyornone). This keeps resource elasticity stable in production.
FAQ
I used CPU Burst with the older ack-slo-manager protocol. Does it still work after upgrading to ack-koordinator?
The older pod annotation used alibabacloud.com/cpuBurst. ack-koordinator fully supports this legacy protocol. You can upgrade seamlessly.
ack-koordinator's compatibility period for the earlier protocol version ends on July 30, 2023. We strongly recommend that you upgrade the resource parameters of the earlier protocol version to the latest version.
ack-koordinator is compatible with the following protocol versions.
ack-koordinator version | alibabacloud.com protocol | koordinator.sh protocol |
≥0.2.0 | Supported | Not supported |
≥0.8.0 | Supported | Supported |
Why does CPU throttling still occur after enabling CPU Burst?
Common causes and fixes:
Invalid configuration syntax prevents CPU Burst from taking effect. See Advanced configuration to correct and verify.
Throttling still occurs when CPU usage hits the
cfsQuotaBurstPercentlimit due to insufficient CPU resources.Adjust your CPU request and limit values to match your application’s real needs.
CPU Burst adjusts two cgroup parameters:
cpu.cfs_quota_usandcpu.cfs_burst_us. See Advanced configuration.cpu.cfs_quota_usupdates only after ack-koordinator detects throttling—so there is a small delay.cpu.cfs_burst_usupdates immediately from the configured value—so it responds faster.For best results, use Alibaba Cloud Linux.
The CPU Burst policy has a protection mechanism when adjusting
cpu.cfs_quota_us, which is the overall safety watermark threshold settingsharePoolThresholdPercent. When the overall utilization is excessively high, to prevent an individual pod from causing more interference,cpu.cfs_quota_usis reset to its initial value.You should set an appropriate machine safety threshold based on your application's actual conditions to prevent high machine utilization from affecting application performance.
Do I need to use Alibaba Cloud Linux to enable the CPU Burst policy?
ack-koordinator CPU Burst works on all Alibaba Cloud Linux and CentOS open-source kernels. We recommend Alibaba Cloud Linux. Its kernel features let ack-koordinator provide finer-grained CPU elasticity. For details, see Enable CPU Burst using the cgroup v1 interface.
After enabling CPU Burst, why does my application report different thread counts?
This is because the working mechanism of CPU Burst conflicts with how certain applications obtain system resources. ack-koordinator dynamically adjusts the underlying cgroup parameter of the container, cpu.cfs_quota_us, when implementing CPU Burst. This value represents the available CPU time quota for the container within the current scheduling cycle. ack-koordinator dynamically scales this quota based on the application's load.
Many applications, such as Java's Runtime.getRuntime().availableProcessors(), directly read cpu.cfs_quota_us to calculate the number of available CPU cores. Therefore, when the CPU quota is dynamically adjusted, the number of cores obtained by the application also changes, causing parameters that depend on this value, such as the thread pool size, to become unstable.
Instead, make your application rely on the fixed limits.cpu value defined in the pod spec.
Inject an environment variable: Use
resourceFieldRefto inject the pod’slimits.cpuvalue into the container.env: - name: CPU_LIMIT valueFrom: resourceFieldRef: resource: limits.cpuUpdate your application code: Change the startup logic to read
CPU_LIMITfirst when calculating and setting thread pool size. This ensures stable, reliable behavior—even when CPU Burst changes the quota.