You can use the Internet firewall to apply fine-grained controls to traffic between your public assets and the Internet. This helps reduce your Internet attack surface and mitigate security risks. You can enable the Internet firewall with a single click without changing your network topology. Protection takes effect in seconds, providing immediate traffic visualization, attack prevention, access control, and log auditing.
Features
How it works
After you enable the Internet firewall for a public asset, Cloud Firewall filters all inbound and outbound traffic. It uses deep packet inspection (DPI), intrusion prevention (IPS) rules, threat intelligence, virtual patching, and access control policies to determine whether to allow the traffic. This effectively blocks unauthorized access and secures traffic between your public assets and the Internet.
Protected public assets (inbound and outbound): Includes IPv4 and IPv6 assets such as ECS, EIP (including L2 EIP), load balancers, Bastionhost, NAT Gateway, HAVIP, and GA EIP.
The following figure shows an example of a protection scenario for the Internet firewall:

Impact on your services
Creating, enabling, and disabling an Internet firewall does not require changes to your current network topology and does not affect your services. You can enable or disable protection for your resources in seconds with a single click. Enable the Internet firewall during off-peak hours.
Protection specifications
Starting October 15, 2025, Cloud Firewall will release Billing Method 2.0. New customers will use Billing Method 2.0 by default. Existing customers will continue to use Billing Method 1.0. The protection specifications for the Internet firewall differ between the two billing methods.
Billing Method 2.0
Protection specification | Description | Cloud Firewall subscription (Premium, Enterprise, and Ultimate Editions) | Cloud Firewall pay-as-you-go |
Number of firewall instances | The number of regions that can be protected. Each protected region corresponds to one Internet firewall instance. | This depends on the number of instances and the bandwidth you purchase. For the number of instances and bandwidth provided by different editions, see Subscription 2.0. If the quota is insufficient, upgrade the specifications. For more information, see View the protection status of assets. | Billing is based on the actual number of firewall instances and the total processed traffic. The maximum supported peak bandwidth is 10 Gbps. To request a higher specification, contact your business manager or architect. For more information about billing, see Pay-as-you-go 2.0. |
Public traffic processing capacity | The peak of the total internet traffic processed by the firewall. Billing is based on the sum of outbound and inbound internet traffic bandwidth. |
Billing Method 1.0
Protection specification | Description | Cloud Firewall subscription (Premium, Enterprise, and Ultimate Editions) | Cloud Firewall pay-as-you-go |
Number of protectable public IP addresses | The number of public IP addresses for which you can enable the Internet firewall. | This depends on the number of protectable public IP addresses you purchase and the peak of the total processable traffic. If the quota is insufficient, you can upgrade the specifications. Different Cloud Firewall editions have different public IP address quotas. For more information, see Subscription 1.0. Note If your service traffic exceeds the purchased Cloud Firewall traffic processing specifications, the product Service Level Agreement (SLA) cannot be guaranteed. This may trigger downgrade rules, such as the failure of security features (ACL, IPS, and log auditing), disabling the firewall for top assets that exceed the quota, rate limiting, and packet loss. If your service traffic is at risk of exceeding the quota, see Post-paid elastic bandwidth for subscription instances. | Billing is based on the actual number of public IP addresses with protection enabled and the peak of the total processed traffic. There is no quota limit. For more information about billing, see Pay-as-you-go 1.0. |
Public traffic processing capacity | The peak of the total processed internet traffic. Billing is based on the higher value between the outbound and inbound internet traffic bandwidth. |
Asset protection status
Cloud Firewall tracks the number of active Internet firewall instances and unprotected public IP addresses. You can enable protection for your public assets based on your needs.
To ensure the security of your service traffic, we recommend that you enable Internet firewall protection for all public assets in your Alibaba Cloud account.
Log on to the Cloud Firewall console.
In the left navigation pane, click Firewall.
On the Internet Firewall tab, view the protection status of public assets in your Alibaba Cloud account.
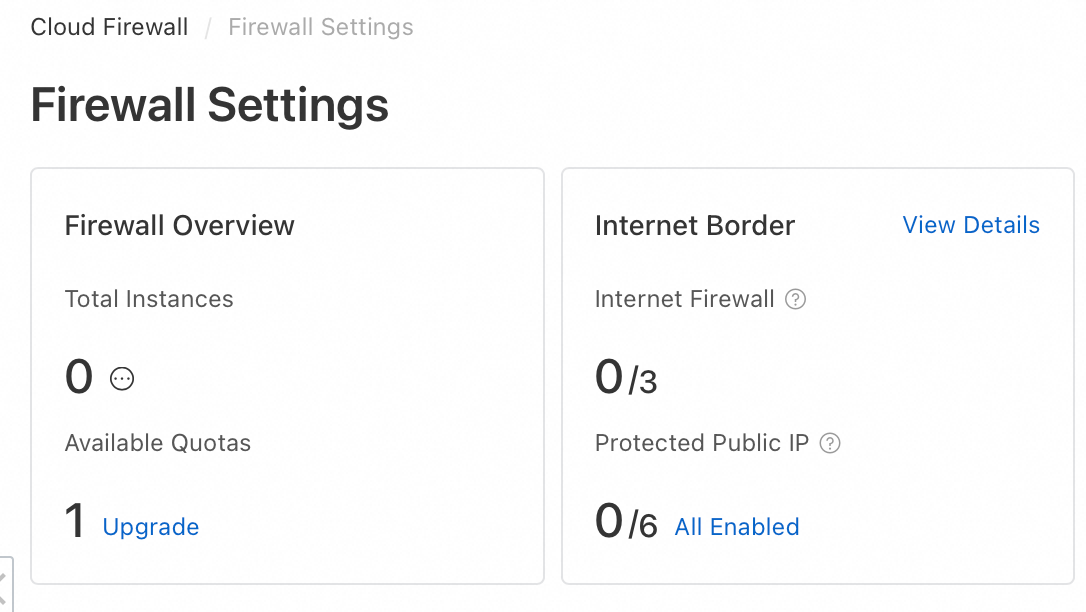
(Optional) If the Available Quotas is insufficient, you can click Upgrade to increase your capacity. For more information, see Subscription 2.0.
Enable the Internet firewall
Enable protection for assets manually
If Automatic Protection for New Assets is not enabled, you can manually enable Internet firewall protection for public assets.
Log on to the Cloud Firewall console.
In the left navigation pane, click Firewall.
On the Internet Firewall tab, click the IPv4 or IPv6 tab to manually enable protection for public assets.
If the asset you want to protect is not in the public asset list, click Synchronize Assets in the upper-right corner of the list. This synchronizes asset information from your current Alibaba Cloud account and its member accounts. Asset synchronization takes about 1 to 2 minutes.
Enable protection for a single asset: Find the public asset you want to protect in the list and click Enable Protection in the Actions column.
Enable protection for multiple assets: Select multiple public assets in the list and click Enable Protection below the list.
Enable automatic protection for new assets
After you enable Automatic Protection for New Assets, Cloud Firewall automatically enables Internet firewall protection for any new public assets added to your current Alibaba Cloud account and its member accounts.
Log on to the Cloud Firewall console.
In the left navigation pane, click Firewall.
Enable Automatic Protection for New Assets: On the Internet Firewall tab, turn on the switch to the right of Automatic Protection for New Assets.
Select asset types for automatic protection: Click Automatic Protection for New Assets. In the dialog box that appears, select the new assets to be automatically protected by asset type and region. Then, click Save.

Next steps
After you enable the Internet firewall, you can configure access control policies and view access logs for public assets to better manage traffic between your public assets and the Internet.
Configure access control policies
If you have not configured any access control policies, Cloud Firewall allows traffic by default. You can create access control policies for the Internet firewall to apply fine-grained control over traffic between your public assets and the Internet.
On the page, locate the target asset. In the Actions column, click Configure Policy and configure either an outbound or inbound access control policy for the public asset. For more information, see Configure access control policies for the Internet firewall.
Query audit logs
On the page, on the tab, set filter conditions to view access logs for traffic between your public assets and the Internet. For more information, see Log auditing.
View traffic analysis
On the page, view traffic data for assets that actively access the Internet. This includes outbound abnormal traffic tracing, destination Internet addresses, and outbound connections from public and private assets. This information helps you identify suspicious assets and ensure service security. For more information, see Outbound connections.
On the page, view data about Internet access to your service assets. This includes inbound abnormal traffic tracing, open public IP addresses, open ports, open applications, and the number of public IP addresses for cloud products. This information helps you identify suspicious assets and ensure service security. For more information, see Internet exposure.
View attack prevention data
On the page, locate the target asset. In the Actions column, click View Attacks and choose to view attack prevention data for outbound or inbound traffic of the public asset. For more information, see Intrusion prevention.
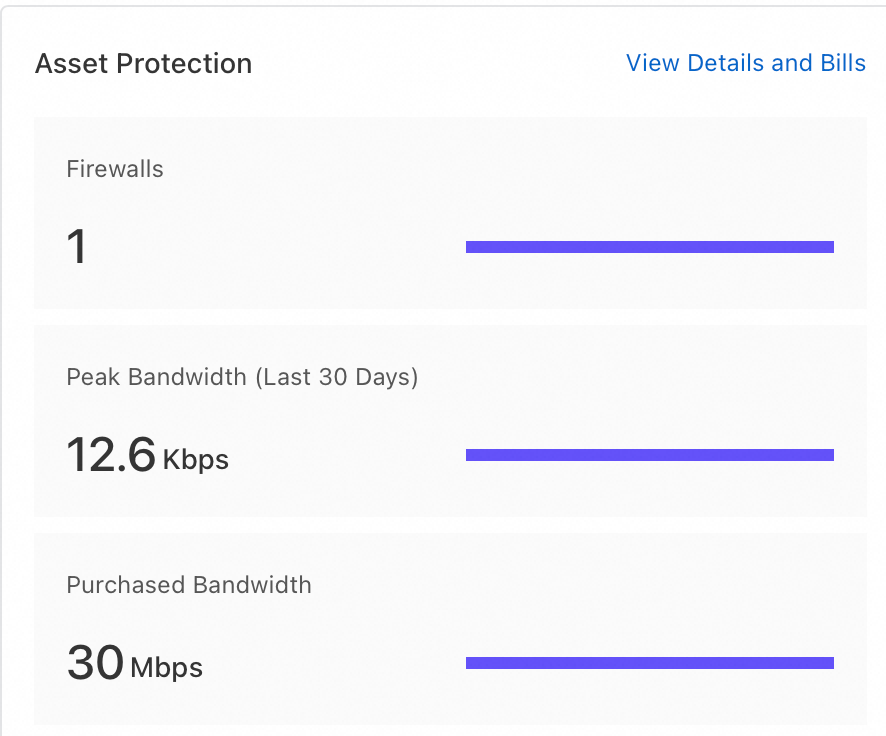
View public traffic processing status
In the left navigation pane, click Overview. Then, on the Overview page in the Asset Protection area, view the number of firewall instances, purchased traffic, and recent peak bandwidth.
More operations
Default allow policies for security groups
The Internet firewall protects traffic to and from the Internet. You must confirm that the public assets you are protecting allow traffic from the Internet. For more information, refer to the official documentation for the corresponding public assets.
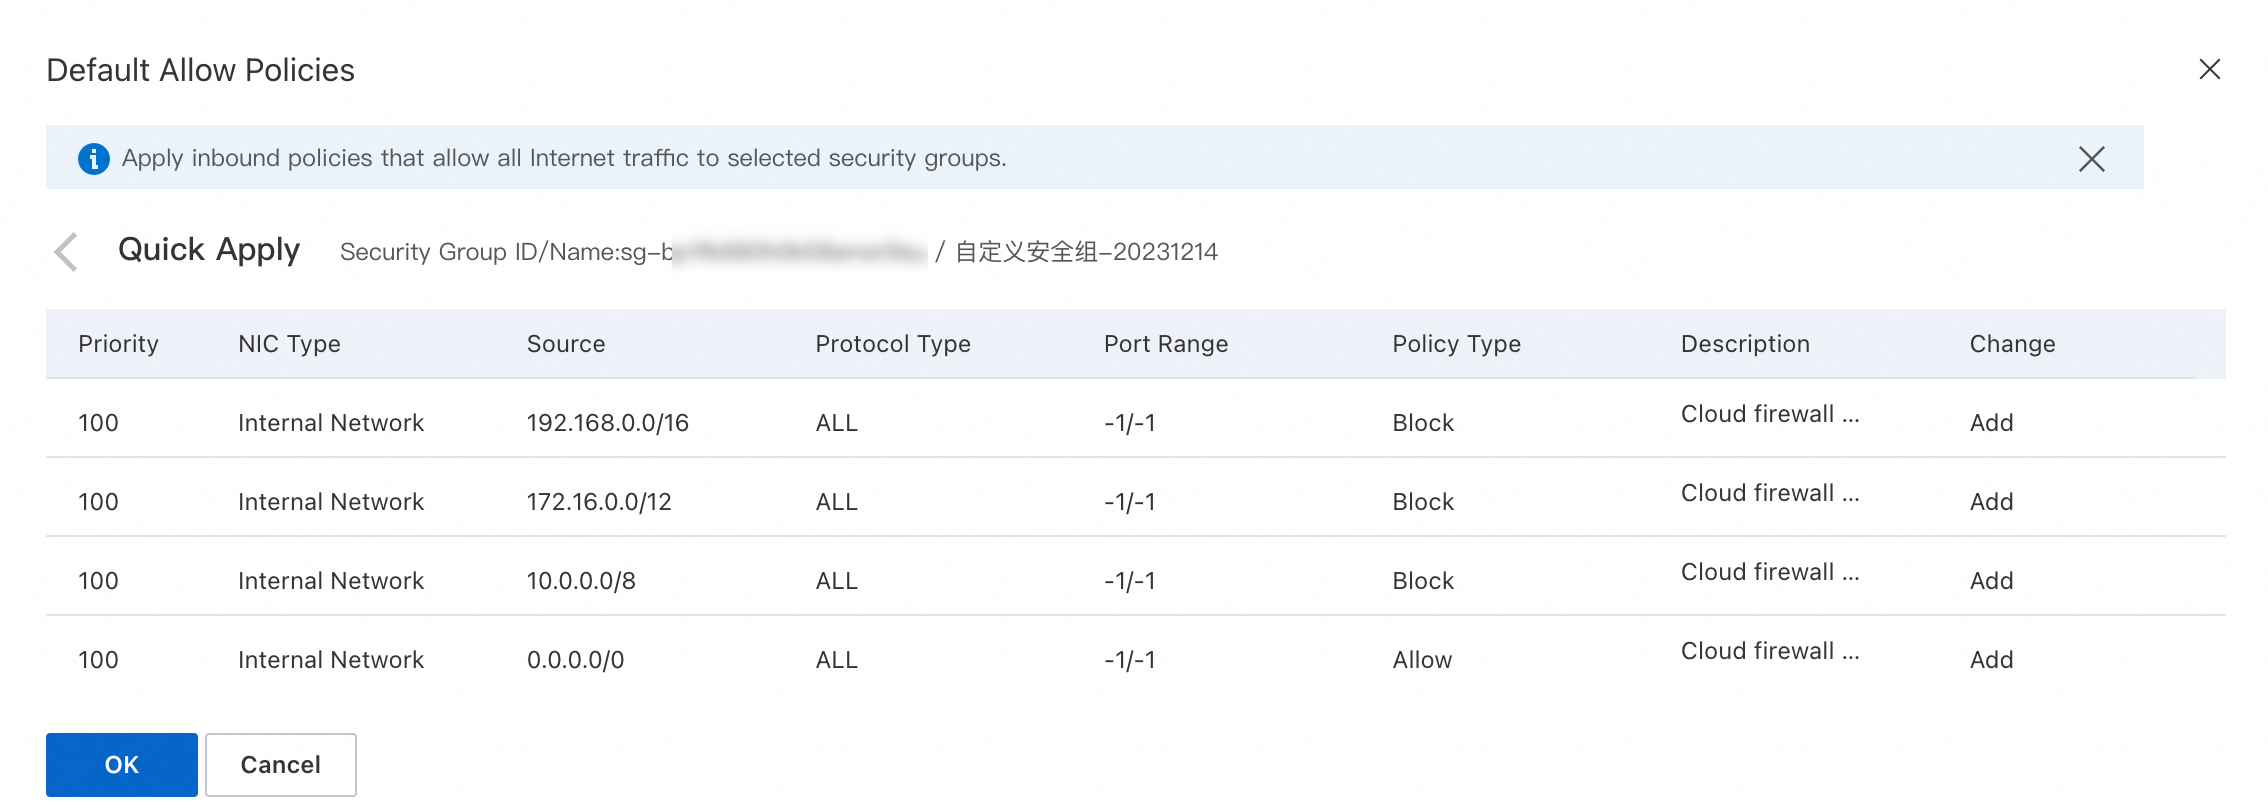
When protecting ECS assets (including ECS public IP addresses and ECS EIPs), you can apply default allow policies for Internet traffic with a single click on the Cloud Firewall console. This allows you to manage rules centrally through Cloud Firewall without modifying security group configurations on the ECS console.
How it works
Cloud Firewall applies four rules with the lowest priority (100) to the security group associated with the ECS asset, allowing Internet access for that asset.
When multiple rules share the same priority, ECS security groups evaluate deny rules first. Therefore, if you have previously configured a deny rule with a priority of 100, the allow policy applied by Cloud Firewall will not override your existing deny rule.
Usage notes
Default allow policies affect all resources associated with the security group. Before you apply these policies, enable Cloud Firewall protection for all associated resources and configure appropriate inbound access control policies. Applying default allow policies to resources for which Cloud Firewall is not enabled exposes those resources to the Internet.
Do not apply default allow policies to resources for which Cloud Firewall is not enabled. Do not disable Cloud Firewall protection for resources that already have default allow policies applied.
After your Cloud Firewall service expires, the four allow policies automatically added by Cloud Firewall will remain in effect in the security group. If you no longer use the Cloud Firewall service, we recommend that you manually delete the four default allow policies applied by Cloud Firewall. For more information, see Delete security group rules.
Limitations
This feature supports only inbound rules for ECS public IP addresses and ECS EIPs.
Applying default allow policies is not supported for enterprise security groups.
Apply allow policies
Log on to the Cloud Firewall console.
In the left navigation pane, click Firewall.
On the Internet Firewall tab, click the IPv4 or IPv6 tab.
In the public asset list, find the ECS asset for which you want to apply the default policy. In the Default Allow Policies column, click Apply.
(Optional) If there is a conflict between the rules in the current security group and the rules to be applied, you need to adjust the policies first.
Adjustable conflict: A rule in the security group has the same priority as the rule to be applied, but a different protocol type, port range, or authorization object.
In the Default Allow Policies dialog box, click Quick Modify to resolve the conflict by increasing the priority of the original rule in the security group.
Non-adjustable conflict: A rule in the security group has the same priority, protocol type, port range, and authorization object as the rule to be applied.
We recommend that you go to the Security Group page on the ECS console to view and adjust the conflicting rule priorities. For more information, see Modify security group rules. Alternatively, you can submit a for assistance.
In the Actions column for the security group, click Quick Apply. Review the four allow policies to be applied, and then click OK.
If an ECS instance is associated with multiple security groups, you must apply the allow policy to all associated security groups for the policy to take effect on that ECS instance.
After configuring the security group allow policy, you can check the application status of the default allow policy on the page to confirm the policy was successfully applied and to troubleshoot any issues.
The security group policy application statuses include:
Applied: The default allow policy has been applied to all security groups associated with the ECS asset.
Not Applied: The default allow policy has not been applied to all or some of the security groups associated with the ECS asset, or a configuration conflict exists.
-: One-click application of the default allow policy is not supported for this asset type.
Download public asset list
You can download the asset information from the public asset list to your local computer as a CSV file.
Log on to the Cloud Firewall console.
In the left navigation pane, click Firewall.
On the Internet Firewall tab, click the IPv4 or IPv6 tab.
In the upper-right corner of the public asset list, click the
 icon.
icon.In the upper-right corner of the Internet Firewall tab, click Download Task Management to view the download progress. After the task is complete, click Download in the Actions column.