Cloud Firewall has a built-in Intrusion Prevention System (IPS) engine that blocks malicious internet traffic, defends against common attacks in real time, and provides precise virtual patching. You can configure the IPS engine mode and manage modules such as threat intelligence, Basic Protection, intelligent defense, and virtual patching to accurately identify and block intrusions. This topic describes how to configure IPS features.
IPS capabilities for the Internet firewall
IPS engine mode
After you enable Cloud Firewall, the IPS engine defaults to Block Mode. Cloud Firewall automatically selects a default block level based on your traffic patterns. Basic Protection and Virtual Patching block threats only when Block Mode is enabled. If Block Mode is disabled, the IPS only monitors and generates alerts for threats and malicious traffic.
For more information about the IPS engine mode, see Overview.
Log on to the Cloud Firewall console. In the navigation pane, choose .
On the Internet Border tab, configure the Threat Engine Mode on the far right.
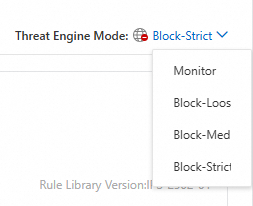
Select one of the following modes:
Monitor: In this mode, Cloud Firewall only logs and generates alerts for attacks without blocking them. The protection actions for Threat Intelligence, Basic Protection, and Virtual Patching are all set to monitor.
Block: In this mode, Cloud Firewall blocks malicious traffic and stops intrusion activities.
You can choose a block mode with a different strictness level based on your security needs:
Block - Loose: Provides coarse-grained protection and uses rules with a low false positive rate. This mode is ideal for services sensitive to false positives.
Block - Medium: Provides a balance between the Loose and Strict modes with high accuracy. This mode is suitable for routine protection in daily operations.
Block - Strict: Provides fine-grained protection with a comprehensive set of rules. This mode may have a higher false positive rate than the Medium mode but is ideal for scenarios that require a low false negative rate.
Feature overview
The IPS Configuration page for the Internet firewall provides features such as Basic Protection, Virtual Patching, Threat Intelligence, Intelligent Defense, Data Leak, and Tracing for Private Networks. You can use the toggles on the left to enable or disable these features.
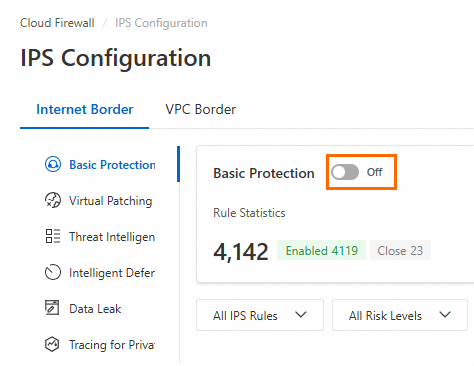
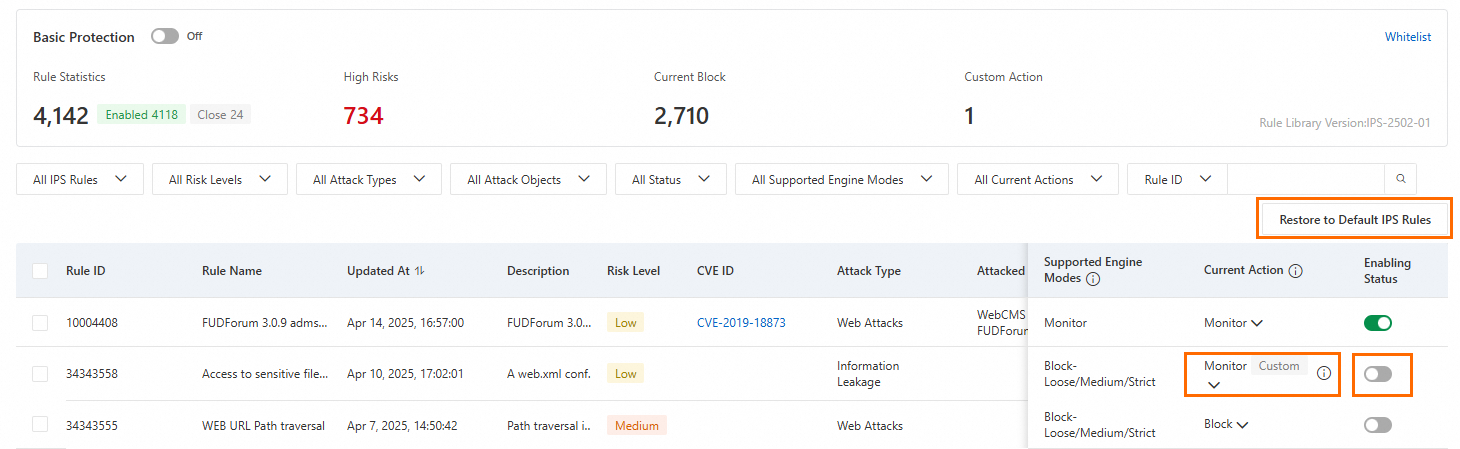
Basic Protection
Basic Protection is enabled by default, and Cloud Firewall activates detection rules for common threats. Basic Protection provides fundamental intrusion prevention, including blocking command execution vulnerabilities and connections from compromised devices to Command and Control (C&C) servers. We recommend keeping Basic Protection enabled to enhance security.
Modify a protection rule: Change the rule's action in the Current Action column. Modified rules are marked as custom rules.
Restore default protection rules: Click Restore to Default IPS Rules, and click OK.
Enable or disable a rule: Click the toggle in the Status column.
Enabled: The rule is active. Custom protection rules have a higher priority than default rules.
Disabled: The rule is inactive.
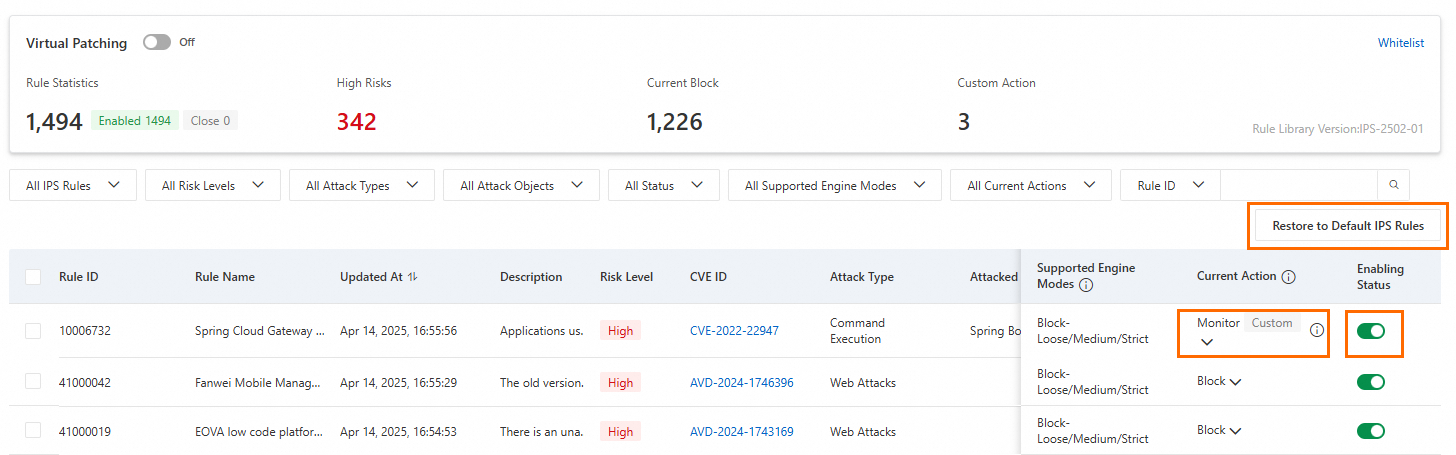
Virtual Patching
Virtual Patching is enabled by default. Cloud Firewall provides real-time protection against popular high-risk and emergency vulnerabilities. Virtual Patching applies hot-patches at the network layer to block exploit attempts, avoiding service interruptions that can occur when patching hosts. You do not need to install virtual patches on your servers. Disabling this feature stops automatic real-time updates. We recommend keeping all virtual patches enabled.
Modify a protection rule: Change the rule's action in the Current Action column. Modified rules are marked as custom rules.
Restore default protection rules: Click Restore to Default IPS Rules, and click OK.
Enable or disable a rule: Click the toggle in the Status column.
Enabled: The rule is active. Custom protection rules have a higher priority than default rules.
Disabled: The rule is inactive.
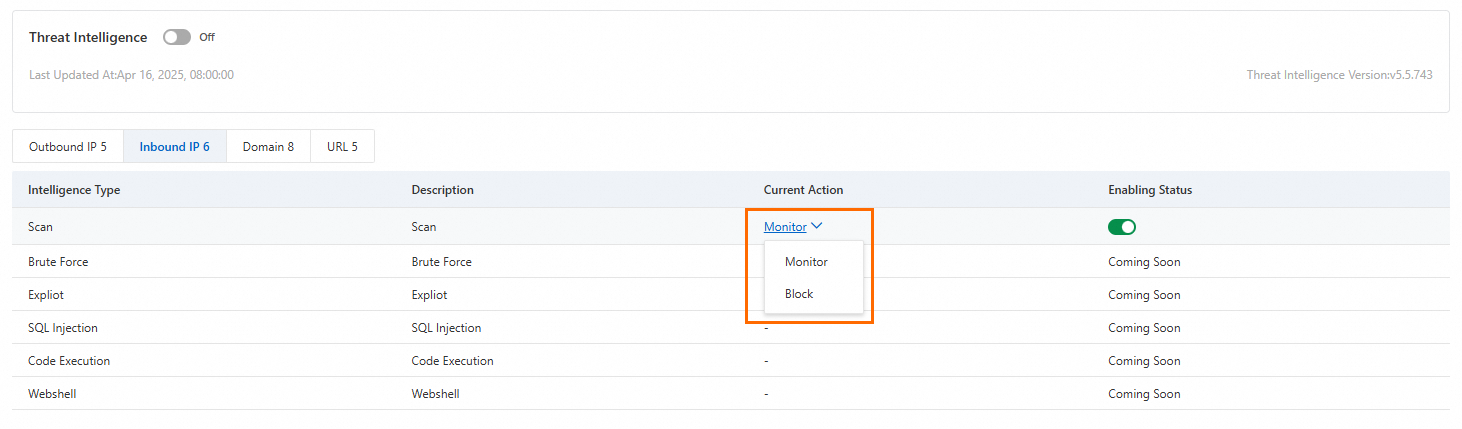
Threat intelligence
Threat Intelligence is enabled by default. Cloud Firewall uses threat intelligence to scan for threats, and you can set the action to Monitor or Block. This feature synchronizes malicious IP addresses from across the Alibaba Cloud network to your Cloud Firewall, such as malicious access sources, scanning sources, and brute-force attack sources, and blocks them. We recommend that you enable Threat Intelligence to proactively defend against network threats.
Intelligent Defense
Intelligent Defense is enabled by default. Cloud Firewall learns from attack data across the cloud to improve threat and attack detection accuracy. Currently, Intelligent Defense is supported only when the IPS engine Mode is set to Observe.
Important: You must enable Basic Protection before you can enable Intelligent Defense.

Data leakage
Cloud Firewall inspects outbound traffic from your cloud assets to the internet to help you identify sensitive data leakage risks.
First, enable data leakage detection for your assets.
In the Common Industry Template list, view the data types that Cloud Firewall can identify. You can enable detection for specific data types based on your business needs.
Click Configure Assets, locate the target Public Asset, and in the Actions column, click Enable Data Leak Detection.
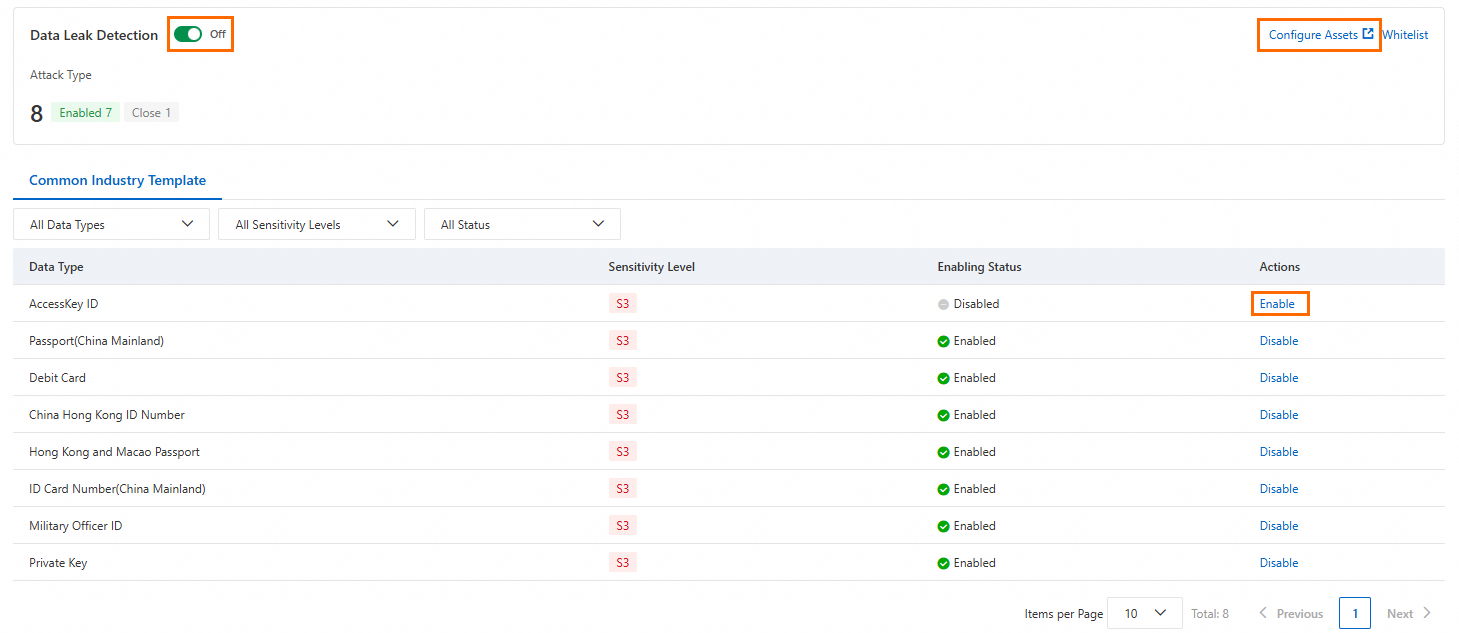
On the Data Leak Detection page, you can view an overview of data leakage events detected by Cloud Firewall. This helps you get detailed information about affected assets, leakage events, and risk payloads. For more information, see Data leak detection.
IPS Private IP Tracing
When a server's real IP address is hidden, such as behind a NAT Gateway or load balancer, locating the specific instance (such as an ECS or server) under attack is difficult. IPS Private IP Tracing automates attack source tracing by correlating NAT Session Logs to reveal the private IP address, helping you quickly identify the at-risk asset.
Currently, this feature is supported only for NAT Gateway assets.
Enabling IPS private network traceability does not incur extra charges from Cloud Firewall. However, the system creates and queries an index in your Session log, which generates Log Service (SLS) fees. For more information about SLS billing, see Billing overview.
If IPS private network traceability is enabled but the index for NAT Session Logs is not, or if the index is missing required fields, the system automatically creates a new index or adds the required fields.
The IPS Private IP Tracing page lists the public assets that support tracing. To use this feature, you must first enable Internet Firewall Protection and NAT Session Logs for the corresponding NAT Gateway. When you click the toggle in the Actions column, a prompt appears with links to guide you through the setup. You can also refer to the following documents for detailed instructions:
Enable Internet Firewall Protection: Internet firewall
Enable NAT Session Logs: Session log
You do not need to enable NAT Session Logs if you only use DNAT.
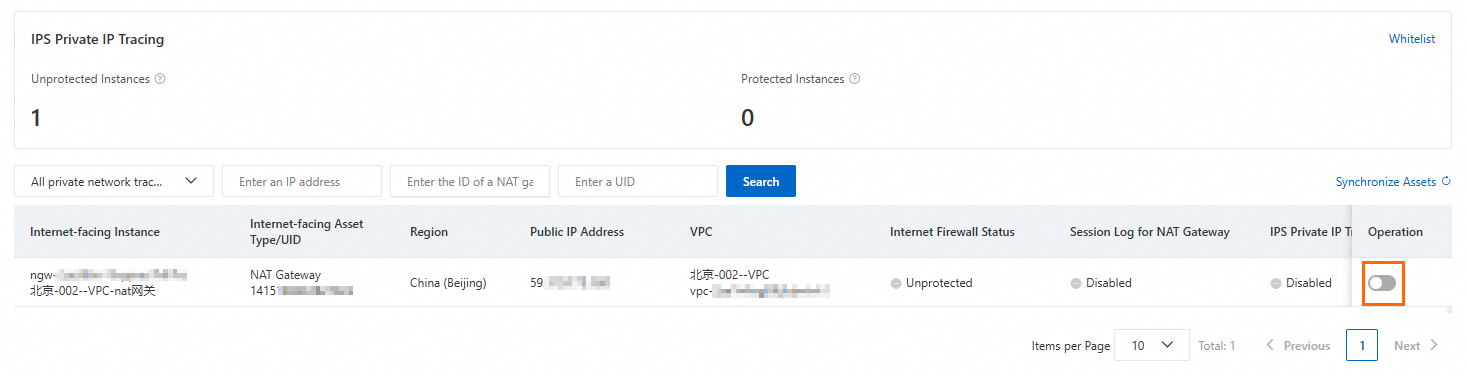
After both Internet Firewall Protection and NAT Session Logs are enabled, click OK to enable IPS Private IP Tracing. When the IPS Private IP Tracing shows Enabled, the tracing feature is active for the public asset.
IPS private network traceability works with NAT Gateway session logs. Due to data latency in capturing and delivering NAT Gateway logs, private IP tracing results may be delayed by approximately 20 minutes.
Protection whitelist
If you need to allow trusted inbound and outbound traffic to or from specific IP addresses, you can add them to an allowlist. Traffic from IP addresses in the allowlist is not blocked by Basic Protection, Intelligent Defense, or Virtual Patching rules. You can add up to 50 IP addresses each to the source and destination IP allowlists.
On the right side of the page, click Whitelist to configure settings.

The protection whitelist only applies to Basic Protection, Intelligent Defense, and Virtual Patching.
IPS capabilities for the VPC firewall
You must enable a VPC Firewall before you can configure IPS protection for the VPC firewall.
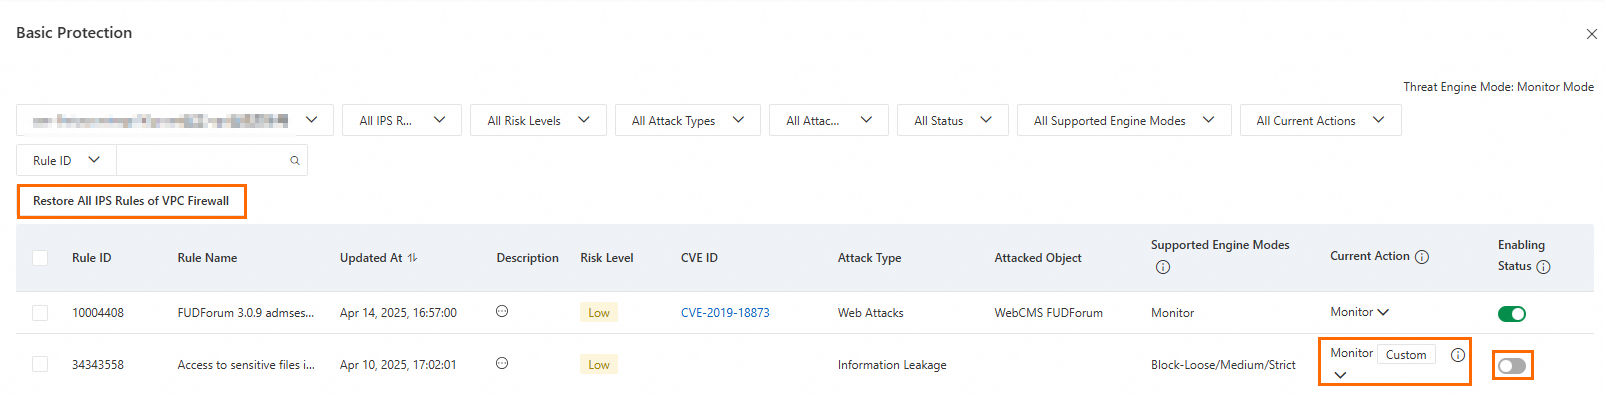
Configure Basic Protection rules
Basic Protection provides fundamental intrusion prevention for your assets, including blocking command execution vulnerabilities and connections from compromised devices to C&C servers.
Click .
In the Basic Protection panel, configure the Current Action and Status for each rule.
Modify a protection rule: Change the rule's action in the Current Action column. Modified rules are marked as custom rules.
Restore default protection rules: Click Restore All IPS Rules of VPC Firewall, and then click OK.
Enable or disable a rule: Click the toggle in the Status column.
Enabled: The rule is active. Custom protection rules have a higher priority than default rules.
Disabled: The rule is inactive.
Note: Enabled protection rules apply to all VPC firewall firewalls for your services.
Configure virtual patching rules
Cloud Firewall provides real-time protection against popular high-risk and emergency vulnerabilities. Virtual Patching applies hot-patches at the network layer to block exploit attempts, avoiding service interruptions that can occur when patching hosts. You do not need to install virtual patches on your servers. Disabling this feature stops automatic real-time updates.
Click View Virtual Patching Policies.
In the Virtual Patching panel, configure the Current Action and Status for each rule.
Modify a protection rule: Change the rule's action in the Current Action column. Modified rules are marked as custom rules.
Restore default protection rules: Click Restore All IPS Rules of VPC Firewall, and then click OK.
Enable or disable a rule: Click the toggle in the Status column.
Enabled: The rule is active. Custom protection rules have a higher priority than default rules.
Disabled: The rule is inactive.
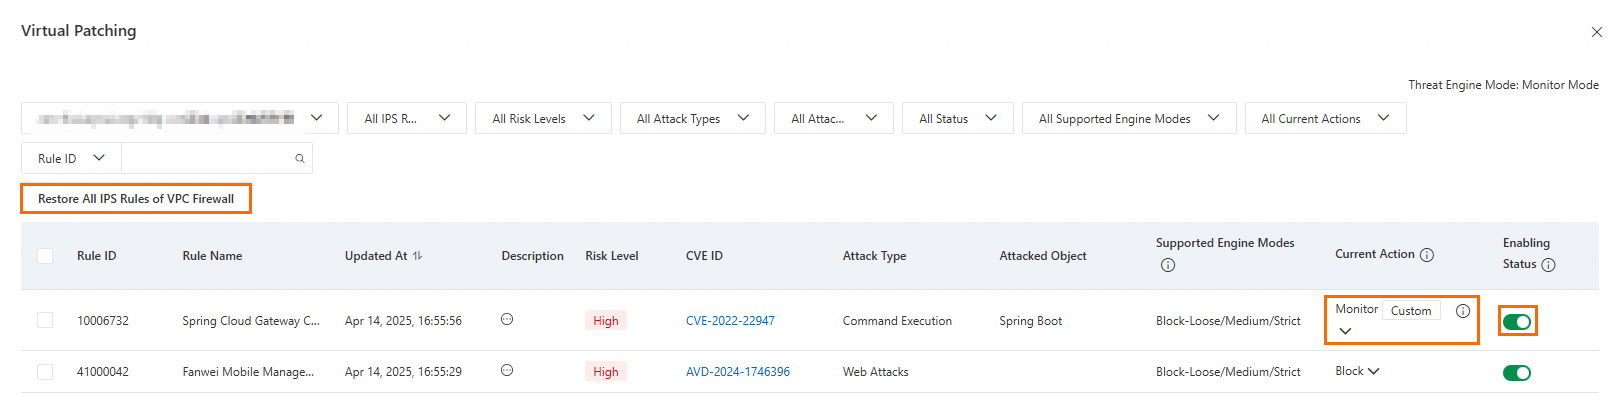
Enabled Virtual Patching rules apply to all VPC firewall firewalls for your services.
Configure IPS protection mode
Click Configure IPS Mode.
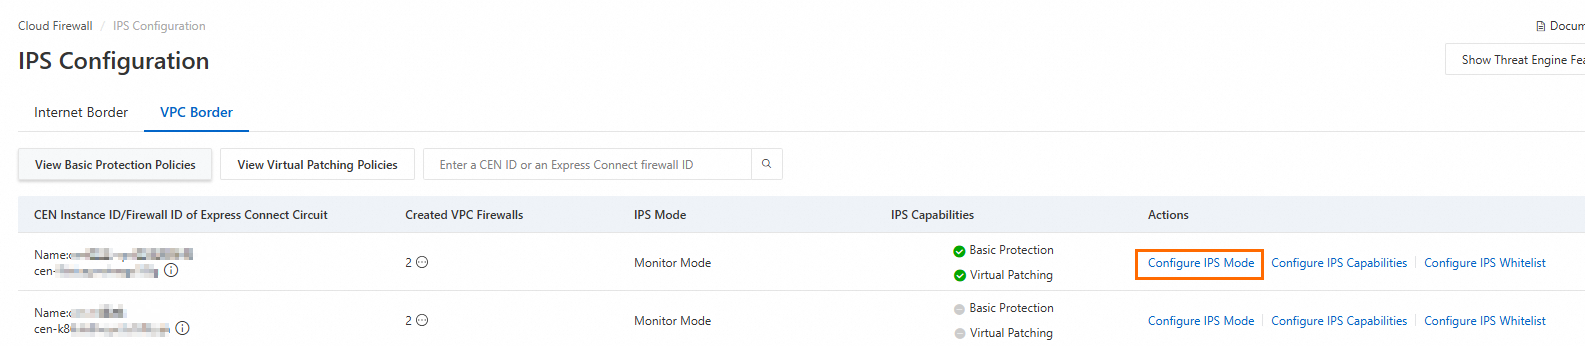
In the Configure IPS Mode dialog box, select a mode and click OK.
You can select one of the following IPS protection modes:
Monitor Mode: In this mode, Cloud Firewall only logs and generates alerts for attacks without blocking them.
Block Mode: In this mode, Cloud Firewall blocks malicious traffic and stops intrusion activities. You can choose a block mode with a different strictness level based on your security needs.
Loose: blocks attacks in a loose manner by using rules that prevent a high rate of false positives. This level is suitable for business that requires the false positive rate to be minimized.
Medium: blocks attacks in a standard manner by using common rules. This level is suitable for daily O&M.
Strict: blocks attacks in a strict manner by using all rules. This level is suitable for business that requires the false negative rate to be minimized, such as major events or cybersecurity protection activities launched by public service sectors. The activities are rehearsals for network attack and defense. This level may cause a higher false positive rate than the Medium level.
Configure IPS protection
You can configure Basic Protection and Virtual Patching. After configuration, Cloud Firewall inspects traffic based on the enabled Basic Protection and Virtual Patching rules.
Locate the target Cloud Enterprise Network (CEN) instance or Express Connect firewall. In the Actions column, click Configure IPS Capabilities to configure the settings.
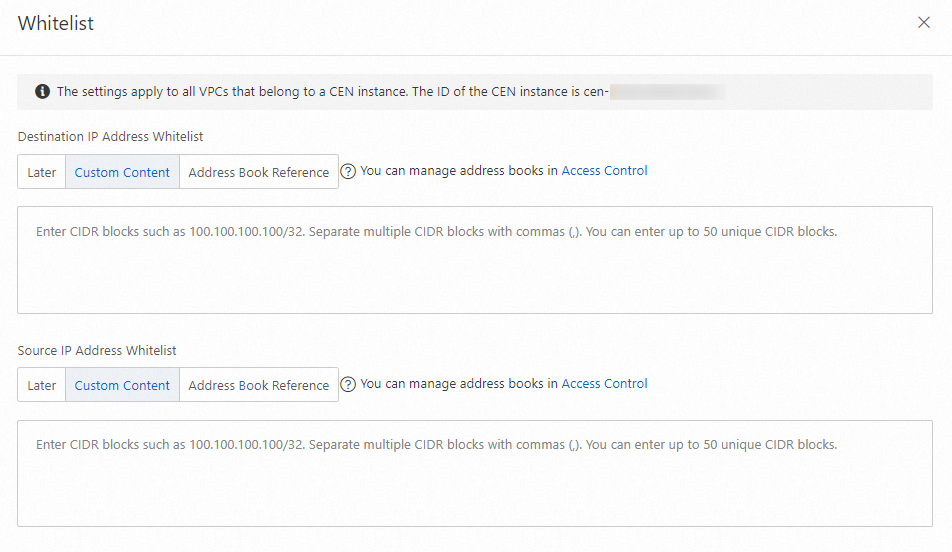
Configure IPS whitelist
If you need to allow trusted traffic to or from specific destination or source IP addresses, you can add them to an allowlist. Traffic from IP addresses in the allowlist is not blocked by Basic Protection, Intelligent Defense, or Virtual Patching rules. You can add up to 50 IP addresses each to the source and destination IP allowlists.
Locate the target Cloud Enterprise Network (CEN) instance or Express Connect firewall. In the Actions column, click Configure IPS Whitelist to configure the settings.
Related documents
After you enable Cloud Firewall, you can go to the Vulnerability prevention page to view network-exploitable vulnerabilities. These vulnerabilities are automatically detected by Security Center and synchronized to Cloud Firewall. The page also shows the attack prevention capabilities of Cloud Firewall.
After you enable Cloud Firewall, you can go to the Breach awareness page to view details of intrusions detected by the IPS engine.