This topic describes how to configure the Send an Instagram Message component. Users can use specific Instagram features to reply to such messages.
Component information
Icon
![]()
Name
Send an Instagram Message
Prerequisites
Go to the canvas page of an existing flow or a new flow.
Go to the canvas page of an existing flow.
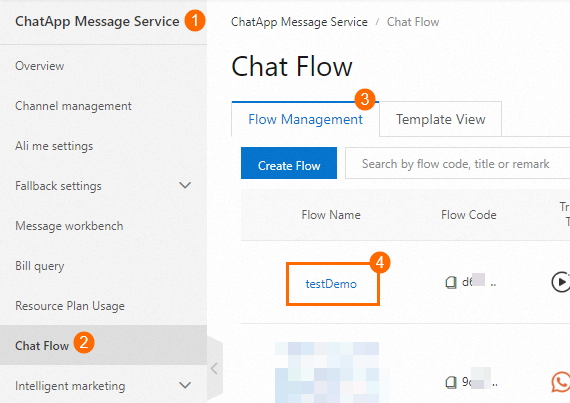
Log on to Chat App Message Service Console. Choose Chat Flow > Flow Management. Click the name of the flow that you want to edit. The canvas page of the flow appears.
Create a new flow to go to the canvas page. For more information, see Create a flow.
Parameters
Available variables
By default, commonly used variables are created and displayed in the available variables section. You can use these variables when you orchestrate a chat flow. You can click Insert Variable to add a custom variable. After a custom variable is added, the variable is displayed in the available variables section. For more information about how to use available variables, see Use available variables.
Message Sending Settings
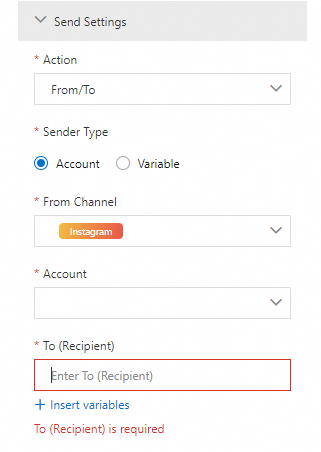
You can select From/To or Reply from the Action drop-down list.
From/To
When the trigger type of the flow is Manual, the action must be From/To.
Sending Type | Description | Example |
Sender Account | If you set the Sending Type parameter to Sender Account, you must select a channel and an account for sending messages. The selected channel must be approved and the selected account must be connected. You can enter the phone number of a recipient or click Insert Variable to insert a defined variable or add a new variable. |
|
Variable | If you select Variable, you must specify the phone number of the message sender. You can enter the phone number of a recipient or click Insert Variable to insert a defined variable or add a new variable. |
|

Message Settings
In the Message Settings section, you can specify the type of the messages that you want to send. The following message types are supported: Text, Image, Quick Reply, and Template Message.
Text
Configure the Content parameter. You can reference variables in the message content.
Image
Enter the URL of the image. The image can be in the JPEG or PNG format and can be up to 5 MB in size.

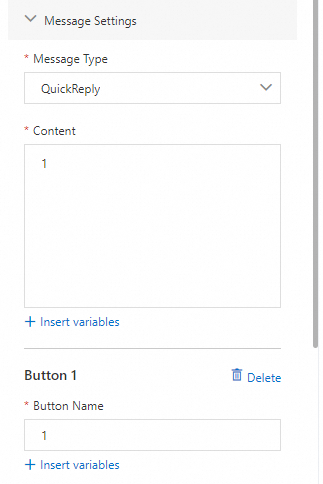
Quick Reply
Enter the message content for quick reply or click Insert Variables to insert a variable in the content. You can enter a button name or click Insert Variables to insert a variable.
Set the button name to the name of the Interactive Reply-based Branch in the Interactive Reply Settings section.
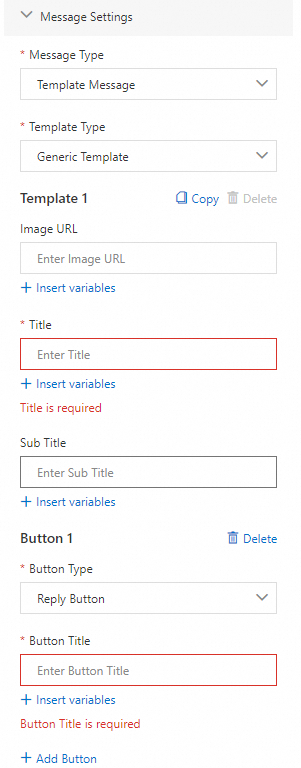
Template Message
For Image URL, Message Title, and Subtitle parameters, you can enter a custom value or click Insert Variables to insert a variable. You can set the Button Type parameter to Reply Button or URL Button. You must set the URL for the URL button. Multiple templates are supported.
Timeout Settings
You can turn on or off Unread Branch based on your business requirements. After you turn on the switch, you can customize the timeout period and add components to handle unread messages. For example, if an Instagram message is not read within the specified timeout period, you can use the Send an SMS Message component to send a message as a fallback.
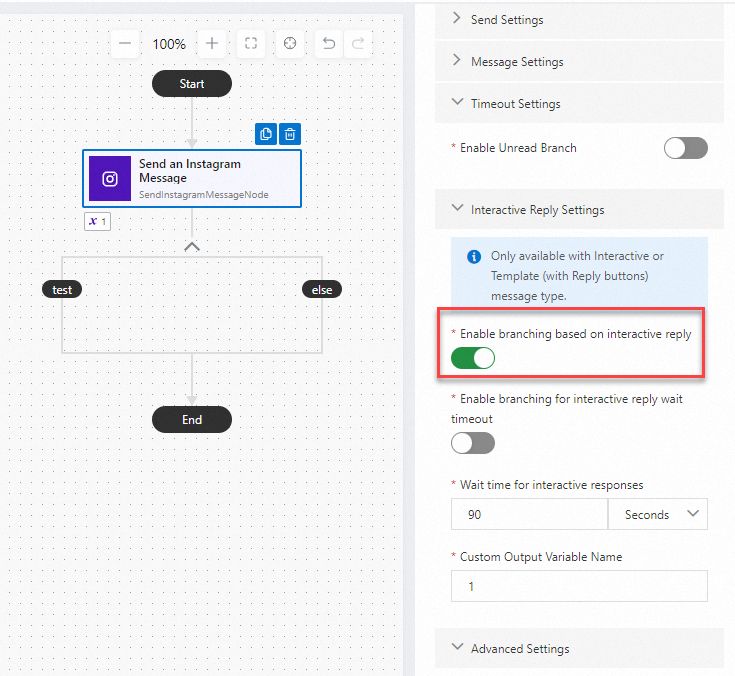
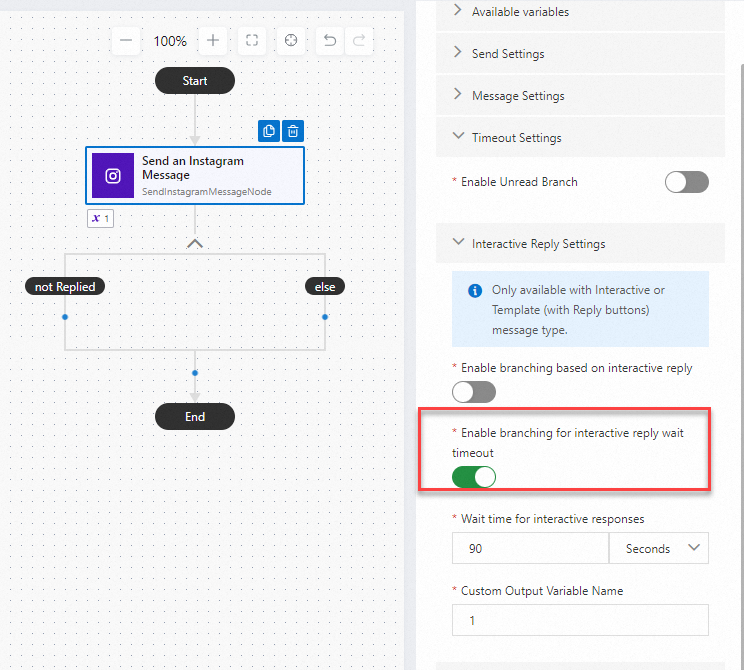
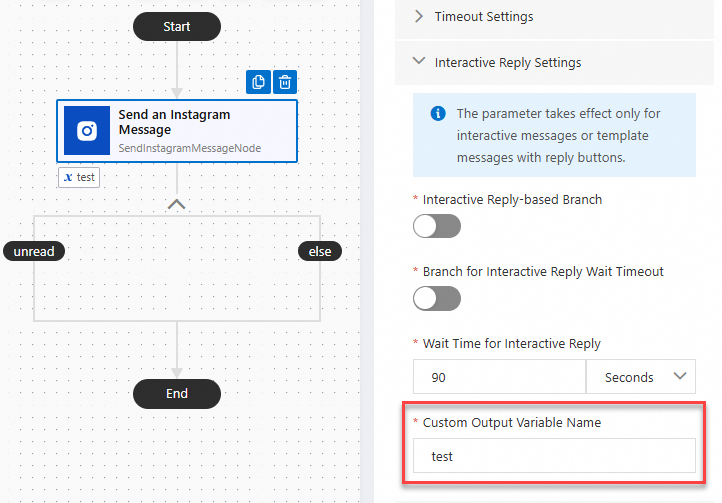
Interactive Reply Settings
These settings are only available to Quick Reply and Template Message.
Parameter | Description | Example value |
Interactive Reply-based Branch | After you turn on the switch, branches are created based on the buttons or lists specified in the interactive messages. You can add components to configure the branches. |
|
Branch for Interactive Reply Wait Timeout | After you turn on the switch, the Not Replied branch is created to handle timeout issues. You need to configure a custom timeout period. If this switch is turned on and no component is added to the branch, the system continues with subsequent steps after a timeout. |
|
Wait Time for Interactive Reply | You can specify a timeout period by second, minute, and hour. After the specified timeout period is reached, the configurations in the Not Replied branch will take effect. | - |
Custom Output Variable Name | You can specify a custom variable that is used to capture user choices. The custom variable will be displayed in the available variables section and can be referenced at any time in the subsequent steps of the chat flow. |
|
Advanced Settings
Parameter | Description |
Status Report | After you turn on the switch, you must enter the URL that receives status reports. |
Track ID | The track ID is used to mark and track specific messages. |