By default, the Open Policy Agent (OPA) plug-in in Service Mesh (ASM) injects OPA sidecar proxies into all pods across the cluster. When you only need OPA access control in specific namespaces -- for example, to enforce policies in production while leaving development namespaces unrestricted -- enable injection scope control. ASM then injects OPA sidecar proxies only into pods in namespaces labeled with opa-istio-injection=enabled.
How it works
After you enable OPA injection scope control, ASM checks the opa-istio-injection label on a pod's namespace when the pod is created:
| Namespace label | Injection behavior |
|---|---|
opa-istio-injection=enabled | OPA sidecar proxy (opa-istio) is injected into the pod |
| Label absent | No OPA sidecar proxy is injected |
Note: The label is evaluated only at pod creation time. To apply label changes to existing pods, delete and recreate them.
Prerequisites
Before you begin, ensure that you have:
A Container Service for Kubernetes (ACK) cluster added to an ASM instance v1.12.4.19 or later. For more information, see Add a cluster to an ASM instance
Two namespaces,
defaultanddevelop, created in the ACK cluster. For more information, see Manage namespaces and resource quotasAn NGINX application deployed in the
defaultnamespace and a sleep application deployed in thedevelopnamespace. For more information, see Create a stateless application by using a Deployment
Step 1: Enable OPA and injection scope control
Log on to the ASM console. In the left-side navigation pane, choose Service Mesh > Mesh Management.
On the Mesh Management page, click the name of the ASM instance.
In the left-side navigation pane, choose Mesh Security Center > OPA Policy.
On the OPA Policy page, select Enable Open Policy Agent (OPA) Plug-in and Enable OPA Injection Range Control, then click Enable OPA.
In the Note dialog box, click OK.
Step 2: Label the target namespaces
Add the opa-istio-injection=enabled label to each namespace where OPA sidecar proxies should be injected. In this example, only the default namespace is labeled, so OPA sidecar proxies are injected into pods in default but not in develop.
Option A: kubectl (recommended)
For more information about how to connect to a cluster, see Obtain the kubeconfig file of a cluster and use kubectl to connect to the cluster.
kubectl label namespace default opa-istio-injection=enabled --overwriteVerify the label:
kubectl get namespace default --show-labelsOption B: ACK console
Log on to the ACK console. In the left-side navigation pane, click Clusters.
On the Clusters page, click the name of the cluster that you want to manage, then click Namespaces and Quotas in the left-side navigation pane.
On the Namespace page, click Edit in the Actions column of the default namespace.
In the Edit Namespace dialog box, set the label name to opa-istio-injection and the label value to enabled, click Add, and then click OK.
Step 3: Restart the applications to trigger injection
Delete the existing pods so that ASM re-evaluates injection when replacement pods start.
Note: If the application has multiple pods, you need to delete all the pods to restart the application. When the state of a pod changes back to Running, the pod is restarted.
Option A: kubectl
kubectl delete pod -l app=nginx -n default
kubectl delete pod -l app=sleep -n develop
Wait until the new pods reach Running status:
kubectl get pod -l app=nginx -n default
kubectl get pod -l app=sleep -n develop
Option B: ACK console
Log on to the ACK console. In the left-side navigation pane, click Clusters.
On the Clusters page, click the name of the cluster that you want to manage, then choose Workloads > Pods in the left-side navigation pane.
In the upper part of the Pods page, set Namespace to default and choose More > Delete in the Actions column of the pod on which the NGINX application is deployed. In the Note dialog box, click OK.
Repeat the preceding operations to restart the pod of the sleep application in the develop namespace.
Step 4: Verify the injection scope
After the pods restart, confirm that OPA sidecar proxies are injected only into the labeled namespace.
Option A: kubectl
Check the READY column to compare the number of containers in each pod:
kubectl get pod -l app=nginx -n defaultExpected output -- 2/2 indicates that the OPA sidecar proxy (opa-istio) runs alongside the application container:
NAME                                READY   STATUS    RESTARTS   AGE
nginx-deployment-xxxx-yyyy          2/2     Running   0          30s
kubectl get pod -l app=sleep -n developExpected output -- 1/1 confirms no OPA sidecar proxy was injected:
NAME                     READY   STATUS    RESTARTS   AGE
sleep-xxxx-yyyy          1/1     Running   0          30s
Option B: ACK console
Log on to the ACK console. In the left-side navigation pane, click Clusters.
On the Clusters page, click the name of the cluster that you want to manage, then choose Workloads > Pods in the left-side navigation pane.
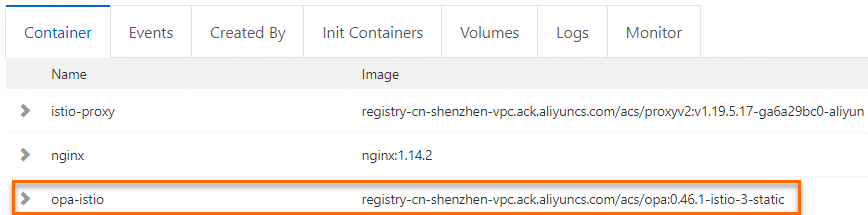
On the Pods page, set Namespace to default and click the pod name of the NGINX application. On the Container tab, opa-istio is displayed, which confirms the OPA sidecar proxy is injected.
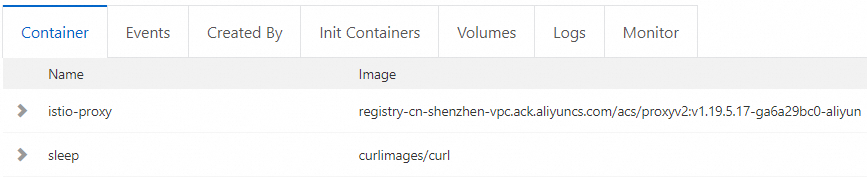
Set Namespace to develop and click the pod name of the sleep application. On the Container tab, opa-istio is not displayed, which confirms no OPA sidecar proxy is injected.
Disable injection for a namespace
To stop injecting OPA sidecar proxies into a namespace, remove the label and restart the pods:
kubectl label namespace default opa-istio-injection-
kubectl delete pod -l app=nginx -n default
After the pods restart, verify that the READY column shows 1/1, confirming the OPA sidecar proxy is no longer injected.