Canal captures row-level changes from MySQL binary logs and delivers them as messages to ApsaraMQ for RocketMQ. This tutorial walks you through the full setup: configure MySQL binary logging, deploy Canal Deployer, and verify that change events arrive in your RocketMQ topic.
How it works
Change data capture (CDC) tracks INSERT, UPDATE, and DELETE operations in a database and streams them to downstream systems. Canal is an open-source CDC tool that poses as a MySQL replica to receive binary log events in real time. Combined with ApsaraMQ for RocketMQ, Canal enables event-driven architectures where database changes trigger downstream processing automatically.
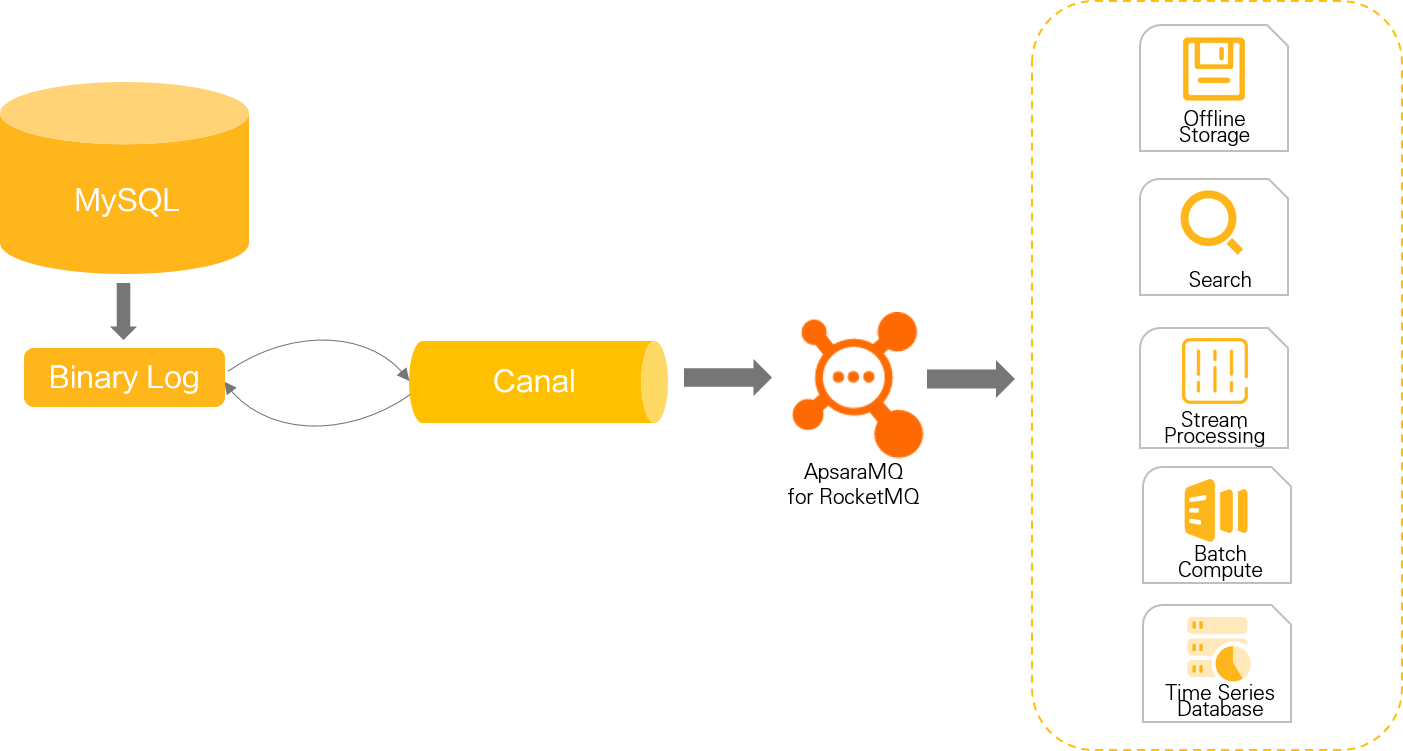
Canal connects to MySQL as a replica, receives binary log events, and forwards them to ApsaraMQ for RocketMQ. Consumers then subscribe to the RocketMQ topic to process change events.
Common use cases
Database mirroring -- Keep a read replica or secondary data store synchronized.
Real-time backup -- Stream changes to a durable message queue for disaster recovery.
Index maintenance -- Rebuild search indexes, inverted indexes, or sharded heterogeneous indexes as data changes.
Cache invalidation -- Refresh business caches when underlying data is updated.
Event-driven processing -- Trigger business logic based on incremental data changes.
Prerequisites
Before you begin, make sure that you have:
An ApsaraMQ for RocketMQ instance in the Running state. For setup instructions, see Create an instance
A MySQL instance in the Running state. This tutorial uses ApsaraDB RDS for MySQL. For setup instructions, see Create an ApsaraDB RDS for MySQL instance
A Linux server to run Canal Deployer. This tutorial uses an Elastic Compute Service (ECS) instance. For setup instructions, see Create and manage an ECS instance
Network connectivity between the Canal server, the MySQL instance, and the ApsaraMQ for RocketMQ instance. ECS instances and containers in a Virtual Private Cloud (VPC) typically meet this requirement
An AccessKey pair for authentication. For instructions, see Create an AccessKey pair
Version compatibility
| Service | Version used | Supported versions |
|---|---|---|
| Canal | 1.1.6 | See Canal releases for other versions |
| MySQL | 8.0 | 5.1.x, 5.5.x, 5.6.x, 5.7.x, and 8.0.x |
| ApsaraMQ for RocketMQ | 5.x | 4.x and 5.x (5.x recommended) |
For ApsaraMQ for RocketMQ 5.x instances, see Synchronize change data to ApsaraMQ for RocketMQ 5.x.
Step 1: Configure MySQL
Enable binary logging
ApsaraDB RDS for MySQL
Binary logging is enabled by default, and your Alibaba Cloud account automatically has the required dump permissions. Skip to
Self-managed MySQL
Edit the MySQL configuration file (
my.cnf) to enable ROW-format binary logging:[mysqld] log-bin=mysql-bin # Enable binary logging binlog-format=ROW # Required format for Canal server_id=1 # Must differ from the Canal secondary node IDCreate a dedicated MySQL user for Canal with replication permissions:
    CREATE USER canal IDENTIFIED BY 'canal';
    GRANT SELECT, REPLICATION SLAVE, REPLICATION CLIENT ON *.* TO 'canal'@'%';
    FLUSH PRIVILEGES;
Create a test database
CREATE DATABASE canal DEFAULT CHARACTER SET utf8mb4 COLLATE utf8mb4_general_ci;Create a test table
Create a students table in the canal database:
CREATE TABLE students (
    id INT AUTO_INCREMENT,
    name VARCHAR(100) NOT NULL,
    age INT,
    gender VARCHAR(10),
    PRIMARY KEY (id)
);
Step 2: Deploy Canal Deployer
Install JDK
sudo yum install java-1.8.0-openjdkDownload and extract Canal Deployer
# Download Canal Deployer 1.1.6
sudo wget https://github.com/alibaba/canal/releases/download/canal-1.1.6/canal.deployer-1.1.6.tar.gz

# Create the installation directory and extract
sudo mkdir -p /usr/local/canal-server
sudo tar -zxvf canal.deployer-1.1.6.tar.gz -C /usr/local/canal-server
Configure Canal for RocketMQ
Two configuration files control Canal behavior: canal.properties for global settings and instance.properties for per-instance settings.
Global configuration (canal.properties)
Edit /usr/local/canal-server/conf/canal.properties:
sudo vi /usr/local/canal-server/conf/canal.propertiesSet the following parameters:
# Output destination: send change events to RocketMQ
canal.serverMode = rocketMQ

# Alibaba Cloud authentication
canal.aliyun.accessKey = <your-access-key-id>
canal.aliyun.secretKey = <your-access-key-secret>

# Access channel: set to "cloud" for Alibaba Cloud managed RocketMQ
canal.mq.accessChannel = cloud

# Message format: must be false for ApsaraMQ for RocketMQ
canal.mq.flatMessage = false

# RocketMQ producer settings
rocketmq.producer.group = canal_test
rocketmq.enable.message.trace = false
rocketmq.customized.trace.topic =
rocketmq.namespace =
rocketmq.namesrv.addr = <your-rocketmq-endpoint>
rocketmq.retry.times.when.send.failed = 0
rocketmq.vip.channel.enabled = false
rocketmq.tag =
Replace the following placeholders with your actual values:
| Placeholder | Description | Example |
|---|---|---|
<your-access-key-id> | AccessKey ID for your Alibaba Cloud account | LTAI5tXxx |
<your-access-key-secret> | AccessKey secret for your Alibaba Cloud account | xXxXxXx |
<your-rocketmq-endpoint> | Endpoint from the Instance Details page in the ApsaraMQ for RocketMQ console | rmq-cn-xxx.cn-hangzhou.rmq.aliyuncs.com:8080 |
Do not store AccessKey credentials in plain text in production configuration files. Use environment variables or attach a RAM role to the ECS instance for more secure authentication.
Key parameter details
| Parameter | Description |
|---|---|
canal.serverMode | Destination type. Set to rocketMQ for ApsaraMQ for RocketMQ. |
canal.mq.accessChannel | Set to cloud when using Alibaba Cloud managed RocketMQ. |
canal.mq.flatMessage | Must be false. ApsaraMQ for RocketMQ does not support encapsulating multiple change records in a single flat message. Consumers must deserialize the message body. For Java, use com.alibaba.otter.canal.client.CanalMessageDeserializer#deserializer(byte[]). |
rocketmq.namespace | Leave blank for ApsaraMQ for RocketMQ 5.x instances. |
rocketmq.namesrv.addr | The endpoint of your ApsaraMQ for RocketMQ instance (available on the Instance Details page). |
Instance configuration (instance.properties)
Edit /usr/local/canal-server/conf/example/instance.properties:
sudo vi /usr/local/canal-server/conf/example/instance.propertiesSet the following parameters:
# MySQL connection
canal.instance.master.address = <your-mysql-endpoint>:3306
canal.instance.dbUsername = <your-db-username>
canal.instance.dbPassword = <your-db-password>

# Table filter: capture all tables in the "canal" schema
canal.instance.filter.regex = canal\\..*

# Target RocketMQ topic
canal.mq.topic = canal_topic
Replace the following placeholders with your actual values:
| Placeholder | Description | Example |
|---|---|---|
<your-mysql-endpoint> | Endpoint of your MySQL instance | rm-uf62****.rwlb.rds.aliyuncs.com |
<your-db-username> | MySQL username | canal |
<your-db-password> | MySQL password | canal |
Key parameter details
| Parameter | Description |
|---|---|
canal.instance.master.address | MySQL endpoint with port. Default MySQL port is 3306. |
canal.instance.filter.regex | A regular expression that controls which tables Canal monitors. canal\\..* captures all tables in the canal schema. |
canal.mq.topic | The RocketMQ topic that receives change events. Create this topic in advance on your ApsaraMQ for RocketMQ instance. |
Start Canal Deployer
/usr/local/canal-server/bin/startup.shVerify the startup
Check the Canal server log to confirm a successful start:
sudo cat /usr/local/canal-server/logs/canal/canal.logA successful startup produces output similar to the following:
2024-07-15 17:24:12.154 [main] INFO  com.alibaba.otter.canal.deployer.CanalLauncher - ## set default uncaught exception handler
2024-07-15 17:24:12.202 [main] INFO  com.alibaba.otter.canal.deployer.CanalLauncher - ## load canal configurations
2024-07-15 17:24:12.497 [main] INFO  c.a.o.c.c.rocketmq.producer.CanalRocketMQProducer - ##Start RocketMQ producer##
2024-07-15 17:24:12.799 [main] INFO  com.alibaba.otter.canal.deployer.CanalStarter - ## start the canal server.
2024-07-15 17:24:12.984 [main] INFO  com.alibaba.otter.canal.deployer.CanalController - ## start the canal server[172.17.XX.XX:11111]
2024-07-15 17:24:16.208 [main] INFO  com.alibaba.otter.canal.deployer.CanalStarter - ## the canal server is running now ......
The final the canal server is running now line confirms that Canal started successfully and connected to RocketMQ.
Next, check the instance log to confirm Canal connected to MySQL and started monitoring:
sudo cat /usr/local/canal-server/logs/example/example.logLook for these key indicators of a successful connection:
2024-07-15 18:22:15.667 [main] INFO  c.a.otter.canal.instance.spring.CanalInstanceWithSpring - start CannalInstance for 1-example
2024-07-15 18:22:15.699 [main] WARN  c.a.o.canal.parse.inbound.mysql.dbsync.LogEventConvert - --> init table filter : ^canal\..*$
2024-07-15 18:22:15.699 [main] WARN c.a.o.canal.parse.inbound.mysql.dbsync.LogEventConvert - --> init table black filter : ^mysql\.slave_.*$The WARN entries for table filter initialization are expected and do not indicate errors. They confirm that Canal loaded your canal.instance.filter.regex setting correctly.
If the instance log shows errors instead, check the following common causes:
| Symptom | Likely cause | Resolution |
|---|---|---|
| Connection refused or timeout | Incorrect MySQL endpoint or firewall rules | Verify canal.instance.master.address and make sure the Canal server can reach the MySQL port (default 3306) |
| Access denied | Wrong MySQL credentials or missing permissions | Verify canal.instance.dbUsername and canal.instance.dbPassword. Make sure the user has SELECT, REPLICATION SLAVE, and REPLICATION CLIENT permissions |
| RocketMQ producer startup failure | Wrong RocketMQ endpoint or AccessKey | Verify rocketmq.namesrv.addr, canal.aliyun.accessKey, and canal.aliyun.secretKey |
Step 3: Verify the result
Insert test data
Insert a row into the students table to trigger a change event:
INSERT INTO `students` (`name`, `age`, `gender`) VALUES ('Tome', 18, 'male');Check the message in ApsaraMQ for RocketMQ
Log on to the ApsaraMQ for RocketMQ console.
In the left-side navigation pane, click Instances.
On the Instances page, click the name of the instance you configured.
In the left-side navigation pane of the Instance Details page, click Message Query.
Verify that a message from Canal appears in the query results.
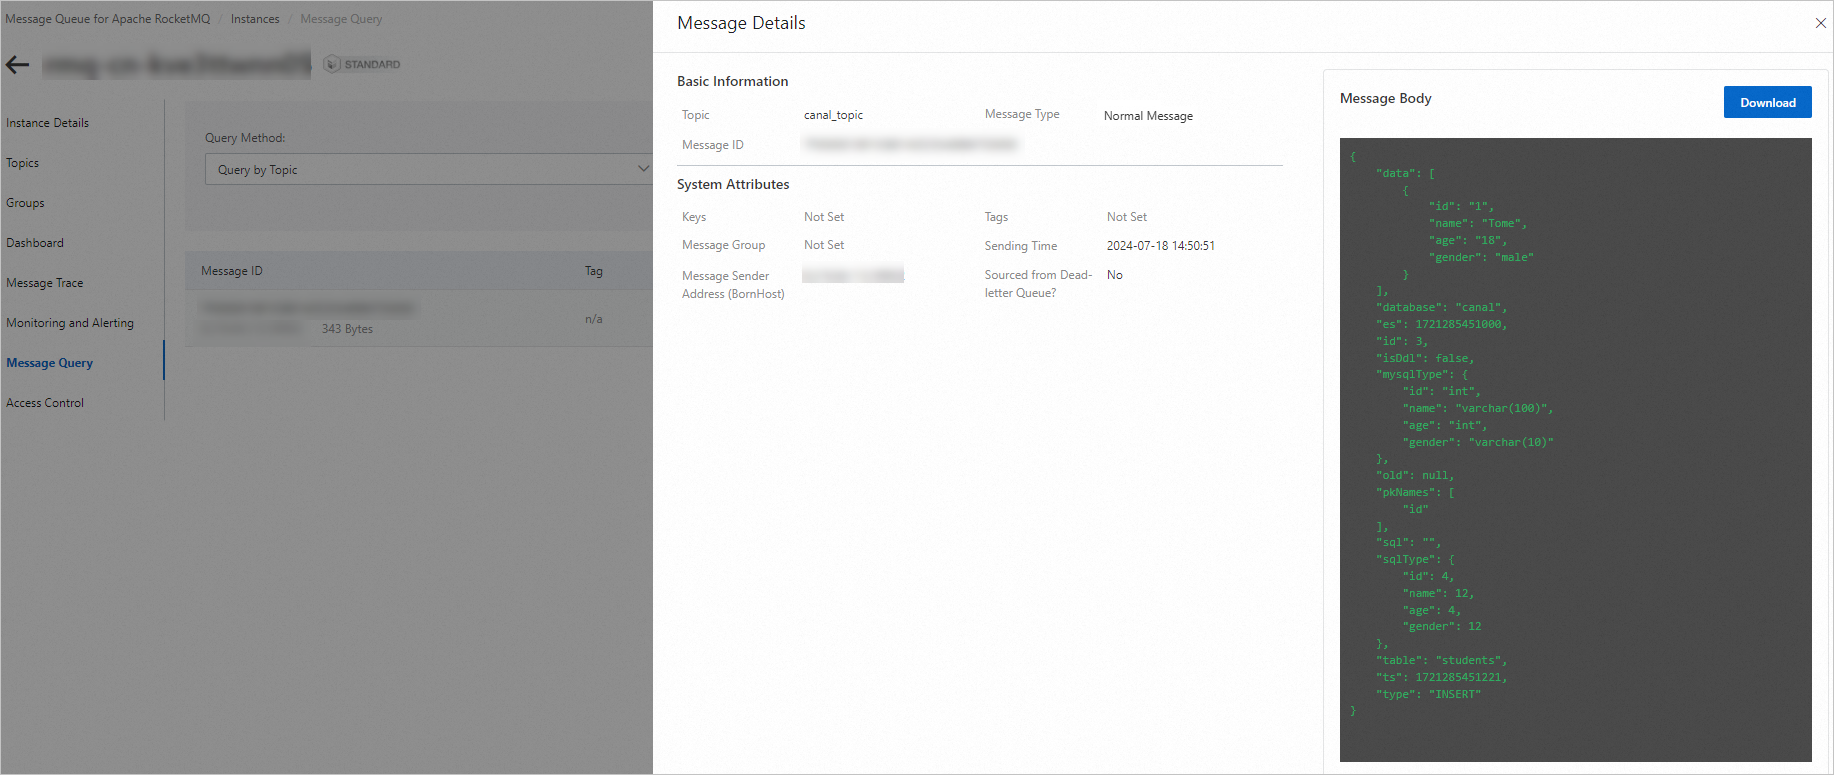
If no message appears, wait a few seconds for Canal to process the binary log event and retry the query. If messages still do not appear after 30 seconds, review the Canal instance log at /usr/local/canal-server/logs/example/example.log for errors.
Configuration reference
canal.properties parameters
| Parameter | Required | Default | Description |
|---|---|---|---|
canal.serverMode | Yes | tcp | Output destination. Set to rocketMQ for ApsaraMQ for RocketMQ. |
canal.aliyun.accessKey | Yes | -- | AccessKey ID for Alibaba Cloud authentication. |
canal.aliyun.secretKey | Yes | -- | AccessKey secret for Alibaba Cloud authentication. |
canal.mq.accessChannel | Yes | local | Set to cloud for Alibaba Cloud managed RocketMQ. |
canal.mq.flatMessage | Yes | false | Must be false for ApsaraMQ for RocketMQ. |
rocketmq.producer.group | Yes | -- | Producer group name on the RocketMQ instance. |
rocketmq.namesrv.addr | Yes | -- | RocketMQ instance endpoint. |
rocketmq.namespace | No | (empty) | Leave blank for 5.x instances. |
rocketmq.enable.message.trace | No | false | Enable or disable message tracing. |
rocketmq.customized.trace.topic | No | (empty) | Custom topic for storing message traces. |
rocketmq.retry.times.when.send.failed | No | 0 | Number of retry attempts on send failure. |
rocketmq.vip.channel.enabled | No | false | Enable or disable the VIP Netty channel. |
rocketmq.tag | No | (empty) | Tag applied to all messages. |
instance.properties parameters
| Parameter | Required | Description |
|---|---|---|
canal.instance.master.address | Yes | MySQL endpoint in host:port format. |
canal.instance.dbUsername | Yes | MySQL username with replication permissions. |
canal.instance.dbPassword | Yes | MySQL password. |
canal.instance.filter.regex | Yes | Regular expression to filter monitored tables. |
canal.mq.topic | Yes | Target RocketMQ topic for change events. |
What's next
To route different tables to different RocketMQ topics, configure dynamic topic routing with
canal.mq.dynamicTopic. For details and examples, see the Canal open-source documentation.To integrate with ApsaraMQ for RocketMQ 5.x instances, see Synchronize change data to ApsaraMQ for RocketMQ 5.x.
For production deployments, consider deploying Canal on multiple nodes for high availability and adjusting
rocketmq.retry.times.when.send.failedto handle transient network failures.