This topic describes how to create and manage a tenant in the ApsaraDB for OceanBase console.
Concepts
Tenant: Tenant is a logical concept. A tenant is a subset of the resources of an OceanBase cluster. A tenant can be taken as a MySQL or Oracle instance. Tenants lay the foundation for database object management and resource management. They serve as containers for both database objects and resources such as CPU, memory, and I/O resources. ApsaraDB for OceanBase supports multiple tenants in a single cluster. Each tenant's resources and data are isolated. Each tenant owns a group of computing and storage resources and independently provides a complete set of database services. For more information, see Multi-tenant architecture.
Resource unit: A resource unit refers to the memory, CPU, I/O, and other resources on a node that are available for a tenant. A resource unit is a basic unit for cluster load balancing. The distribution of resource units is dynamically adjusted among the nodes for balanced resource usage when you bring nodes online or offline and add or remove nodes for cluster scaling. For more information, see Manage resources.
Prerequisites
You have created a cluster instance. For more information, see Purchase an instance.
Limitations
You can calculate the maximum number of tenants that can be created under a single cluster instance according to the following rules:
Maximum number of tenants = min (number of CPUs per cluster node * number of cluster nodes, maximum number of tenants allowed by the cluster), where the maximum number of tenants allowed by the cluster is 50.
In the 2F (two full-featured replicas) scenario, a cluster instance supports the creation of up to 32 tenants; in the 3F (three full-featured replicas) scenario, a cluster instance supports the creation of up to 50 tenants.
Procedure
Log on to the ApsaraDB for OceanBase console.
In the left-side navigation pane, click Instances.
On the Instances page, click the name of the target cluster instance to go to the Cluster Instance Workspace page.
In the upper-right corner of the page that appears, click Create Tenant.

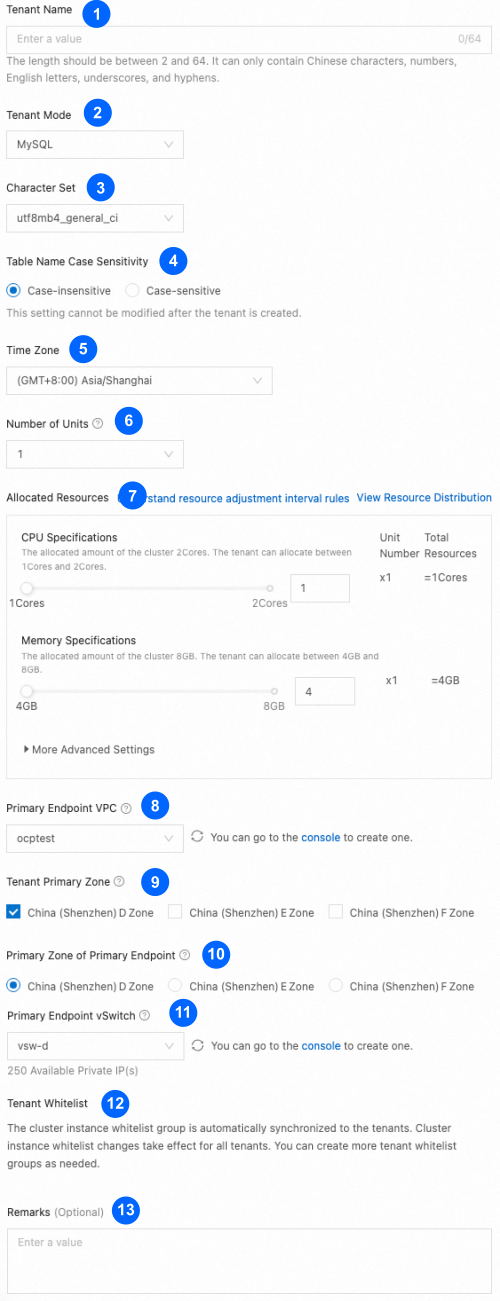
Configure the tenant parameters as needed.
No.
Parameter
Description
1
Tenant Name
The name of the tenant.
It must start with a letter or an underscore (_), and contain 2 to 20 characters, which can be uppercase letters, lowercase letters, digits, and underscores (_). It cannot be set to sys.
2
Tenant Mode
The tenant mode, which can be Oracle or MySQL.
NoteYou can create only a MySQL tenant in a Standard Edition (Key-Value) cluster instance.
3
Character Set
The character set of the database.
The following character sets are supported for a MySQL tenant:
utf8mb4_general_ci
utf8mb4_bin
utf8mb4_unicode_ci
utf16_general_ci
utf16_bin
utf16_unicode_ci
gbk_chinese_ci
gbk_bin
gb18030_chinese_ci
gb18030_bin
binary
The following character sets are supported for an Oracle tenant:
utf8
gbk
NoteWhen you create a tenant in a Standard Edition (Key-Value) cluster instance, only the utf8mb4 character set is supported and cannot be modified.
4
Table Name Case Sensitivity
Specifies whether table names are case-sensitive.
NoteYou must configure this parameter when Tenant Mode is set to MySQL. By default, table names are case-insensitive.
This parameter cannot be modified after the tenant is created.
5
Time Zone
The time zone of the tenant.
6
Number of Units
The number of resource units for the tenant.
To increase the number of resource units for a tenant, you must first add nodes to the cluster. For more information, see Add or delete nodes.
7
Allocated Resources
The number of CPU cores and size of memory for the tenant on a single node. If the ApsaraDB for OceanBase version of the cluster is V4.x, you can expand More Advanced Settings and specify the log disk size for the tenant.
NoteYou can specify the log disk size for a tenant only in OceanBase Database V4.x.
You can create a tenant with specifications of 1C4G (1 CPU core and 4 GB of memory) in a cluster instance of OceanBase Database V3.x and V4.x.
The sum of the CPU and memory resources of all tenants in a cluster instance cannot exceed the specifications of the cluster instance. In ApsaraDB for OceanBase V4.x, the sum of the log disk sizes of all tenants cannot exceed the log disk capacity of the cluster.
Total available resources of a tenant = Single-node resources × Number of resource distribution nodes × Number of replicas
8
Primary Endpoint VPC
The ID of the VPC where the database instance resides. We recommend that you use the VPC where your business or application resides to effectively reduce the access latency.
If no suitable VPC is available, create a VPC as prompted. For more information, see What is a VPC?
9
Tenant Primary Zone
The primary zone of the tenant. You can select multiple primary zones.
10
Primary Zone of Primary Endpoint
The zone where the primary address proxy of the tenant is deployed.
NoteIf the zone for the primary address proxy and the data primary zone are different, data latency exists.
11
Primary Endpoint vSwitch
The ID of the vSwitch to which the primary address is bound. You can view the number of available private IP addresses. When the number of available private IP addresses is 0, you must select another VPC and vSwitch.
If no appropriate vSwitch is available, create one as prompted. For more information, see Create and manage a vSwitch.
12
Tenant Whitelist
The allowlists of the tenant, which are automatically synchronized from the cluster instance. The allowlist modifications made in the cluster instance take effect for all tenants in the cluster instance. You can add more allowlists for the tenant later. For more information, see Set tenant allowlists.
13
Remarks (Optional)
Additional information about the tenant. The remarks cannot exceed 30 characters in length.
Click Create. You can view the tenant creation progress on the Instances page.