API Gateway provides a secure and controlled method for API callers to call APIs. This helps you better manage and monitor Function Compute services. This topic provides a quick guide on how to create an API in API Gateway and call the API to invoke a web function in Function Compute 3.0. In the call, the AppCode of an application is used according to the Alibaba Cloud App authentication method.
Prerequisites
An API Gateway instance is created. For more information about instance types, see Choose an instance type.
Overview
In this example, you deploy a web function in Function Compute 3.0, create an API that uses a backend service associated with the created web function in API Gateway, and use the AppCode of an authorized application to call the API. This example helps you understand how you can use API Gateway to control access to Function Compute services. The process consists of six steps:
Create a web function: Build a web application based on Function Compute 3.0.
Create a backend service: Define a backend service that points to Function Compute in API Gateway. This ensures that API requests can be accurately forwarded to the corresponding web function in a seamless frontend-backend integration.
Create API: Create an API for external applications to call to invoke the web function.
Create an application and authorize it to call the API: Establish an authentication mechanism for API calls. This ensures that only authorized applications can call the API, thus enhancing security.
Debug the API: Debug the created API by using the online debugging tool. This ensures that API issues are detected and resolved and that the API works properly before it is published.
Call the API: The API is ready for calls after all configurations are complete.
Step 1: Create a web function
Before you connect API Gateway to a Function Compute service, you must create a web function in the Function Compute service to help you quickly build and deploy a web application. In this example, Function Compute 3.0 is used.
Log on to the Function Compute 3.0 console. In the left-side navigation pane, click Functions. On the Functions page, select a region in the top navigation bar.
ImportantMake sure that the web function is created in the same region as your API Gateway instance.
On the Functions page, click Create Function, select Web Function, configure the following parameters, and then click Create.
Basic Settings: Configure Function Name.
Code: Configure the runtime and code of the function. Use the default settings for Startup Command and Listening Port.

On the Function Details tab that automatically appears after you create the function, click the Configurations tab. In the left-side navigation tree, click Triggers. Find the trigger that you want to use and copy its internal endpoint
https://***-helloworld-**.cn-hangzhou.fcapp.runin the Configurations column.
Step 2: Create a backend service
API Gateway allows you to configure backend services as resources of a region to simplify management. You need only to create a backend service in the API Gateway console and configure a URL for the backend service to associate with Function Compute.
Log on to the API Gateway console. In the left-side navigation pane, choose Manage APIs > Backend Services. On the page that appears, select a region in the top navigation bar and click Create Backend Service.

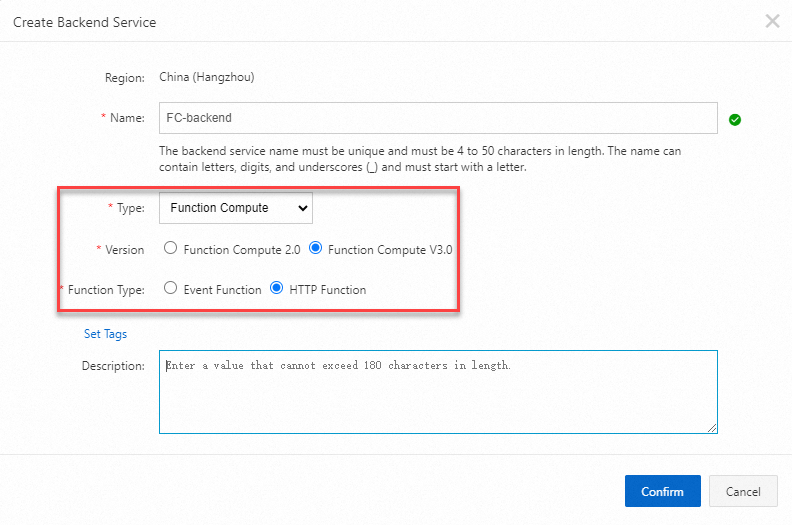
In the Create Backend Service dialog box, configure the parameters and click Confirm. The following figure shows an example:
On the Backend Services page, click the created backend service. On the Backend Service Definition page, click the Production tab. In the Basic Information section, click Create.

In the Basic Information section of the page that appears, set Trigger Path to
https://***-helloworld-**.cn-hangzhou.fcapp.runthat is copied earlier in the Create a web function step. Then, click Publish.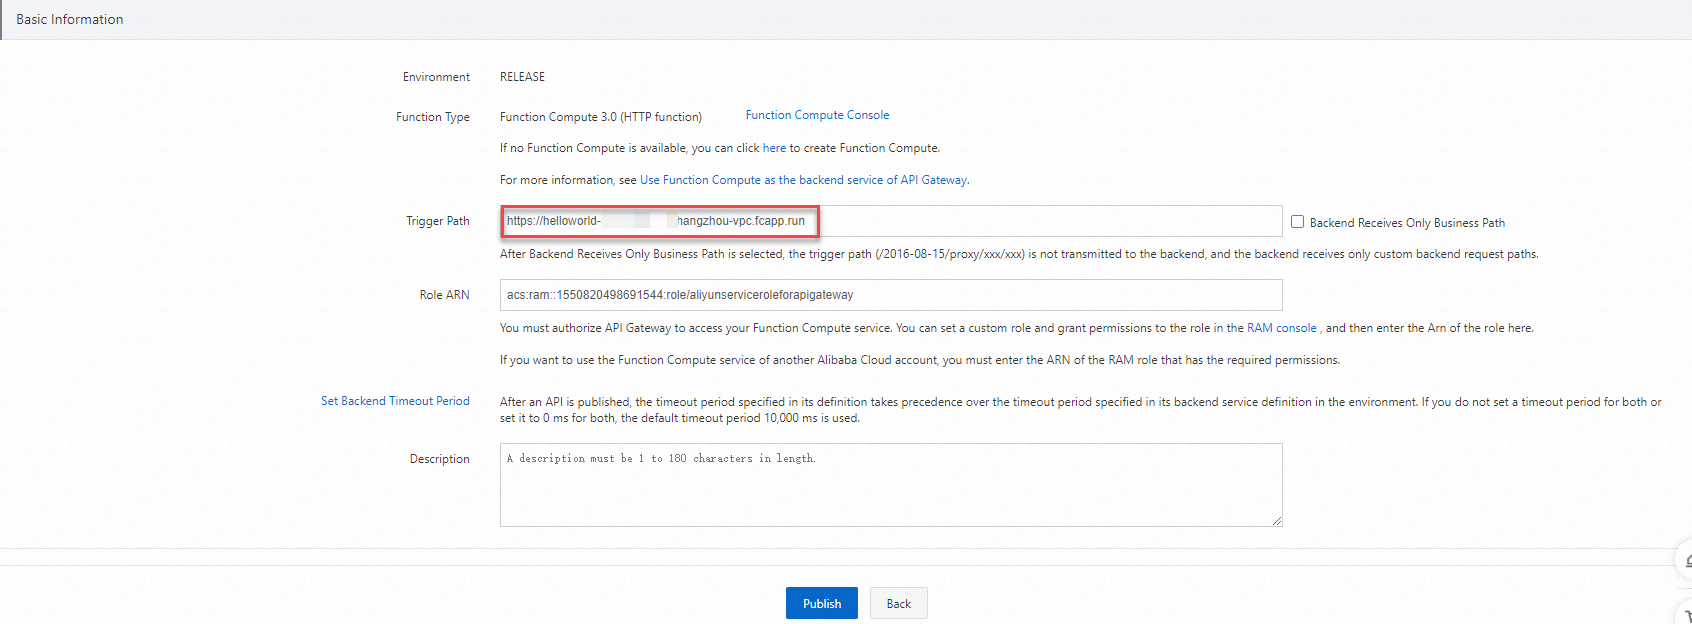
Step 3: Create an API
In this step, you create an API for external applications to call in specific methods. The API call invokes the associated web function. API groups are used to manage APIs based on unified security and traffic policies.
Log on to the API Gateway console. In the left-side navigation pane, choose Manage APIs > API Groups. On the API Groups page, click Create Group in the upper-right corner.
In the Create Group dialog box, select an instance from the Instances drop-down list, set Group Name to
FC-Groupand BasePath to/, and then click Confirm.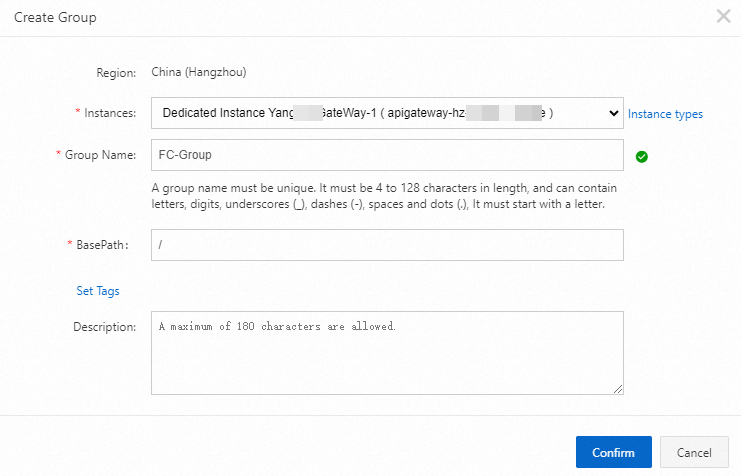
After the group is created, click Manage APIs in the Actions column of the group to go to the APIs page.

Click Create API. In the Basic Information step, configure the following parameters and click Next:
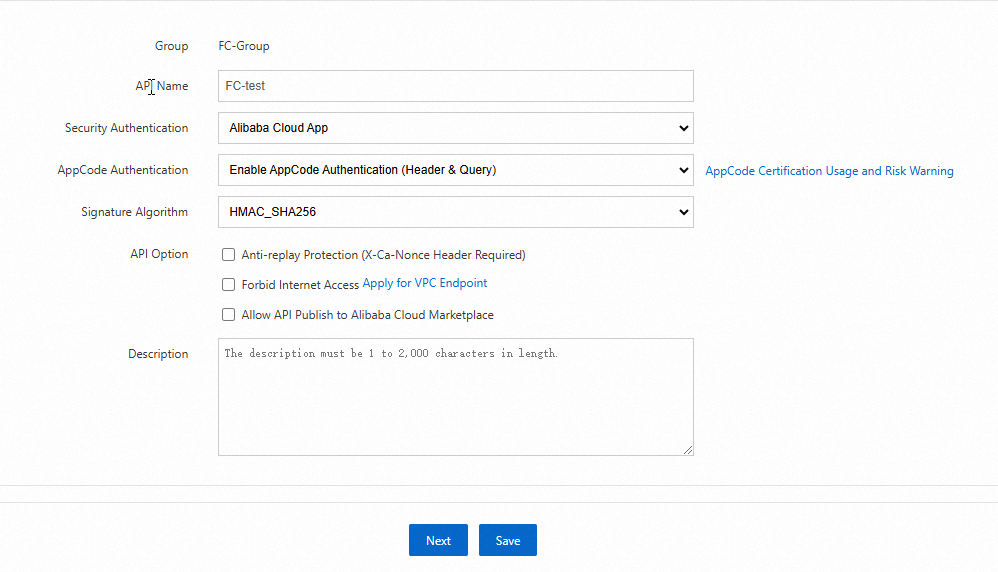
In the Define API Request step, set Request Path to
/, keep the default values for other parameters, and then click Next.In the Define Backend Service step, configure the following parameters and click Next:
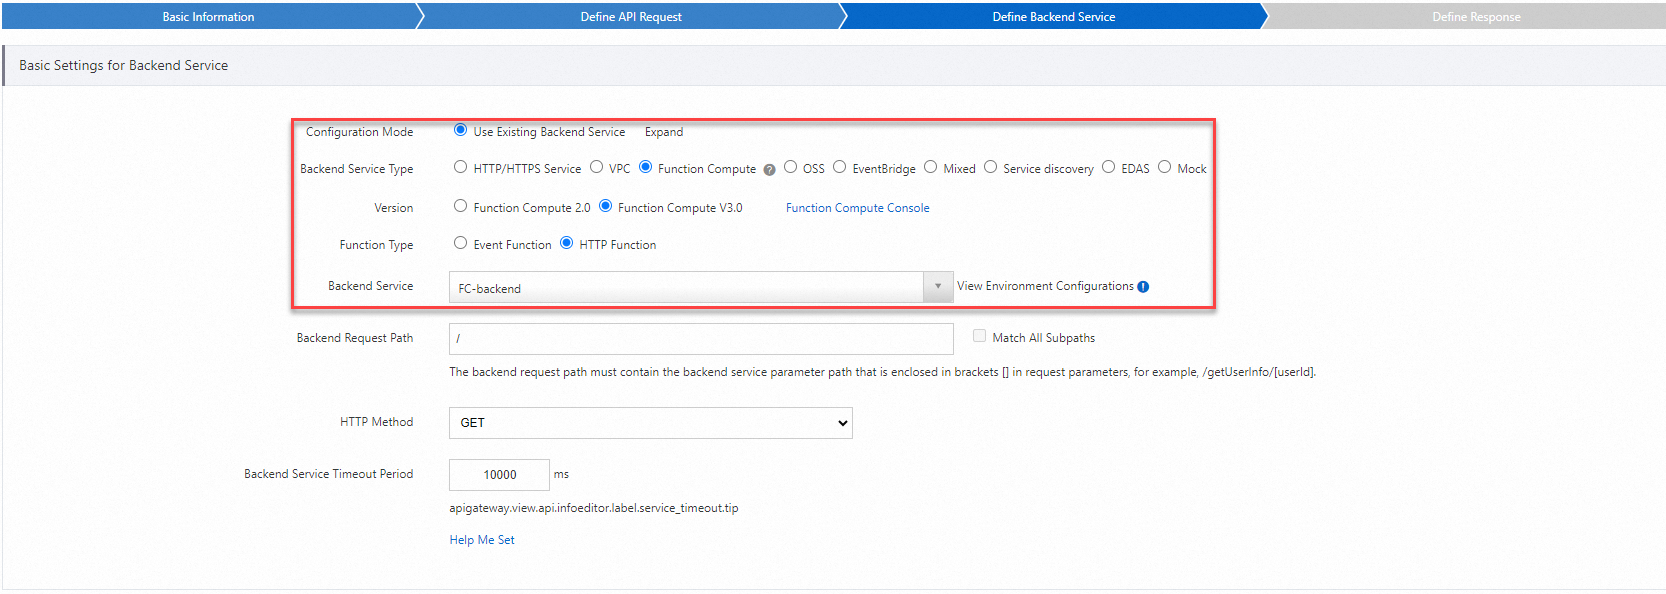
In the Define Response step, keep the default settings and click Create. After the API is created, find the API on the APIs page and click Publish in the Actions column.
In the Publish API dialog box, configure the following parameters and click Publish.
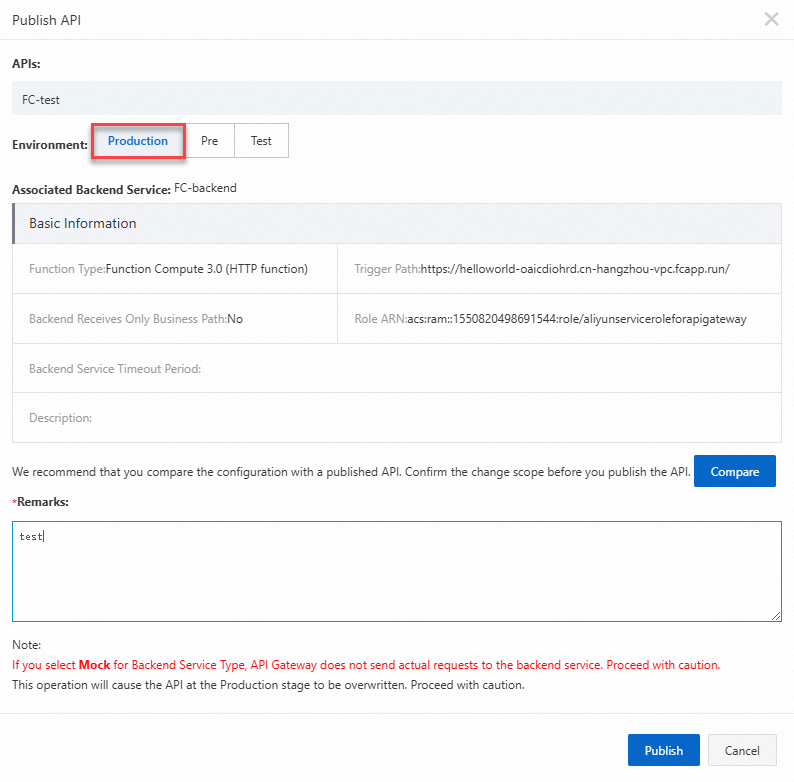
Step 4: Create an application and authorize it to call the API
An application is an identity that an API caller assumes to call an API. In this example, Alibaba Cloud App was selected for the Security Authentication parameter in the Create an API step. Therefore, after the API is published, you must create an application and authorize the application to call the API that you created.
Log on to the API Gateway console. In the left-side navigation pane, choose Call APIs < Apps.
On the Apps page, click Create App in the upper-right corner. In the Create App dialog box, set App Name to
fcAPPand click Confirm.On the Apps page, click the created
fcAppapplication. On the App Details page, you can see that two authentication methods are available:AppKeyandAppCode. TheAppKeymethod includes a pair ofAppKeyandAppSecret, which works similarly to a pair of username and password. When you call the API, you must pass theAppKeyas a parameter. TheAppSecretis used to calculate signatures. API Gateway verifies the AppKey-AppSecret pair to authenticate your identity.
In the left-side navigation pane, choose Manage APIs > APIs. On the APIs page, find the created
FC-testAPI and click > Authorize in the Actions column.
 On the Authorize page, set the Stage parameter to Release. Enter
fcAppin the search bar of the Choose Apps for Authorization section. In the search result, select the created application, click Add in the Actions column, and then click Confirm. A message appears to inform you that the application is authorized to call the API.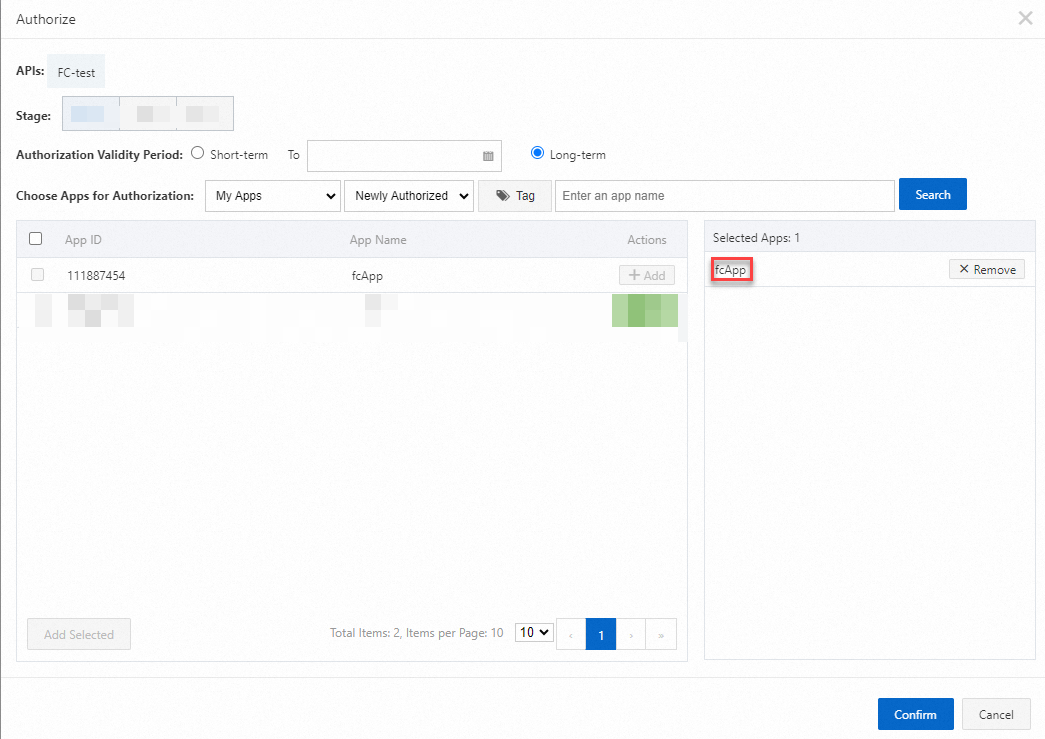
Step 5: Debug the API
Debug the created API by using the online debugging tool. This ensures that API issues are detected and resolved and that the API works properly before it is published.
Log on to the API Gateway console. In the left-side navigation pane, choose Call APIs > Debug.
On the Debug page, select the
FC-testAPI that you created, set Verification Method to Use AppCode, and then click Send Request. The following information indicates that the configuration is successful: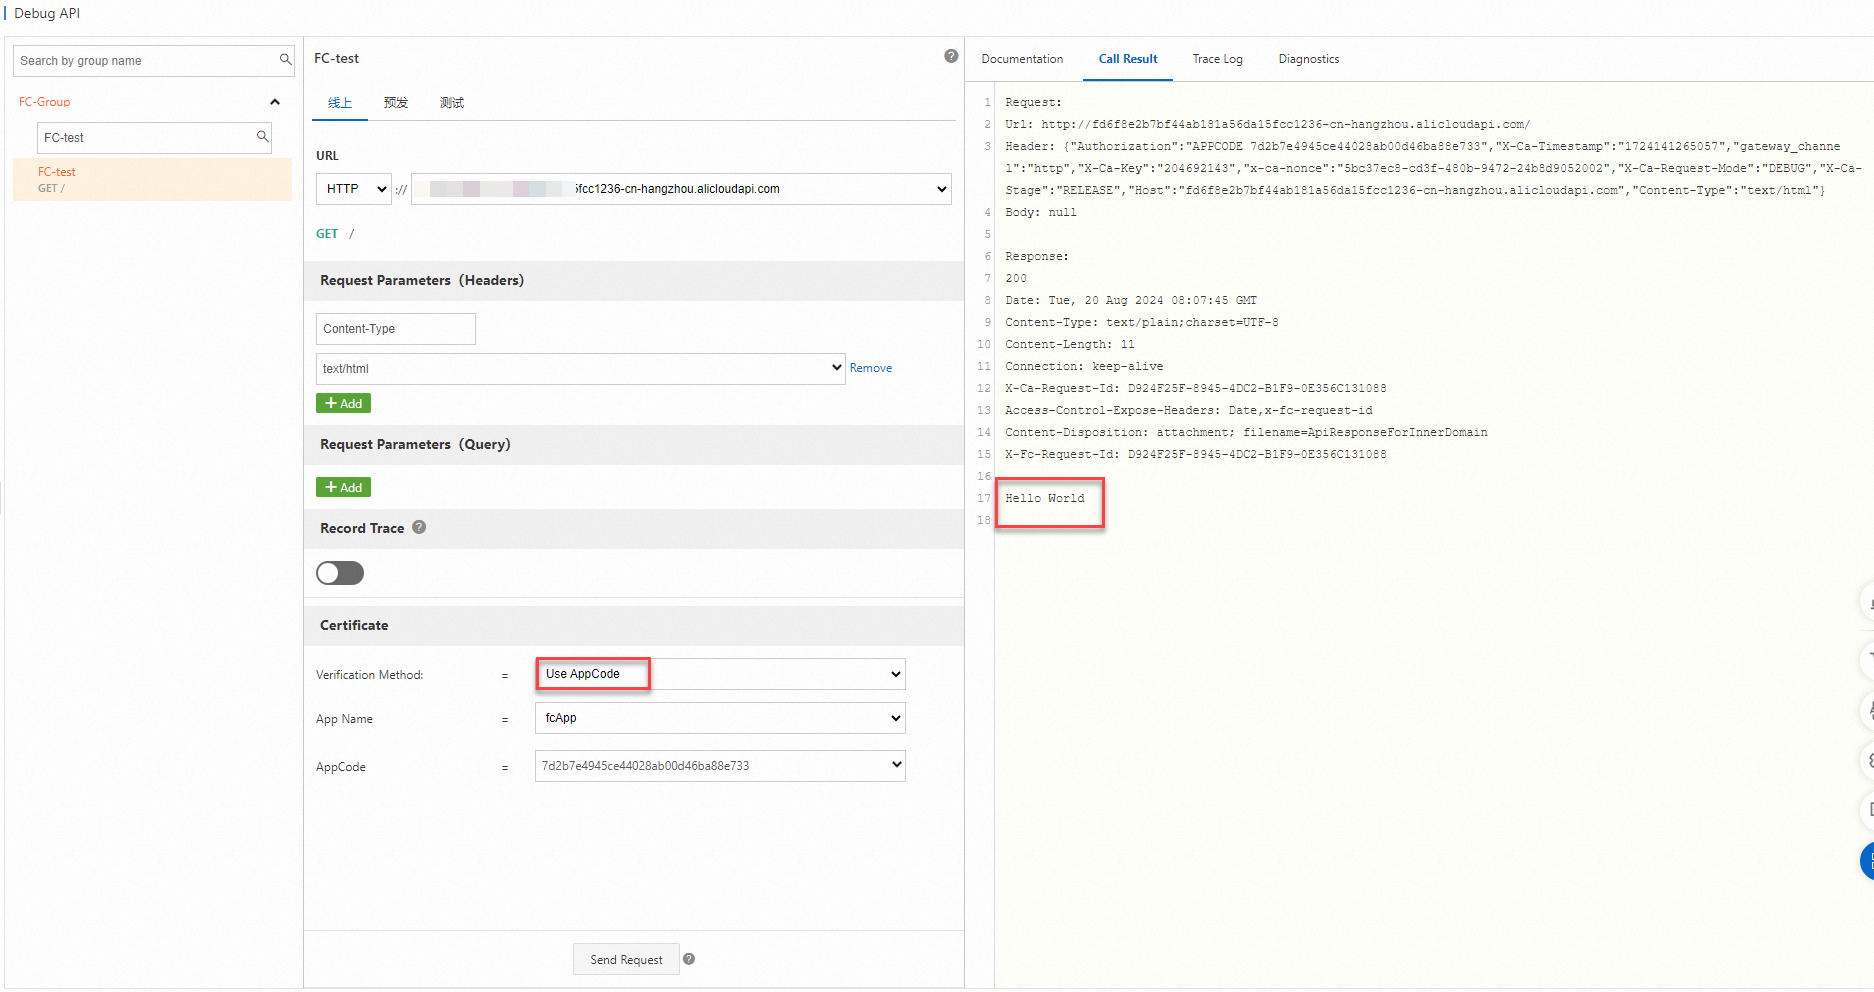
Step 6: Call the API
By performing the preceding steps, you created and published the API, created and authorized an application to call the API, and debugged the API. In this step, you can use the AppCode provided by API Gateway to call the published API from a business system. For more information about how to call an API, see Call an API in simple authentication mode. In this example, cURL is used to call the API.
Log on to the API Gateway console. In the left-side navigation pane, choose Call APIs > Apps. On the Apps page, click the authorized application and obtain its AppCode on the page that appears. Then, use the following sample code to call the API:
curl -i -X GET "http://fd6f8e2b7bf44ab181a56****-cn-hangzhou.alicloudapi.com" -H "Authorization:APPCODE 7d2b7e4945ce44028ab00***"The following figure shows the result of an API call:
