You can use Application Real-Time Monitoring Service (ARMS) to manage Container Service for Kubernetes (ACK) Serverless clusters that are deployed across regions in a unified manner. This topic describes how to enable ARMS for an ACK Serverless Basic cluster.
Table of contents
Prerequisites
Step 1: Install the ARMS application monitoring agent
Before you install the ARMS application monitoring agent, check whether your ACK Serverless cluster has ARMS Addon Token. If the cluster has ARMS Addon Token, ARMS performs passwordless authentication. If the cluster does not have ARMS Addon Token, you need to manually specify the AccessKey ID and AccessKey secret to complete authentication.
Procedure
Complete authorization on the RAM Quick Authorization page.
Log on to the ACK console. In the navigation pane on the left, click Clusters.
On the Clusters page, find the one you want to manage and click its name. In the navigation pane on the left, click Add-ons.
On the Add-ons page, click the Logs and Monitoring tab and click Install in the ack-onepilot card.
In the Install ack-onepilot dialog box, configure the parameters and click OK.
If the ACK Serverless cluster does not have ARMS Addon Token, you need to specify the AccessKey ID and AccessKey secret. You can configure other parameters on demand. We recommend that you use the default settings.
Parameter
Description
accessKey
The AccessKey ID of your Alibaba Cloud account. Your account must be authorized to access ARMS.
accessKeySecret
The AccessKey secret of your Alibaba Cloud account.
Step 2: Enable ARMS for a Java application
Log on to the ACK console. In the navigation pane on the left, click Clusters.
On the Clusters page, find the cluster you want to manage and click its name. In the left-side pane, choose .
On the Deployments page, choose
 > Edit YAML in the Actions column.
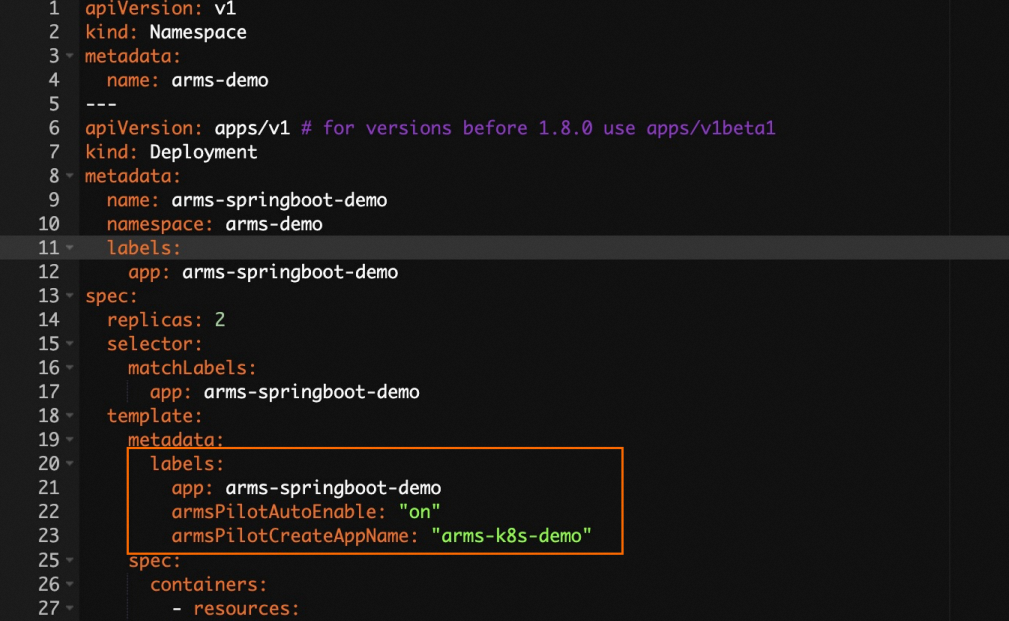
 In the YAML file, add the following labels to
spec.template.metadata:labels: armsPilotAutoEnable: "on" armsPilotCreateAppName: "<your-deployment-name>" # Replace <your-deployment-name> with the actual application name. armsSecAutoEnable: "on" # If you want to connect the application to Application Security, you must configure this parameter.NoteFor information about Application Security, see What is Application Security?
For information about the billing rules of Application Security, see Billing.
Click Update.
On the Deployments page, choose
> ARMS Console in the Actions column to view the application monitoring details. 
On the Deployments page, click ARMS Console in the Actions column of the Java application to navigate to the ARMS console and perform service governance.
What to do next
Uninstall ack-onepilot for all applications in the cluster
Log on to the ACK console. On the Clusters page, click the name of the cluster.
In the left-side navigation pane, choose . In the search box, enter ack-onepilot.
On the ack-onepilot card, click Uninstall.
In the message that appears, click OK.
Restart your business pod.
Uninstall ack-onepilot for an application in the cluster
Log on to the ACK console. In the left-side navigation pane, click Clusters. On the Clusters page, find the cluster, and click Applications in the Actions column.
On the Deployments page, choose in the Actions column of the application that you want to manage.
In the Edit YAML dialog box, delete the labels that you added in Step 2, and click Update.
Restart the pod.