All Products
Search
Document Center

Container Service for Kubernetes:Create custom images

Last Updated:Jan 07, 2026

In some preinstallation or high-performance scenarios, you may want to customize the operating system image to enhance the convenience of elastic scaling in complex situations. You can build a custom operating system image by using Alicloud Image Builder and create node pools based on this image. Alicloud Image Builder can accelerate the provisioning speed of nodes and optimize the performance of automatic scaling.

Prerequisites

Benefits of custom images

ACK node pools support node auto scaling. When you create a node pool, you can select OS images, such as Alibaba Cloud Linux and CentOS. These OS images meet the requirements of most scenarios. However, in scenarios that require preinstallation or high performance, these images may be unable to meet your business requirements. Alibaba Cloud provides Alicloud Image Builder to help you build custom OS images and facilitate auto scaling in complex scenarios.

To use Alicloud Image Builder to create custom images, you can create a Job or CronJob to distribute the image building task in an ACK cluster.

Create a Job to quickly build a custom OS image

In this example, a ConfigMap named build-config and a Job named build are used to show how to use Alicloud Image Builder to quickly build a custom OS image.

Step 1: Set parameters for the OS image

Create a ConfigMap named build-config to specify the parameters of the OS image.

  1. Create a YAML file named build-config.yaml and add the following content to the file:

    YAML template

    apiVersion: v1
    kind: ConfigMap
    metadata:
      name: build-config
    data:
      ack.json: |-
    
        {
          "variables": {
            "image_name": "ack-optimized_image-1.30-{{timestamp}}",
            "source_image": <source_image>,
            "instance_type": <instance_type>,
            "region": "{{env `ALICLOUD_REGION`}}",
            "access_key": "{{env `ALICLOUD_ACCESS_KEY`}}",
            "secret_key": "{{env `ALICLOUD_SECRET_KEY`}}"
          },
          "builders": [
            {
              "type": "alicloud-ecs",
              "system_disk_mapping": {    
                        "disk_size": 120
                        },   # Specify the size of the system disk. Unit: GB. Default value: 40. 
              "access_key": "{{user `access_key`}}",
              "secret_key": "{{user `secret_key`}}",
              "region": "{{user `region`}}",
              "image_name": "{{user `image_name`}}",
              "source_image": "{{user `source_image`}}",
              "ssh_username": "root",
              "vpc_id": "",  # If you do not specify the vpc_id parameter, a virtual private cloud (VPC) is automatically created during the image building process. The VPC is automatically deleted after the image is built. 
              "vswitch_id": "",  # If you do not specify the vswitch_id parameter, a vSwitch is automatically created during the image building process. The vSwitch is automatically deleted after the image is built. 
              "security_group_id": "",   # If you do not specify the security_group_id parameter, a security group is automatically created during the image building process. The security group is automatically deleted after the image is built. 
              "instance_type": "{{user `instance_type`}}",
              "skip_image_validation": "true",
              "io_optimized": "true"
            }
          ],
          "provisioners": [{
           "type": "file",
           "source": "scripts/ack-optimized-os-all.sh",    # Only apply to Alibaba Cloud Linux 2 images.
           "destination": "/root/"
            },
            {
           "type": "shell",
           "inline": [
             "export RUNTIME=containerd",    # Specify the runtime that is used. 
             "export RUNTIME_VERSION=1.6.28",
             "export SKIP_SECURITY_FIX=true",
             "export KUBE_VERSION=1.30.1-aliyun.1",
             "export OS_ARCH=amd64",    # Specify amd64 or arm64 based on your business requirements. 
             "bash /root/ack-optimized-os-all.sh"
          ]
          }]
        }

    The following table describes the parameters.

    Table 1. Alicloud Image Builder parameters

    Parameter

    Example

    Description

    variables{"<variable1>":"<value>"}

    variables{"access_key":"{{env ALICLOUD_ACCESS_KEY}}"}

    The variables that are used by Alicloud Image Builder.

    Note

    If you write sensitive information such as an AccessKey pair that is specified by using the access_key and secret_key parameters to the configuration file, the information may be leaked. To ensure data security, you can specify the AccessKey pair as variables. The values of the variables are based on the input values of the runtime.

    builders{"type":"<value>"}

    builders{"type":"alicloud-ecs"}

    The image builders. If the type parameter is set to alicloud-ecs, a temporary Elastic Compute Service (ECS) instance is created to build the image. The ECS instance is automatically released after the image is built.

    provisioners{"type":"<value>"}

    provisioners{"type":"shell"}

    The image provisioners that are used to specify the operations to be performed on the temporary instance. If the type parameter is set to shell, a shell provisioner is used. A shell command is automatically run after the Linux instance is connected. For example, you can run the yum install redis.x86_64 -y command to install Redis.

    For more information about how to configure provisioners, see the Provisioner configuration section of this topic.

    Table 2. Image building parameters

    Parameter

    Example

    Description

    Required/optional

    access_key

    yourAccessKeyID

    The AccessKey ID that is used to create the custom image. For more information, see Obtain an AccessKey pair.

    Required

    secret_key

    yourAccessKeySecret

    The AccessKey secret that is used to create the custom image.

    Required

    region

    cn-beijing

    The region in which the custom image is deployed.

    Required

    image_name

    ack-custom_image

    The name of the custom image. The name must be globally unique.

    Required

    source_image

    aliyun_2_1903_x64_20G_alibase_20200904.vhd

    The ID of the Alibaba Cloud public image based on which the custom image is created. The created custom image contains the same operating system as the public image. For more information, see the OS images supported by ACK section of the "Overview of OS images" topic.

    Required

    instance_type

    ecs.c6.xlarge

    The instance type of the ECS instance that is created from the base image specified in the source_image parameter. The ECS instance is used to run the preinstallation task and build the custom image. If you want to use a GPU-accelerated image, specify a GPU-accelerated instance type.

    Required

    RUNTIME

    containerd

    The container runtime, which can be Docker or containerd.

    Required

    RUNTIME_VERSION

    1.6.28

    1. When you select Docker, RUNTIME_VERSION is 19.03.15 by default.

    2. When you select containerd, RUNTIME_VERSION is 1.6.20 by default.

    Required

    SKIP_SECURITY_FIX

    true

    Specifies whether to skip security update.

    Required

    KUBE_VERSION

    1.30.1-aliyun.1

    The Kubernetes version of the cluster.

    Required

    PRESET_GPU

    true

    Specifies whether to preinstall a GPU driver to accelerate startup.

    Optional

    NVIDIA_DRIVER_VERSION

    460.91.03

    The version of the preinstalled GPU driver. If you do not specify this parameter, the default value 460.91.03 is used.

    Optional

    OS_ARCH

    amd64

    The CPU architecture. Valid values: amd64 and arm64.

    Required

    MOUNT_RUNTIME_DATADISK

    true

    Set this parameter to true to enable dynamic data disk attachment during ECS instance runtime when using custom images with pre-cached application dependencies.

    Optional

    Important
    • Before you specify a custom image for a node pool, make sure that the configurations of the node pool are the same as the build settings of the custom image. Otherwise, nodes created from the custom image cannot be added to the cluster. The configurations of the node pool include the cluster version, cluster region, container runtime, and GPU-accelerated instance type.

    • When you verify the custom image, select a regular node pool that uses the same build settings as the custom image. After you use the custom image to create nodes and add the nodes to the node pool, check whether your application can run on the nodes as expected.

  2. Run the following command to deploy Alicloud Image Builder in the cluster:

    kubectl apply -f build-config.yaml

Step 2: Create a Job to build a custom OS image

  1. Use the following YAML template to grant permissions to the account that uses the AccessKey pair.

    YAML template

    {
      "Version": "1",
      "Statement": [
        {
          "Action": [
            "ecs:DeleteInstance",
            "ecs:StartInstance",
            "ecs:StopInstance",
            "ecs:DescribeInstances"
          ],
          "Resource": "*",
          "Effect": "Allow"
        },
        {
          "Action": [
            "ecs:CreateInstance",
            "ecs:DescribeImages",
            "ecs:CreateImage",
            "ecs:ModifyImageSharePermission",
            "ecs:CreateKeyPair",
            "ecs:DeleteKeyPairs",
            "ecs:DetachKeyPair",
            "ecs:AttachKeyPair",
            "ecs:CreateSecurityGroup",
            "ecs:DeleteSecurityGroup",
            "ecs:AuthorizeSecurityGroupEgress",
            "ecs:AuthorizeSecurityGroup",
            "ecs:CreateSnapshot",
            "ecs:AttachDisk",
            "ecs:DetachDisk",
            "ecs:DescribeDisks",
            "ecs:CreateDisk",
            "ecs:DeleteDisk",
            "ecs:CreateNetworkInterface",
            "ecs:DescribeNetworkInterfaces",
            "ecs:AttachNetworkInterface",
            "ecs:DetachNetworkInterface",
            "ecs:DeleteNetworkInterface",
            "ecs:DescribeInstanceAttribute"
          ],
          "Resource": "*",
          "Effect": "Allow"
        },
        {
          "Action": [
            "vpc:DescribeVpcs",
            "vpc:DescribeVSwitches",
            "vpc:AllocateEipAddress",
            "vpc:AssociateEipAddress",
            "vpc:UnassociateEipAddress",
            "vpc:DescribeEipAddresses",
            "vpc:ReleaseEipAddress",
            "vpc:CreateVpc",
            "vpc:DeleteVpc",
            "vpc:DescribeVpcs",
            "vpc:CreateVSwitch",
            "vpc:DeleteVSwitch",
            "vpc:DescribeVSwitches",
            "vpc:CreateRouteTable",
            "vpc:DeleteRouteTable",
            "vpc:DescribeRouteTables",
            "vpc:CreateNatGateway",
            "vpc:DeleteNatGateway",
            "vpc:DescribeNatGateways",
            "vpc:CreateSnatEntry",
            "vpc:DeleteSnatEntry",
            "vpc:DescribeSnatTableEntries"
          ],
          "Resource": "*",
          "Effect": "Allow"
        }
      ]
    }
  2. Run the following command to generate encrypted strings for the AccessKey pair:

    echo -n "yourAccessKeyID" | base64
    echo -n "yourAccessKeySecret" | base64
  3. Use the following YAML template to create a Secret named my-secret:

    apiVersion: v1
    kind: Secret
    metadata:
      name: my-secret
      namespace: default
    type: Opaque
    data:
      ALICLOUD_ACCESS_KEY: TFRI****************        # The Base64-encoded string in the previous substep.
      ALICLOUD_SECRET_KEY: a0zY****************
  4. Create a YAML file named build.yaml and add the following content to the file.

    Configure variables to run the Job. This Job builds a custom image by first launching a temporary ECS instance of the specified instance_type using the source_image. The instance is provisioned in the Alibaba Cloud account corresponding to the provided AccessKey pair. After the instance is running, a series of provisioners are executed to install and configure the necessary software. Once this process is complete, a new custom image is created from the instance and is then pushed to the specified REGION within the same account.

    YAML template

    apiVersion: batch/v1
    kind: Job
    metadata:
      name: image-builder
      namespace: default
    spec:
      template:
        metadata:
          name: image-builder
        spec:
          containers:
            - name: image-builder
              image: "registry-cn-hangzhou.ack.aliyuncs.com/acs/image-builder:v3.3"
              imagePullPolicy: Always
              env:
                - name: ALICLOUD_ACCESS_KEY
                  valueFrom:
                    secretKeyRef:
                      name: my-secret
                      key: ALICLOUD_ACCESS_KEY
                - name: ALICLOUD_SECRET_KEY
                  valueFrom:
                    secretKeyRef:
                      name: my-secret
                      key: ALICLOUD_SECRET_KEY
                - name: ALICLOUD_REGION
                  value: cn-hangzhou
              command: ["packer"] 
              args: ["build", "/config/ack.json"]
              volumeMounts:
                - name: config
                  mountPath: /config
          volumes:
            - name: config
              configMap:
                name: build-config
                items:
                  - key: ack.json
                    path: ack.json
          restartPolicy: Never
  5. Deploy the Job and start to build the image.

    kubectl apply -f build.yaml

Step 3: (Optional) View the image building log

A log is generated during the image building process. The log records all image building operations, including checking parameters, creating temporary resources, preinstalling software, creating target resources, and releasing temporary resources. To view the image building log, perform the following steps:

  1. Log on to the ACK console. In the left-side navigation pane, click Clusters.

  2. On the Clusters page, find the cluster you want and click its name. In the left navigation pane, choose Workloads > Jobs.

  3. On the Jobs page, find the Job that you created and click Details in the Actions column. Click the Logs tab to check the image building log.

Provisioner configuration

A provisioner is a component used to install and configure software in a running operating system before the operating system is packaged into an OS image. A provisioner is often used to install software in images in the following scenarios:

  • Install software.

  • Patch kernels.

  • Create users.

  • Download application code.

  • Build a custom Alibaba Cloud Linux 3 image.

Execute shell scripts

  "provisioners": [{
      "type": "shell",
      "script": "script.sh"
  }]

Execute orchestration scripts by using Ansible

  "provisioners": [
    {
    "type": "ansible",
    "playbook_file": "./playbook.yml"
    }
  ]

Install the CPFS client

The installation of Cloud Paralleled File System (CPFS) requires multiple installation packages, some of which involve real-time compilation and may require an additional period of time to install. The use of a custom image can reduce the cost of installing the CPFS client on a large number of nodes.

YAML template

    {
      "variables": {
        "region": "{{env `ALICLOUD_REGION`}}",
        "image_name": "ack-custom_image",
        "source_image": "centos_7_04_64_20G_alibase_201701015.vhd",
        "access_key": "{{env `ALICLOUD_ACCESS_KEY`}}",
        "instance_type": "ecs.c6.xlarge",
        "secret_key": "{{env `ALICLOUD_SECRET_KEY`}}"
      },
    "builders": [
        {
          "type": "alicloud-ecs",
          "access_key": "{{user `access_key`}}",
          "secret_key": "{{user `secret_key`}}",
          "region": "{{user `region`}}",
          "image_name": "{{user `image_name`}}",
          "source_image": "{{user `source_image`}}",
          "ssh_username": "root",
          "instance_type": "{{user `instance_type`}}",
          "skip_image_validation": "true",
          "io_optimized": "true"
        }
      ],
   "provisioners": [{
        "type": "shell",
        "inline": [
            "cd $HOME",
            "wget https://cpfs-client.oss-cn-beijing.aliyuncs.com/kernel/kernel-devel-`uname -r`.rpm",
            "rpm -ivh --replacefiles kernel-devel-`uname -r`.rpm"
        ]
      }
    ]
  }

Build an ARM-based image

YAML template

{
      "variables": {
        "region": "{{env `ALICLOUD_REGION`}}",
        "image_name": "ack-custom_image",
        "source_image": "aliyun_3_arm64_20G_alibase_20240528.vhd",
        "instance_type": "ecs.r8y.xlarge",   # Specify an instance type that uses the ARM architecture. 
        "access_key": "{{env `ALICLOUD_ACCESS_KEY`}}",
        "secret_key": "{{env `ALICLOUD_SECRET_KEY`}}"
      },
    "builders": [
        {
          "type": "alicloud-ecs",
          "access_key": "{{user `access_key`}}",
          "secret_key": "{{user `secret_key`}}",
          "region": "{{user `region`}}",
          "image_name": "{{user `image_name`}}",
          "source_image": "{{user `source_image`}}",
          "instance_type": "{{user `instance_type`}}",
          "ssh_username": "root",
          "skip_image_validation": "true",
          "io_optimized": "true"
        }
      ],
   "provisioners": [
        {
            "type": "file",
            "source": "scripts/ack-optimized-os-linux3-all.sh",
            "destination": "/root/"
        },
        {
            "type": "shell",
            "inline": [
                "export RUNTIME=containerd",
                "export SKIP_SECURITY_FIX=true",
                "export KUBE_VERSION=1.28.9-aliyun.1",
                "export OS_ARCH=arm64",
                "bash /root/ack-optimized-os-linux3-all.sh"
            ]
        }
      ]
    }

Customize the OS image of a GPU-accelerated node

Important

You cannot deploy images with GPU drivers preinstalled on CPU-accelerated nodes.

YAML template

{
      "variables": {
        "region": "{{env `ALICLOUD_REGION`}}",
        "image_name": "ack-custom_image",
        "source_image": "aliyun_2_1903_x64_20G_alibase_20221102.vhd",
        "instance_type": "ecs.gn6i-c4g1.xlarge",   # Specify the type of the GPU-accelerated instance where the GPU driver will be preinstalled. 
        "access_key": "{{env `ALICLOUD_ACCESS_KEY`}}",
        "secret_key": "{{env `ALICLOUD_SECRET_KEY`}}"
      },
    "builders": [
        {
          "type": "alicloud-ecs",
          "access_key": "{{user `access_key`}}",
          "secret_key": "{{user `secret_key`}}",
          "region": "{{user `region`}}",
          "image_name": "{{user `image_name`}}",
          "source_image": "{{user `source_image`}}",
          "instance_type": "{{user `instance_type`}}",
          "ssh_username": "root",
          "skip_image_validation": "true",
          "io_optimized": "true"
        }
      ],
   "provisioners": [
        {
            "type": "file",
            "source": "scripts/ack-optimized-os-all.sh",
            "destination": "/root/"
        },
        {
            "type": "shell",
            "inline": [
                "export RUNTIME=containerd",
                "export SKIP_SECURITY_FIX=true",
                "export PRESET_GPU=true",          # Set PRESET_GPU to true if you need to preinstall the GPU driver. Otherwise, leave the parameter empty or set it to false. 
                "export NVIDIA_DRIVER_VERSION=510.47.03",         # Specify the GPU driver version. If you leave this parameter empty, the 460.91.03 version is installed. 
                "export KUBE_VERSION=1.22.3-aliyun.1",
                "export OS_ARCH=amd64",
                "bash /root/ack-optimized-os-all.sh"
            ]
        }
      ]
    }

Add the application image to the system image

YAML template

{
      "variables": {
        "image_name": "ack-custom_image",
        "source_image": "aliyun_3_x64_20G_alibase_20240528.vhd",
        "instance_type": "ecs.c6.xlarge",
        "access_key": "{{env `ALICLOUD_ACCESS_KEY`}}",
        "region": "{{env `ALICLOUD_REGION`}}",
        "secret_key": "{{env `ALICLOUD_SECRET_KEY`}}"
      },
    "builders": [
        {
          "type": "alicloud-ecs",
          "access_key": "{{user `access_key`}}",
          "secret_key": "{{user `secret_key`}}",
          "region": "{{user `region`}}",
          "image_name": "{{user `image_name`}}",
          "source_image": "{{user `source_image`}}",
          "instance_type": "{{user `instance_type`}}",
          "ssh_username": "root",
          "skip_image_validation": "true",
          "io_optimized": "true"
        }
      ],
   "provisioners": [
        {
            "type": "file",
            "source": "scripts/ack-optimized-os-linux3-all.sh",
            "destination": "/root/"
        },
        {
            "type": "shell",
            "inline": [
                "export RUNTIME=containerd",
                "export SKIP_SECURITY_FIX=true",
                "export KUBE_VERSION=1.30.1-aliyun.1",
                "export OS_ARCH=amd64",
                "bash /root/ack-optimized-os-linux3-all.sh",
                "ctr -n k8s.io i pull registry-cn-hangzhou-vpc.ack.aliyuncs.com/acs/pause:3.9"        # Add the application image to the system image. 
            ]
        }
      ]
    }

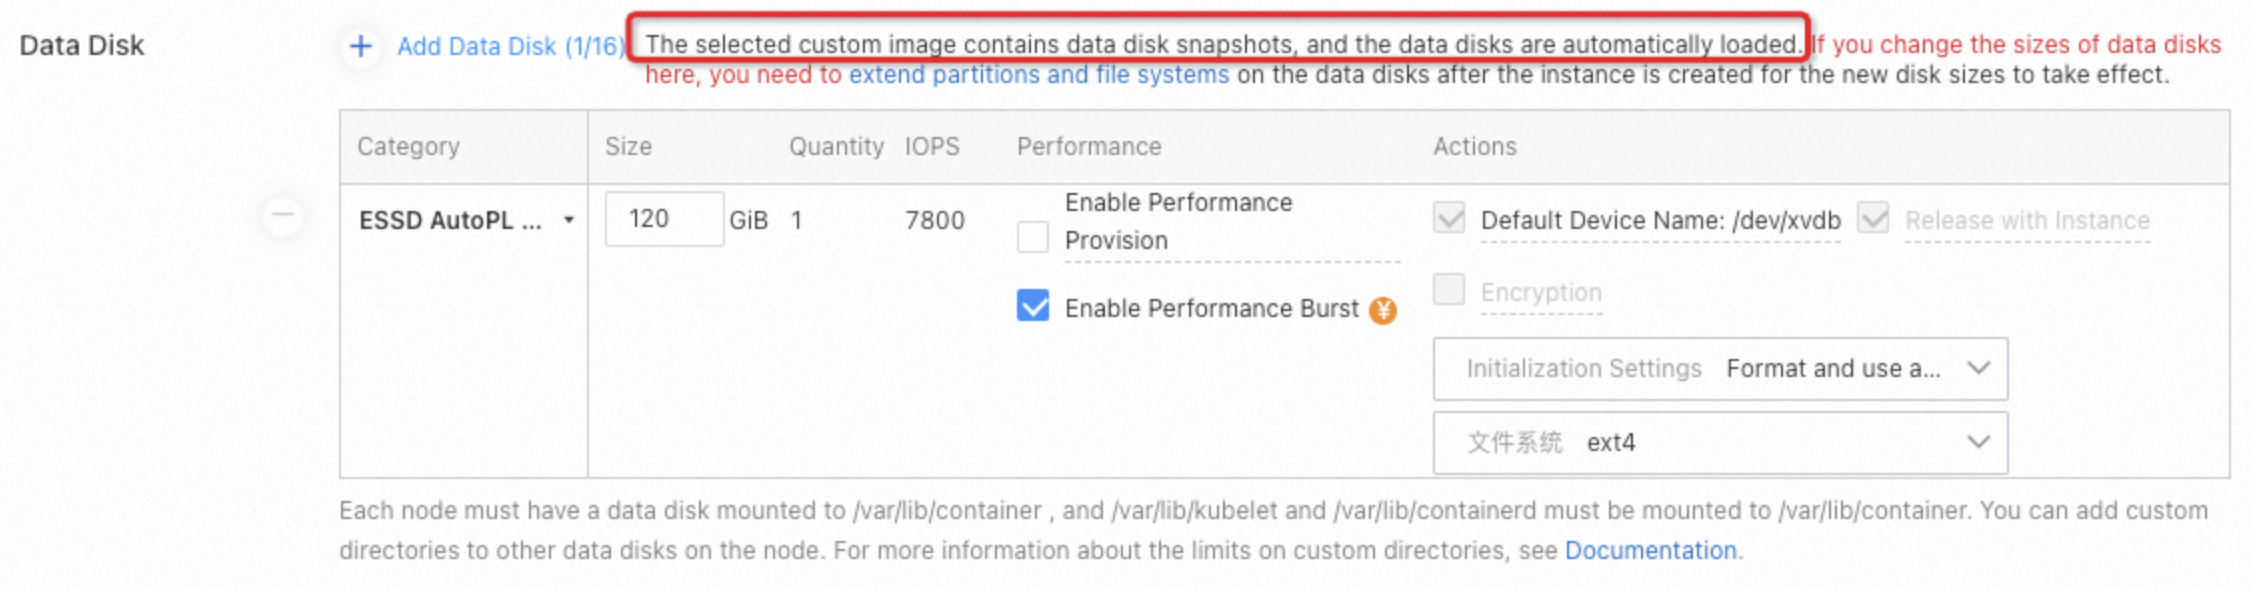
Disk initialization occurs when you add an ECS instance with a mounted data disk to a node pool, which results in the removal of any pre-stored application images. To mount a data disk when you create an ECS instance from a custom image, you can generate a data disk snapshot during the custom image creation process to ensure that the application image is preserved.

{
      "variables": {
        "image_name": "ack-custom_image",
        "source_image": "aliyun_3_x64_20G_alibase_20240528.vhd",
        "instance_type": "ecs.c6.xlarge",
        "access_key": "{{env `ALICLOUD_ACCESS_KEY`}}",
        "region": "{{env `ALICLOUD_REGION`}}",
        "secret_key": "{{env `ALICLOUD_SECRET_KEY`}}"
      },
    "builders": [
        {
          "type": "alicloud-ecs",
          "system_disk_mapping": {    
                    "disk_size": 120,
                    "disk_category": "cloud_essd"
                    },
          "image_disk_mappings": {
                    "disk_size": 40,
                    "disk_category": "cloud_auto"
                    },     # Configure a data disk when you create the custom image, and a snapshot of the data disk is automatically generated after the image is created.
          "access_key": "{{user `access_key`}}",
          "secret_key": "{{user `secret_key`}}",
          "region": "{{user `region`}}",
          "image_name": "{{user `image_name`}}",
          "source_image": "{{user `source_image`}}",
          "instance_type": "{{user `instance_type`}}",
          "ssh_username": "root",
          "skip_image_validation": "true",
          "io_optimized": "true"
        }
      ],
   "provisioners": [
        {
            "type": "file",
            "source": "scripts/ack-optimized-os-linux3-all.sh",
            "destination": "/root/"
        },
        {
            "type": "shell",
            "inline": [
                "export RUNTIME=containerd",
                "export SKIP_SECURITY_FIX=true",
                "export KUBE_VERSION=1.30.1-aliyun.1",
                "export OS_ARCH=amd64",
                "export MOUNT_RUNTIME_DATADISK=true",     # Mount the file path of the container runtime to the data disk.
                "bash /root/ack-optimized-os-linux3-all.sh",
                "ctr -n k8s.io i pull registry-cn-hangzhou-vpc.ack.aliyuncs.com/acs/pause:3.9",        # Add the application image to the system image.
                "mv /var/lib/containerd /var/lib/container/containerd"       # Move the image file to the data disk.
            ]
        }
      ]
    }

When you configure the node pool, you can set up a custom image that includes data disk snapshots, and the system will automatically associate the corresponding data disk snapshots.

image

Pull an image from a private image repository when the container runtime is Docker

docker login <Image address> -u user -p password
docker pull nginx

Pull an image from a private image repository when the container runtime is containerd

ctr -n k8s.io i pull --user=username:password nginx

Pull an image from a private repository after the custom image is built

  1. Run the following docker login command on a Linux server that has Docker installed to generate a certificate:

    docker login --username=zhongwei.***@aliyun-test.com --password xxxxxxxxxx registry.cn-beijing.aliyuncs.com

    After the docker login command succeeds, a certificate named config.json is created in the /root/.docker directory. 96

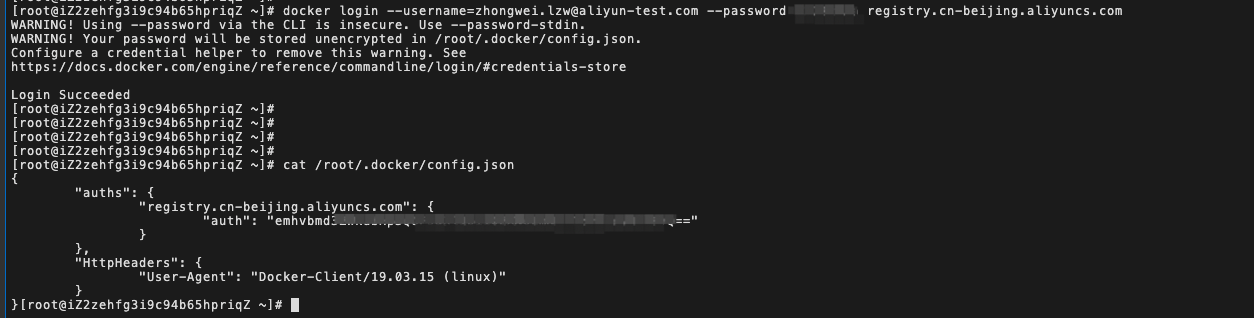
  2. Create a ConfigMap based on the certificate file named config.json.

    apiVersion: v1
    kind: ConfigMap
    metadata:
      name: docker-config
    data:
      config.json: |-
    
        {
            "auths": {
                    "registry.cn-beijing.aliyuncs.com": {
                            "auth": "xxxxxxxxxxxxxx"
                    }
            },
            "HttpHeaders": {
                    "User-Agent": "Docker-Client/19.03.15 (linux)"
            }
    
        }
  3. Modify the YAML template of the Job to mount the ConfigMap to the pod. 95

    YAML template

    apiVersion: batch/v1
    kind: Job
    metadata:
      name: image-builder
      namespace: default
    spec:
      template:
        metadata:
          name: image-builder
        spec:
          containers:
            - name: image-builder
              image: "registry.cn-hangzhou.aliyuncs.com/acs/image-builder:v2.9"
              imagePullPolicy: Always
              env:
                - name: ALICLOUD_ACCESS_KEY
                  value: yourAccessKeyID
                - name: ALICLOUD_SECRET_KEY
                  value: yourAccessKeySecret
                - name: ALICLOUD_REGION
                  value: cn-heyuan
              command: ["packer"]
              args:  ["build","/config/ack.json"]
              volumeMounts:
                - name: config
                  mountPath: /config
                - name: docker
                  mountPath: /dockerconfig
          volumes:
            - name: config
              configMap:
                name: build-config
                items:
                  - key: ack.json
                    path: ack.json
            - name: docker
              configMap:
                name: docker-config
                items:
                  - key: config.json
                    path: config.json
          restartPolicy: Never
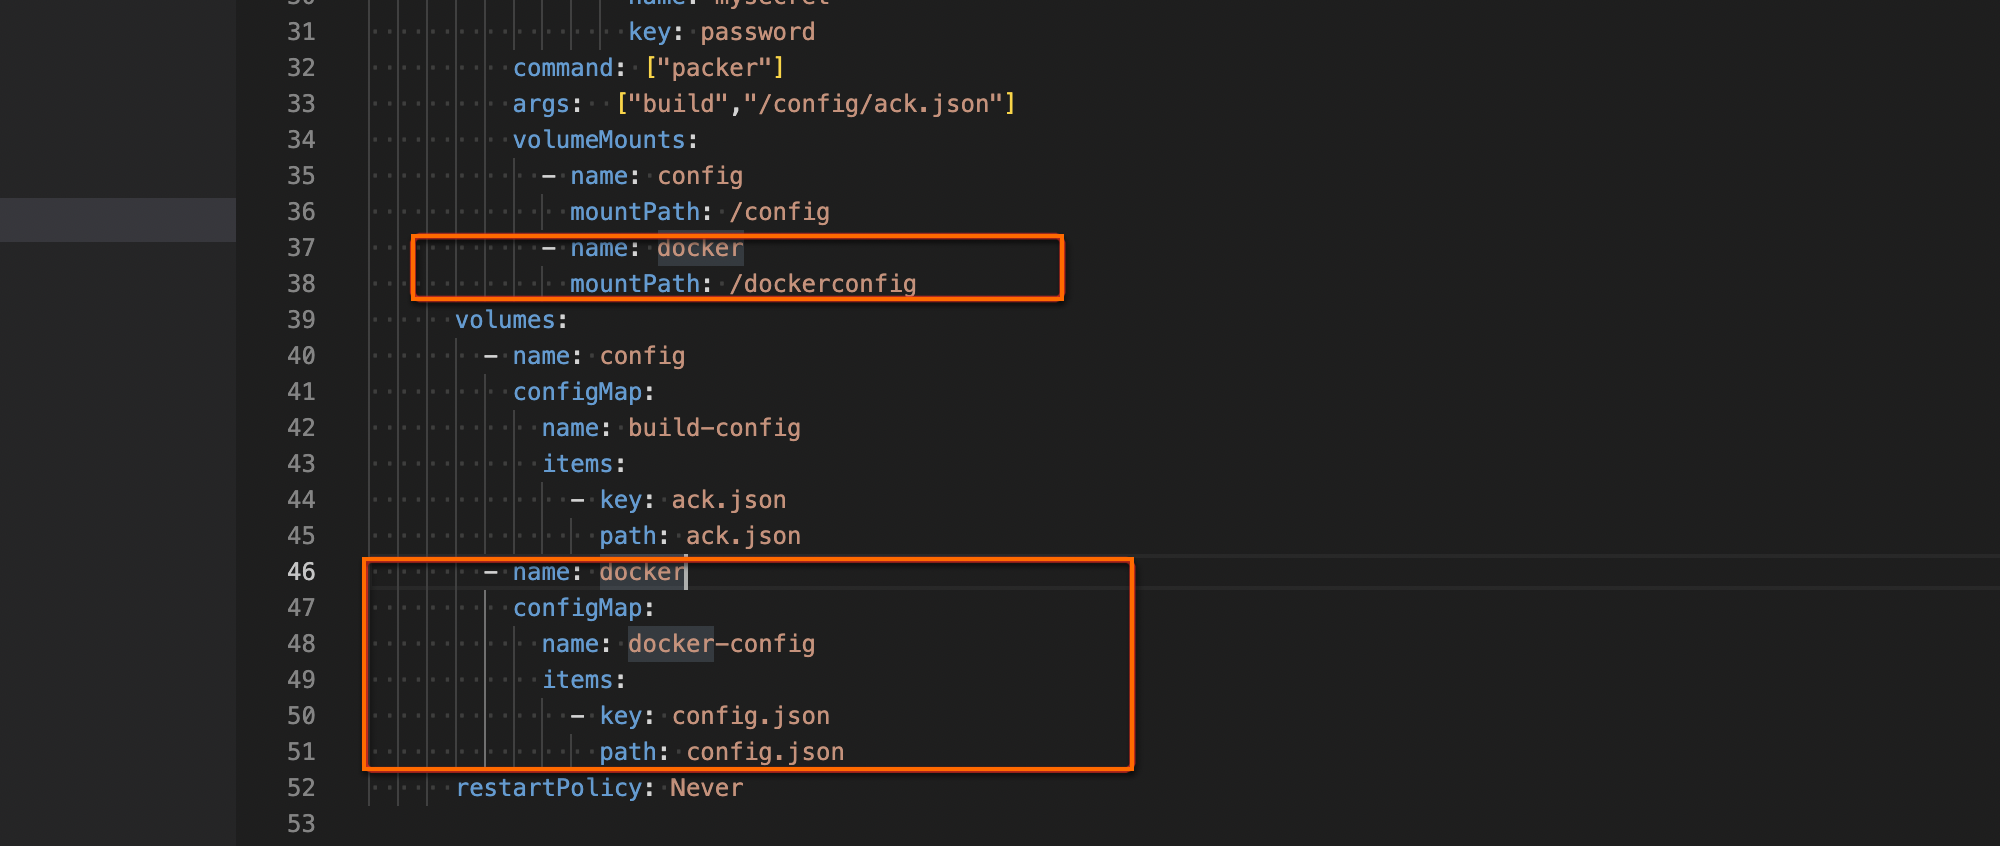
  4. Add the content in the following figure to the build-config ConfigMap.94

    YAML template

    apiVersion: v1
    kind: ConfigMap
    metadata:
      name: build-config
    data:
      ack.json: |-
    
        {
          "variables": {
            "image_name": "ack-optimized_image-1.20-{{timestamp}}",
            "source_image": "aliyun_2_1903_x64_20G_alibase_20221102.vhd",
            "instance_type": "ecs.c6.xlarge",
            "region": "{{env `ALICLOUD_REGION`}}",
            "access_key": "{{env `ALICLOUD_ACCESS_KEY`}}",
            "secret_key": "{{env `ALICLOUD_SECRET_KEY`}}"
          },
          "builders": [
            {
              "type": "alicloud-ecs",
              "access_key": "{{user `access_key`}}",
              "secret_key": "{{user `secret_key`}}",
              "region": "{{user `region`}}",
              "image_name": "{{user `image_name`}}",
              "source_image": "{{user `source_image`}}",
              "ssh_username": "root",
              "instance_type": "{{user `instance_type`}}",
              "skip_image_validation": "true",
              "io_optimized": "true"
            }
          ],
          "provisioners": [{
           "type": "file",
           "source": "scripts/ack-optimized-os-all.sh",
           "destination": "/root/"
            },
            {
           "type": "file",
           "source": "dockerconfig/config.json",
           "destination": "/root/"
            },
            {
           "type": "shell",
           "inline": [
             "export OS_ARCH=amd64",
             "export RUNTIME=docker",
             "export SKIP_SECURITY_FIX=true",
             "export KUBE_VERSION=1.22.15-aliyun.1",
             "bash /root/ack-optimized-os-all.sh",
             "mkdir -p /root/.docker",
             "cp /root/config.json /root/.docker",
             "docker pull registry.cn-beijing.aliyuncs.com/ringtail/kruise-game:0.1"
    
          ]
          }]
        }
  5. Execute the Job.

Specify the maximum numbers of concurrent uploads and downloads for the image

  1. Log on to the ACK console. In the navigation pane on the left, click Clusters.

  2. On the Clusters page, find the cluster you want and click its name. In the left navigation pane, choose Nodes > Node Pools.

  3. Find the target node pool and click its name. Click the Overview tab. In the Node Pool Information section, click the hyperlink next to the Auto Scaling Group field.

  4. On the page that appears, click the Instance Configuration Sources tab. Find the scaling configuration you want to manage, click Edit in the Actions column, and click OK.

  5. On the Modify Scaling Configuration page, click Advanced Settings, and copy the content from the Instance User Data field.

  6. Decode and modify the user data

    1. Base64-decode the existing user data content that you copied earlier.

    2. Append the following script to the end of the decoded content.

      # --- Script to Optimize Docker Settings ---
      # Install the jq tool for JSON processing
      yum install -y jq
      
      # Modify the Docker daemon configuration to increase concurrent image layer downloads/uploads
      echo "$(jq '. += {"max-concurrent-downloads": 20,"max-concurrent-uploads": 20}' /etc/docker/daemon.json)" > /etc/docker/daemon.json
      
      # Restart the Docker service to apply the new settings
      service docker restart

      image

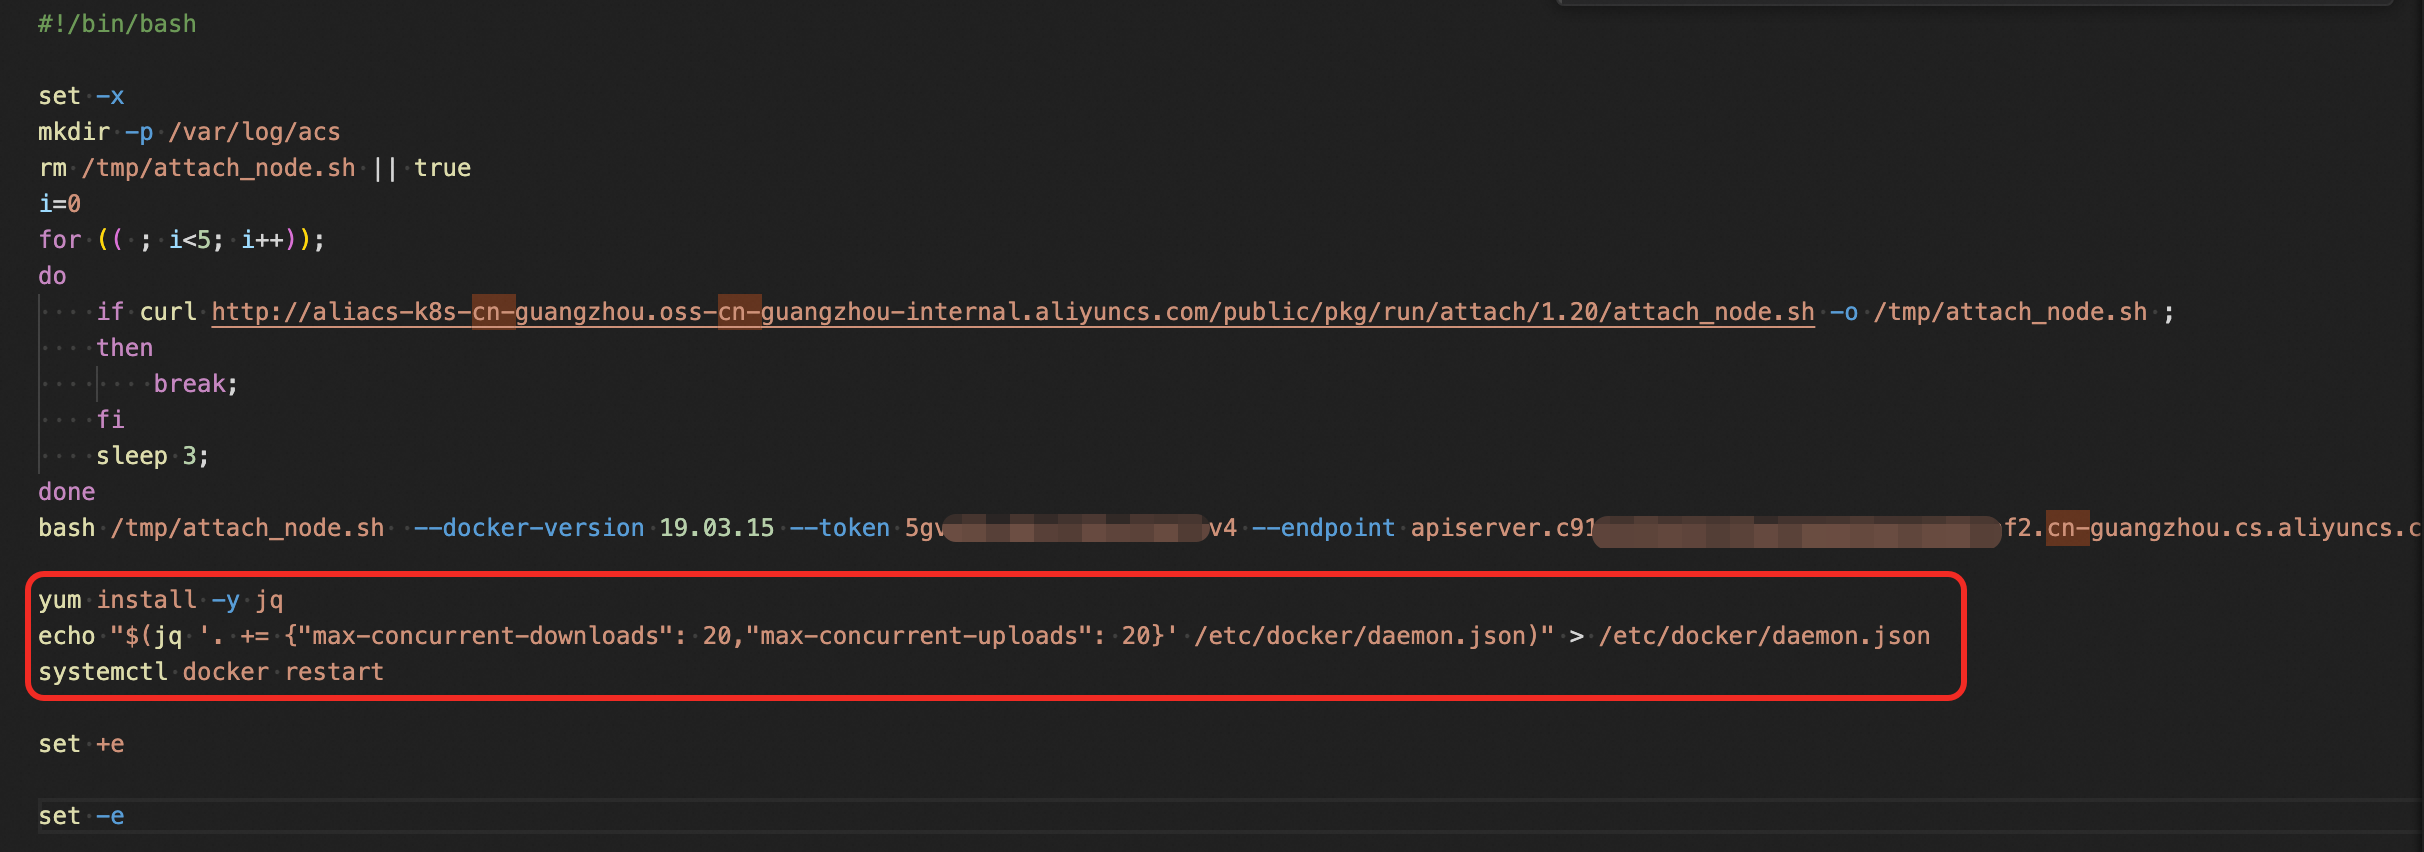
  7. Re-encode and update the user data

    1. Base64-encode the entire modified script (including the lines you just added).

    2. Replace the original content in the Instance User Data field with your newly encoded string.

    3. Click Modify to save the changes.

Build a custom Alibaba Cloud Linux 3 image

YAML template

apiVersion: v1
kind: ConfigMap
metadata:
  name: build-config
data:
  ack.json: |-
    
    {
      "variables": {
        "image_name": "ack-optimized_image-1.22-{{timestamp}}",
        "source_image":"aliyun_3_x64_20G_alibase_20230110.vhd",  # The basic image of Alibaba Cloud Linux 3.
        "instance_type": "ecs.c6.xlarge",
        "region": "{{env `ALICLOUD_REGION`}}",
        "access_key": "{{env `ALICLOUD_ACCESS_KEY`}}",
        "secret_key": "{{env `ALICLOUD_SECRET_KEY`}}"
      },
      "builders": [
        {
          "type": "alicloud-ecs",
          "access_key": "{{user `access_key`}}",
          "secret_key": "{{user `secret_key`}}",
          "region": "{{user `region`}}",
          "image_name": "{{user `image_name`}}",
          "source_image": "{{user `source_image`}}",
          "ssh_username": "root",  
          "instance_type": "{{user `instance_type`}}",
          "skip_image_validation": "true",
          "io_optimized": "true"
        }
      ],
      "provisioners": [{
       "type": "file",
       "source": "scripts/ack-optimized-os-linux3-all.sh",
       "destination": "/root/"
        },
        {
       "type": "shell",
       "inline": [
         "export RUNTIME=containerd",
         "export SKIP_SECURITY_FIX=true",
         "export OS_ARCH=amd64",
         "export KUBE_VERSION=1.22.3-aliyun.1",
         "bash /root/ack-optimized-os-linux3-all.sh"
      ]
      }]
    }

Build a custom Red Hat Enterprise Linux 9 (RHEL 9) image

YAML template

apiVersion: v1
kind: ConfigMap
metadata:
  name: build-config
data:
  ack.json: |-
    
    {
      "variables": {
        "image_name": "ack-optimized_image-1.26-{{timestamp}}",
        "source_image": "m-bp1c7zuf8mcabc99babc",       # The base image for RHEL 9. 
        "instance_type": "ecs.c6.xlarge",
        "region": "{{env `ALICLOUD_REGION`}}",
        "access_key": "{{env `ALICLOUD_ACCESS_KEY`}}",
        "secret_key": "{{env `ALICLOUD_SECRET_KEY`}}",
        "runtime": "{{env `RUNTIME`}}",
        "skip_security_fix": "{{env `SKIP_SECURITY_FIX`}}"
      },
      "builders": [
        {
          "type": "alicloud-ecs",
          "access_key": "{{user `access_key`}}",
          "secret_key": "{{user `secret_key`}}",
          "region": "{{user `region`}}",
          "image_name": "{{user `image_name`}}",
          "source_image": "{{user `source_image`}}",
          "ssh_username": "root",
          # "vpc_id": "",
          # "vswitch_id": "",
          # "security_group_id": "",      
          "instance_type": "{{user `instance_type`}}",
          "skip_image_validation": "true",
          "io_optimized": "true"
        }
      ],
      "provisioners": [{
       "type": "file",
       "source": "scripts/ack-optimized-os-rhel9-all.sh",
       "destination": "/root/"
        },
        {
       "type": "shell",
       "inline": [
         "export RUNTIME=containerd",
         "export SKIP_SECURITY_FIX=true",
         "export OS_ARCH=amd64",
         "export KUBE_VERSION=1.26.3-aliyun.1",
         "bash /root/ack-optimized-os-rhel9-all.sh"
      ]
      }]
    }

What to do next