All Products
Search
Document Center

OpenSearch:Build a RAG system based on DeepSeek-R1

Last Updated:Jul 25, 2025

DeepSeek-R1 is an large language model (LLM) that focus on complex inference tasks. Compared with other LLMs, DeepSeek-R1 has advantages in terms of understanding of complex instructions, accuracy of inference results, and performance stability. OpenSearch LLM-Based Conversational Search Edition is integrated with DeepSeek-R1 to further improve the enterprise-level Retrieval-Augmented Generation (RAG) performance. This topic describes how to build a RAG-based system.

Create and configure an instance

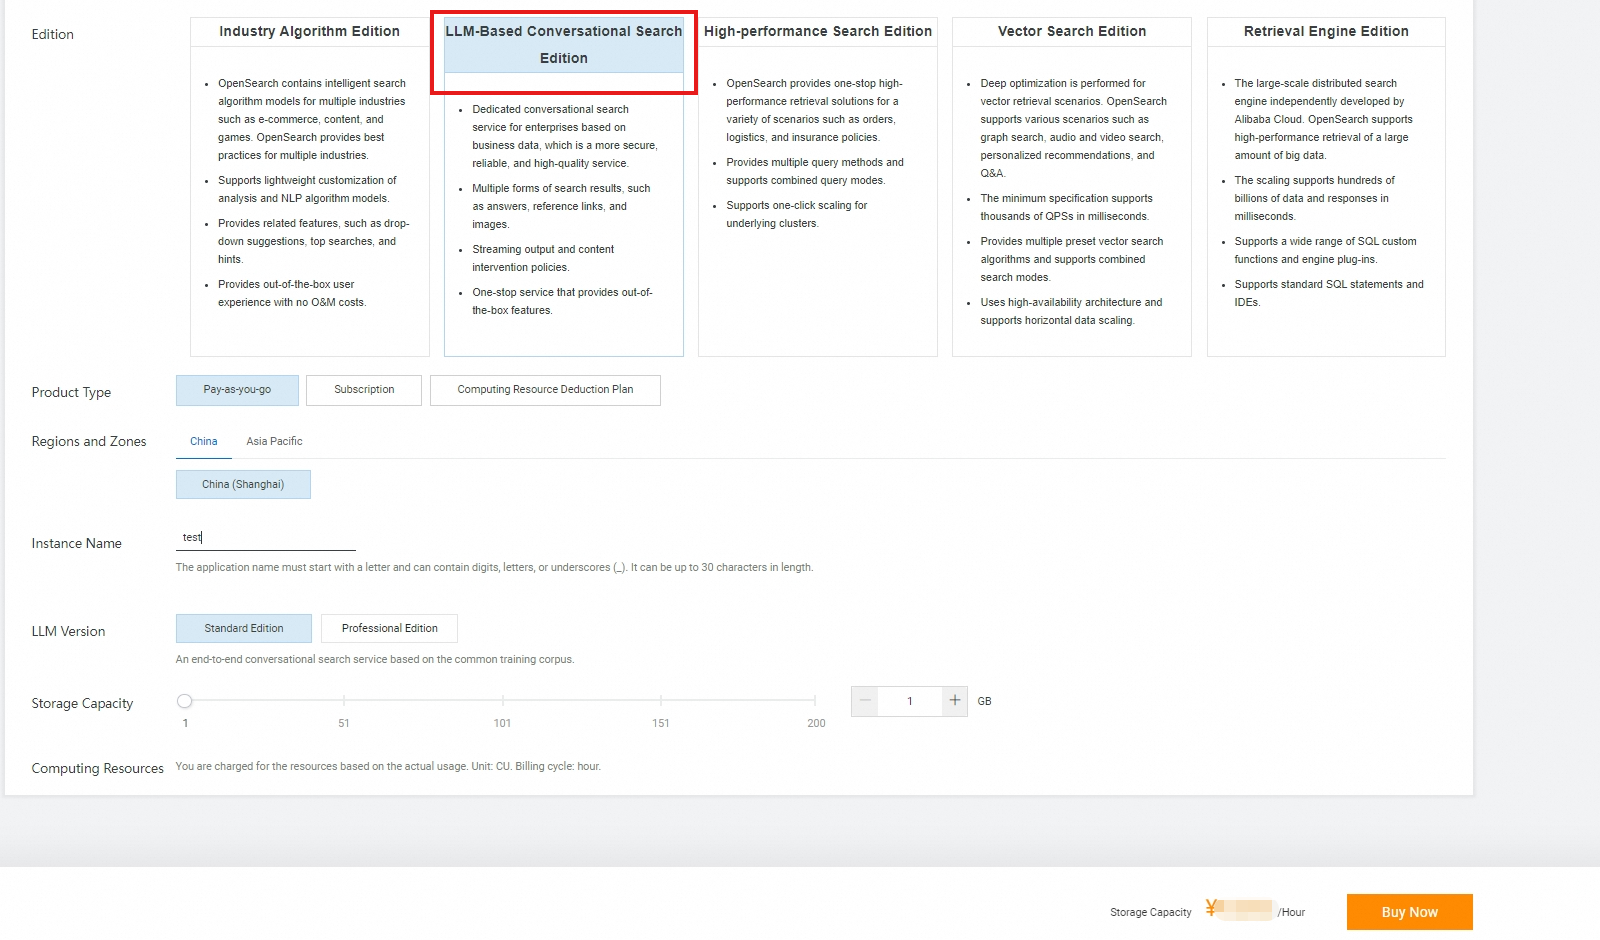
  1. Create an OpenSearch LLM-Based Conversational Search Edition instance. Only Standard Edition and Professional Edition instances of OpenSearch LLM-Based Conversational Search Edition in the China (Shanghai) region support DeepSeek-R1. For more information about how to create an instance, see Create an OpenSearch LLM-Based Conversational Search Edition instance. For more information about the billing rules, see Billing methods and billable items.

    Note

    Standard Edition instances do not support custom training of LLMs. Professional Edition instances support training of specific LLMs. DeepSeek-R1 does not support training.

    image

  2. Import data of a knowledge base.

    After you create an instance, the system automatically generates a knowledge base data table. You can import structured and unstructured data from documents or batch import data from multiple URLs.

    On the Instance Management page, find the desired instance and click Manage in the Actions column. In the left-side navigation pane of the page that appears, choose Configuration Center > Data Configuration. On the page that appears, click Import File or Web Page URL Import based on your business requirements. For more information, see Import data.

    image.png

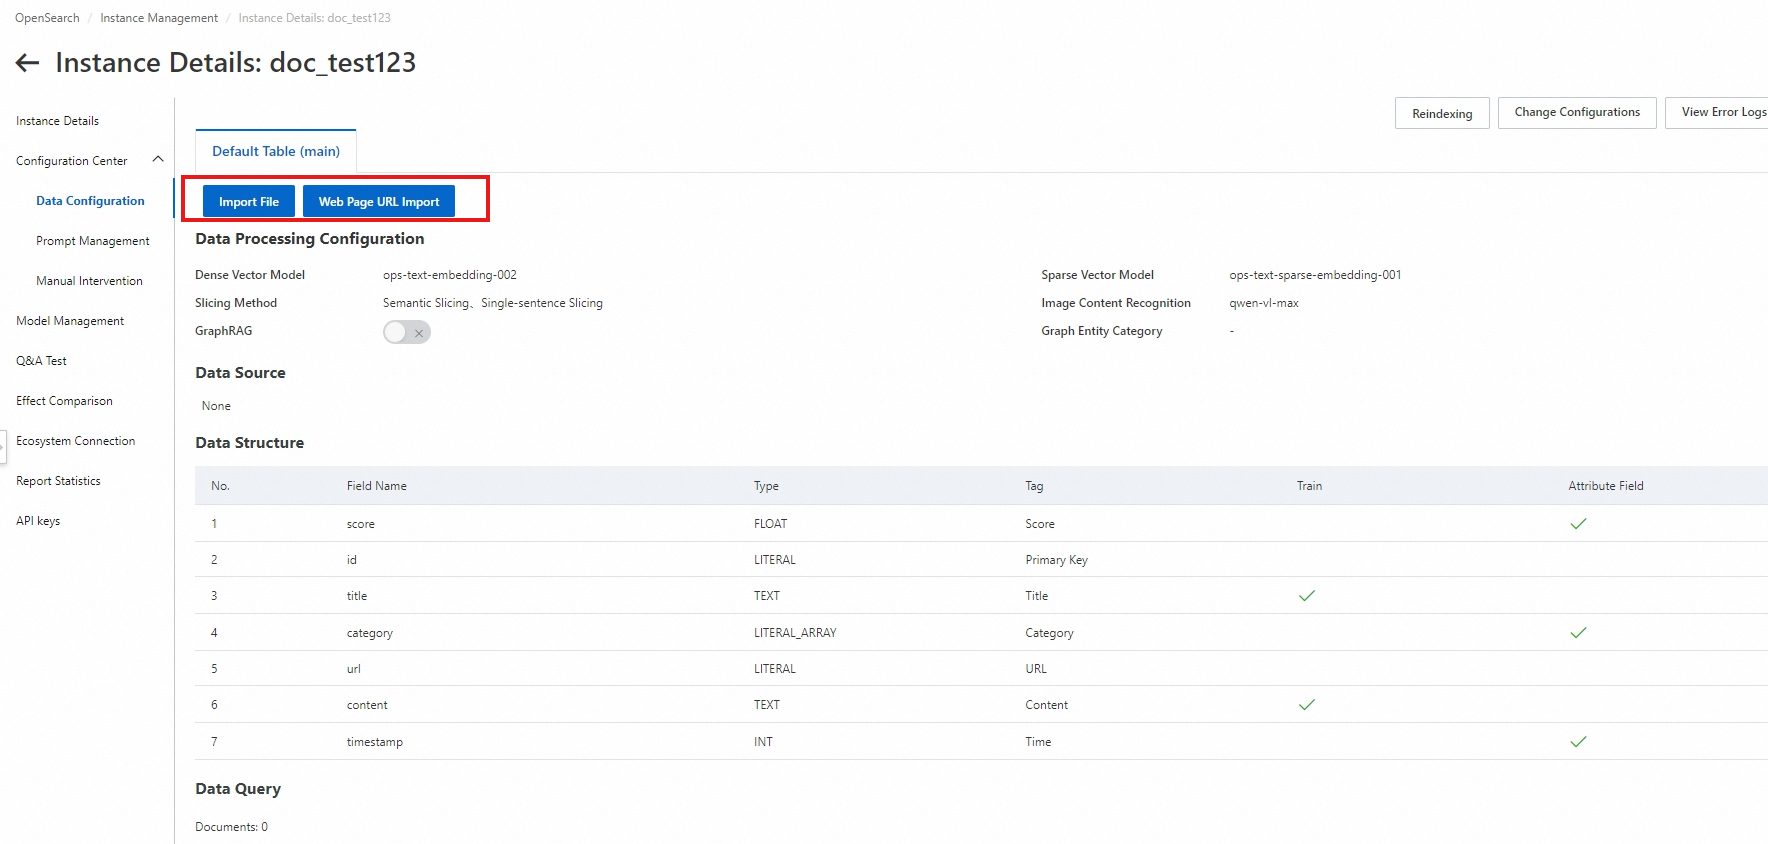
    If the data import status is Uploaded, the data is vectorized and stored. You can click View Content in the Actions column of the desired document to view the parsed document. |

    image

Note

You can also call SDKs to upload structured or unstructured documents.

Test the Q&A performance

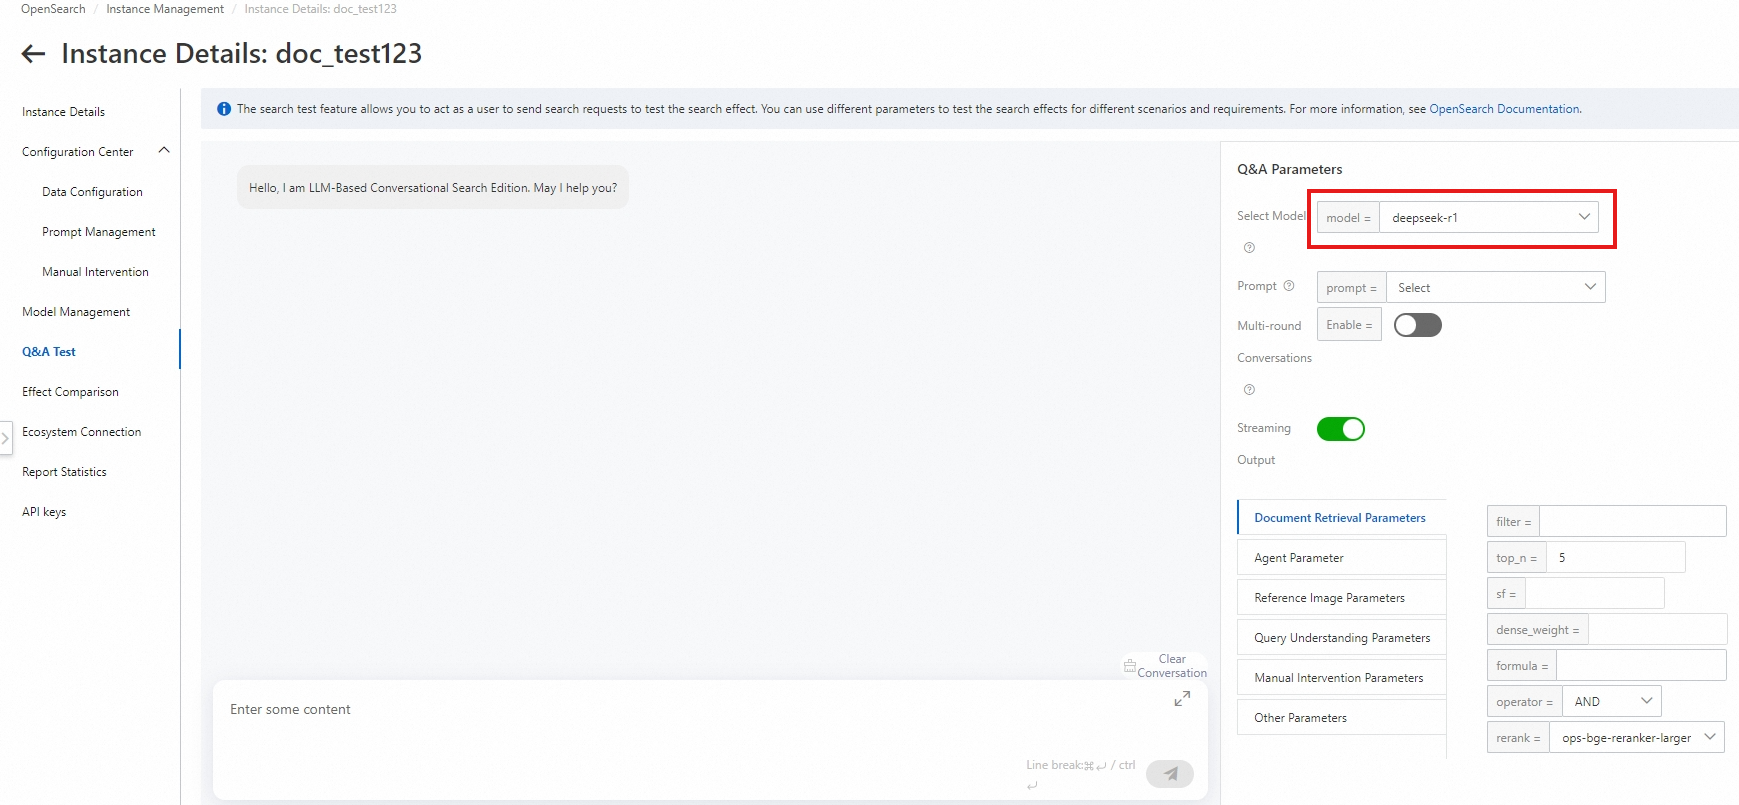
In the left-side navigation pane, click Q&A Test. In the Q&A Parameters section of the page that appears, set Select Model to deepseek-r1 and configure different values for Prompt and Document Retrieval Parameters, including filter, top_n, and rerank, to test the Q&A performance.

The following table describes the key parameters. For more information, see Parameters.

Parameter

Description

Prompt

The instruction that you provide to the LLM to clarify requirements and guide the LLM to generate accurate and relevant answers or content. For more information, see Manage prompts.

Multi-round conversation

Specifies whether to enable the multi-round conversation feature. If you enable the multi-round conversation feature, you must configure the request ID to check whether the questions are asked by the same user. This way, questions from the same user can be identified for multi-round conversations.

Streaming output

We recommend that you enable streaming output to return intermediate results in real time. This reduces the waiting time.

filter

The field specified to filter data when documents are retrieved. For example, if you set this parameter to timestamp>1356969600, documents whose timestamps are later than January 1, 2013 are queried.

top_n

The number of documents to be retrieved. Default value: 5.

image.png

Perform RAG-based Q&A by using SDKs

After you complete the performance test, perform RAG-based Q&A by using SDKs in application systems. To update a knowledge base, you can import documents in the OpenSearch console or import structured documents and unstructured documents by using SDKs.

Obtain an AccessKey Pair

Before you install and use an SDK, make sure that you obtain an AccessKey pair. For more information, see Create an AccessKey pair. When you use an SDK to access an Alibaba Cloud service, the initiated request includes the AccessKey ID and the signature that is generated to encrypt the request by using the AccessKey secret. In this case, the AccessKey pair is used for identity verification and request validity verification.

  1. Move the pointer over the profile icon in the upper-right corner of the OpenSearch console and click AccessKey.

    image

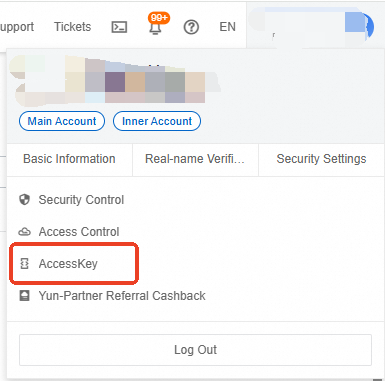
  2. On the AccessKey page, view the AccessKey pair.

    image

    If the AccessKey list is empty or no AccessKey pair is enabled, create an AccessKey pair. For more information, see Create an AccessKey pair.

If you use a RAM user to access the Alibaba Cloud service, make sure that the AliyunOpenSearchFullAccess policy is attached to the RAM user.

Configure an AccessKey pair as environment variables

To prevent AccessKey pair leaks, we recommend that you configure the AccessKey ID and AccessKey secret as environment variables and do not directly specify the AccessKey ID and AccessKey secret in the code.

Windows

In Windows, you can use Command Prompt or PowerShell to configure environment variables, or modify environment variables by using system properties.

Command Prompt

Configure permanent environment variables

If you want environment variables to take effect in all new sessions initiated by the current user, perform the following steps:

  1. Run the following commands in Command Prompt:

    # Replace <access_key_id> with your AccessKey ID and <access_key_secret> with your AccessKey secret. 
    setx ALIBABA_CLOUD_ACCESS_KEY_ID <access_key_id>
    setx ALIBABA_CLOUD_ACCESS_KEY_SECRET <access_key_secret>
  2. Open a new Command Prompt window.

  3. Run the following commands to check whether the environment variables take effect:

    echo %ALIBABA_CLOUD_ACCESS_KEY_ID%
    echo %ALIBABA_CLOUD_ACCESS_KEY_SECRET%

Configure temporary environment variables

If you want to use environment variables only in the current session, run the following commands in Command Prompt:

# Replace <access_key_id> with your AccessKey ID and <access_key_secret> with your AccessKey secret. 
set ALIBABA_CLOUD_ACCESS_KEY_ID=<access_key_id>
set ALIBABA_CLOUD_ACCESS_KEY_SECRET=<access_key_secret>

Run the following commands in the current session to check whether the environment variables take effect:

echo %ALIBABA_CLOUD_ACCESS_KEY_ID%
echo %ALIBABA_CLOUD_ACCESS_KEY_SECRET%
PowerShell

Configure permanent environment variables

If you want environment variables to take effect in all new sessions initiated by the current user, perform the following steps:

  1. Run the following commands in PowerShell:

    # Replace <access_key_id> with your AccessKey ID and <access_key_secret> with your AccessKey secret. 
    [Environment]::SetEnvironmentVariable("ALIBABA_CLOUD_ACCESS_KEY_ID", "<access_key_id>", [EnvironmentVariableTarget]::User)
    [Environment]::SetEnvironmentVariable("ALIBABA_CLOUD_ACCESS_KEY_SECRET", "<access_key_secret>", [EnvironmentVariableTarget]::User)
  2. Open a new PowerShell window.

  3. Run the following commands to check whether the environment variables take effect:

    echo $env:ALIBABA_CLOUD_ACCESS_KEY_ID
    echo $env:ALIBABA_CLOUD_ACCESS_KEY_SECRET

Configure temporary environment variables

If you want to use environment variables only in the current session, run the following commands in PowerShell:

# Replace <access_key_id> with your AccessKey ID and <access_key_secret> with your AccessKey secret. 
$env:ALIBABA_CLOUD_ACCESS_KEY_ID = "<access_key_id>"
$env:ALIBABA_CLOUD_ACCESS_KEY_SECRET = "<access_key_secret>"

Run the following commands in the current session to check whether the environment variables take effect:

echo $env:ALIBABA_CLOUD_ACCESS_KEY_ID
echo $env:ALIBABA_CLOUD_ACCESS_KEY_SECRET
Modify environment variables by using system properties
  • Right-click This PC and select Properties. On the Settings page, click Advanced system settings.

  • In the System Properties dialog box, click Environment Variables. The Environment Variables dialog box appears.

  • In the System Variables section, click Create to open the Create System Variable dialog box.

  • Variable Name: Set the value to ALIBABA_CLOUD_ACCESS_KEY_ID and then ALIBABA_CLOUD_ACCESS_KEY_SECRET. Variable Value: Enter the value of <access_key_id> for ALIBABA_CLOUD_ACCESS_KEY_ID and then the value of <access_key_secret> for ALIBABA_CLOUD_ACCESS_KEY_SECRET.

After you configure the variables, click OK.

Run the following commands in the terminal to check whether the environment variables take effect:

echo %ALIBABA_CLOUD_ACCESS_KEY_ID%
echo %ALIBABA_CLOUD_ACCESS_KEY_SECRET%

macOS

Configure permanent environment variables

If you want environment variables to take effect in all new sessions of the current user, configure permanent environment variables.

  1. Run the following command in the terminal to view the default shell type:

    echo $SHELL
  2. Configure environment variables based on the default shell type.

    Zsh

    1. Run the following commands to add the configurations of the environment variables to the ~/.zshrc file:

      # Replace <access_key_id> with your AccessKey ID and <access_key_secret> with your AccessKey secret. 
      echo "export ALIBABA_CLOUD_ACCESS_KEY_ID=<access_key_id>" >> ~/.zshrc
      echo "export ALIBABA_CLOUD_ACCESS_KEY_SECRET=<access_key_secret>" >> ~/.zshrc

      You can also manually modify the ~/.zshrc file.

      Manual modification

      Run the following command to open the shell configuration file:

      nano ~/.zshrc

      Add the following content to the configuration file:

      # Replace <access_key_id> with your AccessKey ID and <access_key_secret> with your AccessKey secret. 
      export ALIBABA_CLOUD_ACCESS_KEY_ID=<access_key_id> 
      export ALIBABA_CLOUD_ACCESS_KEY_SECRET=<access_key_secret>

      In the nano editor, press Ctrl+X, Y, and then Enter to save and close the file.

    2. Run the following command to apply the changes:

      source ~/.zshrc
    3. Open a terminal window and run the following commands to check whether the environment variables take effect:

      echo $ALIBABA_CLOUD_ACCESS_KEY_ID
      echo $ALIBABA_CLOUD_ACCESS_KEY_SECRET

    Bash

    1. Run the following commands to add the configurations of the environment variables to the ~/.bash_profile file:

      # Replace <access_key_id> with your AccessKey ID and <access_key_secret> with your AccessKey secret. 
      echo "export ALIBABA_CLOUD_ACCESS_KEY_ID=<access_key_id>" >> ~/.bash_profile
      echo "export ALIBABA_CLOUD_ACCESS_KEY_SECRET=<access_key_secret>" >> ~/.bash_profile

      You can also manually modify the ~/.bash_profile file.

      Manual modification

      Run the following command to open the shell configuration file:

      nano ~/.bash_profile

      Add the following content to the configuration file:

      # Replace <access_key_id> with your AccessKey ID and <access_key_secret> with your AccessKey secret. 
      export ALIBABA_CLOUD_ACCESS_KEY_ID=<access_key_id> 
      export ALIBABA_CLOUD_ACCESS_KEY_SECRET=<access_key_secret>

      In the nano editor, press Ctrl+X, Y, and then Enter to save and close the file.

    2. Run the following command to apply the changes:

      source ~/.bash_profile
    3. Open a terminal window and run the following commands to check whether the environment variables take effect:

      echo $ALIBABA_CLOUD_ACCESS_KEY_ID
      echo $ALIBABA_CLOUD_ACCESS_KEY_SECRET
Configure temporary environment variables

If you want to use environment variables only in the current session, configure temporary environment variables.

  1. Run the following commands to configure temporary environment variables:

    # Replace <access_key_id> with your AccessKey ID and <access_key_secret> with your AccessKey secret. 
    export ALIBABA_CLOUD_ACCESS_KEY_ID=<access_key_id> 
    export ALIBABA_CLOUD_ACCESS_KEY_SECRET=<access_key_secret>
  2. Run the following commands to check whether the environment variables take effect:

    echo $ALIBABA_CLOUD_ACCESS_KEY_ID
    echo $ALIBABA_CLOUD_ACCESS_KEY_SECRET

Linux

Configure permanent environment variables

If you want environment variables to take effect in all new sessions of the current user, configure permanent environment variables.

  1. Run the following commands to add the configurations of the environment variables to the ~/.bashrc file:

    # Replace <access_key_id> with your AccessKey ID and <access_key_secret> with your AccessKey secret. 
    echo "export ALIBABA_CLOUD_ACCESS_KEY_ID=<access_key_id>" >> ~/.bashrc
    echo "export ALIBABA_CLOUD_ACCESS_KEY_SECRET=<access_key_secret>" >> ~/.bashrc

    You can also manually modify the ~/.bashrc file.

    Manual modification

    Run the following command to open the ~/.bashrc file:

    nano ~/.bashrc

    Add the following content to the configuration file:

    # Replace <access_key_id> with your AccessKey ID and <access_key_secret> with your AccessKey secret. 
    export ALIBABA_CLOUD_ACCESS_KEY_ID=<access_key_id> 
    export ALIBABA_CLOUD_ACCESS_KEY_SECRET=<access_key_secret>

    In the nano editor, press Ctrl+X, Y, and then Enter to save and close the file.

  2. Run the following command to apply the changes:

    source ~/.bashrc
  3. Open a terminal window and run the following commands to check whether the environment variables take effect:

    echo $ALIBABA_CLOUD_ACCESS_KEY_ID
    echo $ALIBABA_CLOUD_ACCESS_KEY_SECRET

Configure temporary environment variables

If you want to use environment variables only in the current session, configure temporary environment variables.

  1. Run the following commands to configure temporary environment variables:

    # Replace <access_key_id> with your AccessKey ID and <access_key_secret> with your AccessKey secret. 
    export ALIBABA_CLOUD_ACCESS_KEY_ID=<access_key_id> 
    export ALIBABA_CLOUD_ACCESS_KEY_SECRET=<access_key_secret>
  2. Run the following commands to check whether the environment variables take effect:

    echo $ALIBABA_CLOUD_ACCESS_KEY_ID
    echo $ALIBABA_CLOUD_ACCESS_KEY_SECRET

Select a development language

Java

Step 1: Configure the Java environment

Check the Java environment

Run the following command in the terminal to check whether Java is installed in the current environment:

java -version

To confirm the Java version, check the first line of the returned message. For example, the openjdk version "16.0.1" 2021-04-20 message indicates that the current Java version is Java 16. If Java is not installed, or the Java version is earlier than Java 8, go to Java to download and install Java.

Install the SDK

To use OpenSearch SDK for Java in Maven, you must add the corresponding dependency to the pom.xml file. In this example, the dependency for OpenSearch SDK for Java 6.0.0 is added.

<dependency>
    <groupId>com.aliyun.opensearch</groupId>
    <artifactId>aliyun-sdk-opensearch</artifactId>
    <version>6.0.0</version>
</dependency>

Step 2: Obtain the parameters

Callling API operations by using SDKs depends on the following key parameters:

  • AppName: the name of the application.

  • host: the endpoint of the application API.

Step 3: Call the API operations

Run the following sample code:

package com.aliyun.opensearch;

import com.aliyun.opensearch.OpenSearchClient;
import com.aliyun.opensearch.sdk.generated.OpenSearch;
import com.aliyun.opensearch.sdk.generated.commons.OpenSearchClientException;
import com.aliyun.opensearch.sdk.generated.commons.OpenSearchException;
import com.aliyun.opensearch.sdk.generated.commons.OpenSearchResult;

import java.util.HashMap;
import java.util.Map;

public class LLMSearch {

    private static String appName = "Your application name";
    private static String host = "Your API";
    private static String accesskey = "Your AccessKey ID";
    private static String secret = "Your AccessKey Secret";
    private static String path = "/apps/%s/actions/knowledge-search";

    public static void main(String[] args) {
      
        String appPath = String.format(path, appName);

        //ApiReadTimeOut
        OpenSearch openSearch = new OpenSearch(accesskey, secret, host);
        openSearch.setTimeout(90000);

        OpenSearchClient openSearchClient = new OpenSearchClient(openSearch);

        Map<String, String> params = new HashMap<String, String>() {{
            put("format", "full_json");
            put("_POST_BODY", "{\"question\":{\"text\":\"怎么充电\",\"type\":\"TEXT\",\"session\":\"\"},\"options\":{\"retrieve\":{\"doc\":{\"filter\":\"\",\"top_n\":5,\"sf\":\"\",\"dense_weight\":\"0.7\",\"formula\":\"\",\"operator\":\"AND\"},\"entry\":{\"sf\":\"\"},\"image\":{\"sf\":\"\",\"dense_weight\":\"0.7\"},\"qp\":{\"query_extend\":false,\"query_extend_num\":5},\"return_hits\":false,\"rerank\":{\"enable\":true,\"model\":\"ops-bge-reranker-larger\"}},\"chat\":{\"stream\":true,\"prompt_config\":{\"attitude\":\"normal\",\"rule\":\"detailed\",\"noanswer\":\"sorry\",\"language\":\"Chinese\",\"role\":false,\"role_name\":\"AI小助手\",\"out_format\":\"text\"},\"agent\":{\"tools\":[]},\"csi_level\":\"strict\",\"history_max\":\"\",\"link\":\"false\",\"model\":\"deepseek-r1\",\"model_generation\":\"\"}}}");

        }};
          try {
            OpenSearchResult openSearchResult = openSearchClient
            .callAndDecodeResult(appPath, params, "POST");
            System.out.println("RequestID=" + openSearchResult.getTraceInfo().getRequestId());
            System.out.println(openSearchResult.getResult());
        } catch (
            OpenSearchException e) {
            System.out.println("RequestID=" + e.getRequestId());
            System.out.println("ErrorCode=" + e.getCode());
            System.out.println("ErrorMessage=" + e.getMessage());
        } catch (
            OpenSearchClientException e) {
            System.out.println("ErrorMessage=" + e.getMessage());
        }
    }
}

Python

Step 1: Configure the Python environment
Check the Python environment

Run the following command in the terminal to check whether Python is installed in the current computing environment:

# If the execution fails, replace python with python3 and re-run the command.
python -V

Python 3.0 or later is required. If Python is not installed or the Python version does not meet the requirement, install Python by referring to Python.

(Optional) Configure a virtual environment

If Python is installed, you can create a virtual environment to install OpenSearch SDK for Python to prevent dependency conflicts with other projects.

  1. Create a virtual environment

    Run the following command to create a virtual environment named .venv:

    # If the execution fails, replace python with python3 and re-run the command.
    python -m venv .venv
  2. Activate the virtual environment

    For Windows, run the following command to activate the virtual environment:

    .venv\Scripts\activate

    For macOS or Linux, run the following command to activate the virtual environment:

    source .venv/bin/activate
Install the SDK

Run the following commands to install OpenSearch SDK for Python:

pip install alibabacloud_tea_util 
pip install alibabacloud_opensearch_util
pip install alibabacloud_credentials

Step 2: Obtain the parameters

Calling API operations by using SDKs depends on the following key parameters:

  • app_name: the name of the application.

  • endpoint: the endpoint of the application API.

Step 3: Call the API operations

For more information about BaseRequest, see Sample code for the Python client.

# -*- coding: utf-8 -*-

import time, os
from typing import Dict, Any

from Tea.exceptions import TeaException
from Tea.request import TeaRequest
from alibabacloud_tea_util import models as util_models
from BaseRequest import Config, Client


class LLMSearch:
    def __init__(self, config: Config):
        self.Clients = Client(config=config)
        self.runtime = util_models.RuntimeOptions(
            connect_timeout=10000,
            read_timeout=90000,
            autoretry=False,
            ignore_ssl=False,
            max_idle_conns=50,
            max_attempts=3
        )
        self.header = {}


    def searchDoc(self, app_name: str,body:Dict, query_params: dict={}) -> Dict[str, Any]:
        try:
            response = self.Clients._request(method="POST", pathname=f'/v3/openapi/apps/{app_name}/actions/knowledge-search',
                                             query=query_params, headers=self.header, body=body, runtime=self.runtime)
            return response
        except TeaException as e:
            print(e)


if __name__ == "__main__":
    # Specify the endpoint of the application API. Remove the http:// prefix from the value.
    endpoint = "<endpoint>"

    # Specify the request protocol. Valid values: HTTPS and HTTP.
    endpoint_protocol = "HTTP"

    # Specify your AccessKey pair.
    # Obtain the AccessKey ID and AccessKey secret from environment variables. 
    # You must configure environment variables before you run this code. For more information, see the "Configure an AccessKey pair as environment variables" section of this topic.
    access_key_id = os.environ.get("ALIBABA_CLOUD_ACCESS_KEY_ID")
    access_key_secret = os.environ.get("ALIBABA_CLOUD_ACCESS_KEY_SECRET")

    # Specify the authentication method. Default value: access_key. The value sts indicates authentication based on RAM and Security Token Service (STS).
    # Valid values: sts and access_key.
    auth_type = "access_key"

    # If you use authentication based on RAM and STS, you must configure the security_token parameter. You can call the AssumeRole operation of Alibaba Cloud RAM to obtain an STS token.
    security_token =  "<security_token>"

    # Configure common request parameters.
    # The type and security_token parameters are required only if you use the SDK as a RAM user.
    Configs = Config(endpoint=endpoint, access_key_id=access_key_id, access_key_secret=access_key_secret,
                     security_token=security_token, type=auth_type, protocol=endpoint_protocol)

    # Create an OpenSearch LLM-Based Conversational Search Edition instance.
    # Replace <Application name> with the name of your OpenSearch LLM-Based Conversational Search Edition instance.
    ops = LLMSearch(Configs)
    app_name = "<Application name>"

    # --------------- Search for documents ---------------

    docQuery = {"question": {"text": "Search", "type": "TEXT"}, "options": {"chat": {"model": "deepseek-r1"}}}

    res1 = ops.searchDoc(app_name=app_name, body=docQuery)
    print(res1)