By Avi Anish, Alibaba Cloud Community Blog author.
In this article, we will look at how you can set up Docker to be used to launch a single-node Hadoop cluster inside a Docker container on an Alibaba ECS instance.
Before we get into the main part of this tutorial, let's look at some of the major products discussed in this blog.
First, there's Docker, which is a very popular containerization tool with which you can create containers where software or other dependencies that are installed run the application. You might have heard about virtual machines. Well, Docker containers are basically a light-weight version of a virtual machine. Creating a docker container to run an application is very easy, and you can launch them on the fly.
Next, there's Apache Hadoop, which is a core big data framework to store and process Big Data. The storage component of Hadoop is called Hadoop Distributed File system (usually abbreviated HDFS) and the processing component of Hadoop is called MapReduce. Next, there are several daemons that will run inside a Hadoop cluster, which include NameNode, DataNode, Secondary Namenode, ResourceManager, and NodeManager.
Now that you know a bit more about what Docker and Hadoop are, let's look at how you can set up a single node Hadoop cluster using Docker.
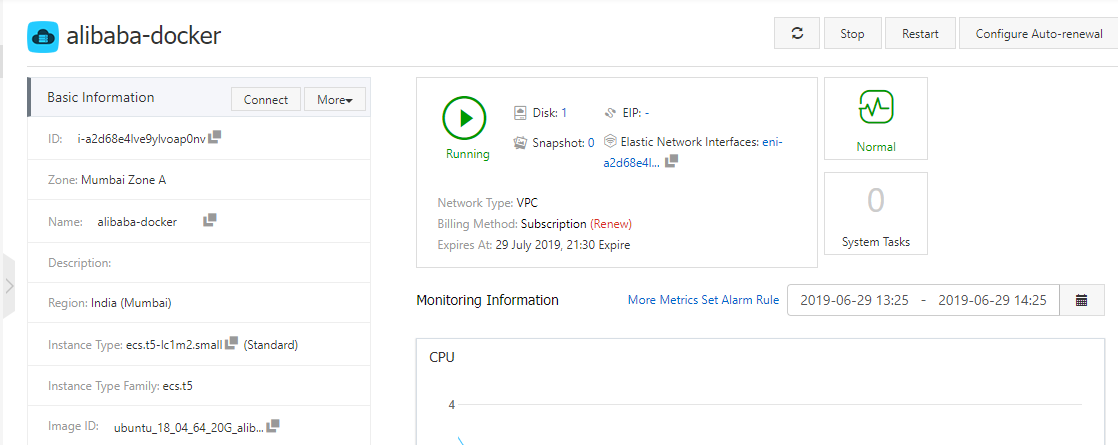
First, for this tutorial, we will be using an Alibaba Cloud ECS instance with Ubuntu 18.04 installed. Next, as part of this tutorial, let's assume that you have docker installed on this ubuntu system. Below are the details of this setup:


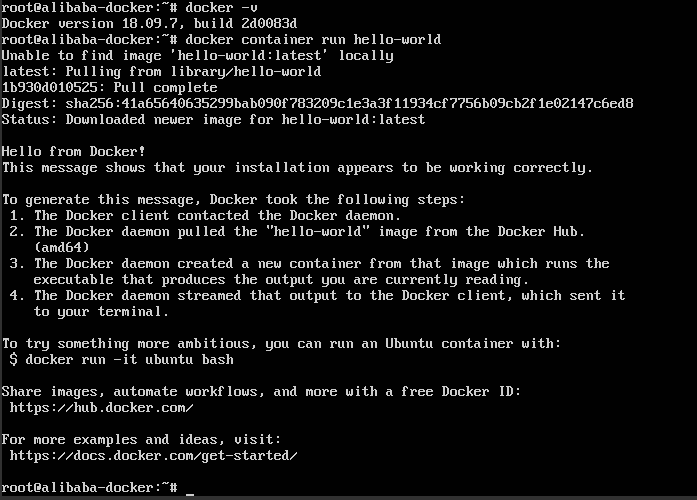
As a preliminary part of this tutorial, you'll want to confirm everything's up and running as it should. First, to confirm that docker is installed on the instance system, you can run the below command to check the version of docker installed on the machine.
root@alibaba-docker:~# docker -v
Docker version 18.09.6, build 481bc77
Next, to check that docker is running correctly, launch a simple hello world container.
root@alibaba-docker:~# docker container run hello-world
Unable to find image 'hello-world:latest' locally
latest: Pulling from library/hello-world
1b930d010525: Pull complete
Digest: sha256:41a65640635299bab090f783209c1e3a3f11934cf7756b09cb2f1e02147c6ed8
Status: Downloaded newer image for hello-world:latest

Hello from Docker!
This message shows that your installation appears to be working correctly.
To generate this message, Docker will have completed the following operations in the background:
To try something more ambitious, you can also run an Ubuntu-installed container with this command below:
$ docker run -it ubuntu bashNext, you can share images, automate workflows, and do more with a free Docker ID, which you can find at Docker's official website. And, for more examples and ideas, check out Docker's Get Started guide.

If you are getting the output you see above, the docker is running properly on your instance, and now we can setup Hadoop inside a docker container. To do so, run a pull command to get the docker image on Hadoop. More specifically, what you'll see is a Docker Image a file with multiple layers, which you'll use to deploy containers.
root@alibaba-docker:~# docker pull sequenceiq/hadoop-docker:2.7.0
2.7.0: Pulling from sequenceiq/hadoop-docker
b253335dcf03: Pulling fs layer
a3ed95caeb02: Pulling fs layer
69623ef05416: Pulling fs layer
63aebddf4bce: Pulling fs layer
46305a4cda1d: Pulling fs layer
70ff65ec2366: Pulling fs layer
72accdc282f3: Pulling fs layer
5298ddb3b339: Pulling fs layer
ec461d25c2ea: Pulling fs layer
315b476b23a4: Pulling fs layer
6e6acc31f8b1: Pulling fs layer
38a227158d97: Pulling fs layer
319a3b8afa25: Pulling fs layer
11e1e16af8f3: Pulling fs layer
834533551a37: Pulling fs layer
c24255b6d9f4: Pulling fs layer
8b4ea3c67dc2: Pulling fs layer
40ba2c2cdf73: Pulling fs layer
5424a04bc240: Pulling fs layer
7df43f09096d: Pulling fs layer
b34787ee2fde: Pulling fs layer
4eaa47927d15: Pulling fs layer
cb95b9da9646: Pulling fs layer
e495e287a108: Pulling fs layer
3158ca49a54c: Pulling fs layer
33b5a5de9544: Pulling fs layer
d6f46cf55f0f: Pulling fs layer
40c19fb76cfd: Pull complete
018a1f3d7249: Pull complete
40f52c973507: Pull complete
49dca4de47eb: Pull complete
d26082bd2aa9: Pull complete
c4f97d87af86: Pull complete
fb839f93fc0f: Pull complete
43661864505e: Pull complete
d8908a83648e: Pull complete
af8b686deb23: Pull complete
c1214abd7b96: Pull complete
9d00f27ba8d2: Pull complete
09f787a7573b: Pull complete
4e86267d5247: Pull complete
3876cba35aed: Pull complete
23df48ffdb39: Pull complete
646aedbc2bb6: Pull complete
60a65f8179cf: Pull complete
046b321f8081: Pull complete
Digest: sha256:a40761746eca036fee6aafdf9fdbd6878ac3dd9a7cd83c0f3f5d8a0e6350c76a
Status: Downloaded newer image for sequenceiq/hadoop-docker:2.7.0
Next, run the below command to the check the list of docker images present on your system.
root@alibaba-docker:~#:~$ docker images
REPOSITORY                 TAG                 IMAGE ID            CREATED             SIZE
hello-world                latest              fce289e99eb9        5 months ago        1.84kB
sequenceiq/hadoop-docker   2.7.0               789fa0a3b911        4 years ago         1.76GB
After that's out of the way, run the Hadoop docker image inside a docker container.
root@alibaba-docker:~# docker run -it sequenceiq/hadoop-docker:2.7.0 /etc/bootstrap.sh -bash
/
Starting sshd:                                             [  OK  ]
Starting namenodes on [9f397feb3a46]
9f397feb3a46: starting namenode, logging to /usr/local/hadoop/logs/hadoop-root-namenode-9f397feb3a46.out
localhost: starting datanode, logging to /usr/local/hadoop/logs/hadoop-root-datanode-9f397feb3a46.out
Starting secondary namenodes [0.0.0.0]
0.0.0.0: starting secondarynamenode, logging to /usr/local/hadoop/logs/hadoop-root-secondarynamenode-9f397feb3a46.out
starting yarn daemons
starting resourcemanager, logging to /usr/local/hadoop/logs/yarn--resourcemanager-9f397feb3a46.out
localhost: starting nodemanager, logging to /usr/local/hadoop/logs/yarn-root-nodemanager-9f397feb3a46.out
bash-4.1#
In the above output you can see, the container is starting all the Hadoop daemons one by one. Just to make sure all the daemons are up and running, run the jps command.
bash-4.1# jps
942 Jps
546 ResourceManager
216 DataNode
371 SecondaryNameNode
126 NameNode
639 NodeManager
bash-4.1#
If you get the above output after running the jps command, then you can be assured that all the hadoop daemons are running correctly. After that, run the docker command shown below to get the details on the docker container.
root@alibaba-docker:~# docker ps
CONTAINER ID        IMAGE                            COMMAND                  CREATED             STATUS              PORTS                                                                                                                                NAMES
9f397feb3a46        sequenceiq/hadoop-docker:2.7.0   "/etc/bootstrap.sh -…"   5 minutes ago      Up 5 minutes       2122/tcp, 8030-8033/tcp, 8040/tcp, 8042/tcp, 8088/tcp, 19888/tcp, 49707/tcp, 50010/tcp, 50020/tcp, 50070/tcp, 50075/tcp, 50090/tcp   determined_ritchie
Run the below command to get the IP address on which the container is running.
bash-4.1# ifconfig
eth0      Link encap:Ethernet  HWaddr 02:42:AC:11:00:02
          inet addr:172.17.0.2  Bcast:172.17.255.255  Mask:255.255.0.0
          UP BROADCAST RUNNING MULTICAST  MTU:1500  Metric:1
          RX packets:93 errors:0 dropped:0 overruns:0 frame:0
          TX packets:21 errors:0 dropped:0 overruns:0 carrier:0
          collisions:0 txqueuelen:0
          RX bytes:9760 (9.5 KiB)  TX bytes:1528 (1.4 KiB)

lo        Link encap:Local Loopback
          inet addr:127.0.0.1  Mask:255.0.0.0
          UP LOOPBACK RUNNING  MTU:65536  Metric:1
          RX packets:3160 errors:0 dropped:0 overruns:0 frame:0
          TX packets:3160 errors:0 dropped:0 overruns:0 carrier:0
          collisions:0 txqueuelen:1000
          RX bytes:455659 (444.9 KiB)  TX bytes:455659 (444.9 KiB)
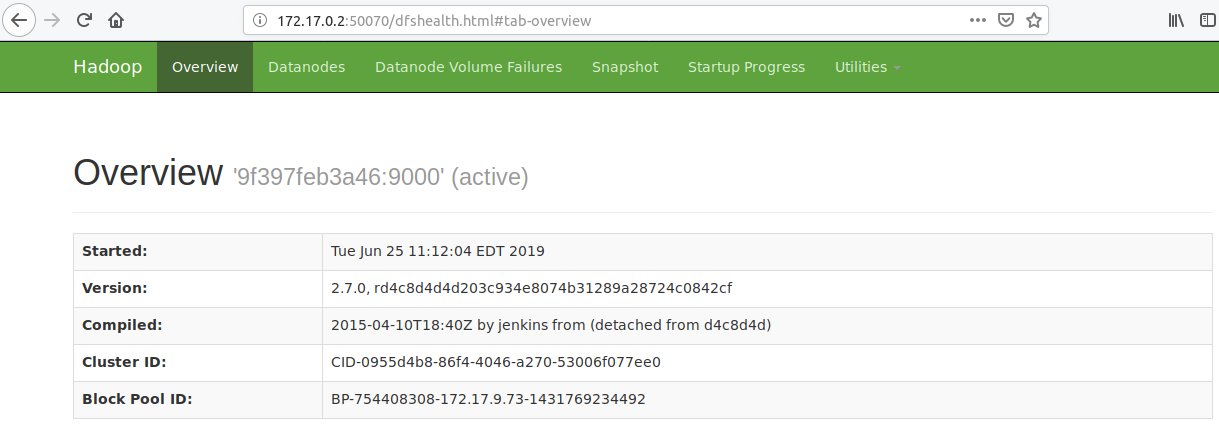
From the above output, we know that the docker container is running at 172.17.0.2. Following this, the Hadoop cluster web interface can be accessed on port 50070. So, you can open your browser, specifically Mozilla Firefox browser, in your ubuntu machine and go to 172.17.0.2:50070. Your Hadoop Overview Interface will open. You can see from below output that Hadoop is running at port 9000, which is the default port.

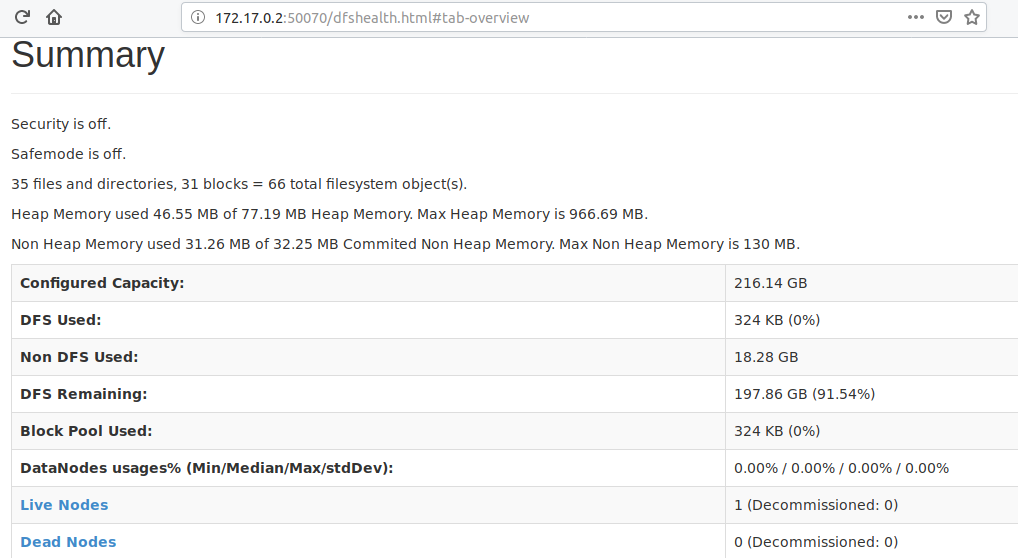
Now scroll down to "Summary", where you will get the details for your Hadoop cluster, which is running inside the docker container. Live Node 1 means 1 datanode is up and running (single node).

To access the Hadoop Distributed File System (HDFS), you can go to Utilities -> Browse the file system. You will find the user directory, which is present in HDFS by default.

Now you're inside a docker container. You will find bash shell inside the container, not the default ubuntu terminal shell. Let's run a wordcount mapreduce program on this Hadoop cluster running inside a docker container. This program will take the input containing text and give output as key value pair where key will the work and value will be the number of occurrences of that word. First thing you'll want to do is go to the Hadoop home directory.
bash-4.1# cd $HADOOP_PREFIXNext, run the hadoop-mapreduce-examples-2.7.0.jar file, which has a wordcount program pre-installed. The output is as follows:
bash-4.1# bin/hadoop jar share/hadoop/mapreduce/hadoop-mapreduce-examples-2.7.0.jar grep input output 'dfs[a-z.]+'
19/06/25 11:28:55 INFO client.RMProxy: Connecting to ResourceManager at /0.0.0.0:8032
19/06/25 11:28:58 INFO input.FileInputFormat: Total input paths to process : 31
19/06/25 11:28:59 INFO mapreduce.JobSubmitter: number of splits:31
19/06/25 11:28:59 INFO mapreduce.JobSubmitter: Submitting tokens for job: job_1561475564487_0001
19/06/25 11:29:00 INFO impl.YarnClientImpl: Submitted application application_1561475564487_0001
19/06/25 11:29:01 INFO mapreduce.Job: The url to track the job: http://9f397feb3a46:8088/proxy/application_1561475564487_0001/
19/06/25 11:29:01 INFO mapreduce.Job: Running job: job_1561475564487_0001
19/06/25 11:29:22 INFO mapreduce.Job: Job job_1561475564487_0001 running in uber mode : false
19/06/25 11:29:22 INFO mapreduce.Job:  map 0% reduce 0%
19/06/25 11:30:22 INFO mapreduce.Job:  map 13% reduce 0%
19/06/25 11:30:23 INFO mapreduce.Job:  map 19% reduce 0%
19/06/25 11:31:19 INFO mapreduce.Job:  map 23% reduce 0%
19/06/25 11:31:20 INFO mapreduce.Job:  map 26% reduce 0%
19/06/25 11:31:21 INFO mapreduce.Job:  map 39% reduce 0%
19/06/25 11:32:11 INFO mapreduce.Job:  map 39% reduce 13%
19/06/25 11:32:13 INFO mapreduce.Job:  map 42% reduce 13%
19/06/25 11:32:14 INFO mapreduce.Job:  map 55% reduce 15%
19/06/25 11:32:18 INFO mapreduce.Job:  map 55% reduce 18%
19/06/25 11:32:59 INFO mapreduce.Job:  map 58% reduce 18%
19/06/25 11:33:00 INFO mapreduce.Job:  map 61% reduce 18%
19/06/25 11:33:02 INFO mapreduce.Job:  map 71% reduce 19%
19/06/25 11:33:05 INFO mapreduce.Job:  map 71% reduce 24%
19/06/25 11:33:45 INFO mapreduce.Job:  map 74% reduce 24%
19/06/25 11:33:46 INFO mapreduce.Job:  map 81% reduce 24%
19/06/25 11:33:47 INFO mapreduce.Job:  map 84% reduce 26%
19/06/25 11:33:48 INFO mapreduce.Job:  map 87% reduce 26%
19/06/25 11:33:50 INFO mapreduce.Job:  map 87% reduce 29%
19/06/25 11:34:28 INFO mapreduce.Job:  map 90% reduce 29%
19/06/25 11:34:29 INFO mapreduce.Job:  map 97% reduce 29%
19/06/25 11:34:30 INFO mapreduce.Job:  map 100% reduce 32%
19/06/25 11:34:32 INFO mapreduce.Job:  map 100% reduce 100%
19/06/25 11:34:32 INFO mapreduce.Job: Job job_1561475564487_0001 completed successfully
19/06/25 11:34:32 INFO mapreduce.Job: Counters: 50
File System Counters
FILE: Number of bytes read=345
FILE: Number of bytes written=3697508
FILE: Number of read operations=0
FILE: Number of large read operations=0
FILE: Number of write operations=0
HDFS: Number of bytes read=80529
HDFS: Number of bytes written=437
HDFS: Number of read operations=96
HDFS: Number of large read operations=0
HDFS: Number of write operations=2
Job Counters
Killed map tasks=1
Launched map tasks=32
Launched reduce tasks=1
Data-local map tasks=32
Total time spent by all maps in occupied slots (ms)=1580786
Total time spent by all reduces in occupied slots (ms)=191081
Total time spent by all map tasks (ms)=1580786
Total time spent by all reduce tasks (ms)=191081
Total vcore-seconds taken by all map tasks=1580786
Total vcore-seconds taken by all reduce tasks=191081
Total megabyte-seconds taken by all map tasks=1618724864
Total megabyte-seconds taken by all reduce tasks=195666944
Map-Reduce Framework
Map input records=2060
Map output records=24
Map output bytes=590
Map output materialized bytes=525
Input split bytes=3812
Combine input records=24
Combine output records=13
Reduce input groups=11
Reduce shuffle bytes=525
Reduce input records=13
Reduce output records=11
Spilled Records=26
Shuffled Maps =31
Failed Shuffles=0
Merged Map outputs=31
GC time elapsed (ms)=32401
CPU time spent (ms)=19550
Physical memory (bytes) snapshot=7076614144
Virtual memory (bytes) snapshot=22172876800
Total committed heap usage (bytes)=5196480512
Shuffle Errors
BAD_ID=0
CONNECTION=0
IO_ERROR=0
WRONG_LENGTH=0
WRONG_MAP=0
WRONG_REDUCE=0
File Input Format Counters
Bytes Read=76717
File Output Format Counters
Bytes Written=437
19/06/25 11:34:32 INFO client.RMProxy: Connecting to ResourceManager at /0.0.0.0:8032
19/06/25 11:34:33 INFO input.FileInputFormat: Total input paths to process : 1
19/06/25 11:34:33 INFO mapreduce.JobSubmitter: number of splits:1
19/06/25 11:34:33 INFO mapreduce.JobSubmitter: Submitting tokens for job: job_1561475564487_0002
19/06/25 11:34:33 INFO impl.YarnClientImpl: Submitted application application_1561475564487_0002
19/06/25 11:34:33 INFO mapreduce.Job: The url to track the job: http://9f397feb3a46:8088/proxy/application_1561475564487_0002/
19/06/25 11:34:33 INFO mapreduce.Job: Running job: job_1561475564487_0002
19/06/25 11:34:50 INFO mapreduce.Job: Job job_1561475564487_0002 running in uber mode : false
19/06/25 11:34:50 INFO mapreduce.Job:  map 0% reduce 0%
19/06/25 11:35:04 INFO mapreduce.Job:  map 100% reduce 0%
19/06/25 11:35:18 INFO mapreduce.Job:  map 100% reduce 100%
19/06/25 11:35:19 INFO mapreduce.Job: Job job_1561475564487_0002 completed successfully
19/06/25 11:35:19 INFO mapreduce.Job: Counters: 49
File System Counters
FILE: Number of bytes read=291
FILE: Number of bytes written=230543
FILE: Number of read operations=0
FILE: Number of large read operations=0
FILE: Number of write operations=0
HDFS: Number of bytes read=570
HDFS: Number of bytes written=197
HDFS: Number of read operations=7
HDFS: Number of large read operations=0
HDFS: Number of write operations=2
Job Counters
Launched map tasks=1
Launched reduce tasks=1
Data-local map tasks=1
Total time spent by all maps in occupied slots (ms)=10489
Total time spent by all reduces in occupied slots (ms)=12436
Total time spent by all map tasks (ms)=10489
Total time spent by all reduce tasks (ms)=12436
Total vcore-seconds taken by all map tasks=10489
Total vcore-seconds taken by all reduce tasks=12436
Total megabyte-seconds taken by all map tasks=10740736
Total megabyte-seconds taken by all reduce tasks=12734464
Map-Reduce Framework
Map input records=11
Map output records=11
Map output bytes=263
Map output materialized bytes=291
Input split bytes=133
Combine input records=0
Combine output records=0
Reduce input groups=5
Reduce shuffle bytes=291
Reduce input records=11
Reduce output records=11
Spilled Records=22
Shuffled Maps =1
Failed Shuffles=0
Merged Map outputs=1
GC time elapsed (ms)=297
CPU time spent (ms)=1610
Physical memory (bytes) snapshot=346603520
Virtual memory (bytes) snapshot=1391702016
Total committed heap usage (bytes)=245891072
Shuffle Errors
BAD_ID=0
CONNECTION=0
IO_ERROR=0
WRONG_LENGTH=0
WRONG_MAP=0
WRONG_REDUCE=0
File Input Format Counters
Bytes Read=437
File Output Format Counters
Bytes Written=197
After the mapreduce program has finished executing the operation, run the below command to check the output.
bash-4.1# bin/hdfs dfs -cat output/*
6 dfs.audit.logger
4 dfs.class
3 dfs.server.namenode.
2 dfs.period
2 dfs.audit.log.maxfilesize
2 dfs.audit.log.maxbackupindex
1 dfsmetrics.log
1 dfsadmin
1 dfs.servers
1 dfs.replication
1 dfs.file
bash-4.1#
Now you've successfully setup a single node Hadoop cluster using Docker. You can check out other articles on Alibaba Cloud to learn more about Docker and Hadoop.

2,593 posts | 793 followers
FollowAlibaba Clouder - November 14, 2019
Alibaba Clouder - September 29, 2019
Alibaba Cloud Indonesia - February 15, 2024
Alibaba Cloud Community - December 29, 2021
Alibaba Clouder - April 9, 2019
Alibaba Developer - February 1, 2021

2,593 posts | 793 followers
Follow MaxCompute
Conduct large-scale data warehousing with MaxCompute
Learn More DataWorks
A secure environment for offline data development, with powerful Open APIs, to create an ecosystem for redevelopment.
Learn More ECS(Elastic Compute Service)
Elastic and secure virtual cloud servers to cater all your cloud hosting needs.
Learn MoreMore Posts by Alibaba Clouder