By Xulun
In the Quick Start to VSCode Plug-Ins: Programming Language Extensions, we introduced the general situation of language extensions in VSCode. In this part of the tutorial series, we start to go into some more details about diagnostic information found in VSCode.
Diagnostic information specifically that for code scanning is an important function of language extension. This sort of diagnostic information is presented on the basis of VSCode.
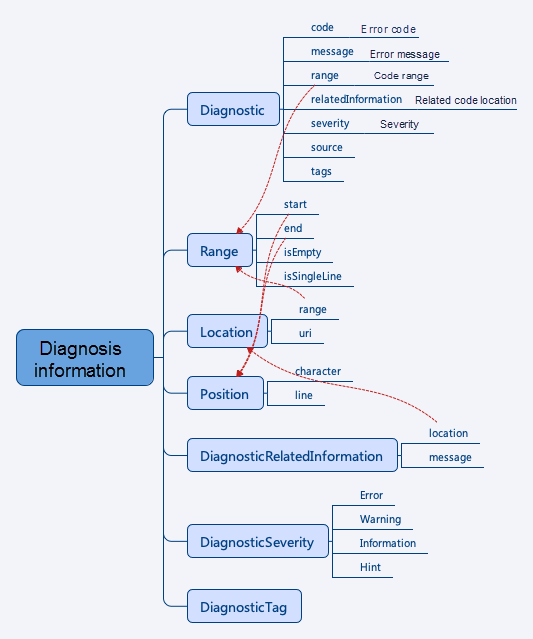
In this part of this multi-part tutorial series, let's take a look at the diagnostic information classes of the VSCode:

From the graphic above, you can see the major classes of diagnostic information are:
Below, we will create some diagnostic information through these steps:
Create an example of BASIC and save it as test.bas:
dim i as integer

for i = 1 to 10 step 1
    for i = 1 to 10 step 1
        print "*";
    next i
next i
In this example, the loop control variable is reused in the external and internal loops, leading to the failure of the external loop. The problematic Range is the 9th to 10th characters on row 4. The Position starts with 0, so we build a Range (3, 8) to (3, 9), with two positions as the start and the end.
        new vscode.Range(
            new vscode.Position(3, 8), new vscode.Position(3, 9),
        )
With the Range, plus the problem description message and the problem severity program, a Diagnostic information can be built.
    let diag1: vscode.Diagnostic = new vscode.Diagnostic(
        new vscode.Range(
            new vscode.Position(3, 8), new vscode.Position(3, 9),
        ),
        'Repeated assignment of loop variables',
        vscode.DiagnosticSeverity.Hint,
    )
One type of aiagnostic information can be created with a Range, a description message, and severity program.
In addition, some advanced information can also be set. The first is the source. For example, the problem comes from a certain ESlint version, because a certain rule is used. This can be written to the "source" property of the Diagnostic information.
diag1.source = 'basic-lint';The second is the error code, which is helpful for classification and query. This is represented by the code property. It can be either a number or a string.
diag1.code = 102;The third is related information. In the above example, i has been assigned a value, but we can further tell developers where it was assigned a value. Therefore, a URI is required to find the address of the code. In addition, a Range is required to tell the specific location in the URI. This is a vscode.Location structure.
    diag1.relatedInformation = [new vscode.DiagnosticRelatedInformation(
        new vscode.Location(document.uri,
            new vscode.Range(new vscode.Position(2, 4), new vscode.Position(2, 5))),
        'First assignment')];
Next, we integrate them together, and pop up an error message for the test.bas above. It mainly writes the above prompt information to the DiagnosticCollection passed in.
import * as vscode from 'vscode';
import * as path from 'path';

export function updateDiags(document: vscode.TextDocument,
    collection: vscode.DiagnosticCollection): void {
    let diag1: vscode.Diagnostic = new vscode.Diagnostic(
        new vscode.Range(
            new vscode.Position(3, 8), new vscode.Position(3, 9),
        ),
        'Repeated assignment of loop variables',
        vscode.DiagnosticSeverity.Hint,
    );
    diag1.source = 'basic-lint';
    diag1.relatedInformation = [new vscode.DiagnosticRelatedInformation(
        new vscode.Location(document.uri,
            new vscode.Range(new vscode.Position(2, 4), new vscode.Position(2, 5))),
        'First assignment')];
    diag1.code = 102;

    if (document && path.basename(document.uri.fsPath) === 'test.bas') {
        collection.set(document.uri, [diag1]);
    } else {
        collection.clear();
    }
}Next, we add the call to the updateDiags function just written, into the activate function of the plug-in.
    const diag_coll = vscode.languages.createDiagnosticCollection('basic-lint-1');

    if (vscode.window.activeTextEditor) {
        diag.updateDiags(vscode.window.activeTextEditor.document, diag_coll);
    }

    context.subscriptions.push(vscode.window.onDidChangeActiveTextEditor(
        (e: vscode.TextEditor | undefined) => {
            if (e !== undefined) {
                diag.updateDiags(e.document, diag_coll);
            }
        }));
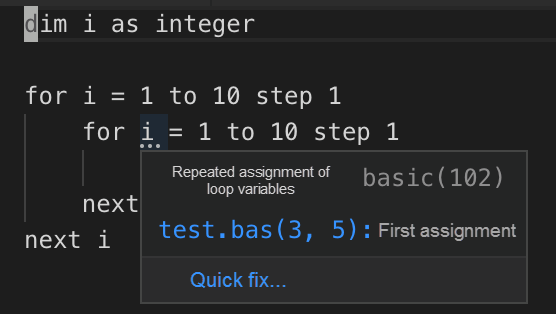
Run it. Open test.bas in the newly launched VSCode, and then arbitrarily edit the code at the end to trigger the activation. The running interface is as follows:

We can see a prompt below the "i" variable in row 4. The error code is 102, and the source is basic-lint. The second row is the information of DiagnosticRelatedInformation.
Quick Start to VSCode Plug-Ins: Programming Language Extensions
Quick Start to VSCode Plug-Ins: Language Server Protocol (LSP)
Louis Liu - August 26, 2019
Louis Liu - August 27, 2019
Louis Liu - August 27, 2019
Louis Liu - August 27, 2019
Louis Liu - August 26, 2019
Louis Liu - August 27, 2019
 YiDA Low-code Development Platform
A low-code development platform to make work easier
Learn More mPaaS
mPaaS
Help enterprises build high-quality, stable mobile apps
Learn More Super App Solution for Telcos
Alibaba Cloud (in partnership with Whale Cloud) helps telcos build an all-in-one telecommunication and digital lifestyle platform based on DingTalk.
Learn MoreMore Posts by Louis Liu