Alibaba Cloud offers a powerful Web Application Firewall (WAF) to protect your cloud-based services and web sites from common techniques and threats posed by hackers.
This tutorial will walk you through the process of purchasing the WAF service and setting the service up for use.
To follow this tutorial, you'll need an Alibaba Cloud account, and you'll need to know how to log in and get to the main console screen. If you don't already have an account, you can sign up at http://www.alibabacloud.com/ . You'll also receive USD $300 of credit as a new user.
Whereas a conventional firewall protects a server by blocking access to or from specified TCPIP ports, or tofrom specified IP addresses, a Web Application Firewall is designed to detect traffic that appears to be an attempt to gain unauthorized access to a web-based application, or to commit fraud.
It works by operating "upstream" of your protected site. To use it, you change the DNS settings of your site to point at the WAF. It then filters incoming traffic, rejects offending packets, and forwards all permitted traffic.
In this tutorial we will use the WAF to protect an application which is hosted on an Alibaba Cloud server. Alibaba Cloud WAF can also be used to protect applications running on servers other than those provided by Alibaba Cloud – raise a support ticket on your account if you'd like further information about this.
The threats against which a WAF is effective are typically those covered in the OWASP (Open Web Application Security Project) material, and include:
The ability of the WAF to detect both conventional hacking attempts as well as fraud is of particular importance, and it can detect fraud attempts by both humans and automated bots. This will be of interest in those industries which are specifically vulnerable to this type of threat, such as transport, banking and insurance, healthcare, government, e-commerce and real estate.
To use the Alibaba Cloud WAF you'll need to have a web-based application up and running that you wish to protect. You'll also need:
If you don't already have a site up and running, you can create one quickly and easily on Alibaba Cloud. In this tutorial we will protect a WordPress installation at www.my-test-domain-123.com whose public IP address is 184.168.221.42. The precise steps that were used to create the site are beyond the scope of this tutorial, but can be summarized as follows.
The cost of the server for a month, including the domain registration, will be around $10, and if you're a new Alibaba Cloud user you can use some of your $300 new user credit to pay for it.
Before you can deploy and configure the WAF, you need to purchase the service. If you haven't already done this, log in to your Alibaba Cloud console and, under Security, choose Web Application Firewall.
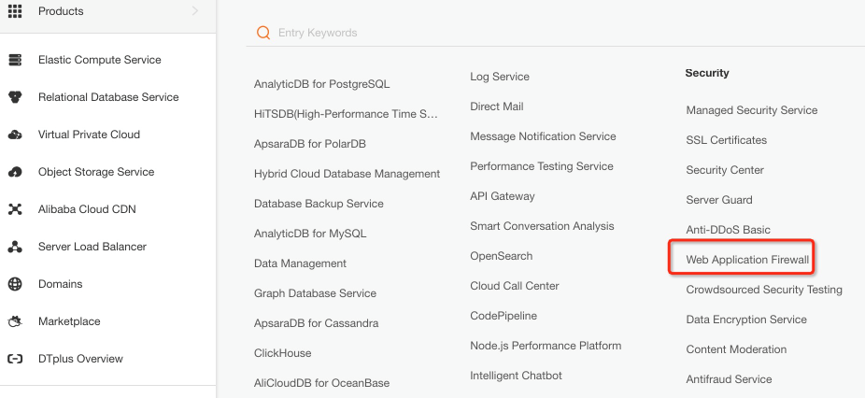
You'll see a screen that looks like this
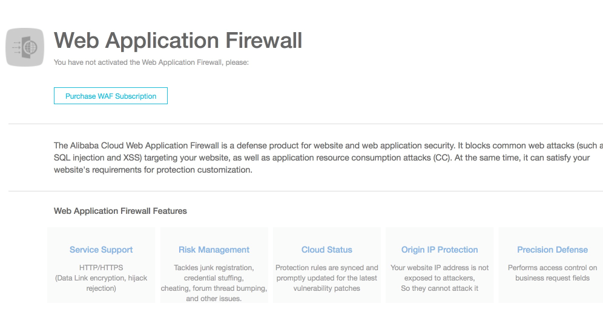
Click on the Purchase WAF Subscription button.
Then you'll see the following screen, which allows you to specify your requirements before you make the purchase.
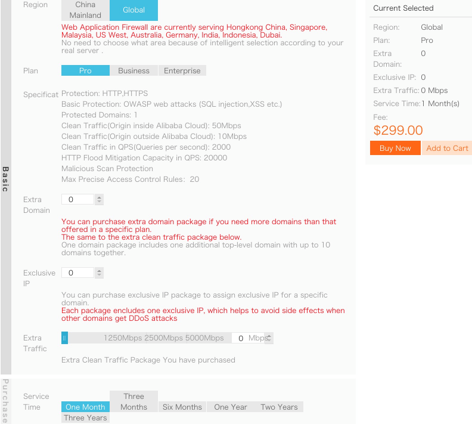
If the service you wish to protect is hosted in Mainland China, choose the China Mainland option at the top of the screen. Otherwise choose Global.
Click on the Pro, Business and Enterprise buttons in turn, and read the specification that is displayed for each. Choose the option that is best for you. In this tutorial we will use the Pro option.
The Pro, Business and Enterprise options let you protect 1, 3 or 5 top-level domains respectively. You can add up to 9 subdomains to each top-level domain free of charge. So if you wish to protect www.mycompany.com and mail.mycompany.com then you only need to pay to protect one domain.
If you need to protect additional domains then you can do so via the Extra Domain option, or choose the Business or Enterprise package rather than Pro.
You can also purchase additional exclusive IP addresses and extra traffic from this screen too (the amount of traffic included with each package is shown when you click the Pro, Business or Enterprise buttons).
Choose a Service Time, that is to say the duration for which you want the WAF. For now we'll choose one month, but you can purchase the service for up to three years. Paying upfront for longer periods will get you a discount of up to 15 percent.
When you've made your choices, click on the Buy Now button and you'll see a summary of your order. You also need to tick the box to agree to the terms of service.
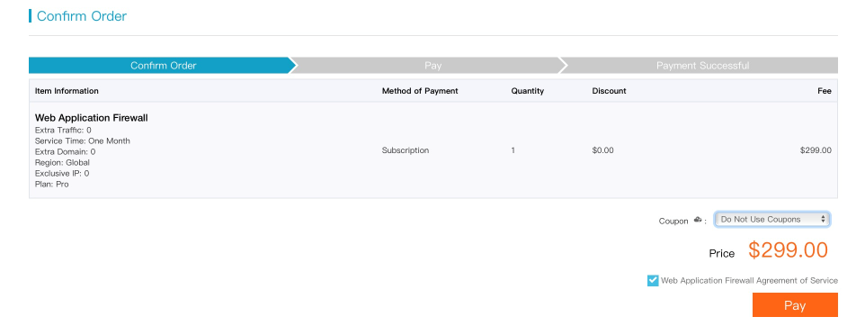
Finally click on the Pay button to see a final order summary, then click the Pay button again to make the payment. Your payment will be processed.

It will take a few minutes to complete the payment and activate the service. To check the status, click on the link to your order management page. If you need to return to that page later, start from the main console home page then, under Billing Management on the top menu line, click on Orders.

Wait until the status changes from Paying to Paid, at which point your WAF will be ready to use.

With the purchase complete we can now go on to deploy the WAF. To start, log in to the console and, as before, choose Web Application Firewall from the Security menu.
Note that the WAF screen defaults to the Mainland China region. If you still see a Buy Now button and if you purchased the international WAF region, this will be why. Change the current region to International.
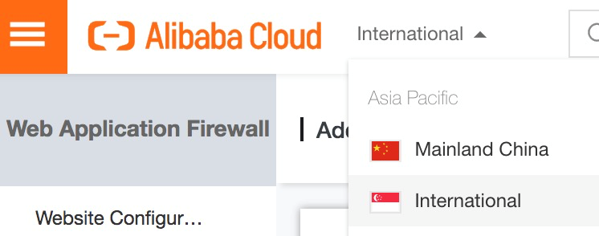
You can now see the main WAF screen.

The screen shows the domains that you have chosen to protect (there are none as yet), the expiry date of your WAF subscription, and some further information too.
Click on Add Domain.

Fill in the name and IP address of the site you wish to protect.
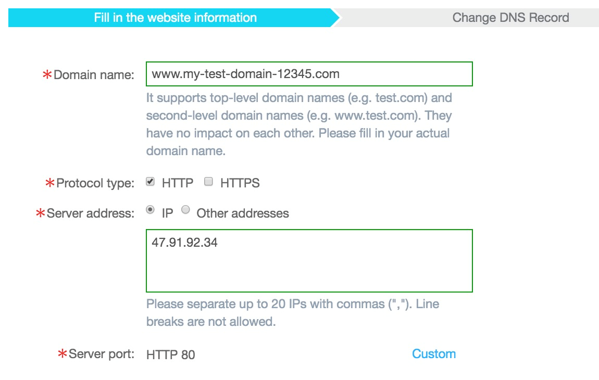
The Domain name entry allows wildcards if you wish (such as .ourcompany.com).
If your site operates on more than one server and therefore has more than one IP address, you can specify up to 20 IP addresses. Otherwise just enter the address of your single server. If you specify more than one IP address they will be automatically load-balanced, in which case you can choose from the IP hash or round robin algorithm.
In the case of round robin load balancing, each IP address in the list will be used in turn. In IP hash load balancing, a hash of a packet's source and destination address is used to determine which of the entered IP addresses is used. Unless you have a specific reason not to do so, we recommend that you choose IP hash.
When you're ready, click Next.
If you include the HTTPS protocol, note that you will be asked to upload the certificate and the private key for the domain. For simplicity, we will stick to HTTP in this tutorial.
The WAF works by positioning itself in front of your site so that it can filter all incoming traffic. Therefore, you need to change the DNS settings of your site to point to the WAF rather than to your actual site. The WAF will then accept all incoming traffic, filter it, and pass on the filtered traffic to your actual site. To activate the WAF you need to change your site's DNS settings. If the site is hosted on Alibaba Cloud then this can be done automatically, and the screen that appears will show you how.
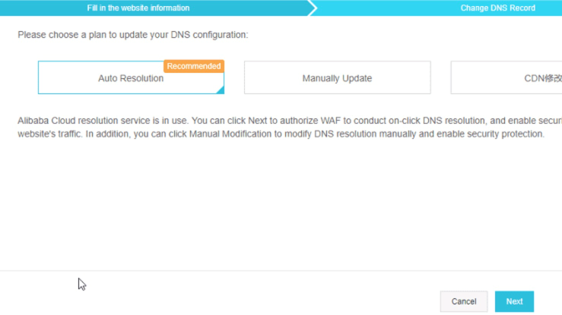
Simply ensure that Auto Resolution is selected, and click the Next button. If the change is successful you will see the following

Click OK, then click "Return to web list" to check the status of your WAF. You'll probably see an error message because the DNS hasn't been updated yet.
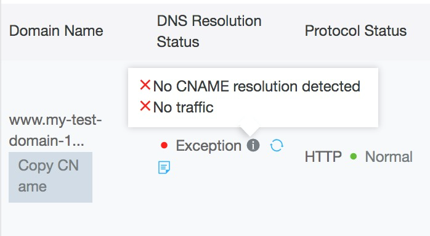
Wait a few minutes and check again (choose Web Application Firewall from the console's Security menu, then, under Management, click Website Configuration).
After a few minutes, the DNS settings should take effect and you'll see that everything is working.

The WAF is now monitoring your site and is protecting you against common threats such as database injection and cross-site scripting. If you wish, you can leave it at that. However, you may prefer to tailor the WAF to your needs by adding new rules or editing the existing ones. If you want to do so, just click on the Policies link to get started.
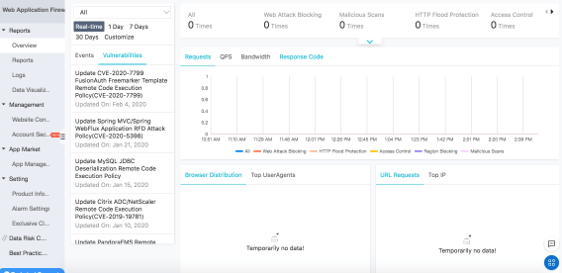
With your WAF up and running, you can choose to simply leave it working in the background to keep your site protected. However, you can also log in occasionally to read reports about threats that have been blocked. This is a good security practice. To do so, first log in to the console. From the Security section choose Web Application Firewall, then use the options in the Reports section on the left hand side of the screen to see details of traffic, threats blocked, and so on.
This tutorial has demonstrated how to use the Alibaba Cloud Web Application Firewall. To get started and use it on your own systems, whether they are hosted with Alibaba Cloud or elsewhere, see http://www.alibabacloud.com/product/waf . Or if you don't already have an Alibaba Cloud account, start at http://www.alibabacloud.com/ , where you can sign up and receive $300 in credit as a new user.
Setting up a Jenkins-Based Continuous Delivery Pipeline with Docker
Protect Your Website and Servers with Alibaba Cloud WAF Anti-Bot Features

2,597 posts | 775 followers
FollowAlibaba Clouder - July 11, 2019
Alibaba Clouder - July 12, 2019
Alibaba Clouder - January 28, 2021
Alibaba Clouder - December 25, 2020
Alibaba Clouder - July 9, 2019
Alibaba Clouder - July 10, 2019

2,597 posts | 775 followers
Follow WAF(Web Application Firewall)
A cloud firewall service utilizing big data capabilities to protect against web-based attacks
Learn More Security Center
A unified security management system that identifies, analyzes, and notifies you of security threats in real time
Learn More ECS(Elastic Compute Service)
Elastic and secure virtual cloud servers to cater all your cloud hosting needs.
Learn MoreMore Posts by Alibaba Clouder
Start building with 50+ products and up to 12 months usage for Elastic Compute Service
Get Started for Free Get Started for Free