By Abdulaziz Gebril, Alibaba Cloud Community Blog author
This tutorial is a two-part series on how to configure Load Balancer for ECS instances created by using Alibaba Cloud Starter Package. In the current tutorial, we will show you how to get started with Alibaba Cloud by using Starter Package ECS instances and will give you a walkthrough on how to create and prepare your Starter Package ECS instances. While the second part will show you how to setup the Server Load Balancer for your active ECS instances.
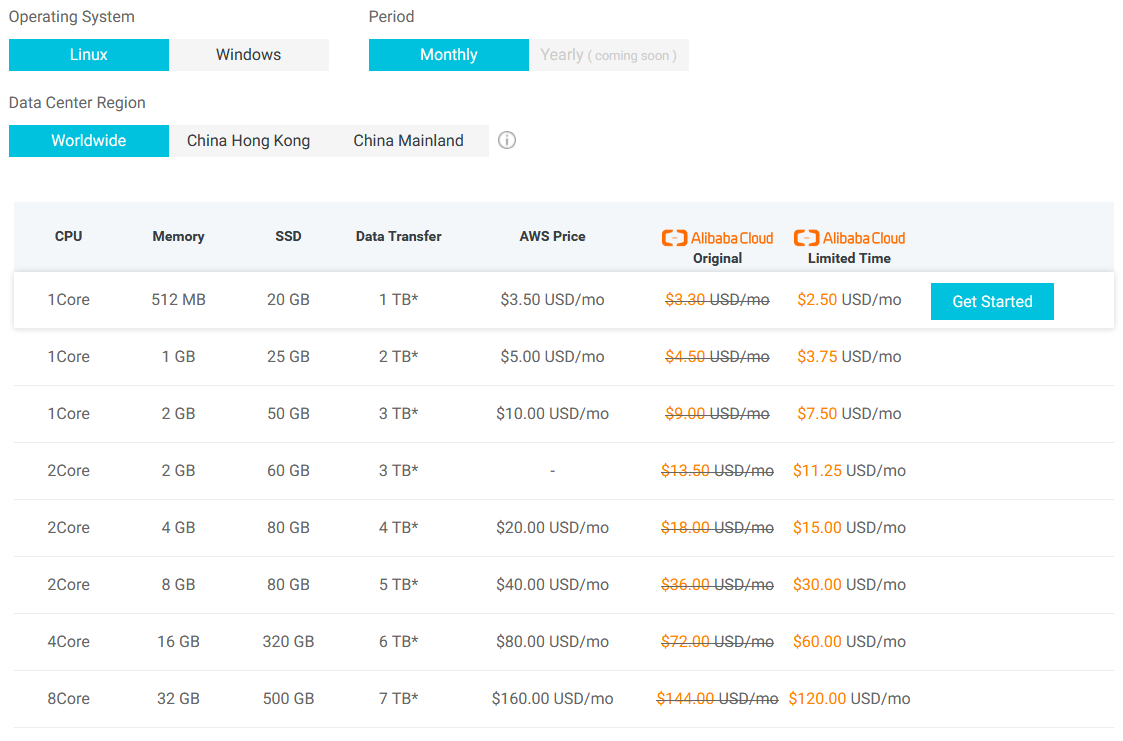
Alibaba Cloud's Starter Package helps you get started instantly through simple, scalable, and cost-effective Elastic Compute Service (ECS) that caters to all your cloud hosting needs. The new SSD Cloud Server Packages provide easy-to-use, high-performance virtual machines with higher data transfer plans at hugely discounted rates for enabling you to start from as low as $2.50 a month. Since it is available across 14 global regions, you can easily choose the Datacenter Region for your servers to meet any specific requirements. It allows each user to have up to five ECS instances with the simultaneous Data Transfer Plans.
Having an Alibaba Cloud account with a valid payment method is a prerequisite to get started with the Starter Package program. In case you don't already have one, set up an account before continuing.
To get started, log in to your Alibaba Cloud account, and directly navigate to the Starter Package page to review a comprehensive range of server sizes available, with a single click. Alibaba Cloud allows you to easily choose between a Linux or Windows operating system for your cloud server. Further, it's essential to note that Windows instances are slightly expensive with prices starting from $6 per month, compared to the highly economical Linux servers starting at a minimum price of $2.50 a month.
Next, it allows you to select the Data Center Region. On this page, you can select Worldwide as we will choose our specific Datacenter Region and Zone on the next detailed specification page. Now choose the package that you want and click the Get Started button.
On the next page, you see additional details and options for the selected package.
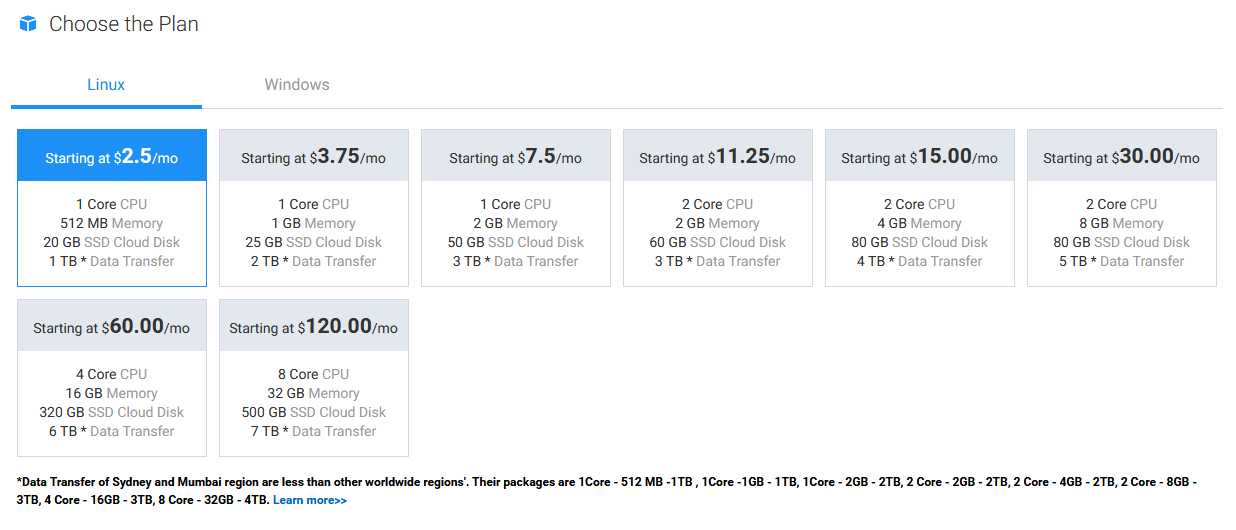
Once you choose the package, you can select the Datacenter Region to host your server according to your requirements. Select US East 1 (Virginia) or US West 1 (Silicon Valley) unless you particularly want a specific region either in Asia or Europe. It makes sense to choose either of these locations only if you require a server principally to deliver content to people in Asia or Europe.

It is critical to note that if you choose to host in Asia, Mainland China, you need to complete the real-name verification and apply for an Internet Content Provider (ICP) license.
Real-name verification and ICP license are not required for instances launched in Hong Kong or any other region outside Mainland China. After you create an instance, you cannot change its region and zone.
If you are creating multiple instances for an application that requires lower network latency, it is recommended to create the instances in the same zone. Additionally, if your application demands higher provisions for disaster recovery, it is recommended to create the instances in different zones of one region. Take note that if you don't specify a zone, the instance will be put in a Random zone for the selected region.
Moving ahead, you can choose your preferred operating system from the array of options available

By default, the basic version of the Server Guard is selected and it is recommended that you leave the option selected. It's a free built-in security feature that provides Trojan detection, abnormal login warnings, brute-force blocking and cracking interception.
Furthermore, the ECS supports both, automatic renewal and manual renewal. By default, auto-renew is pre-selected to ensure that your ECS instance gets automatically renewed at the same discounted price until you cancel it.

The final price is based on your chosen region for the ECS instance. Check the final cost and click the Buy Now button to go to the payment page.
The following page will display your chosen ECS configuration along with a data transfer plan. Review the details, and make changes if required by clicking Go Back. Before you place the order, confirm that you have read and accepted the End User Licensing Agreement and the General Terms of Alibaba Cloud, and then click the Place Order button.
Review your choices on the final page and then hit the Pay button to complete your order.
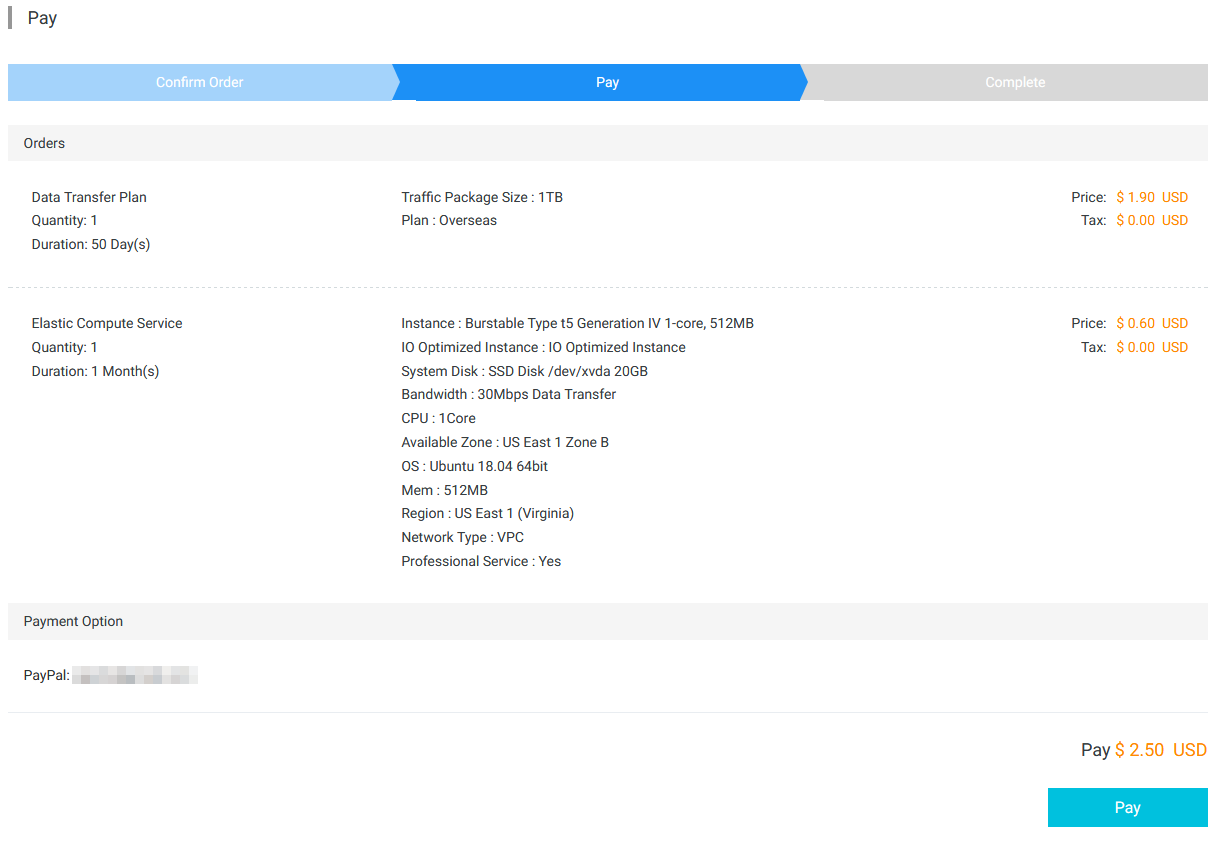
Once your payment is successfully processed, you get access to a simple, pre-configured ECS server instance on Alibaba Cloud. For this tutorial, we repeat this process to purchase another four Starter Package ECS instances in the same region for setting up a Server Load Balancer for the same in the second part of this tutorial.
To manage all your Alibaba Cloud ECS instances and other products, click on Console at the top navigation bar. Then, on the left side of the Console, besides the Alibaba Cloud's logo, click on the menu icon as shown below to view all the Alibaba Cloud Products.

In order to manage the purchased instances, click on Elastic Compute Service under the Elastic Computing section. This will let you retrieve a summary of your ECS instances across all the Alibaba Cloud hosting regions.
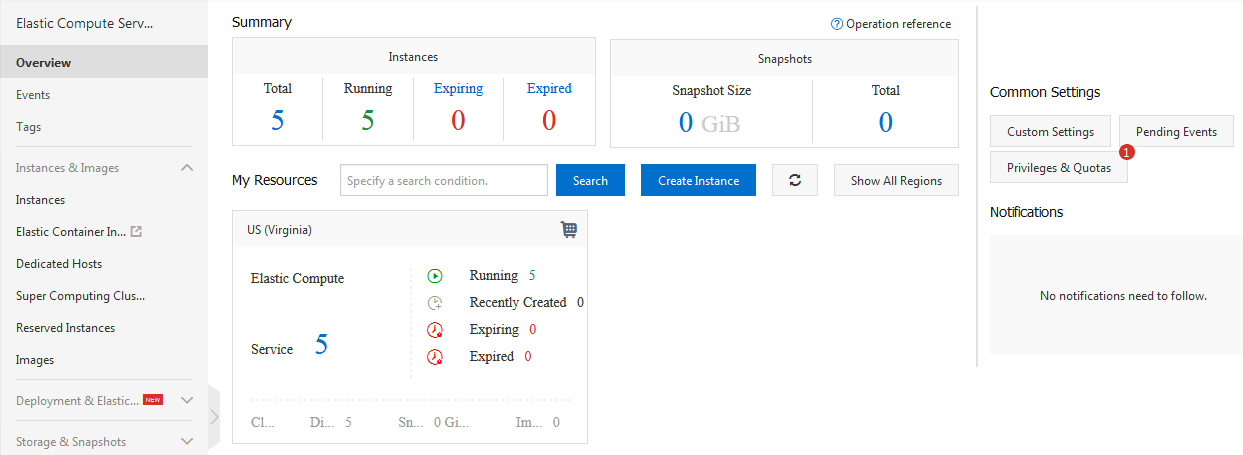
Now choose Instances and Images > Instances in the left-side navigation menu and in the top navigation bar, select the region where the instances are located.

It's important to understand that Regions in Alibaba Cloud are independent, you can have several instances as well as other products in different regions and zones, but you have to specify a region to view and manage your products in the console.
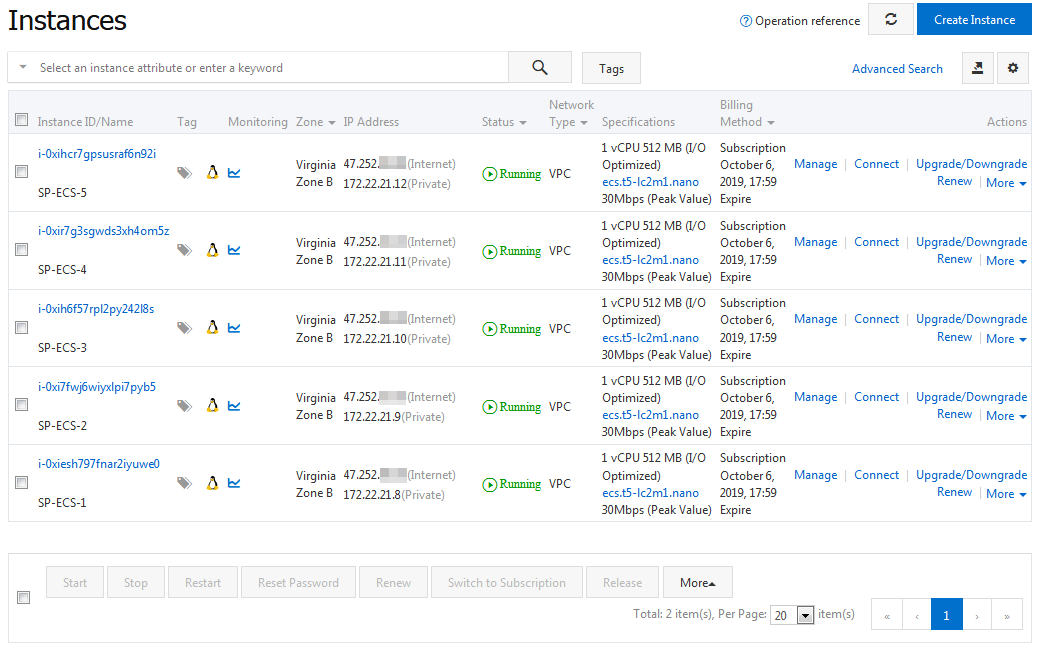
This will display the list of instances for the region and shows the basic information about each instance, such as status, configuration, network type, and internal and public IP addresses.
You can rename each instance to something more relevant than the random name that was assigned at the time of instance creation. Place your mouse over the Instance ID/Name column and click the Edit icon.
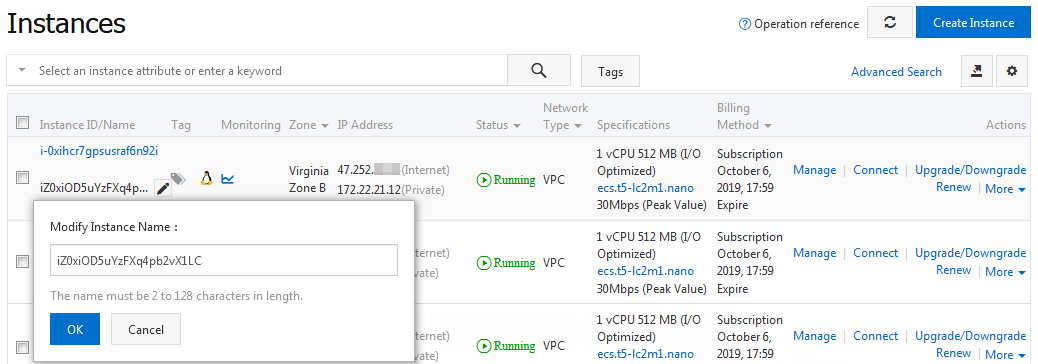
To make things easier, for our tutorial, we will rename all the five instances as SP-ECS along with a number ranging between 1 to 5 respectively as shown below:
An ECS instance must belong to one or more security groups. Security groups are sets of firewall rules that allow access to your server, and is considered as an additional protection layer that gives you the control of your Inbound/Outbound traffic.
You may get a warning message about the security group similar to the one mentioned below.

After you create an ECS instance in a region, a default security group is created, in case no security group has been specified in the particular region. The default security group will have the following basic firewall rules:
This implies that no one except you can access your instance.
We need to add firewall rules to allow the inbound traffic to HTTP port 80 and HTTPS 443 which are used for web servers, in addition to ICMP, SSH port 22, RDP port 3389.
You can also go ahead to:
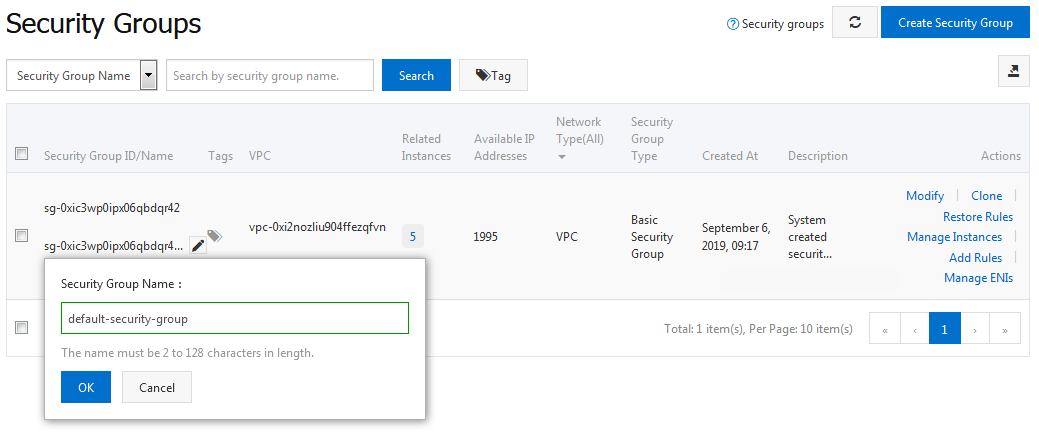
Additionally, you can simply modify the default security group as depicted below to suit our needs by choosing Network & Security > Security Groups in the left-side navigation menu.
Start by changing the random name of the default security group created by the system to something more meaningful. Place your mouse over the Security Group ID/Name column and click the Edit icon.
Now click on Add Rules in the Actions column.

Then click Quick Rule Creation, select HTTP (80), HTTPS (443) and any other ports that you need, and set the Authorization Objects 0.0.0.0/0 to allow all IP addresses unless you particularly want to limit the access to an IP address/CIDR block.
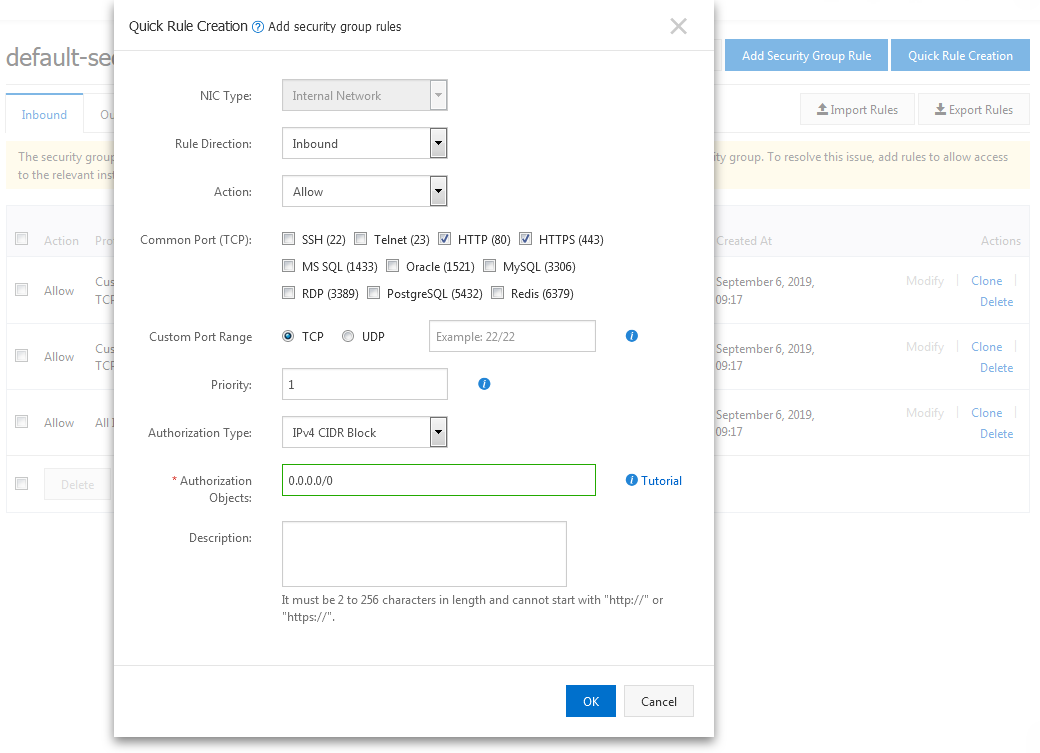
In addition, you can add any of the following ports by clicking on Add Security Group Rule. For more information refer to the Add Security Group Rules Guide.
 20 – FTP
 21 – FTP
 25 – SMTP/EMAIL
 53 – BIND/DNS
110 – POP3/EMAIL
143 – IMAP
465 – SMTP/EMAIL SSL/TLS
587 - SMTPS
873 – RSYNC
993 – IMAP/EMAIL SSL
995 – POP3/EMAIL SSL
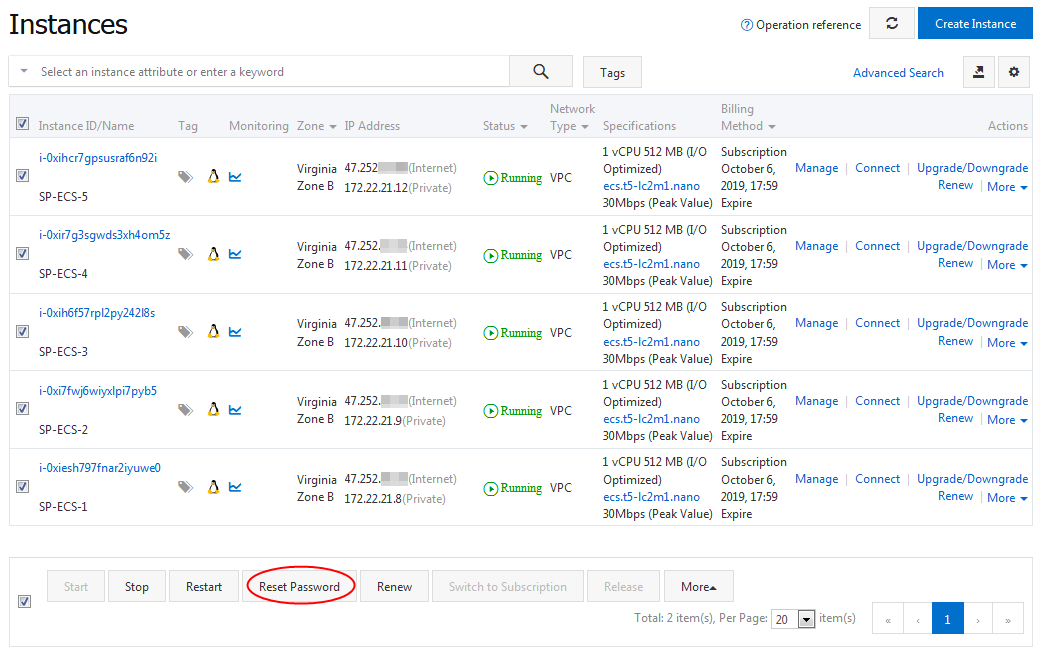
In order to connect to the new instances that you have created. First, you need to set a root password for the same. Select the instances and click on Reset Password under the instance list.
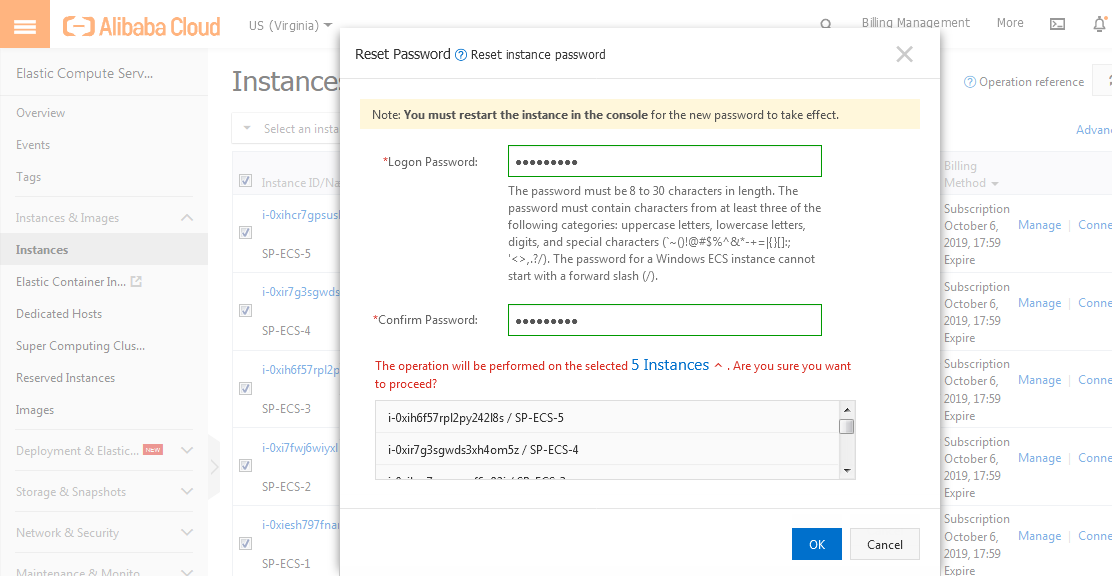
Specify and confirm a new valid password and then click OK.
Then select the instances to restart them by clicking on Restart to ensure that the new password is in effect.
Now you can make a remote connection to any of your instances using SSH client such as PuTTY. To find more information on how to connect to a specific instance, follow the instructions below:
As a part of this tutorial, it is required to setup a simple Web server to serve HTTP/HTTPS requests, such as Apache or nginx. You can install Apache by connecting to your instances as a root, then use one of the following commands:
yum -y updateyum -y install httpdapt-get -y updateapt-get -y install apache2Open your browser and hit the public IP of your instance as follows:http://PUBLIC_IP
The server default page will display upon installation. In order to identify each of your ECS instances, navigate to /var/www/html/ and create a file named instance.html, then put the instance name in this file and save it.
Open your browser and hit that page using the public IP of your instance as follows:http://PULIC_IP/instance.html
This will show your instance name.
So, now you have everything ready and prepared for the next step. In the second part of this tutorial we will explain a step-by-step procedure about how to setup Server Load Balancer for the five ECS instances created in this tutorial.
Load Balancing Between Starter Package ECS Instances: Part 2

2,598 posts | 769 followers
FollowAlibaba Clouder - January 25, 2021
Alibaba Clouder - October 25, 2019
Alibaba Cloud Community - May 6, 2024
Alibaba Clouder - June 2, 2020
Alibaba Clouder - May 29, 2020
Alibaba Clouder - August 11, 2020

2,598 posts | 769 followers
FollowLearn More
 ECS(Elastic Compute Service)
Elastic and secure virtual cloud servers to cater all your cloud hosting needs.
Learn MoreMore Posts by Alibaba Clouder