By Shangzuo
To use SLF4J, you need to first create an org.slf4j.Logger instance. You can do this by using its factory function org.slf4j.LoggerFactory.getLogger(). The argument provided can be a string or a class.
• If the argument is a string, this string will be used as the name of the returned Logger instance.
• If the argument is a class, its getName() method will be called to obtain the full class name, which will then be used as the name of the Logger instance.
public class ExampleService {
    // Pass a class. Generally, the current class is passed.
    private static final Logger log = LoggerFactory.getLogger(ExampleService.class);
    // The above line is the same as:
    private static final Logger log = LoggerFactory.getLogger("com.example.service.ExampleService");

    // You can also specify any string.
    private static final Logger log = LoggerFactory.getLogger("service");
}
This instance name in the string format can be called LoggerName, which is used to distinguish the log level at the log implementation layer. For more information, see section 3.1 Conversion Word in the next article.
Regardless of the mixed opinions about Lombok, it has become an essential dependency for Java development. Personally, I recommend using Lombok.
Lombok also provides support for various logging systems. For example, with only the @lombok.extern.slf4j.Slf4j annotation, you can have Lombok generate a static log field, without having to manually call the factory function. The default LoggerName is the annotated class. You can also specify a LoggerName in the string format by using the topic field.
@Slf4j
public class ExampleService {
    // The @Slf4j annotation will help you generate the following line of code.
    // private static final org.slf4j.Logger log = org.slf4j.LoggerFactory.getLogger(ExampleService.class);
}

@Slf4j(topic = "service")
public class ExampleService {
    // The @Slf4j(topic = "service") annotation will automatically generate the following line of code for you.
    // private static final org.slf4j.Logger log = org.slf4j.LoggerFactory.getLogger("service");
}
In addition to SLF4J, Lombok supports almost all available logging frameworks, from interfaces to implementations. For more information, see Lombok's official document @Log (and friends) [1].
From org.slf4j.event.Level, we can see that the following five log levels are supported, listed in ascending order of priority:
• TRACE: Logs at this level generally record traces. For example, xxx start is printed when a method starts.
• DEBUG: Personally, I think it can be merged with the TRACE level. If you have to distinguish between the two, consider printing DEBUG logs to record the input and output parameters of a method.
• INFO: the default level. Logs at this level generally record key information during code execution.
• WARN: Logs at this level are printed when something unexpected happens during code execution, but such logs do not affect subsequent execution.
• ERROR: Logs at this level are printed when an exception occurs and the code does not have a fallback mechanism.
Furthermore, Logback has two additional levels: ALL and OFF, which are used to fully enable and disable log output but are not involved in the actual logging process.
The logging implementation layer determines which level of logs can be output, which is why we need to distinguish between different log levels when logging. This ensures that important logs are not lost while only printing DEBUG logs when necessary.
The above explanation may be a little abstract. Let me give an example for illustration:
@Slf4j
public class ExampleService {
    @Resource
    private RpcService rpcService;

    public String querySomething(String request) {
        // Use TRACE logs to record the call status of the method.
        log.trace("querySomething start");
        // Use DEBUG logs to record input and output parameters.
        log.debug("querySomething request={}", request);

        String response = null;
        try {
            RpcResult rpcResult = rpcService.call(a);
            if (rpcResult.isSuccess()) {
                response = rpcResult.getData();

                // Use INFO logs to record important nodes.
                log.info("querySomething rpcService.call succeed, request={}, rpcResult={}", request, rpcResult);
            } else {
                // Use WARN logs to record unexpected but controllable errors in the program call.
                log.warn("querySomething rpcService.call failed, request={}, rpcResult={}", request, rpcResult);
            }
        } catch (Exception e) {
            // Use ERROR logs to record exceptions in the program.
            log.error("querySomething rpcService.call abnormal, request={}, exception={}", request, e.getMessage(), e);
        }

        // Use DEBUG logs to record input and output parameters.
        log.debug("querySomething response={}", response);
        // Use TRACE logs to record the call status of the method.
        log.trace("querySomething end");

        return response;
    }
}Through org.slf4j.Logger, we can see that there are many logging interfaces, but their definitions are similar. Taking INFO as an example, there are two categories:
• public boolean info(...);
• public boolean isInfoEnabled(...);
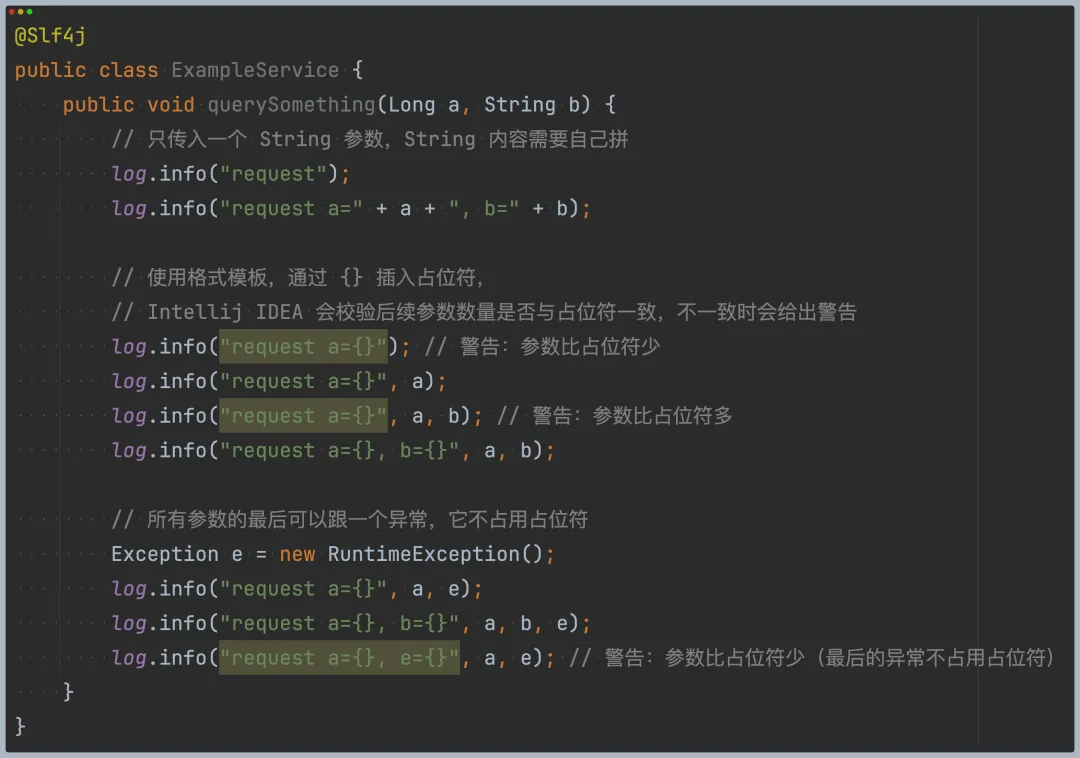
This method has numerous overloads, but the usage logic is consistent. To understand this, we can refer directly to the code in the following figure.

It can be seen that IntelliJ IDEA supports the SLF4J API very well. The warnings in yellow alert us immediately to problems with specific logs.
The use of string templates may cause a slight performance penalty [2]. However, it is acceptable given the readability and convenience the templates provide. Ultimately, the parameters passed by the developer are assembled by the implementation layer, and the logs are finally output according to the configuration. For more information, see section 3. Placeholders in the next article.
You can use the isInfoEnabled method to check whether the corresponding log level is enabled for the current Logger instance. For example, you may have seen code similar to the following:
if (log.isInfoEnabled()) {
    log.info(...)
}
However, the implementation layer itself determines the output level of the current Logger instance, and logs below this level will not be output. Therefore, it is generally unnecessary to make such a judgment. Nonetheless, if your output requires additional resources, it is better to determine the log level first. For example:
if (log.isInfoEnabled()) {
    // There is a remote call.
    String resource = rpcService.call();
    log.info("resource={}", resource)

    // A large object needs to be parsed.
    Object result = ....; // A large object
    log.info("result={}", JSON.toJSONString(result));
}In the previous section about interfaces, we only mentioned passing string templates and arguments to the log.info() method. You may notice that some interfaces have an additional input parameter of the org.slf4j.Marker type. For example:
• log.info(Marker, ...)
We can create a marker through a factory function and then use it. For example:
Marker marker = MarkerFactory.getMarker("foobar");
log.info(marker, "test a={}", 1);
A marker is passed to the implementation layer, which determines how it is processed. For example:
• Print the marker through %marker.
• Use MarkerFilter [3] to filter out logs that contain the marker. For example, you can filter out logs that need to be monitored by Sunfire and write them to a separate log file.
In simple terms, Mapped Diagnostic Context (MDC) is used to store extended fields and is thread-safe. For example, traceId of OpenTelemetry [4] is stored in the MDC. For more information, see section 5. traceId in MDC in the next article.
Moreover, MDC is easy to use. Like a Map<String, String> instance, common methods such as put/get/remove/clear are available. For example:
// Interface definition similar to that of Map<String, String>.
MDC.put("key", "value");
String value = MDC.get("key");
MDC.remove("key");
MDC.clear();

// Get all data in the MDC.
Map<String, String> context = MDC.getCopyOfContextMap();SLF4J 2.0.x and later incorporate the fluent API [5]. Similar to the @Builder annotation in Lombok, the fluent API sets each property separately through method chaining and finally calls the .log() method (just like calling the .build() method) to end the call process.
Examples:
Marker marker = MarkerFactory.getMarker("foobar");
Exception e = new RuntimeException();

// == The following examples have exactly the same effect. ==

// Example of the traditional call method
log.info(marker, "request a={}, b={}", 1, 2, e);

// Example 1 of the fluent API
log.atInfo() // Indicates the INFO level. Sure, you can also replace it with atTrace/atDebug/atWarn/atError.
    .addMarker(marker)
    .log("request a={}, b={}", 1, 2, e); // Very similar to a traditional API

// Example 2 of the fluent API
log.atInfo()
    .addMarker(marker)
    .setCause(e)
    .setMessage("request a={}, b={}") // Pass a string template.
    .setMessage(() -> "request a={}, b={}") // You also can pass a Supplier to setMessage.
    .addArgument(1) // Pass a value corresponding to a placeholder in the string template.
    .addArgument(() -> 2) // You can also pass a Supplier to addArgument.
    .log(); // End the call process.


// == The output format of addKeyValue depends on the configuration of the implementation layer. The default format is different from the previous example. ==

// Example 3 of the fluent API
log.atInfo()
    .setMessage("request") // Note that there is no placeholder here.
    .setKeyValue("a", 1) // Pass a variable through setKeyValue.
    .setKeyValue("b", () -> 2) // You can also pass a Supplier as the value.
    .log();
// By default, the values set by setKeyValue are placed before the message. For example, the default output here is as follows:
// a=1 b=2 request
To sum up:
• You can use methods prefixed with add, such as addMarker/addArgument/addKeyValue, to set multiple items. Therefore, you can add multiple markers through the fluent API but cannot do this through a traditional API.
• You can use methods prefixed with set, such as setMessage/setCause, to set only one value. Although you can call such a method multiple times, only the value set in the last call will take effect.
As you can see from the examples above, a traditional API is more concise. However, if there are many placeholders in logs, using the fluent API, especially the addKeyValue method, would be a better choice.
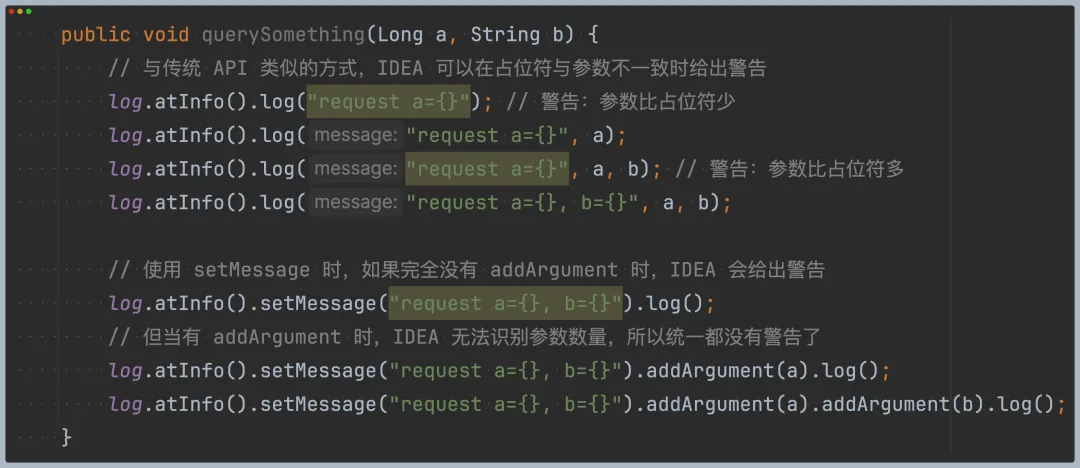
At present, IntelliJ IDEA provides limited support for the fluent API, as it cannot handle cases where the passed arguments do not match placeholders.

By the way, Log4j 2, which was launched later than SLF4J, also supports lazy evaluation by passing a Supplier in a traditional API. For example:
log.info("request a={}", () -> a);The above is only a brief introduction to the common functions of SLF4J. For further information, please refer to the official document: SLF4J user manual [6].
[1] https://projectlombok.org/features/log
[2] https://juejin.cn/post/6915015034565951501
[3] https://logback.qos.ch/apidocs/ch/qos/logback/classic/turbo/MarkerFilter.html
[4] https://www.aliyun.com/product/xtrace
[5] https://www.slf4j.org/manual.html#fluent
[6] https://www.slf4j.org/manual.html
Disclaimer: The views expressed herein are for reference only and don't necessarily represent the official views of Alibaba Cloud.
Cloud for AI | La Rivière Alibaba Cloud Showcase @International Broadcast Center

1,344 posts | 470 followers
FollowAlibaba Cloud Community - July 31, 2024
Alibaba Cloud Community - June 14, 2024
Alibaba Cloud Community - November 9, 2021
Alibaba Cloud Community - August 13, 2024
Alibaba Cloud Community - August 5, 2024
Alibaba Cloud Community - September 4, 2024

1,344 posts | 470 followers
Follow Web Hosting Solution
Explore Web Hosting solutions that can power your personal website or empower your online business.
Learn More YiDA Low-code Development Platform
A low-code development platform to make work easier
Learn More mPaaS
mPaaS
Help enterprises build high-quality, stable mobile apps
Learn More Web Hosting
Explore how our Web Hosting solutions help small and medium sized companies power their websites and online businesses.
Learn MoreMore Posts by Alibaba Cloud Community