This tutorial explains the concept of the Function Compute facility on Alibaba Cloud, and then shows you how to use it step-by-step. The tutorial also explains the differences between conventional server-based cloud computing and serverless Function Compute, to help you understand the various methodologies.
To follow this tutorial you'll need an Alibaba Cloud account. If you don't already have one, sign up for a free account through this link. Alibaba Cloud provides a Free Trial for you explore various products worth $300-1200 USD depending on your account type.
Business and enterprise IT has conventionally been based around the concept of servers. Companies' data centers contained web servers, database servers, DNS servers, LDAP servers, file servers, print servers, mail servers, and many more. A server was originally a physical box, but in recent years the move to virtualization technology meant that many servers became virtual machines, or VMs, instead. Some servers provided a single function, such as database or web, while others provided multiple functions in order to utilize resources more efficiently or to keep costs down.
As business IT moved to the cloud, and in-house data centers relocated to become Virtual Private Clouds, the concept of a server being the basic building block remained in place. In-house web servers became cloud-based web servers, in-house database servers migrated to the cloud unchanged, and so on.
Over the past couple of years, server-based cloud computing has been joined by a new way of operating, known as serverless computing. The basic building block is no longer a server but a single block of code, known as a function, which is run whenever a particular event, known as a trigger, occurs. A customer simply uploads functions to a cloud provider's infrastructure and triggers them as required. There are no servers to build, maintain, secure or patch. There's no need for scaling and load-balancing, as this all happens automatically behind the scenes on the cloud provider's infrastructure. You can trigger a function once per week or a million times per hour, and the underlying systems will handle it all.
Function-based serverless computing on Alibaba Cloud is known as Function Compute, and it's available to use right now. This tutorial will show you how, step by step.
Billing for Function Compute is on a pay-as-you-go model and is based on the number of times you trigger a function, its resources used, and any Internet traffic that the function uses.
Using Function Compute to implement a specific feature is incredibly cost-effective. Triggering a function costs USD $0.20 per million triggers, with your first million triggers free each month. Internet traffic costs between $0.07 and $0.13 per GB, depending on which hosting region you use.
Resources are measured in gigabyte-seconds, which is the amount of memory you allocated to the function, multiplied by the time it took to run (to the nearest 100 ms). Your first 400,000 GB-seconds each month are free of charge which, for example, gives you 1.6 million invocations of a function that runs for one second, if it's been allocated 256MB.
The easiest way to understand function-based serverless computing is to consider some cases where it might be used. For example:
As you can see, serverless function-based computing doesn't necessarily replace existing servers. More often than not, conventional servers work alongside serverless trigger-based functions.
As to the choice of language runtime, Function Compute currently supports PHP, Python, Node.js and Java.
You can work with Function Compute on Alibaba Cloud in three ways. You can download and install a command-line tool called fcli, which is hosted on GitHub and available for Linux, Mac and Windows. You can also download an SDK.
The most flexible solution is to use the online Function Compute console, so that's what we'll use for this tutorial. There is no need to download or install anything, as it can all be done from a browser on any computer. We're going to create a function which outputs a simple message to a log, and then trigger manually and also on a timer.
Before you can use Function Compute you need to activate the Alibaba Cloud Log Service and create a logstore. You need to do this first, as you'll need to supply details of the logstore when you create the function. So, if you haven't already got a log store set up, do this before working on your Function Compute features.
From the main console, under Application Services, click on Log Service. If it's not already activated, activate it.
Next, click on the blue Create Project button. Choose a name and description, and select a region. We'll use the Frankfurt region throughout this tutorial, as our customers are mostly based in Western Europe.
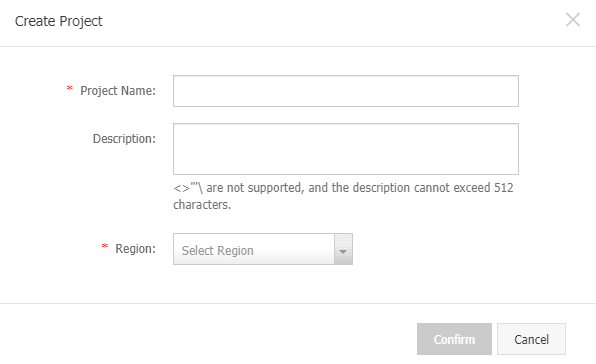
You'll then be asked to create a logstore for the project.
Give it a name and click Confirm. You don't need to enter anything else on this screen right now. When you're asked about importing data, just click the Cancel box in the top right-hand corner, as we don't need to do this.
With a logstore created, we can now move on to working with Function Compute. To start, you need to create a service. This is a container for one or more functions. You can have multiple services, and multiple functions in a service. Services help you keep groups of functions separate, such as those relating to a particular application or project.
Log into your Alibaba Cloud account and, from the main console under Elastic Computing, choose Function Compute. If you haven't already activated this service on your account, you'll be asked to do so.
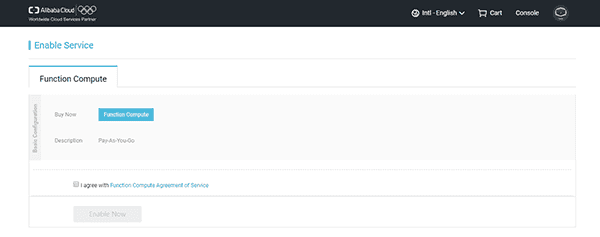
You'll then see the main Function Compute screen. Note the region, which is shown at the top of the page. This specifies where your functions will be stored and executed from. As with choosing the location for hosting a conventional server, choose the region that is closest to where the code will be running. For this example, we'll be using Frankfurt, Germany throughout the tutorial. This is the same location that we chose earlier for our logstore.

To create a new service, click on the blue Create Service button. Give it a name and a description, and slide the control to enable advanced settings.
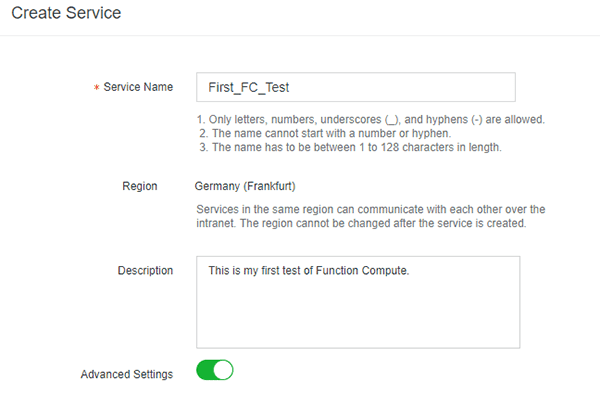
Under Log Configs, select a log project and a logstore from the dropdown lists. Choose the ones you created earlier, which should appear in the lists automatically. If they don't, check that you have the correct region selected.
Under Role Config, set the Role Operation to Create New Role, then click the Authorize button. You'll see a screen such as this one:

Click the Confirm Authorization Policy button.
Your screen should now look something like this.
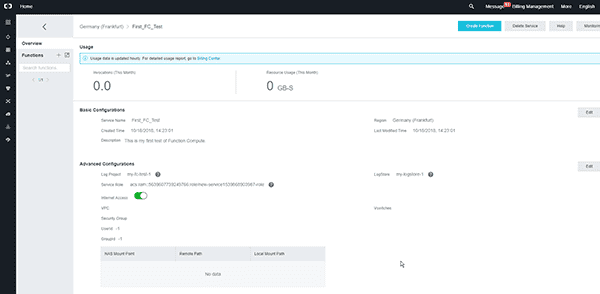
You have now created a service, and you're ready to create functions and triggers within the service. You can see, in the screen above, details of the service, including how many function invocations have run this month and how many GB-seconds of resources have been used. At the moment these are zero, as you would expect.
With the service created, we can now create a function within it. Ensure that you are logged into your Alibaba Cloud console at the Function Compute page, and that the selected region your service was created in.
Click on the name of the service on the left-hand side of the screen, and you will see something like this.

You can see that, in this example, we have used 206 invocations so far, and 10.22 GB-Seconds.
Click on the blue Create Function button and you'll see the following.
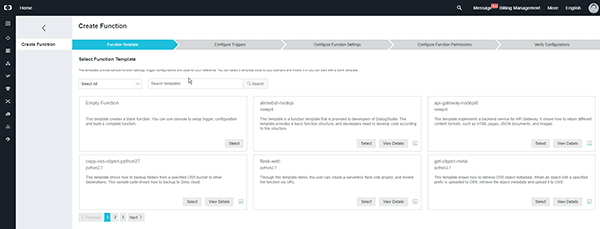
As you can see, there's a selection of ready-made function templates that you can start from. Select the Empty function, as this is the easiest place to start from.
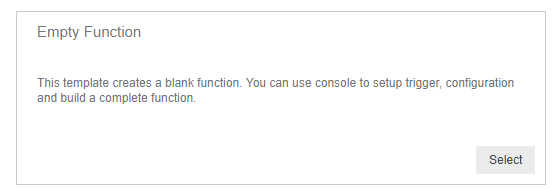
For the trigger type, choose No Trigger and click the Next button to continue to the code editor.
The service name is already entered. Enter a name and description for your function, and choose a runtime language from the list offered. In this example we'll choose python3. As mentioned earlier, Function Compute currently supports PHP, Python (2 and 3), Java and node.js.
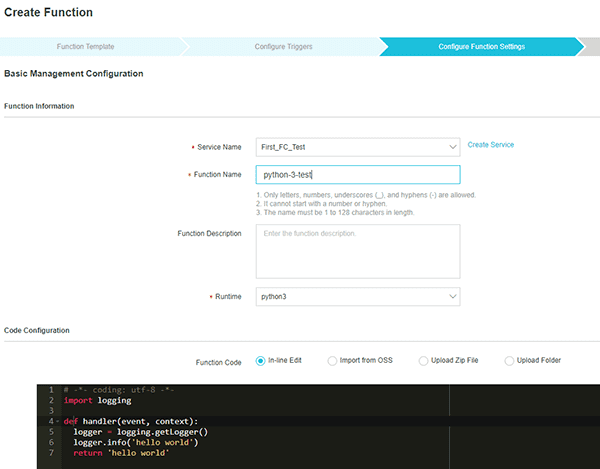
The code editor window shows the basic code for your empty function, which is simply going to write "hello world" to the associated logstore. To ensure that we can recognize our function's output when we examine the logstore later, we'll change the text slightly from the default.

Change the function's allocated memory from the default 512 MB to 128. This is plenty for our demo function, and will ensure that we don't consume more resources than is necessary.

Click the Next button and you'll see the following.

You don't need to do anything here (and you don't need to click the Authorize button either). So just click the Next button to continue.
Check the summary screen that is displayed, then click the Create button to create your function. You'll now see the following.
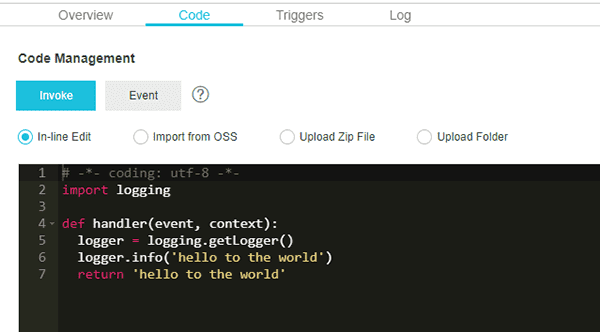
You can run your function by clicking the Invoke button. Try it now.
Once you've run your function, click on the Log link at the top of the screen, to view the logstore.
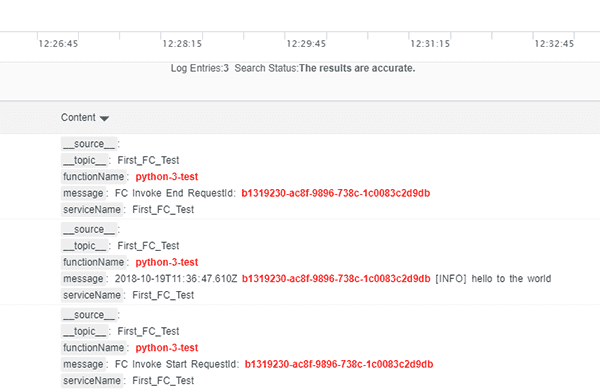
As you can see, the function executed correctly and wrote "hello to the world" to the logstore.
To be able to view and search the logstore in more detail, return to the main Alibaba Cloud console and, under Application Services, choose Log Service.

Click the Preview link for the chosen logstore (we only have one right now), and again you'll see the output from your function.

There is an option to search the logstore by entering a search term, and you can use this facility instead of the Preview feature.

Note that you'll be asked to enable full-text indexing for your logstore when you use the search feature for the first time. Just accept the default options and click the OK button, then wait a couple of minutes while the full text index is built.

Because functions don't necessarily generate much output that can be used for diagnostic and debugging purposes, it's good practice to ensure that your function creates frequent log entries so that you know what it's been doing and whether it succeeded. You can then retrospectively debug your function by searching the logstore.
So far, we've created a service and a function. We have also manually invoked the function, and examined the logstore to verify that the function did actually run.
Function Compute functions are generally invoked automatically by triggers, and these can take many forms. For example, you can choose an http trigger, in which case a unique URL will be generated for your function that will trigger it when it's called.
For this tutorial we will create a trigger that uses a timer to automatically invoke our function every few minutes.
Ensure that you are on the Function Compute section of the console, and that the correct region is selected. Select your service, and then your function, from the menus on the left-hand side of the screen.

Click on the Triggers link, and then click the Create Trigger button.
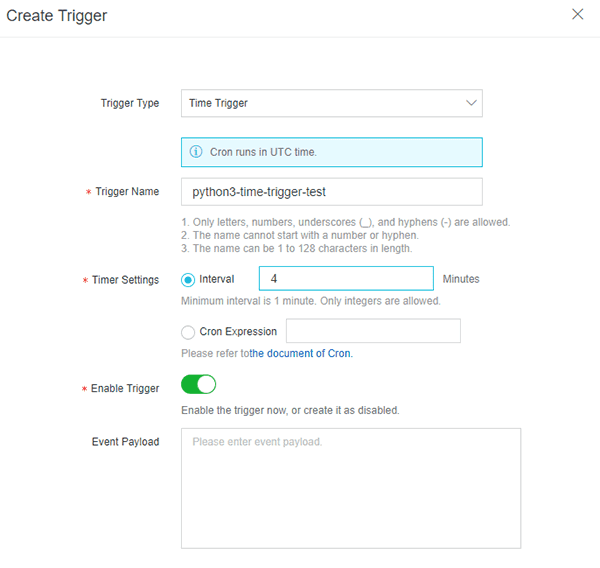
Choose a Trigger Type of "Time Trigger", and give it a name. We'll set our interval to four minutes. There's no need to enter anything in the payload box. When you're done, click the OK button.
After a while, return to the main console and to the log service, and then view the logstore.
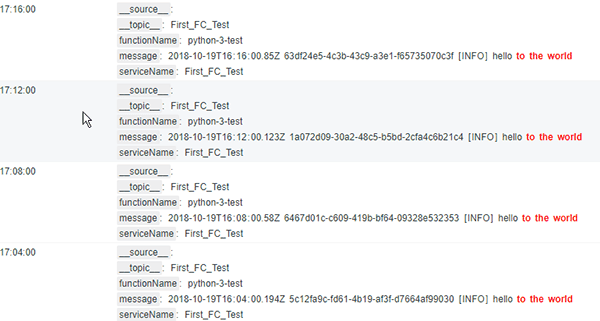
As you can see, our function was invoked at 17:04, 17:08, 17:12 and 17:16, just as we requested.
In this tutorial we have used Alibaba Cloud Function Compute to create a function, invoke it manually, and then then set a trigger to execute it on a scheduled basis. Welcome to the new world of serverless computing, where you can run code in a scalable, secure environment without needing to build or maintain servers.
To find out more about serverless computing on Alibaba Cloud in general, and Function Compute in particular, refer to the online documentation at:
https://www.alibabacloud.com/product/function-compute

2,593 posts | 793 followers
FollowAlibaba Clouder - June 16, 2020
Alibaba Clouder - February 16, 2021
Alibaba Clouder - January 18, 2021
Alibaba Clouder - April 7, 2021
Alibaba Clouder - April 15, 2019
JDP - July 17, 2020

2,593 posts | 793 followers
Follow Function Compute
Alibaba Cloud Function Compute is a fully-managed event-driven compute service. It allows you to focus on writing and uploading code without the need to manage infrastructure such as servers.
Learn More ECS(Elastic Compute Service)
Elastic and secure virtual cloud servers to cater all your cloud hosting needs.
Learn More Serverless Workflow
Visualization, O&M-free orchestration, and Coordination of Stateful Application Scenarios
Learn More Serverless Application Engine
Serverless Application Engine (SAE) is the world's first application-oriented serverless PaaS, providing a cost-effective and highly efficient one-stop application hosting solution.
Learn MoreMore Posts by Alibaba Clouder
Raja_KT February 16, 2019 at 5:38 am
Great one. Environment restrictions are impediments on PAYG model.