By Jonathan Peng, Staff Solutions Architect
Nowadays, customers are using different BI tools to gain new insights into their treasure trove of data. And Tableau is one of the popular tools in the market for enterprises. In this tutorial, we will demonstrate how to connect Tableau to Alibaba Cloud's most advance big data platform MaxCompute.
Apache Hive is a data warehouse software project built on top of Apache Hadoop for providing data query and analysis. Hive gives a SQL-like interface to query data stored in various databases and file systems that integrate with Hadoop. Traditional SQL queries must be implemented in the MapReduce Java API to execute SQL applications and queries over distributed data. Hive provides the necessary SQL abstraction to integrate SQL-like queries (HiveQL) into the underlying Java without the need to implement queries in the low-level Java API. Since most data warehousing applications work with SQL-based querying languages, Hive aids portability of SQL-based applications to Hadoop.
HiveServer2 (HS2) is a server interface that enables remote clients to execute queries against Hive and retrieve the results. The current implementation, based on Thrift RPC, is an improved version of HiveServer and supports multi-client concurrency and authentication. It is designed to provide better support for open API clients like JDBC and ODBC.
The Thrift interface definition language (IDL) for HiveServer2 is available at https://github.com/apache/hive/blob/trunk/service/if/TCLIService.thrift
Thrift documentation is available at http://thrift.apache.org/docs/
HiveServer2 Proxy is a proxy, which is obtained after custom development based on the original HiveServer2. It does the job of accepting the Thrift request submitted by the client, de-serializing it and converting it into a request that MaxCompute can recognize, then submitting it to MaxCompute for processing, and converting the response to a client-recognizable process after MaxCompute has finished processing it. The Thrift response conforms to the Hive interface specification, enabling the Hive ecosystem to interoperate with MaxCompute. In short, its function is to provide a way for these tools to interact with MaxCompute without modifying the Hive ecosystem, so that we can reuse existing Hive tools. MaxCompute's powerful big data engine.
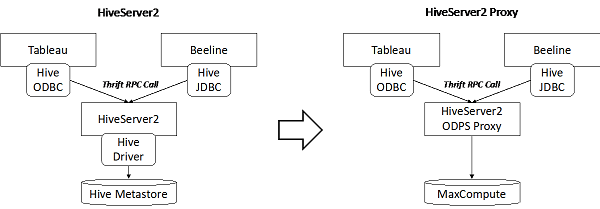
This approach is also applying to other BI tools such as Beeline and QlikView, which can connect to HiveServer2.
Before you install HiveServer2 Proxy, you need to install Java 1.7.0 or Java 1.8.0 in your Linux server. And download the HiveServer2 Proxy for ODPS from here http://repo.aliyun.com/download/apache-hive-2.1.0-odps-proxy.tar.gz.
First, we need to configure the HiveServer2 Proxy running environment, including JAVA_HOME, HIVE_HOME and HADOOP_HOME.
[root@HS2Proxy apache-hive-2.1.0-odps-proxy]# cd /usr/lib/jvm/jre-1.8.0-openjdk
[root@HS2Proxy jre-1.8.0-openjdk]# export JAVA_HOME=$(pwd)
[root@HS2Proxy jre-1.8.0-openjdk]# echo $JAVA_HOME
/usr/lib/jvm/jre-1.8.0-openjdk
[root@HS2Proxy ~]# cd ~/apache-hive-2.1.0-odps-proxy
[root@HS2Proxy apache-hive-2.1.0-odps-proxy]# export HIVE_HOME=$(pwd)
[root@HS2Proxy apache-hive-2.1.0-odps-proxy]# echo $HIVE_HOME
/root/apache-hive-2.1.0-odps-proxy
[root@HS2Proxy apache-hive-2.1.0-odps-proxy]# export HADOOP_HOME=$(pwd)/hadoop
[root@HS2Proxy apache-hive-2.1.0-odps-proxy]# echo $HADOOP_HOME
/root/apache-hive-2.1.0-odps-proxy/hadoop
After we have finished the configuration for environment, we need to configure the hive-site.xml under folder apache-hive-2.1.0-odps-proxy/conf, you can find the property description below, and there should be 4 properties you need to change, odps.accessid, odps.accesskey, odps.project, and odps.projects.
<?xml version="1.0" encoding="UTF-8" standalone="no"?>
<?xml-stylesheet type="text/xsl" href="configuration.xsl"?>
<configuration>
  <property>
    <name>hive.execution.engine</name>
    <value>odps</value>
    <description>Hive execution engine, here is odps by default, no need to modify</description>
  </property>
  <property>
    <name>hive.session.impl.classname</name>
    <value>org.apache.hive.service.cli.session.HiveSessionOdpsImpl</value>
    <description>HiveSession's odps plugin, no need to modify</description>
  </property>
  <property>
    <name>odps.accessid</name>
    <value>customeraccessid</value>
    <description>Please modify it to your accessid</description>
  </property>
  <property>
    <name>odps.accesskey</name>
    <value>customeraccesskey</value>
    <description> Please modify it to your accesskey</description>
  </property>
  <property>
    <name>odps.project</name>
    <value>odpsdemo</value>
    <description>Please change to your default project</description>
  </property>
  <property>
    <name>odps.projects</name>
    <value>odpsdemo</value>
    <description> Please change it to your project list. If there are multiple, please separate them with a comma. This configuration will take effect in show schemas. </description>
  </property>
  <property>
    <name>odps.endpoint</name>
    <value>https://service.odps.aliyun.com/api</value>
    <description>ODPS endpoint</description>
  </property>
  <property>
    <name>hive.server2.thrift.port</name>
    <value>20000</value>
    <description>HiveServer2 Thrift Server starts the service port in binary mode, which can be modified as appropriate to avoid port conflicts.</description>
  </property>
  </configuration>
Now we can start hiveserver2 proxy by running command bin/hiveserver2 under folder apache-hive-2.1.0-odps-proxy, and you can run tail -f /tmp/$USER/hive.log to see if the service is started.
[root@HS2Proxy conf]# tail -f /tmp/$USER/hive.log
2019-02-12T11:58:48,891  INFO [main] service.AbstractService: Service:HiveServer2 is started.
2019-02-12T11:58:48,893  INFO [main] server.Server: jetty-7.6.0.v20120127
2019-02-12T11:58:48,958  INFO [main] webapp.WebInfConfiguration: Extract jar:file:/root/apache-hive-2.1.0-odps-proxy/lib/hive-service-2.1.0.jar!/hive-webapps/hiveserver2/ to /tmp/jetty-0.0.0.0-10002-hiveserver2-_-any-/webapp
2019-02-12T11:58:49,068  INFO [Thread-7] thrift.ThriftCLIService: Starting ThriftBinaryCLIService on port 20000 with 5...500 worker threads
2019-02-12T11:58:49,109  INFO [main] handler.ContextHandler: started o.e.j.w.WebAppContext{/,file:/tmp/jetty-0.0.0.0-10002-hiveserver2-_-any-/webapp/},jar:file:/root/apache-hive-2.1.0-odps-proxy/lib/hive-service-2.1.0.jar!/hive-webapps/hiveserver2
2019-02-12T11:58:49,147  INFO [main] handler.ContextHandler: started o.e.j.s.ServletContextHandler{/static,jar:file:/root/apache-hive-2.1.0-odps-proxy/lib/hive-service-2.1.0.jar!/hive-webapps/static}
2019-02-12T11:58:49,148  INFO [main] handler.ContextHandler: started o.e.j.s.ServletContextHandler{/logs,file:/tmp/root/}
2019-02-12T11:58:49,168  INFO [main] server.HiveServer2: Web UI has started on port 10002
2019-02-12T11:58:49,167  INFO [main] server.AbstractConnector: Started SelectChannelConnector@0.0.0.0:10002
2019-02-12T11:58:49,168  INFO [main] http.HttpServer: Started HttpServer[hiveserver2] on port 10002
If all the services are started and no errors are prompted, it means the proxy has been successfully deployed.
If you don't already have Tableau, you can download Tableau for a 14-day trial from https://www.tableau.com/products/desktop/download
After installed Tableau, we need to use connector that support Hive to connect to HiveServer2 Proxy, including Cloudera Hadoop, Hortonworks Hadoop Hive and MapR Hadoop Hive, all connector needs to install their own drivers before using it.
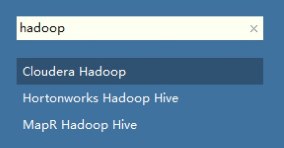
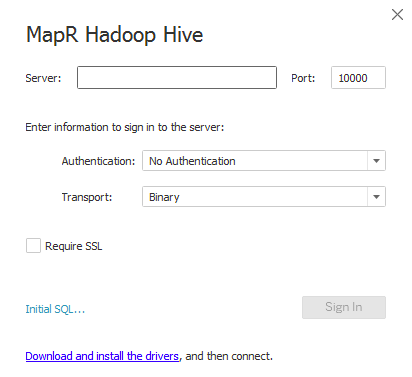
After we install the driver, now we can connect Tableau to HiveServer2 Proxy and access to MaxCompute tables.
I will use Cloudera Hadoop as a connector and use the settings described in the following sections. You can fill in any username and password, because HiveServer2 Proxy do not support authentication at this moment, and the actual authentication is by using accessId and accesskey. Click Sign In and connect to Proxy.
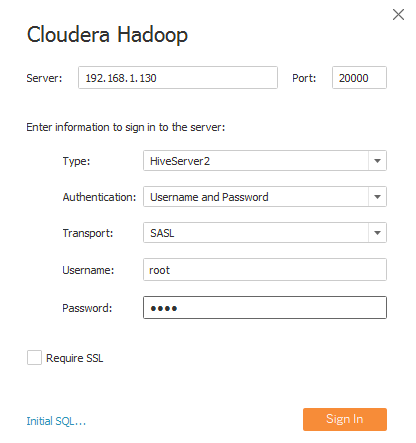
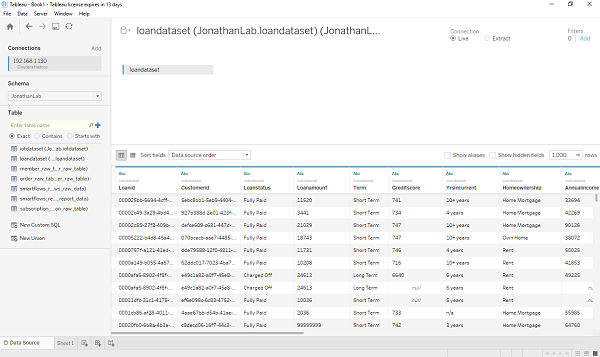
Now, we can connect to MaxCompute project's table and analyze the data by using Tableau.
Real-time SQL Server Migration to Alibaba Cloud ApsaraDB RDS for SQL Server

2,599 posts | 764 followers
FollowAlibaba Clouder - September 29, 2019
Alibaba Cloud MaxCompute - March 2, 2020
Alibaba Clouder - September 24, 2019
Alibaba Cloud Indonesia - July 22, 2020
Apache Flink Community China - March 17, 2023
降云 - January 12, 2021

2,599 posts | 764 followers
Follow MaxCompute
Conduct large-scale data warehousing with MaxCompute
Learn More DataWorks
A secure environment for offline data development, with powerful Open APIs, to create an ecosystem for redevelopment.
Learn More DataV
DataV
A powerful and accessible data visualization tool
Learn MoreMore Posts by Alibaba Clouder
Raja_KT March 10, 2019 at 1:25 pm
Interesting to see the Thrift RPC call for HiveServer2 Proxy for MaxCompute and would like to see the comparison with HiveServer2....Hive Driver metastore.. :)