This article describes how to download and upload the archive files of an Alibaba Cloud's Palworld server that runs a Windows or Linux operating system. Regardless of whether you deploy your Palworld server in the Compute Nest console or directly in the Elastic Compute Service (ECS) console, the server you purchased can be found in the ECS console. The security group to which the server belongs can also be found among ECS resources. The Compute Nest console simplifies your deployment process and does not affect the resources you purchased or deployed.
Pay attention to the following points before you upload and download archive files:
The following section describes how to download archive files from and upload archive files to a Linux server.
Usually, your archive files are saved in the following path:
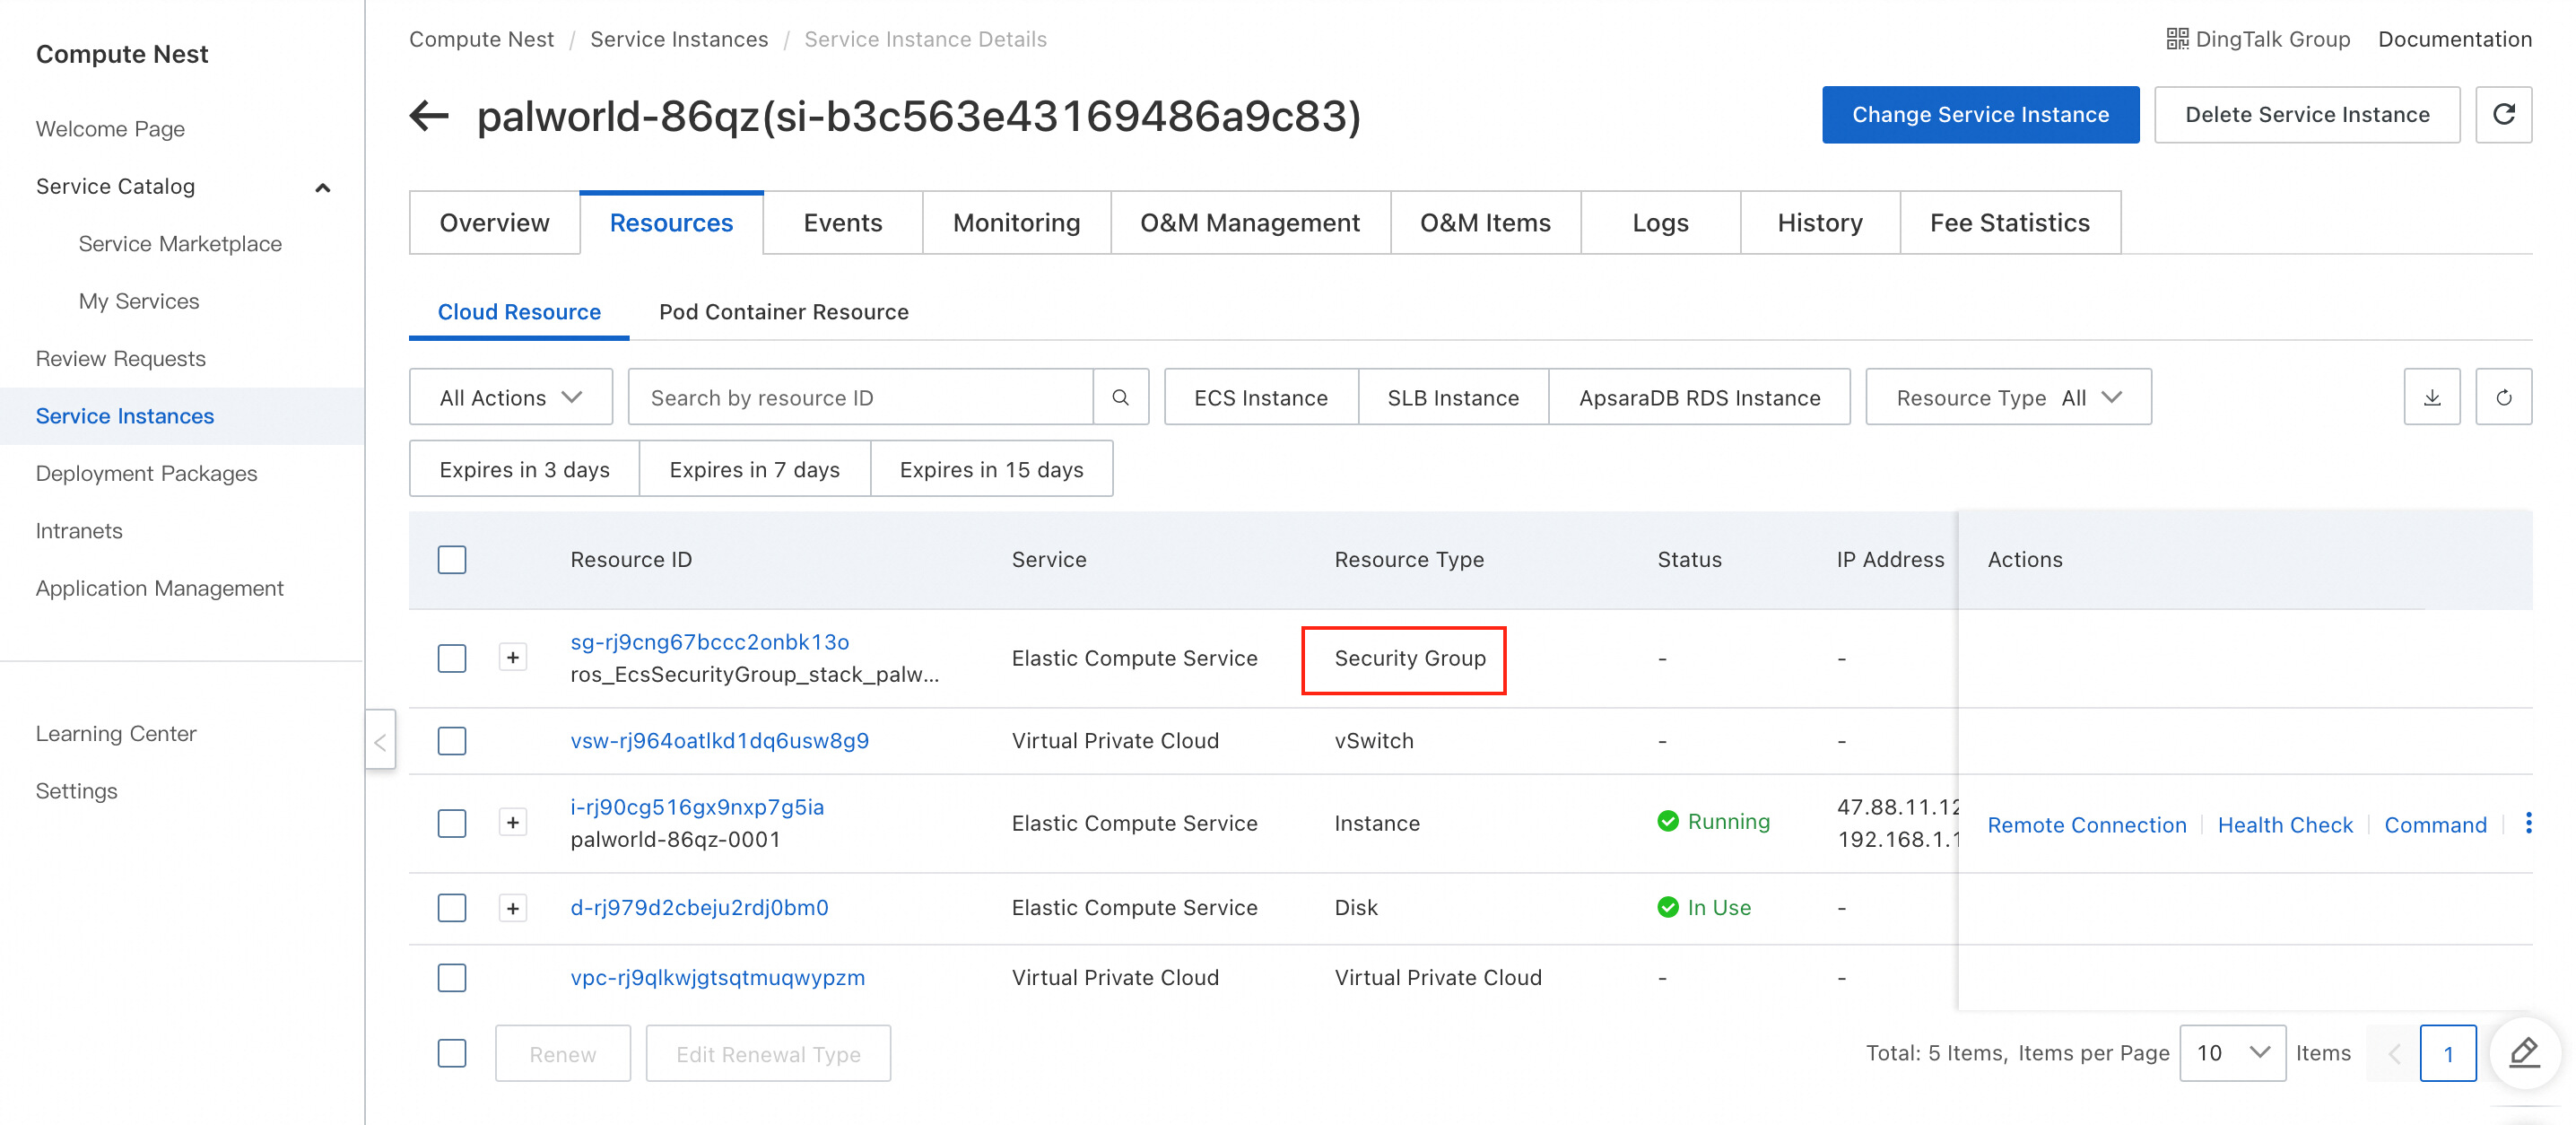
/home/ecs-assist-user/.steam/SteamApps/common/PalServer/Pal/Saved/1. If your server is deployed in the Compute Nest console, click Security Group on the Cloud Resource tab.
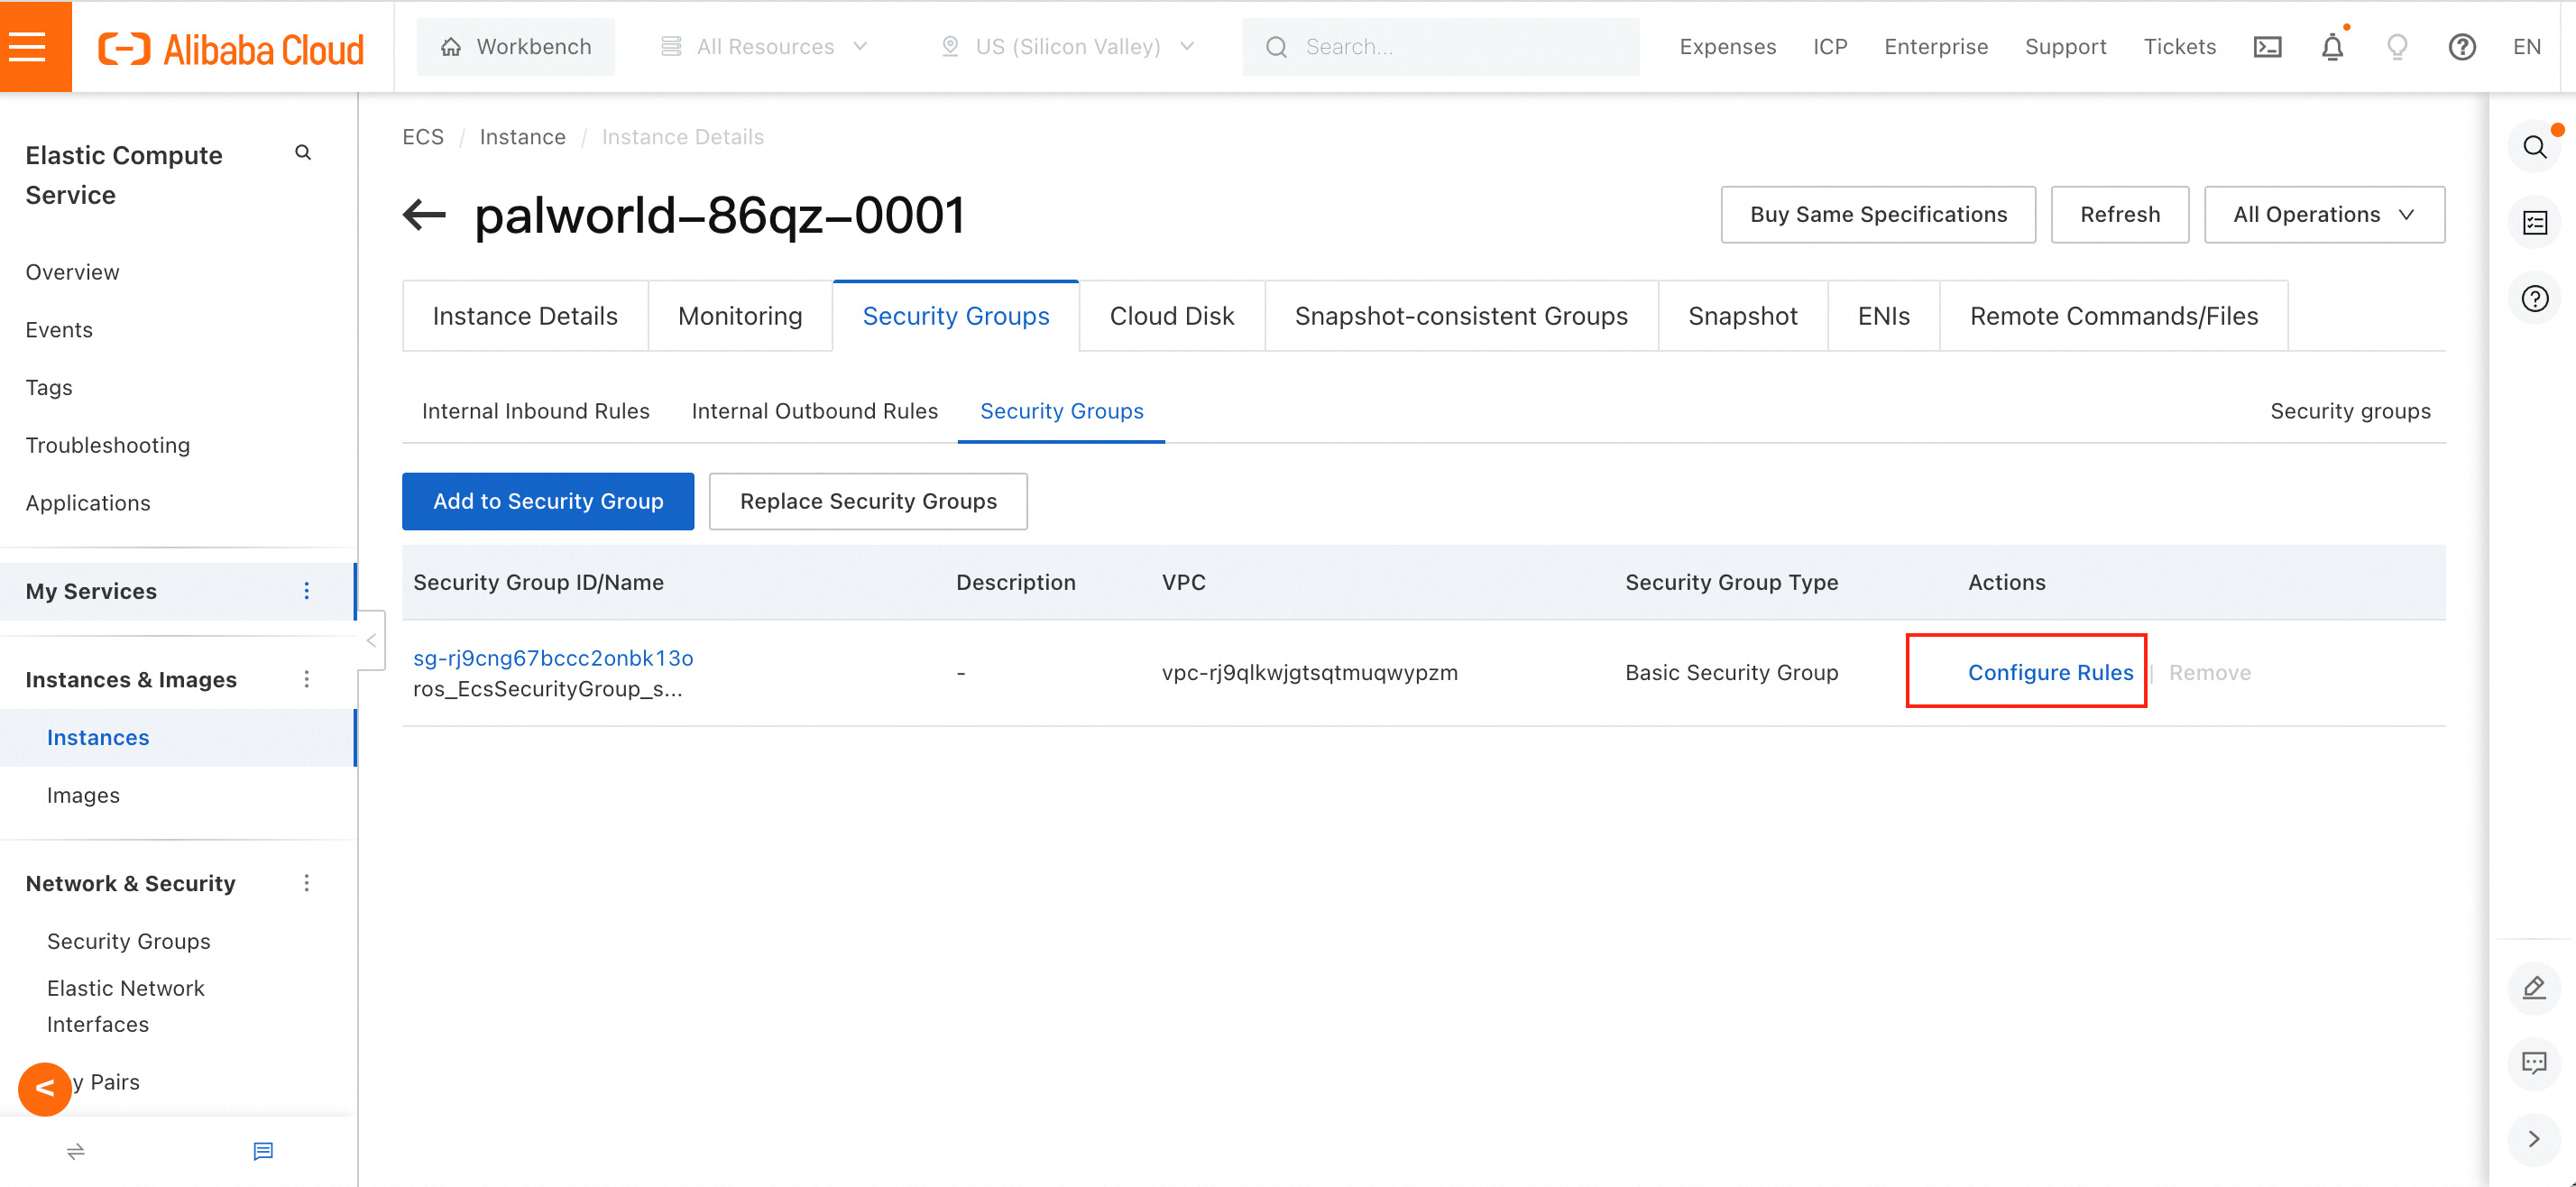
If your server is deployed in the ECS console, open the ECS console, find the ECS resources that you purchased, click the Security Groups tab, and then click Configure Rules.
2. If port 22 is enabled for your security group, no operation is required.
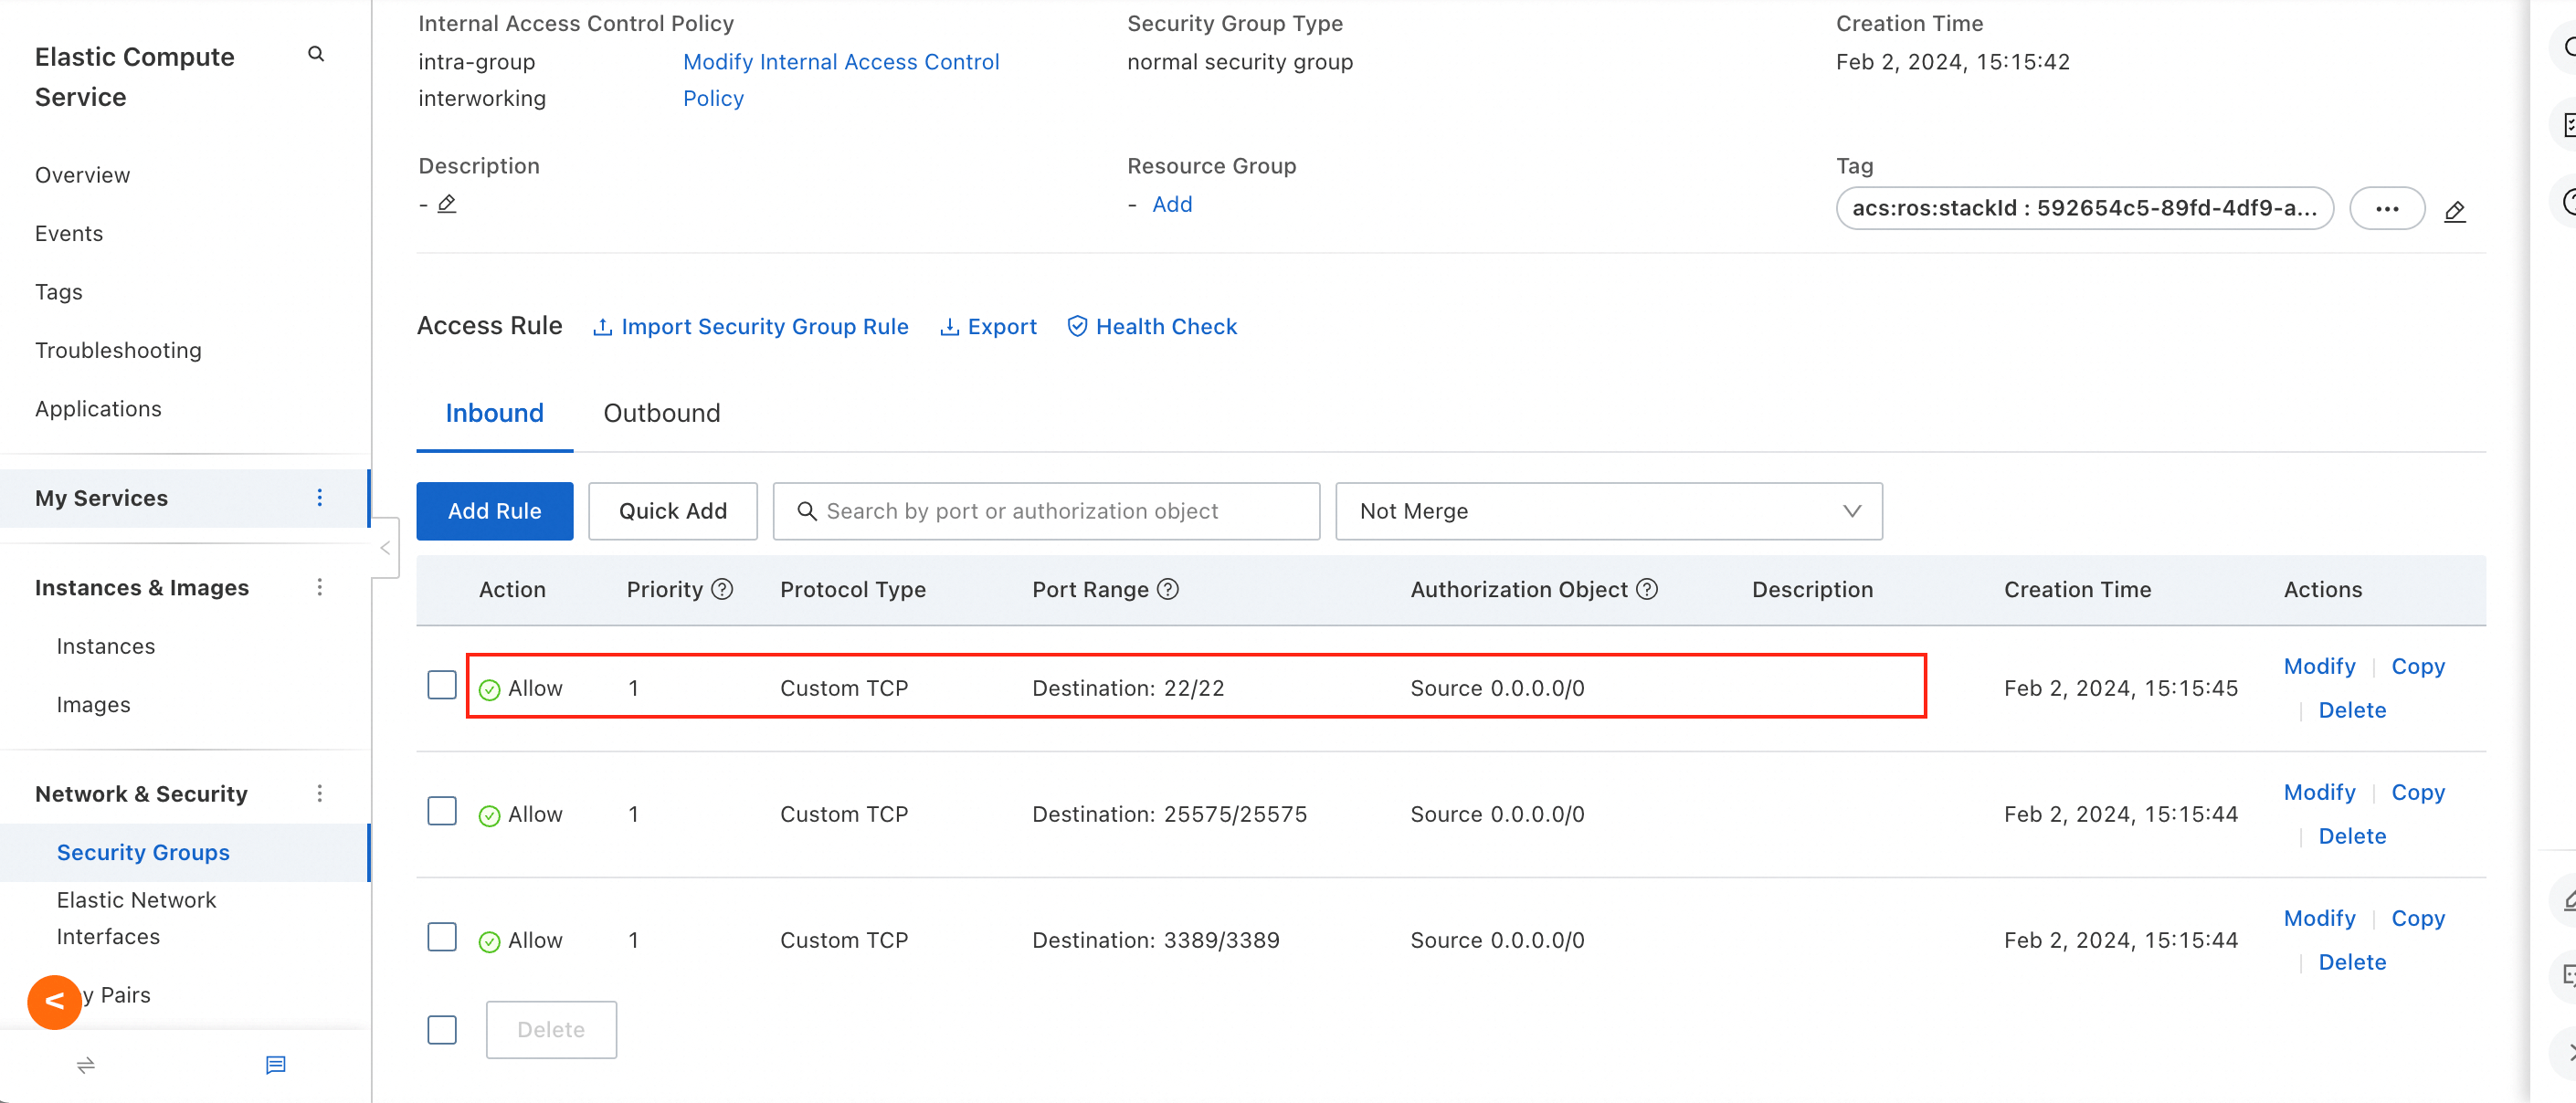
If port 22 is not enabled for your security group, click Add Rule, set Destination to SSH (22), set Source to 0.0.0.0/0, and then save the rule.

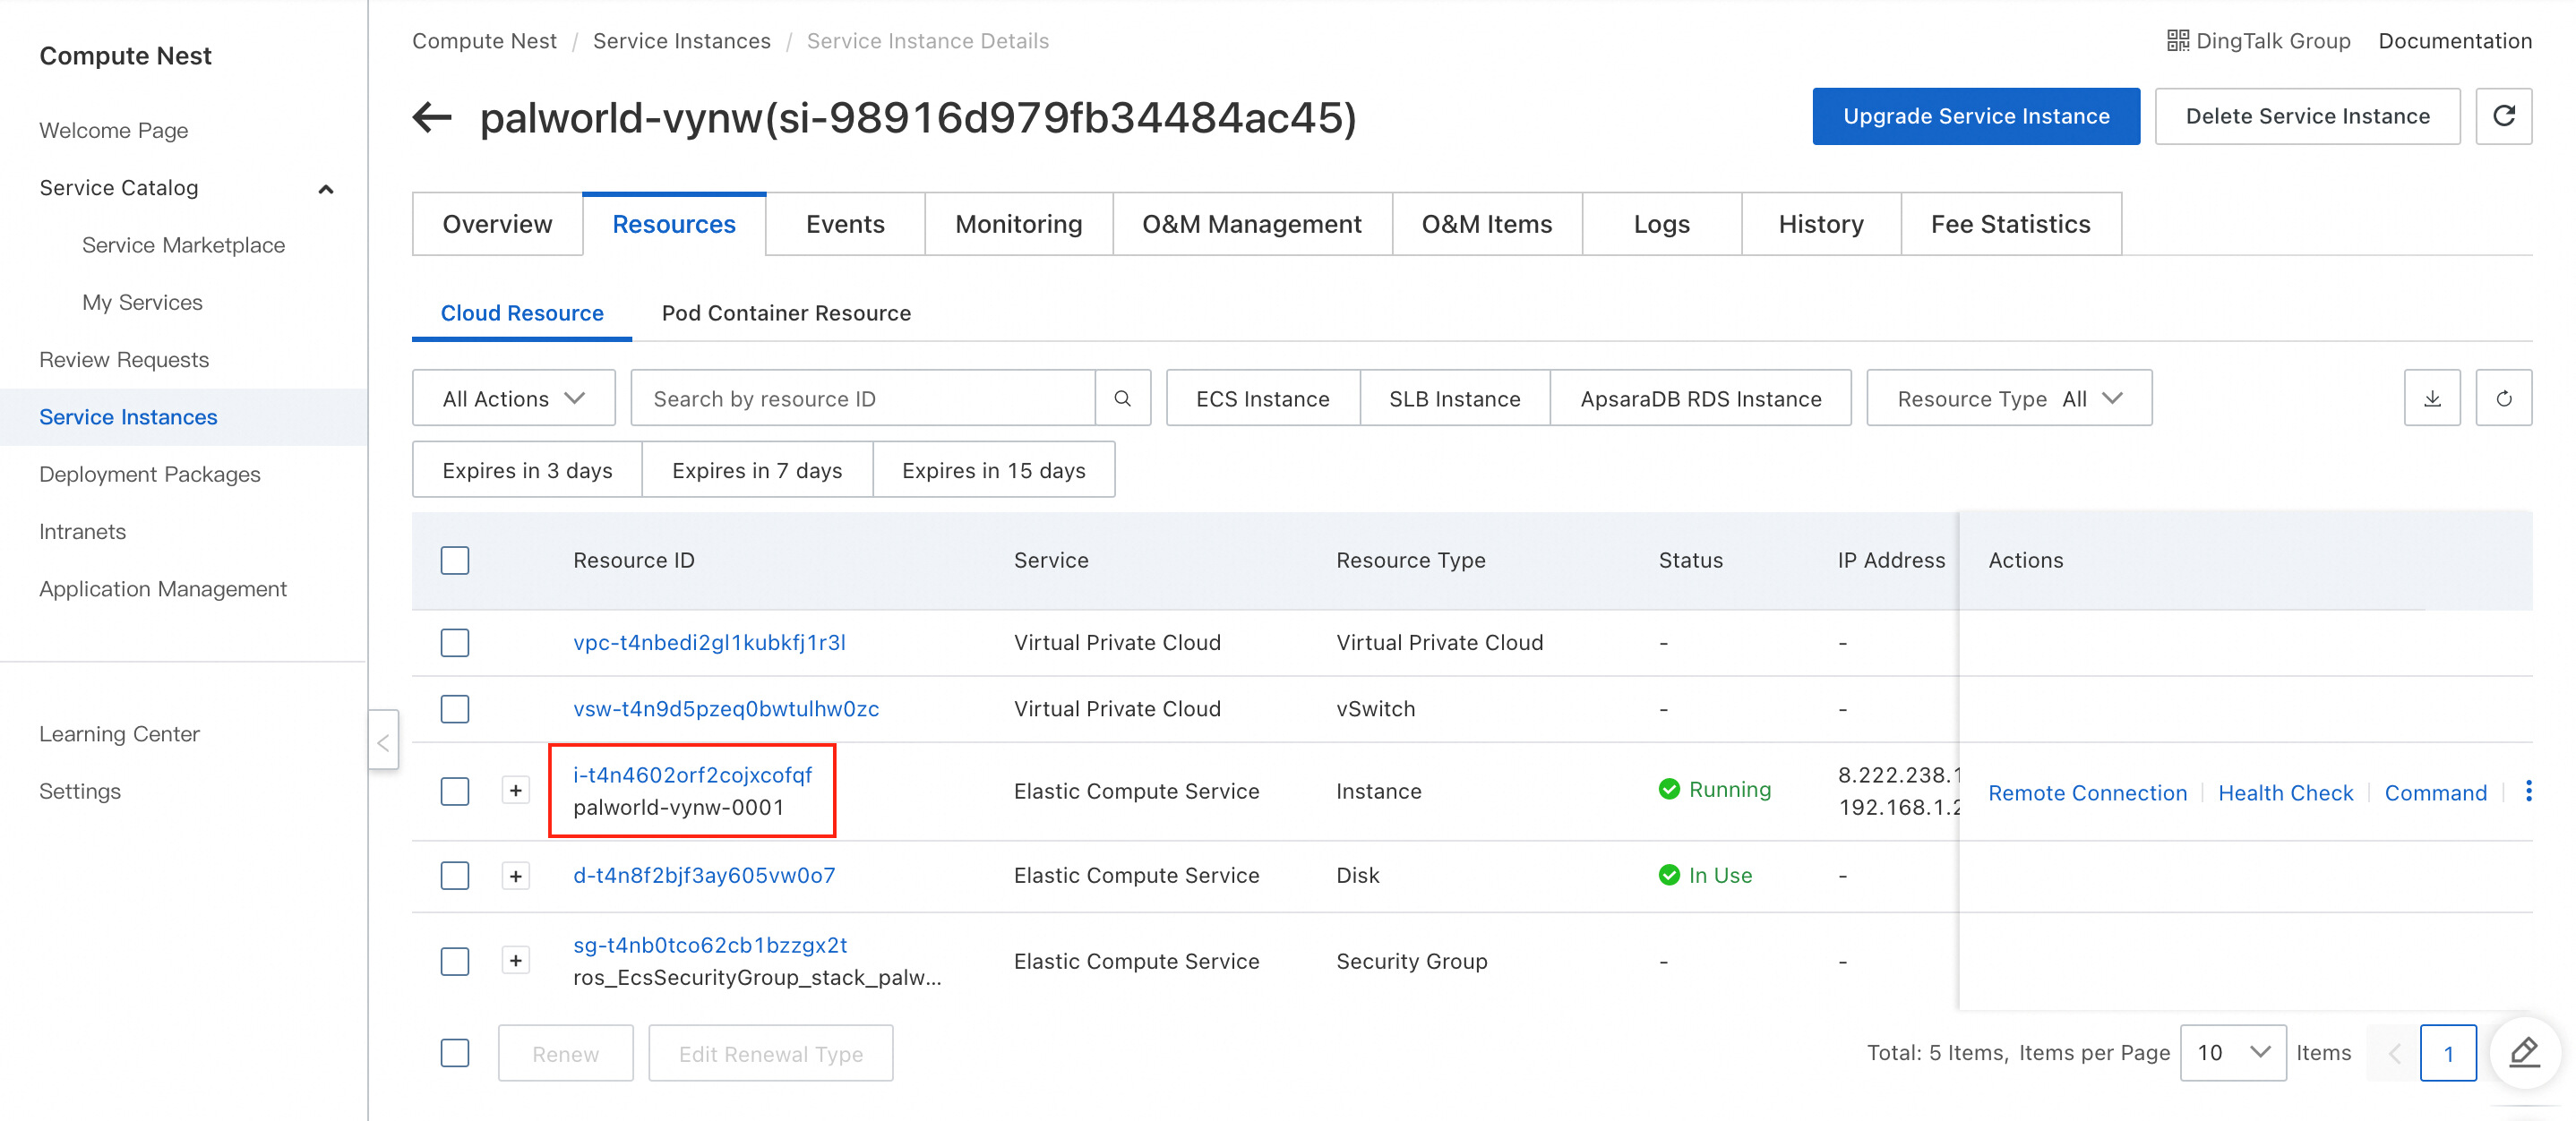
3. If your server is purchased in the Compute Nest console, click the ECS instance on the Resources tab of the Compute Nest console to go to the ECS console. If your server is purchased and deployed in the ECS console, directly go to the ECS console.
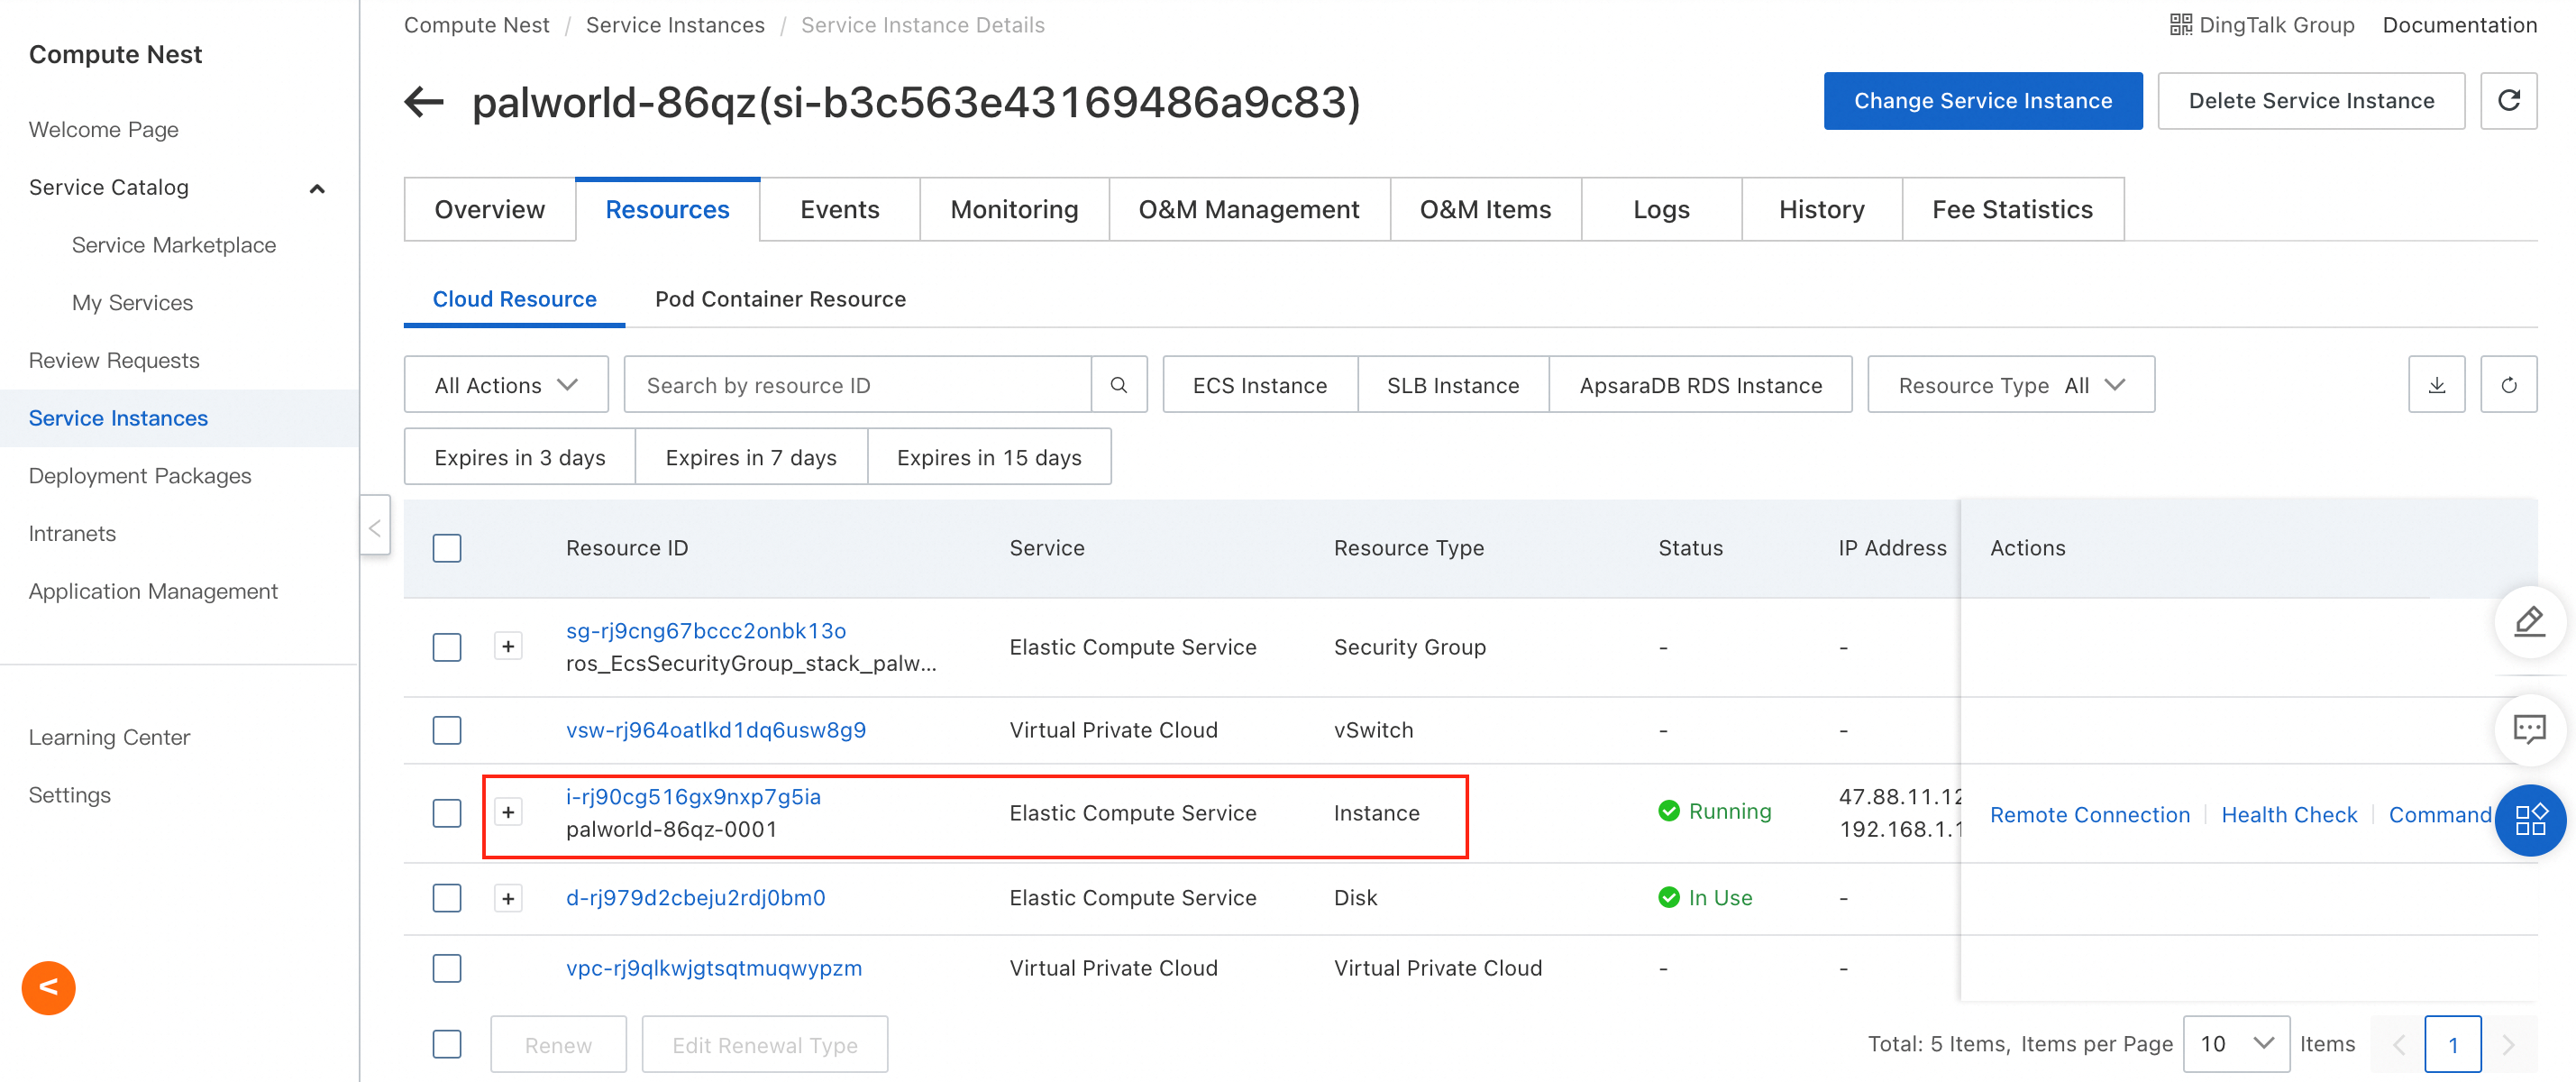
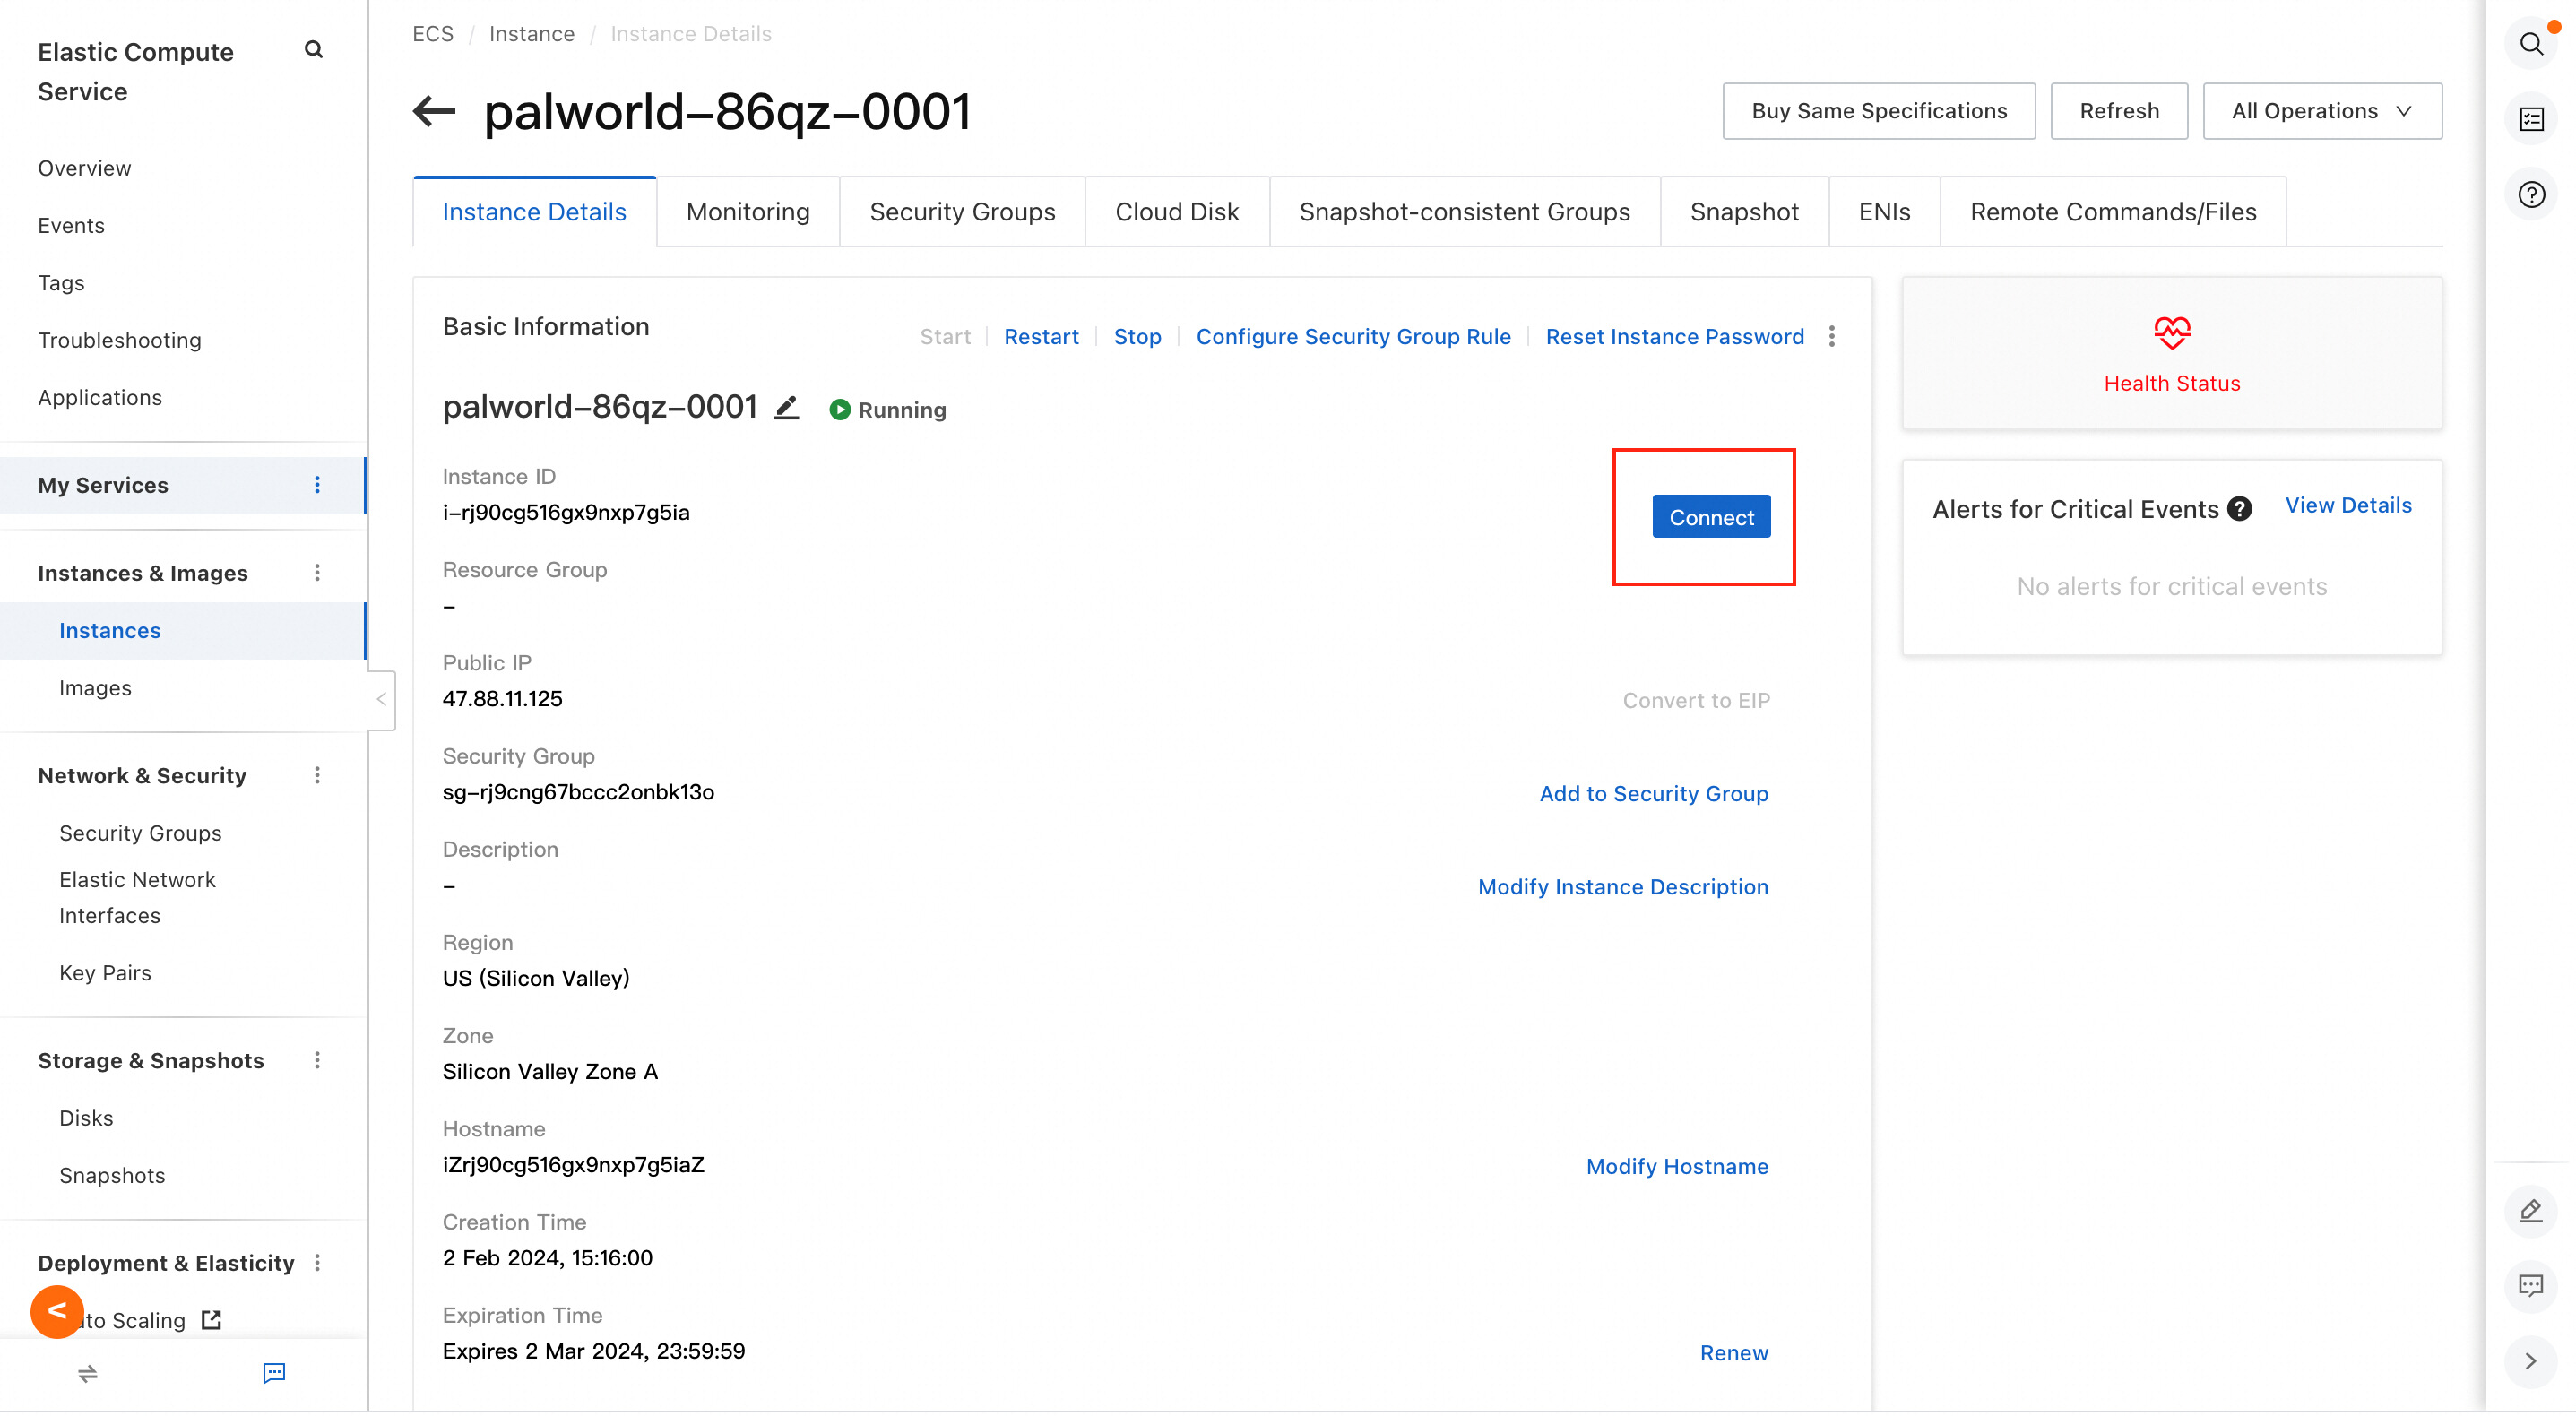
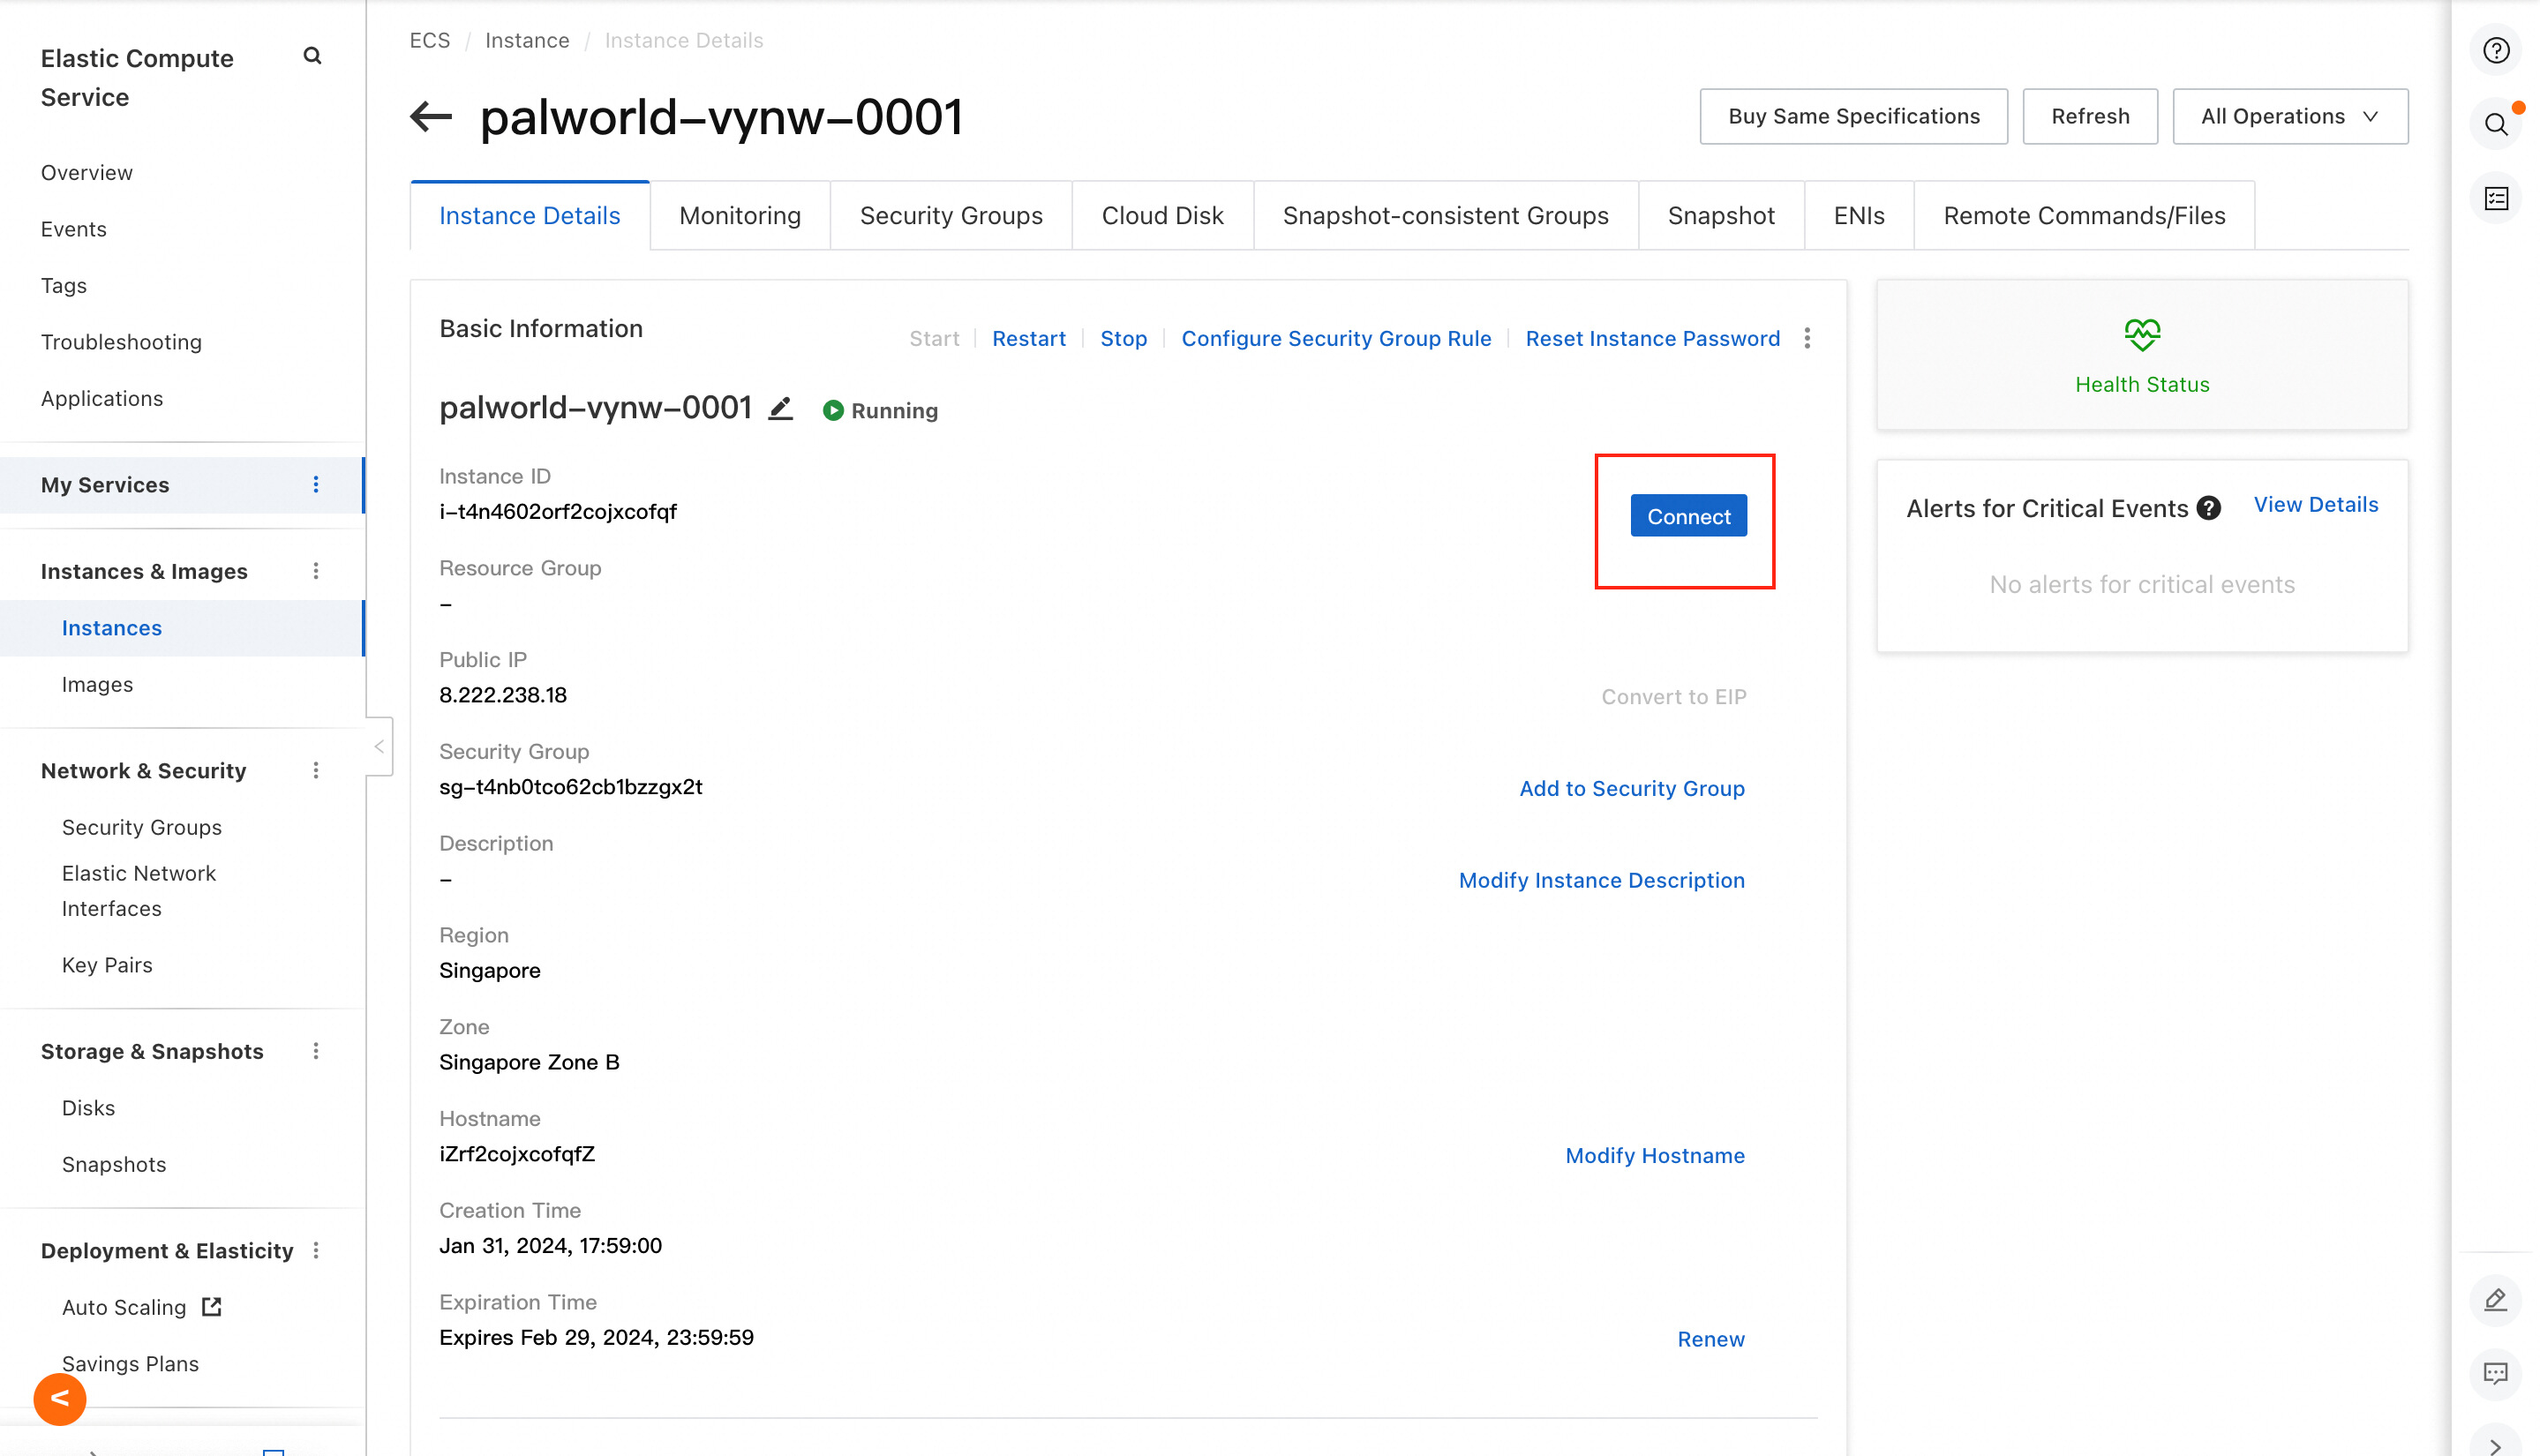
4. In the ECS console, click Connect on the right of the page. In the dialog box that appears, select Workbench.
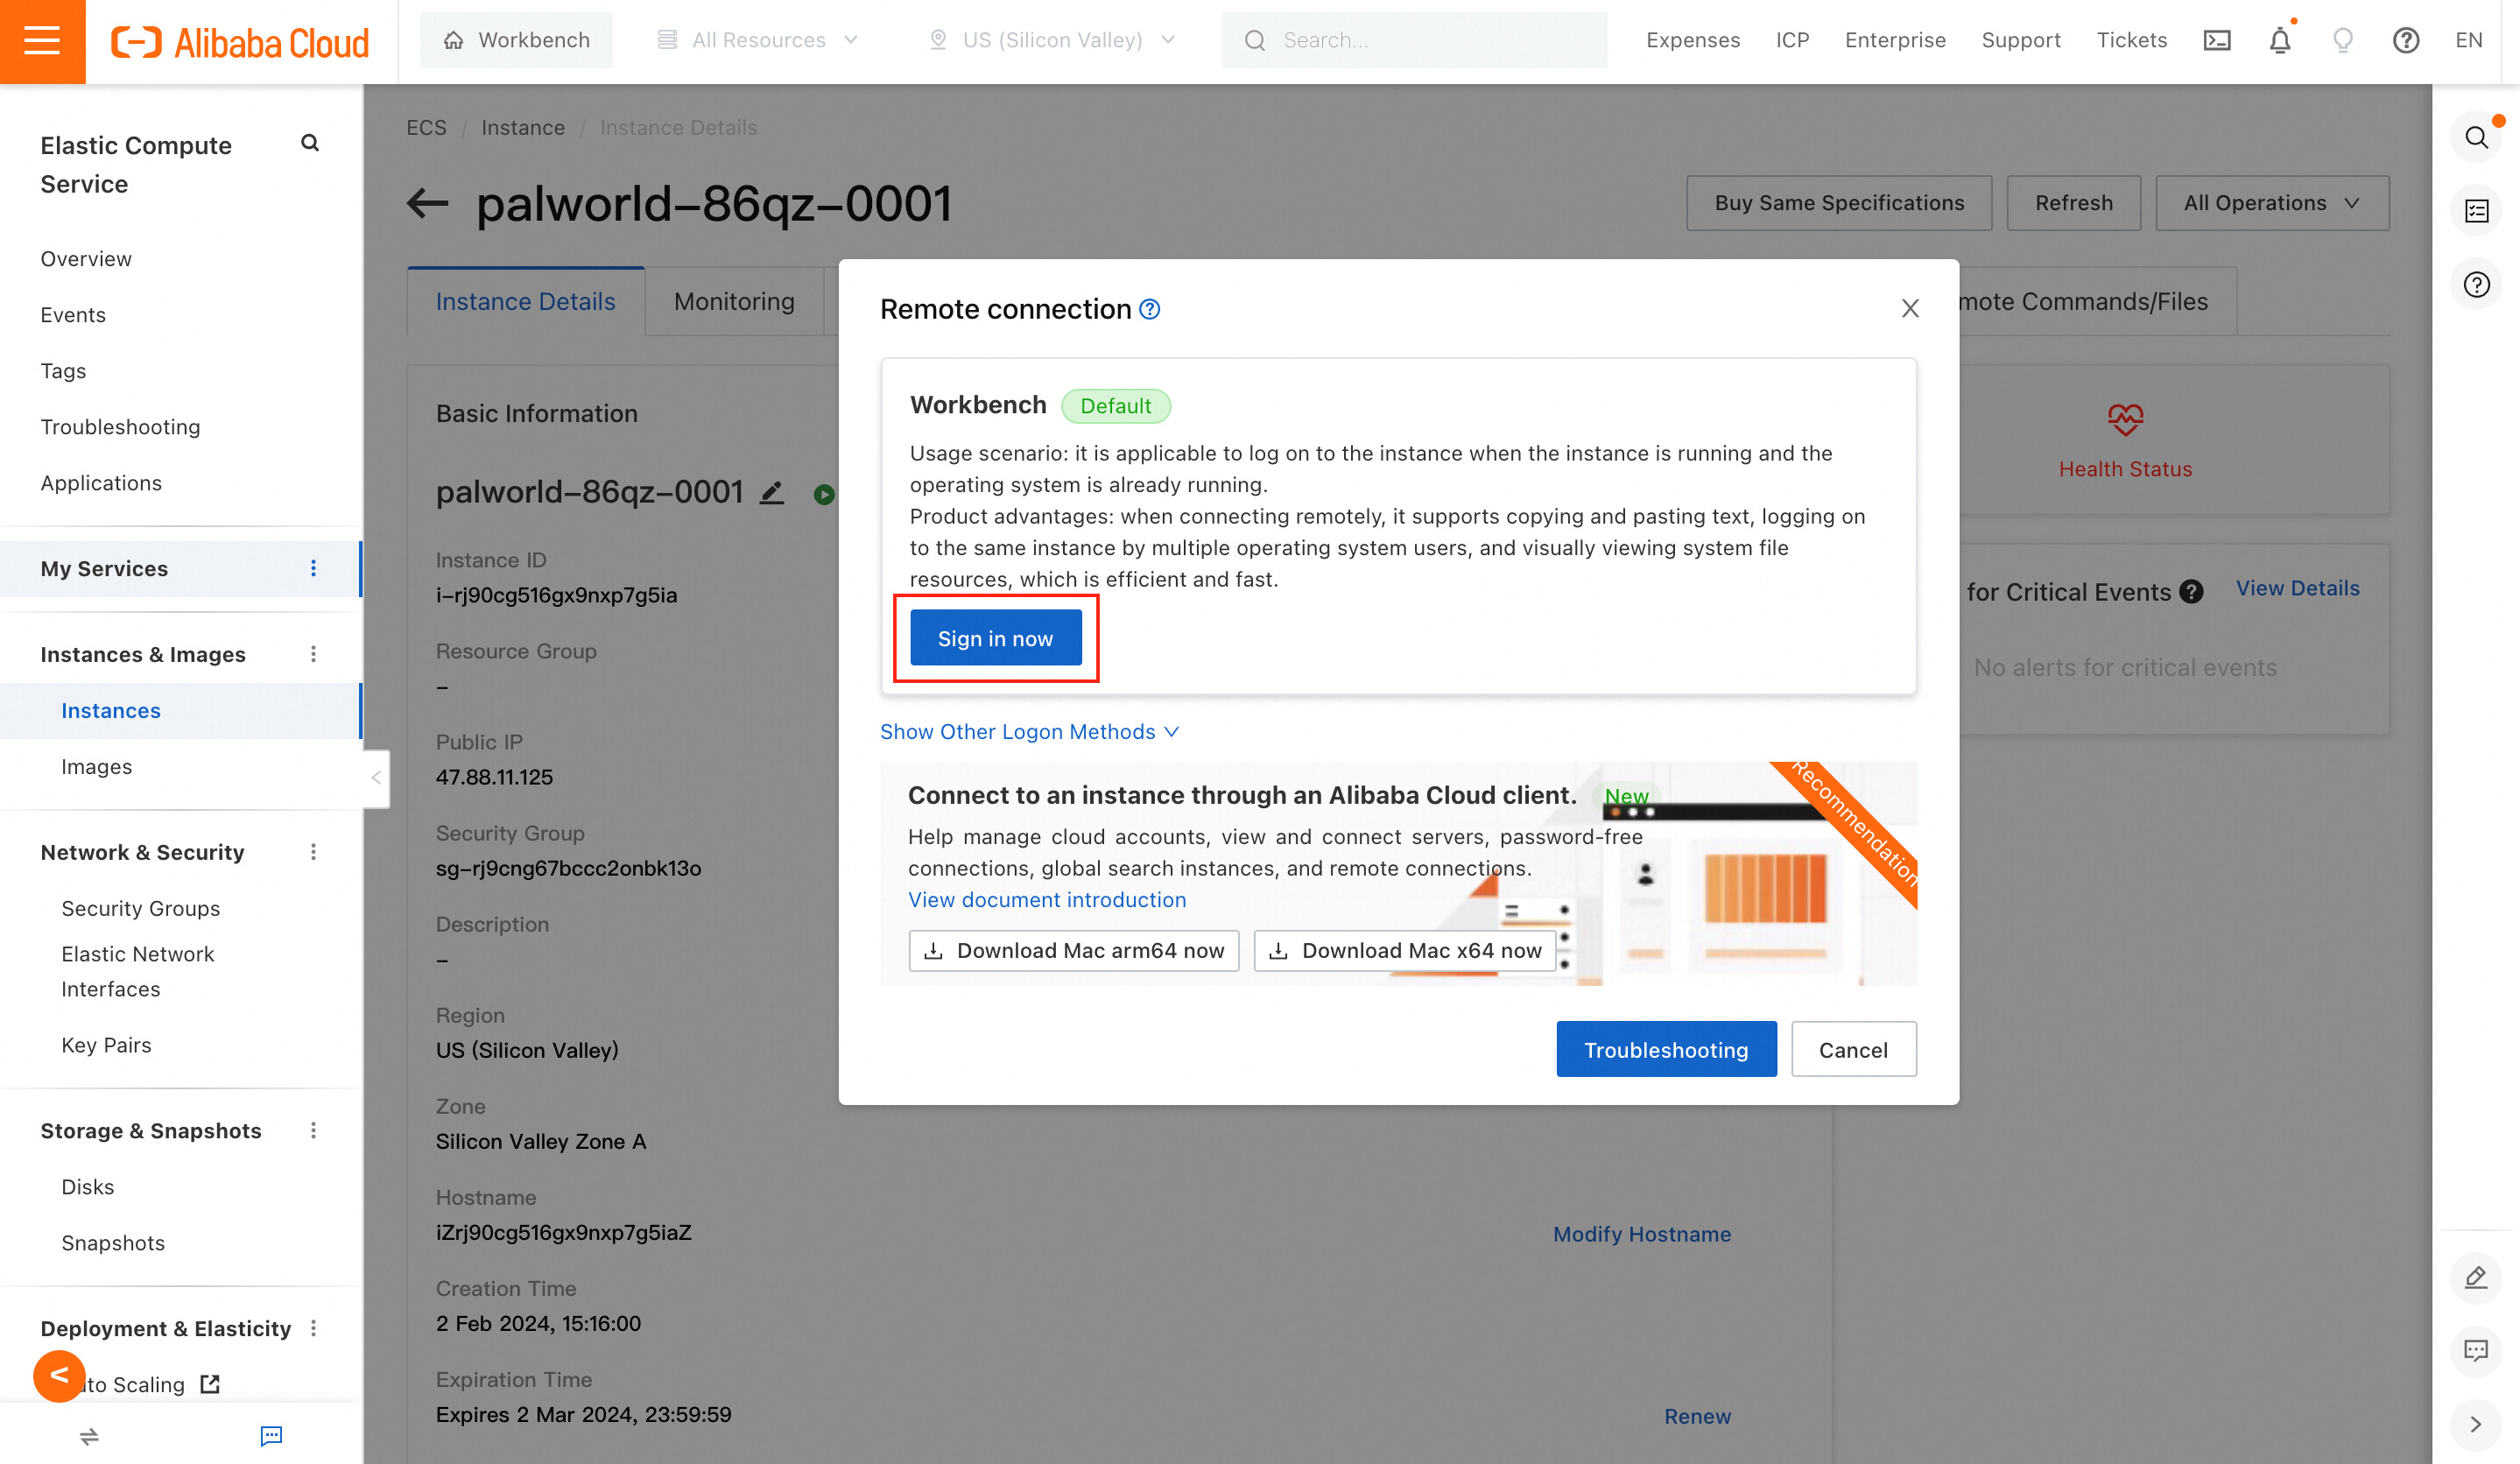
5. Enter the Instance Password specified when you created the Compute Nest service instance or the ECS instance.
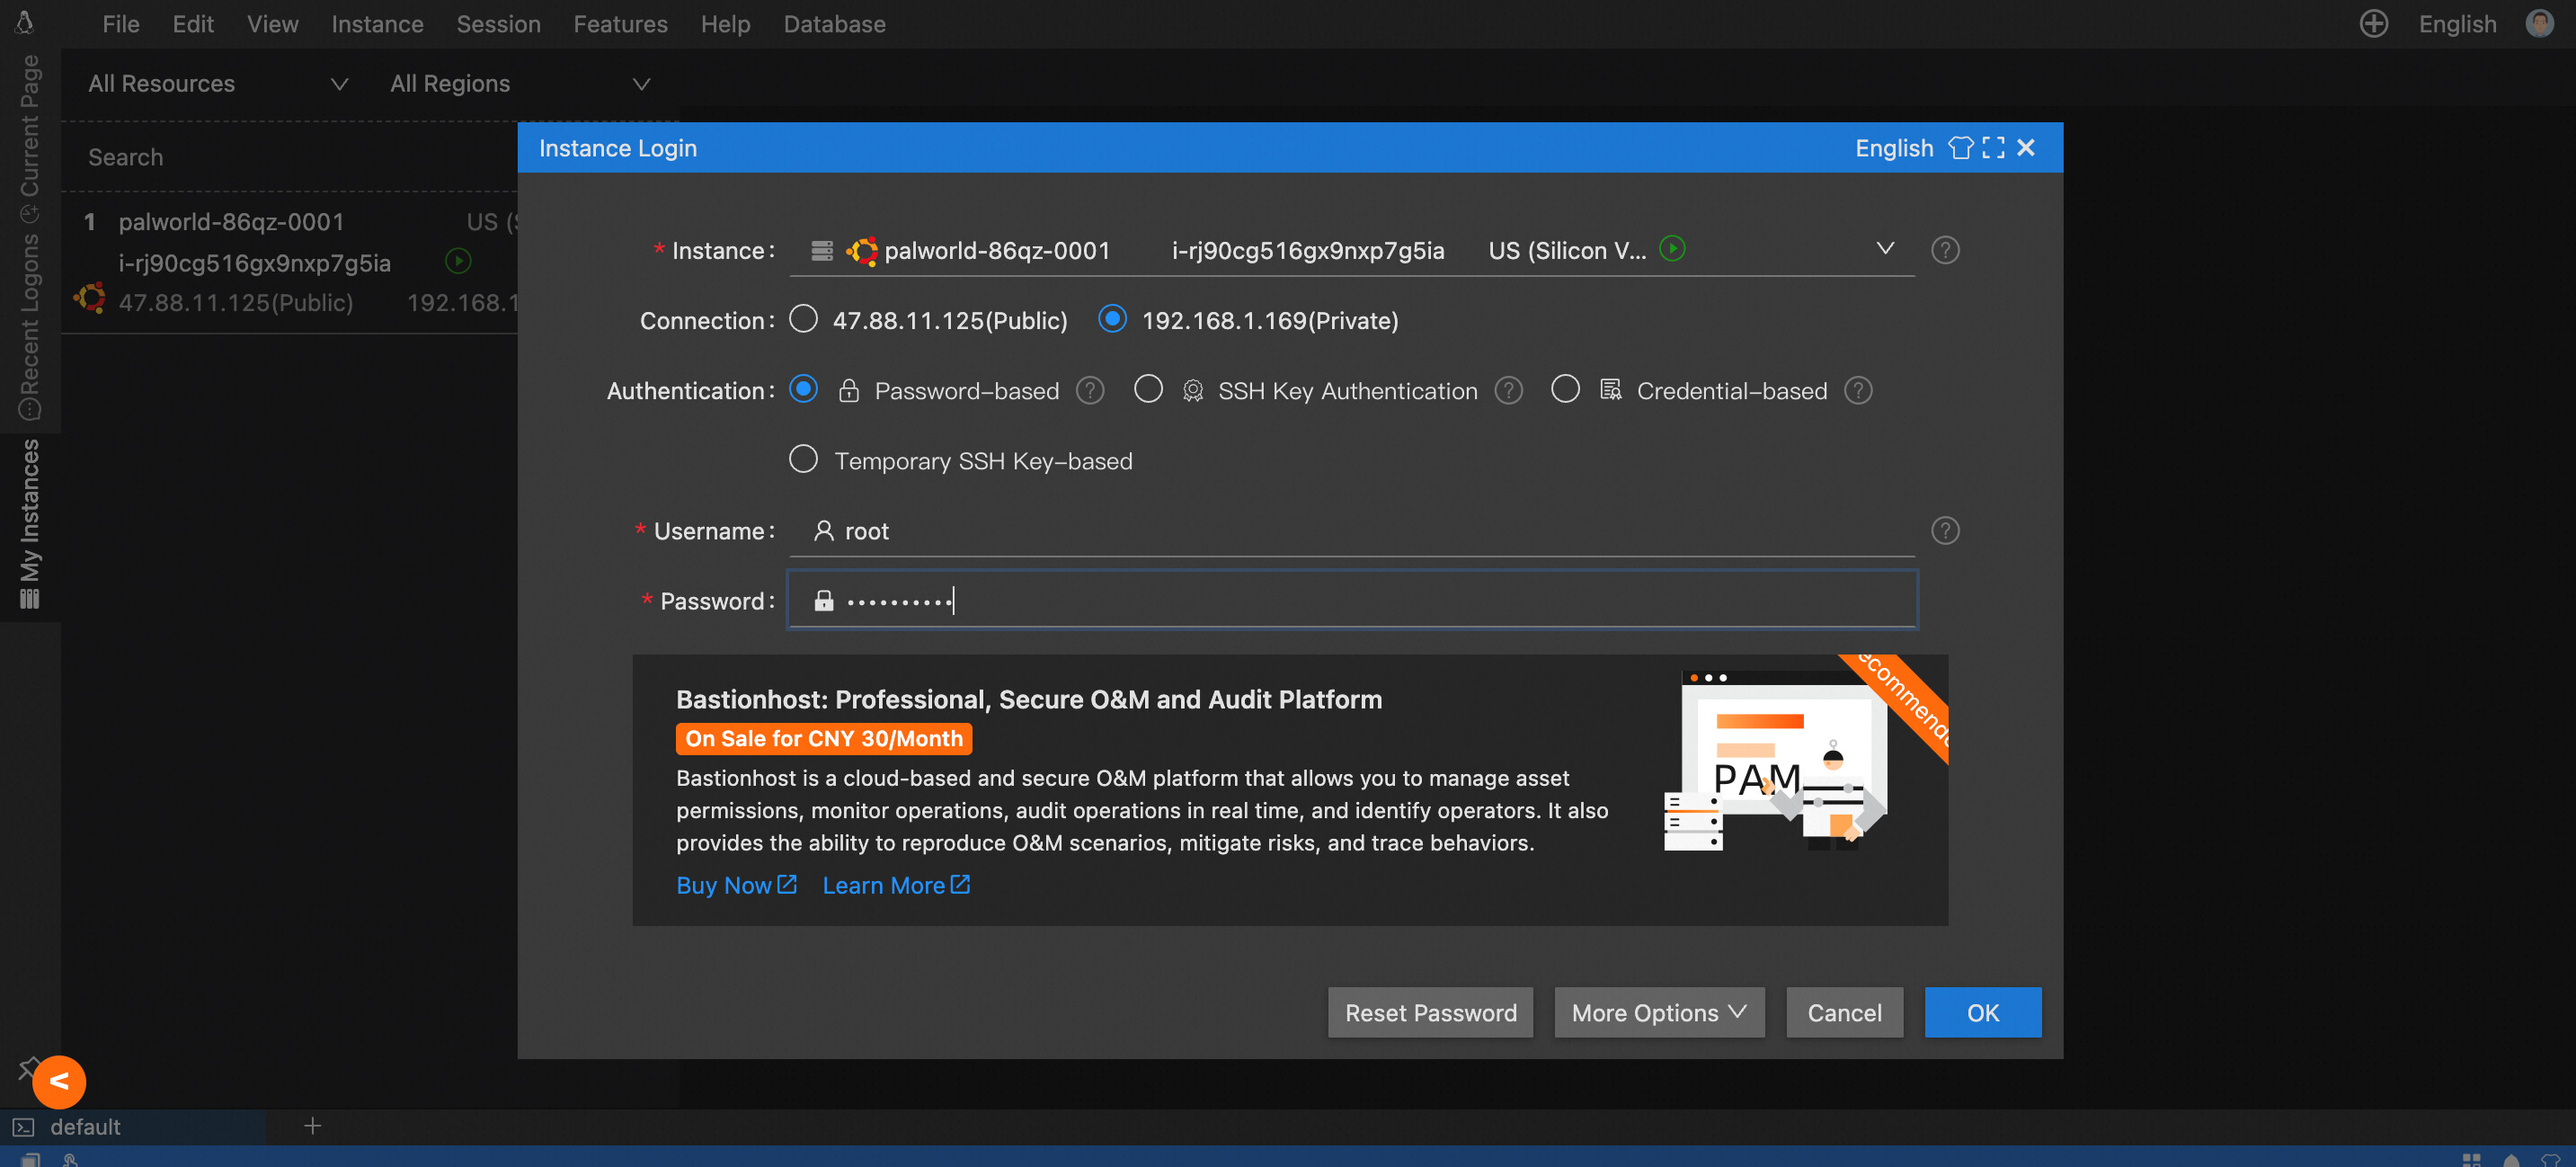
6. Run the following commands in the command line. If the console prompts do you want to continue?, enter y.
sudo apt update
sudo apt install zip -y
cd /home/ecs-assist-user/.steam/SteamApps/common/PalServer/Pal/Saved/
zip -r Saved.zip .
7. Choose File > New Navigator in the top navigation bar. Go to the /home/ecs-assist-user/.steam/SteamApps/common/PalServer/Pal/Saved path.
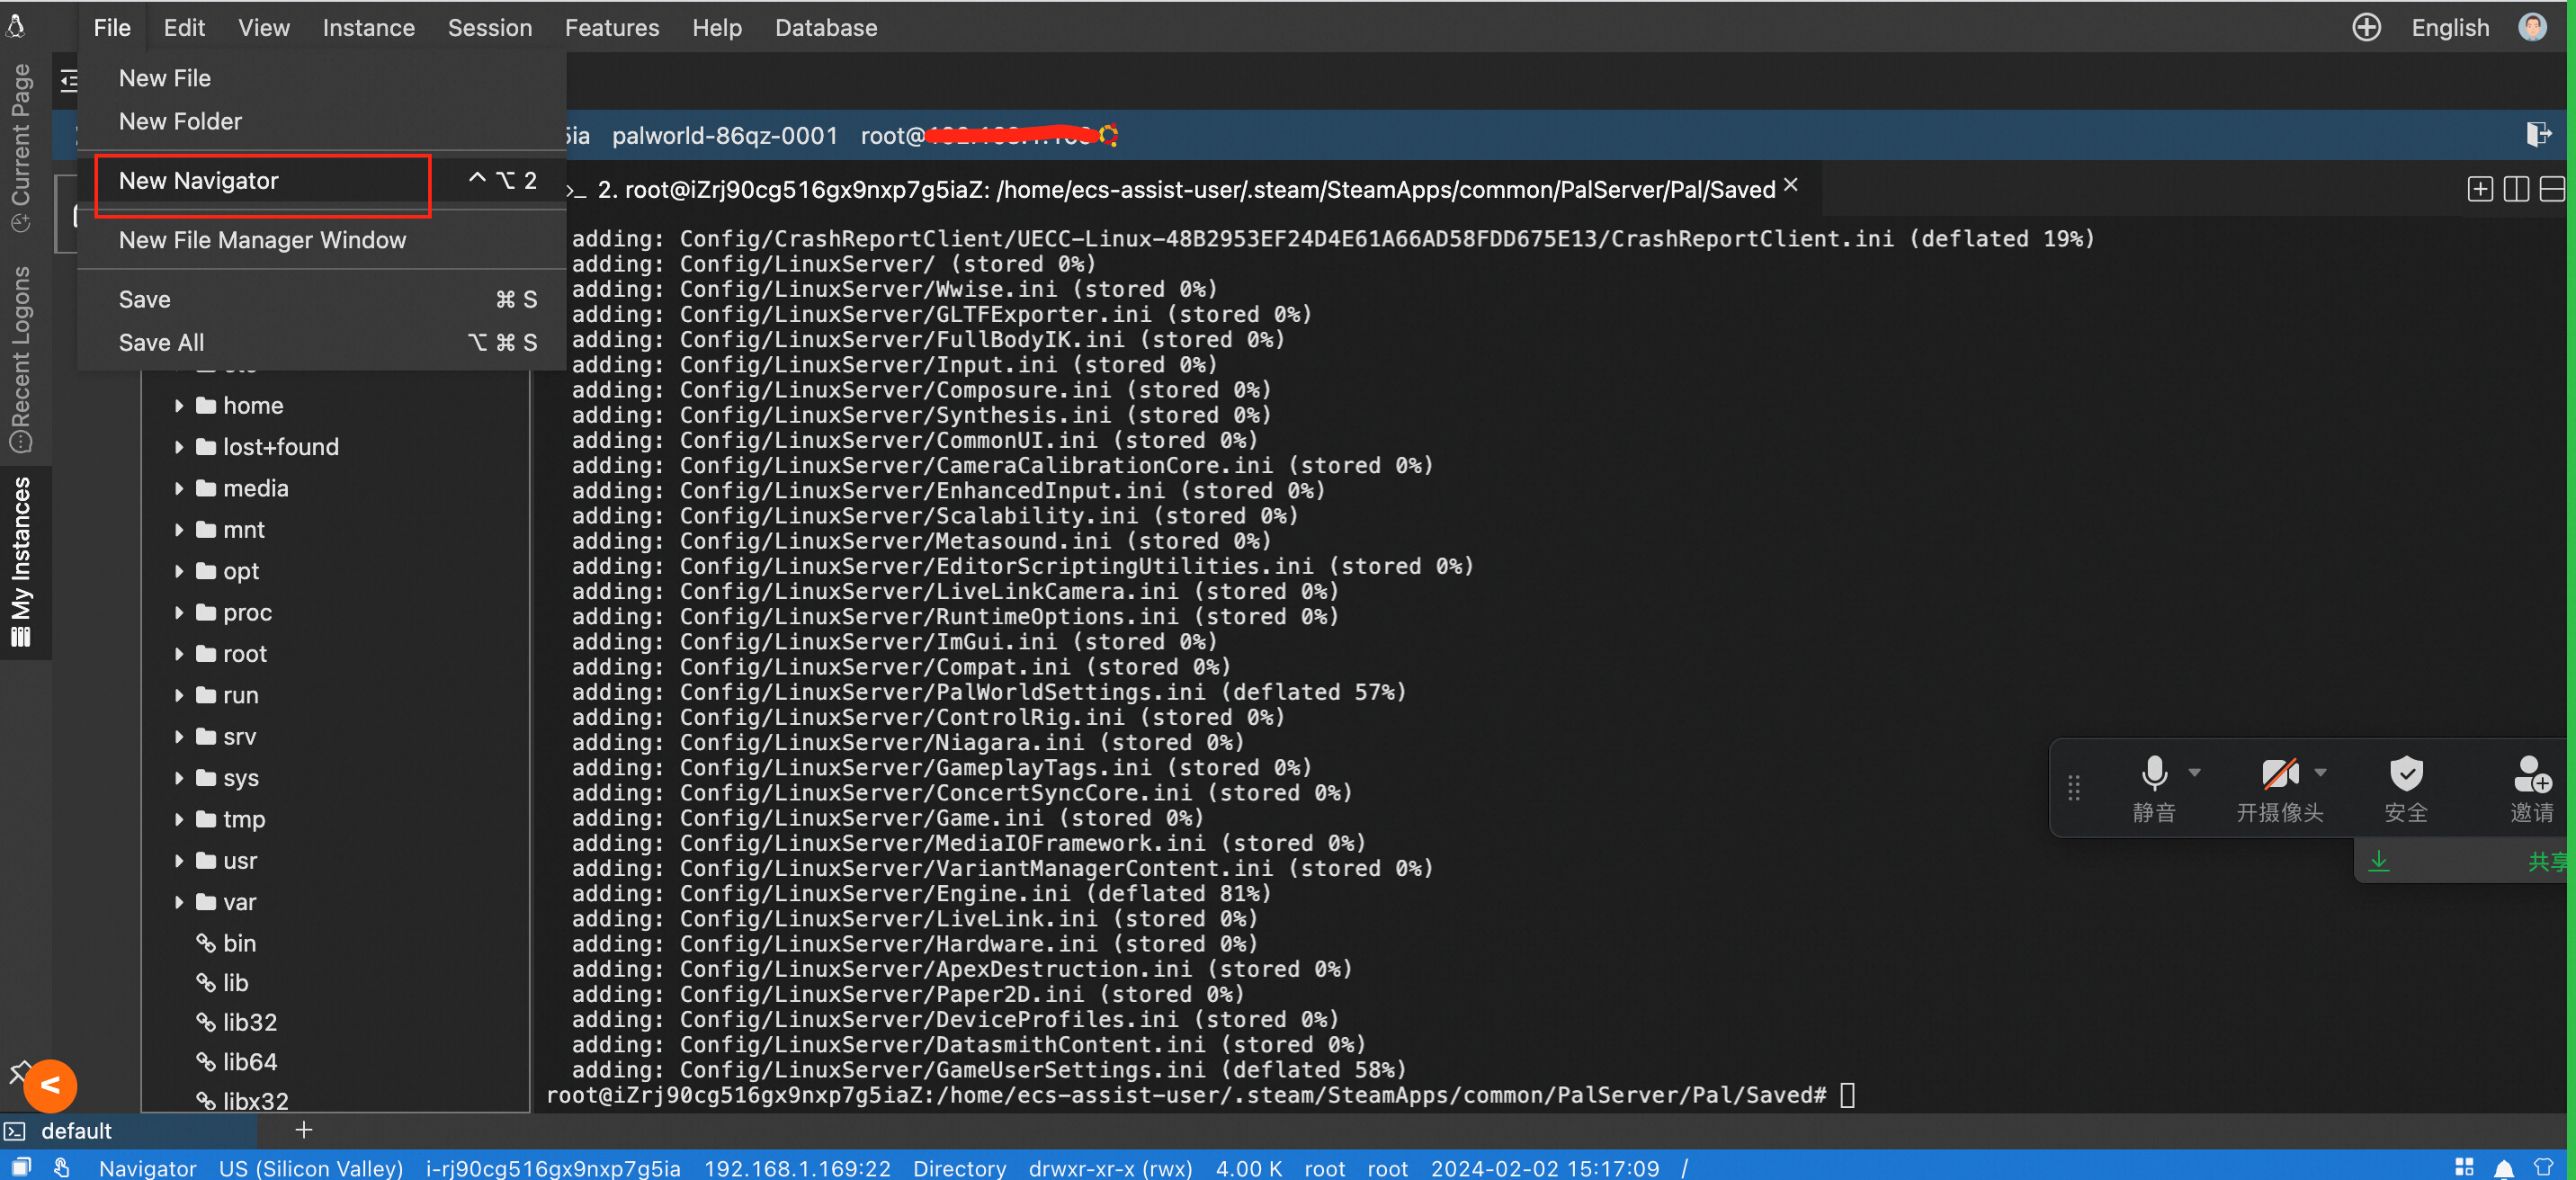
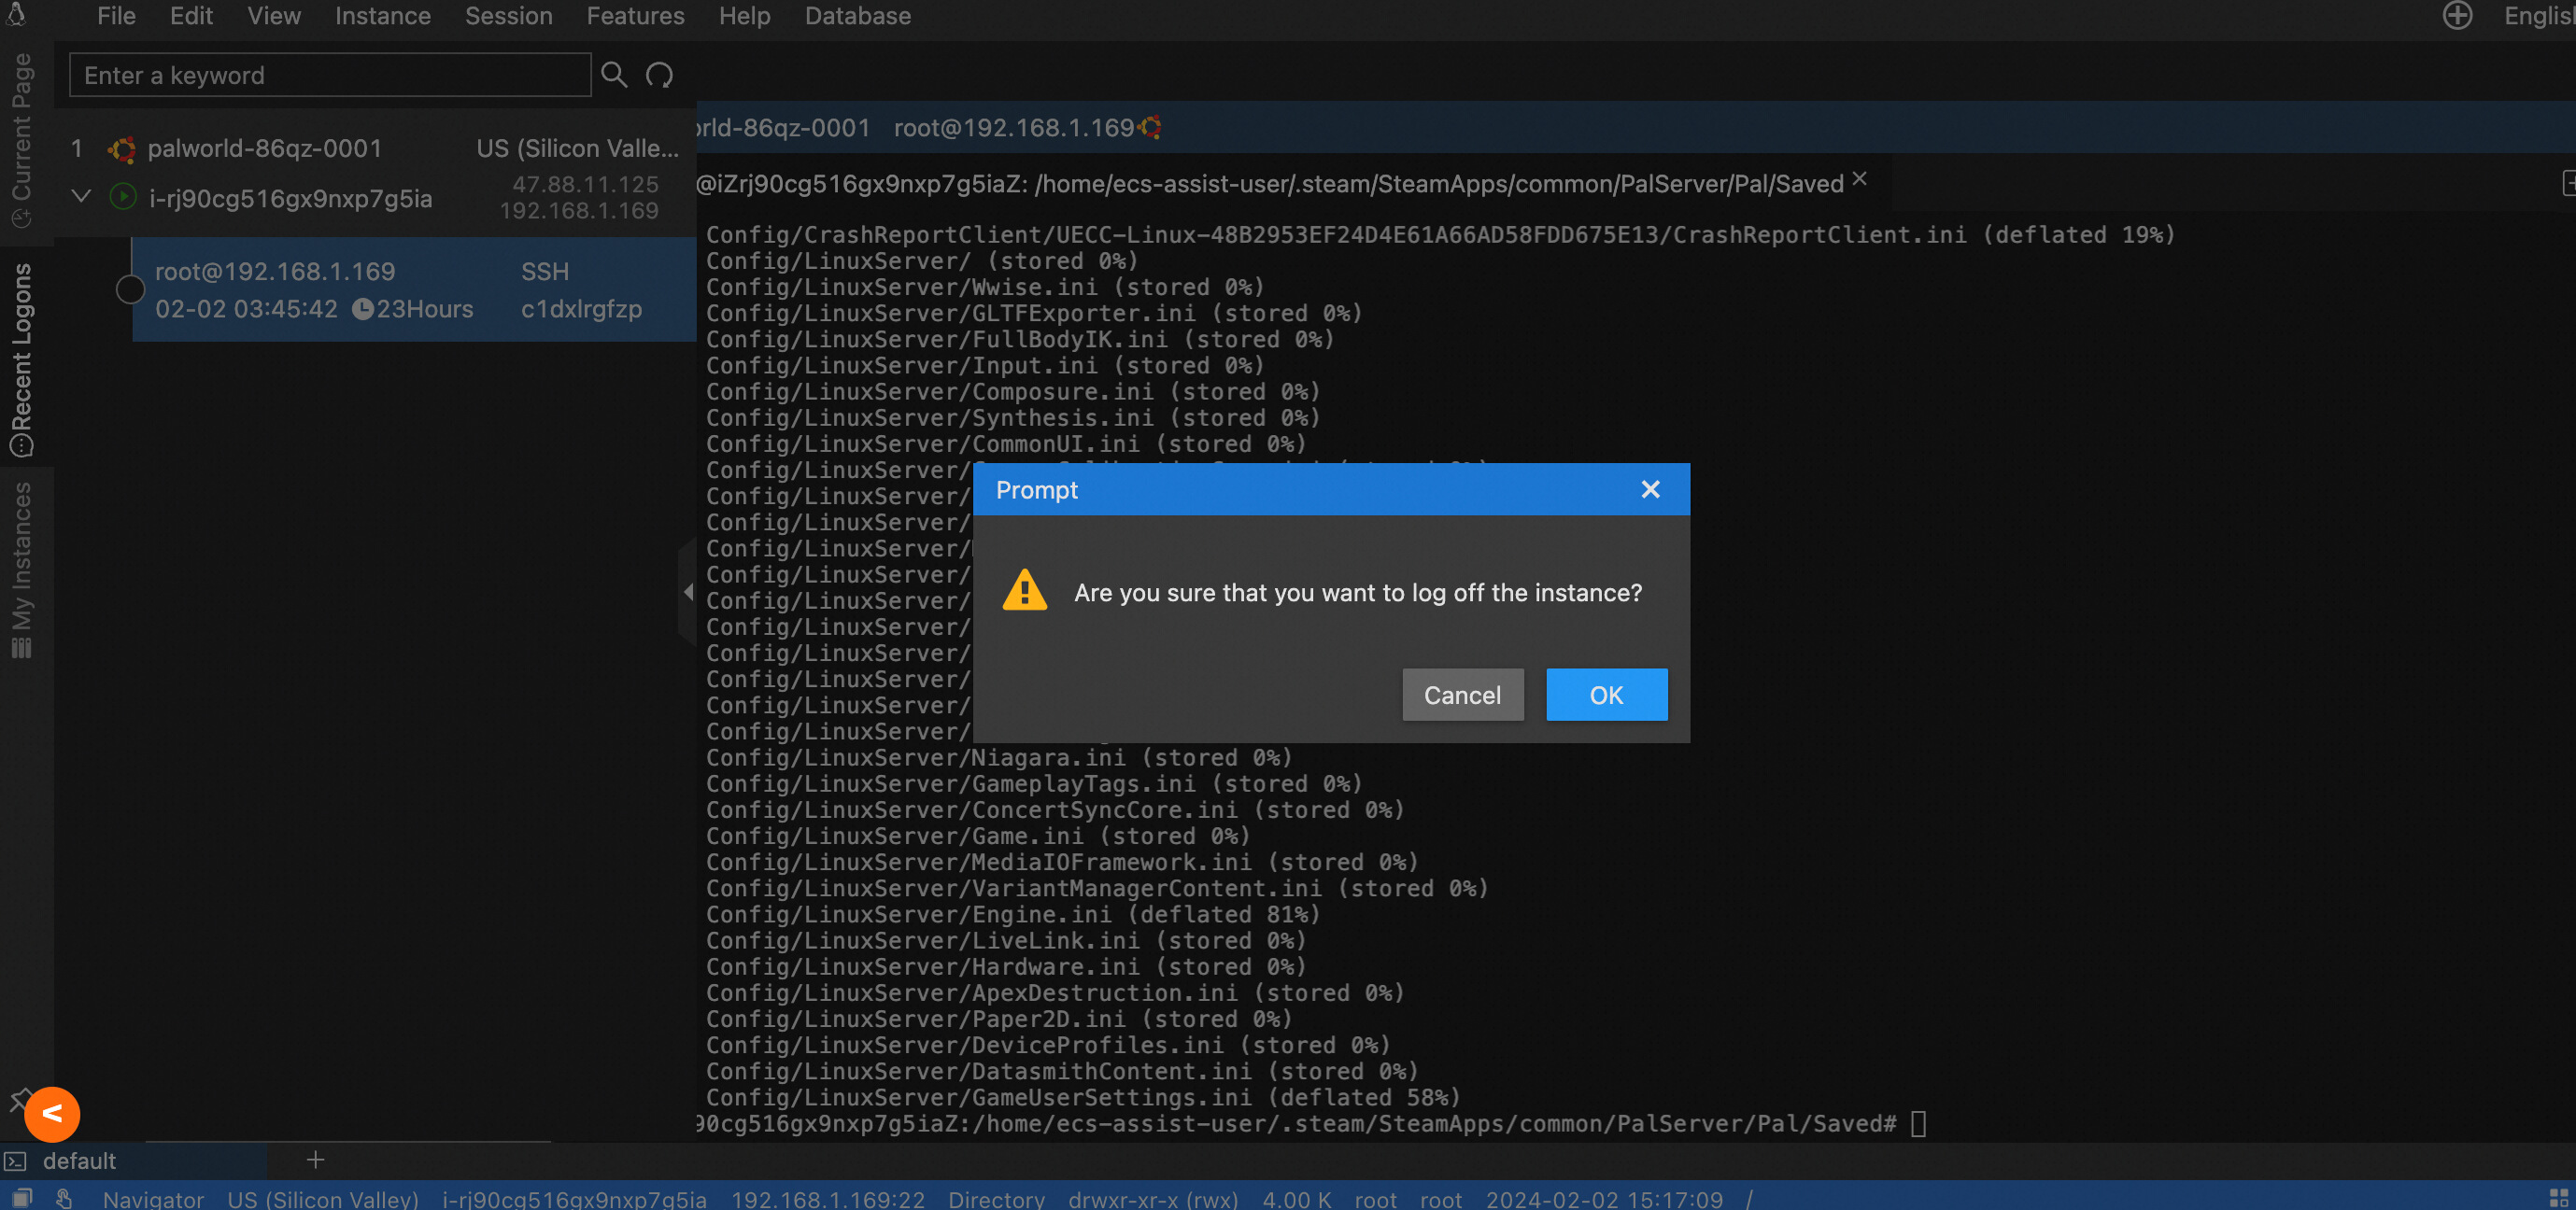
Note: If the directory tree cannot be opened, this is because that you have used Session Manager for ECS logon. You need to click Recent Logons on the left side of the page, log out of the instance, and then go back to Step 4. Note that the Workbench connection mode requires you to enter the corresponding password and you are the root user after logon. If you use Session Manager, you connect to the server as the ecs-assist-user.
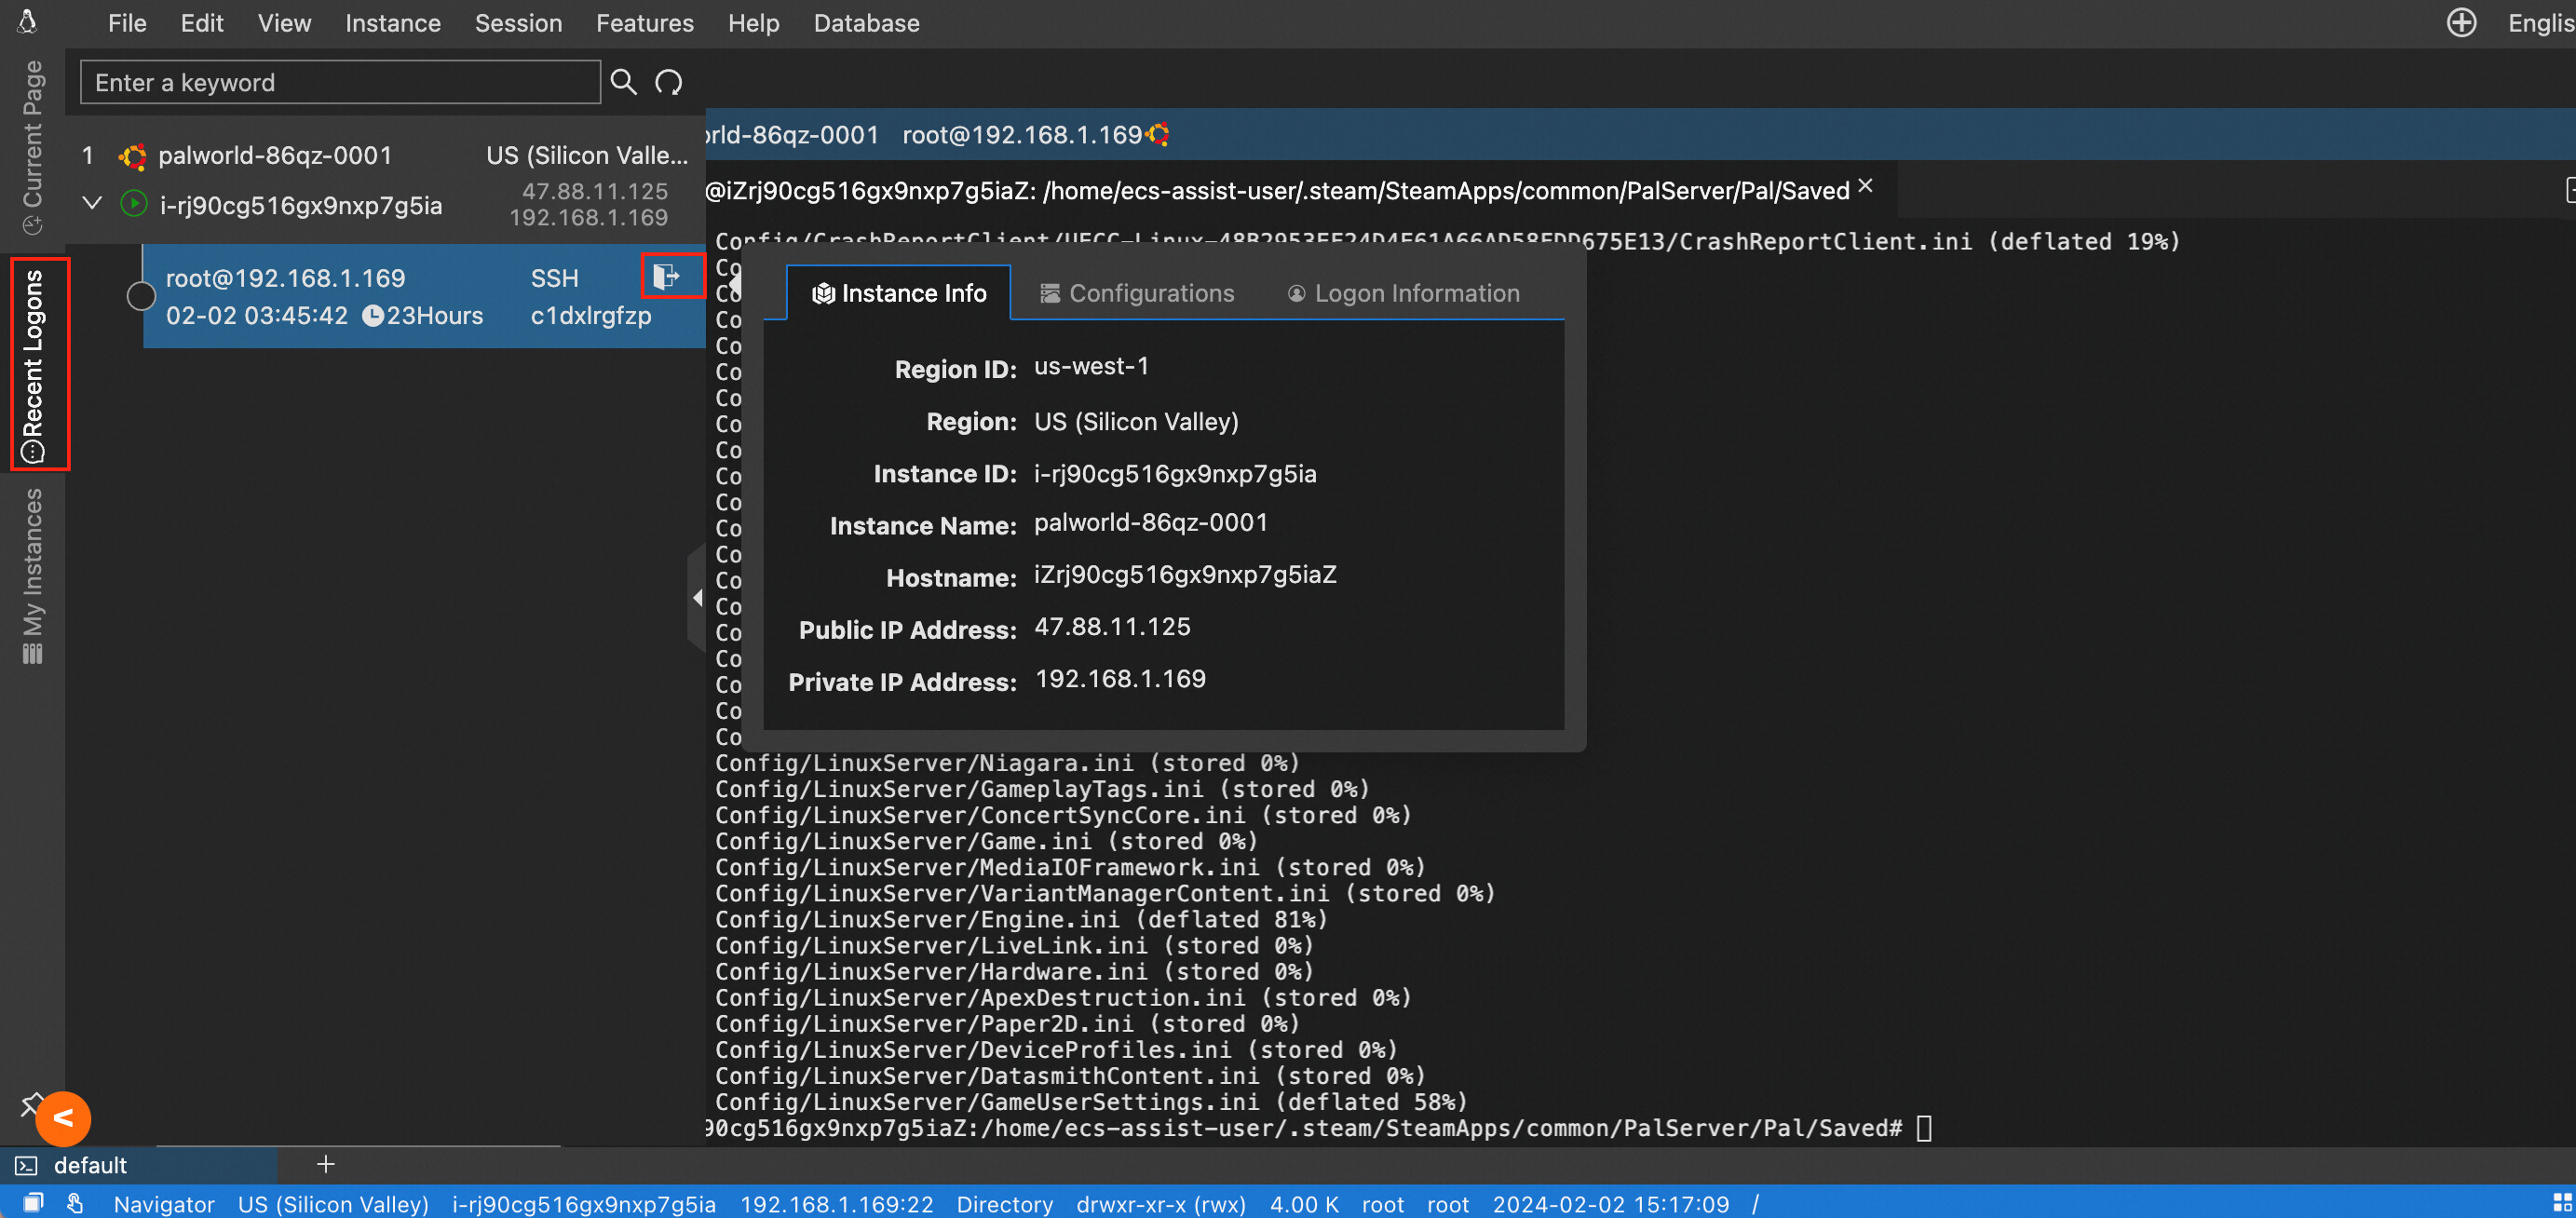
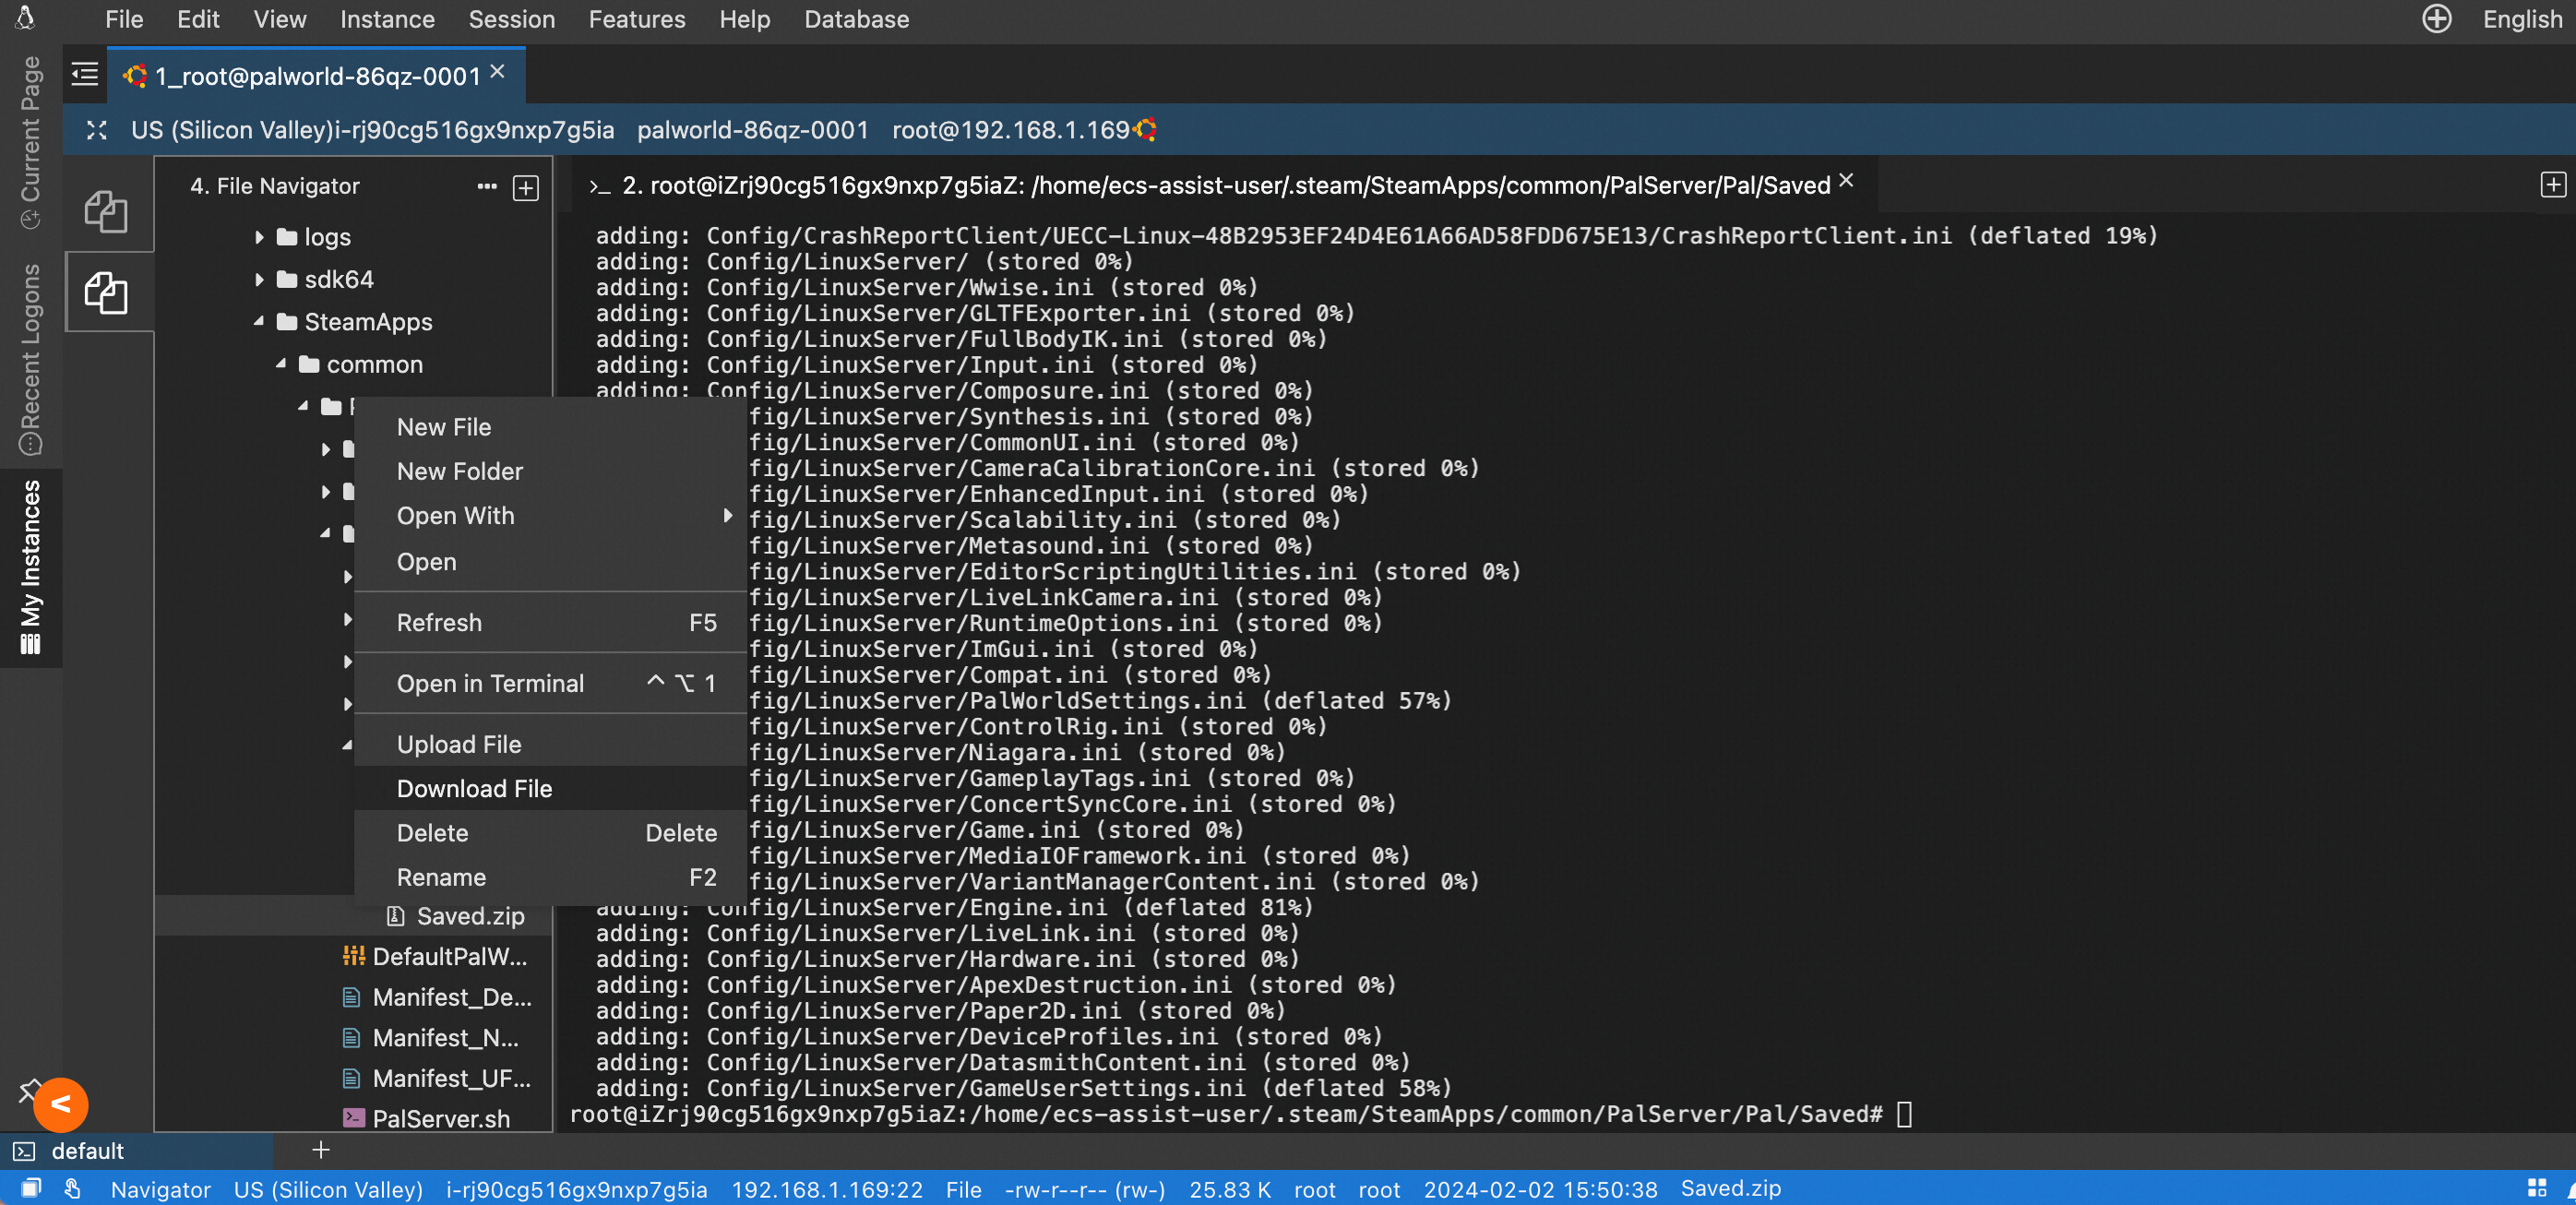
8. Download the Saved.zip file. If the file cannot be found, refresh the left sidebar. If the previous commands failed to be executed, run each command separately.
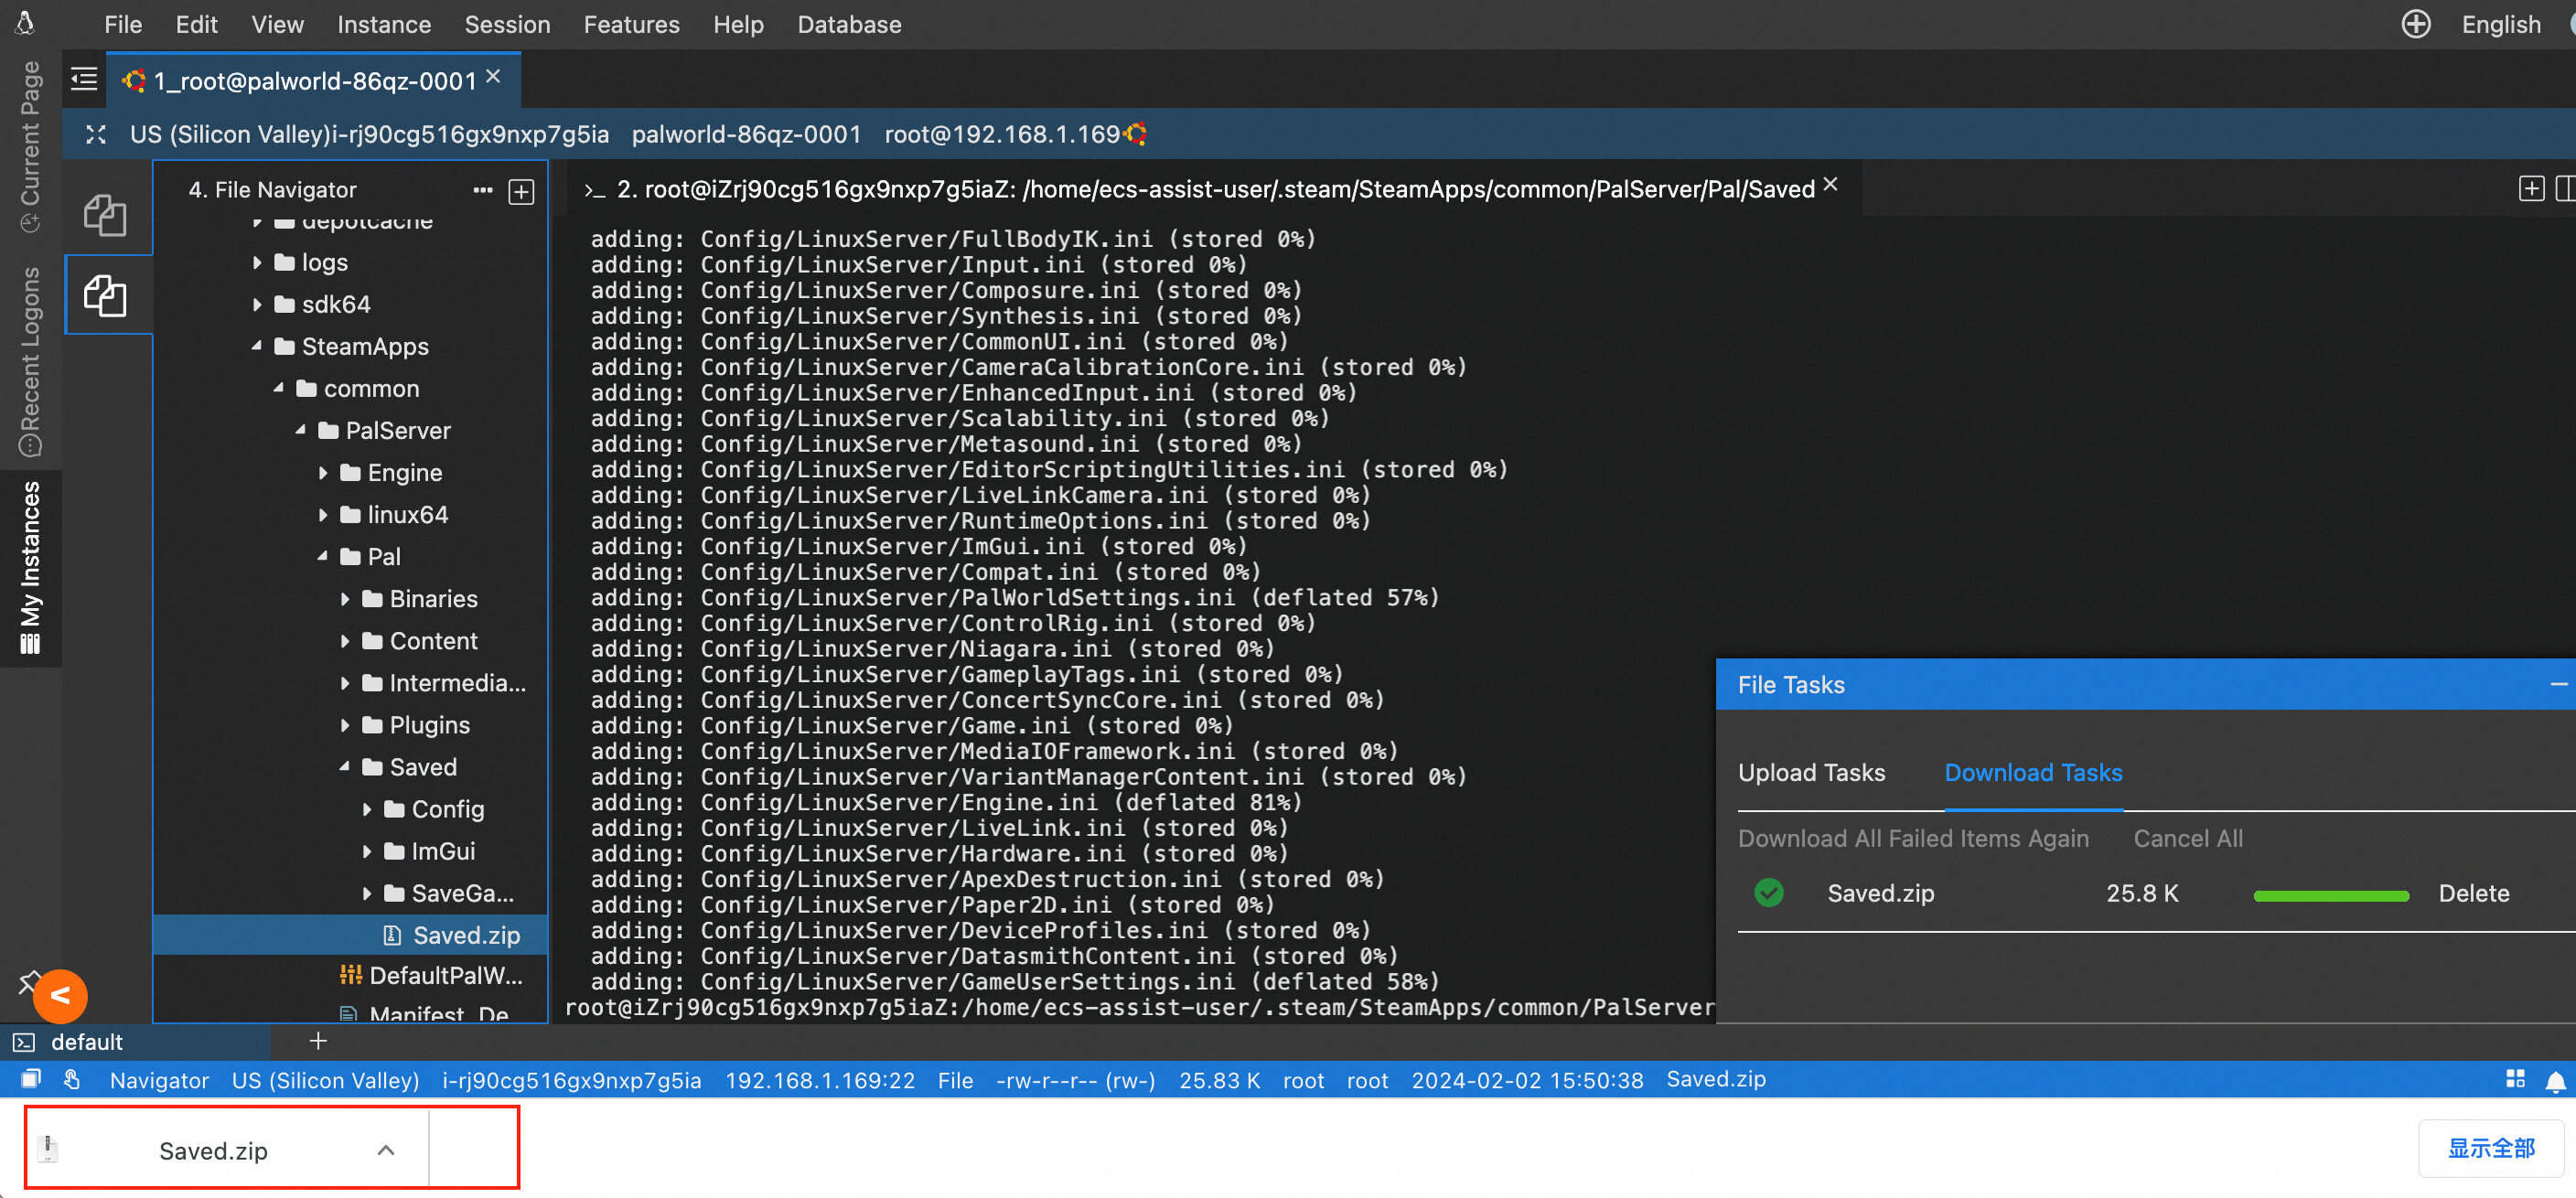
9. When the lower-left corner shows that the download is complete, you can find the file in the download records of the browser.
1. Log on to the ECS console by using the Workbench connection. The logon procedure is the same as Steps 4 to 5 of downloading archive files from a Linux server.
2. Run the following command in the command line to stop the Palworld server:
sudo systemctl stop pal-server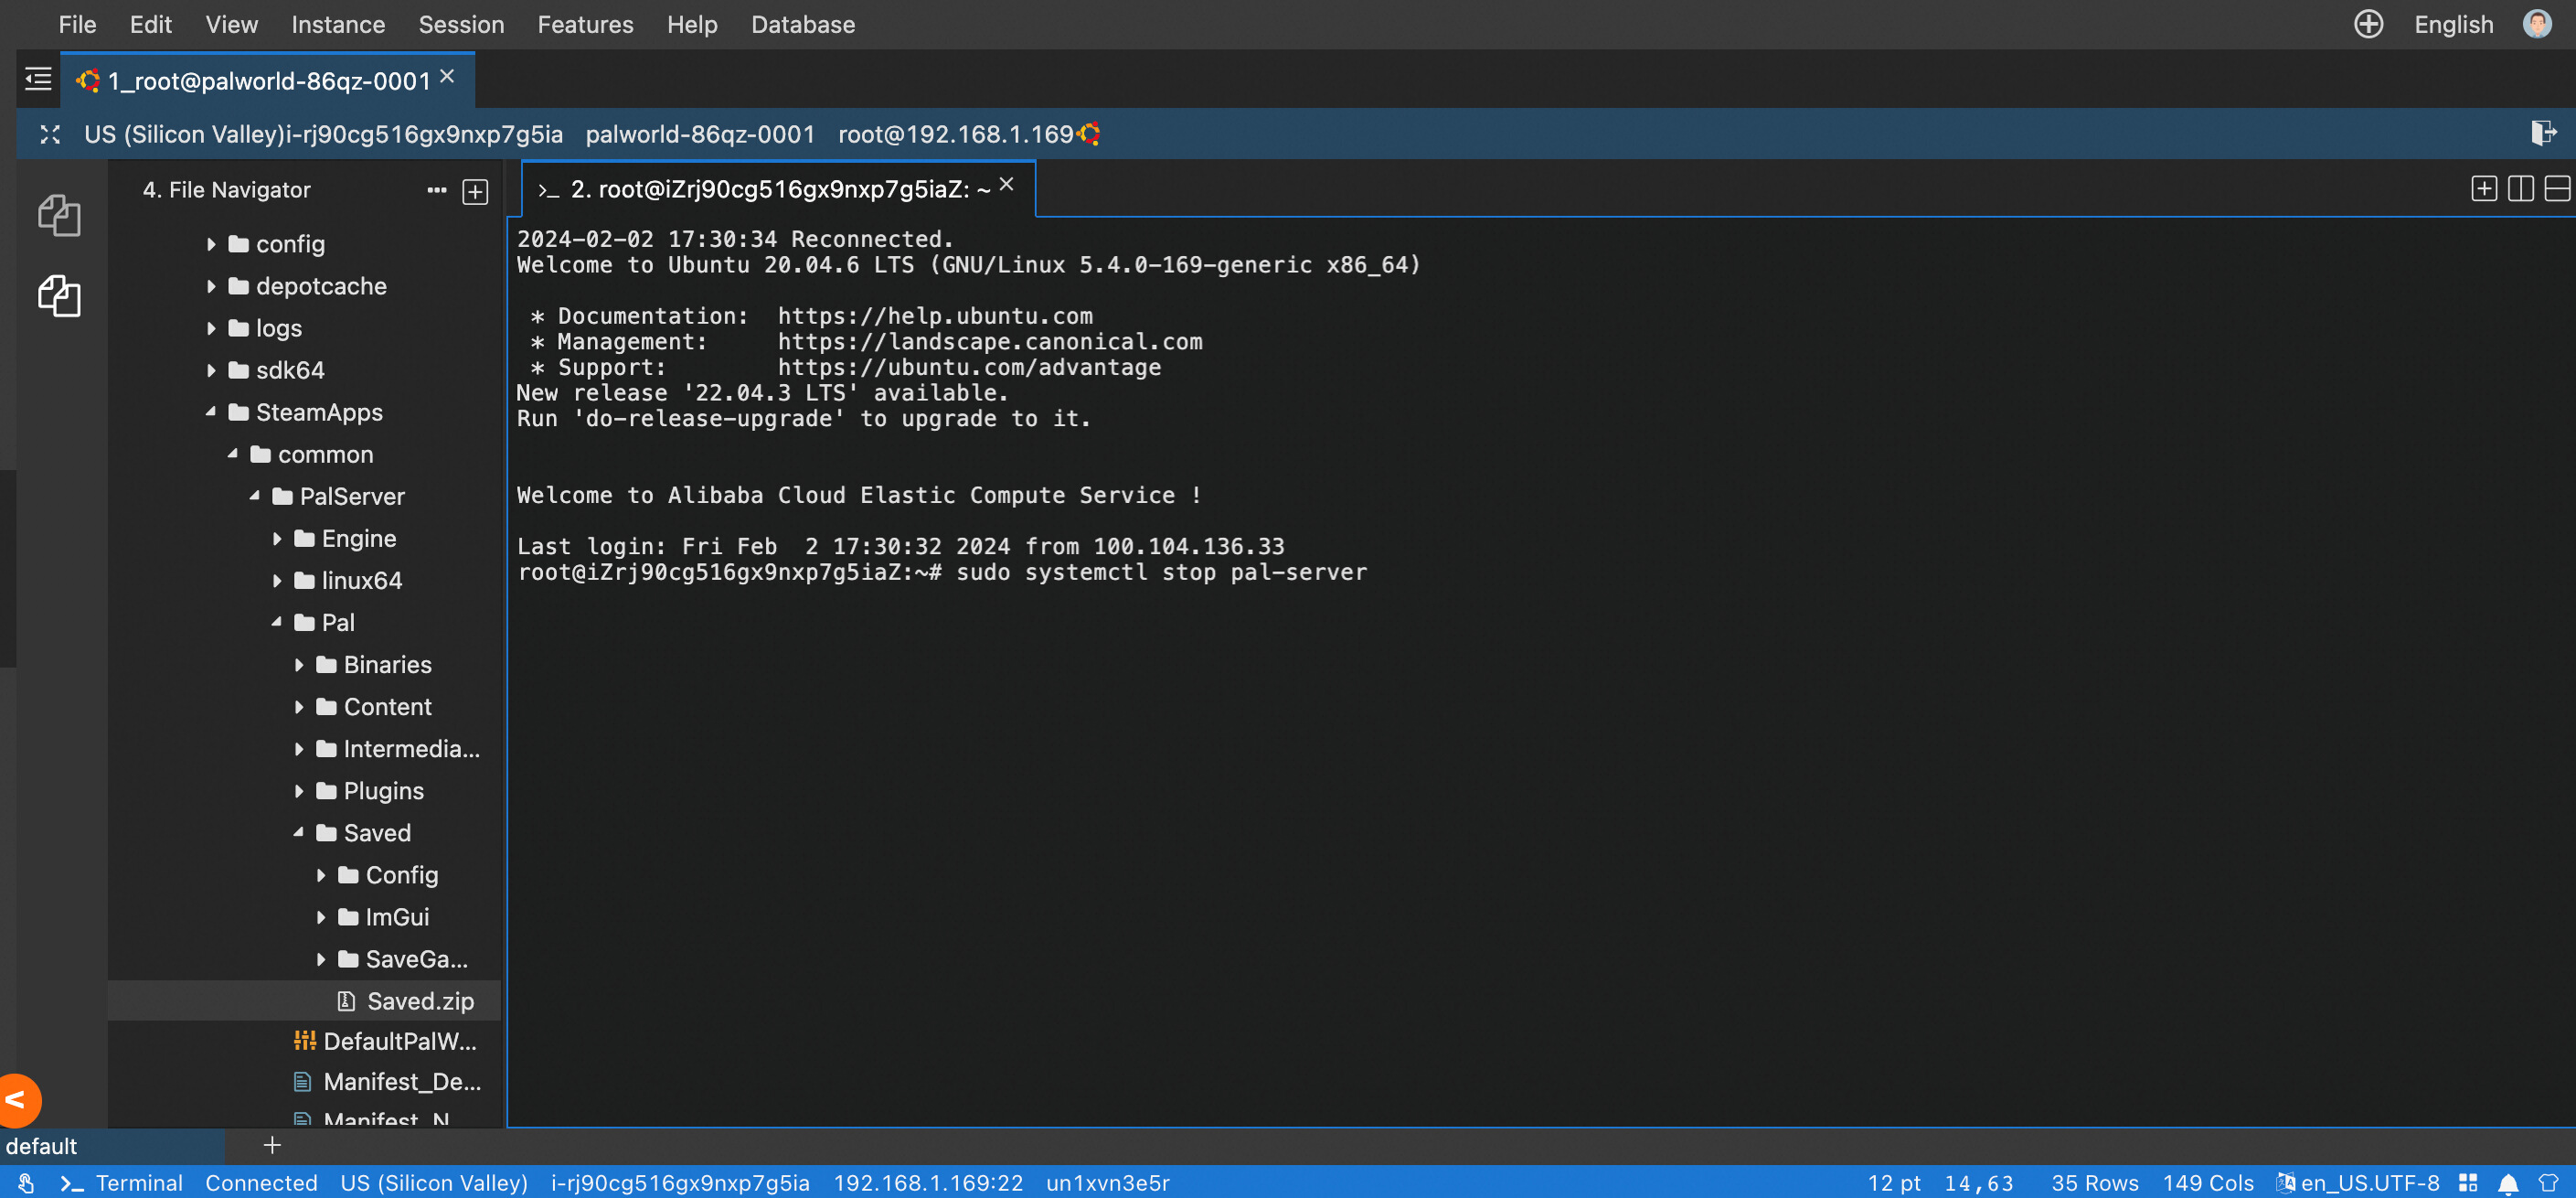
3. Open the directory tree in the upper-left corner. Go to the /home/ecs-assist-user/.steam/SteamApps/common/PalServer/Pal/ path. If the Saved folder already exists in the original path, rename or delete it, and then create an empty folder named Saved.
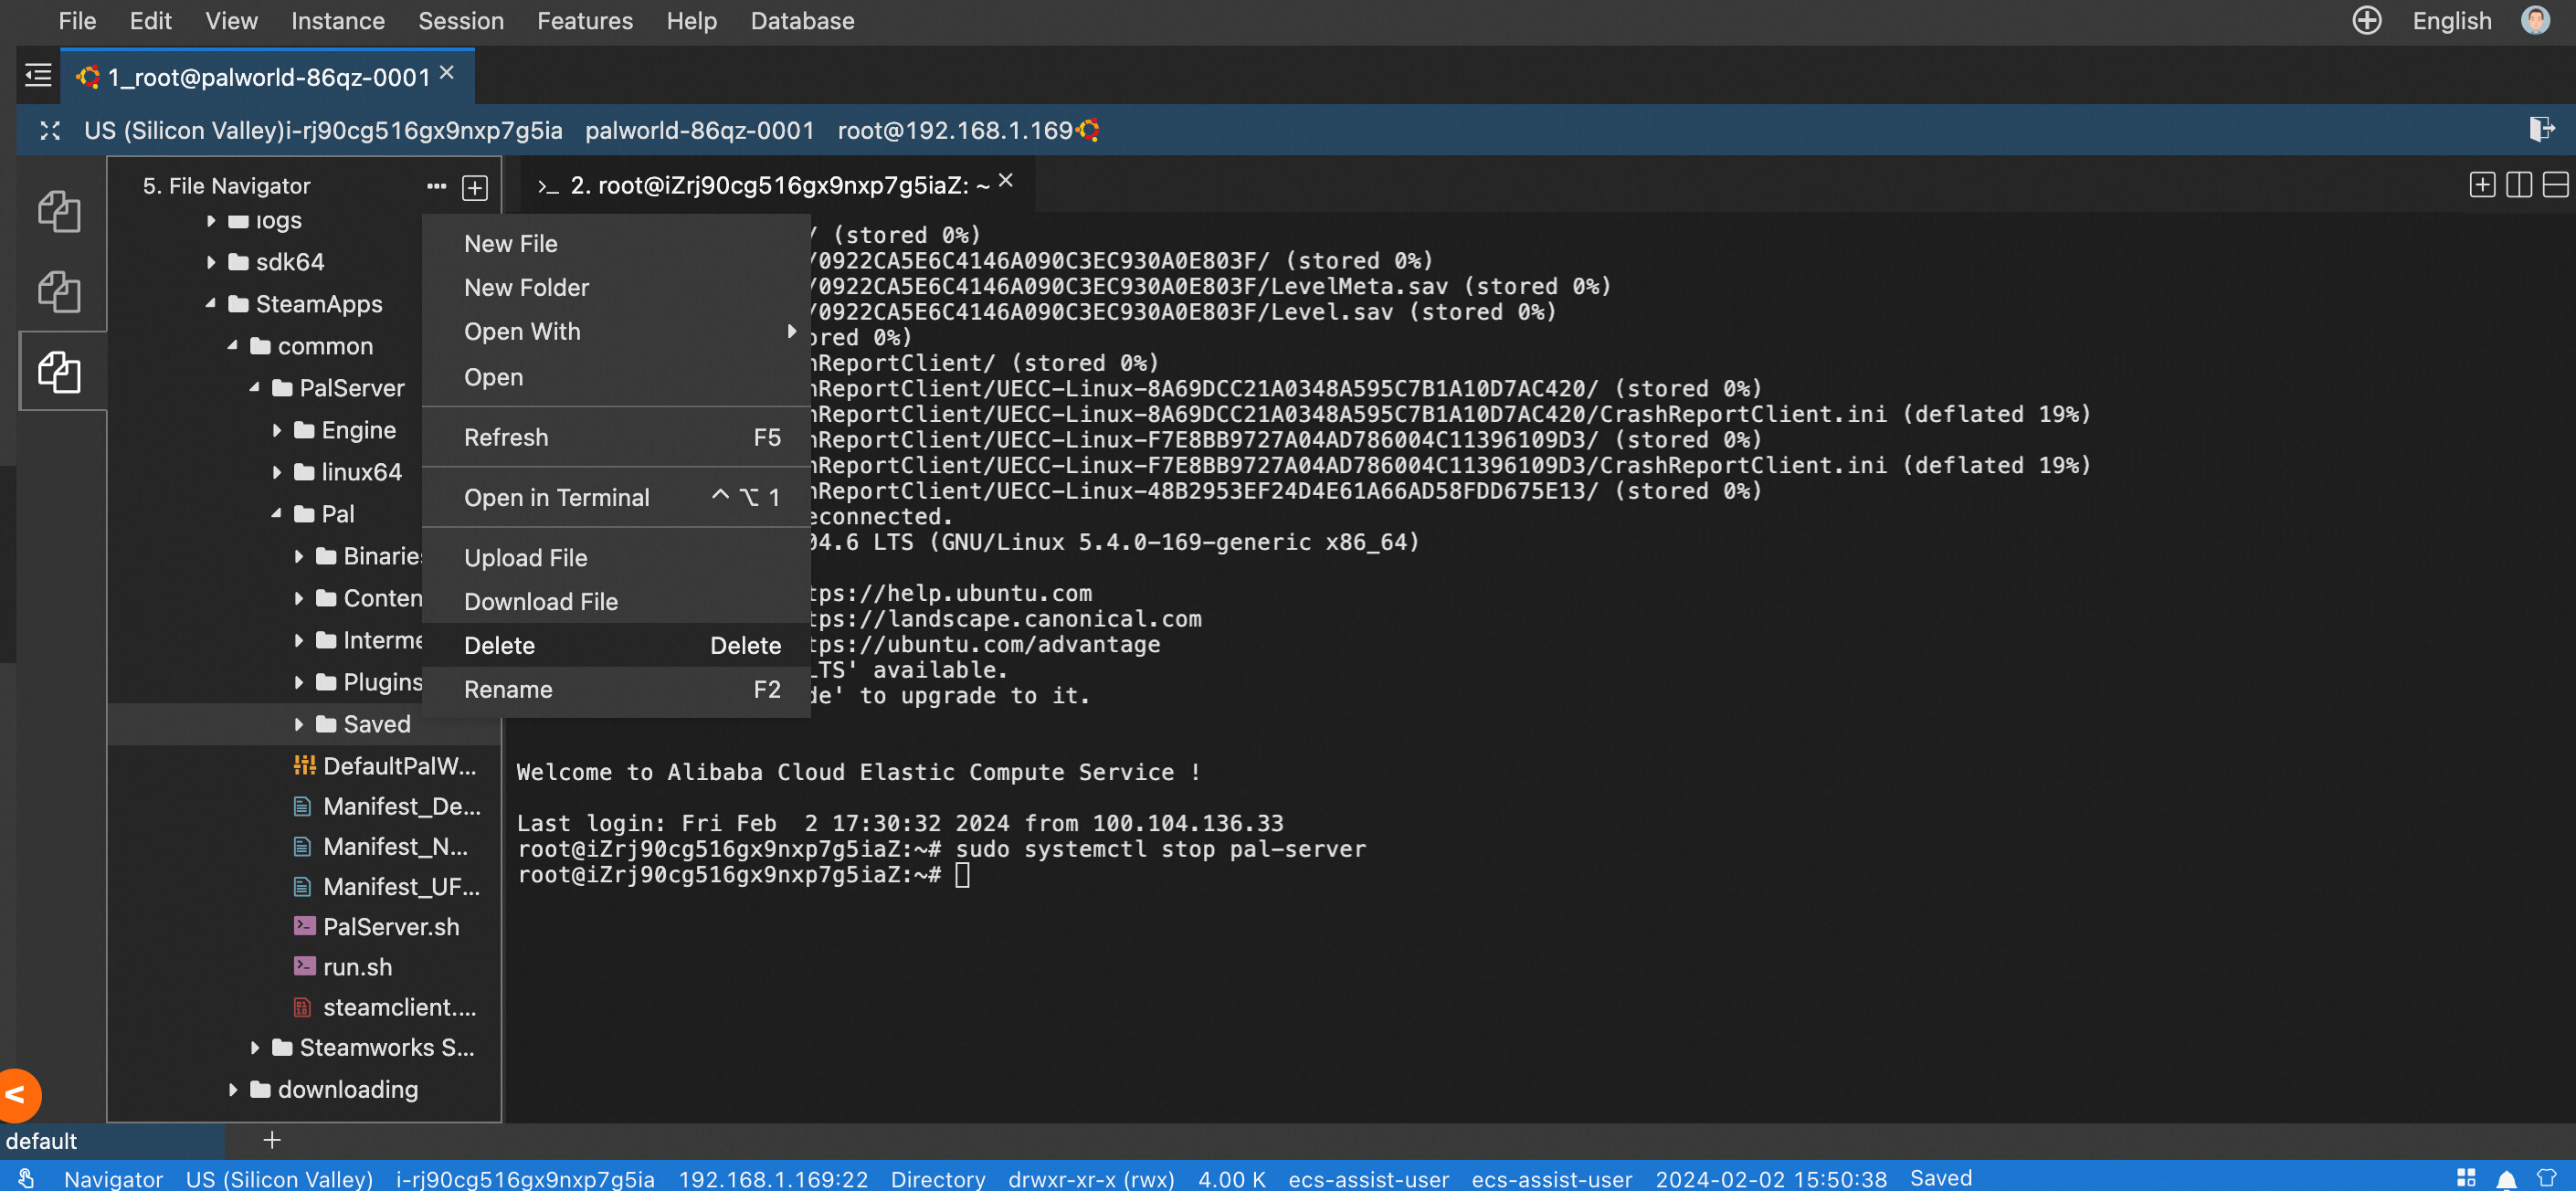
4. Right-click the Saved folder and then select Upload File. Make sure that the name of your compressed file is Saved.zip. You can see that the upload task is in progress in the lower-right corner.
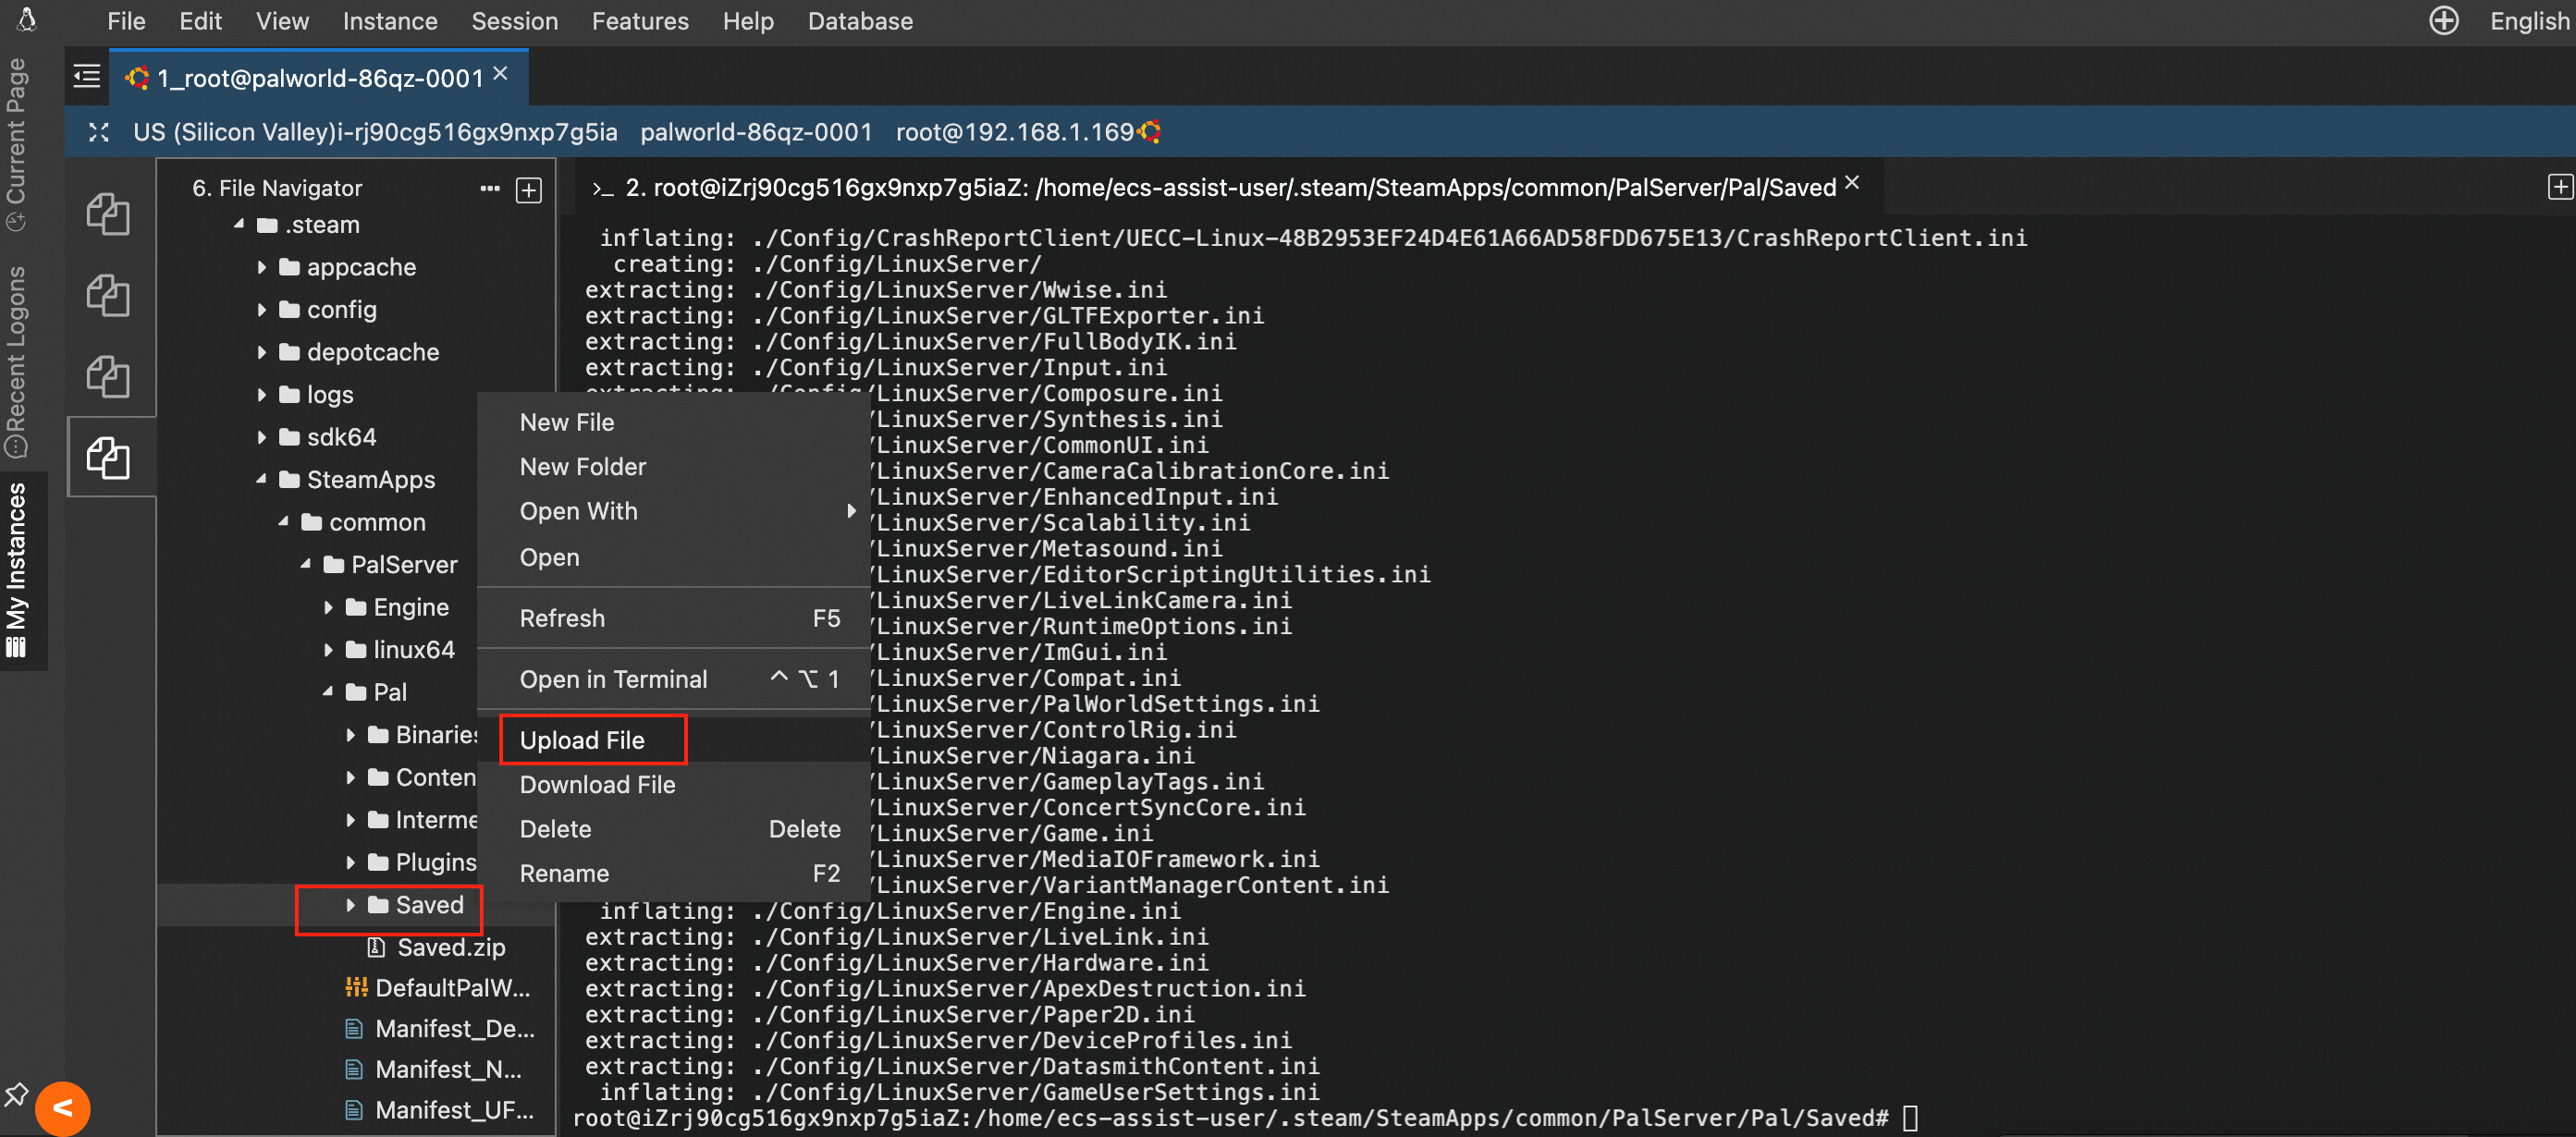
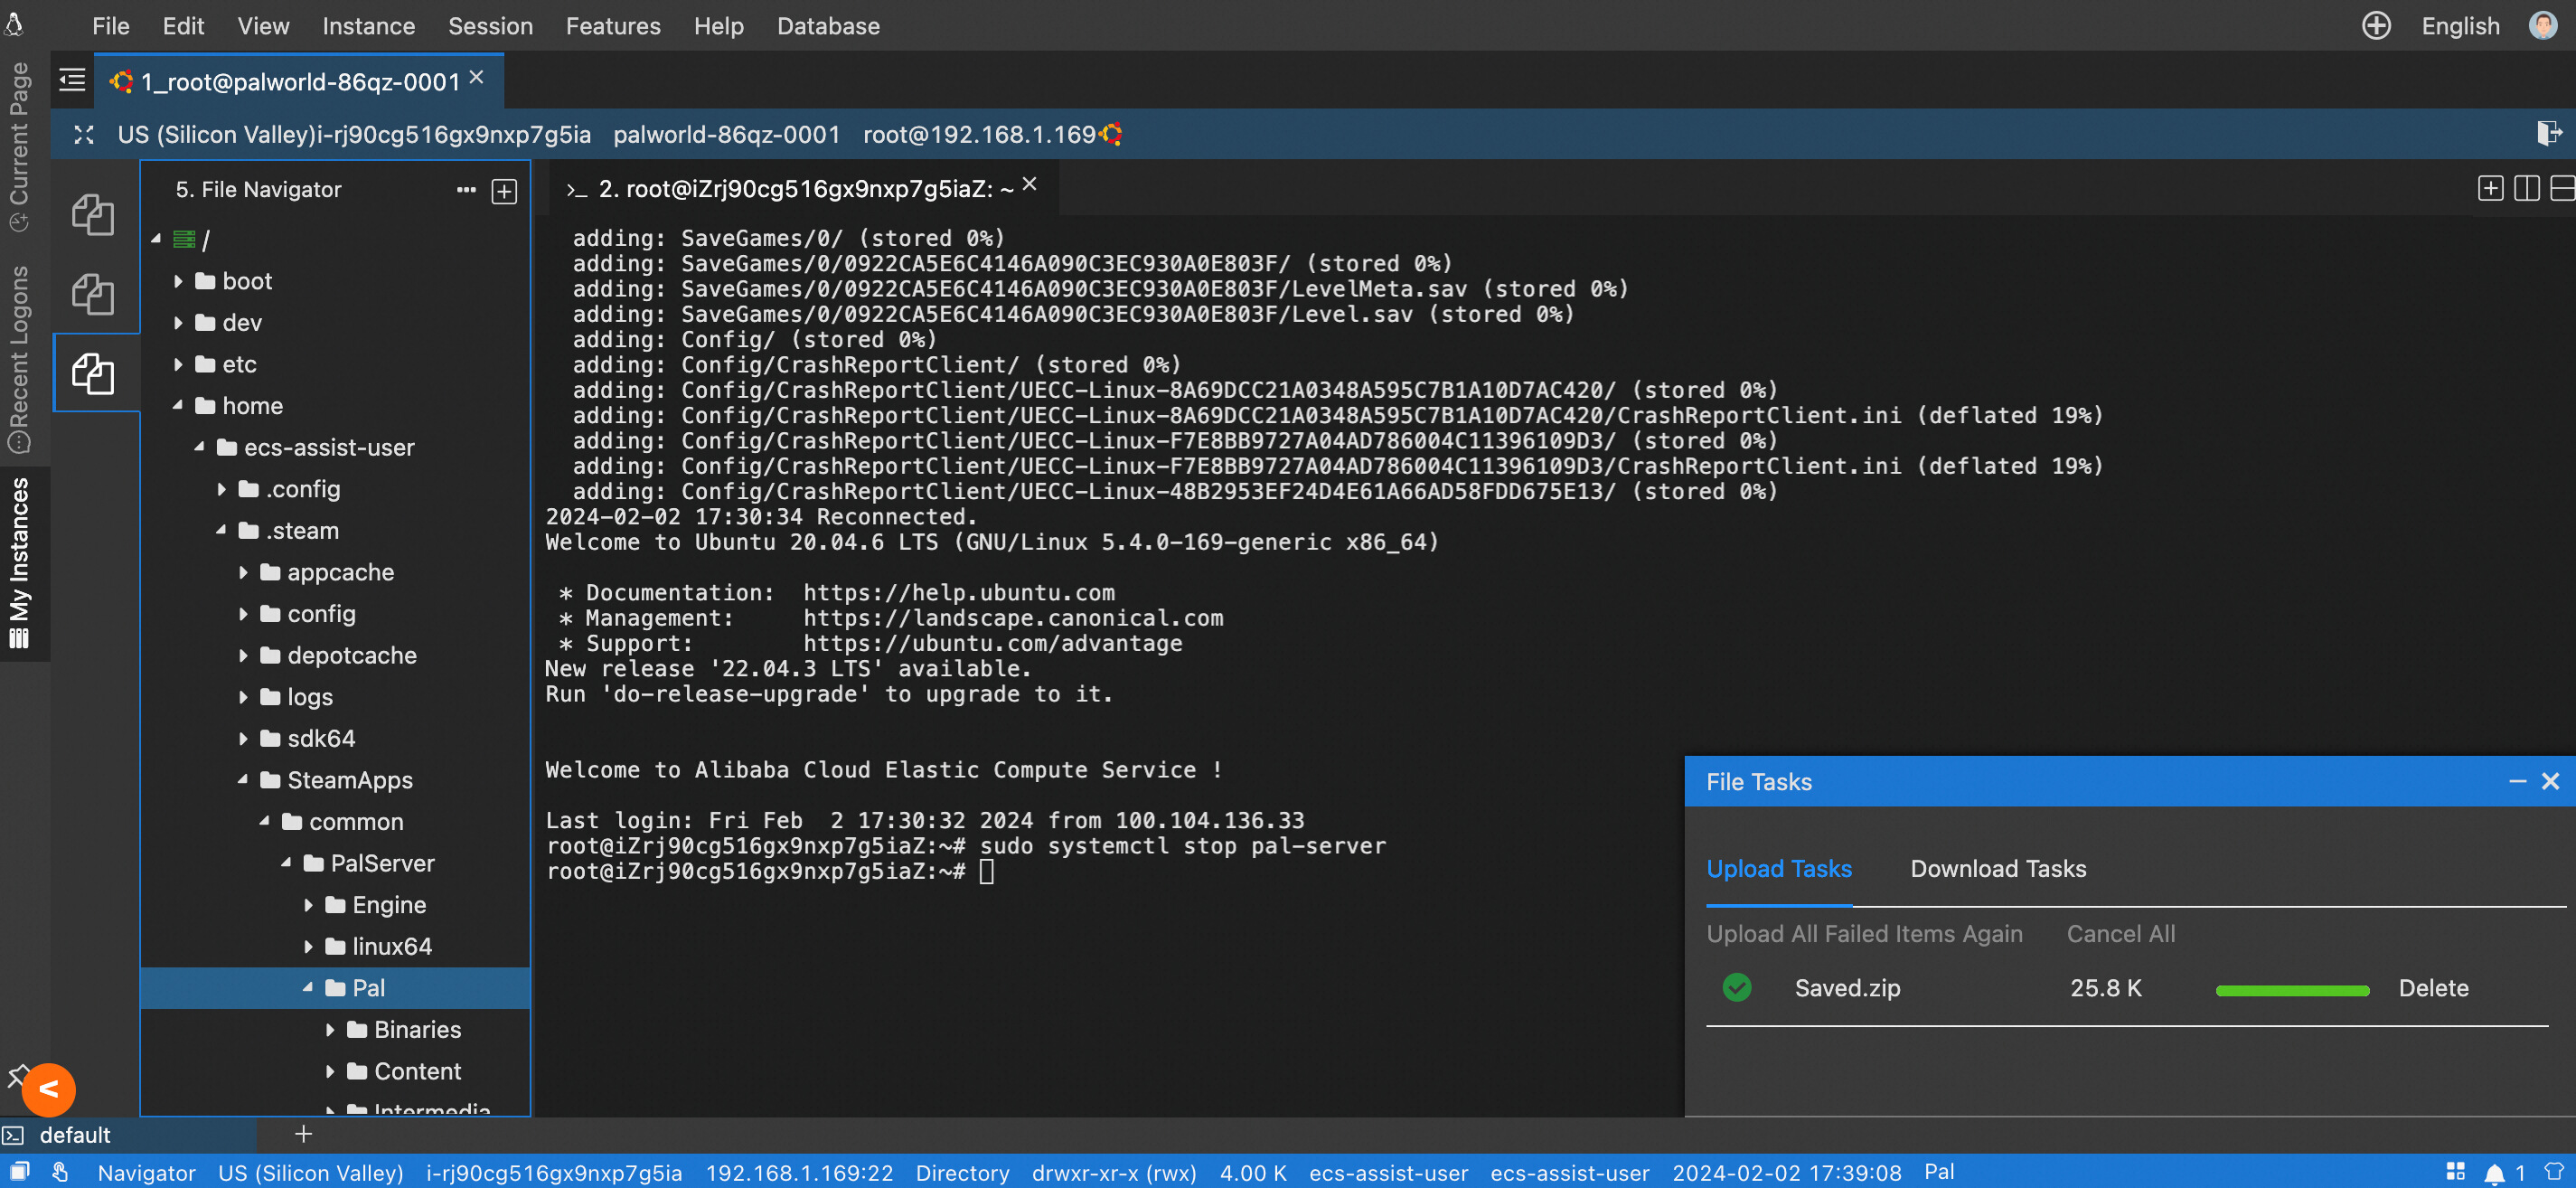
5. Run the following commands to decompress files and replace the archive files. Make sure that the decompressed folder has the same name as the original archive folder.
sudo apt update
sudo apt install unzip
cd /home/ecs-assist-user/.steam/SteamApps/common/PalServer/Pal/Saved
unzip Saved.zip -d .
6. Restart the Palworld service.
sudo systemctl start pal-serverThe following section describes how to download archive files from and upload archive files to a Windows server.
1. Create a security group. The procedure is the same as Steps 1 to 2 for a Linux server.
Pay attention to confirm that your Palworld server is deployed in the Compute Nest console or in the ECS console.
If your server is deployed in the ECS console, open the ECS console, find the ECS resources that you purchased, and then click the Security Groups tab.
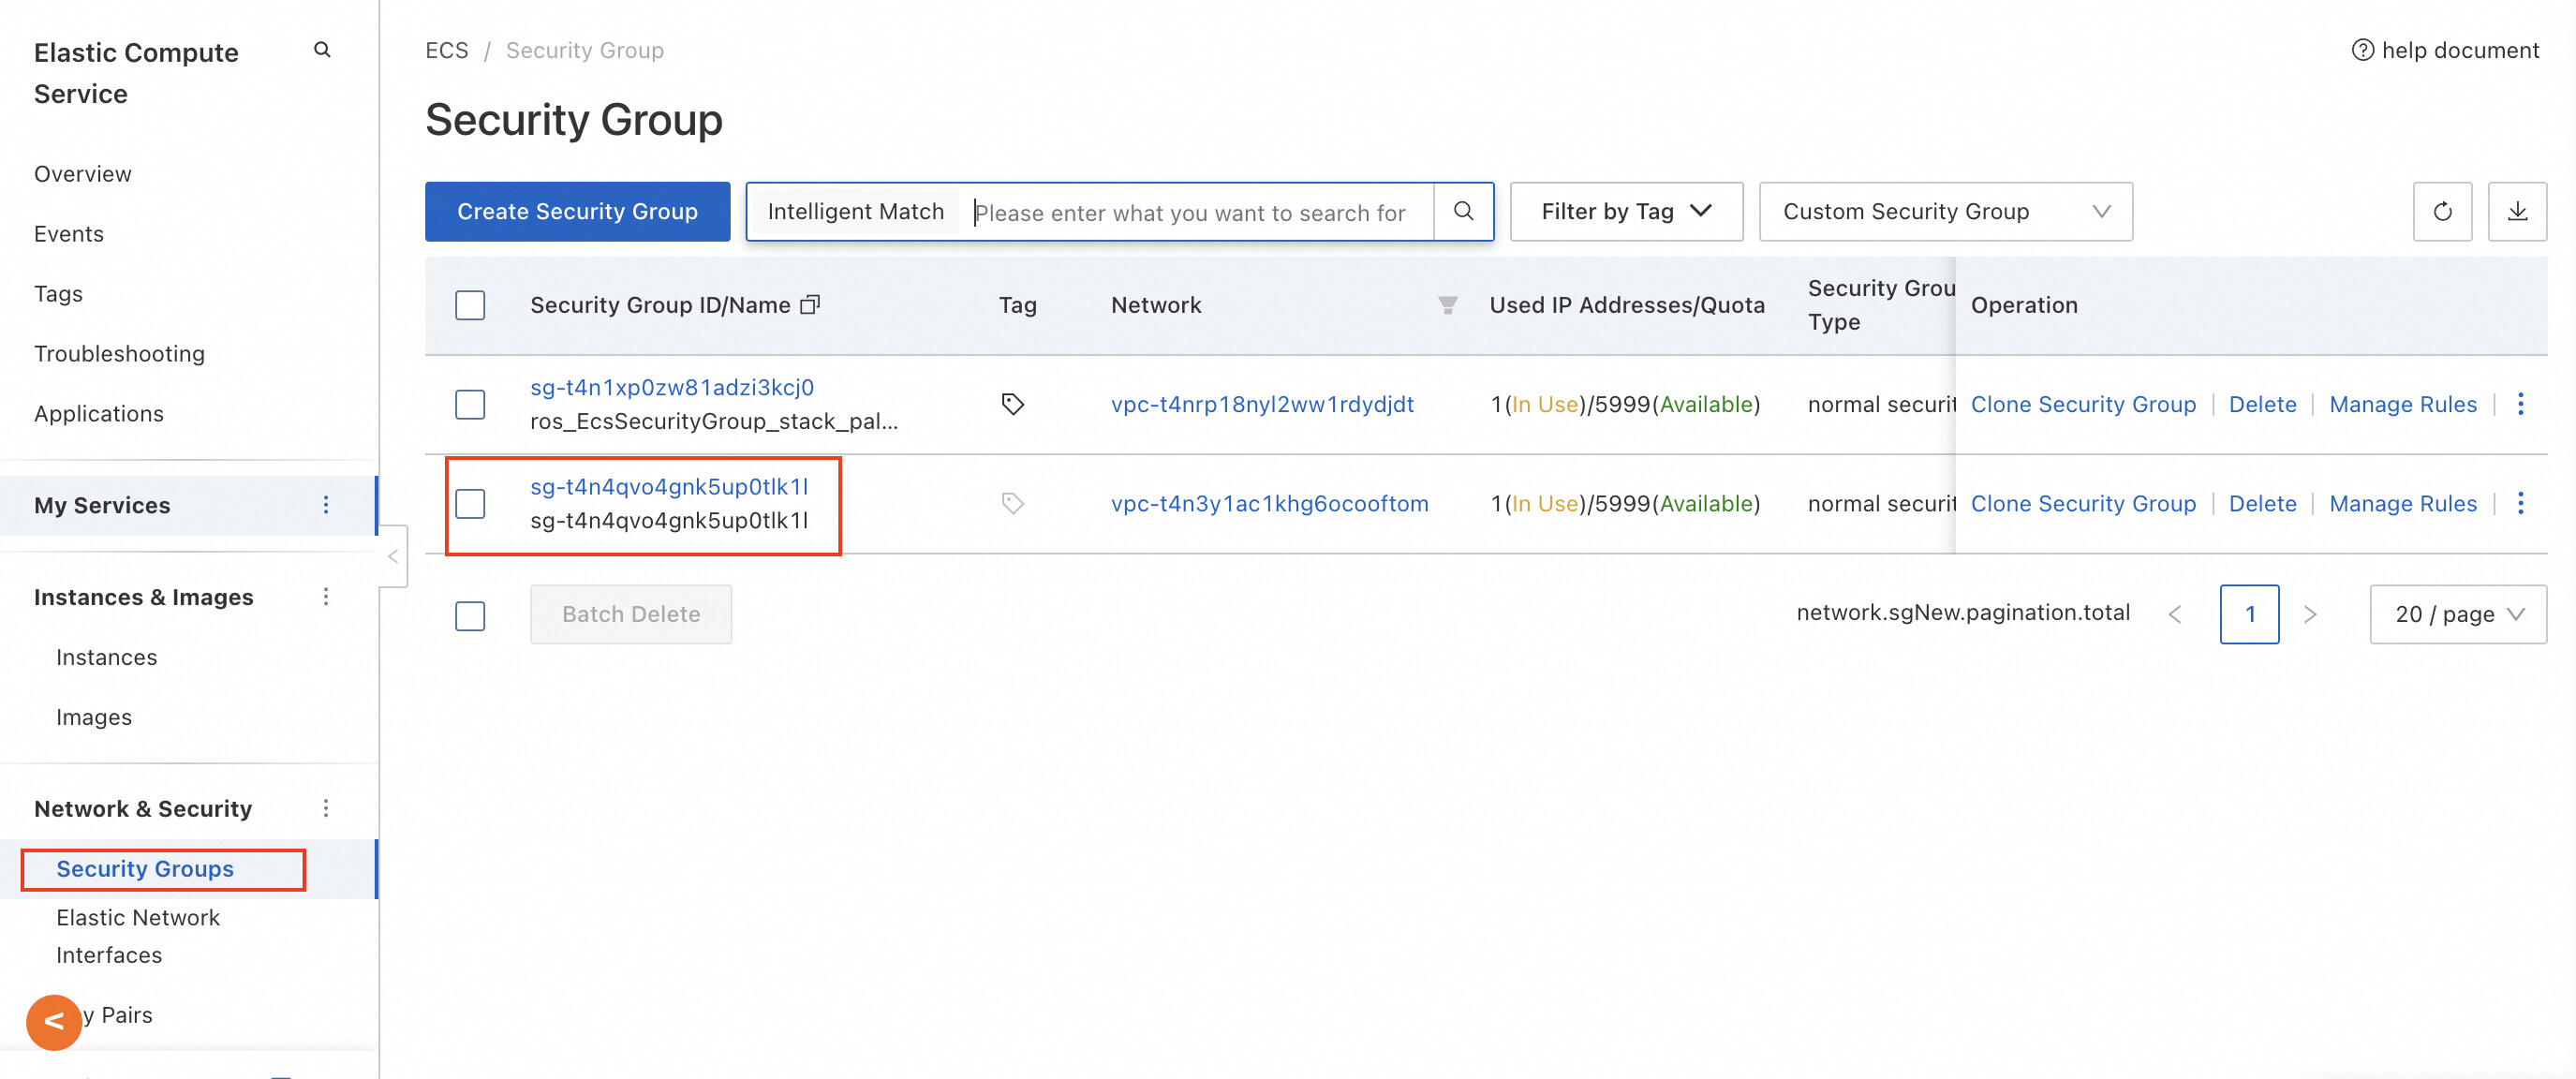
2. Click the ECS instance on the Resources tab of the Compute Nest console to go to the ECS console. You can also open the ECS console to search for your server.
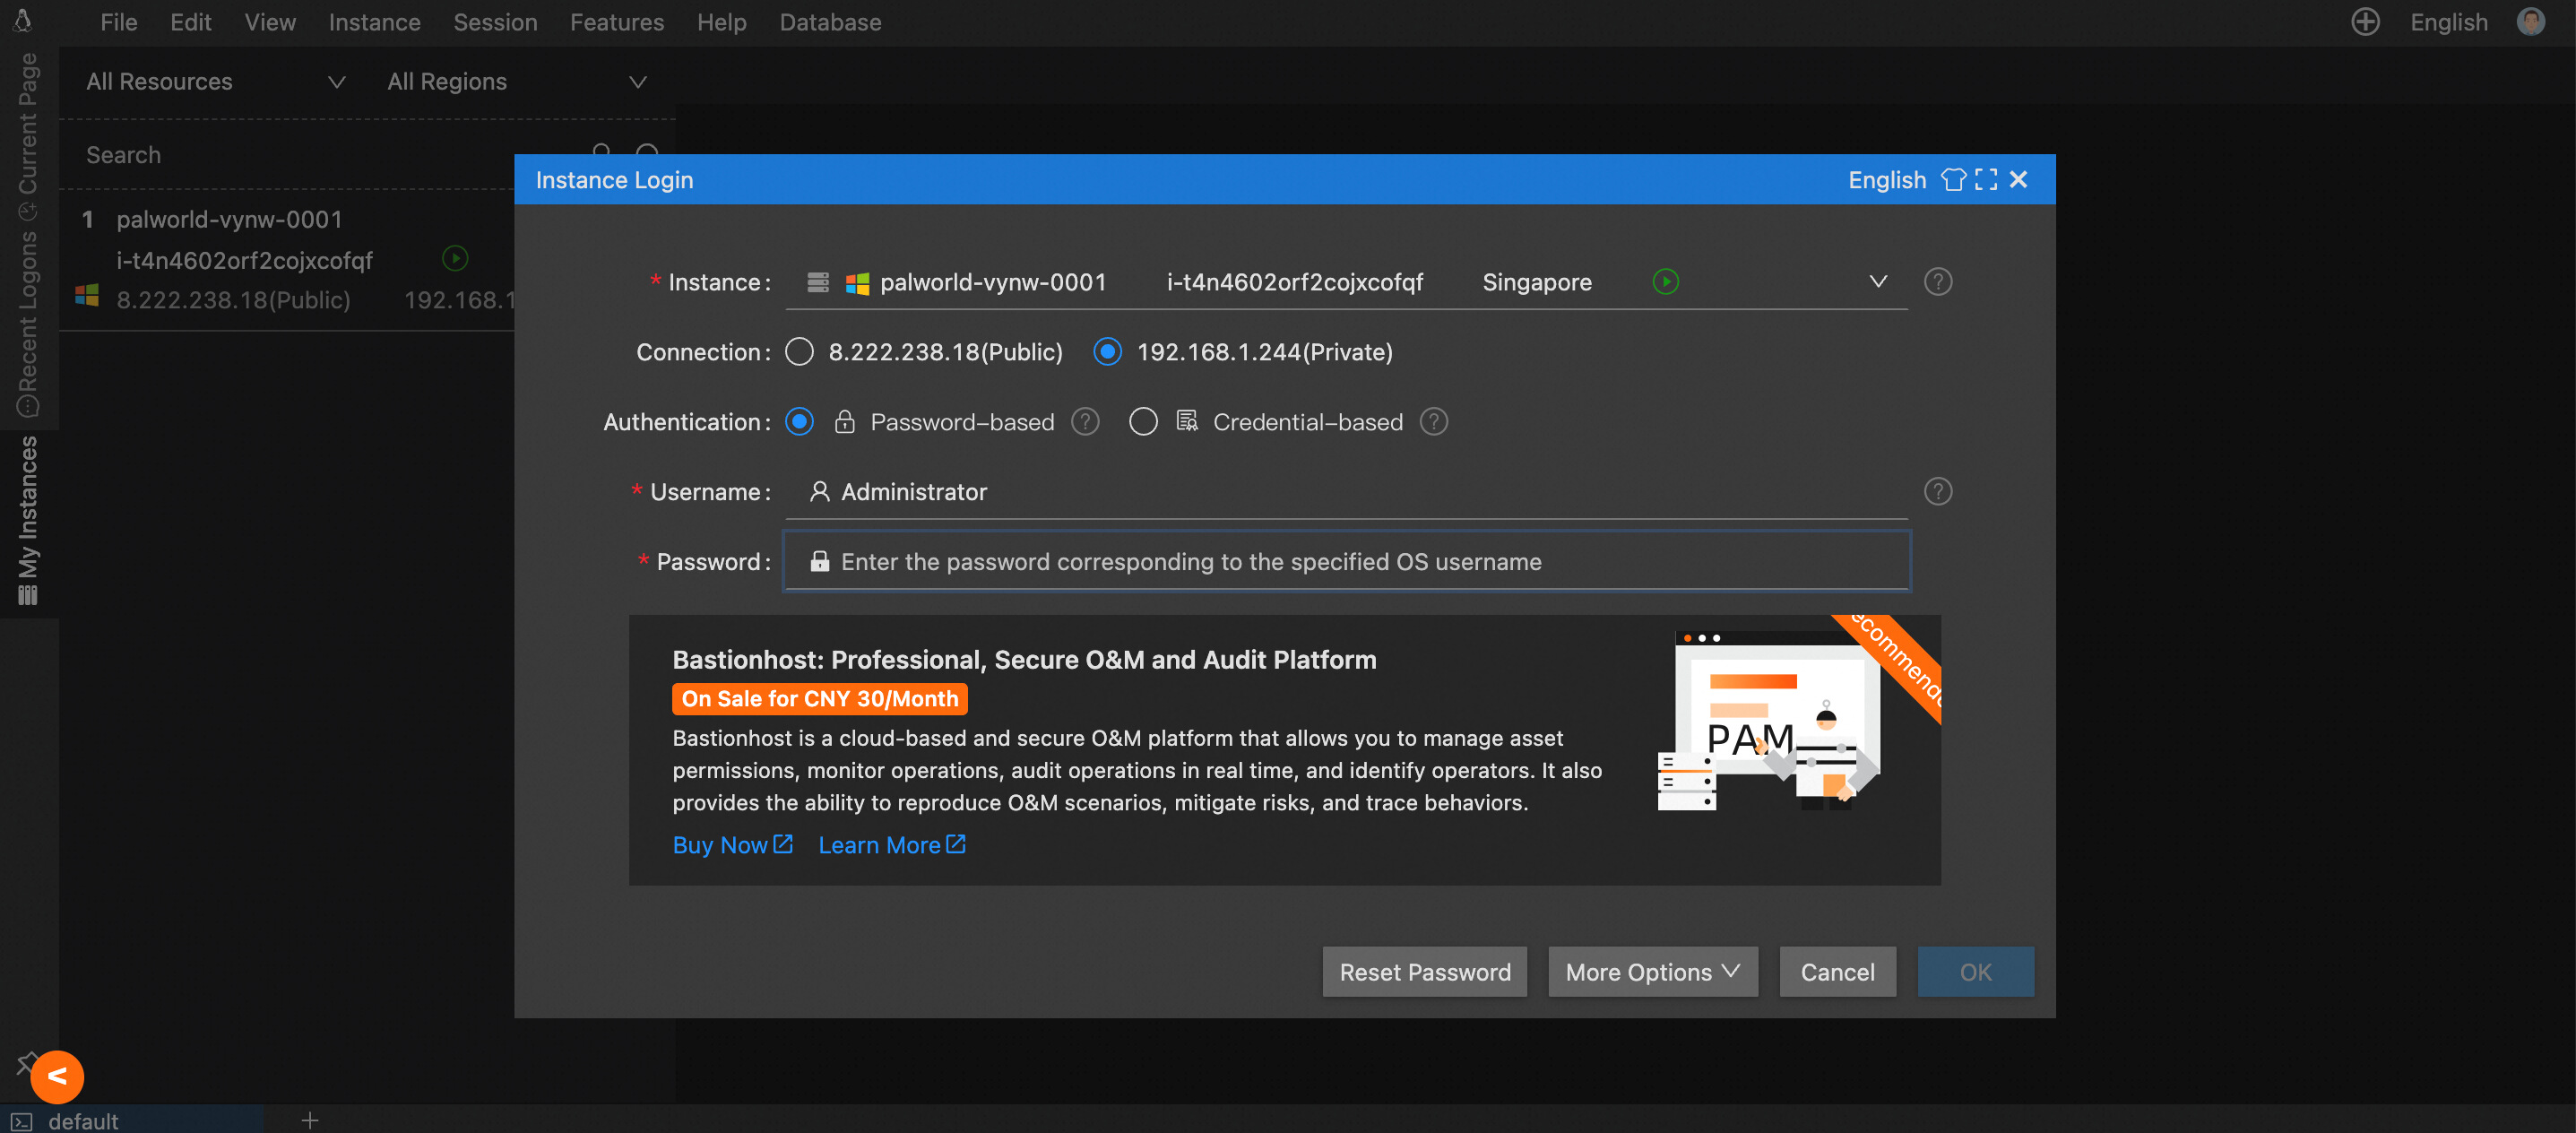
3. Click Connect on the right of the page. In the dialog box that appears, select Workbench.
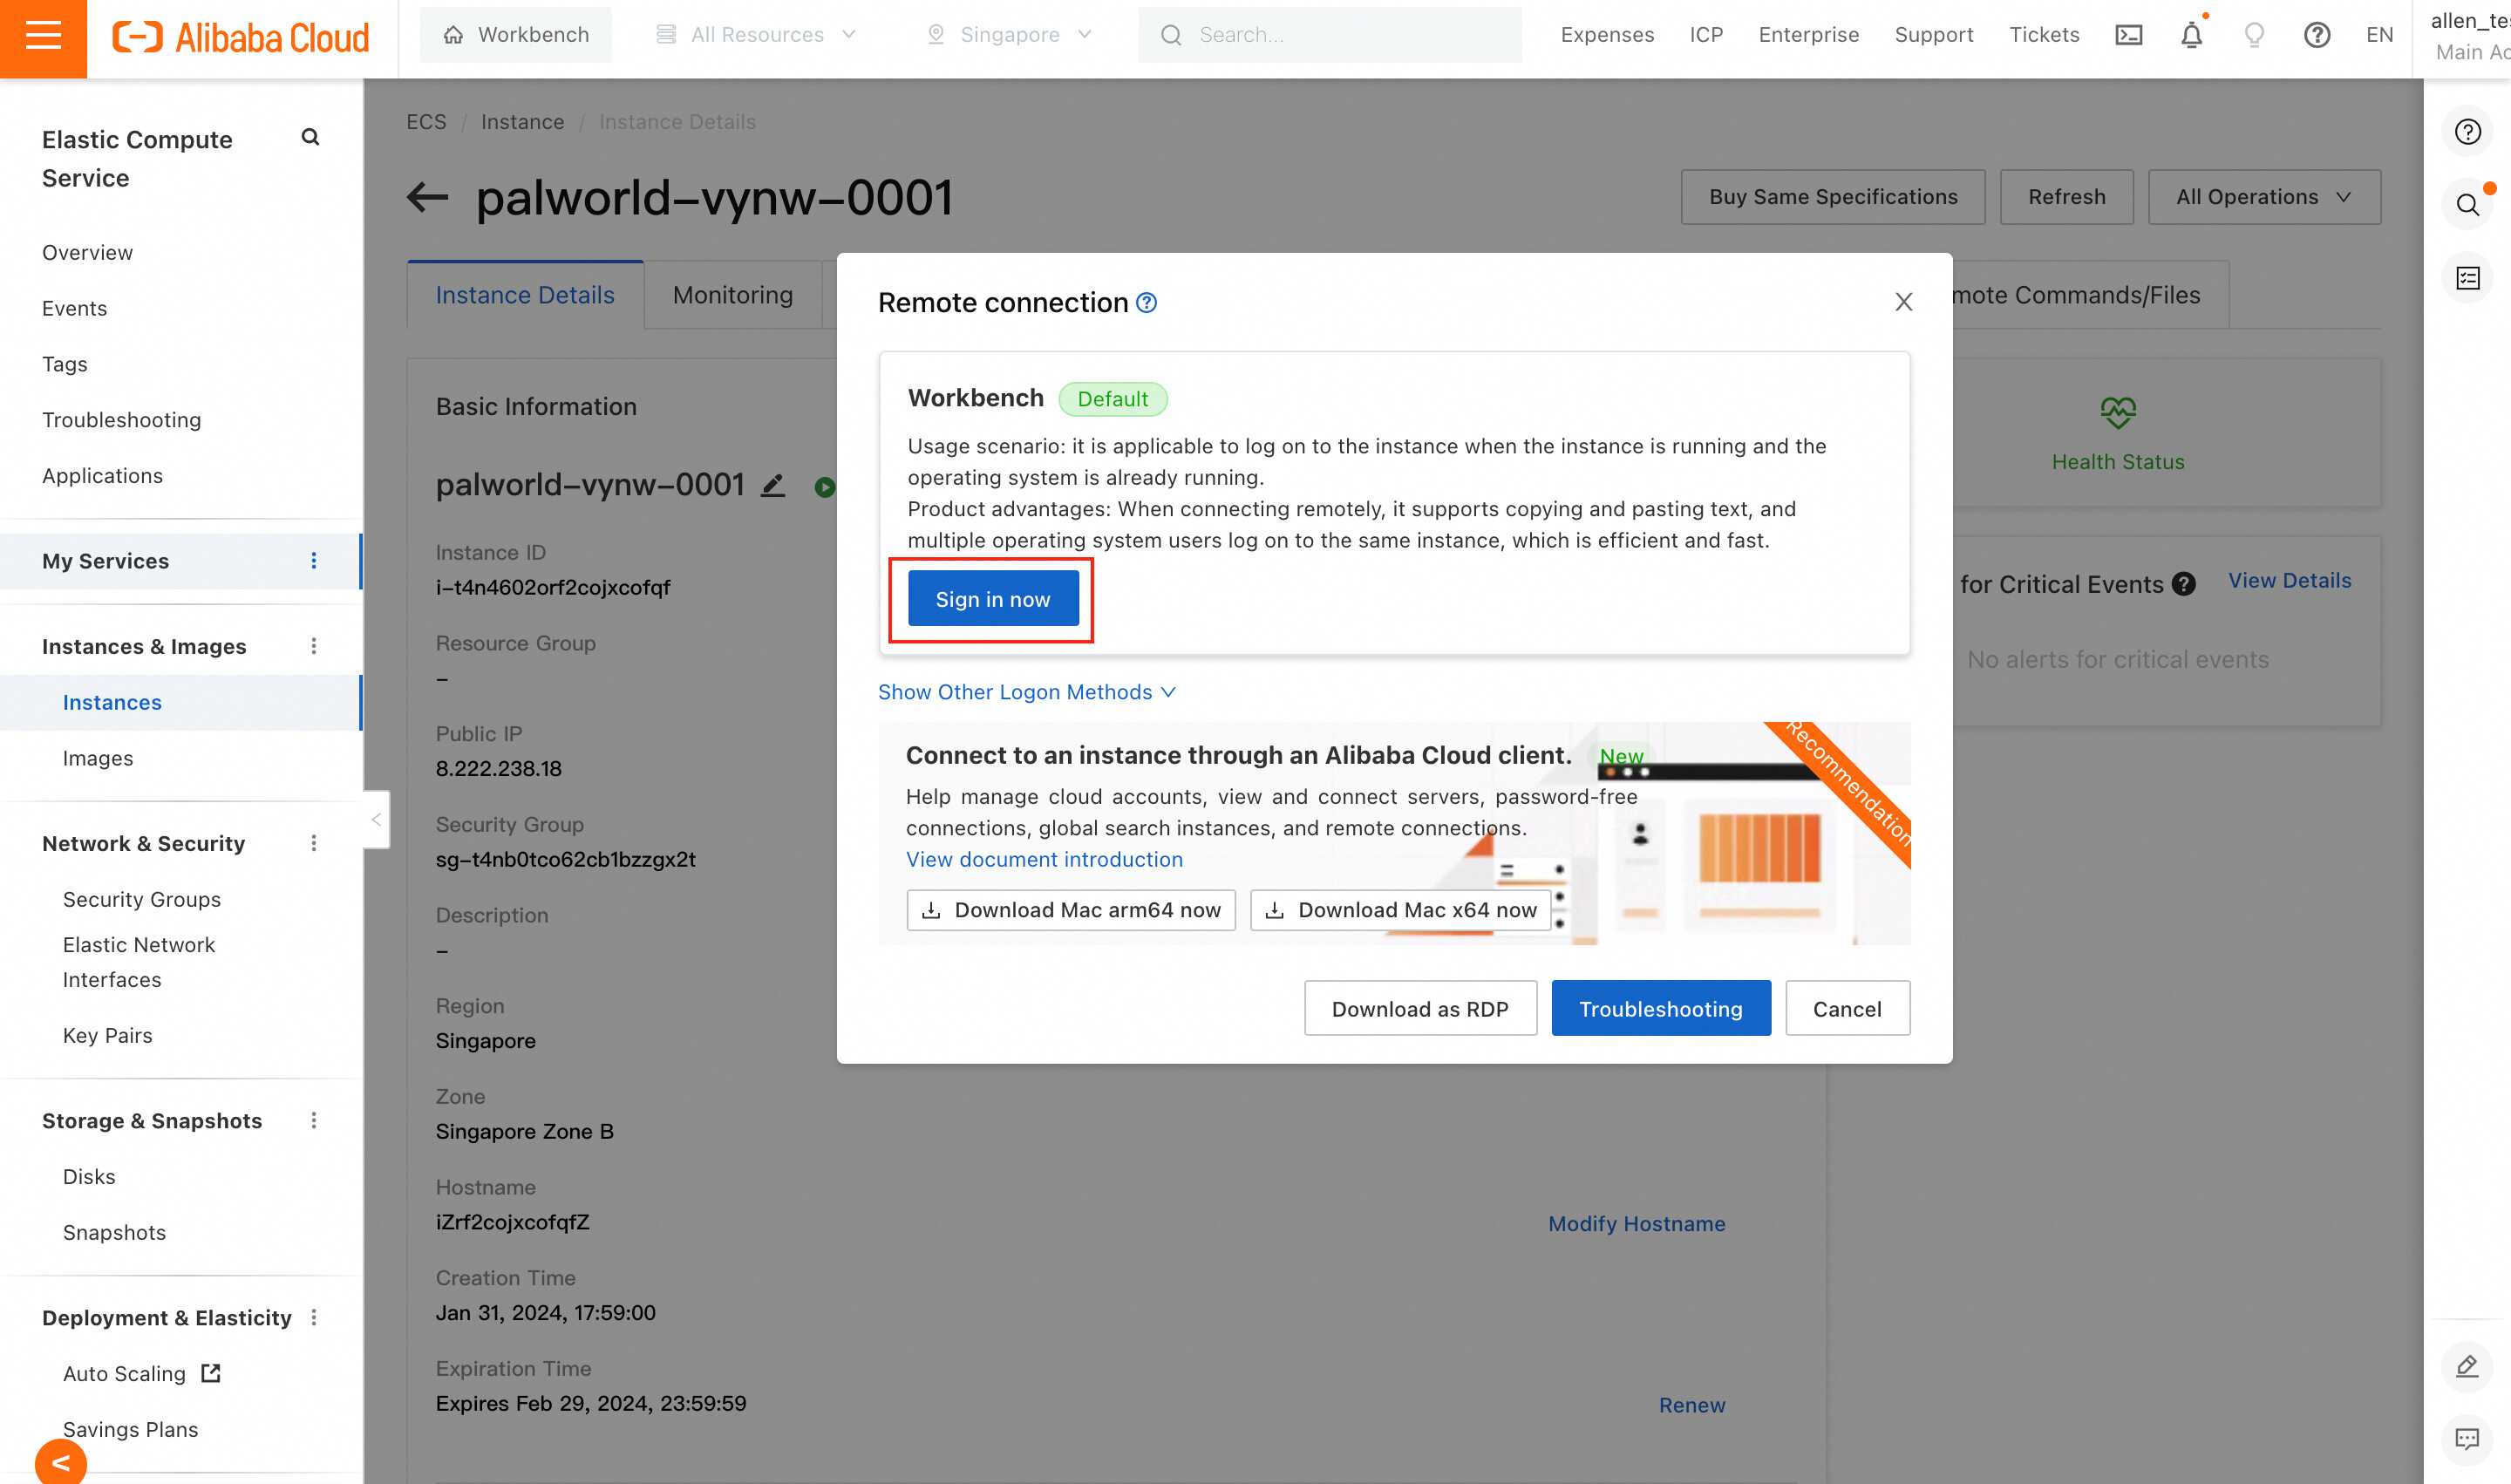
4. Enter the Server Password specified when you created the Compute Nest service instance. Wait for the interface to initialize.
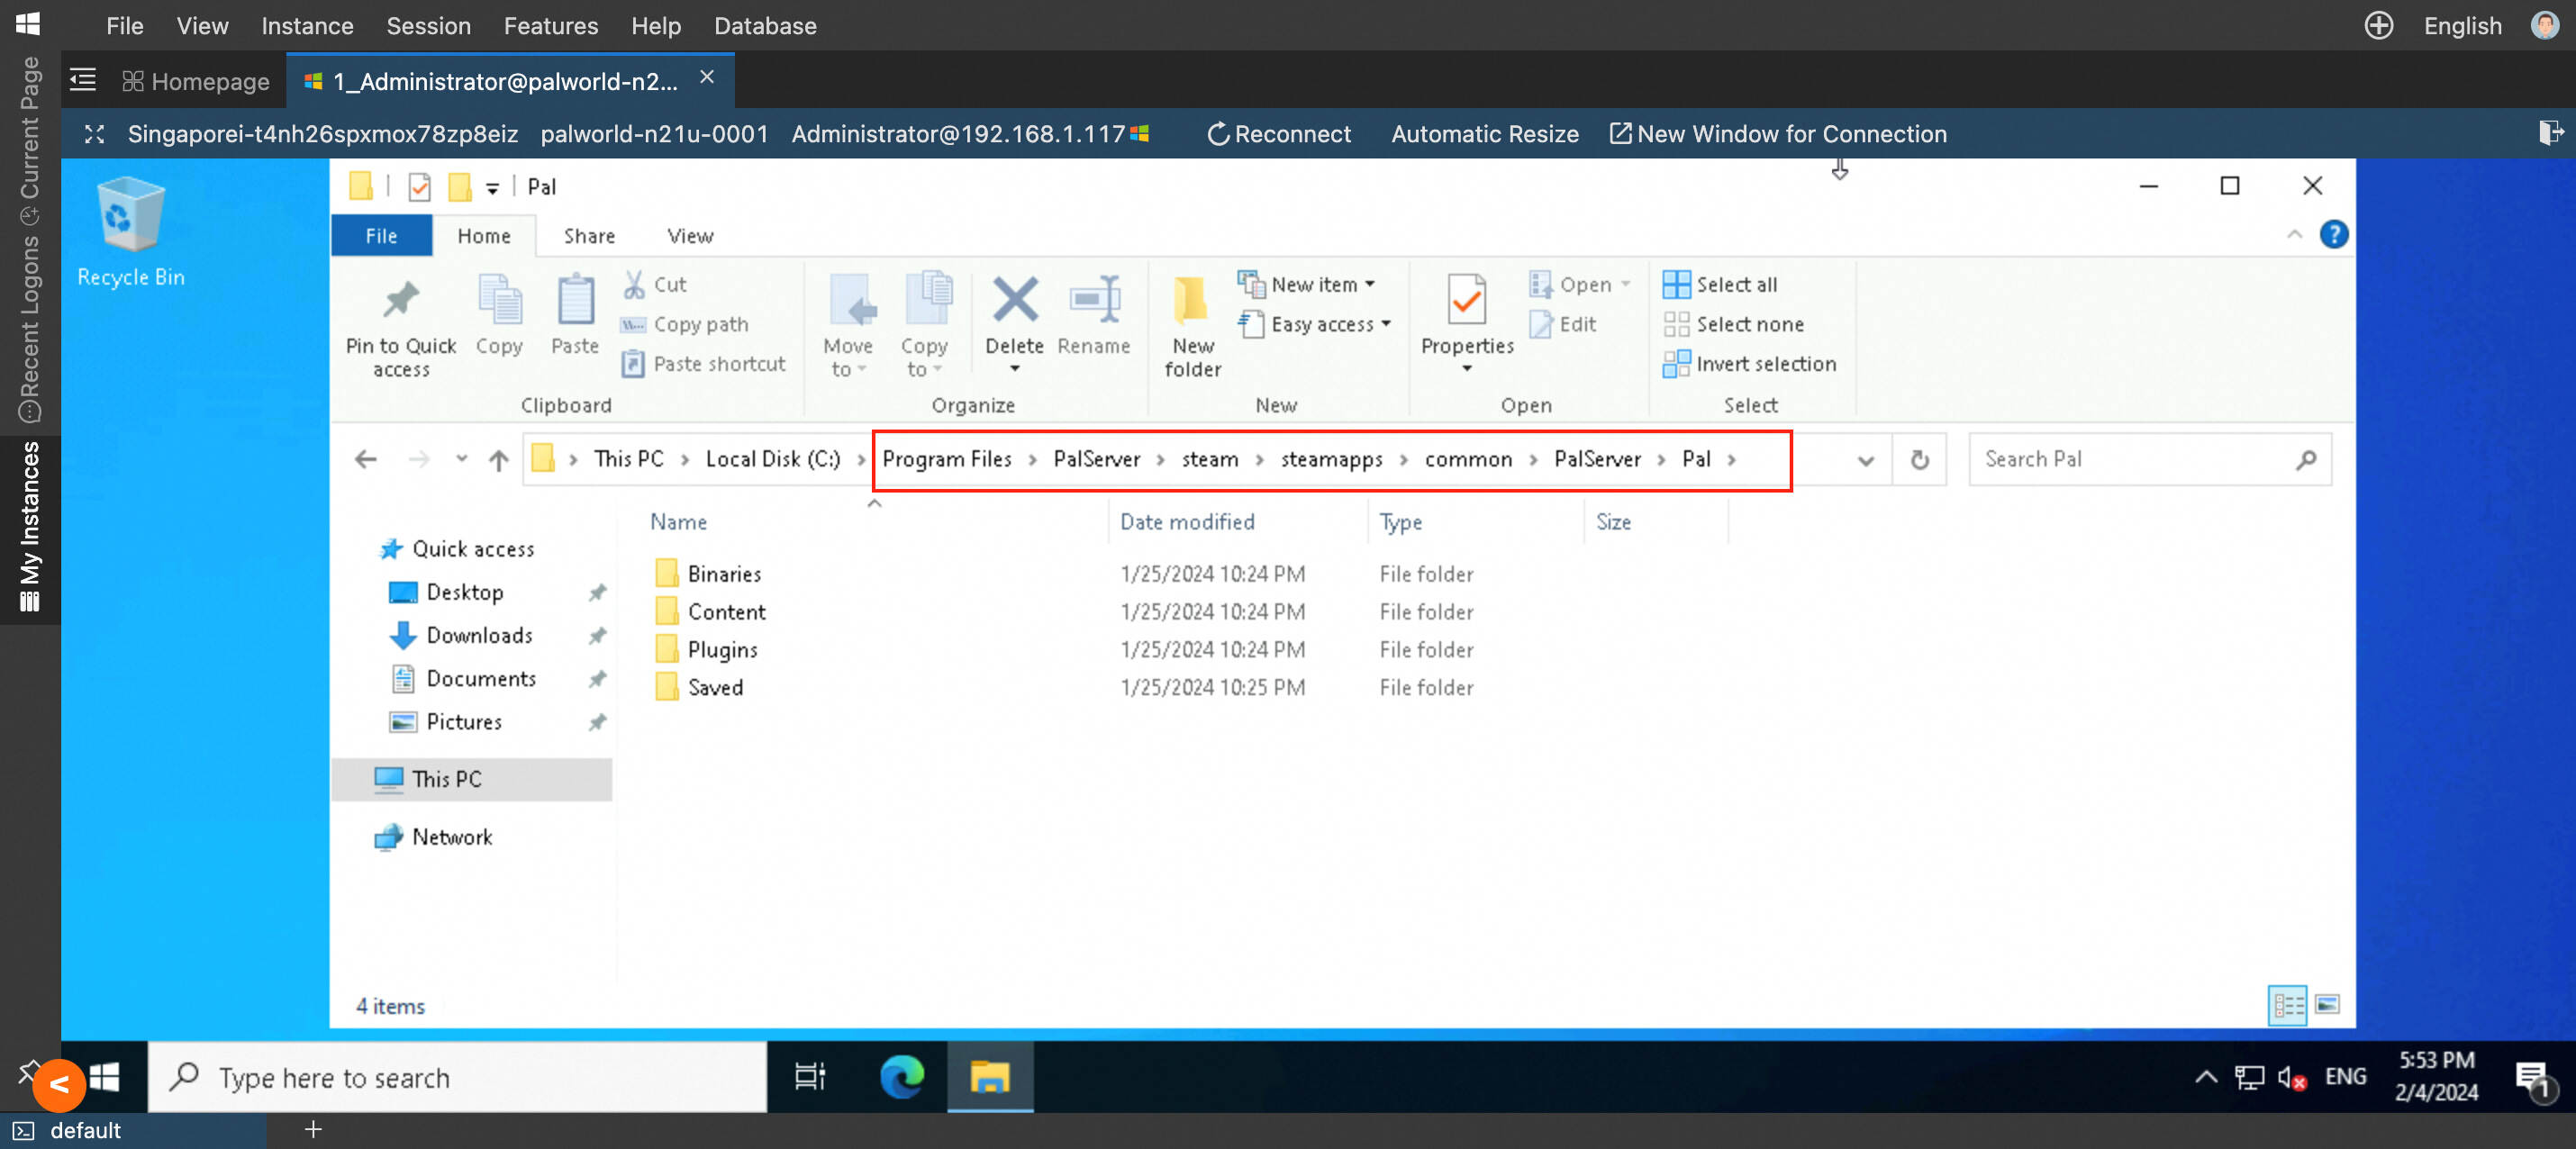
5. Click the folder button at the bottom of the interface. In the address bar circled in the red box, enter the following path and press Enter:
C:\Program Files\PalServer\steam\steamapps\common\PalServer\PalYou can see that the current path is displayed:
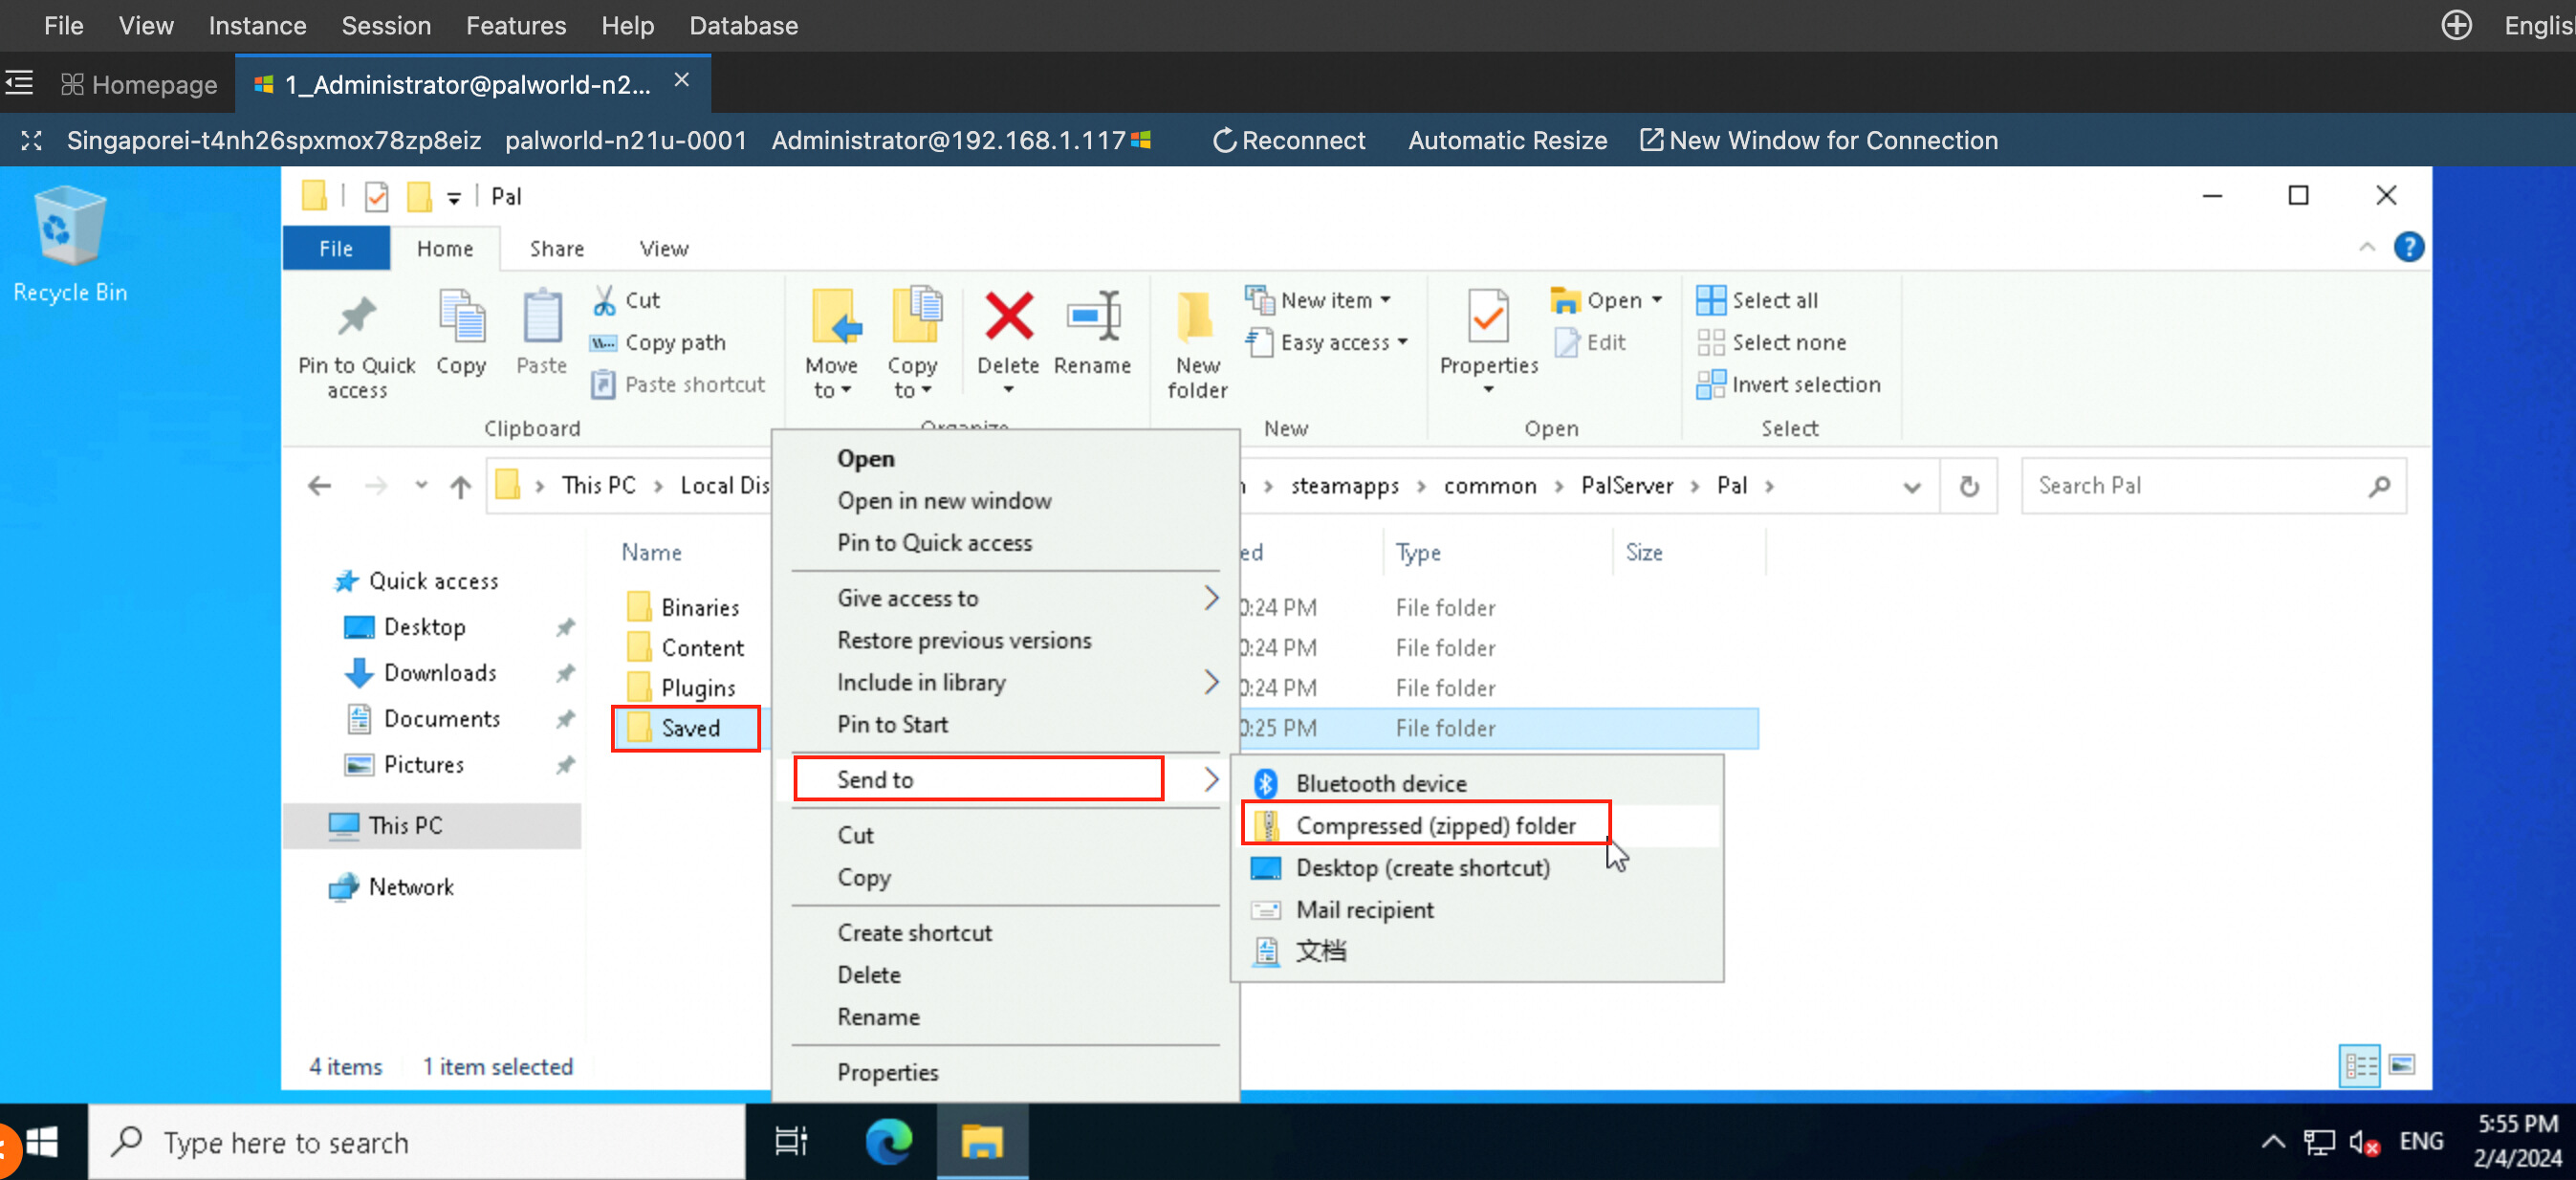
6. Right-click the Saved folder and select Send to > Compressed (zipped) folder.
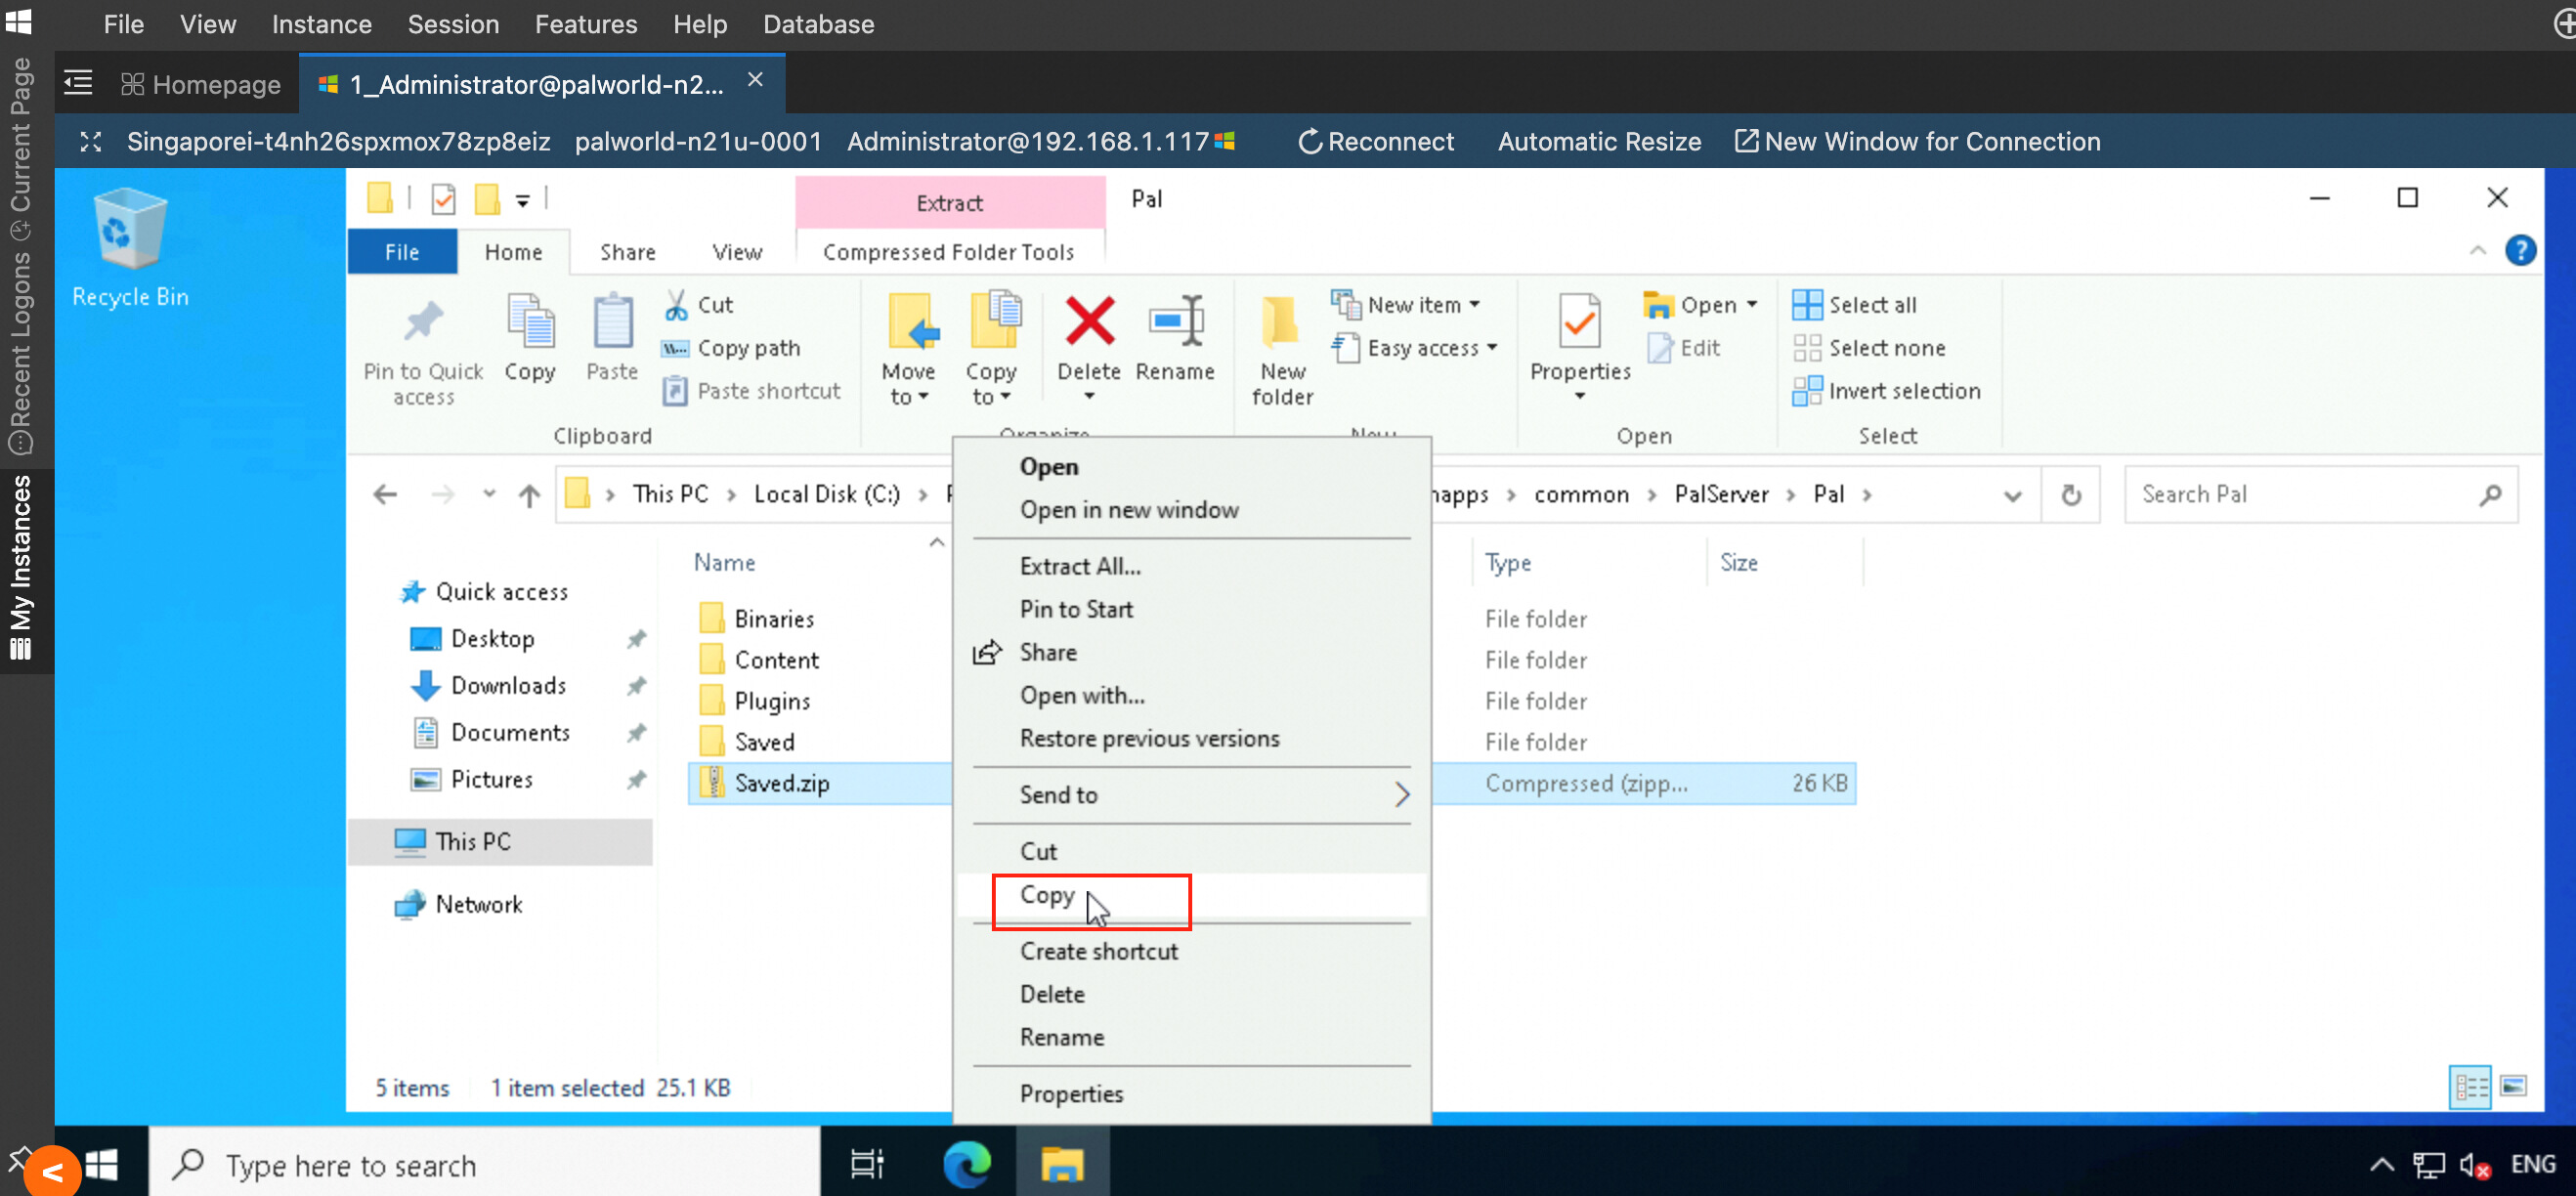
7. Right-click the Saved.zip file and select Copy.
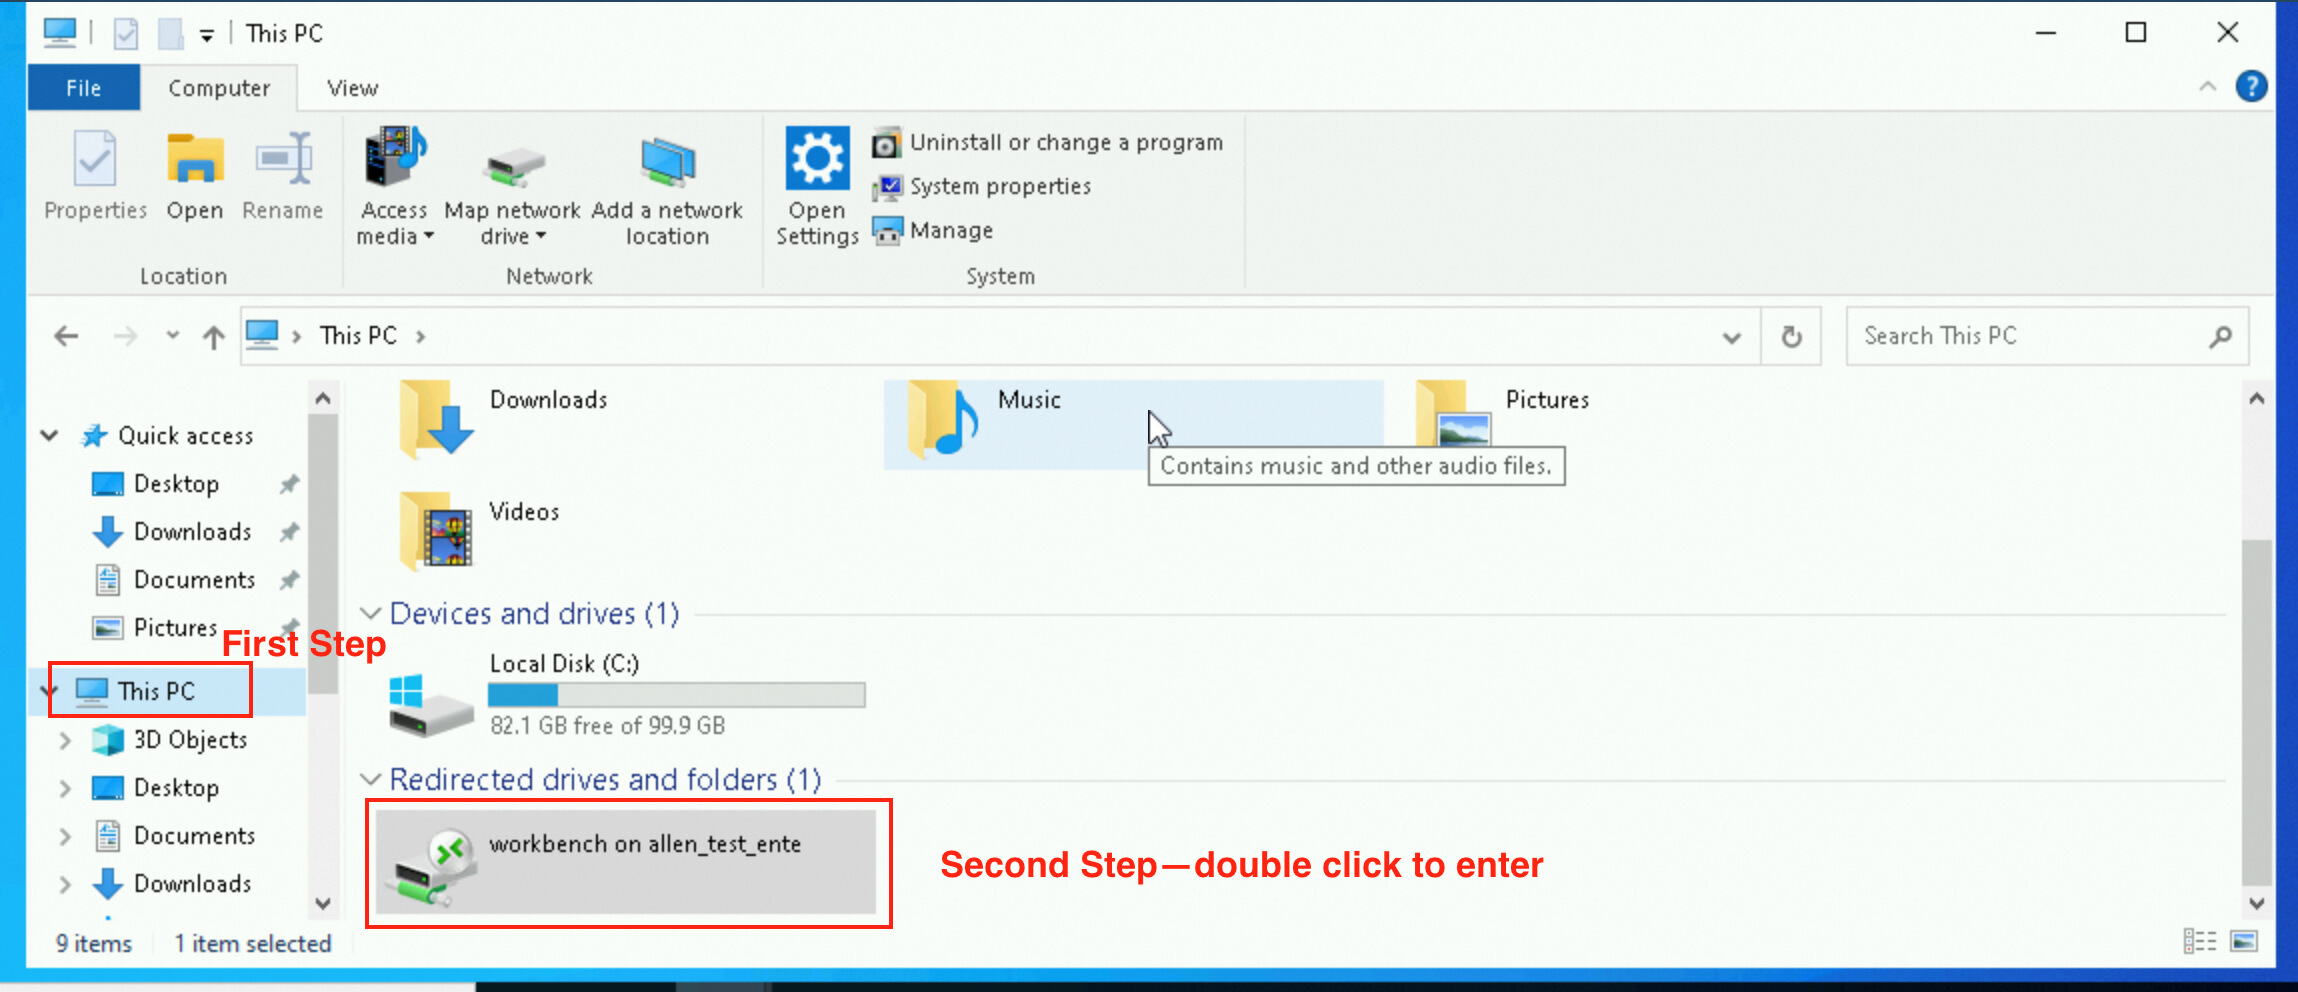
8. In the left-side navigation pane, click This PC. Double-click the disk under Redirected drives and folders.
9. Double-click the Download folder. Right-click and select Paste to download the Saved.zip file.
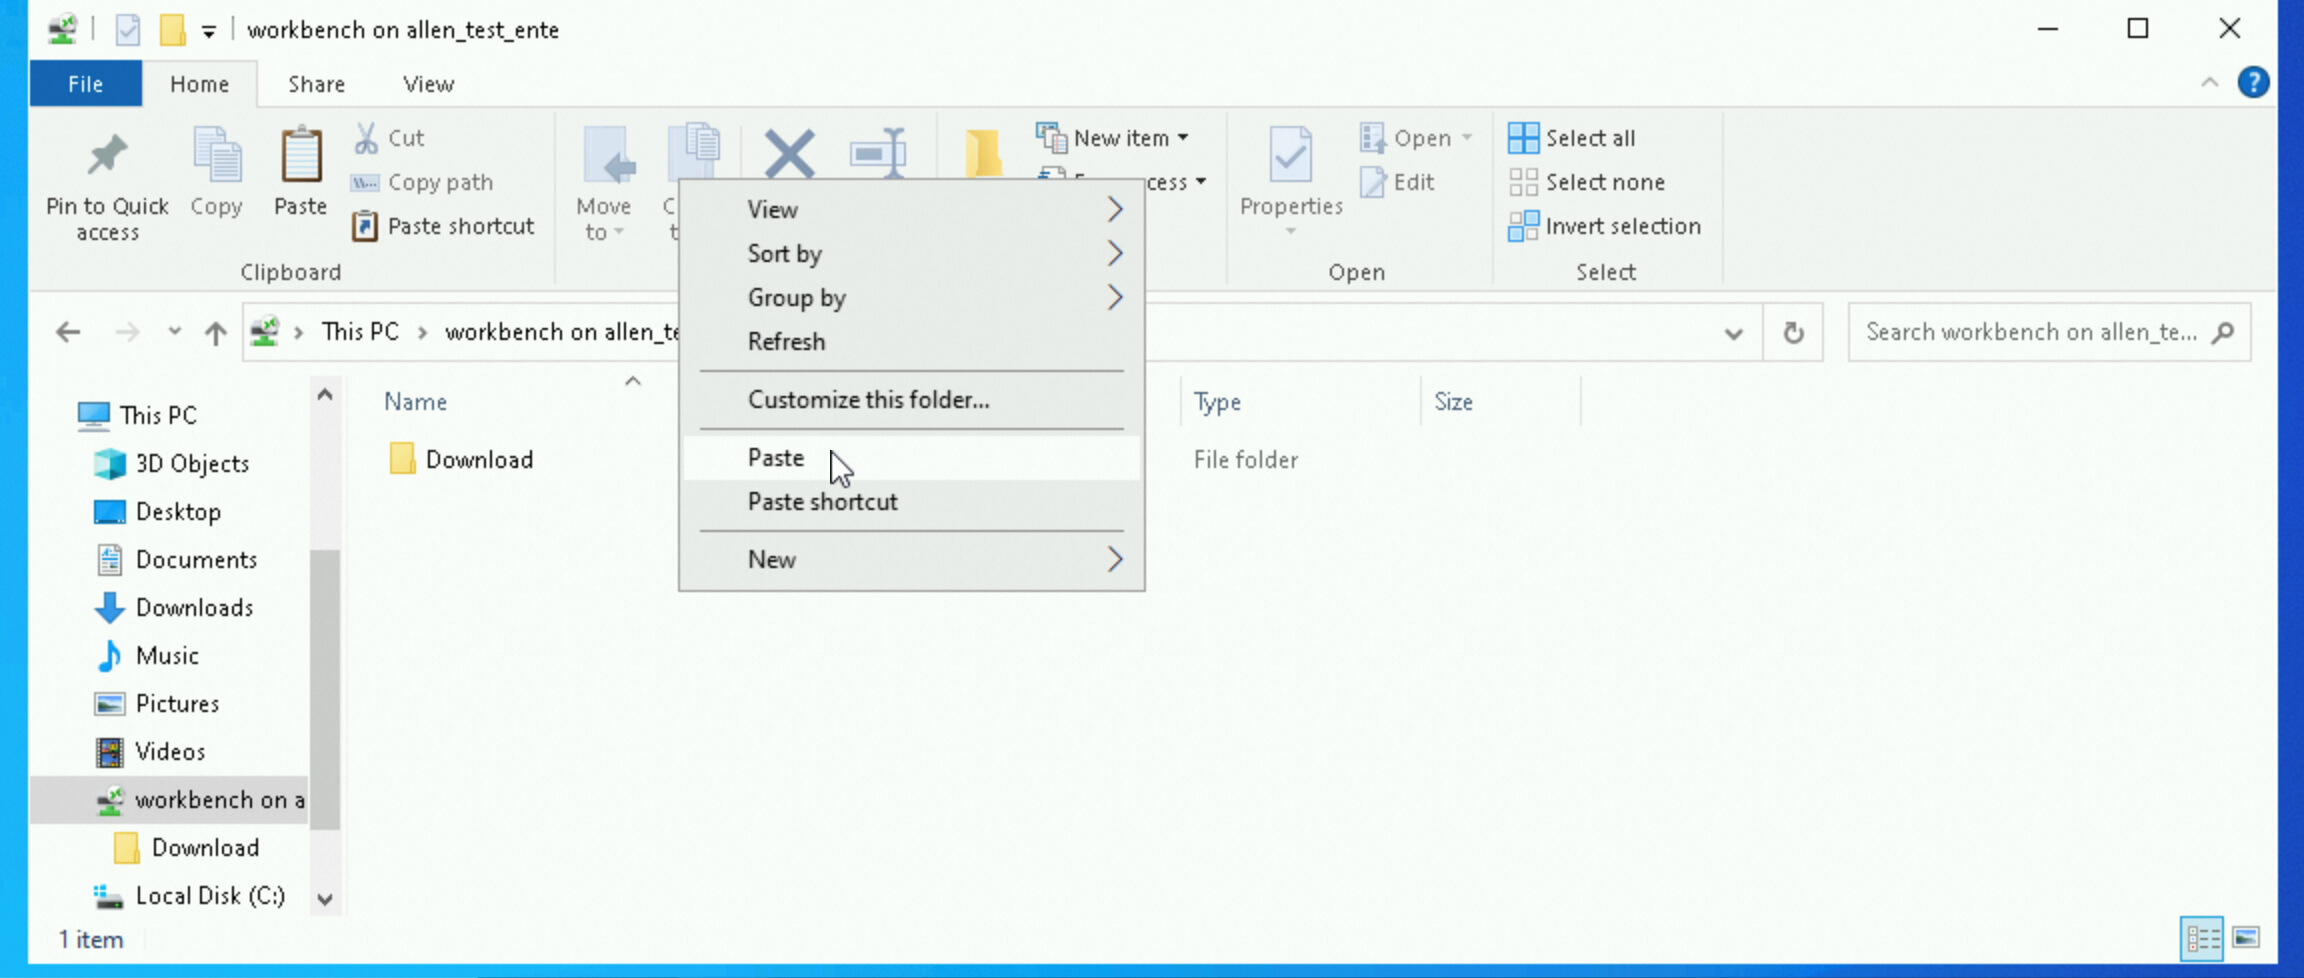
10. The download is successful.

1. Log on to the ECS console by using Workbench. The procedure is the same as that for downloading archive files from a Windows server. Note that you need to enter the Instance Password specified when you created the Compute Nest service instance.
2. Shut down the Palworld server in the task manager.
3. Select the compressed file that you want to upload. Drag the file from the local folder to the left-side console interface. Wait for a moment. After the file is uploaded, you can see it on the current interface.
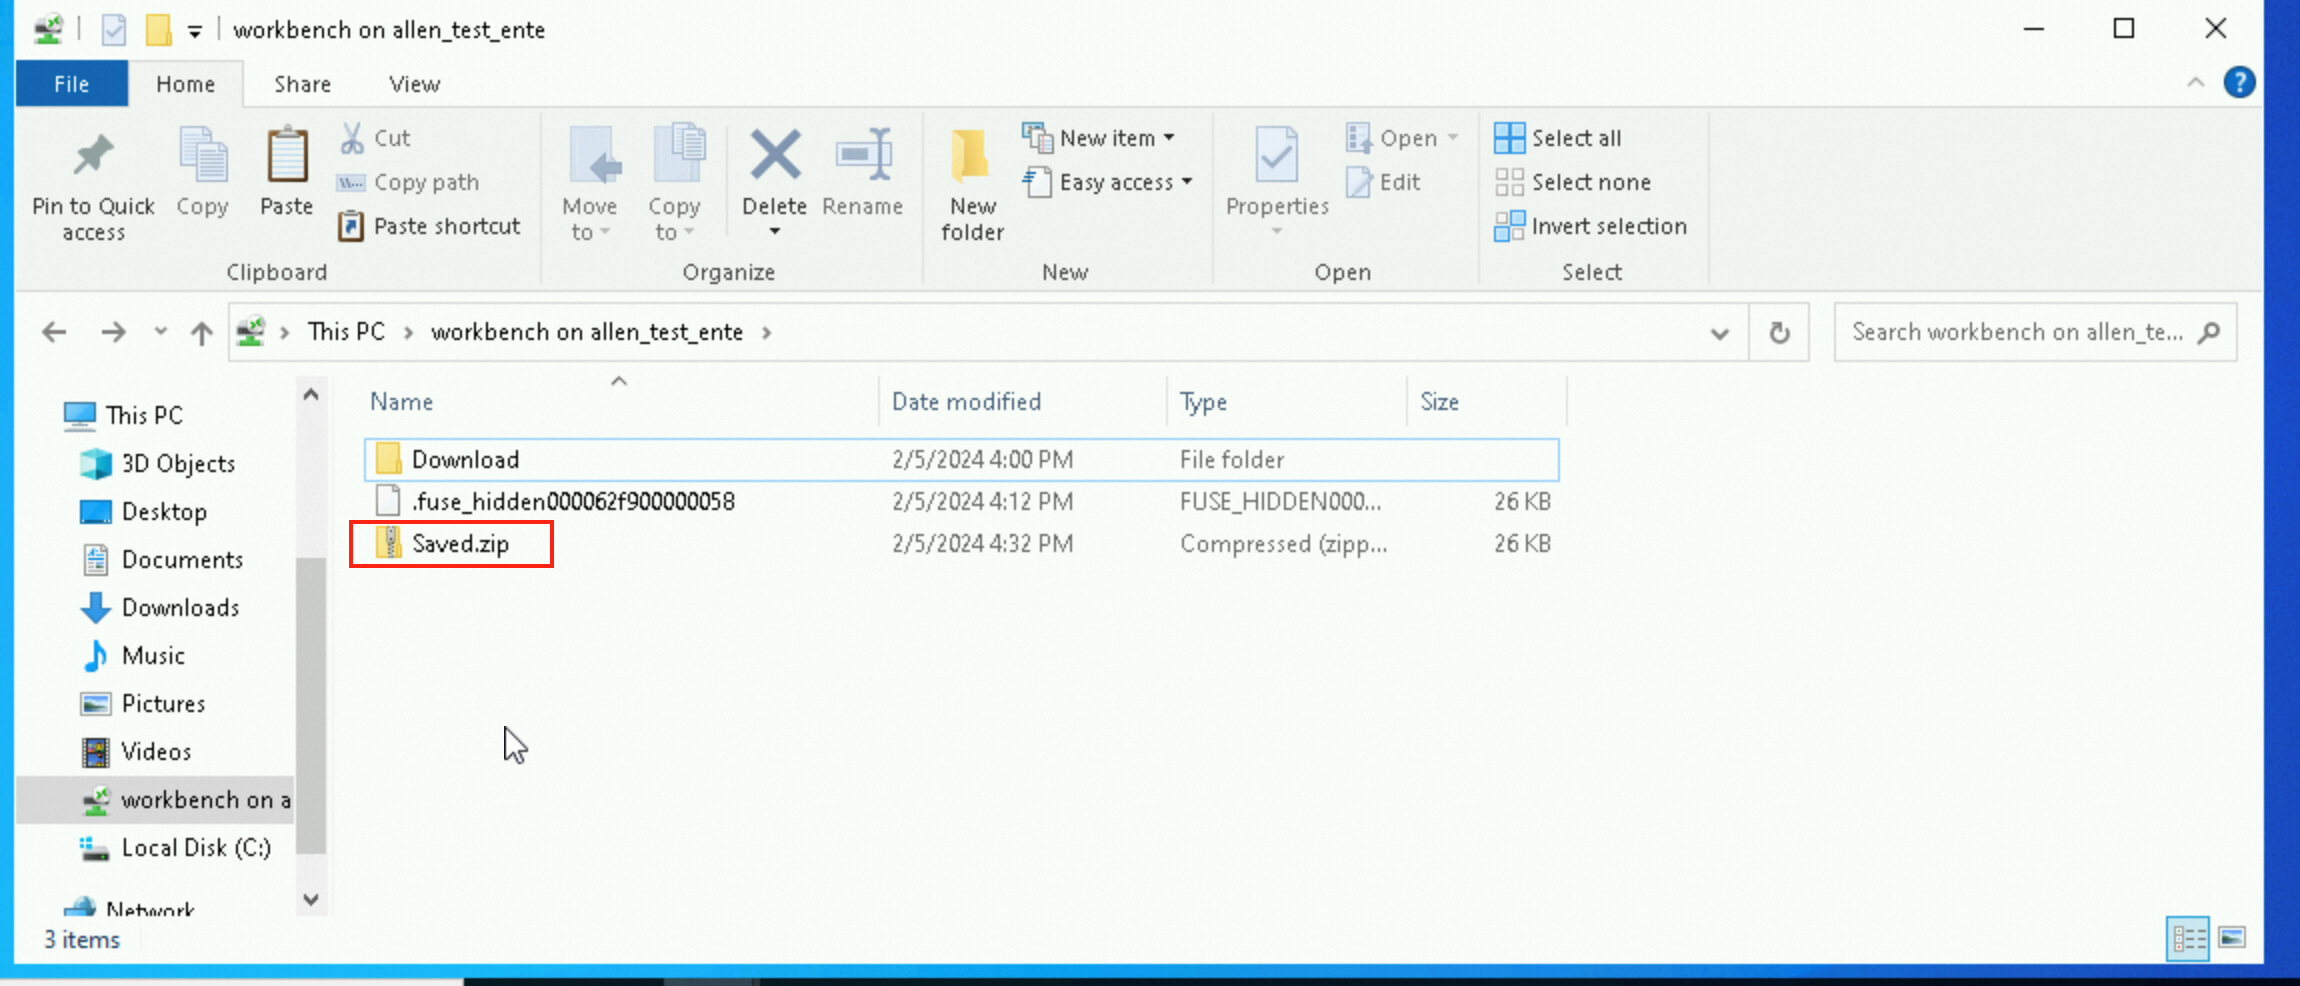
4. Copy the compressed file and switch to the following path:
C:\Program Files\PalServer\steam\steamapps\common\PalServer\Pal5. Note: If the Saved folder already exists in the original path, you need to rename or delete it. Right-click and select Paste.
6. Right-click the uploaded compressed file and select Extract All.
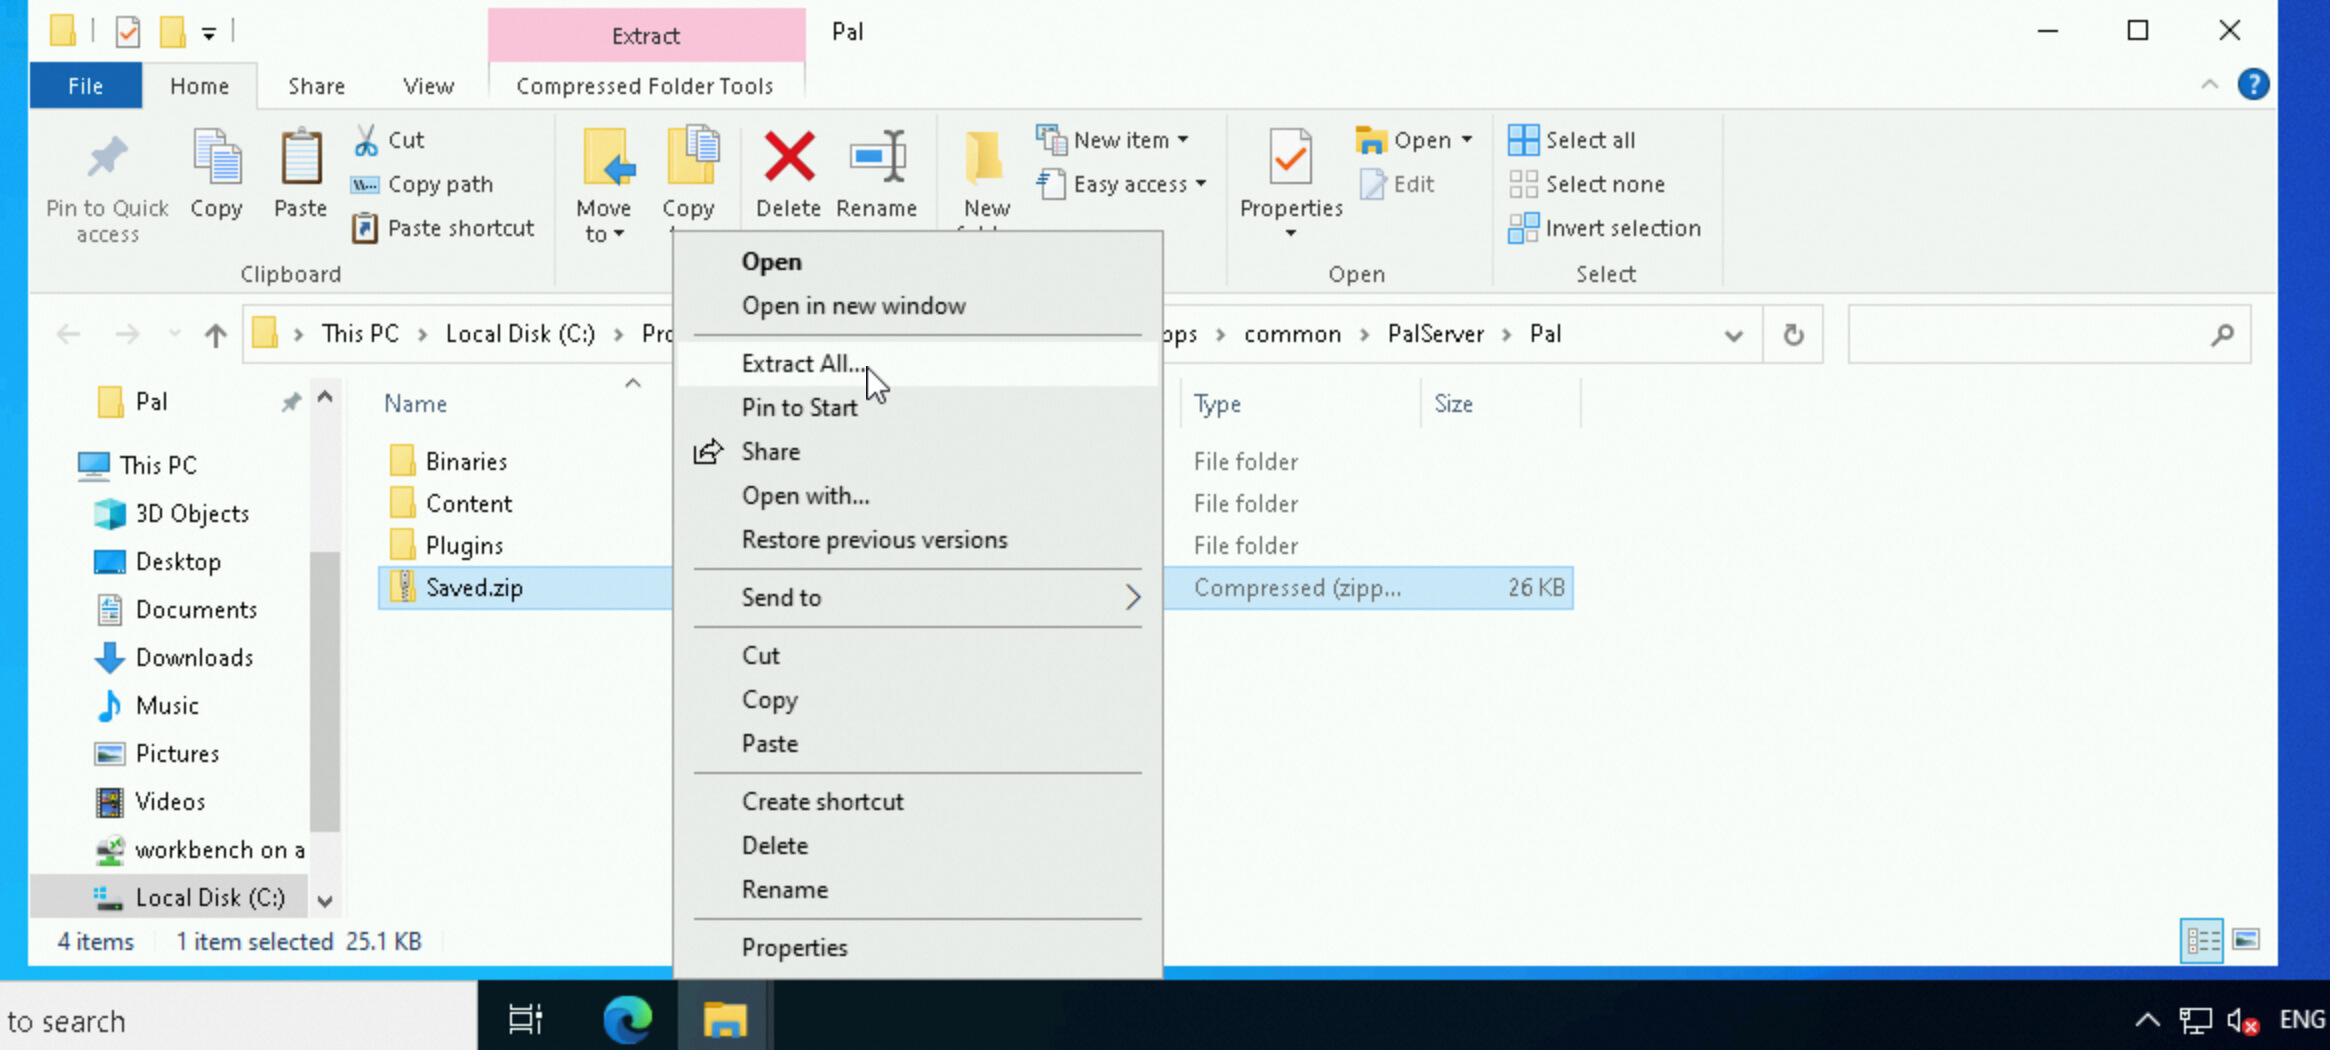
7. Click Extract. Copy the following path to the Files will be extracted to this folder field:
C:\Program Files\PalServer\steam\steamapps\common\PalServer\Pal\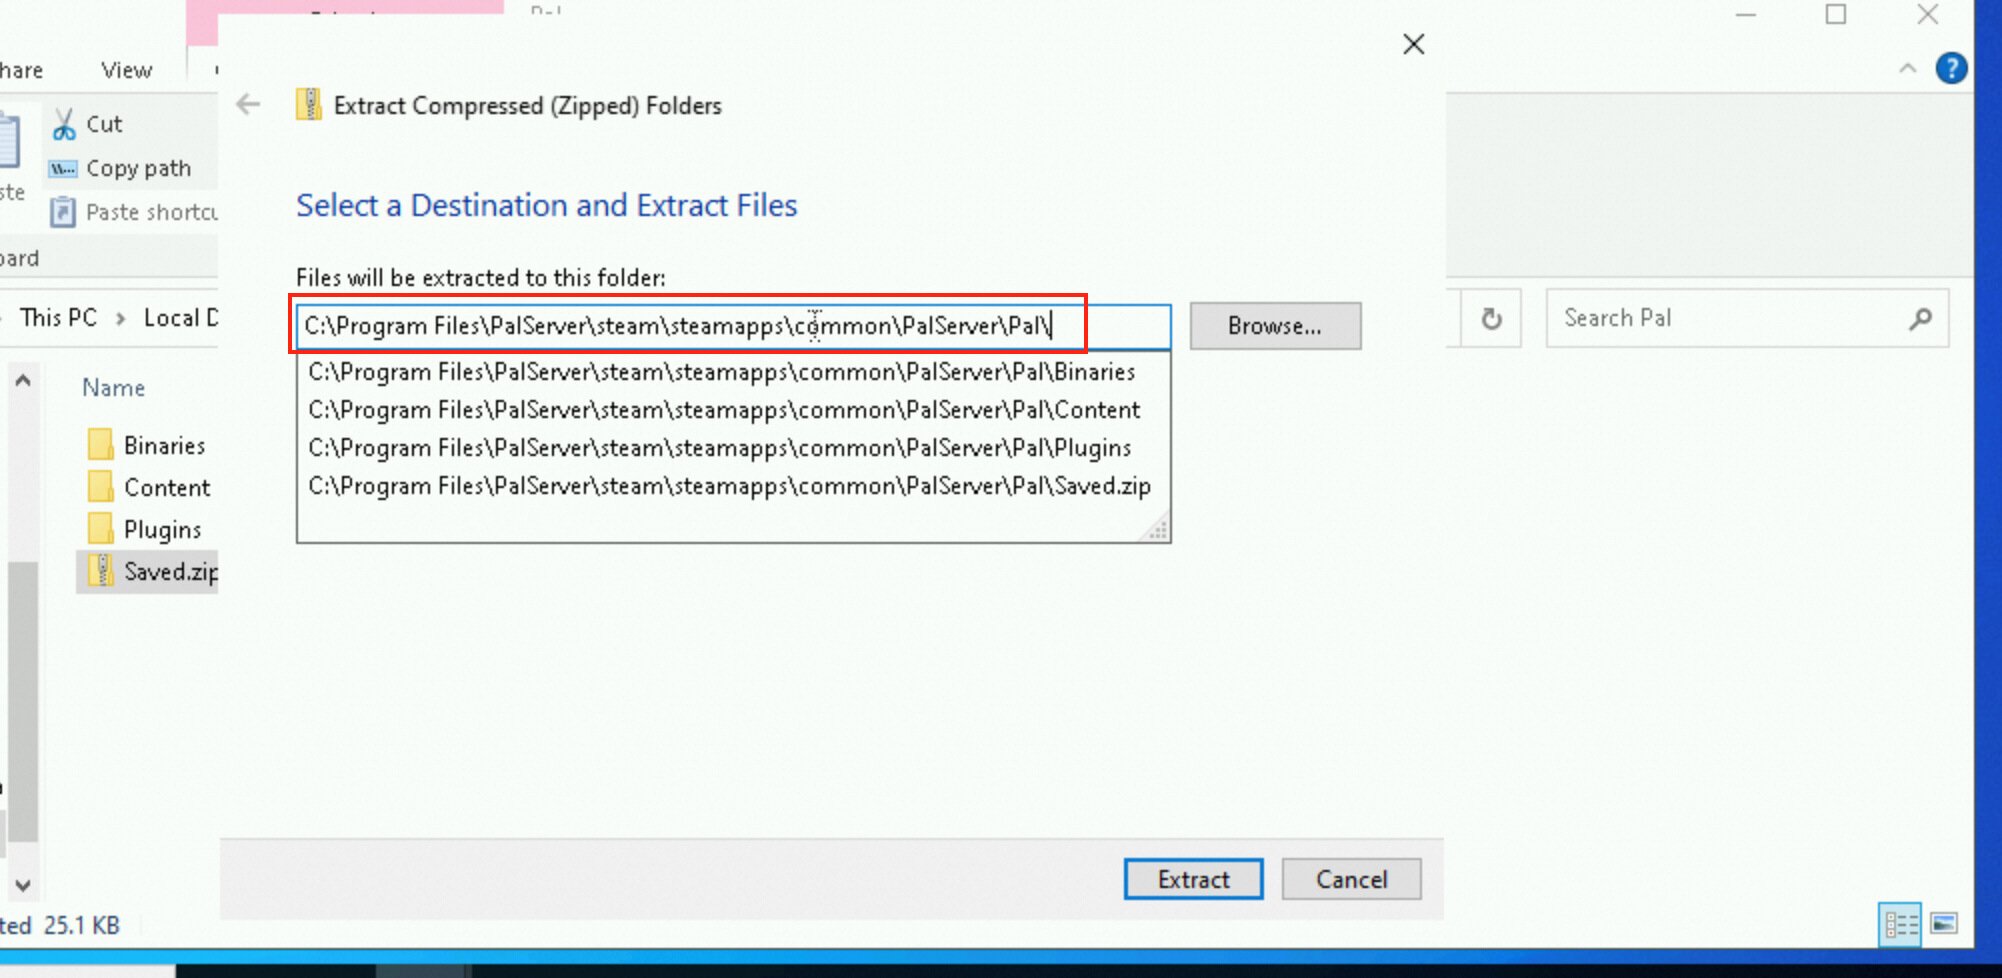
8. You need to manually modify the serial number of the configuration file. The procedure is similar to that for uploading files to a Linux server. Copy the following path to the address bar and press Enter.
C:\Program Files\PalServer\steam\steamapps\common\PalServer\Pal\Saved\SaveGames\0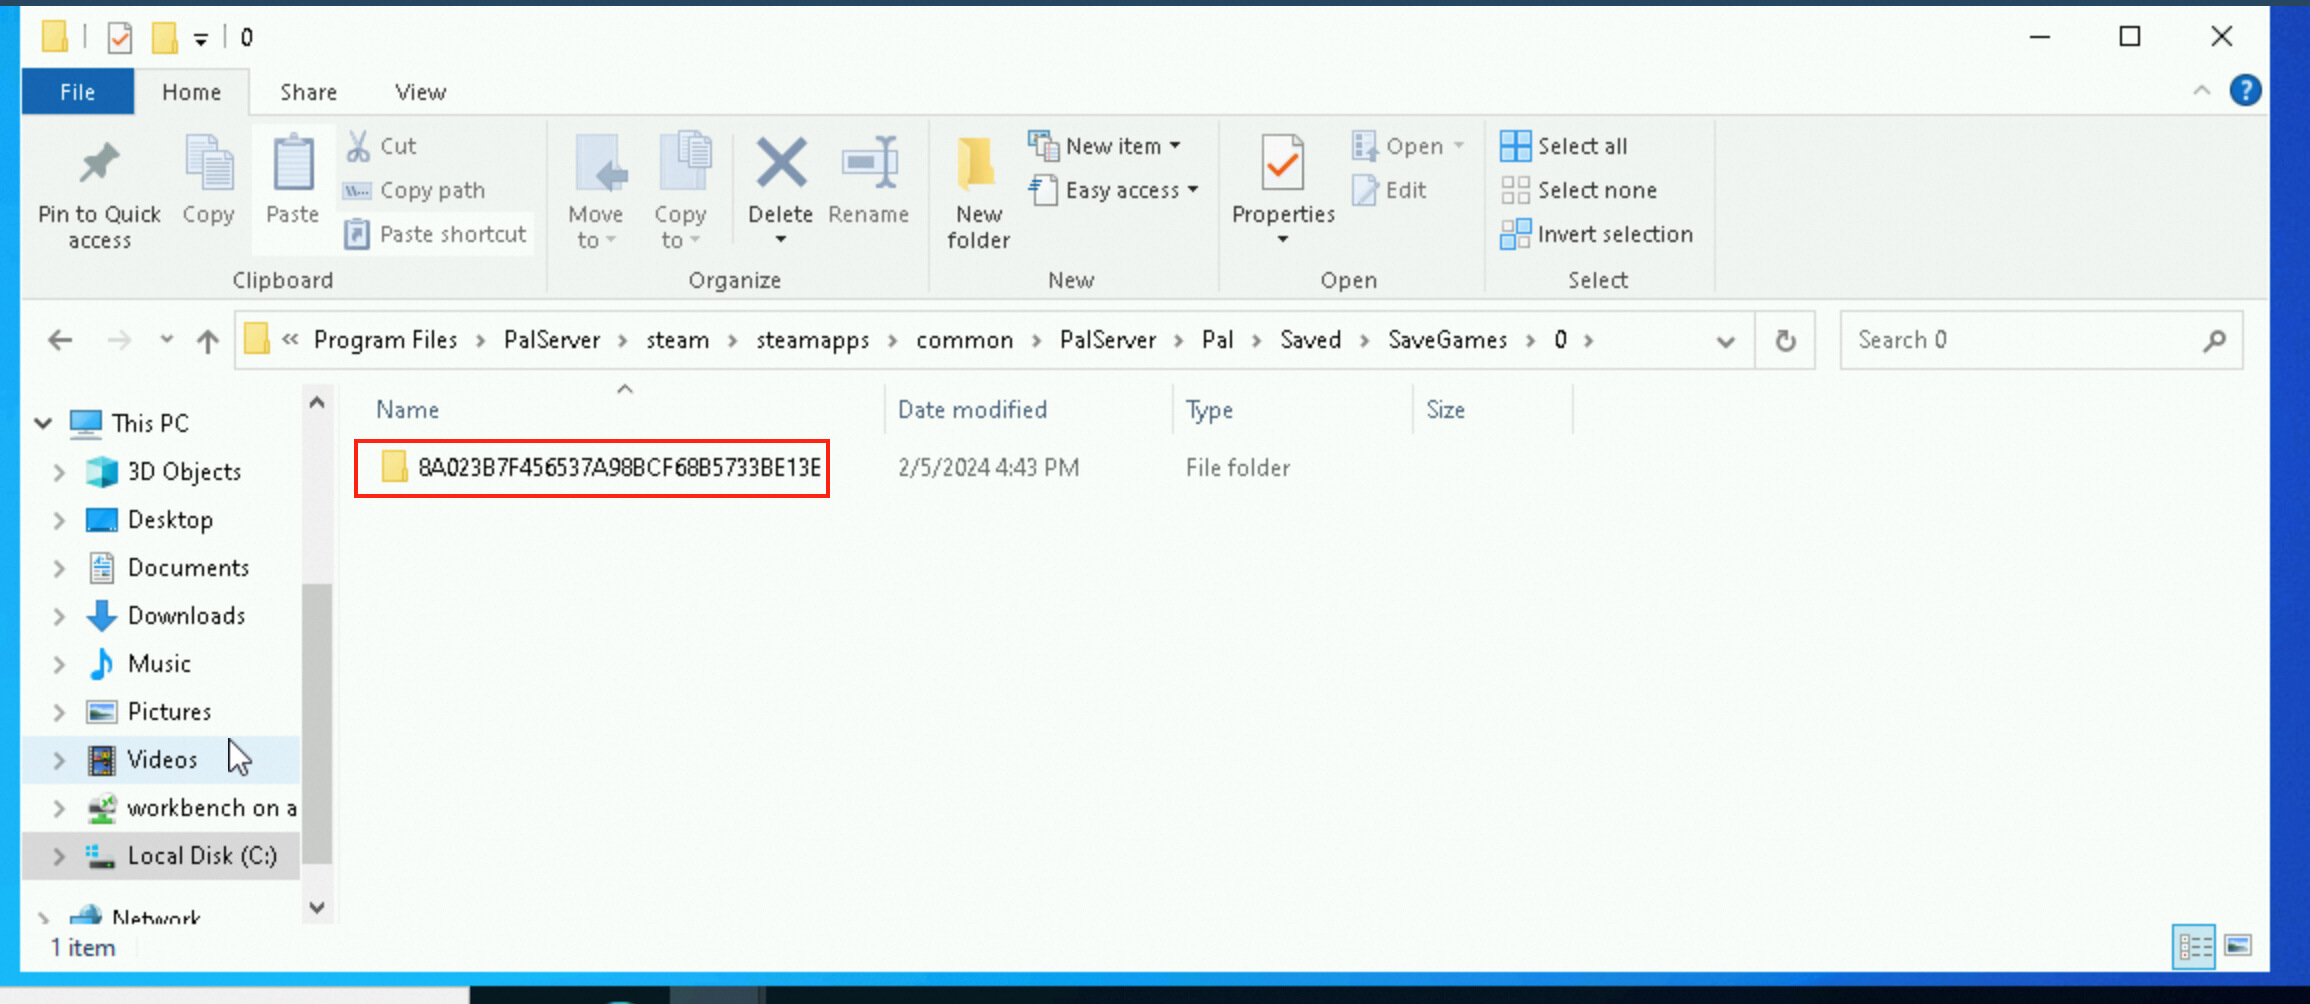
9. Right-click the serial number folder and select Rename.
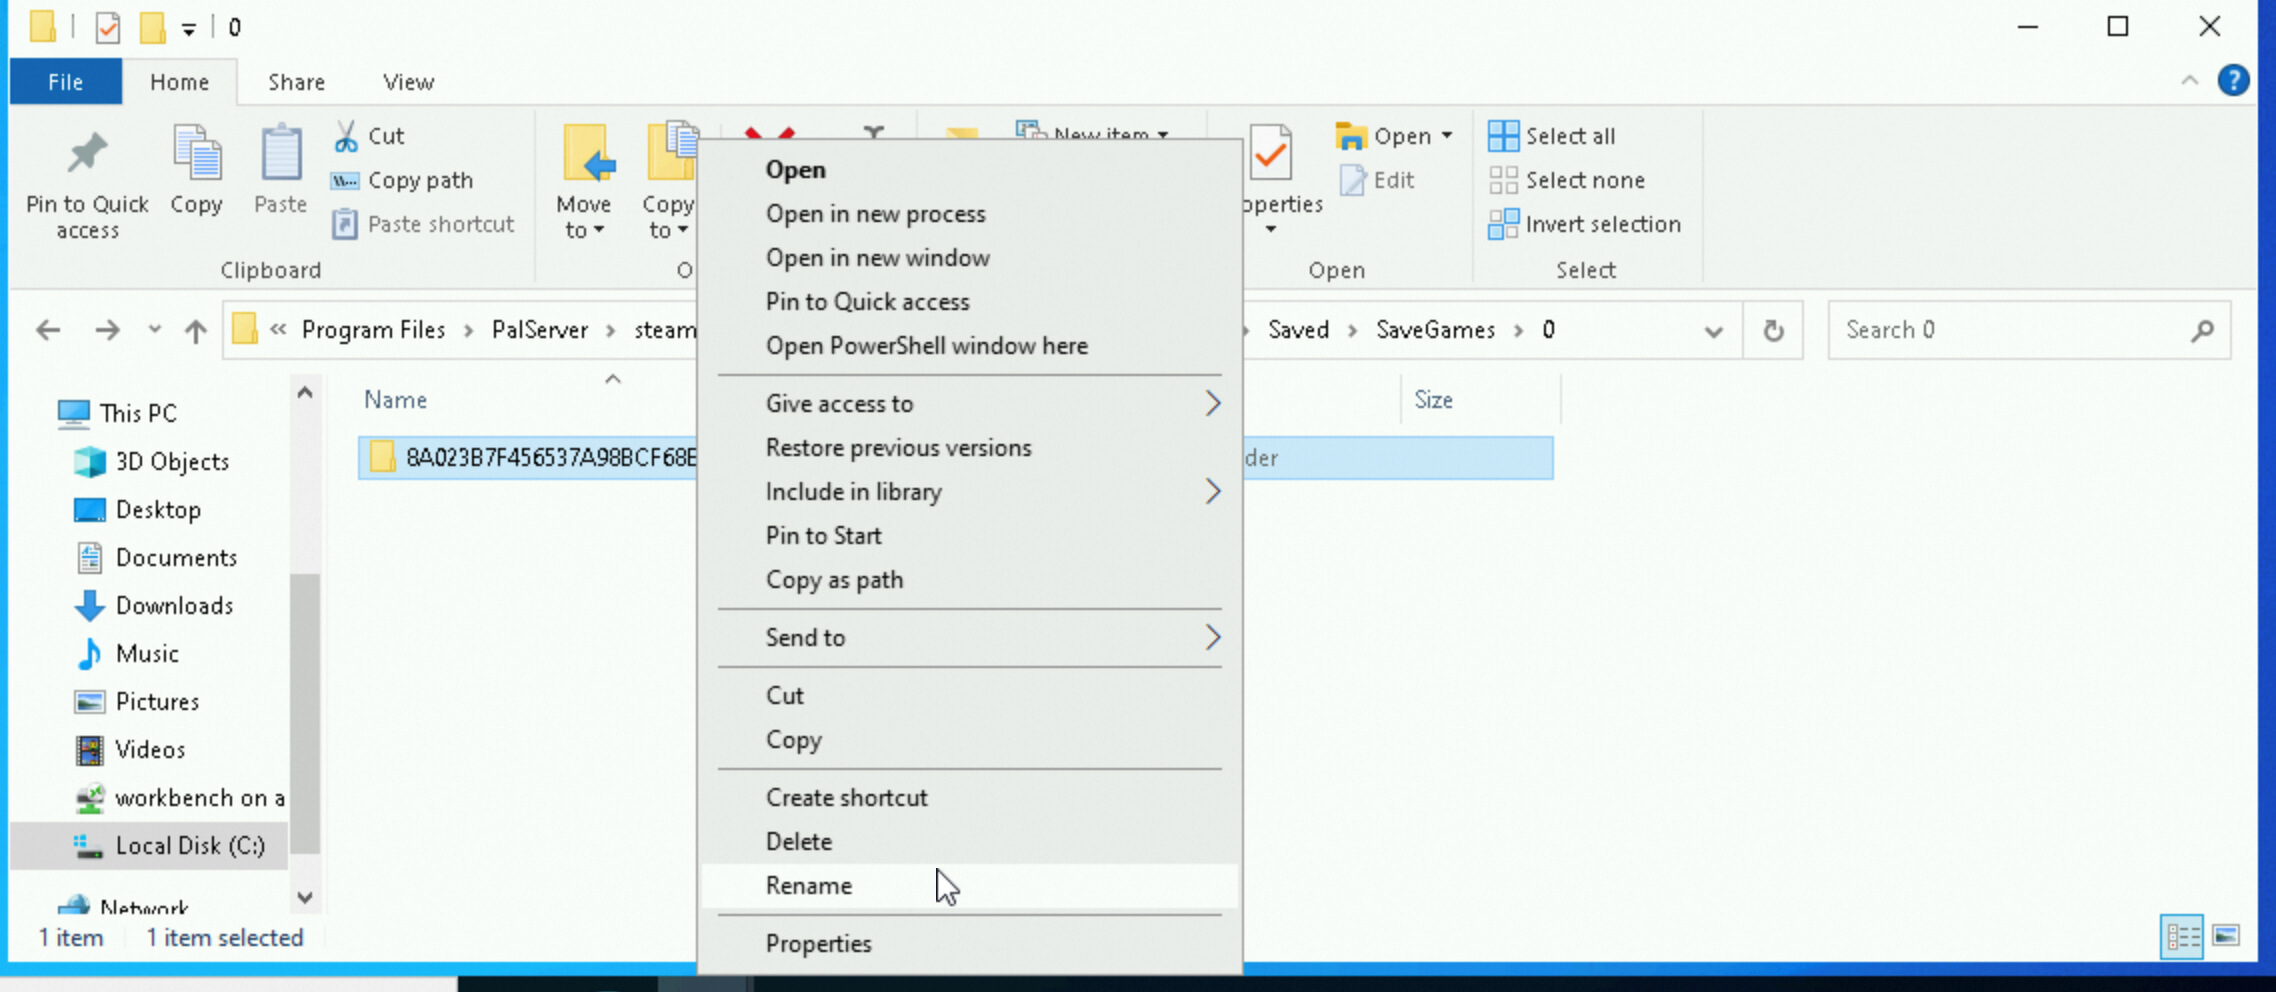
10. Right-click the folder and copy the folder name.
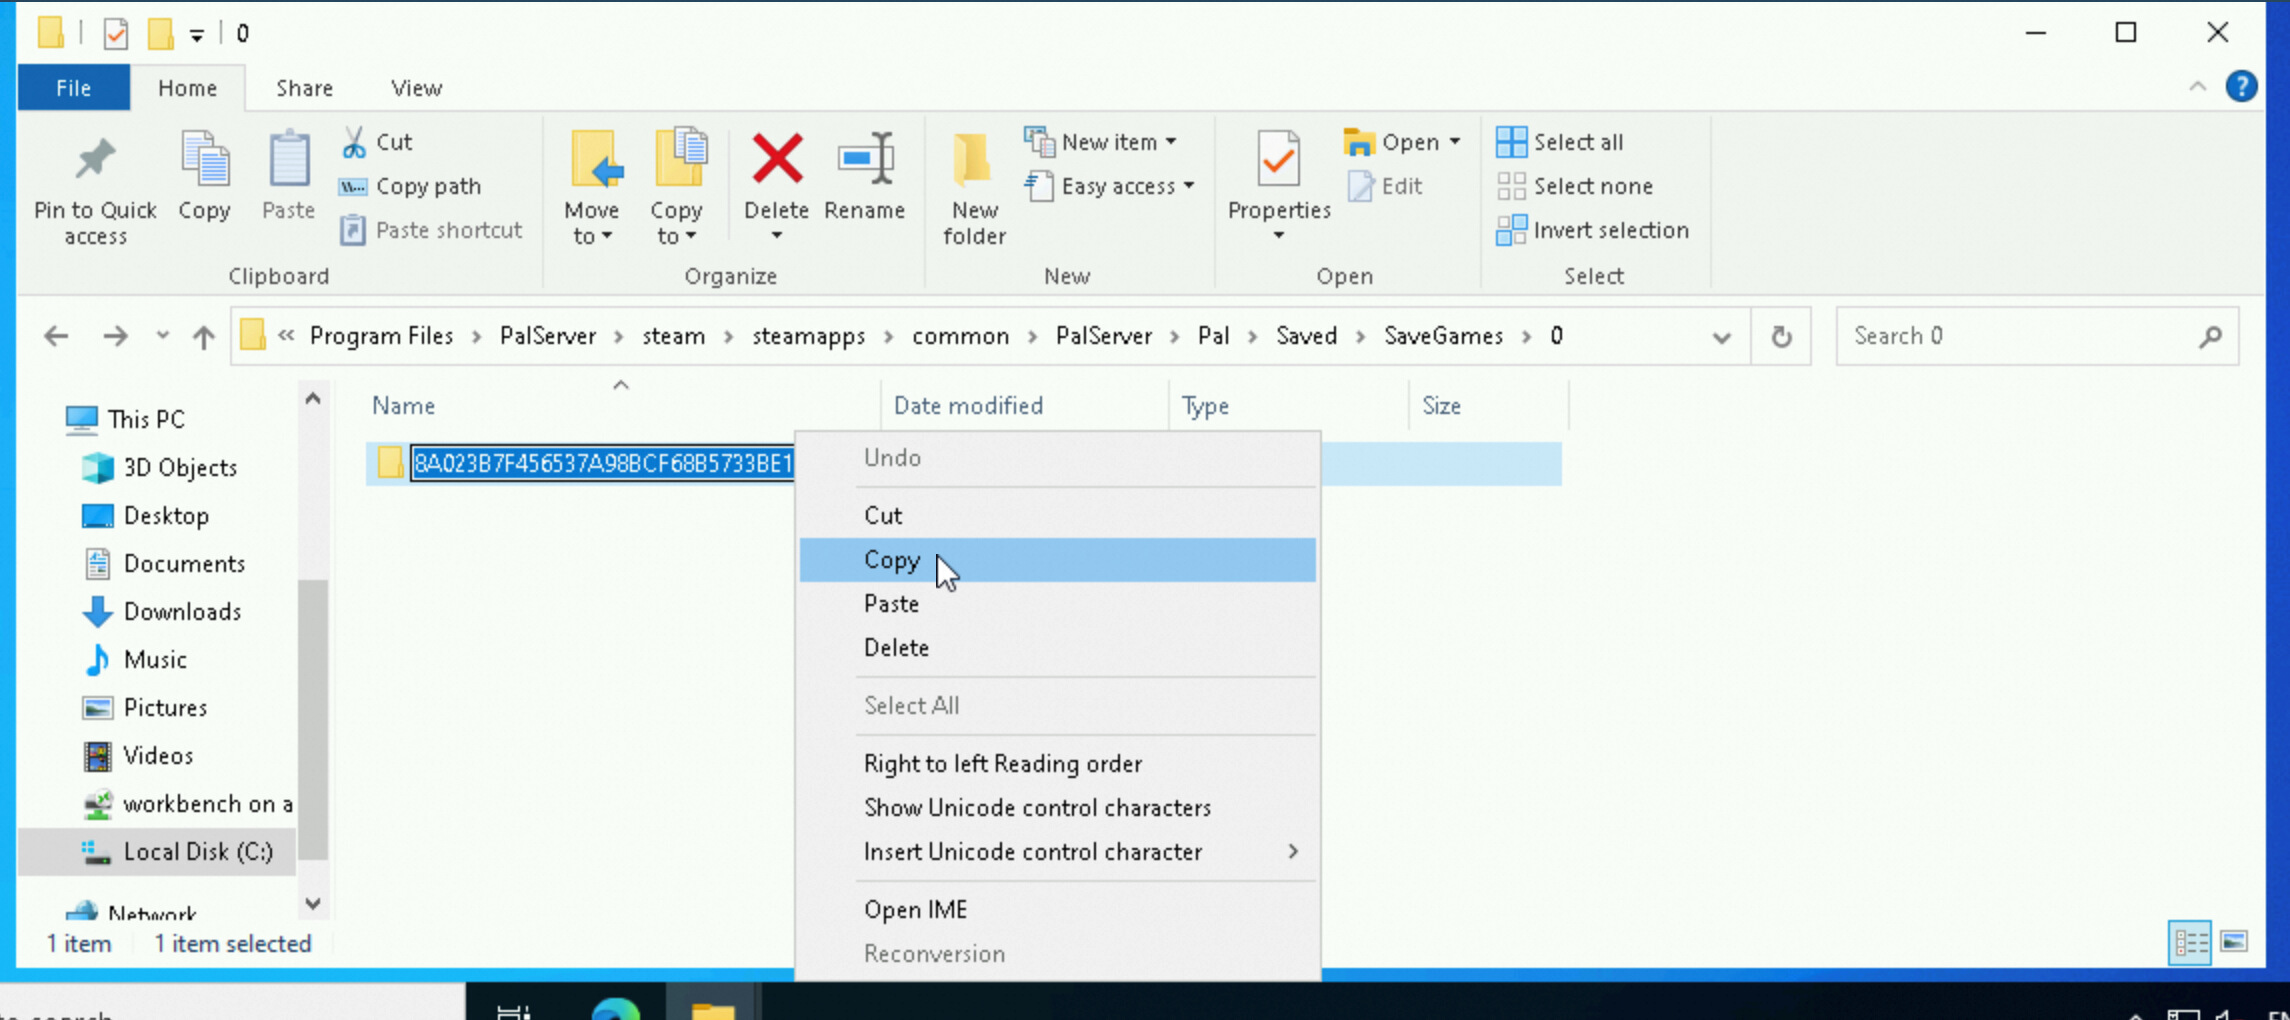
11. Switch to the following path:
C:\Program Files\PalServer\steam\steamapps\common\PalServer\Pal\Saved\Config\WindowsServerFind the GameUserSettings.ini file, right-click the file, and then select Edit.
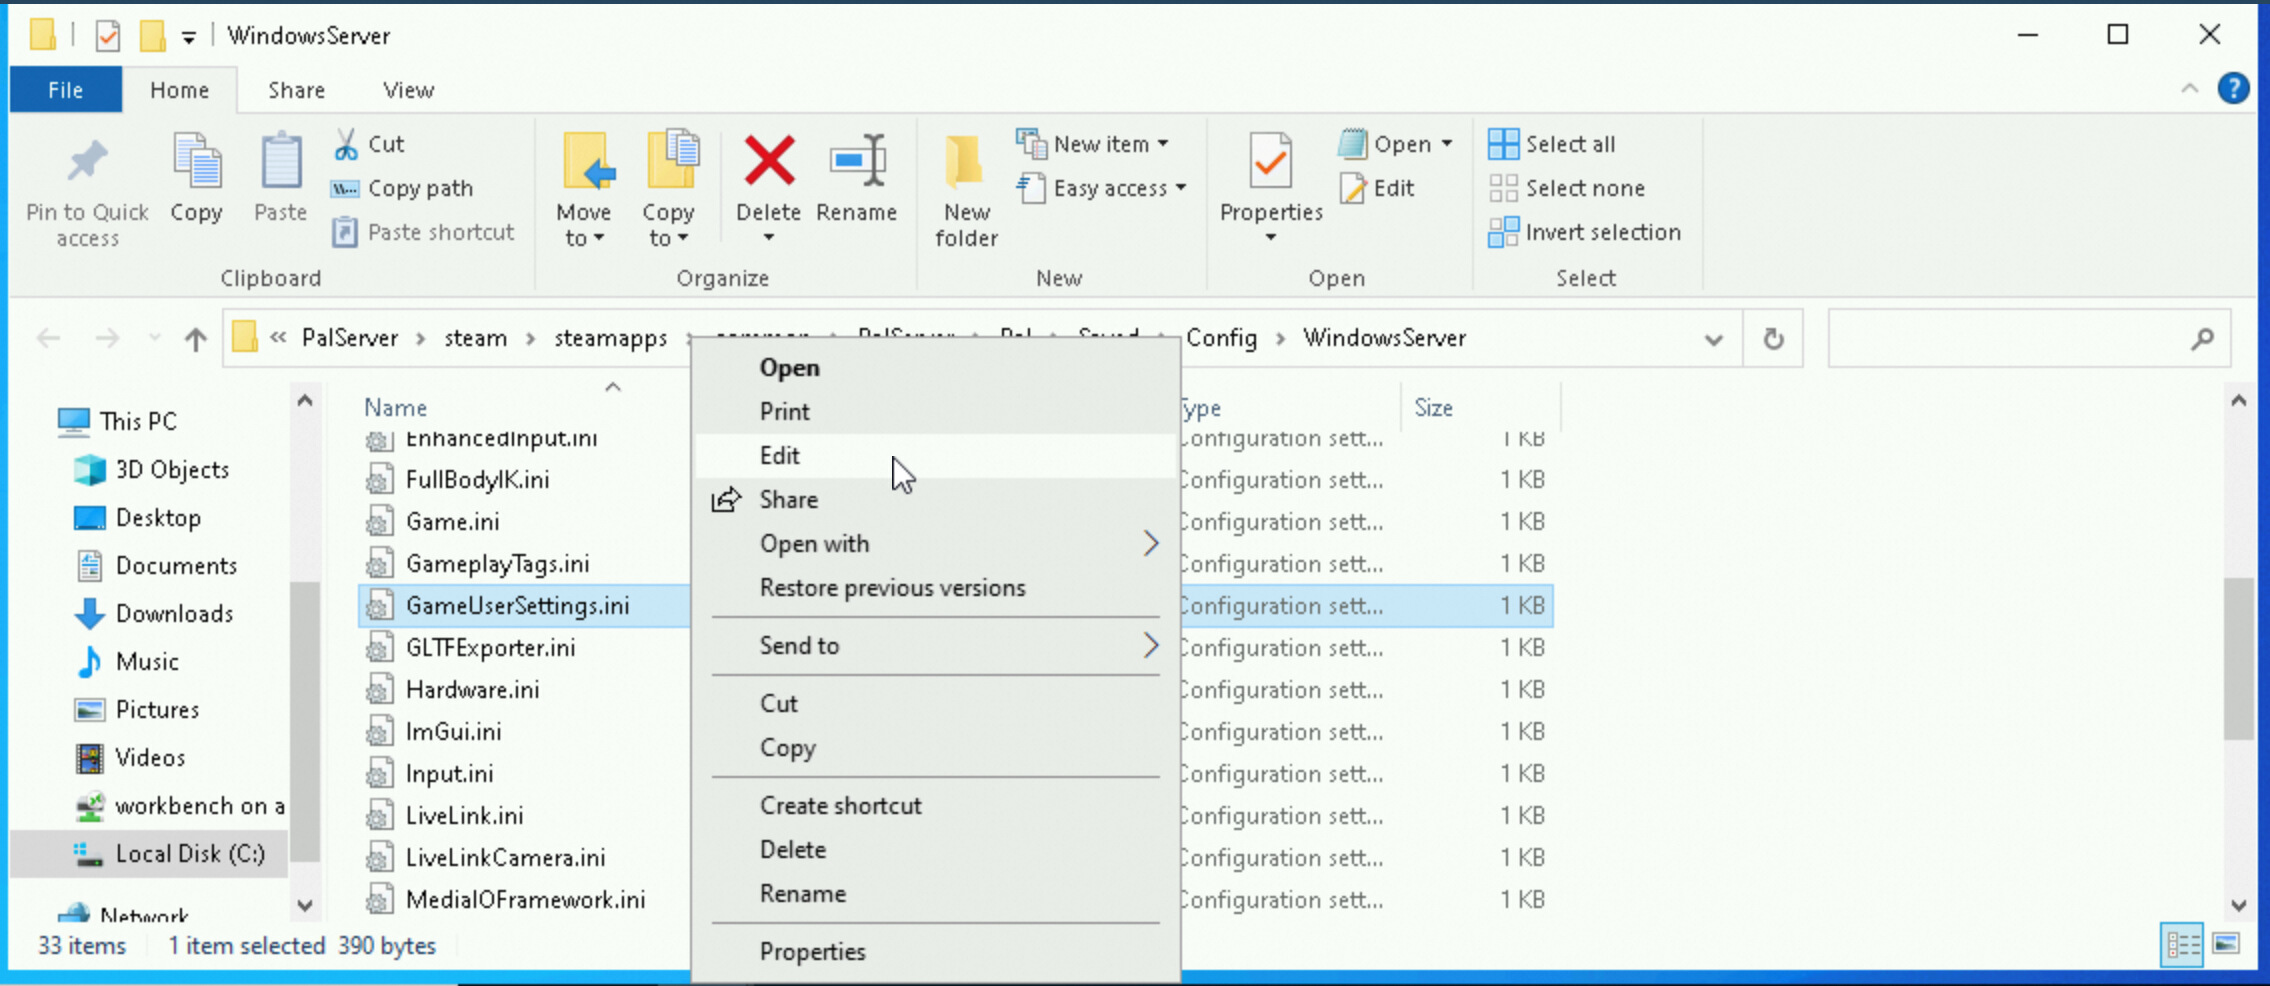
12. Replace the value of the DedicatedServerName field with the serial number (the folder name) copied in step 9. Close and save the file.
Now, the archive file for Windows has been successfully uploaded.
Run the following command and replace the path in the preceding example tutorial with the search result.
find / -type d -path "*/PalServer/Pal/Saved" 2>/dev/nullIn the file manager, enter the path C:\Program Files\PalServer\steam\steamapps\common\PalServer\Pal and locate the Saved file, which is the archive file.

The is because that you have used Session Manager to log on without entering a password. You need to exit the console first, and then connect to the server by using Workbench. The Workbench connection mode requires you to enter the corresponding username and password.
1. Click the ECS instance on the Resources tab of the Compute Nest console to go to the ECS console.
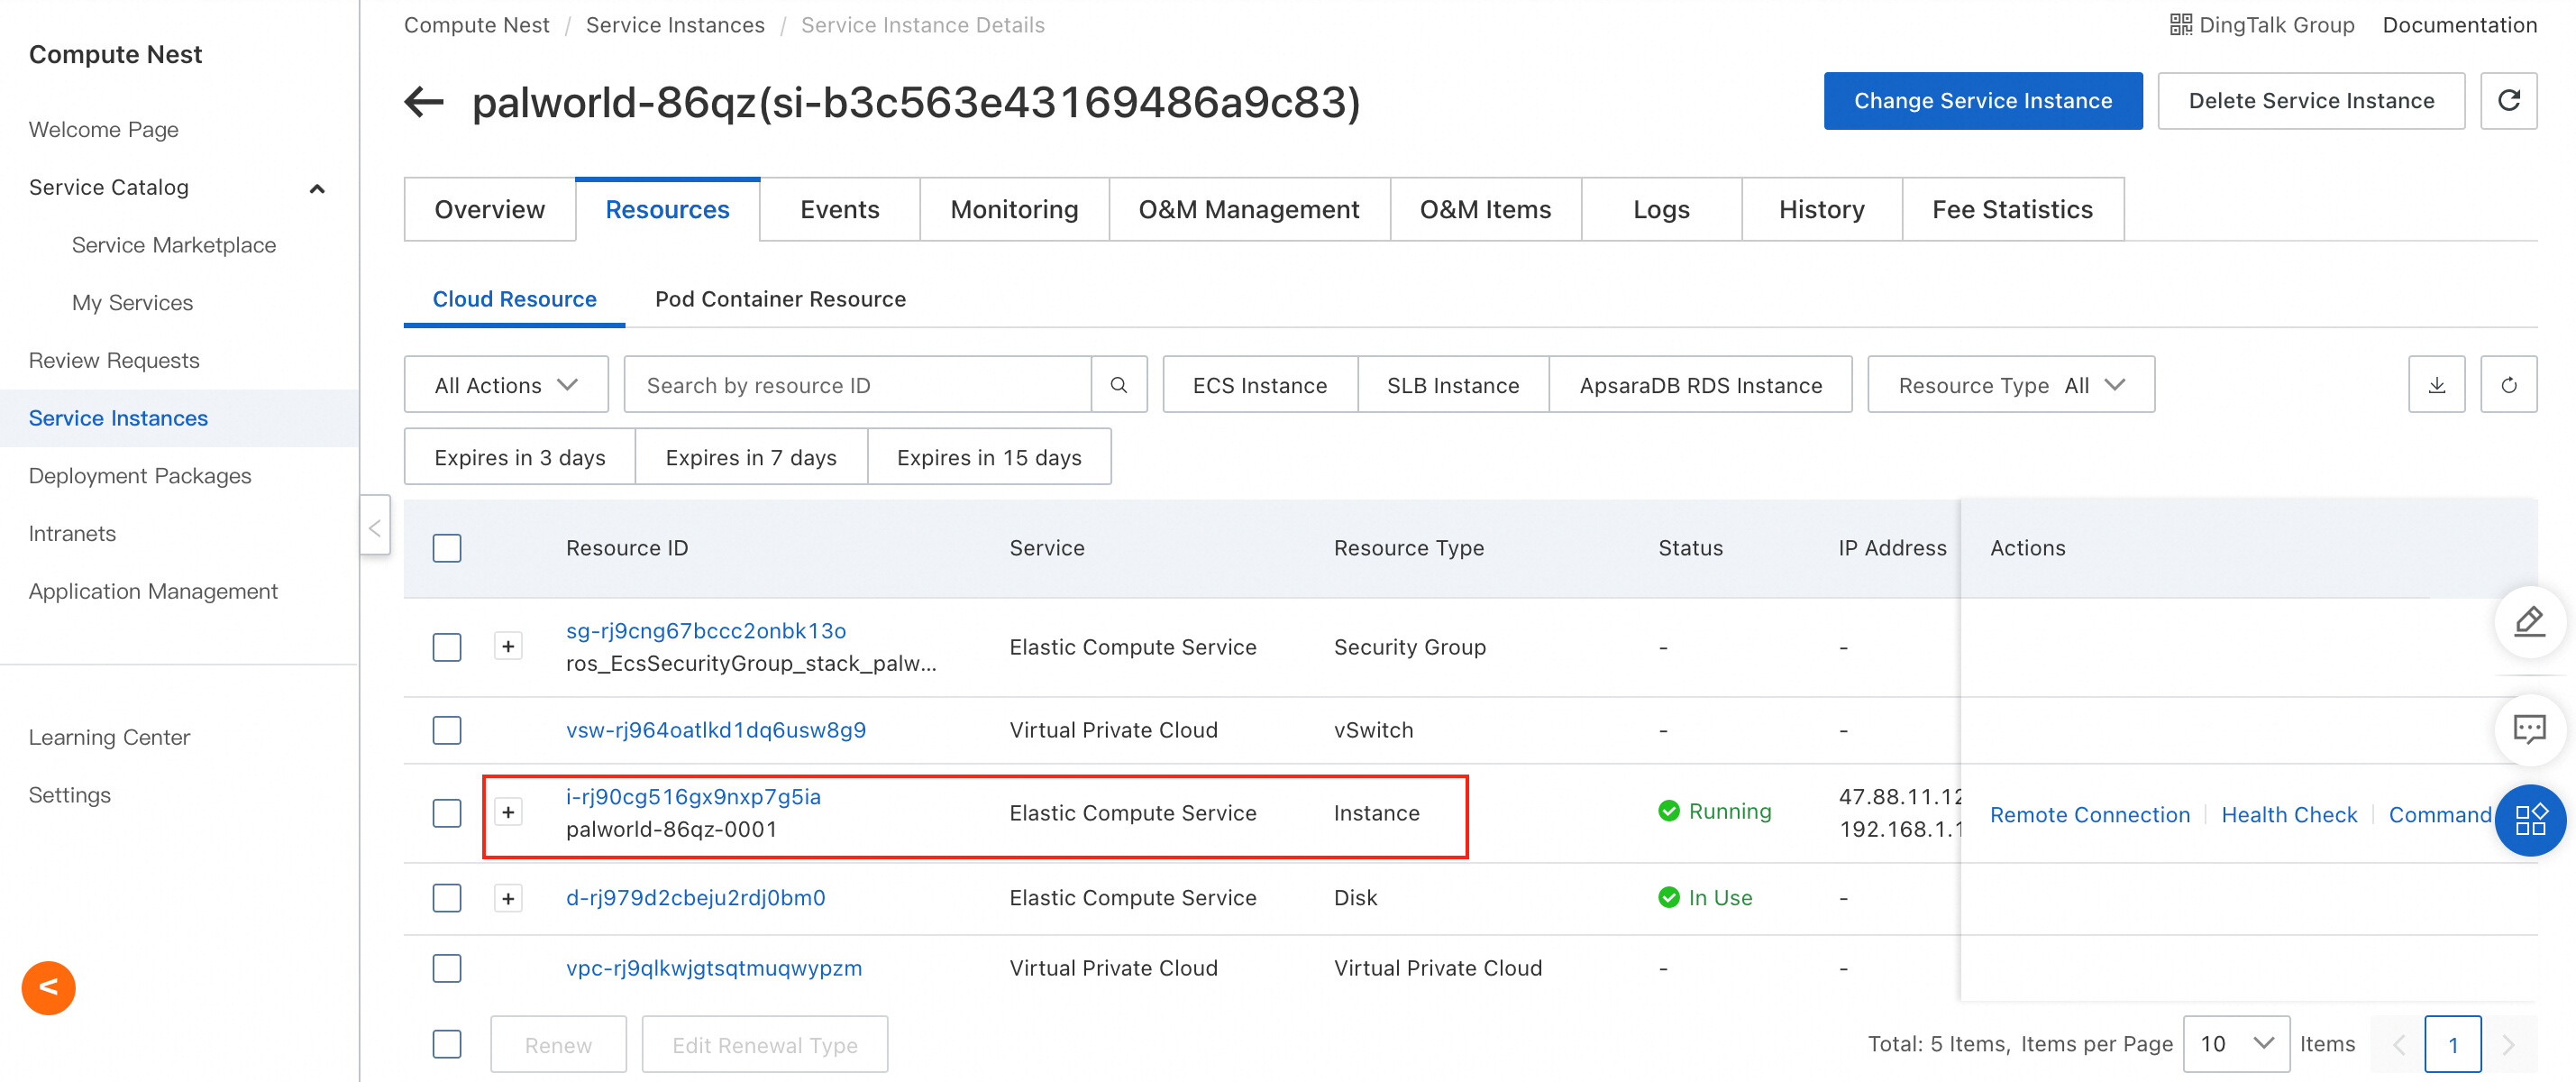
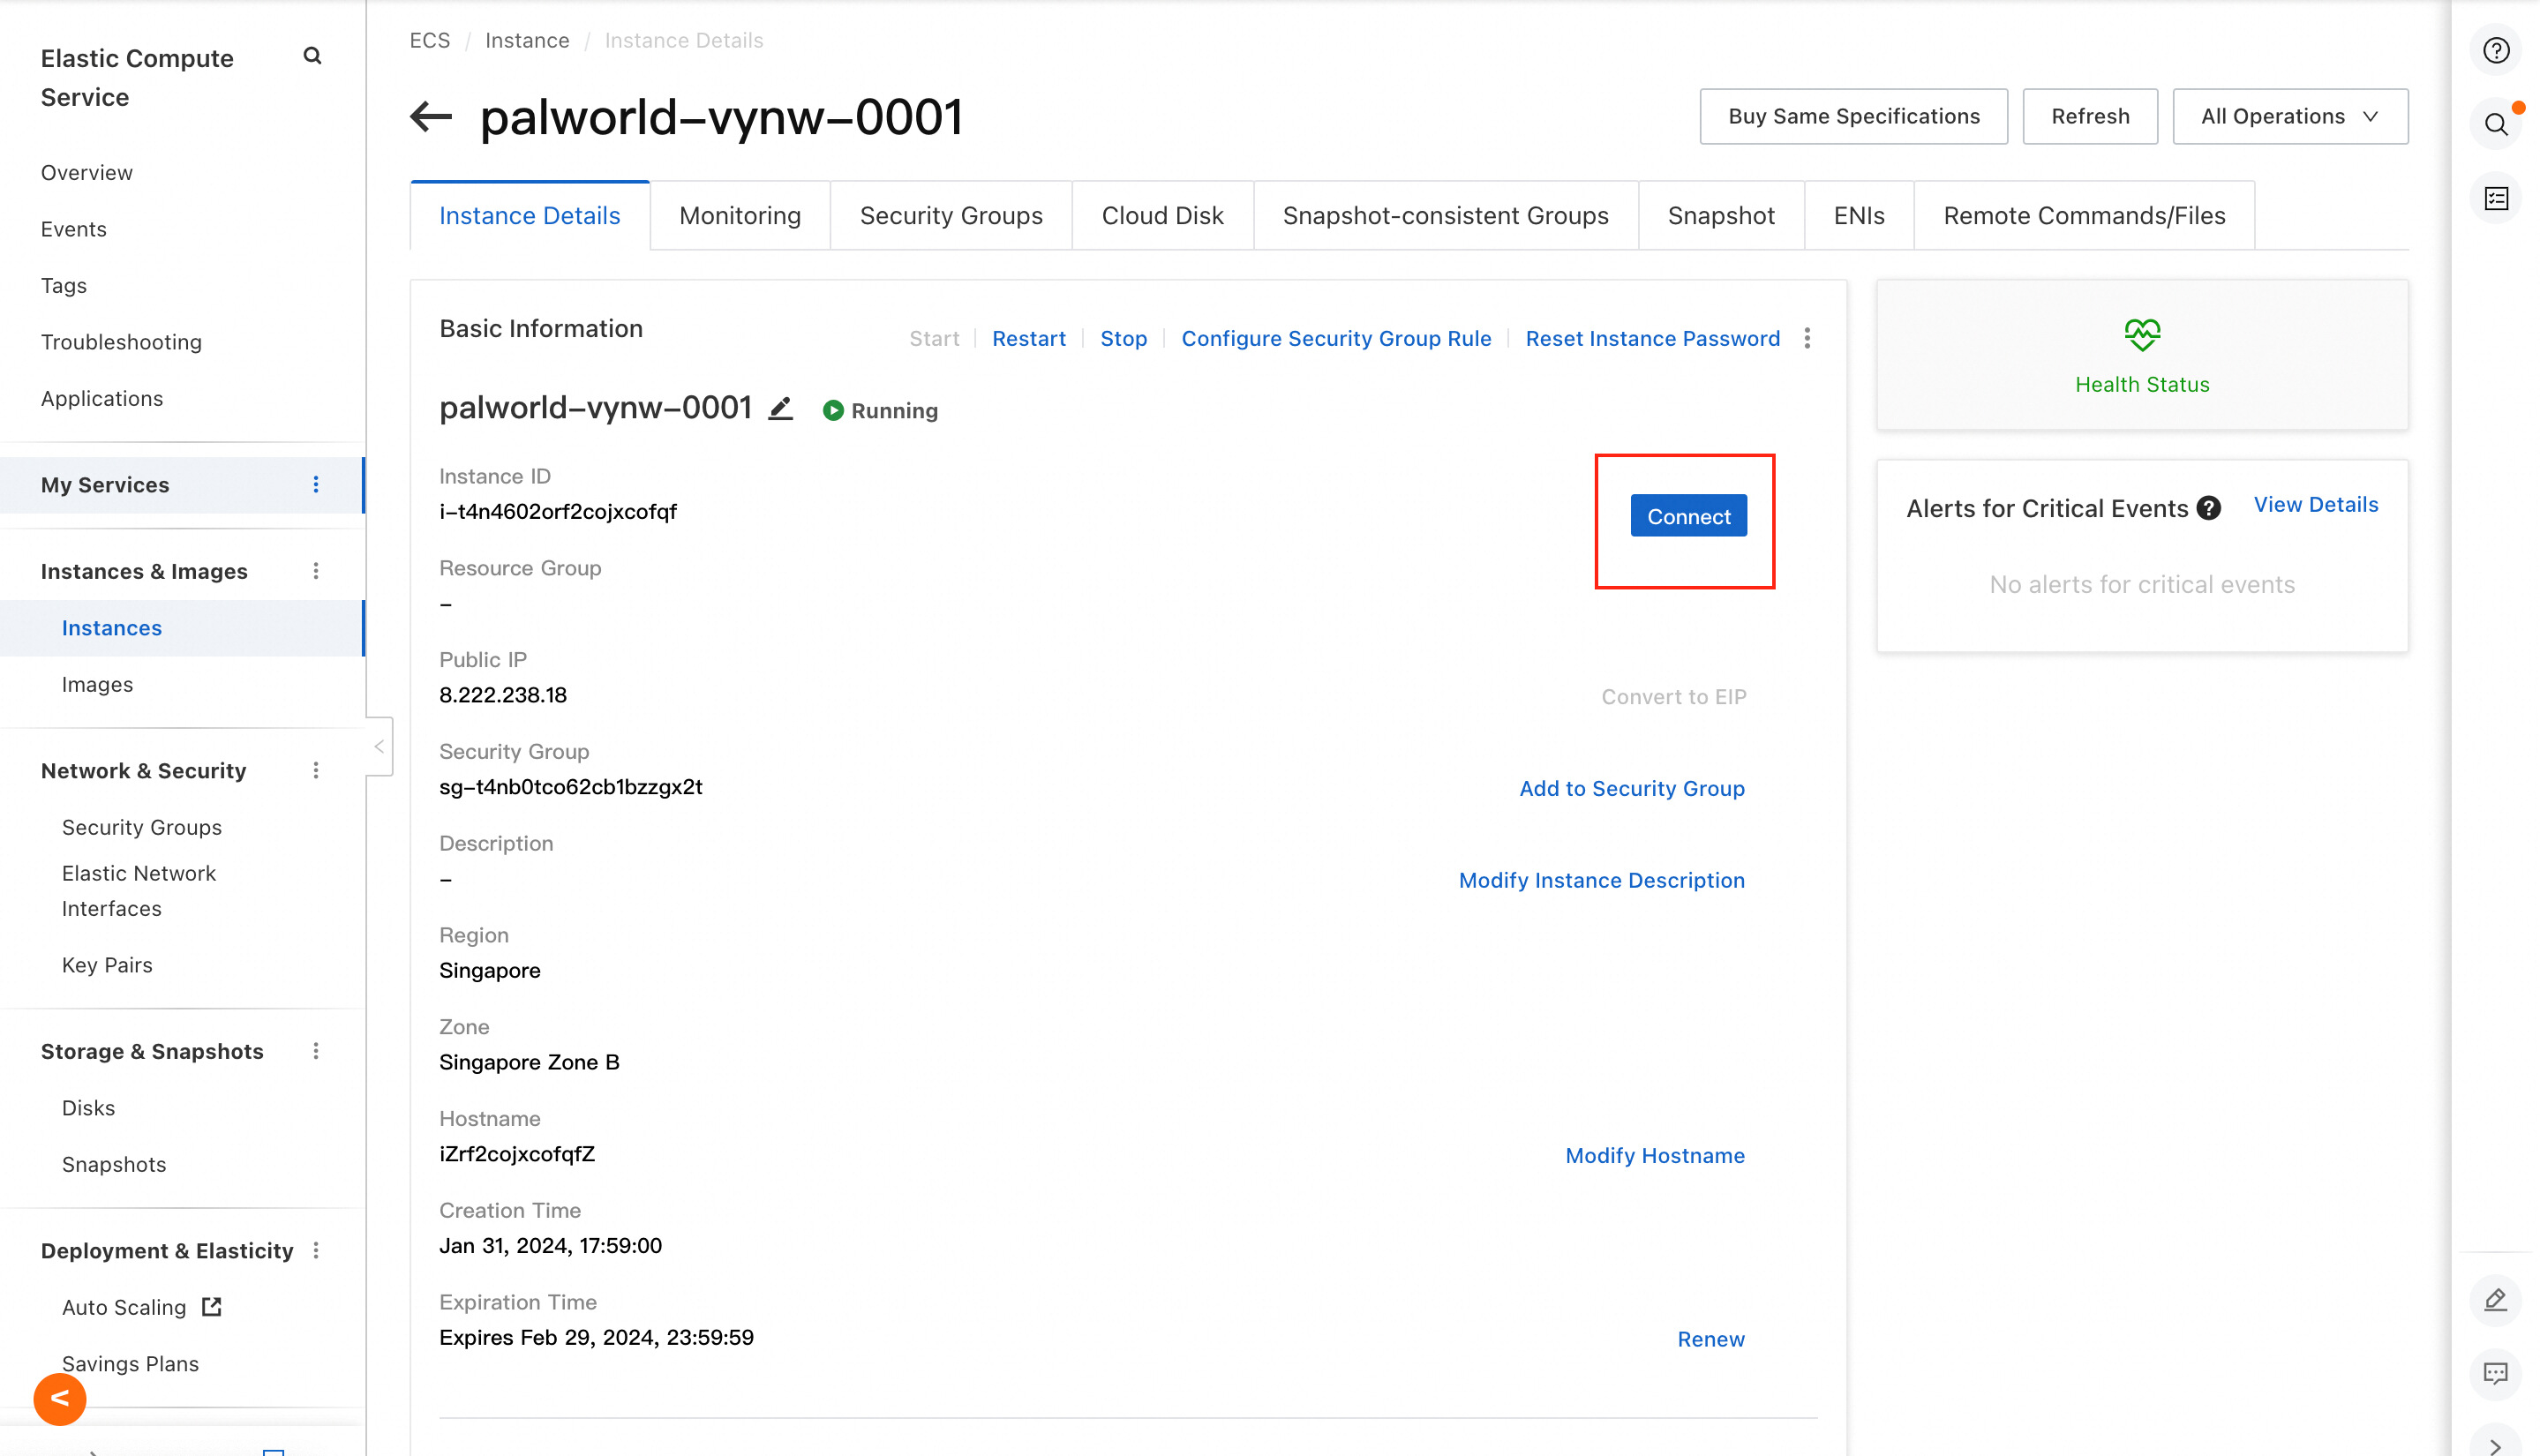
2. In the ECS console, click Connect. In the dialog box that appears, select Workbench.
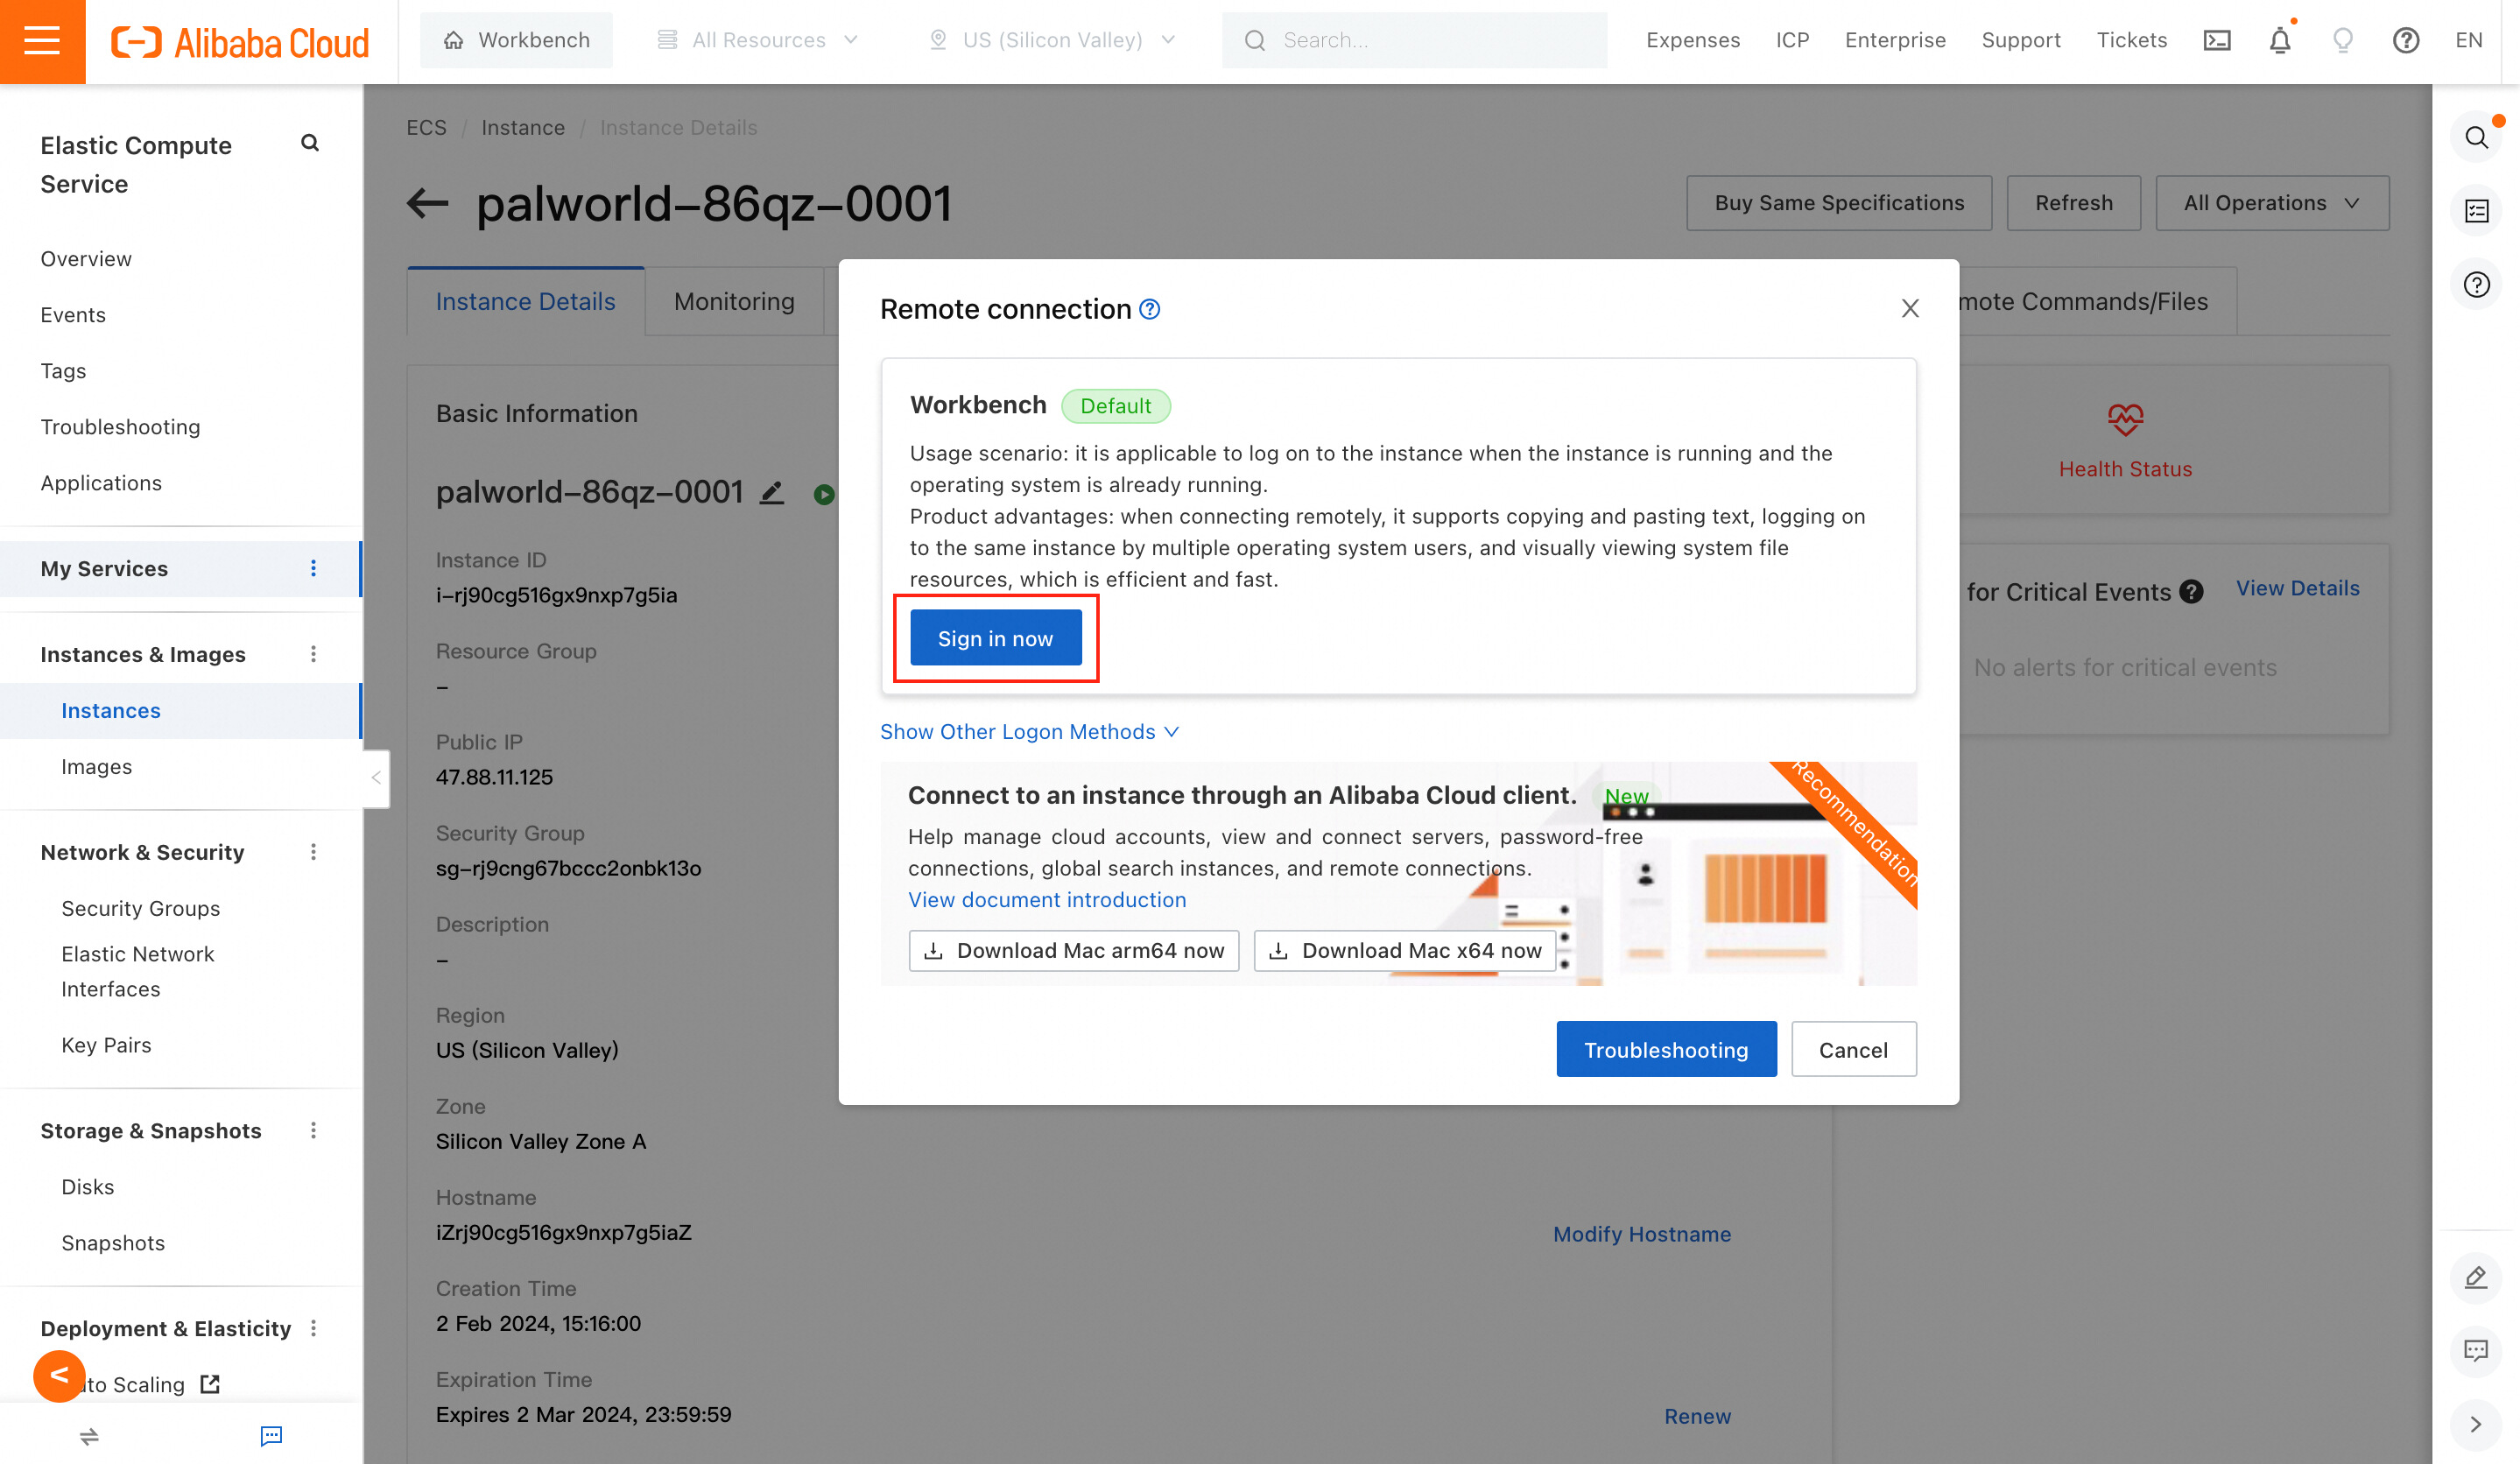
3. Enter the Instance Password specified when you created the Compute Nest service instance, as shown in the following figure. Note that it is not the Server Password.

A file or folder with the same name exists in the current path. Rename the original file or folder and try again.
Log on to your personal mailbox on a web page and use a cloud disk to upload your archive file.

1,081 posts | 271 followers
FollowAlibaba Cloud Community - February 2, 2024
Alibaba Cloud Community - August 28, 2024
OpenAnolis - January 11, 2024
Alibaba Cloud Community - February 7, 2024
Alibaba Cloud Community - January 26, 2024
Alibaba Clouder - September 2, 2019

1,081 posts | 271 followers
Follow ECS(Elastic Compute Service)
Elastic and secure virtual cloud servers to cater all your cloud hosting needs.
Learn More Compute Nest
Cloud Engine for Enterprise Applications
Learn More Elastic High Performance Computing Solution
High Performance Computing (HPC) and AI technology helps scientific research institutions to perform viral gene sequencing, conduct new drug research and development, and shorten the research and development cycle.
Learn More Function Compute
Alibaba Cloud Function Compute is a fully-managed event-driven compute service. It allows you to focus on writing and uploading code without the need to manage infrastructure such as servers.
Learn MoreMore Posts by Alibaba Cloud Community