By Liptan Biswas, Alibaba Cloud Tech Share Author. Tech Share is Alibaba Cloud’s incentive program to encourage the sharing of technical knowledge and best practices within the cloud community.
In the previous tutorial of this three-part series, we have learned how to install Jenkins on Ubuntu 16.04. In this detailed tutorial, we will learn to set up a Maven based Jenkins build job. We will start by installing Apache Maven on Alibaba ECS instance followed by configuring Jenkins to use Git, Maven, and JDK. We will then use the Maven to generate a sample Java web application as a Maven project.
Jenkins can automatically pull source code from Github or any Git repository. In this tutorial, we will configure Jenkins to pull the source from Github. For that to happen, we will also need to set up a repository in Github and push the sample Maven project to the remote repository. Once everything is configured, we will run our first Jenkins build manually. As in DevOps environment, automation of builds are important, we will learn more about different types of build triggers and source code polling in the final tutorial of the series.
If you have followed the first part of the tutorial then you have already installed Git and JDK during the installation of Jenkins. Log back again to your SSH instance and switch to the sudo user. You can verify if Git is installed on your instance by running git --version.
You should see.
aliyun@jenkins:~$ git --version
git version 2.7.4
Similarly, verify if JDK is installed by verifying its version. Run javac -version.
aliyun@jenkins:~$ javac -version
javac 1.8.0_171
Apache Maven is available in default Ubuntu repository, but the available version might be outdated. Obtain the latest copy of Maven binaries from Maven download page.
wget http://www-us.apache.org/dist/maven/maven-3/3.5.3/binaries/apache-maven-3.5.3-bin.tar.gz
Extract the archive and move the whole Maven directory into /opt directory.
tar -xf apache-maven-3.5.3-bin.tar.gz
sudo mv apache-maven-3.5.3 /opt/maven
Now, add Maven in the PATH variable so that the Maven executables can be invoked easily.
echo 'PATH="$PATH:/opt/maven/bin"' | sudo tee -a ~/.profile
source ~/.profile
You can check if Maven has been installed successfully by running mvn --version. You should see.
aliyun@jenkins:~$ mvn --version
Apache Maven 3.5.3 (3383c37e1f9e9b3bc3df5050c29c8aff9f295297; 2018-02-24T19:49:05Z)
Maven home: /opt/maven
Java version: 1.8.0_171, vendor: Oracle Corporation
Java home: /usr/lib/jvm/java-8-oracle/jre
Default locale: en_US, platform encoding: UTF-8
OS name: "linux", version: "4.4.0-122-generic", arch: "amd64", family: "unix"
Now that we have JDK, Git, and Maven installed, login to your Jenkins application and configure Jenkins to work with these applications.
Once you are successfully logged in with the administrator account, navigate to Manage Jenkins >> Global Tool Configuration. In the Global Tool Configuration interface you can configure various tools that will be used by Jenkins during the build process. Under JDK option, provide a name for your JDK, such as JDK 1.8 etc. Uncheck the select box Install automatically since we have already installed JDK. Provide the path to your Java installation so that Jenkins can automatically identify the Java binaries. If you do not know the value of "JAVA_HOME", you can always run the command echo $JAVA_HOME to get the Java installation path.
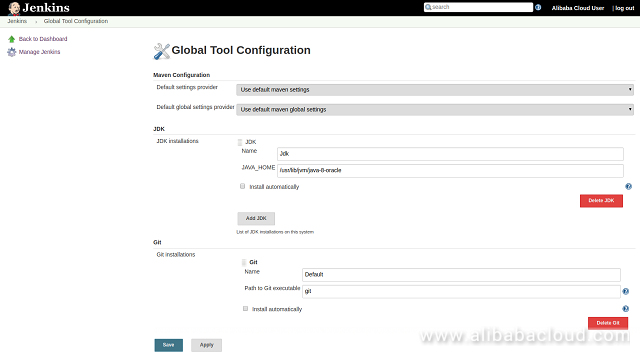
Leave the default values for Git since git is easily accessible by running git command. Scroll down to find the Maven installation configuration. Provide a name for your Maven installation so that you can easily identify it later and uncheck Install automatically option. Since we have installed Maven into /opt/maven, enter the same path /opt/maven into "MAVEN_HOME" textbox.

Finally, click on the Save button to save the changes.
For setting up Jenkins to run a Maven build, we will need a Maven project first. Maven itself is equipped with generating sample projects for the developers to start building the applications. We will use Maven to generate a sample web application in Java. Since we are learning how to use Jenkins, we will not go into the details of Maven project. Generate the Maven project with architecture type "maven-archetype-webapp".
cd ~
mvn archetype:generate -DgroupId=my.maven.app -DartifactId=MyMavenApp -DarchetypeArtifactId=maven-archetype-webapp -DinteractiveMode=false
The above command will generate a project with package name "my.maven.app", and project name "MyMavenApp". You will see a similar output.
[INFO] Generating project in Batch mode
[INFO] ----------------------------------------------------------------------------
[INFO] Using following parameters for creating project from Old (1.x) Archetype: maven-archetype-webapp:1.0
[INFO] ----------------------------------------------------------------------------
[INFO] Parameter: basedir, Value: /home/aliyun
[INFO] Parameter: package, Value: my.maven.app
[INFO] Parameter: groupId, Value: my.maven.app
[INFO] Parameter: artifactId, Value: MyMavenApp
[INFO] Parameter: packageName, Value: my.maven.app
[INFO] Parameter: version, Value: 1.0-SNAPSHOT
[INFO] project created from Old (1.x) Archetype in dir: /home/aliyun/MyMavenApp
[INFO] ------------------------------------------------------------------------
[INFO] BUILD SUCCESS
[INFO] ------------------------------------------------------------------------
[INFO] Total time: 7.599 s
[INFO] Finished at: 2018-05-05T10:39:28Z
[INFO] ------------------------------------------------------------------------
A new project directory "MyMavenApp" will be created with the following files.
MyMavenApp
├── pom.xml
└── src
    └── main
        ├── resources
        └── webapp
            ├── index.jsp
            └── WEB-INF
                └── web.xml
Our Maven project is now ready, now we can go ahead and create a new repository for the project on Github.
Open your Github account and create a new repository with any name you prefer. Make sure not to initialize the repository with any file as it can be done later upon requirement.
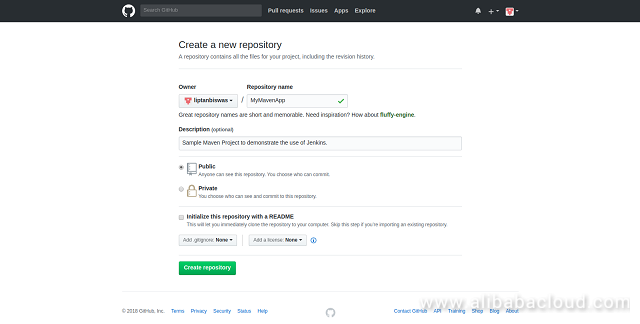
After pushing the button "Create Repository", an empty repository will be created and you will be presented with a link to the repository.
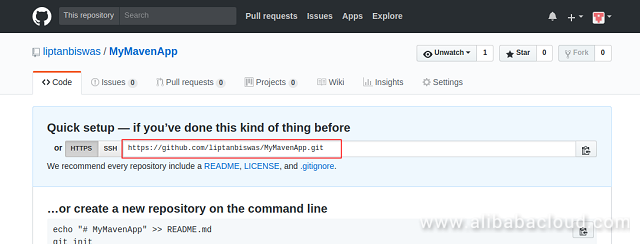
Copy the link to the repository as it will be required later in the tutorial. Login to your SSH instance once again as the sudo user. Configure your local git by adding the user information.
git config --global user.name "Alibaba Cloud User"
git config --global user.email you@example.com
Switch to the newly created Maven project directory, and initialize the project as a git repository.
cd MyMavenApp
git init
You should see.
aliyun@jenkins:~/MyMavenApp$ git init
Initialized empty Git repository in /home/aliyun/MyMavenApp/.git/
Add the files to the repository and create the first commit.
echo -e "# MyMavenApp\nSample Project to demostrate Jenkins" >> README.md
git add .
git commit -m "First commit"
Add the URL of the remote Github repository. Replace the URL in the command below with your actual URL.
git remote add origin https://github.com/liptanbiswas/MyMavenApp.git
Verify the remote origin by running git remote -v.
aliyun@jenkins:~/MyMavenApp$ git remote -v
origin    https://github.com/liptanbiswas/MyMavenApp.git (fetch)
origin    https://github.com/liptanbiswas/MyMavenApp.git (push)
Since we already have committed all the files and changes, we can directly push to the remote repository by running.
git push origin master
You will be required to enter your Github credentials for pushing into the remote origin. You will see.
aliyun@jenkins:~/MyMavenApp$ git push origin master
Username for 'https://github.com': liptanbiswas
Password for 'https://liptanbiswas@github.com':
Counting objects: 10, done.
Compressing objects: 100% (7/7), done.
Writing objects: 100% (10/10), 1.07 KiB | 0 bytes/s, done.
Total 10 (delta 0), reused 0 (delta 0)
To https://github.com/liptanbiswas/MyMavenApp.git
 * [new branch]      master -> master
Verify if changes are reflected in Github repository. You should see that code is now uploaded into Github.
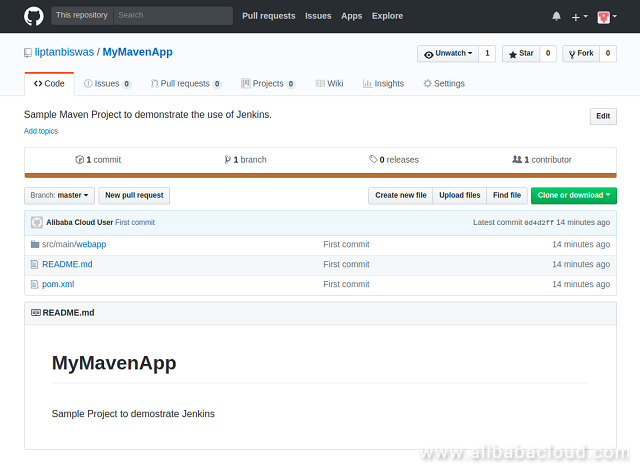
At this point, our sample Java web application is uploaded to Github and we can proceed to create a new pipeline in Jenkins.
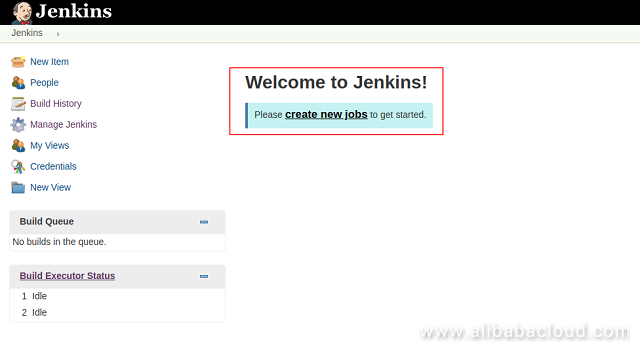
Log in to your Jenkins application and click on "create new jobs" to get started.
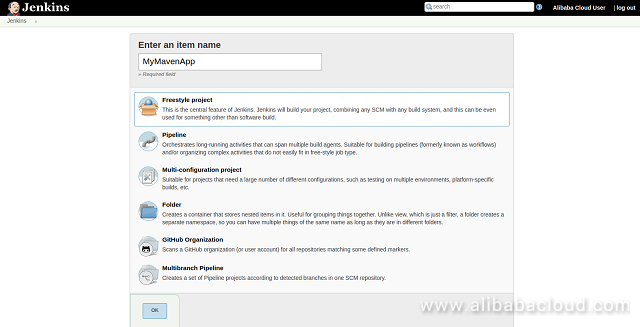
Provide a name for your project and choose "Freestyle project" as the project type. The freestyle type project is the most flexible type project.
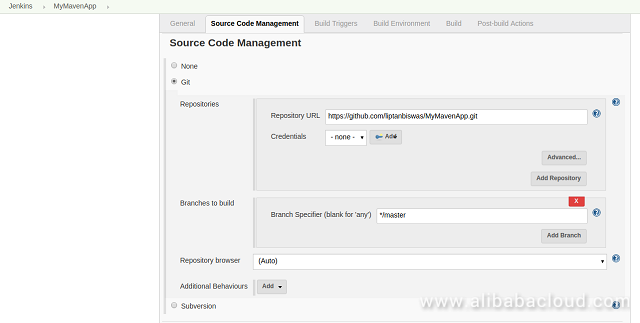
Clicking "OK" will create the project for you and you will be taken to project’s configuration page. Provide a project name and a description of the project.

Under "Source Code Management", select Git and provide the link to the Github repository into "Repository URL". Leave the default option for everything else since we do not have any other branch than "master" and we want to use the default behavior in accessing the repository.
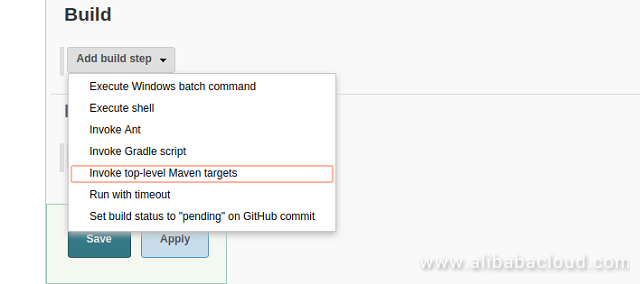
Now, scroll down to the find the "Build" option. Select "Invoke top-level Maven target" from "Add build step" drop-down menu.
Select the Maven version from the drop-down which we have configured earlier and put clean packagein "Goals".
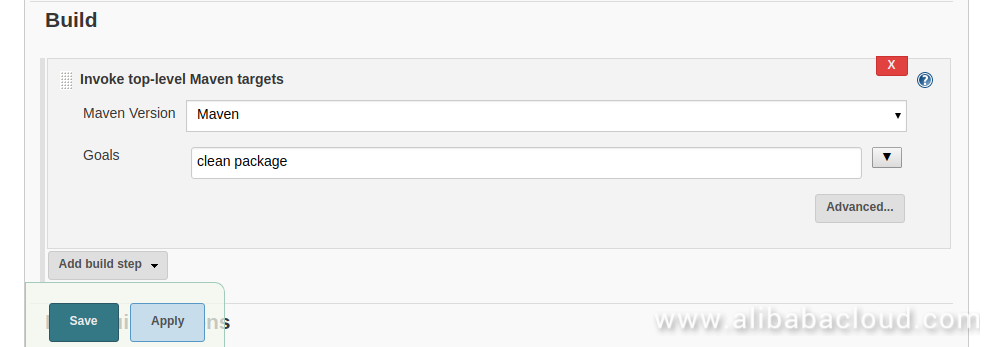
There are certain steps or phases in the Maven build lifecycle, which are: validate, compile, test, package, verify, install, and deploy. Build lifecycle is sequential starting from validate and ending at deploy. clean command will clean the workspace before the build and package command will initiate the build process starting from phase validate to package. Once the build is successful, Maven should have packaged the web application in "war" file.
After saving the configuration, you will be taken to build job interface for the job we just created. We are now ready to run the build job.
Since we have not configured any build trigger, thus we will need to start the build job manually. We can run the build by clicking on the "Build Now" button.
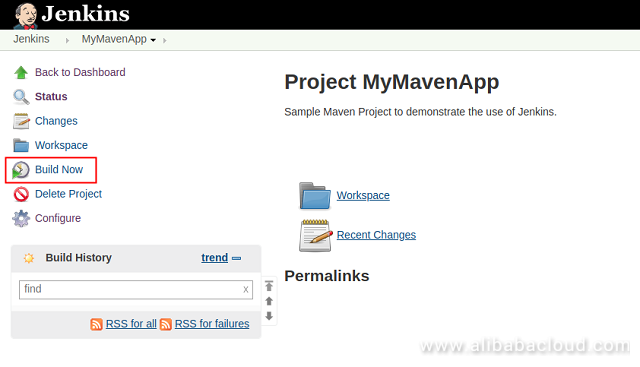
This should trigger the manual build and you should see that the build has started under "Build History". A blinking ball signifies the build is currently running.
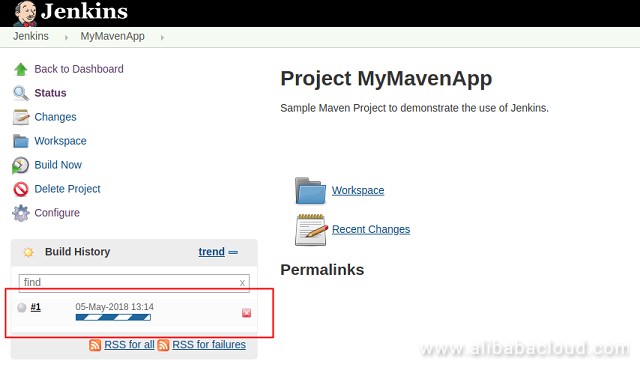
Since our app is a sample app, it should not take more than a few seconds to complete. Click on the build number to get more information about the build.
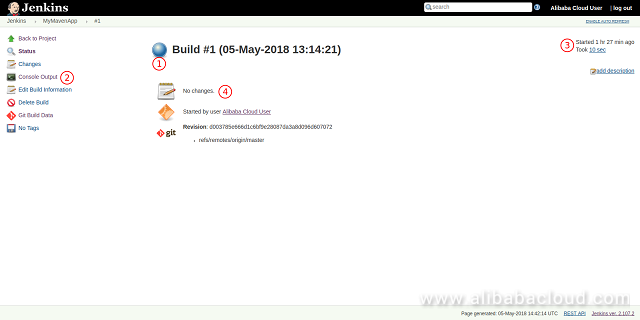
In the above screenshot of the build status, you can identify the following information.
Since the build job has completed successfully, it must have packed out our application war file. We can verify if the file is generated by browsing the files in the workspace for this job. On the project’s main page, click on the "Workspace" link to browse the project’s files.
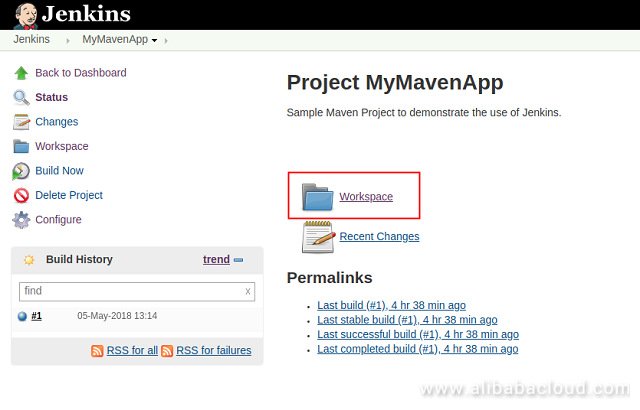
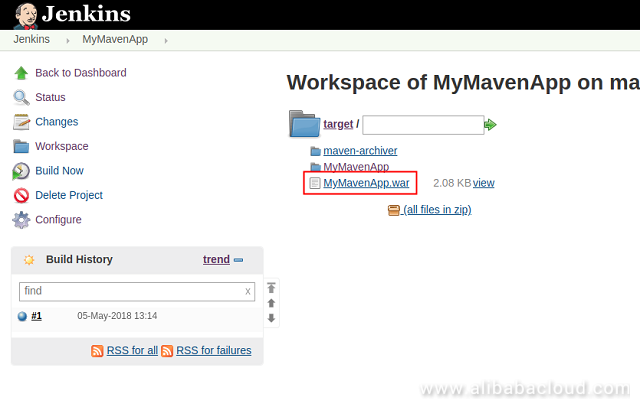
Navigate to the "target" directory and you should see the "MyMavenApp.war". A war file is a cross-platform Java web application archive used to distribute a collection of files. This war package can be deployed on any Java web server such as Apache Tomcat.
Now that we have learned how to trigger a build manually, we will now explore other automatic methods of triggering the builds. One of the popular methods of an automatic build is to periodically poll SCM. If Jenkins detects any change in the code, it automatically triggers a new build from the updated source code.
In this second part of the three series tutorial, we have learned to install Maven and configure it with to work with Jenkins. We have also created a sample project and configured our build project in Jenkins. Finally, we have successfully executed our first build manually.
In the third and last part of the tutorial, we will configure Jenkins to automatically build our application using different types of build triggers. We will also configure Jenkins to automatically deploy our web application on Tomcat 8 web server.
Alibaba Cloud RDS PostgreSQL – Time Series Data Optimization

2,593 posts | 792 followers
FollowAlibaba Clouder - June 24, 2019
Alibaba Clouder - July 27, 2020
Alibaba Clouder - May 31, 2018
PM - C2C_Yuan - July 8, 2020
Alibaba Clouder - May 29, 2018
Alibaba Cloud Indonesia - May 29, 2023

2,593 posts | 792 followers
Follow ECS(Elastic Compute Service)
Elastic and secure virtual cloud servers to cater all your cloud hosting needs.
Learn MoreLearn More
 Domains
Over 20 million domain, free WHOIS privacy protection.
Learn MoreMore Posts by Alibaba Clouder