Alibaba Cloud Lindorm is a cloud-native multi-modal database provided by Alibaba Cloud. Lindorm has the same engine as Cassandra and can deploy Active-Active Multi Region/Zone like Cassandra.
Lindorm can operate instances across multiple zones, allowing you to deploy applications under each zone and ensure high availability configurations by switching the connection destination to another zone in case of failure.
In this article, we will create a Lindorm instance and deploy it in multiple zones to build an Active-Active application. We will also verify whether we can maintain data consistency across multiple zones while sending data through Lindorm CLI, HBase API, and Cassandra CQL access, and maintain table consistency.
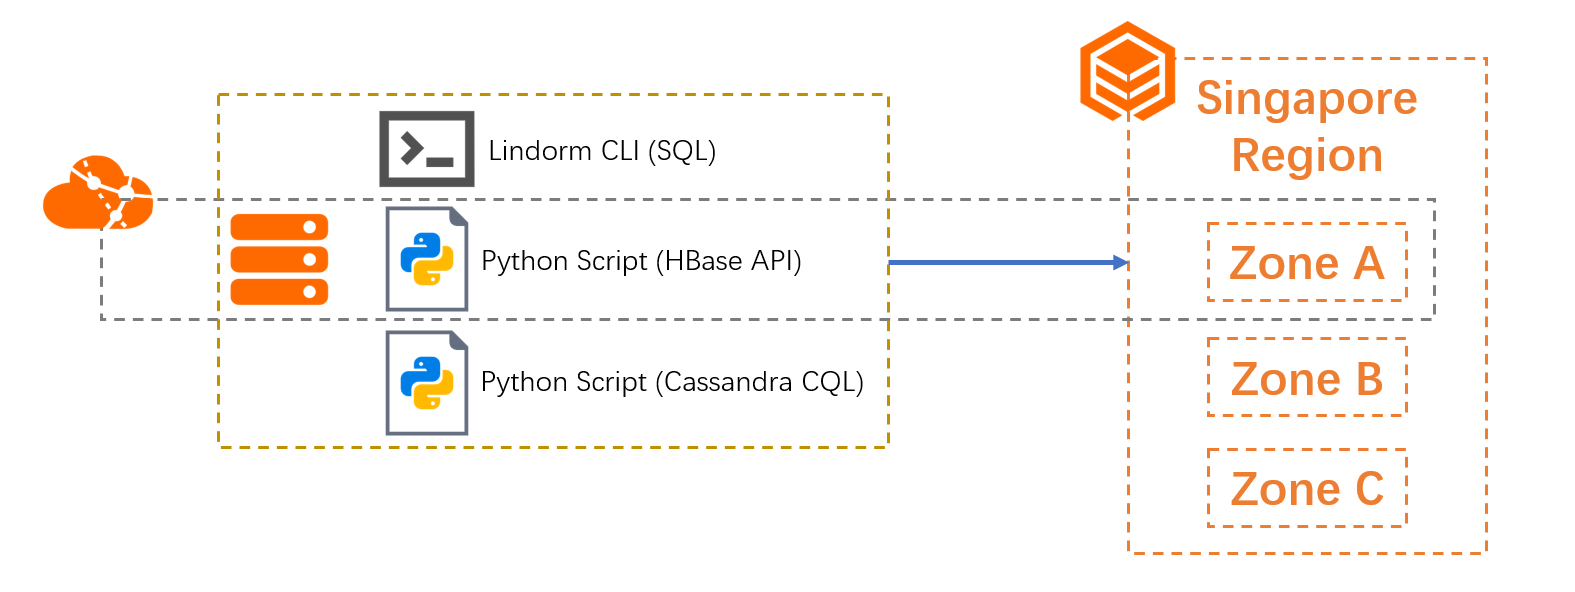
In this article, we will deploy Multi-Zone deployment in the Singapore region and operate the wide table engine through Lindorm CLI, HBase API, and Cassandra CQL. In addition, we will check the consistency of the tables by processing different data simultaneously between different zones.
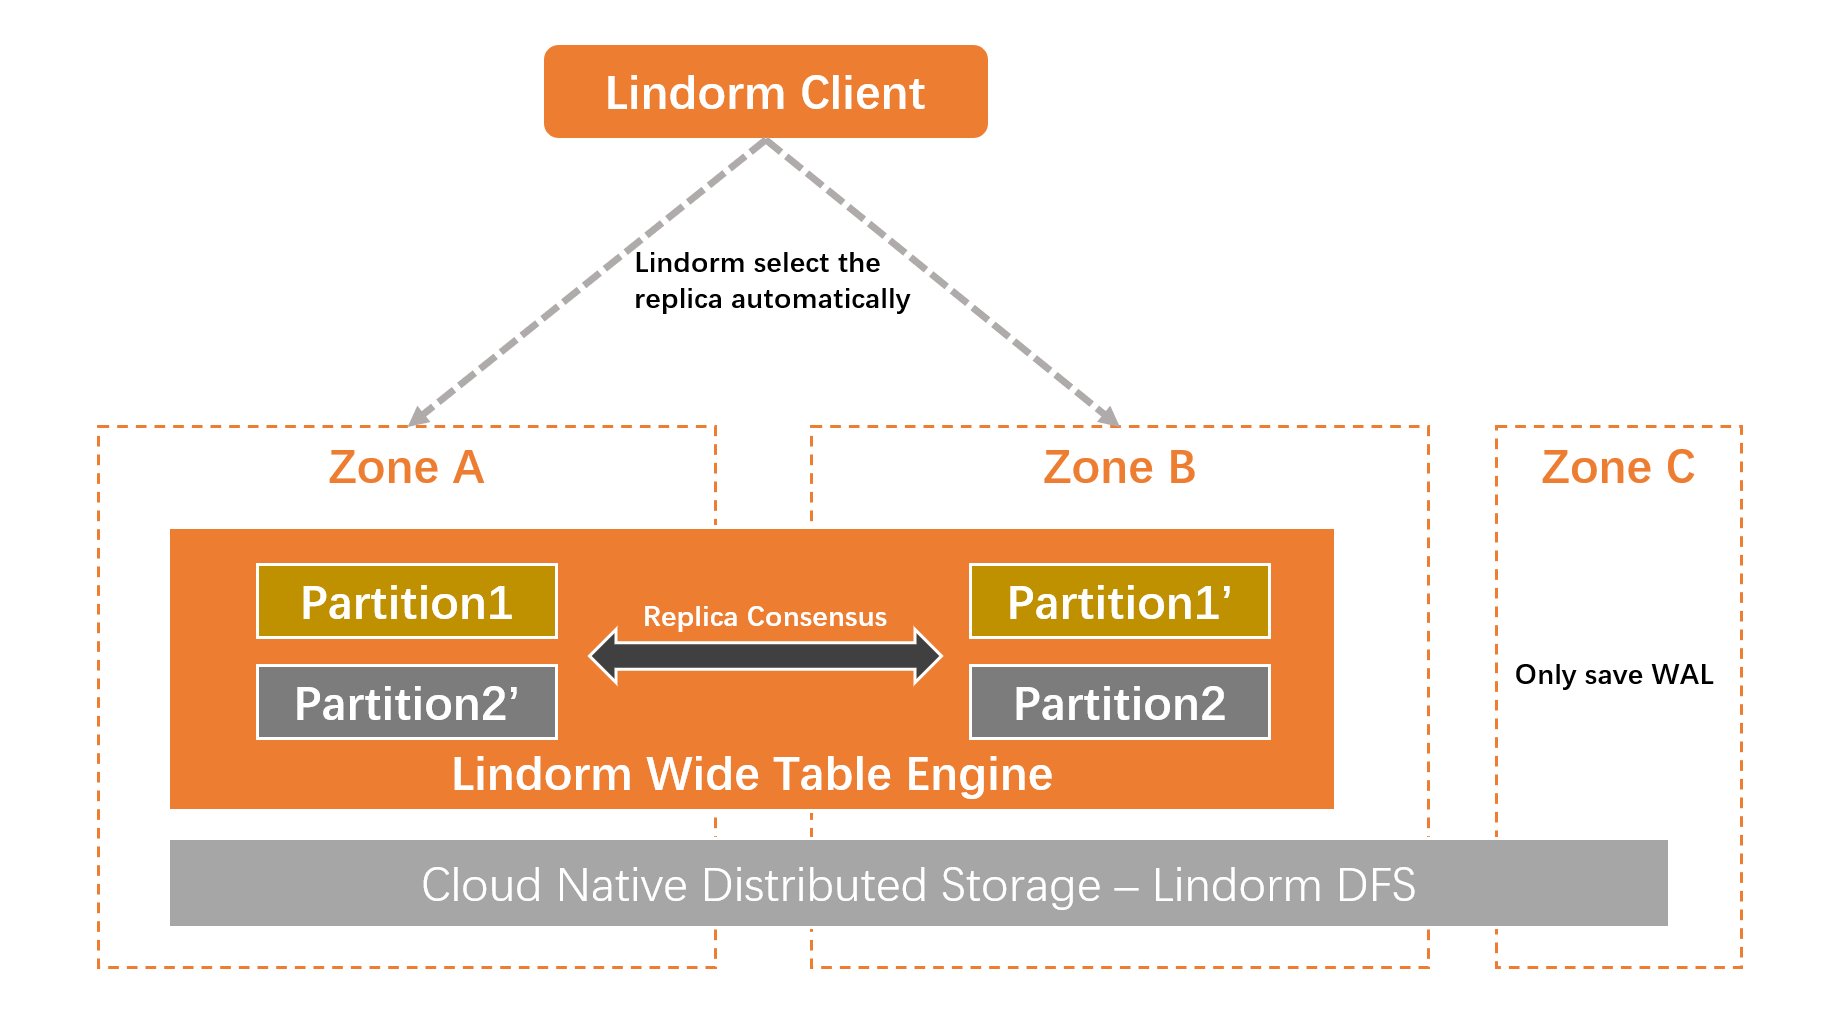
Let's explain the Lindorm multi-zone architecture. The overall architecture is shown in the following figure.
Basically, multi-zone deployment is carried out using three or more zones.
Each partition of the wide table of a Lindorm instance has independent replicas in each zone. Whenever data write/read processing occurs with SQL or API access in Lindorm, WAL logs (Write-Ahead Logging, log-ahead writing) occur. These WAL logs are saved to the DFS of Zone C via the Lindorm DFS, which is a common infrastructure for Zones A/B/C. Therefore, if Zone A becomes unusable due to a failure or other issue, the data saved to the DFS of Zone C can be quickly restored on Zone B, for example.
When deploying Lindorm in a multi-zone environment, the Replica consensus protocol, a type of distributed consensus algorithm, is used to keep the data of different zones' replicas synchronized in real-time. To maintain consistency, at least two replicas are required, meaning that three or more zones are necessary.
Recommend Reading:
A Brief Analysis of Consensus Protocol: From Logical Clock to Raft
Let's create a multi-zone Lindorm instance.
To create a multi-zone Lindorm instance, you need to build a VPC instance with at least one vSwitch under each zone.

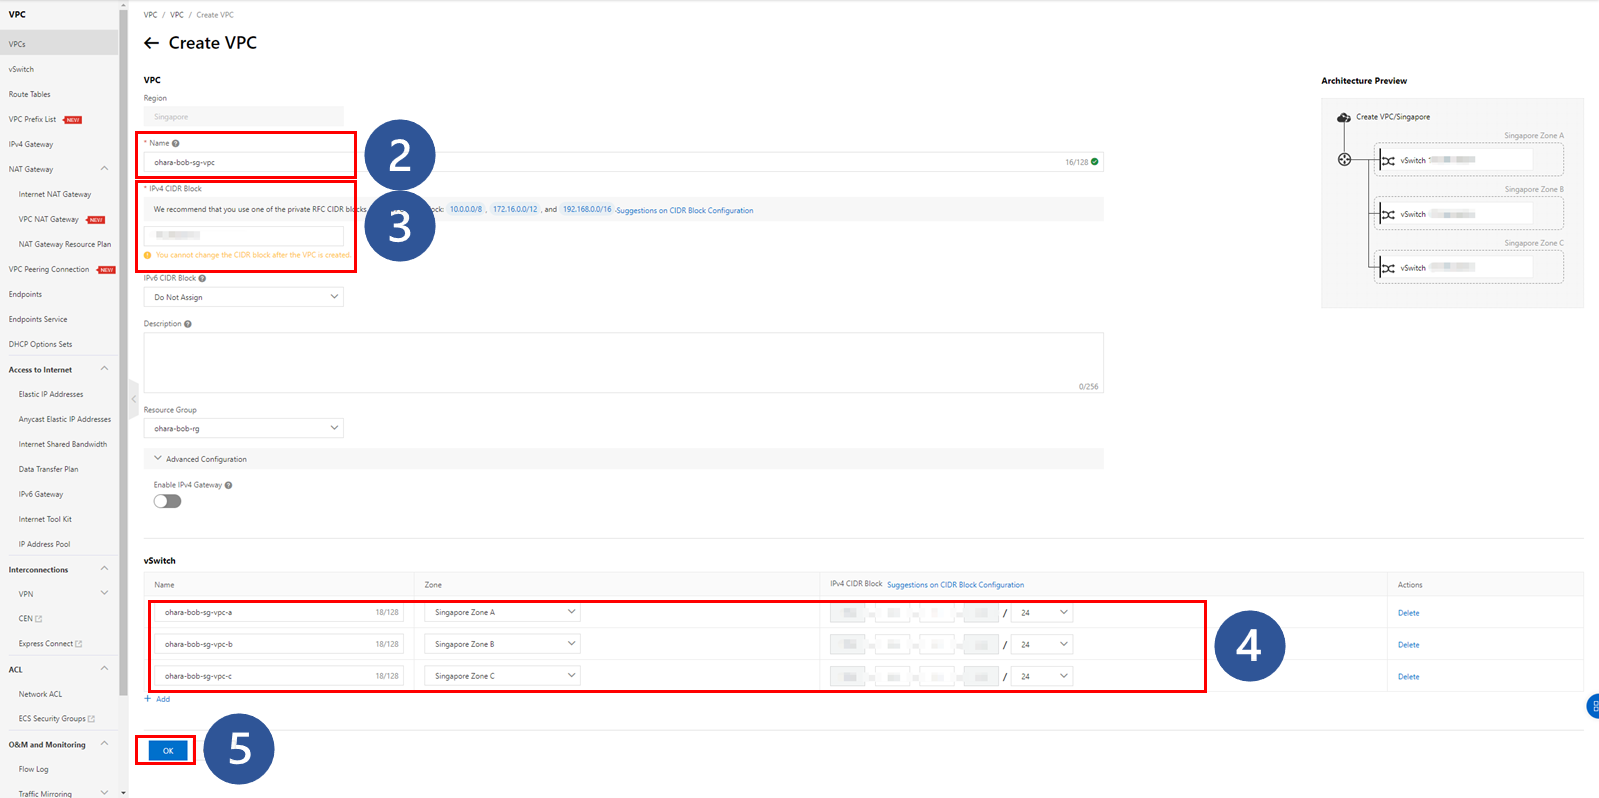
Once completed, the necessary VPC and vSwitch will be prepared.

Go to the Lindorm console and create a multi-zone Lindorm instance.

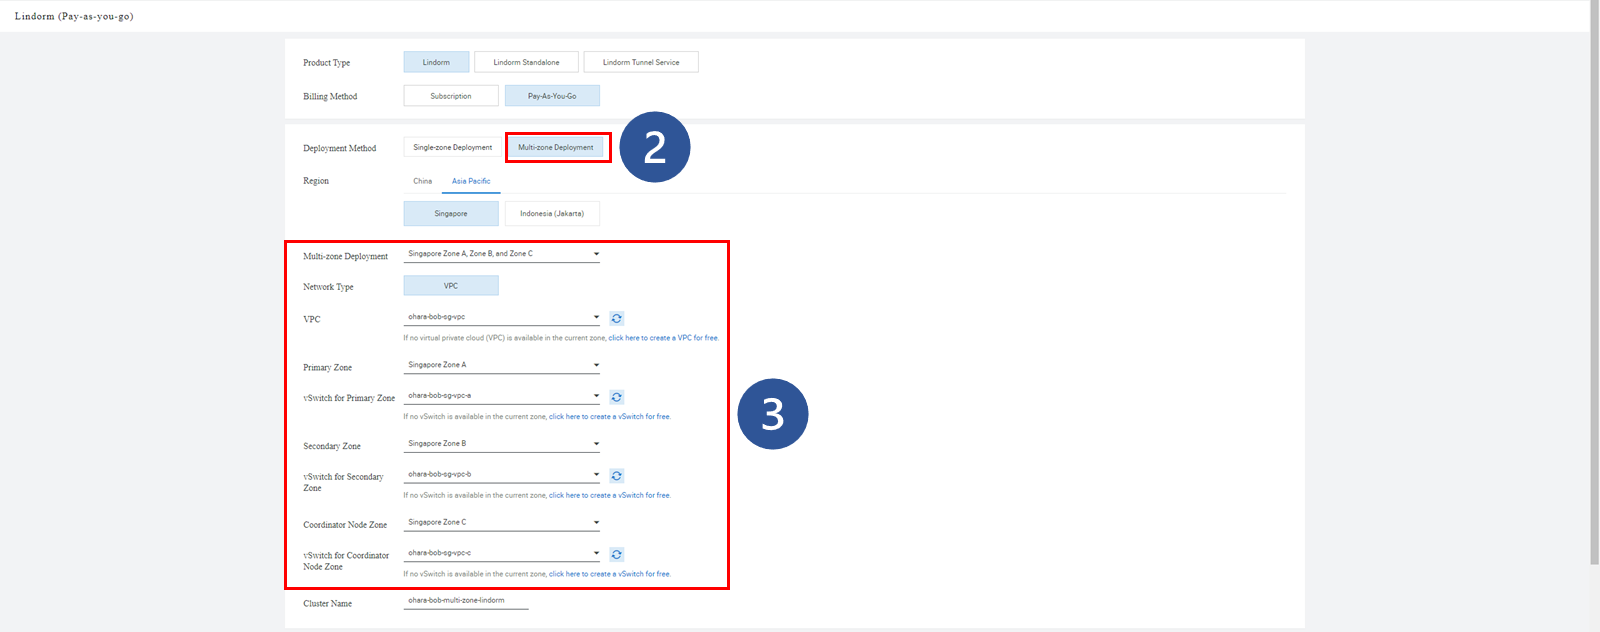

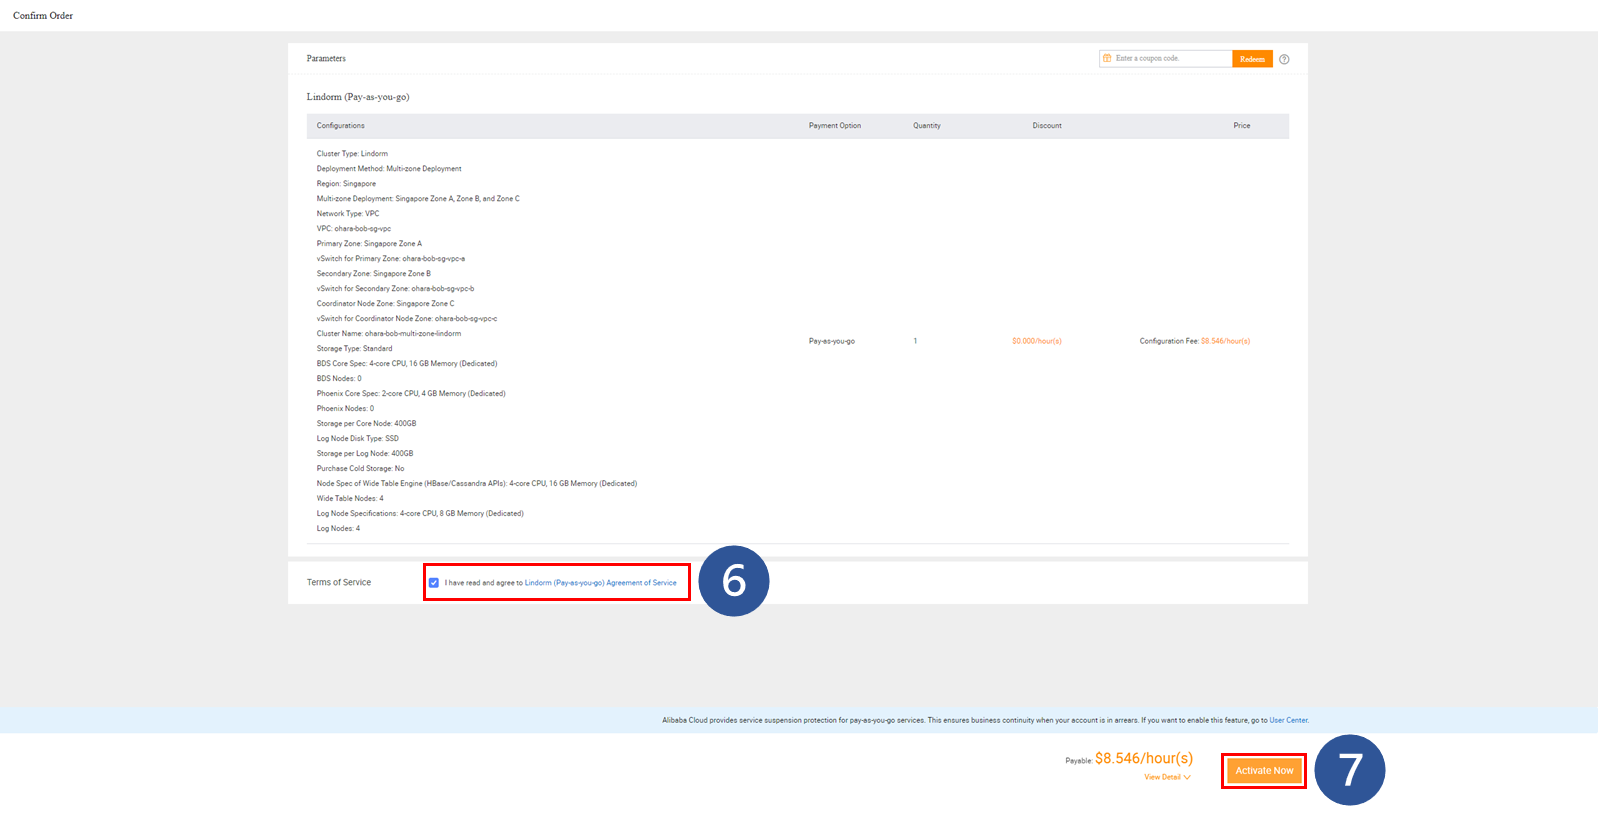
After this, the status of the instance will be Creating. It will take some time for the instance to be prepared.

Once the status changes to Running, you can perform operations on the multi-zone Lindorm instance in the next step.

Check the node and zone information on the instance's detail page.
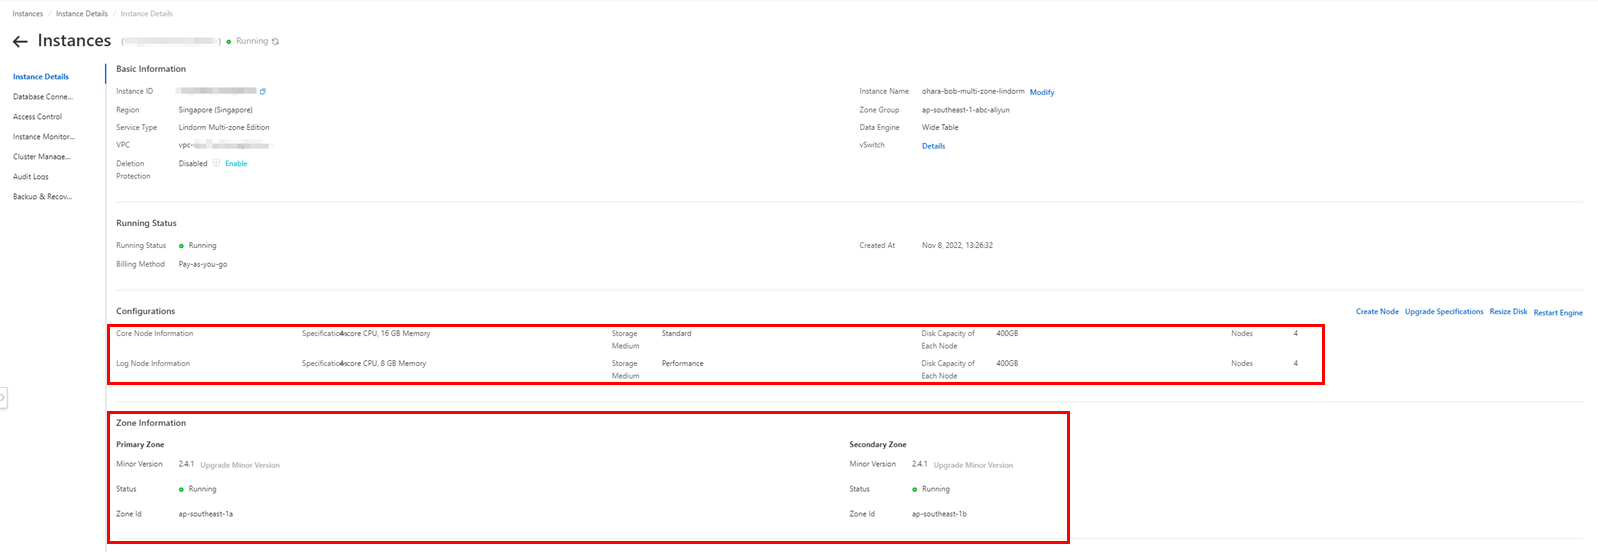
This time, we will connect to the Lindorm instance from an ECS instance under the same VPC. You can check the connection information in the Database Connection menu.
If a public endpoint is required for connection from outside the VPC, you need to prepare the connection environment by clicking the Apply for Public Endpoint button.

Before starting the connection process, add the intranet address of the ECS instance to the whitelist on the "Access Control" page for connection security.

By registering the IP address of the connection destination on the whitelist, you will be able to connect.
If you are using SQL-based LindormTable, Lindorm SDK supports multiple programming languages such as Java, Python, and Go. By using Lindorm SDK for multiple programming languages, you can use all the features provided by LindormTable.
For example, we will explain how to connect to the Wide Table Engine using Lindorm CLI and execute LindormTable SQL.
Connect to the ECS instance prepared in the same VPC.

Download and extract the installation package for Lindorm CLI to use it.
wget -O lindorm-cli-linux-latest.tar.gz https://tsdbtools.oss-cn-hangzhou.aliyuncs.com/lindorm-cli-linux-latest.tar.gz?spm=a2c63.p38356.0.0.338d5a2egBGtdx&file=lindorm-cli-linux-latest.tar.gz
tar -xvf lindorm-cli-linux-latest.tar.gz
This time, we will prepare an executable file called lindorm-cli. Run the following command to connect to the Lindorm instance.
Please change the jdbc url and user info as you like. You can get the jdbc url from the database connection page. By default, the user info is root/root.

If the connection is successful, a message related to the version of lindorm-cli will be displayed.
./lindorm-cli -url <jdbc url> -username <Username> -password <Password>
In Lindorm, you can set the consistency level of a table to meet various business requirements. LindormTable SQL has two valid parameter values for table consistency:
• Eventual consistency: Data from the base table and index table becomes consistent from a certain point in time.
• Strong consistency: Data from the base table and index table becomes consistent at all times.
For more information on table consistency, please refer to the Feature section in the Help documentation on the official website.
Create two tables with eventual consistency and strong consistency, respectively, and execute SQL statements such as UPSERT, SELECT, and DELETE using them. UPSERT is a process that performs an UPDATE if the data exists and an INSERT if it does not.
The following SQL statement is for a table with strong consistency:
CREATE DATABASE demo;

use demo;

CREATE TABLE demo_table_strong(
    chat varchar,
    id bigint,
    sender varchar,
    message varchar,
    PRIMARY KEY(chat, id DESC)
) 'CONSISTENCY' = 'strong';

UPSERT
INTO
    demo_table_strong(
        chat,
        id,
        sender,
        message
    )
    VALUES(
        'sql demo',
        20221108001,
        'Bob',
        'Test from CLI'
    );

SELECT
    *
FROM
    demo_table_strong;

UPSERT
INTO
    demo_table_strong(
        chat,
        id,
        sender,
        message
    )
    VALUES(
        'sql demo',
        20221108001,
        'Bob',
        'Test from CLI update'
    );

SELECT
    *
FROM
    demo_table_strong;

DELETE
FROM
    demo_table_strong
WHERE
    chat = 'sql demo'
AND id = 20221108001;

SELECT
    *
FROM
    demo_table_strong;

DROP TABLE demo_table_strong;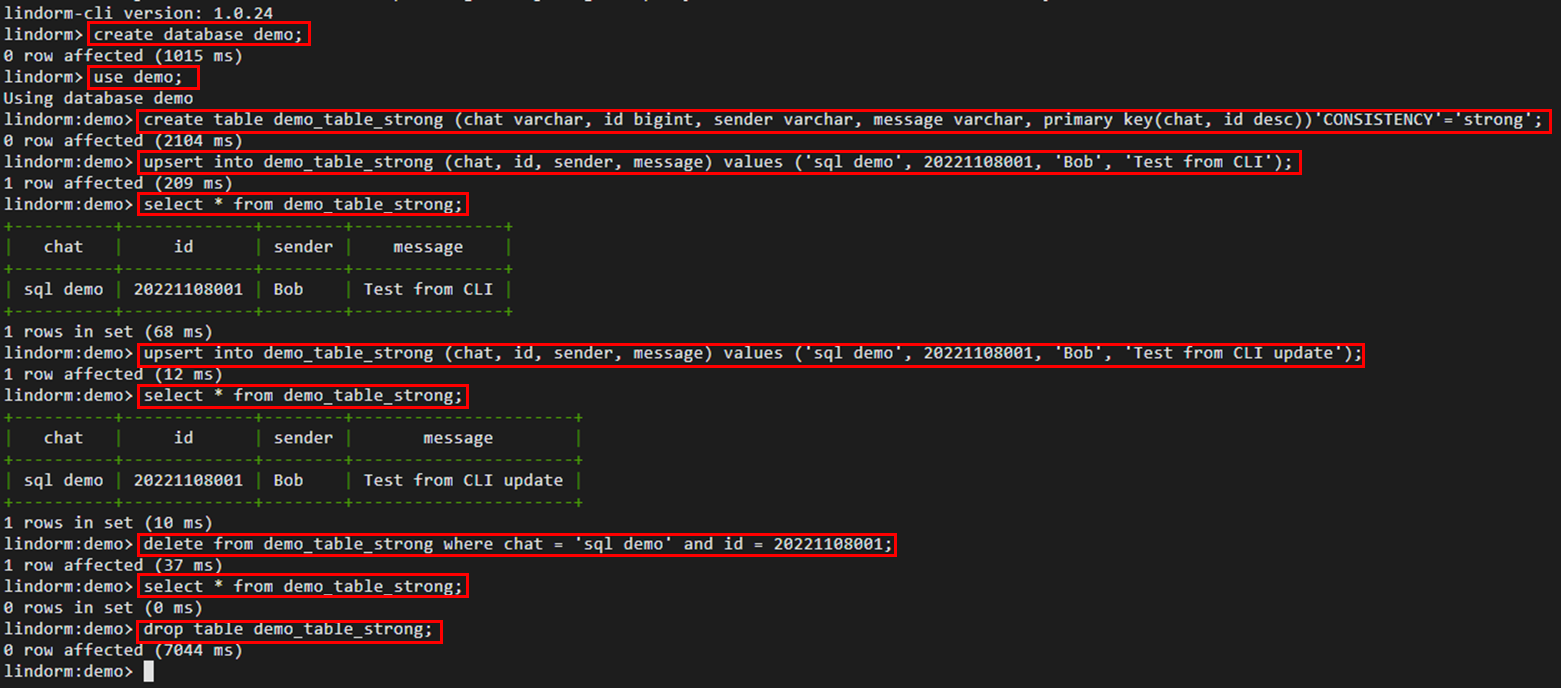
This is the SQL statement for a table with eventual consistency:
CREATE TABLE demo_table_eventual(
    chat varchar,
    id bigint,
    sender varchar,
    message varchar,
    PRIMARY KEY(chat, id DESC)
) 'CONSISTENCY' = 'eventual';

UPSERT
INTO
    demo_table_eventual(
        chat,
        id,
        sender,
        message
    )
    VALUES(
        'sql demo',
        20221108001,
        'Bob',
        'Test from CLI'
    );

SELECT
    *
FROM
    demo_table_eventual;

UPSERT
INTO
    demo_table_eventual(
        chat,
        id,
        sender,
        message
    )
    VALUES(
        'sql demo',
        20221108001,
        'Bob',
        'Test from CLI update'
    );

SELECT
    *
FROM
    demo_table_eventual;

DELETE
FROM
    demo_table_eventual
WHERE
    chat = 'sql demo'
AND id = 20221108001;

SELECT
    *
FROM
    demo_table_eventual;
DROP TABLE demo_table_eventual;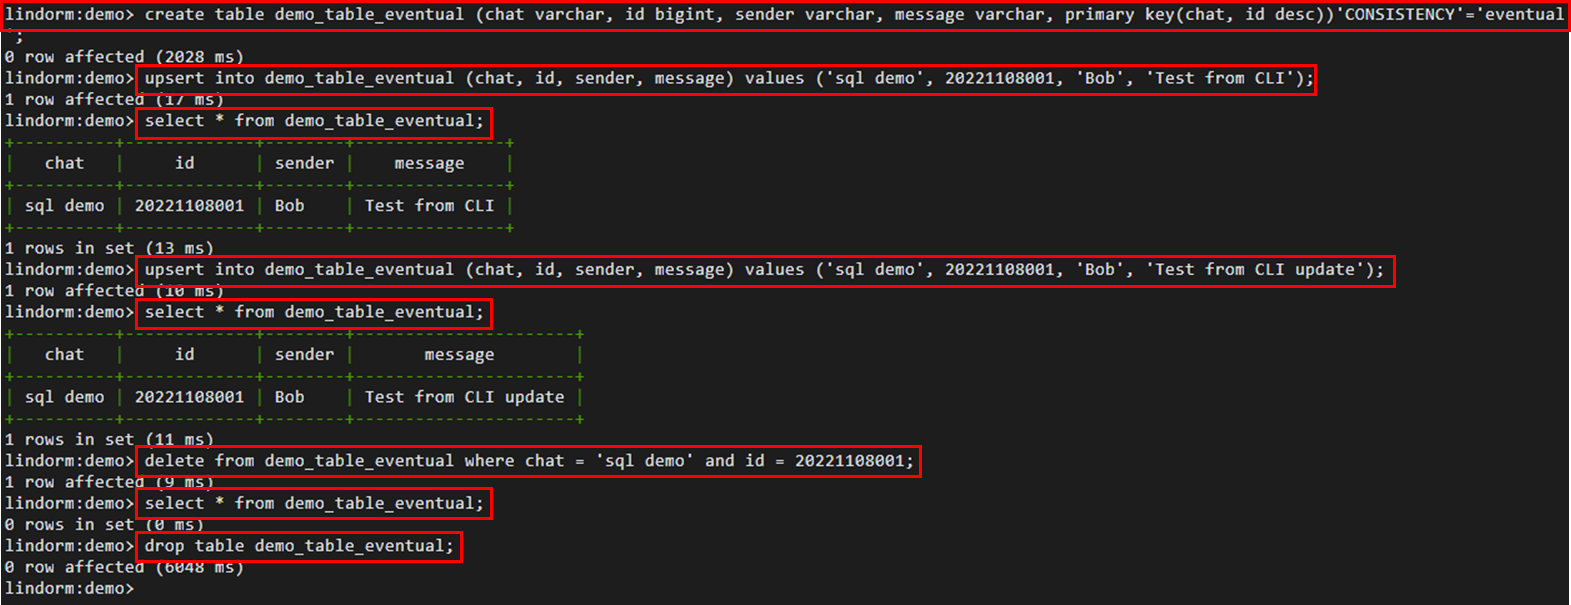
As a result, executing the same SQL query for both the table with eventual consistency and the table with strong consistency produces the same result.
Next, we will recreate both tables with eventual consistency and strong consistency, respectively, and execute the DESCRIBE and EXPLAIN statements using them. DESCRIBE is an SQL statement used to check the table structure, and EXPLAIN is an SQL statement used to obtain information for an SQL execution plan.
CREATE TABLE demo_table_strong(
    chat varchar,
    id bigint,
    sender varchar,
    message varchar,
    PRIMARY KEY(chat, id DESC)
) 'CONSISTENCY' = 'strong';

CREATE TABLE demo_table_eventual(
    chat varchar,
    id bigint,
    sender varchar,
    message varchar,
    PRIMARY KEY(chat, id DESC)
) 'CONSISTENCY' = 'eventual';

UPSERT
INTO
    demo_table_strong(
        chat,
        id,
        sender,
        message
    )
    VALUES(
        'sql demo',
        20221108001,
        'Bob',
        'Test from CLI'
    );

UPSERT
INTO
    demo_table_eventual(
        chat,
        id,
        sender,
        message
    )
    VALUES(
        'sql demo',
        20221108001,
        'Bob',
        'Test from CLI'
    );

DESCRIBE demo_table_strong;
DESCRIBE demo_table_eventual;

EXPLAIN
SELECT
    *
FROM
    demo_table_strong
WHERE
    chat = 'sql demo'
AND id = 20221108001;

EXPLAIN
SELECT
    *
FROM
    demo_table_eventual
WHERE
    chat = 'sql demo'
AND id = 20221108001;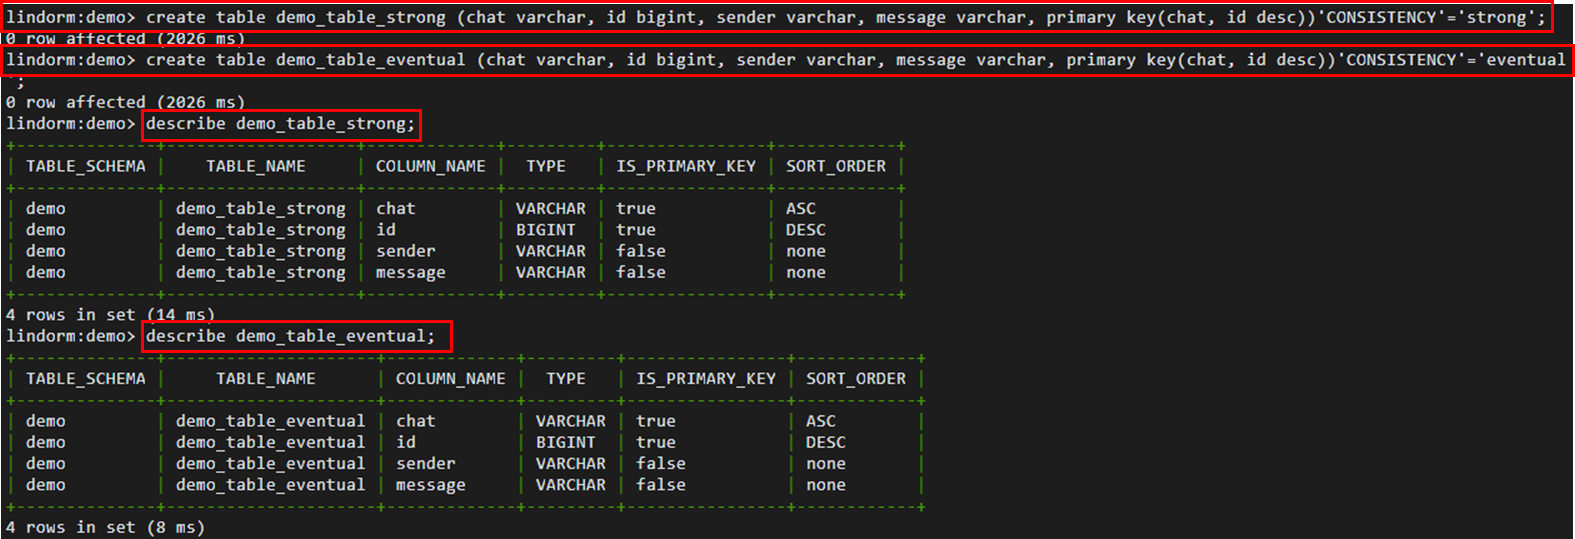
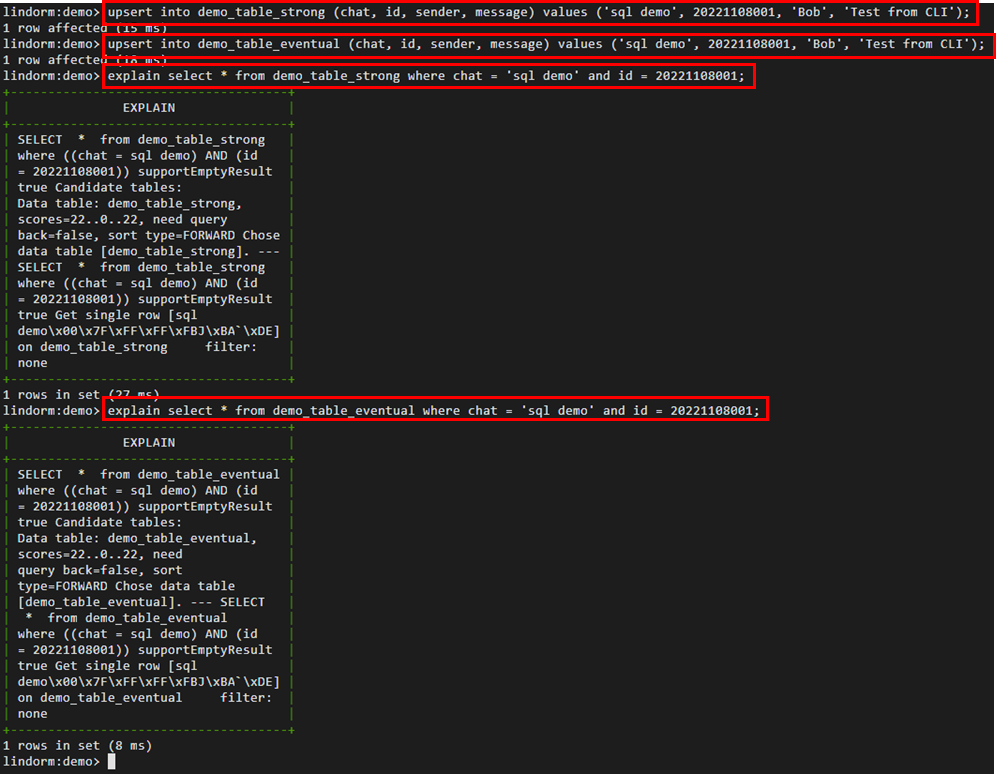
We executed the DESCRIBE and EXPLAIN commands on tables with eventual consistency and strong consistency, but no changes were observed.
From this result, we can conclude that in Lindorm's multi-zone deployment, the fault identification and failover of wide tables in Lindorm instances are determined by the health status of the instances, regardless of whether the tables have eventual consistency or strong consistency. In other words, there are no issues with data inconsistency regardless of which zone the application is operated in.
Compared to the multi-zone deployment of relational databases as HA high availability configuration (DR: disaster recovery), Lindorm's multi-zone deployment is advantageous in terms of data consistency and recovery speed (RPO under 100ms) on each zone, and the ability to process and access data from each zone, making Lindorm very useful when deploying applications across different zones.
Related reading:
Lindorm is compatible with Apache HBase, and to connect to the wide table engine using the HBase API, you can use Alibaba Cloud ApsaraDB for HBase SDK or HBaseue Shell.
In this case, we will perform a simple verification using sample Python code. All HBase tables are set to strong consistency, so there is no need for any settings related to the HBase API. Please download the source code from GitHub.
git clone https://github.com/aliyun/aliyun-apsaradb-hbase-demo.git
In addition to Python scripts for the HBase API, the above repo also includes sample code for other connection methods and programming languages.
Use the following command to move the target Python script to the main folder.
cd aliyun-apsaradb-hbase-demo/hbase/thrift2/python/To use ApsaraDB for HBase API in a language other than Java, you need to execute the Thrift2 command to generate an Interface Definition Language (IDL) file for the corresponding language. Apache Thrift is an interface definition language and code generator tool developed by Facebook that seamlessly operates across different languages. The downloaded source code already includes the generated IDL file. If you want to use your own code, generate the necessary files using the following steps and copy them to your project.
Configure the Thrift2 package in your working environment. In this case, we will use the apt command to install the thrift-compiler.
apt install thrift-compiler -y
Afterward, an IDL file based on Hbase.thrift is generated in the main folder of the target Python script.
thrift --gen python Hbase.thrift
When the process is complete, the following generated files will be displayed under the gen-py folder. These files can be used in the current project.

This method can also be used to generate IDL files for other programming languages such as C++, NodeJS, PHP, and Go. You can change the language name as you like.
thrift --gen <language> Hbase.thriftNow, you can update the source code using your own connection information.
Change the URL to the console URL and modify the user information as needed.
vi index.py

Run the Python script and confirm the results.
Note that the sample code was created based on Python 2.x, so if you are using Python 3.x, you will need to modify the code before running it.
python index.py
As a result, we can see that the HBase API Python script returns a list of wide column tables.
Lindorm also features the Cassandra engine, which has high compatibility with Cassandra. You can connect to the wide table engine in multiple languages such as C++, Python, Nodejs, and Go using the Cassandra client driver. Here, we will explain using Python as an example.
Install the Cassandra Python client driver using the pip command.
pip install cassandra-driver
According to the Lindorm CQL documentation, there are four parameter values for table consistency: eventual, timestamp, basic, and strong.
This time, since the consistency types are eventual consistency and strong consistency, prepare tables for eventual and strong consistency using a Python script called lindorm_cassandra.py. For more details, please refer to the help documentation.
Below is a sample code for lindorm_cassandra.py. Please update the connection information and user information according to your own situation.

#!/usr/bin/env python
# -*- coding: UTF-8 -*-
import logging
import sys
from cassandra.cluster import Cluster
from cassandra.auth import PlainTextAuthProvider

logging.basicConfig(stream=sys.stdout, level=logging.INFO)

cluster = Cluster(
    # Set cassandra CQL connection endpoint without the port
    contact_points=["ld-xxxxxxx"],
    # Set user name and password, default as root
    auth_provider=PlainTextAuthProvider("root", "root"))

session = cluster.connect()
print "Connect the Lindorm server successfully!"
# Create the keyspace
session.execute("CREATE KEYSPACE IF NOT EXISTS demo WITH replication = {'class':'SimpleStrategy', 'replication_factor':1};")
print "Create the keyspace successfully!"

# Create the table with consistency type of table as eventual
session.execute("CREATE TABLE IF NOT EXISTS demo.testTableEventual (id int PRIMARY KEY, name text,age int,address text) with extensions = {'CONSISTENCY_TYPE':'eventual'};")
print "Create the table with consistency type of table as eventual successfully!"
# Clear the table data
session.execute("TRUNCATE TABLE demo.testTableEventual;")
print "Clear the table data successfully!"
# Insert the data
session.execute("INSERT INTO demo.testTableEventual (id, name, age, address) VALUES ( 1, 'Bob', 11, 'testing eventual');")
print "Insert the data into the table successfully!"
# Search the data
rows = session.execute("SELECT * FROM demo.testTableEventual;")
print "Query the data from the table successfully!"
# Print the results
for row in rows:
    print "# row: {}".format(row)

# Create the table with consistency type of table as eventual
session.execute("CREATE TABLE IF NOT EXISTS demo.testTableStrong (id int PRIMARY KEY, name text,age int,address text) with extensions = {'CONSISTENCY_TYPE':'strong'};")
print "Create the table with consistency type of table as strong successfully!"
# Clear the table data
session.execute("TRUNCATE TABLE demo.testTableStrong;")
print "Clear the table data successfully!"
# Insert the data
session.execute("INSERT INTO demo.testTableStrong (id, name, age, address) VALUES ( 2, 'Bob_new', 22, 'testing strong');")
print "Insert the data into the table successfully!"
# Search the data
rows = session.execute("SELECT * FROM demo.testTableStrong;")
print "Query the data from the table successfully!"
# Print the results
for row in rows:
    print "# row: {}".format(row)

# Drop the table
session.execute("DROP TABLE demo.testTableEventual;")
session.execute("DROP TABLE demo.testTableStrong;")
print "Drop the table successfully!"
# Close the session
session.shutdown()
# Close the cluster
cluster.shutdown()
print "Close the connection successfully!"
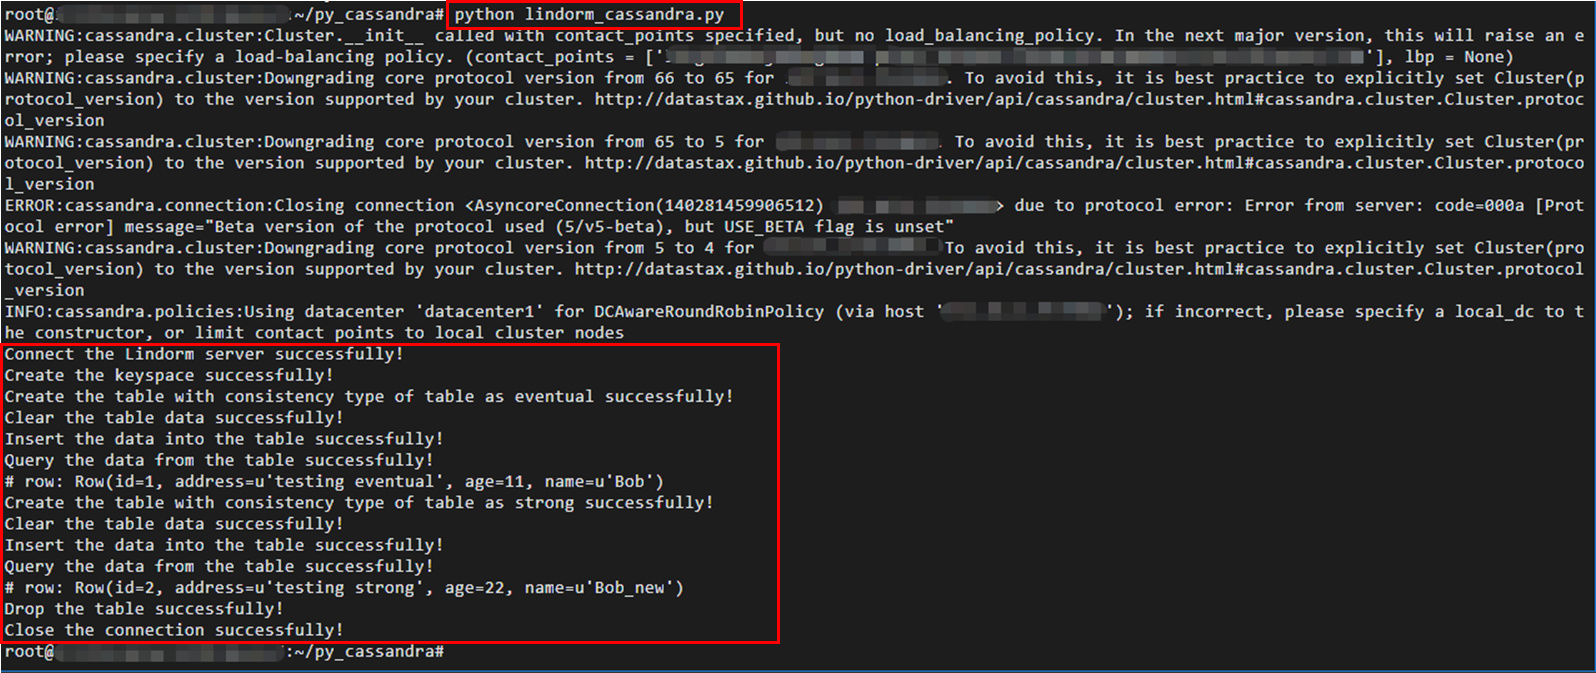
Execute a Python script and check the results, which include functions for creating records, adding and referencing data, and deleting tables. Please note that this script is based on Python 2.x.
If you encounter this error when trying to connect to a Lindorm Table through Lindorm CLI, check the whitelist of the Lindorm instance. Adding the IP address of the operating user to the whitelist should resolve the error.

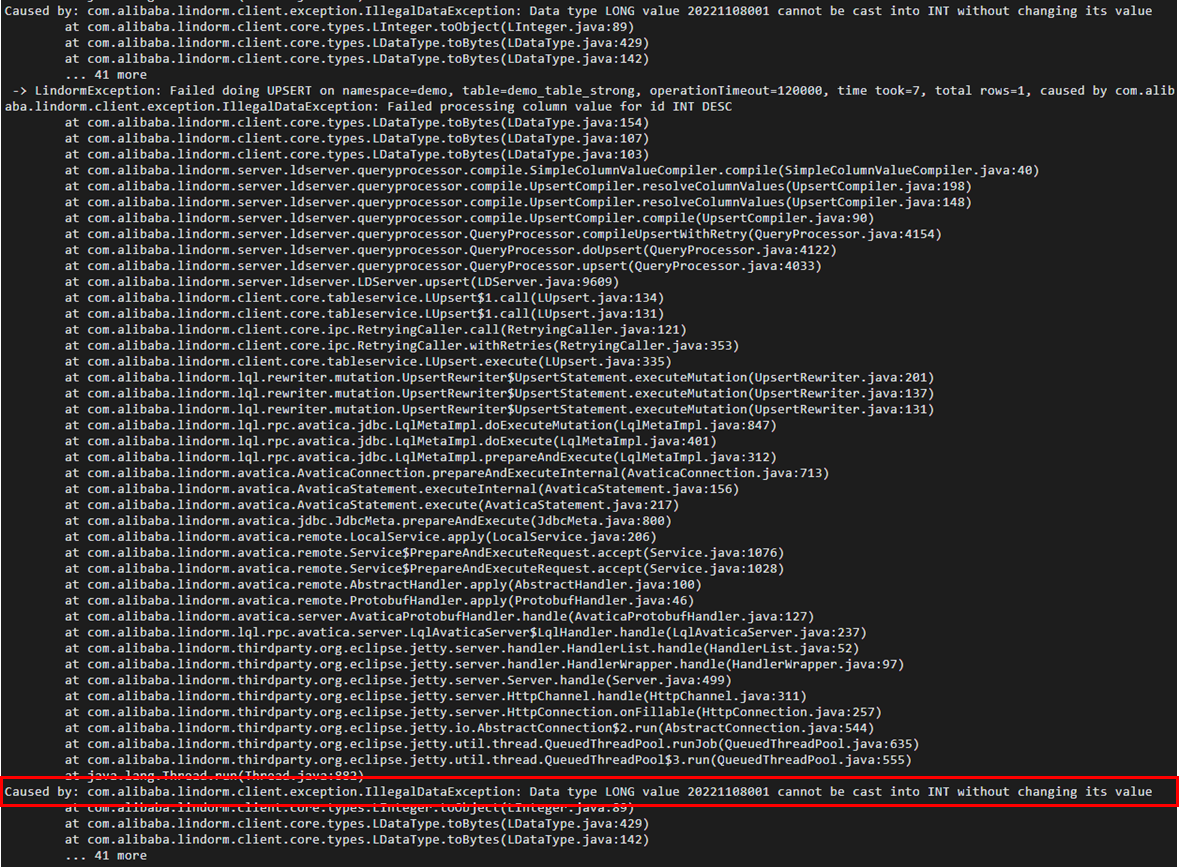
It's the same as other SQL command tools. If an error occurs, you need to check the error message and modify the SQL statement accordingly.
Below are examples of SQL statement errors:
● Using reserved words or keywords as table or column names.

● Using the wrong data type in the statement.
If you encounter the following error during installation of the Cassandra Python client driver, you can first manually install Cython using the pip command. After that, the installation process of the Cassandra Python client driver should proceed normally.
Building wheels for collected packages: cassandra-driver, geomet
  Running setup.py bdist_wheel for cassandra-driver ... error
  Complete output from command /usr/bin/python -u -c "import setuptools, tokenize;__file__='/tmp/pip-build-OQBIQ5/cassandra-driver/setup.py';f=getattr(tokenize, 'open', open)(__file__);code=f.read().replace('\r\n', '\n');f.close();exec(compile(code, __file__, 'exec'))" bdist_wheel -d /tmp/tmpwXzN7gpip-wheel- --python-tag cp27:
  Couldn't find index page for 'Cython' (maybe misspelled?)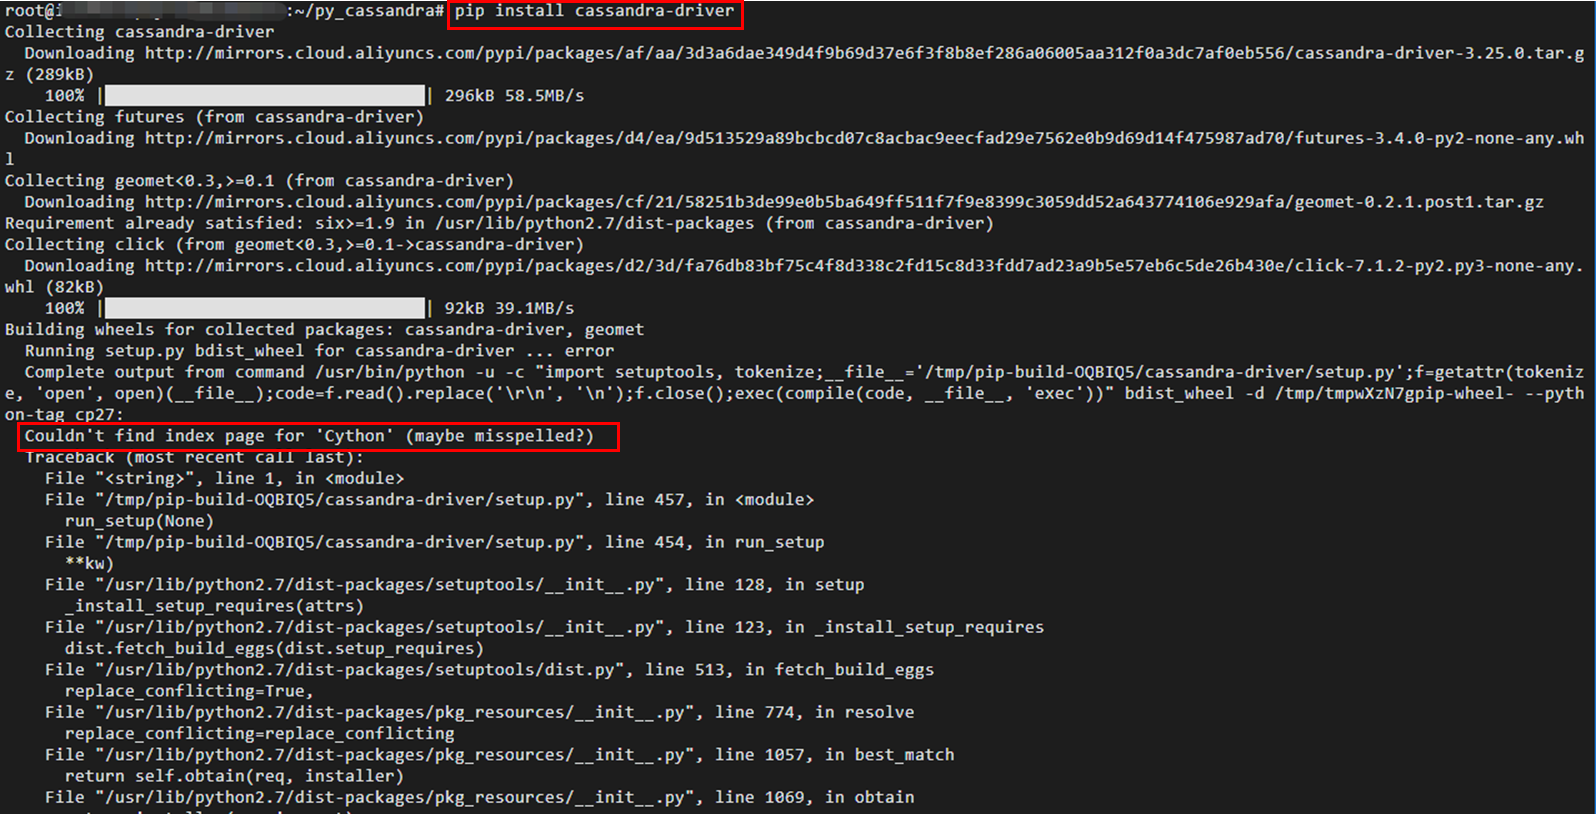

This article introduces Lindorm's Multi-Zone deployment, the construction of Active-Active applications in Multi-Zone, and the consistency of tables.
Lindorm is equipped with HBase and Cassandra engines, capable of processing data in real-time queries at the same speed as an In-Memory type Key-Value database, with Wide-Column tables having up to several thousand PB, hundreds of billions of records, and millions of columns as HBase. Additionally, Lindorm's Active-Active architecture ensures that data from all zones is always replicated, making it possible to provide continuous service without losing data even if a failure occurs, recovering within 100ms. Lindorm is a hybrid database of HBase and Cassandra, making it an attractive option. Lindorm completely eliminates Apache HBase's weakness where the master node failure causes the entire cluster to lose access. Also, unlike Cassandra's nature, Lindorm supports the entire cluster's rebalancing.
While Apache HBase follows the CA model (Consistency, Availability) and Cassandra follows the AP model (Availability, Partition Tolerance) according to the CAP theorem, Lindorm is a database that achieves all three aspects of CAP. Therefore, this article is a useful reference for anyone struggling with the nature of databases based on the CAP theorem, regardless of SQL/NoSQL.
Cross-zone deployment
https://www.alibabacloud.com/help/en/lindorm/latest/cross-zone-deployment
Create a multi-zone instance
https://www.alibabacloud.com/help/en/lindorm/latest/create-a-multi-zone-instance
How Can Alibaba's Newest Databases Support 700 Million Requests a Second?
https://www.alibabacloud.com/blog/how-can-alibabas-newest-databases-support-700-million-requests-a-second_595828?spm=a2c41.14005934.0.0
Cloud NoSQL Comparison
https://www.softbank.jp/biz/blog/cloud-technology/articles/202207/cloud-nosql-comparison/
This article is a translated piece of work from SoftBank: https://www.softbank.jp/biz/blog/cloud-technology/articles/202301/act-act-multi-zone-with-lindorm/
A Beginner's Guide to Building RESTful APIs in Python or Node.js Using Tablestore
Using Let's Encrypt to Enable HTTPS for a Streamlit Web Service

9 posts | 0 followers
FollowAlibaba Cloud Community - June 16, 2023
ApsaraDB - December 17, 2024
Alibaba Container Service - April 17, 2024
ApsaraDB - December 13, 2024
Alibaba Cloud Community - March 8, 2022
Alibaba Clouder - September 28, 2020

9 posts | 0 followers
Follow Lindorm
Lindorm is an elastic cloud-native database service that supports multiple data models. It is capable of processing various types of data and is compatible with multiple database engine, such as Apache HBase®, Apache Cassandra®, and OpenTSDB.
Learn More ApsaraDB for Cassandra
A database engine fully compatible with Apache Cassandra with enterprise-level SLA assurance.
Learn More Database for FinTech Solution
Leverage cloud-native database solutions dedicated for FinTech.
Learn More Oracle Database Migration Solution
Migrate your legacy Oracle databases to Alibaba Cloud to save on long-term costs and take advantage of improved scalability, reliability, robust security, high performance, and cloud-native features.
Learn MoreMore Posts by Hironobu Ohara