I have built RESTful APIs in Python or Node.js using Tablestore. I'd like to show you how to do it in this article.
Tablestore is a fully managed NoSQL cloud database service that supports the storage of massive structured and semi-structured data. Tablestore allows you to query online data within milliseconds and perform multidimensional analysis on the stored data.
This article describes how to build RESTful APIs in Python or Node.js using Tablestore.
The following flowchart shows the workflow of building RESTful APIs using Tablestore.
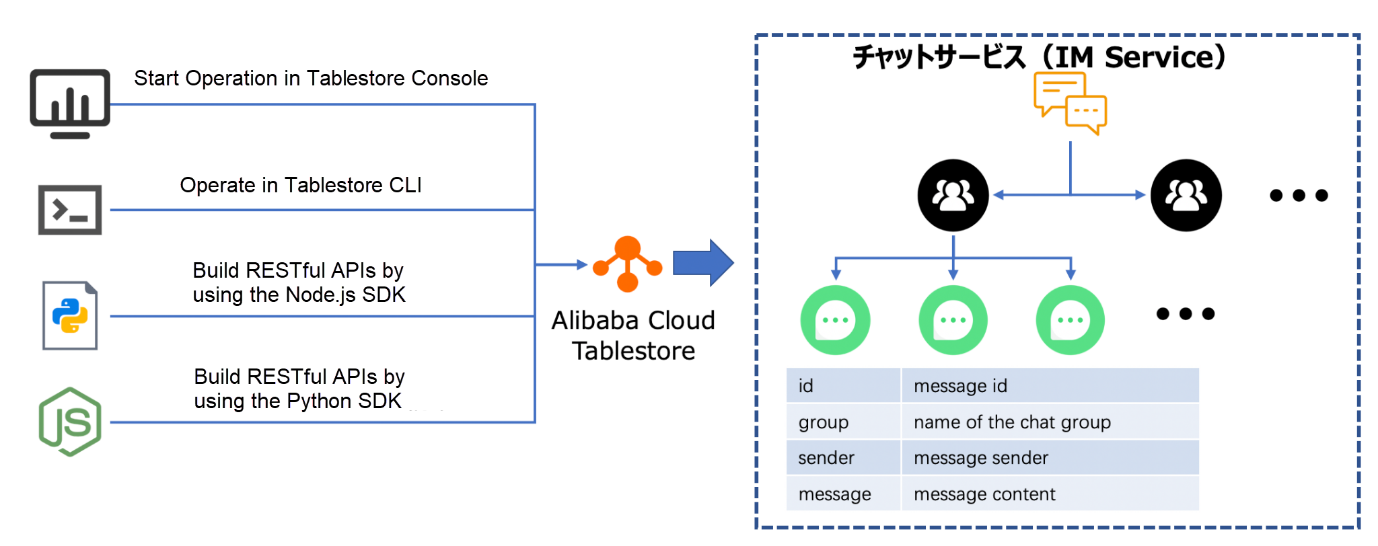
Before you start, you must have an Alibaba Cloud account with the Tablestore service activated. You can create instances and tables in several ways. This article will create them in the Tablestore console and perform operations on data using different methods. The table in this article is used to store messages in IM services.
Go to the Tablestore console and create a new instance in the dialog box, as shown in the following image. Capacity instances are only supported in the Japan (Tokyo) region.
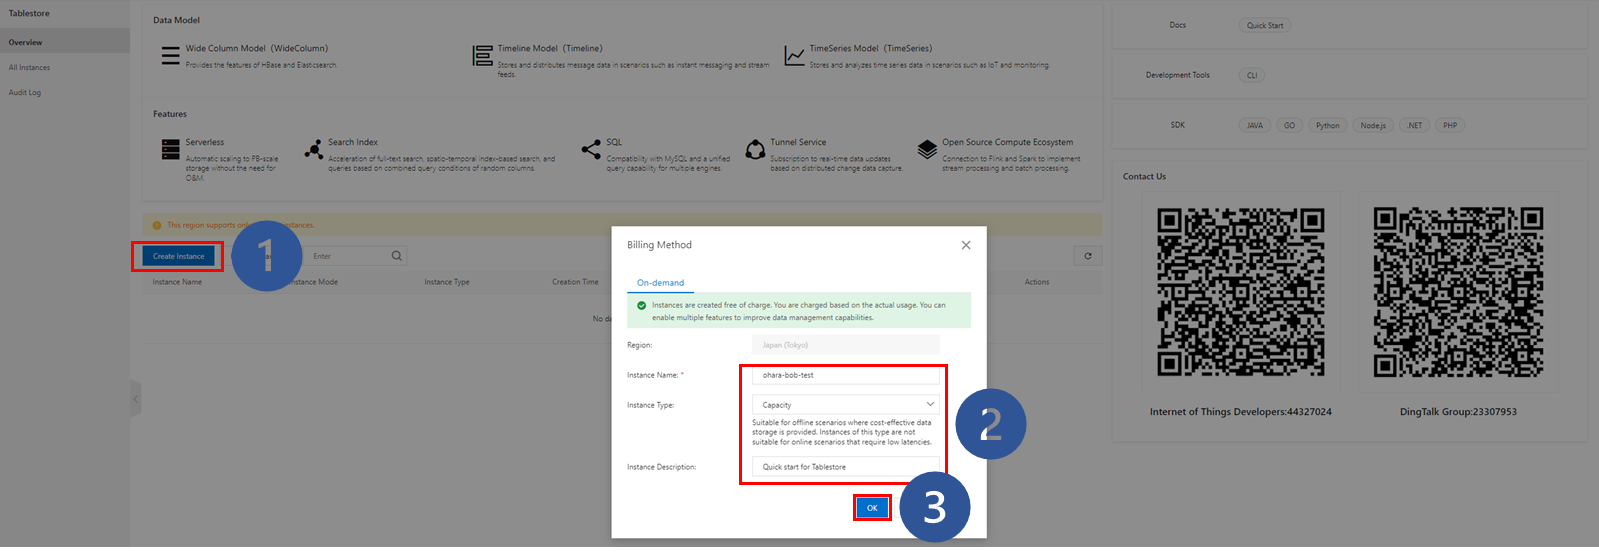
The system prompts that the instance is created, and the created instance appears in the instance list.

Next, create a table. Go to the details page of the instance you created. In the Create Table dialog box, create a table for testing.
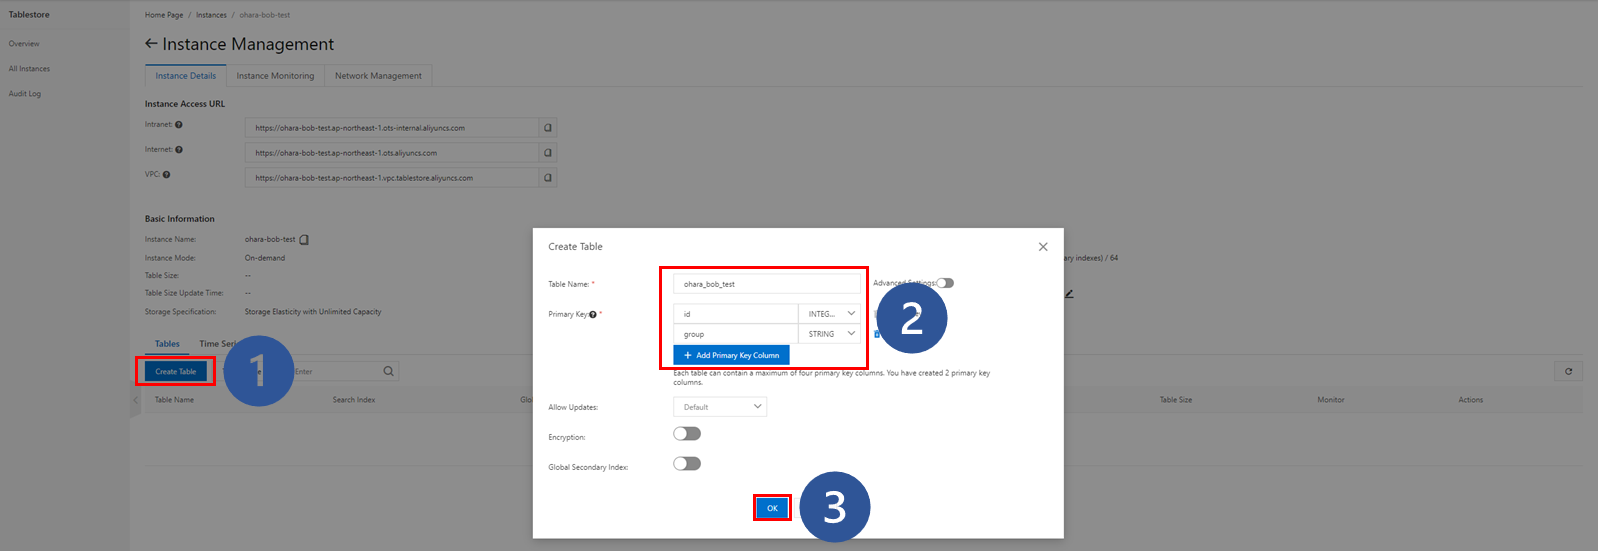
Prime key columns support the STRING, INTEGER, and BINARY data types. The id column stores integers, and the group column stores strings. The group column is used to group data based on different conditions.
If necessary, you can turn on Advanced Settings to configure advanced parameters, as shown in the following figure. The default settings are used in this example.
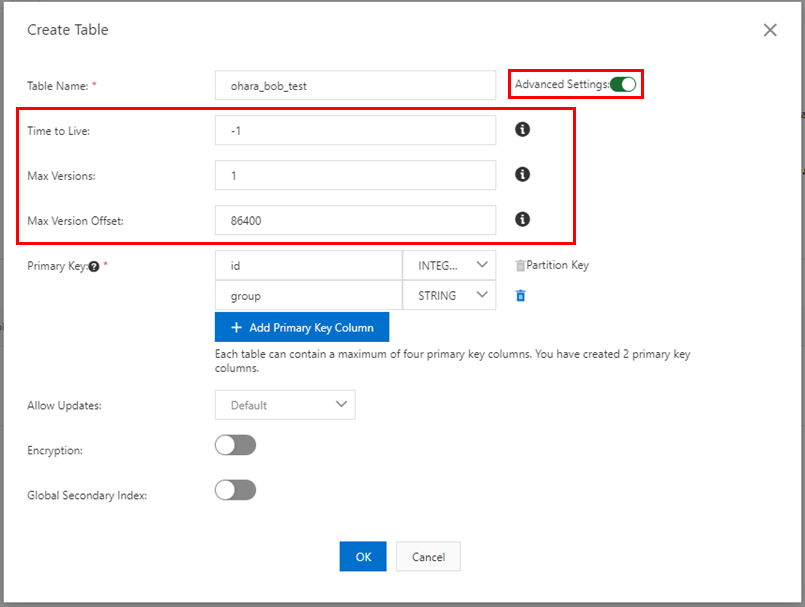
The table is created and appears in the table list.

Check the table details:
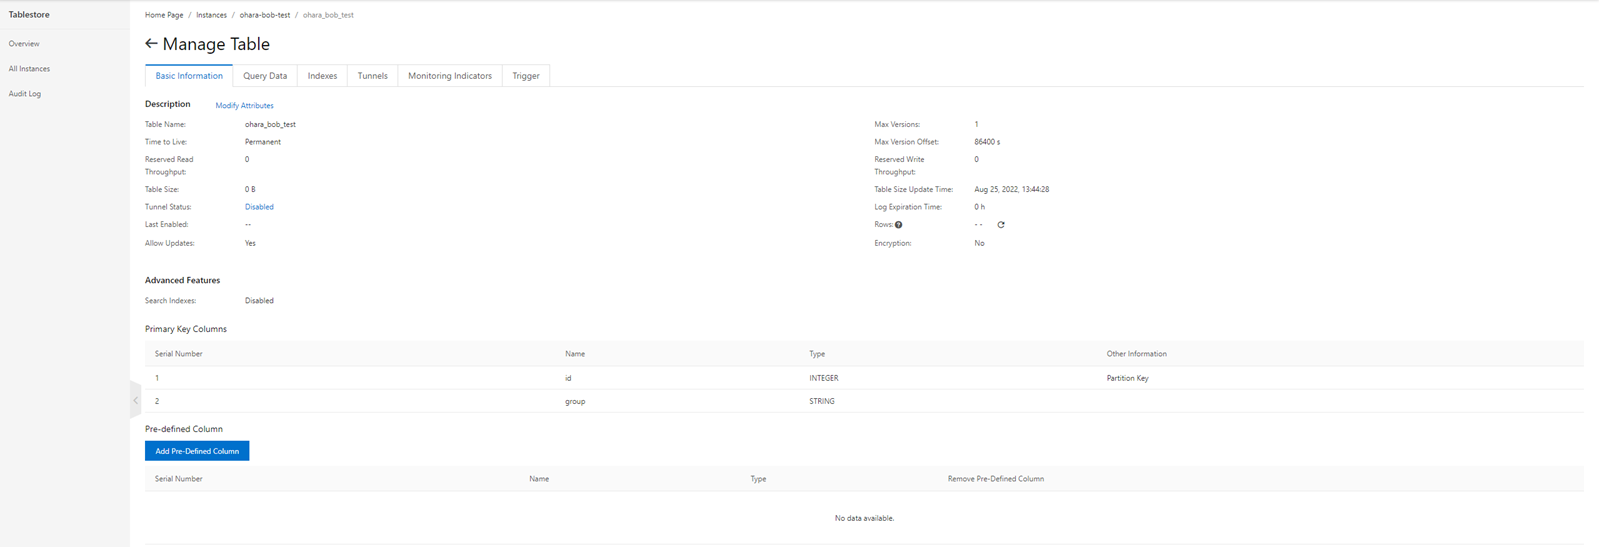
Click Insert on the Query Data tab of the table details page to insert data to the table you created:
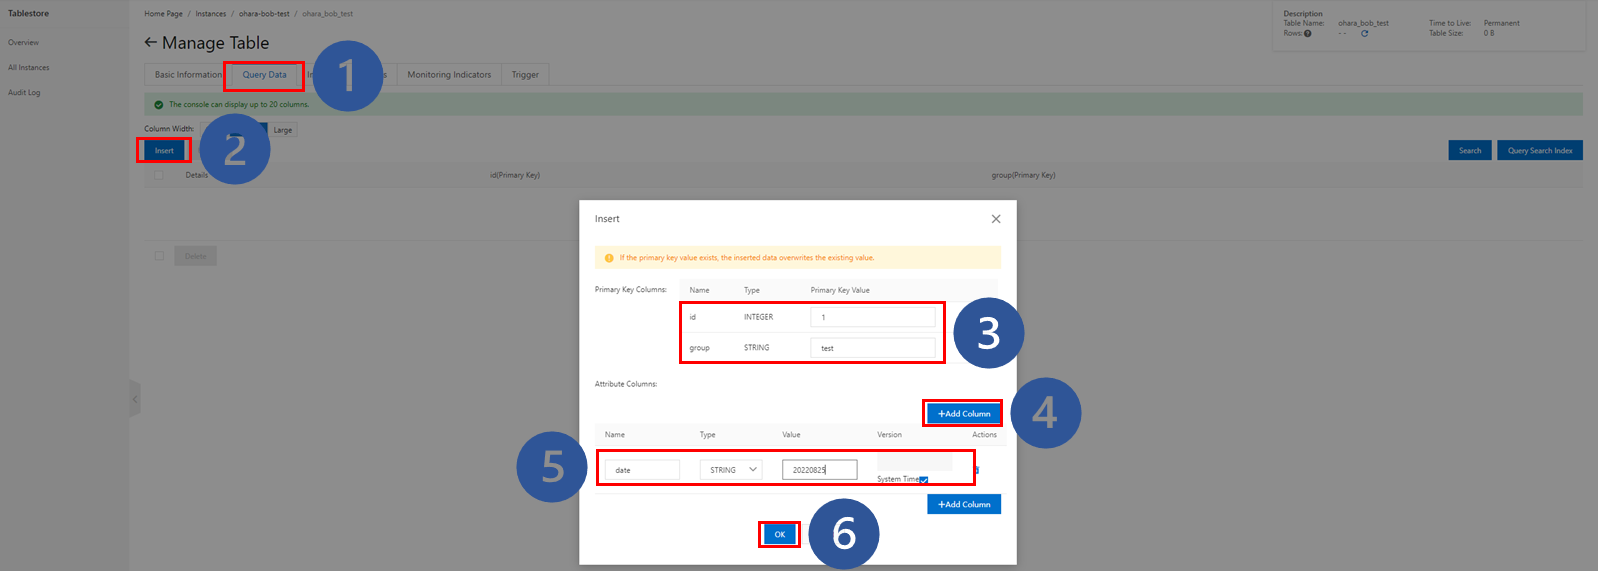
The column is added to the table.

Perform the following steps to query data from the table. First, add data to the table, as described in the preceding steps:

You can query a single row or a specific range of data.
First, try to query a single row of data using the Tablestore console.
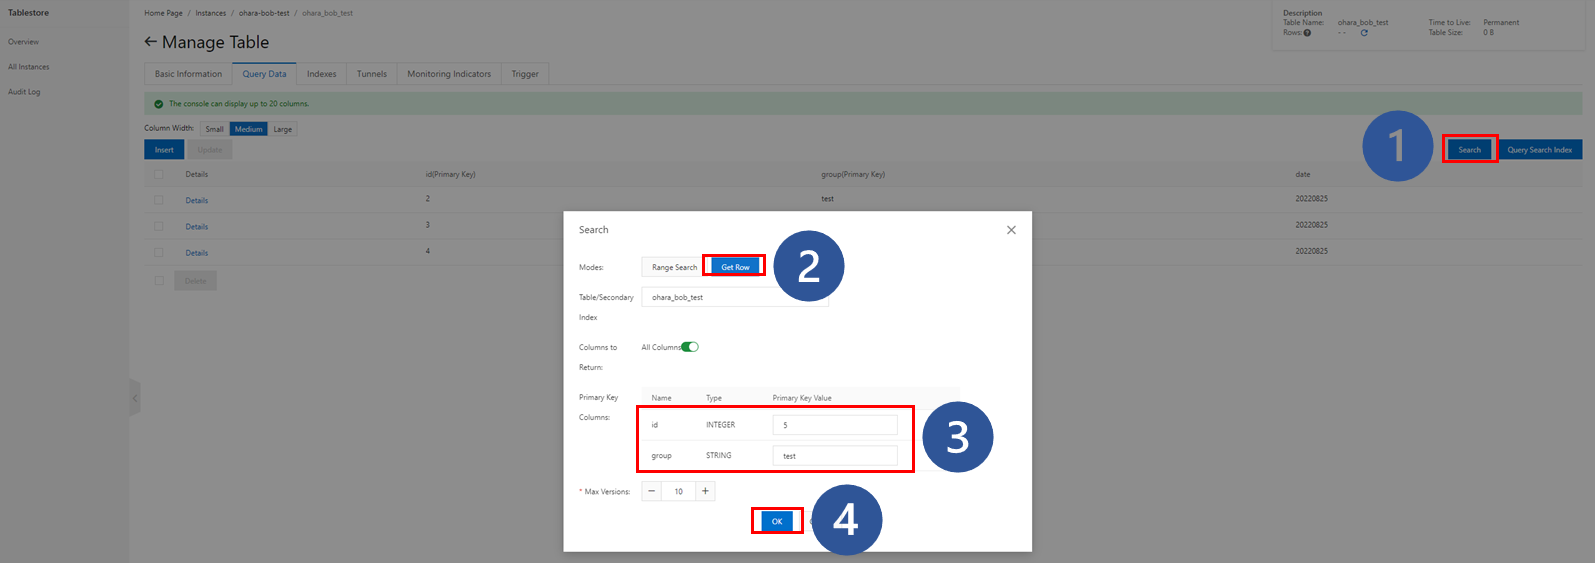
The row you queried appears on the Query Data tab:

If no relevant data is found, no record appears.

Now, try to query a specific range of data from the table.
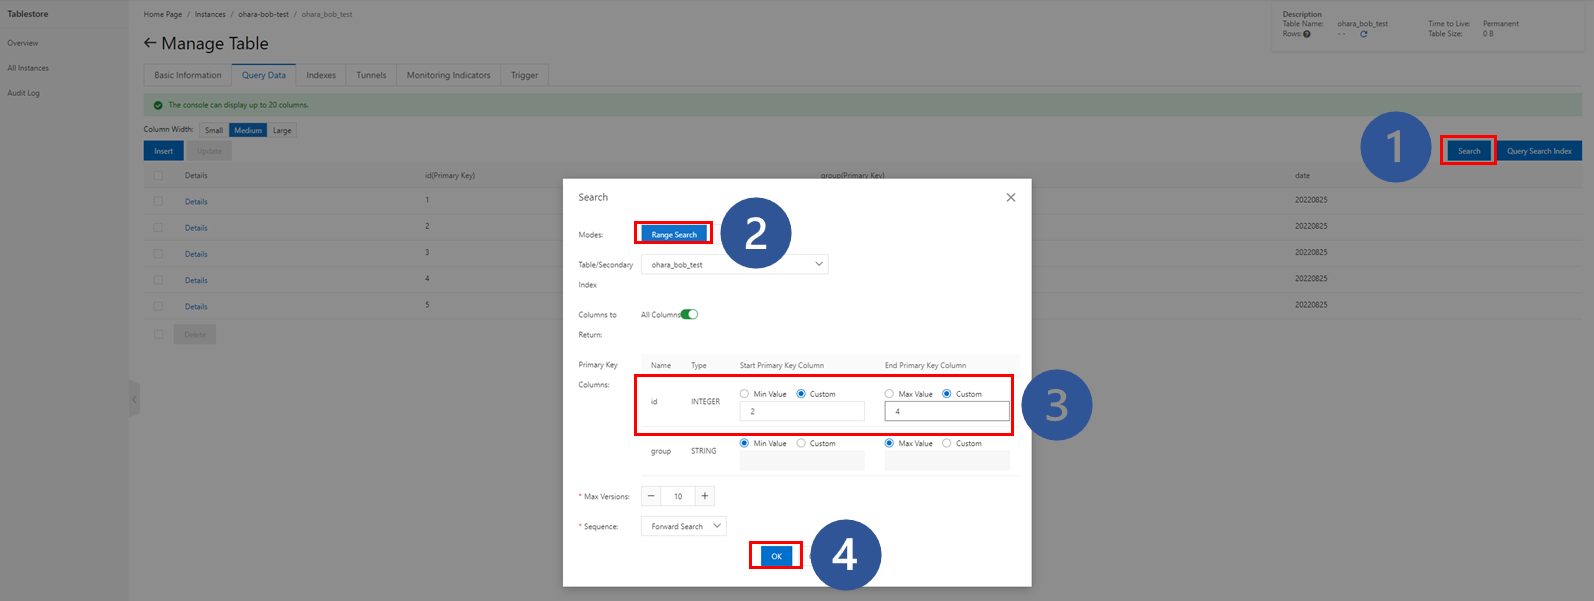
The query results are displayed.

You can also update the data in the table. Select the row to update and perform the following steps:
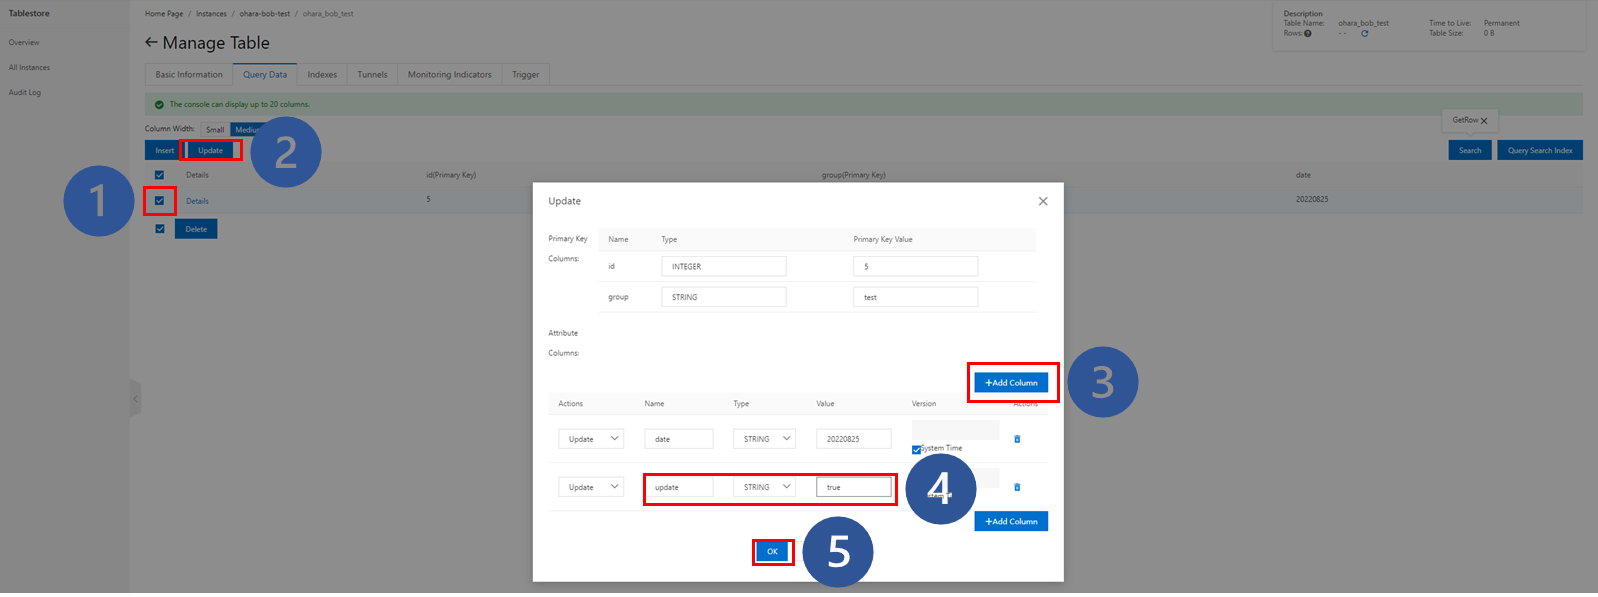
The updated row appears on the tab:

Note: You can only update one row at a time in the Tablestore console. If you select more than one row, Update is dimmed.

Perform the following steps to delete data. The delete operation is similar to the update operation, except that you can delete multiple rows of data at a time. One row is deleted in this example:

If you query the deleted data, the No data available message appears.

You can also add, query, update, and delete data records in Tablestore CLI. First, you need to install and configure Tablestore CLI.
Tablestore CLI is a command line tool developed by Alibaba Cloud. Tablestore CLI supports multiple operating systems.
Windows is used in this example. Decompress the downloaded Tablestore CLI package. Navigate to the root directory of the package and double-click the ts.exe file or run ts in the command prompt to start Tablestore CLI.


Run the config command to configure Tablestore CLI. The following four parameters are returned for you to configure: endpoint, instance, id, and key. The first two specify the Tablestore instance to manage, and the last two specify the AccessKey pair that you use to access the Tablestore instance.
If no Tablestore instance exists, only configure the id and key parameters and run the following command to create an instance:
create_instance -d <DESCRIPTION> -n <INSTANCE_NAME> -r <REGION>In this example, a Tablestore instance and a table was created, so all four parameters are configured.

If you do not know the endpoint of the instance, obtain the endpoint on the instance detail page of the Tablestore console or refer to the Help Center.

In Tablestore, run the following command to describe the instance. The information about the instance is returned.
describe_instance -r <REGION> -n <INSTANCE_NAME>
Run the use command to specify the table that you want to manage. If you do not know the table name, run the list command to check the table name.

Before you perform operations on the table, make sure the instance and the table are properly configured. Otherwise, the error messages in the following figures appear.


Now that you have configured Tablestore CLI (as shown above), try some basic operations in Tablestore CLI.
Run the get command to query a row that has specific primary key values. This command is frequently used to check the operation results in subsequent operations.

Run the put command to insert records into a row. The required parameters are pk and attr. The value of pk must be an array of primary key values, and the value of attr must be a JSON array that contains the names and values of attribute columns.
put --pk '[1,"cli"]' --attr '[{"c":"date", "v":"20220825"}, {"c":"os", "v":"Windows"}]'
You can also prepare a JSON file for the row, and insert the content of the file into the table. Sample code:
{
"PK": {
       "Values": [
            2,
      "cli"
      ]
    },
    "Attr": {
       "Values": [
            {
                "c": "date",
                "v": "20220825"
            },
            {
                "c": "os",
          "v": "Windows10"
            }
        ]
    }
}
The update operation is similar to the insert operation. Run the update command to configure the pk and attr parameters. You can also run this command to update the content of the JSON file that records the row data.

To delete a row from a table, run the delete command to specify the primary key values of the row.

Tablestore CLI also allows you to manage multiple rows of data at a time.
Query multiple or all rows from a table, as shown in the following figure:

To export query results, use the -o flag to specify the output JSON file and the directory of the file. If you do not want to export all attribute columns of the query results, use the -c flag.

Check the generated JSON file. The query results are exported as configured.

If the data to insert is recorded in the same format in a JSON file, run the import command to insert the content of the JSON file.


Now that you have a general understanding of Tablestore CLI, you can build RESTful APIs using the Tablestore SDK for Node.js. First, you need to install the Tablestore SDK for Node.js. Tablestore provides SDKs for multiple programming languages, including the Node.js SDK. You only need to run the npm install tablestore command to install this SDK in your project.

Alibaba Cloud provides the documentation and sample code of the Node.js SDK for your reference.
The main usage of the Node.js SDK is to initialize the Tablestore client and prepare parameters for each function (such as parameters about primary keys, attribute columns, and conditions). The following references provide more details:
Overview of Tablestore SDK for Node.js:
https://www.alibabacloud.com/help/en/tablestore/latest/node-js-sdk
GitHub page of Tablestore SDK for Node.js:
https://github.com/aliyun/aliyun-tablestore-nodejs-sdk/tree/master/samples
After the Node.js SDK is installed, you can start building RESTful APIs. The Express package is used to explain how to use this SDK.
To facilitate data read, clear the table data before you start the API server:


After you clear the table data, prepare the project folder for building RESTful APIs. Let’s assume an existing table is used to store messages for a chat group. The id and group primary keys are the column that stores message IDs and the column that stores chat group names.
Create a project folder named Node_ali_tablestore and install the Tablestore and Express dependencies.

Add the following files to the folder:
The following code shows the directory structure of the project:
.
├── node_modules
├── message.js
├── package.json
├── server.js
└── ts.js
After the project folder is configured, prepare the code. ts.js provides SDK-based functions. Initialize the Tablestore client and call the relevant functions through the Tablestore client.
"use strict";

const TableStore = require('tablestore');
var Long = TableStore.Long;
let client;
let tableName = process.env.tableName;

/**
* Generate and return TableStore client with specific configuration
 * @returns TableStore client
 */
function getClient() {
    if (!client) {
        client = new TableStore.Client({
            accessKeyId: process.env.accessKeyId,
            secretAccessKey: process.env.secretAccessKey,
Endpoint: Process.ENV.Endpoint,
            instancename: process.env.instancename
        });
    }
    return client;
}

/**
 * Scan the TableStore data based on default range
 * @returns
 */
async function getRange() {
    client = getClient();
    var params = {
        tableName: tableName,
        direction: TableStore.Direction.FORWARD,
        inclusiveStartPrimaryKey: [{ "id": TableStore.INF_MIN }, { "group": TableStore.INF_MIN }],
        exclusiveEndPrimaryKey: [{ "id": TableStore.INF_MAX }, { "group": TableStore.INF_MAX }],
        limit: 10
    };
    return new Promise((resolve, reject) => {
        client.getRange(params, function (err, data) {
            if (err) {
                console.log('error:', err);
                return;
            }
            resolve(data);
        });
    });
}

/**
 * Scan the TableStore data based on default range
 * @param {*} id
 * @param {*} group
 * @param {*} sender
 */
async function getRow(id, group, sender = null) {
    client = getClient();
    var params = {
        tableName: tableName,
        primaryKey: [{ 'id': Long.fromNumber(id) }, { 'group': group }],
    };
    if (null != sender) {
        // Support CompositeCondition
        // var condition = new TableStore.CompositeCondition(TableStore.LogicalOperator.AND);
        // condition.addSubCondition(new TableStore.SingleColumnCondition('sender', sender, TableStore.ComparatorType.EQUAL));
        // condition.addSubCondition(new TableStore.SingleColumnCondition('sender', sender, TableStore.ComparatorType.EQUAL));
        var condition = new TableStore.SingleColumnCondition('sender', sender, TableStore.ComparatorType.EQUAL);
        params.columnFilter = condition;
    }
    return new Promise((resolve, reject) => {
        client.getRow(params, function (err, data) {
            if (err) {
                console.log('error:', err);
                if (err.code == 400) {
                    resolve({ "row": [] });
                }
                return;
            }
            resolve(data);
        });
    });
}

/**
 * Put row in the target TableStore table
 * @param {*} id
 * @param {*} group
 * @param {*} sender
 * @param {*} message
 */
async function putRow(id, group, sender, message) {
    client = getClient();
    var params = {
        tableName: tableName,
        condition: new TableStore.Condition(TableStore.RowExistenceExpectation.IGNORE, null),
        primaryKey: [{ 'id': Long.fromNumber(id) }, { 'group': group }],
        attributeColumns: [
            { 'sender': sender },
            { 'message': message }
        ],
        returnContent: { returnType: TableStore.ReturnType.Primarykey }
    };
    return new Promise((resolve, reject) => {
        client.putRow(params, function (err, data) {
            if (err) {
                console.log('error:', err);
                return;
            }
            resolve(data);
        });
    });
}

/**
 * Put row in the target TableStore table
 * @param {*} id
 * @param {*} group
 */
async function deleteRow(id, group) {
    client = getClient();
    var params = {
        tableName: tableName,
        condition: new TableStore.Condition(TableStore.RowExistenceExpectation.IGNORE, null),
        primaryKey: [{ 'id': Long.fromNumber(id) }, { 'group': group }],
    };
    return new Promise((resolve, reject) => {
        client.deleteRow(params, function (err, data) {
            if (err) {
                console.log('error:', err);
                return;
            }
            resolve(data);
        });
    });
}

module.exports = { putRow, getRange, getRow, deleteRow }
message.js acts as a controller. It collects, parses, and formats results so the results can be easily read by server.js.
"use strict";

const ts = require('./ts');

async function listMessages() {
    var result = await ts.getRange();
    if (result.rows.length == 0) {
        return { "rows": 0, "results": "No data" };
    } else {
        return { "rows": result.rows.length, "results": "Get top 10 messages successfully.", "data": result.rows };
    }
}

async function getMessageByGroup(id, group) {
    var result = await ts.getRow(id, group);
    if (result.row.length == 0) {
        return { "rows": 0, "results": "No data" };
    } else {
        return { "rows": result.row.length, "results": "Get target message successfully.", "data": result.row };
    }
}

async function getMessageByGroupAndSender(id, group, sender) {
    var result = await ts.getRow(id, group, sender);
    if (result.row.length == 0) {
        return { "rows": 0, "results": "No data" };
    } else {
        return { "rows": result.row.length, "results": "Get target message successfully.", "data": result.row };
    }
}

async function saveMessage(id, group, sender, message) {
    var result = await ts.putRow(id, group, sender, message);
    if (result.consumed.capacityUnit.write == 0) {
        return { "rows": 0, "results": "Failed to save message." };
    } else {
        return { "rows": result.row.length, "results": "Save target message successfully.", "data": result.row };
    }
}

async function deleteMessage(id, group) {
    var result = await ts.deleteRow(id, group);
    return { "rows": 1, "results": "Delete target message successfully.", "data": result };
}

module.exports = { listMessages, getMessageByGroup, getMessageByGroupAndSender, saveMessage, deleteMessage }
server.js is the entry point of the Express server and defines the corresponding routes. In this example, RESTful APIs used for the following purposes are built.
"use strict";

const express = require('express');
const app = express();
const message = require('./message');
app.use(express.json());

app.get('/', (req, res) => {
    res.end('Welcome to Tablestore RESTful API demo!');
});

app.get('/api/msg', async (req, res) => {
    var results = await message.listMessages();
    res.json(results).end();
});

app.get('/api/msg/:id/:group', async (req, res) => {
    var id = parseInt(req.params.id);
    var group = req.params.group;

    var results = await message.getMessageByGroup(id, group);
    res.json(results).end();
});

app.get('/api/msg/:id/:group/:sender', async (req, res) => {
    var id = parseInt(req.params.id);
    var group = req.params.group;
    var sender = req.params.sender;
    var results = await message.getMessageByGroupAndSender(id, group, sender);
    res.json(results).end();
});

app.post('/api/msg', async (req, res) => {
    var id = req.body.id;
    var group = req.body.group;
    var sender = req.body.sender;
    var msg = req.body.message;

    var results = await message.saveMessage(id, group, sender, msg);
    res.json(results).end();
});

app.delete('/api/msg/:id/:group', async (req, res) => {
    var id = parseInt(req.params.id);
    var group = req.params.group;
    var results = await message.deleteMessage(id, group);
    res.json(results).end();
});

const port = process.env.PORT || 5000;
app.listen(port, () => console.log(`Listening on port ${port}`));
When the code is ready to execute, run the npm run start command to start the Express server.

Run the curl command to test the first RESTful API. The API works if a welcome message is returned.

Use the second RESTful API to get the top 10 messages. Since the table has been cleared, the No data message is returned.
curl -X GET http://localhost:5000/api/msg
Use a RESTful API and the putRow() function of the SDK to save the following messages.
curl -H "Content-Type: application/json" -X POST -d "{\"id\":\"20220830101\",\"group\":\"restful\",\"sender\":\"bob\",\"message\":\"This is testing message.\"}" http://localhost:5000/api/msg
After the messages are saved, use the RESTful APIs to query the top 10 messages, query messages based on message IDs and chat group names, and query messages based on messages IDs, chat group names, and the names of the senders.
curl -X GET http://localhost:5000/api/msg
curl -X GET http://localhost:5000/api/msg/20220830101/restful
curl -X GET http://localhost:5000/api/msg/20220830101/restful/bob
If no message matches the query condition, the No data message is returned.
curl -X GET http://localhost:5000/api/msg/20220830101/restful/bob121
Use a RESTful API to delete a row:
curl -X DELETE http://localhost:5000/api/msg/20220830101/restful
Now that you have built RESTful APIs by using the Node.js SDK, you can try to use the Python SDK and the Flask package to build RESTful APIs. Similarly, before you start, deploy the Tablestore SDK for Python. Tablestore provides SDKs for multiple programming languages, including Python SDK.
References:
Overview of Tablestore SDK for Python:
https://www.alibabacloud.com/help/en/tablestore/latest/python-sdk-preface
Tablestore SDK for Python:
https://www.alibabacloud.com/help/en/tablestore/latest/python-sdk
GitHub Page of Tablestore SDK for Python:
https://github.com/aliyun/aliyun-tablestore-python-sdk/tree/master/examples
Prepare a project folder for the virtual environment named Python_ali_tablestore. Run the following command to start the environment:
py -m venv .venv
.venv\scripts\activate
Run the pip install command to install the Flask-RESTful and tablestore packages:
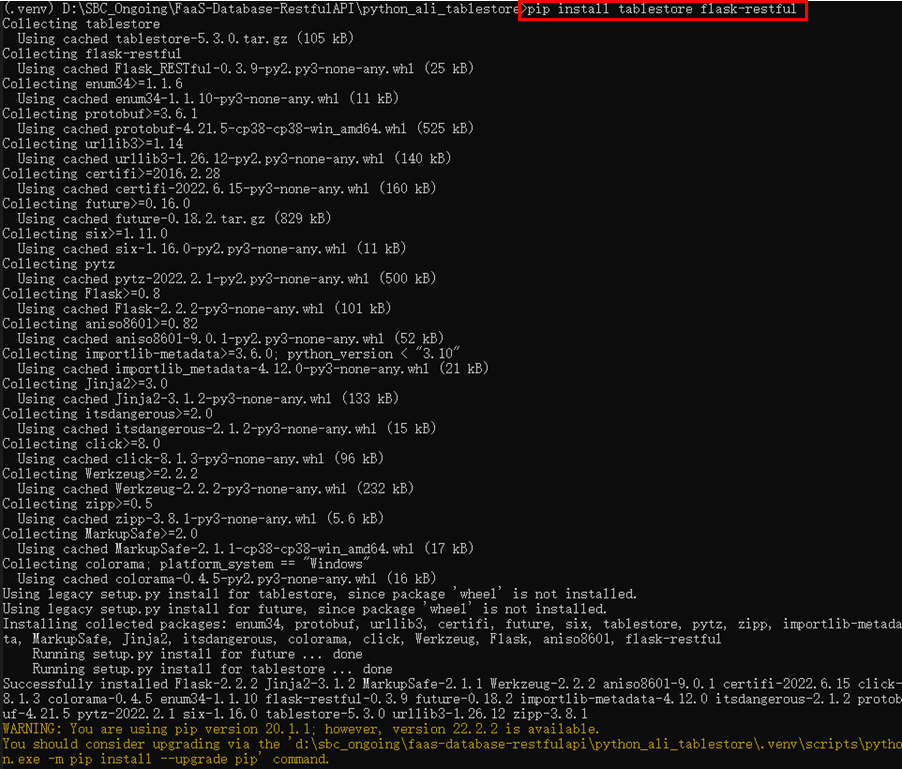
Add the following files to the folder:
The following code shows the directory structure of the project:
.
├── .venv
├── server.py
└── ts.py
After the project folder is configured, prepare the code. ts.py defines the OTSManager class that deals with communication with the Tablestore service.
from tablestore import *
import os

class OTSManager:

    def __init__(self):
        self.endpoint = os.getenv('OTS_ENDPOINT')
        self.access_key = os.getenv('OTS_ID')
        self.access_secret = os.getenv('OTS_SECRET')
        self.instance = os.getenv('OTS_INSTANCE')
        self.table = os.getenv('OTS_TABLE')
        self.client = OTSClient(self.endpoint, self.access_key, self.access_secret, self.instance)

    def get_row(self, id, group, sender=None):
        try:
            primary_key = [('id',id), ('group',group)]
            columns_to_get = [] # Specifies the list of columns to retrieve, or an empty list if you want to retrieve the entire row
            if sender:
                condition = SingleColumnCondition('sender', sender, ComparatorType.EQUAL)
            else:
                condition = None
            consumed, return_row, next_token = self.client.get_row(self.table, primary_key, columns_to_get, condition)
            if return_row:
                return {"status": "Success", "readCU": consumed.read, "data": {"primaryKey": return_row.primary_key, "attrColumn": return_row.attribute_columns}}
            else:
                return {"status": "Failed", "errMessage": "No target data row."}
        except OTSClientError as e:
            return {"status": "Failed", "HTTPStatus": e.get_http_status(), "errMessage": e.get_error_message()}
        except OTSServiceError as e:
            return {"status": "Failed", "HTTPStatus": e.get_http_status(), "errMessage": e.get_error_message(), "errCode": e.get_error_code()}

    def put_row(self, id, group, sender, message):
        try:
            primary_key = [('id',id), ('group',group)]
            attribute_columns = [('sender',sender), ('message',message)]
            row = Row(primary_key, attribute_columns)
Condition= Condition(RowExistenceExpectation.EXPECT_NOT_EXIST)# Expect not exist: Put it into the table only if this row does not exist.
            consumed, return_row = self.client.put_row(self.table, row, condition)
            return {"status": "Success", "writeCU": consumed.write}
        except OTSClientError as e:
            return {"status": "Failed", "HTTPStatus": e.get_http_status(), "errMessage": e.get_error_message()}
        except OTSServiceError as e:
            return {"status": "Failed", "HTTPStatus": e.get_http_status(), "errMessage": e.get_error_message(), "errCode": e.get_error_code()}

    def delete_row(self, id, group):
        try:
            primary_key = [('id',id), ('group',group)]
            row = Row(primary_key)
            condition = Condition(RowExistenceExpectation.IGNORE)
            consumed, return_row = self.client.delete_row(self.table, row, condition)
            return {"status": "Success", "writeCU": consumed.write}
        except OTSClientError as e:
            return {"status": "Failed", "HTTPStatus": e.get_http_status(), "errMessage": e.get_error_message()}
        except OTSServiceError as e:
            return {"status": "Failed", "HTTPStatus": e.get_http_status(), "errMessage": e.get_error_message(), "errCode": e.get_error_code()}
server.py sets the server and root of the Flask as RESTful APIs:
from flask import Flask, jsonify
from flask_restful import Api, Resource, reqparse
from ts import OTSManager

class Message(Resource):
    def __init__(self):
        self.manager = OTSManager()
        super().__init__()

    def get(self, id, group):
        return jsonify(self.manager.get_row(int(id), group))

    def post(self, id, group):
        args = reqparse.RequestParser() \
            .add_argument('sender', type=str, location='json', required=True, help="Empty sender") \
            .add_argument('message', type=str, location='json', required=True, help="Empty message") \
            .parse_args()

        return jsonify(self.manager.put_row(int(id), group, args['sender'], args['message']))


    def delete(self, id, group):
        return jsonify(self.manager.delete_row(int(id), group))


app = Flask(__name__)
api = Api(app, default_mediatype="application/json")
api.add_resource(Message, '/api/msg/<id>/<group>')
app.run(host='0.0.0.0', port=5001, use_reloader=True)
When the code is ready to execute, run the python server.py command to start the Flask server.

Run the curl command to test if a new message can be inserted into the table via an API.
curl -H "Content-Type: application/json" -X POST -d "{\"sender\": \"bob\", \"message\":\"Testing message from Python\"}" http://localhost:5001/api/msg/20220905001/python
Check the result. The message is inserted into the table:
curl -X GET http://localhost:5001/api/msg/20220905001/python
Delete a message from the table:
curl -X DELETE http://localhost:5001/api/msg/20220905001/python
The deletion failed because the information about the chat group is invalid.
curl -X GET http://localhost:5001/api/msg/20220905001/python11
Some versions of protobuf may be incompatible with pb2.py files in the current installation package. You can manually generate the pb2.py files to try to resolve this problem. Perform the following steps:
1. Use the current version of protoc to generate the code corresponding to the proto files in sequence.
protoc --python_out=. tablestore/protobuf/search.proto
protoc --python_out=. tablestore/protobuf/table_store.proto
protoc --python_out=. tablestore/protobuf/table_store_filter.proto
2. Change the suffixes of the three generated files to pb2.py and copy them to the tablestore/protobuf/ directory to replace the original *pb2.py files.
The details of the solution above can be found in the Alibaba Cloud Help Center (currently only available in Chinese). The following error messages may be returned when this error occurs:
……
TypeError: Descriptors cannot be created directly.
If this call came from a _pb2.py file, your generated code is out of date and must be regenerated with protoc >= 3.19.0.
If you cannot immediately regenerate your protos, some other possible workarounds are:
 1. Downgrade the protobuf package to 3.20.x or lower.
 2. Set PROTOCOL_BUFFERS_PYTHON_IMPLEMENTATION=python (but this will use pure-Python parsing and will be much slower).
Please visit this link for more information
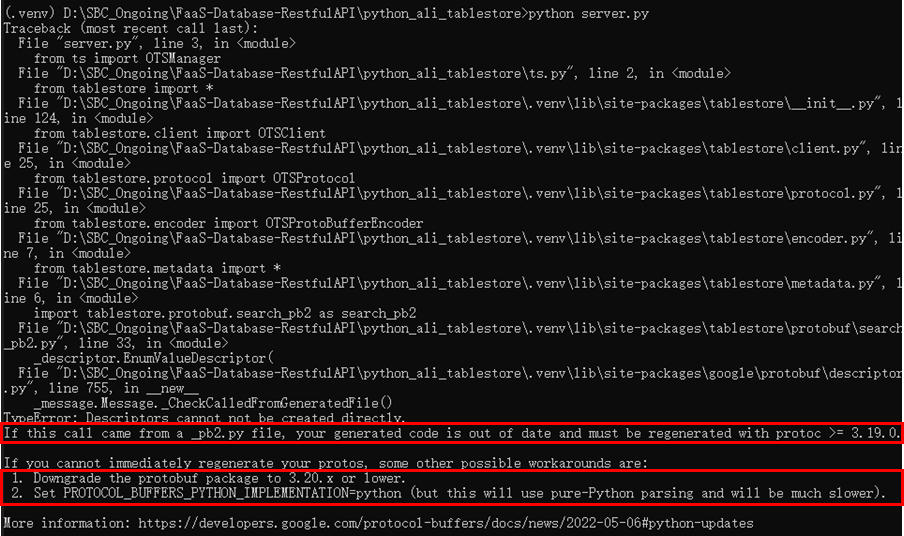
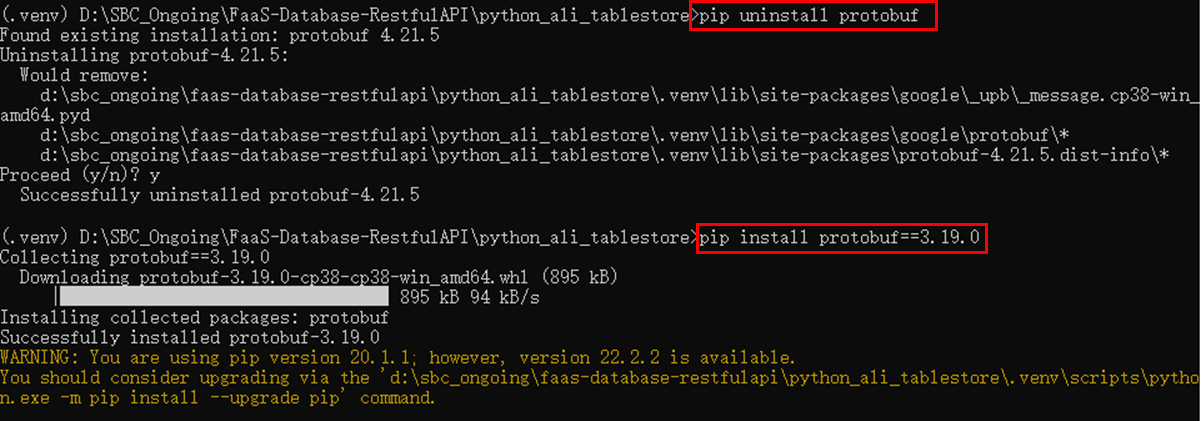
If you do not want to use the preceding solution, fix the error based on the error message. The protobuf package needs to be downgraded to V3.19.0 in this example.
If the OTSAUthFailed error code is returned, the Tablestore client is not properly initiated. Check the AccessKey pair, the endpoint, and the instance ID.

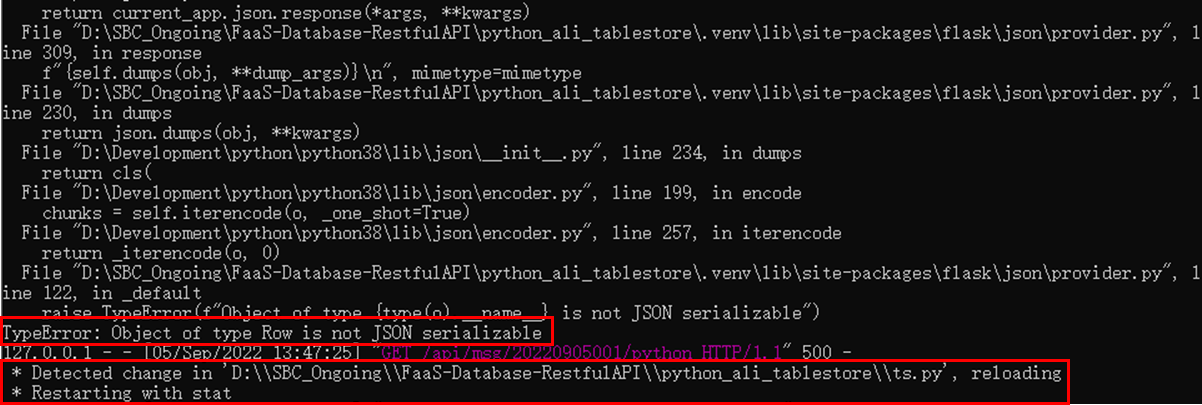
If the Internal Server Error error message is returned, check the stderr information and fix errors in the code.
When the errors are fixed, the Flask server detects and reloads the updated code and automatically restarts.

Tablestore allows you to create a mapping table for a data table and query its information in SQL mode.
In Tablestore CLI, run the sql command to switch to the SQL mode.

The SQL mode is not supported in the Japan (Tokyo) region. If you enable the SQL mode for a Tablestore instance in the Japan (Tokyo) region, the OTSInternalServerError error is returned.
The following error messages may be returned when this error occurs:
tablestore@SQL> show tables;
OTSInternalServerError Internal server error. 0005e70b-af4d-1323-8e6c-ca0b01cb1bee
tablestore@SQL>
You can also switch to the SQL mode in the Tablestore console. On the instance management page, instances that support this mode are tagged with the Query by Execution SQL Statement tag. Please visit this page for more information about the steps.
I have introduced how to build RESTful APIs in Node.js or Python using Tablestore. The methods mentioned in this article are suitable for beginners in scenarios (such as IM services). You can build the RESTful APIs within ten minutes.
Tablestore is a NoSQL database service that offers a wide range of languages, including Node.js and Python. Tablestore facilitates access from applications (such as web applications and mobile applications). Therefore, it can be used to build RESTful APIs regardless of communication protocols in any language. If you want to build RESTful APIs, this article is for reference.
Building an Active-Active Multi-Zone Application with Lindorm

9 posts | 0 followers
FollowAlibaba Cloud Community - June 2, 2023
Farah Abdou - July 4, 2025
Alibaba Clouder - May 6, 2019
Alex - November 8, 2018
Alibaba Cloud Indonesia - September 27, 2023
Alibaba Clouder - November 1, 2018

9 posts | 0 followers
Follow ApsaraDB for HBase
ApsaraDB for HBase is a NoSQL database engine that is highly optimized and 100% compatible with the community edition of HBase.
Learn More Database for FinTech Solution
Leverage cloud-native database solutions dedicated for FinTech.
Learn More Database Migration Solution
Migrating to fully managed cloud databases brings a host of benefits including scalability, reliability, and cost efficiency.
Learn More Oracle Database Migration Solution
Migrate your legacy Oracle databases to Alibaba Cloud to save on long-term costs and take advantage of improved scalability, reliability, robust security, high performance, and cloud-native features.
Learn MoreMore Posts by Hironobu Ohara