By Sunny Jovita, Solution Architect Intern
Nowadays, real-time data analytics are generally used across all industries. Real-time data solutions are inceredibly advantagous since they save time as the business world becomes more data and customer-centric. Real-world cases like fraud detection, real-time alerts in healthcase and network attack alert require real-time processing of instant data. This is due to the fact that even a small delay can have a huge impact, imposing us to deliver immediate value to customers. A tool that can input data as a stream rather than a batch would be ideal for such real-time use cases. Apache flink is certainly suitable as that real-time processing tool.
This article will explain about how to employ a real data streaming solution using Flink for MySQL sharding tables into Hologres data warehouse. This concludes the following sections:
Realtime Compute for Apache Flink is an enterprise-class, high performance real-time big data processing system that is developed by Alibaba Cloud based on Apache Flink.
As a real-time stream computing engine, Flink can process a wide range of real-time data. You can also subscribe to updates of binary logs in relational databases, such as ApsaraDB RDS and PolarDB. Then, you can use DataHub, Log Service, and Message Queue to subscribe to real-time data. After Realtime Compute for Apache Flink reads the real-time data, it analyzes and processes the data in the real time. The analytic results are written to a variety of data services, such as MaxCompute, Hologres, Machine Learning Platform for Artificial Intelligence (PAI), and Elastic Search. You may choose the best data service depending on your business’ needs in order to maximize your data utilization.
1) Why Flink?
In the early of traditional data warehousing architecture, you would often select the full data to be imported into multiple data warehouses every day and analyzed it offline. This architecture has a number of drawbacks, including querying whole business tables daily, which will potentially harm business stability, and as the volume of data keeps expanding, there will be an increase in strain on the data, resulting in a bottleneck performance.
As the time goes by, data warehousing has evolved out of the need of improving the existing issues. The emergence of Flink CDC presents some innovative solutions for data warehousing architecture to address difficulties in traditional data warehouses. With the full-incremental integrated real-time synchronization capability of Flink CDC technology and the update capability provided by data lakes, the entire architecture becomes simple and precise. We can use Flink CDC to read full and incremental data from MySQL and write and update data to Hologres.
Flink is more than just a stream computing engine; with the help of its streaming and batching API, most data analysts can now create real-time data integration, analysis, risk control, and online machine learning scenarion solutions. Flink becomes extremely powerful due to its wide range of applications, and most importantly is real-time data streaming.
CDC is a technology that is used to capture data changes in a database. Flink uses CDC technology to capture any changes happen in a database. Flink cdc implements integrated reading capabilities of full and incremental data based on the change data capture technology of database logs. The core of Flink cdc technology is to support data capture from various databases and real-time synchronization of these changes to downstream storage. Without the need for a middleman like Kafka, the Flink CDC connectors can be used directly in Flink in either an unbounded mode (streaming) or batch mode.
2) Comparing Storm, Spark, and Flink
At its beginning, Flink was able to quickly defeat the previous generation stream computing engine like Spark and Storm using the core concept and characteristics of "stateful stream computing". Flink not only provides high-performance pure stream computing, but it also provides users with accurate data consistency assurance. This is the main reason why, after its initial release, Flink quickly became the new mainstream in the field of stream computing.
Spark Streaming, with its powerful Spark ecosystem, can also be a viable option for some stream computing scenarios. However, when it comes to complex stream processing, Flink outperforms Spark. Its real-time processing reduces data latency and makes it an ideal choice for applications that requires fast data processing. This makes it the perfect option for use cases such as financial analytics and fraud detection. Thus, this gives Flink an upper hand since it is faster than Spark and can process data briskly.
Storm and Flink share the ability to process unbounded data streams in real-time with low latency stream processing via pipelined data transfer. However, the main conceptual difference between Storm and Flink is state handling. While Storm requires the Trident API to manage state and fault tolerancy, Flink handles state in-memory and on disk, making the process of checkpointing and state management faster in Flink. This also makes the maintenance, troubleshooting, and upgrading processes easier in Flink, because the state of an application and the state of the different operators within the data pipeline are saved.
Another important point, Flink's adjustable latency refers to the way that Flink sends records from one task to other. Flink uses pipelined data transfers and forward records as soon as they are produced. For efficiency, these records are colleted in a buffer which is sent over the network once it is full or a certain time threshold is met. However, bear in mind that it cannot be used to give full guarantees about the time it takes for a record to enter and exit a program because this also depends on the processing time within tasks and number of network transfers among things.
If you have installed the Flink system on your local server, you can directly migrate it to Realtime Compute for Apache Flink. If you have installed the Storm or Spark Streaming system on your local server, you can rebuild and then migrate it to Realtime Compute for Apache Flink.
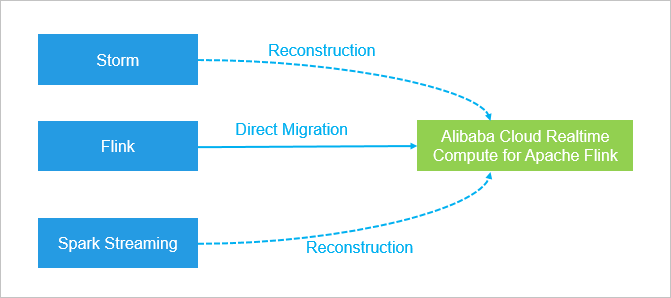
image source: https://www.alibabacloud.com/help/en/realtime-compute-for-apache-flink/latest/scenarios
Realtime Compute for Apache Flink is widely used for real-time big data computing.
Sometimes, in order to deal with a large number of data in a single table, we usually do table and database sharding to get better output. But sometimes, for convenient analysis, we need to merge them into one table when loading them to data warehouse or data lake.
Service Types
Realtime Compute for apache Flink provides 4 different service types.
1) Fully-managed Flink: focus more on business development wthout the need to spend extra time on cluster O&M.
2) Semi-managed Flink (E-Map Reduce based): full control over all cluster resources during business development and is familiar with YARN or Alibaba Cloud E-MapReduce.
3) Blink exclusive cluster
4) Blink shared cluster
Note: we recommend you to choose the full managed Flink service type if you want to purchase Realtime Compute for Apache Flink.
Architecture
Fully managed Flink allows you to ingest data into data warehouses in real time. This guide explaines how to build a deployment that synchronizes data from MySQL to Hologres in the console of fully managed Flink. 
MySQL cdc connector allows for reading snapshot data and incremental data from MySQL database.
CDC connector is used to capture data changes in a database. Not only for capturing data changes, its application scenarios are extensive, including:
‒ Data distribution: Distributes a data source to multiple downstream nodes. It is commonly used for business decoupling and microservice.
‒ Data Integration: Decentralized and heterogeneous data sources are integrated into the data warehouse to eliminate data silos and faciliate subsequent analysis.
‒ Data migration: commonly used for DBS and disaster recovery.
We will use Flink CDC to capture changes from ApsaraDB RDS for Mysql and synchronize these changes to downstream storage in real-time.
Note: Flink CDC not only supports MySQL as data sources, it supports other databases such as MariaDB, Oracle, MongoDB, etc.
The core of Flink CDC technology is to support real-time consistency synchronization and processing of full data and incremental data in tables so that users can easily obtain real-time consistency snapshots of each table. For example, a table contains historical full business data and incremental business data is continuously written and updated. Flink CDC captures incremental update records in real-time and provides snapshots consistent with those in the database in real-time. If the records will be updated, it will update the existing data. If records will be inserted, the data will be appended to the existing data. Flink CDC provides consistency assurance during the whole process, which means there is no duplication and lost data.
https://www.alibabacloud.com/blog/flink-cdc-series-part-1-how-flink-cdc-simplifies-real-time-data-ingestion_598910
**
Prerequisites**
1) An Alibaba Cloud account.
2) Prepare test data
Download these test data below to your on-premises computer.
3) A fully managed Flink workspace, and assign role permissions.
Prerequisites
-Authorization Request
You are required to perform automated authorization when you purchase fully managed Flink for the first time.
a) Log on to the Realtime Compute for Apache Flink console.
b) In the Fully Managed Flink section, click Purchase.
c) On the Authorization Request page, click Authorize in RAM.
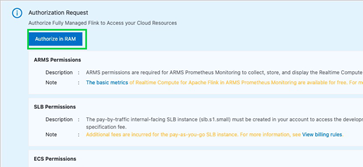
d) On the Cloud Resource Access Authorization page, click Confirm Authorization Policy in the lower part of the page.

-Attach AliyunRDSFullAccess policy to the RAM role:
a) Log on to the RAM console as a RAM user or using your Alibaba Cloud account.
b) In the left-side navigation pane, choose Identities > Users > Add Permissions to the target user.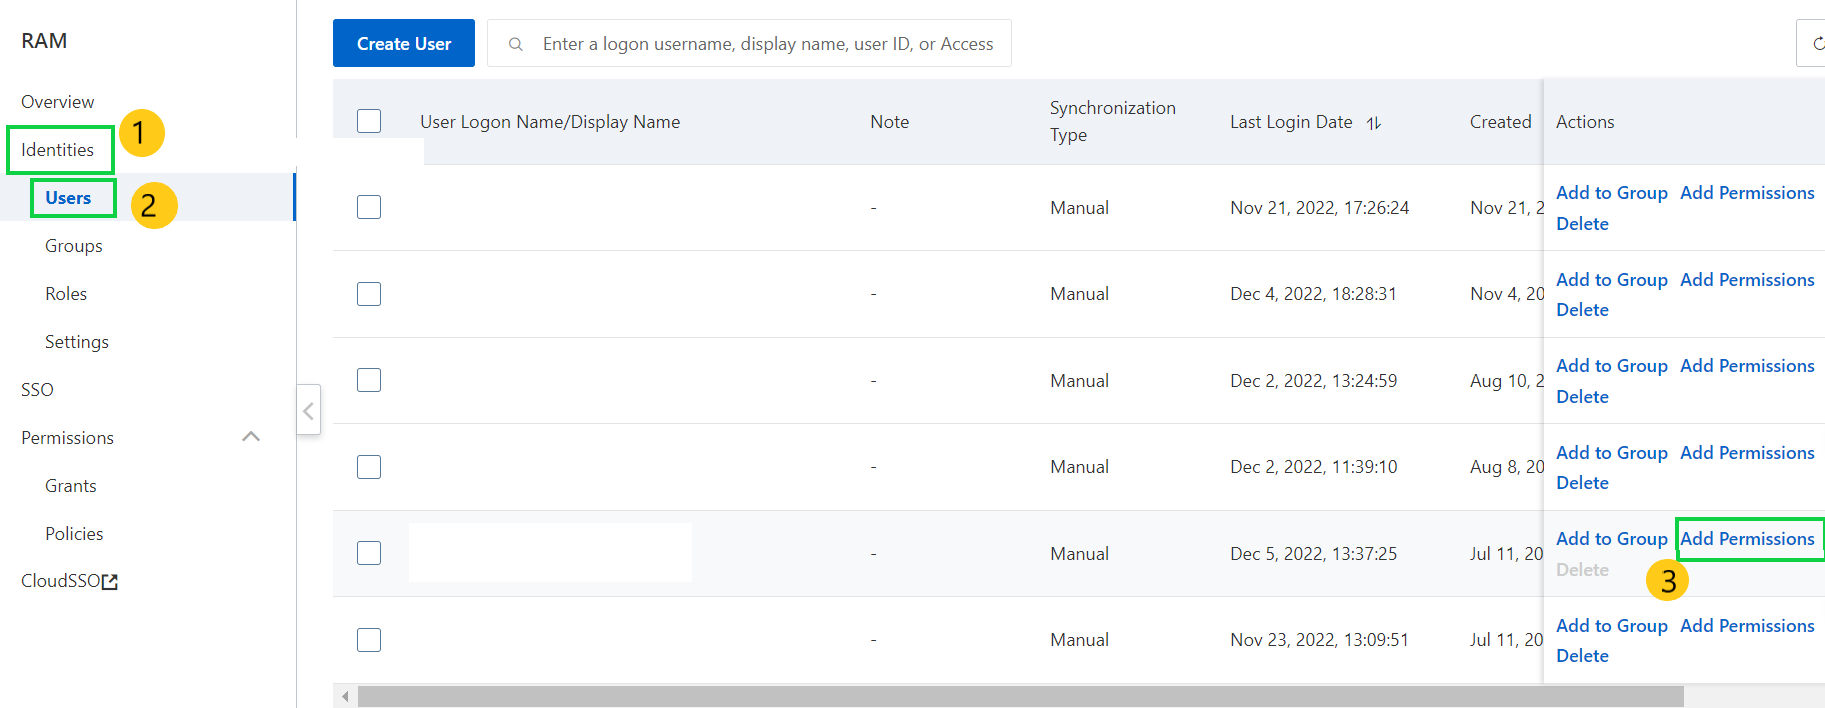
c) On the Add Permissions page, select System Policy, scroll down and search AliyunRDSFullAccess, AliyunHologresFullAccess roles and click Input and Attach in the Actions column. 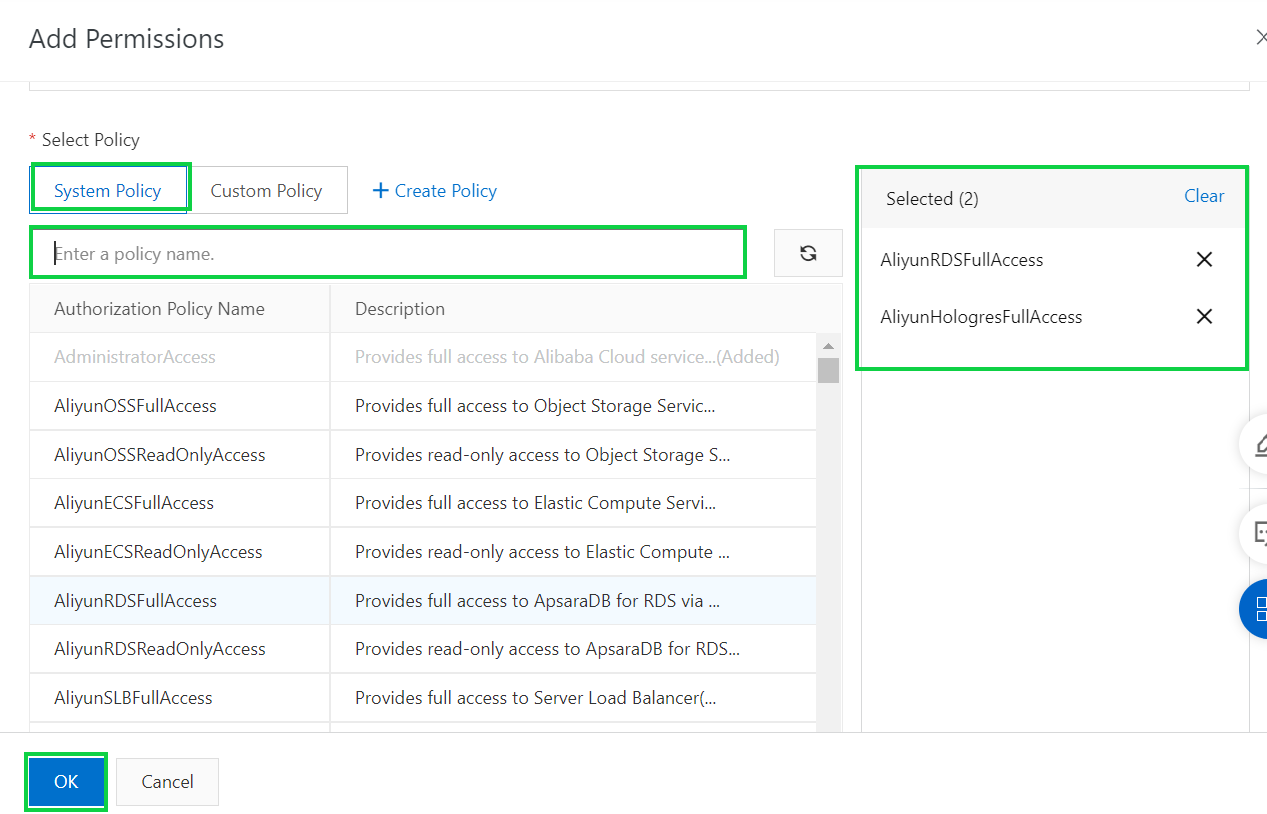
Note: If you attach these policies to the RAM user, the RAM user can view the information about all instances and purchase instances in the Hologres and ApsaraDB RDS consoles.
-Procedure for activating the service
1) Log on to the Realtime Compute for Apache Flink console
2) In the Fully Managed Flink section, click Purchase. 
3) On the purchase page, specify the configuration information.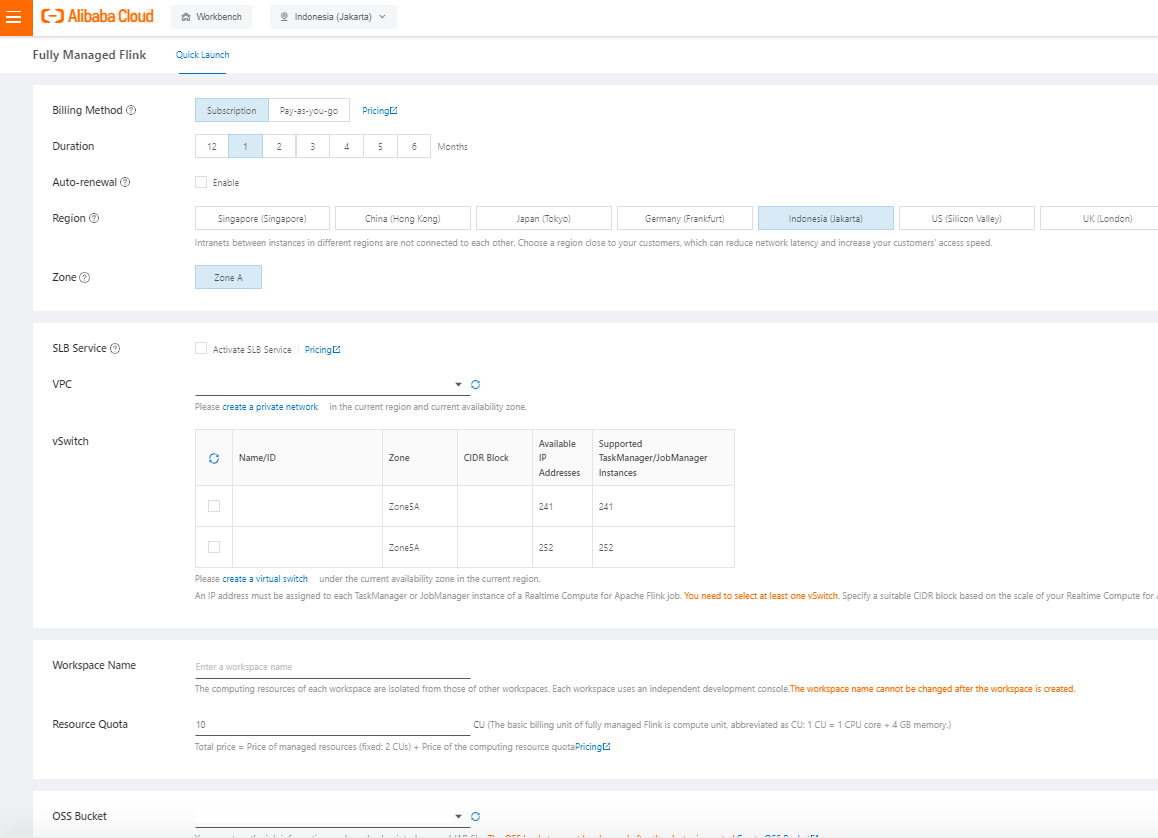
By default, the project named Workspace name-default is generated after the workspace is created.
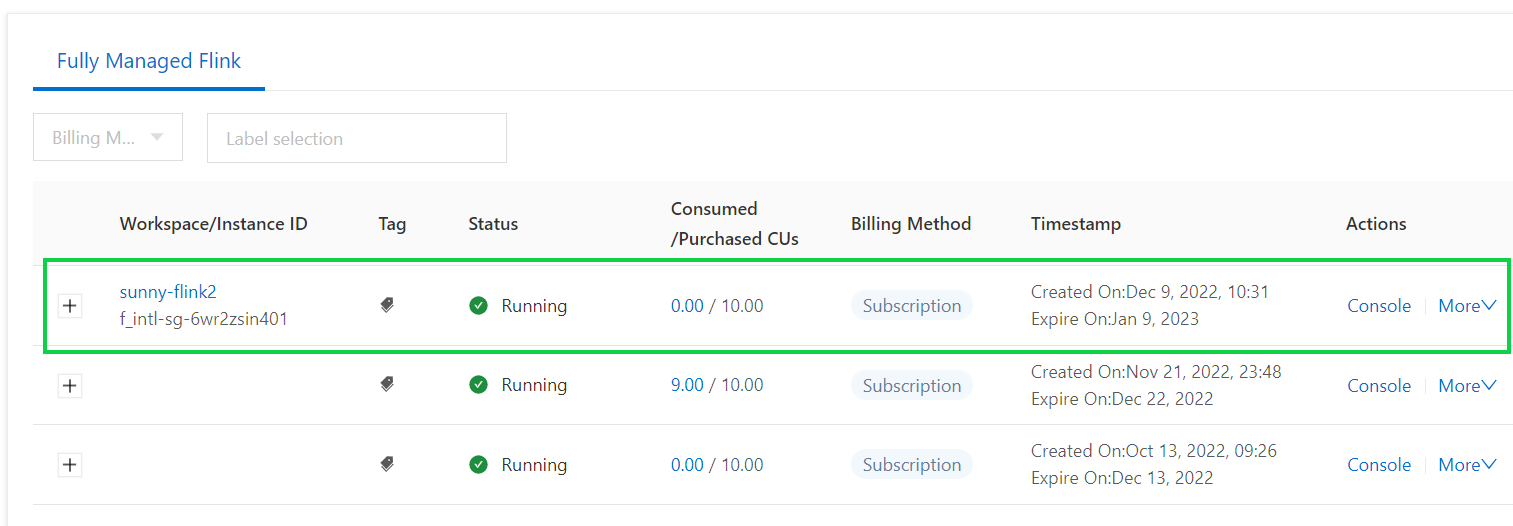
4) Upstream storage: create an ApsaraDB RDS for MySQL.
a) Purchase the ApsaraDB RDS instance.
b) After purchasing the instance, click the targeted instance and go to Database page.

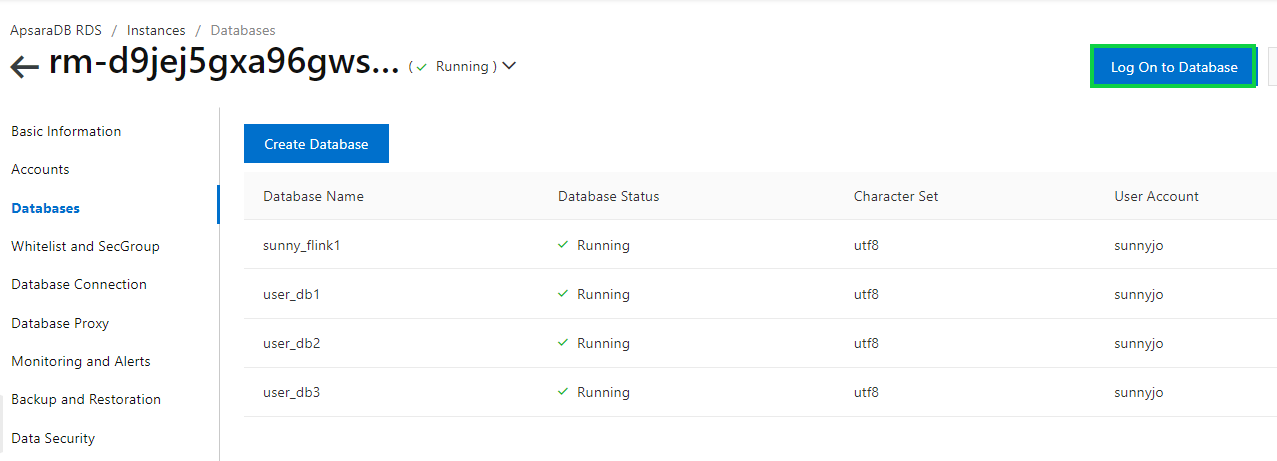
c) Fill out the required fields. (note: in here, we will create 3 databases, namely user_db1, user_db2, and user_db3) it’s same like the test data name).
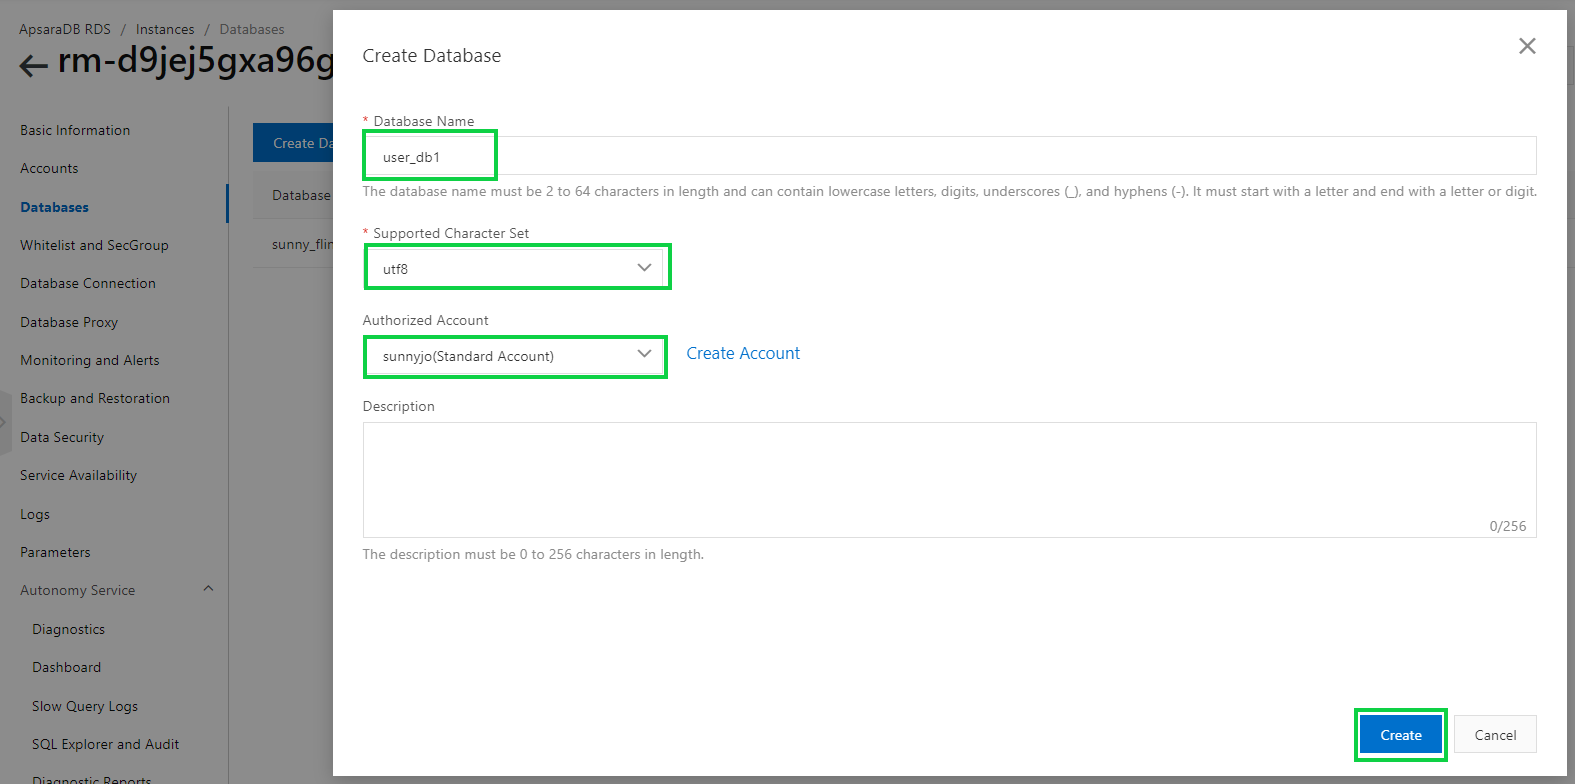
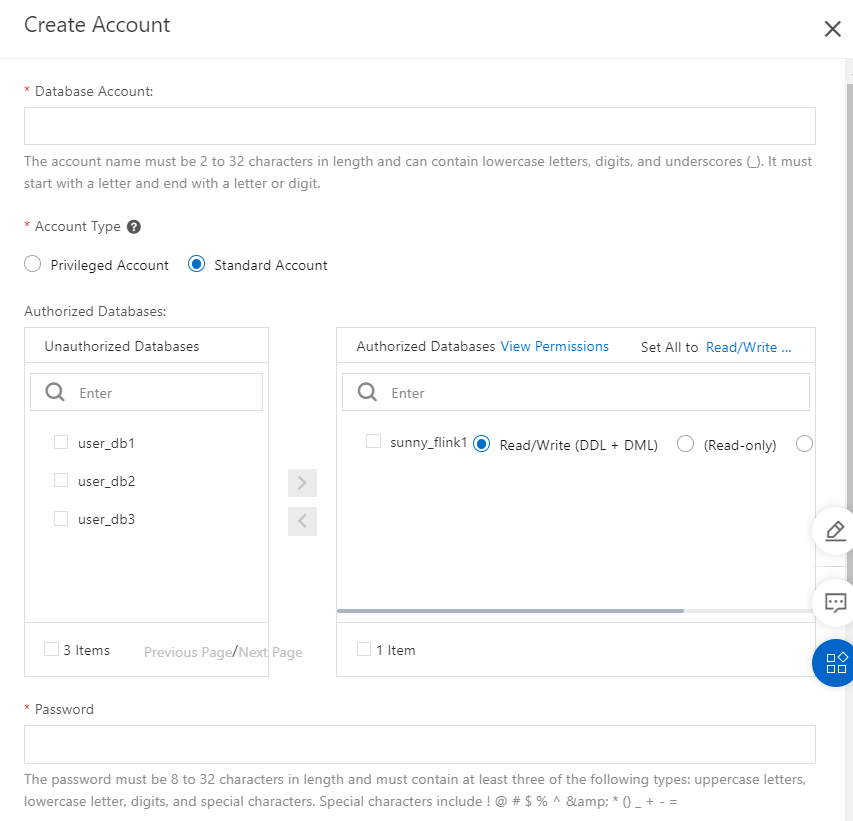
d) After creating the database, go to the Accounts page, and click Create Account.
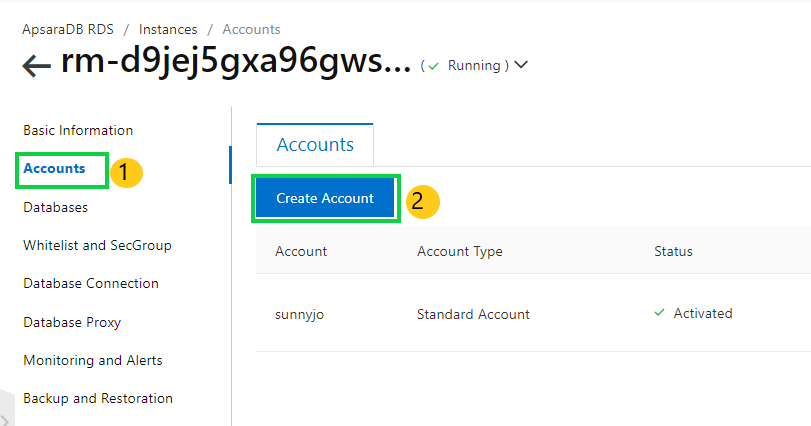
e) Specify the required details, select the targeted database, and click OK
f) To go to the DMS console, Click Log On to Database button on the right side.
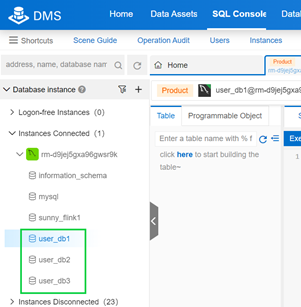
g) After you login, you will see your database that you have created before. (db1, db2, db3).
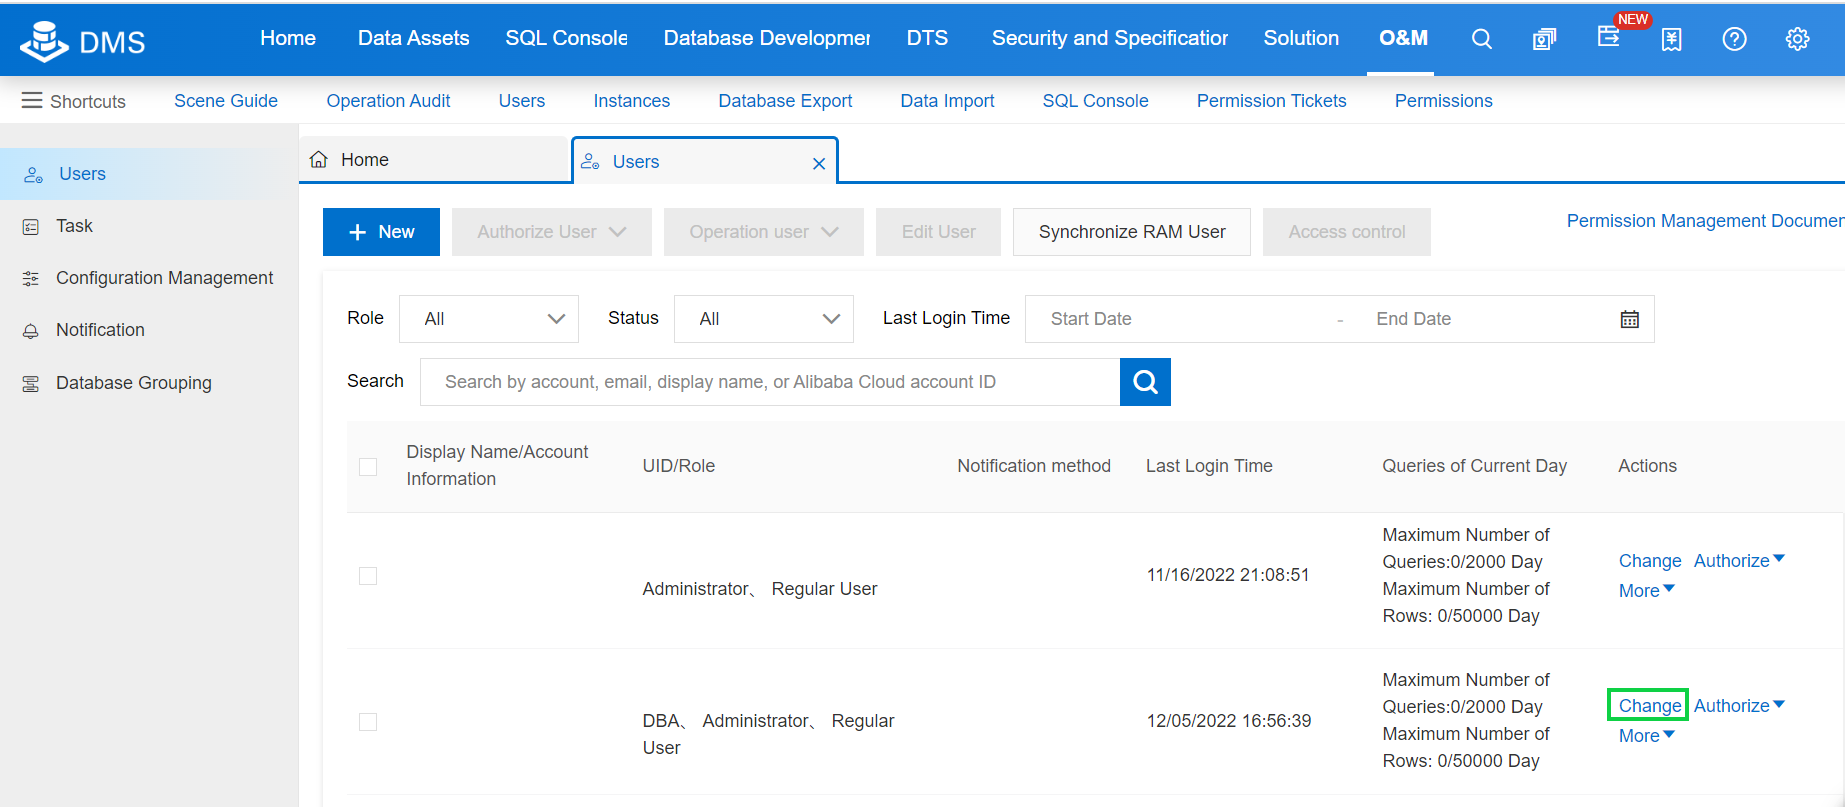
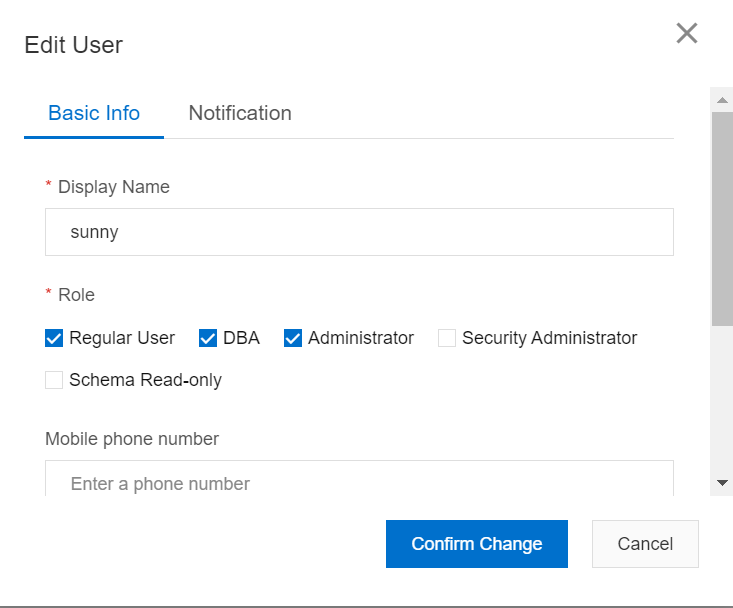
h) Before going thru the dms console, first of all we need to assign ourself as a dba administrator. To assign a dba administrator, we can go to Users, click Change, and select the DBA role.

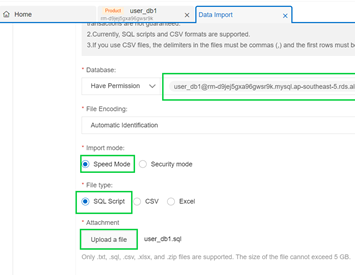
i) Click Data Import to import your test data into each database.

j) Specify the database, import mode, file type, and upload your data in accordance with your database name. (if you select user_db1, then upload your user_db1 sample data). Click Submit.
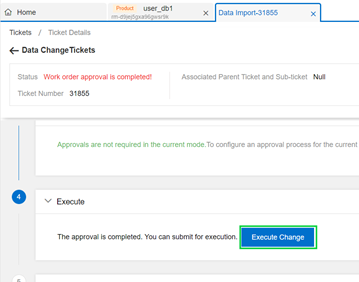
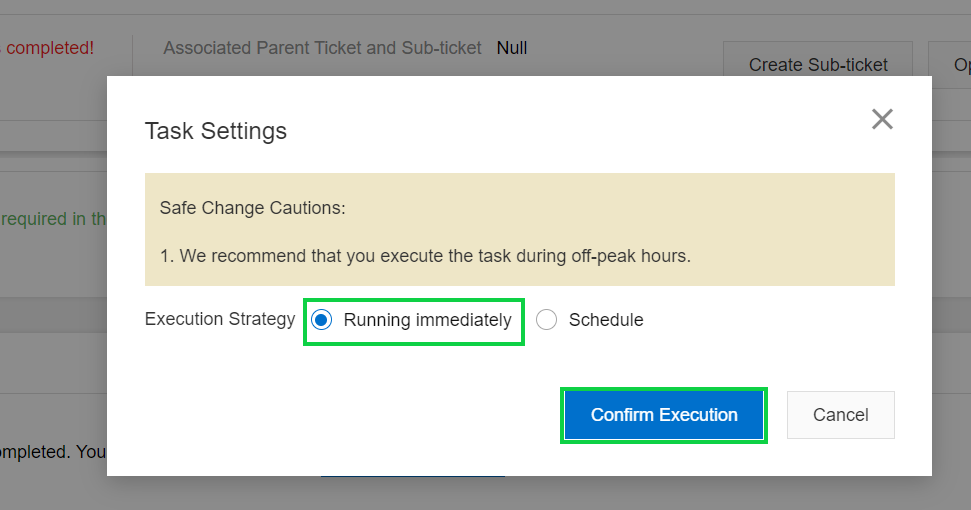
k) After you submit the data, click Execute to start the process.
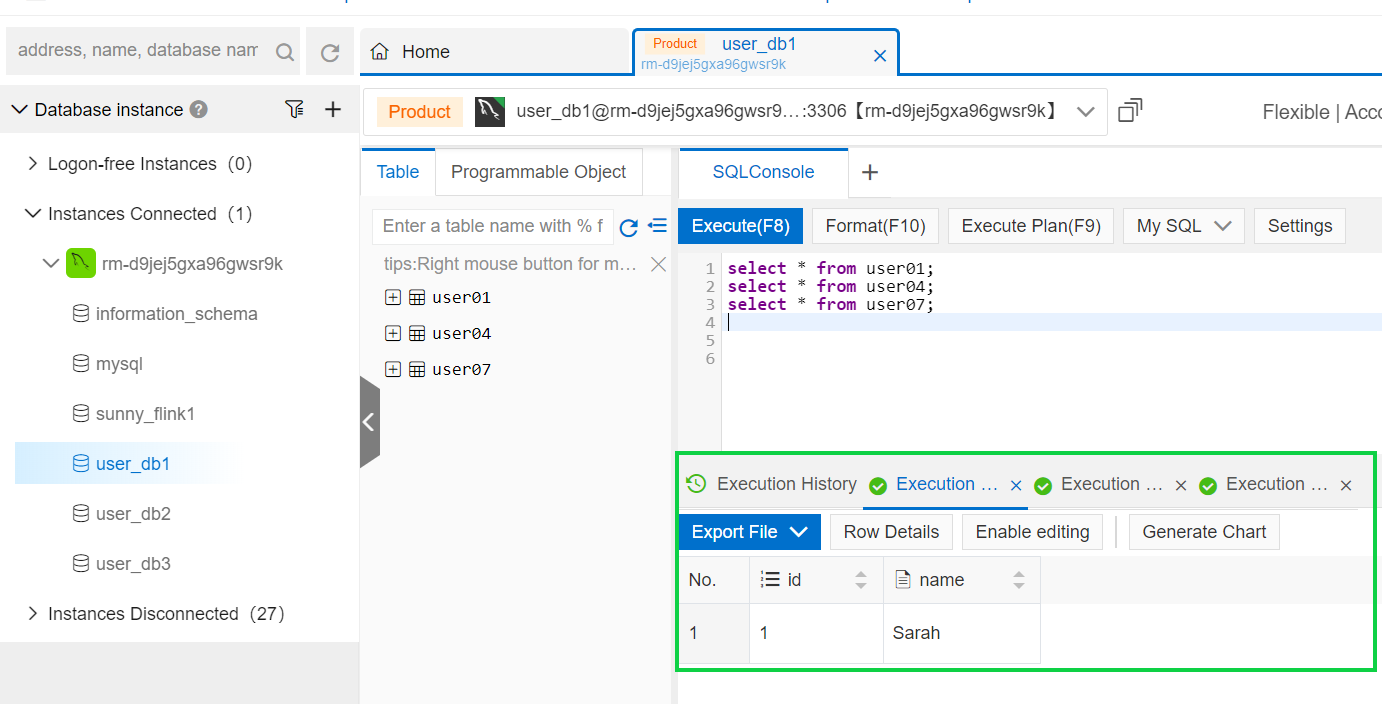
l) You can try to select the query of each database to see if the data have been imported successfully.
5) Downstream storage: purchase a Hologres instance.
a) Purchase a hologres instance.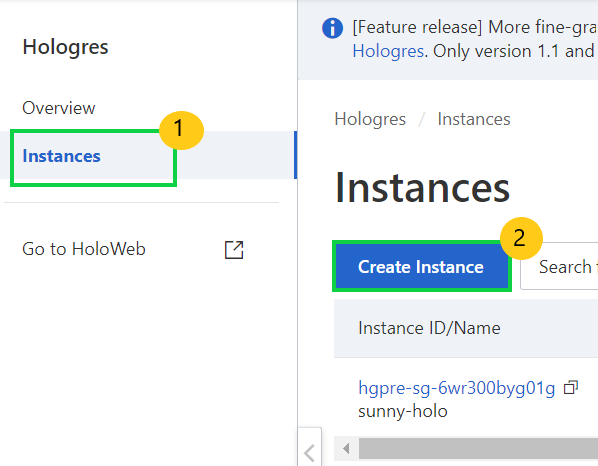
Note: After you purchase a Hologres instance, a database named postgres is automatically created. This database is allocated with a few resources and used only for management purposed. We recommend you to create another database to run the Hologres.
b) Create Database
This section describes how to create a database in the Hologres console.
-Log on to the Hologres Console. Click Instances and find the instance for which you want to create a database.

-In the left-side pane of the instance details page, click Database Management.
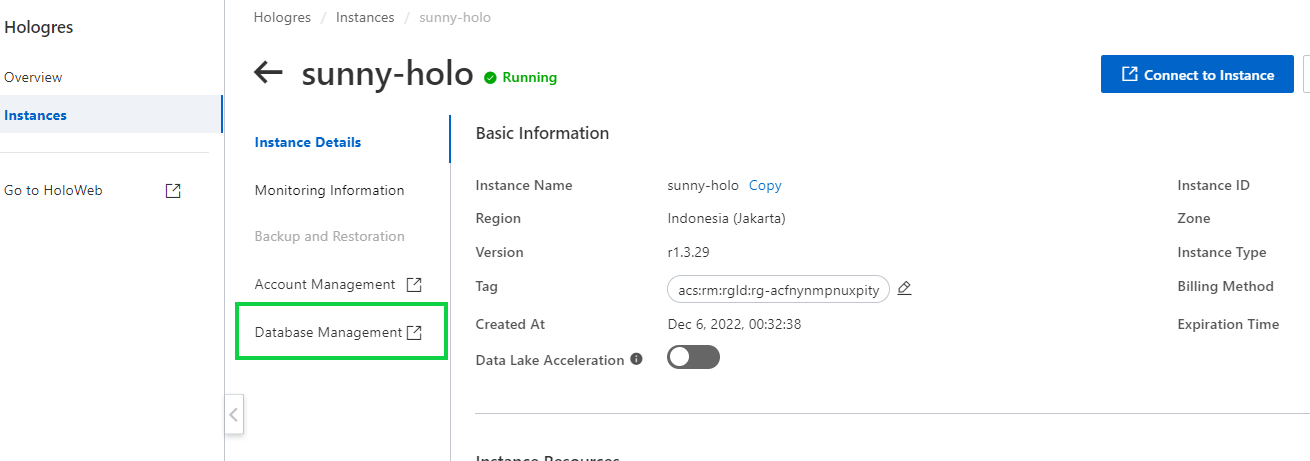
-On the DB Authorization page, click Create Database in the upper-right corner.

-Inside the dialog box, select the name of the targeted instance, enter the database name, and specify the permission model. We recommend you to select SPM.
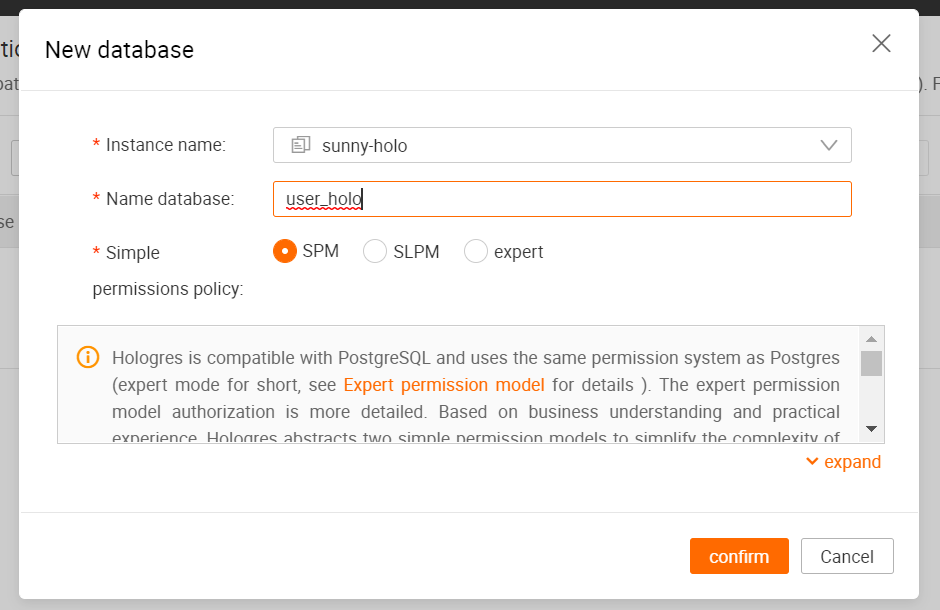
-Click OK. You can view the created database on the DB Authorization page.

This tutorial will show you how to use Flink CDC to build a real-time data streaming for such a scenario. The entire process uses standard SQL syntax without a single line of Java code or IDE installation.
The following section will take the pipeline from ApsaraDB RDS for MySQL to Hologres as an example. The overview of the architecture is as follows:
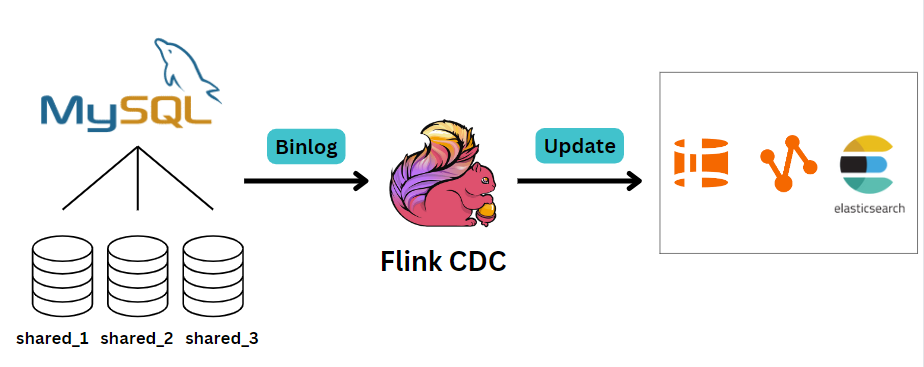
You can also use other data sources like Postgres/Oracle and sinks to MaxCompute/ElasticSearch to build your own pipeline.
Step 1: create catalogs
Catalogs provide metadata, such as databases, tables, and other information needed to access data stored in a database or other external systems.
If you want to synchronize an entire database, merge, and synchronize tables in a sharded database, or synchronize a single table, you must create a destination catalog. You must also create a source catalog to obtain a list of source tables and information about the source tables. You can create both source and destination catalogs in the console of fully managed Flink. In this example, the source catalogs is an ApsaraDB RDS for MySQL catalog and the destination catalog is a Hologres catalog.
Why do We need to create a catalog?
One of the most crucial aspects of data processing is managing metadata. Catalogs provide a unified API for managing metadata and making it accessible from the Table API and SQL Queries. By having catalogs, you can clearly separate the data and making them available from consuming it. Without catalogs, users often work blindly, and this makes them will spend too much time searching for datasets and their location, figuring our data formats and similar cumbersome tasks. Catalog greatly simplifies steps required to get started with Flink with users’ existing system, and greatly enhanced user experiences.
Note: Flink does not store data at rest, it is a compute engine and required other systems to consume input from and write its output. This means that Flink does not own the lifecycle of the data. Integration with Catalogs does not change that. Flink uses catalogs for metadata management only.
1) Go to Flink console.
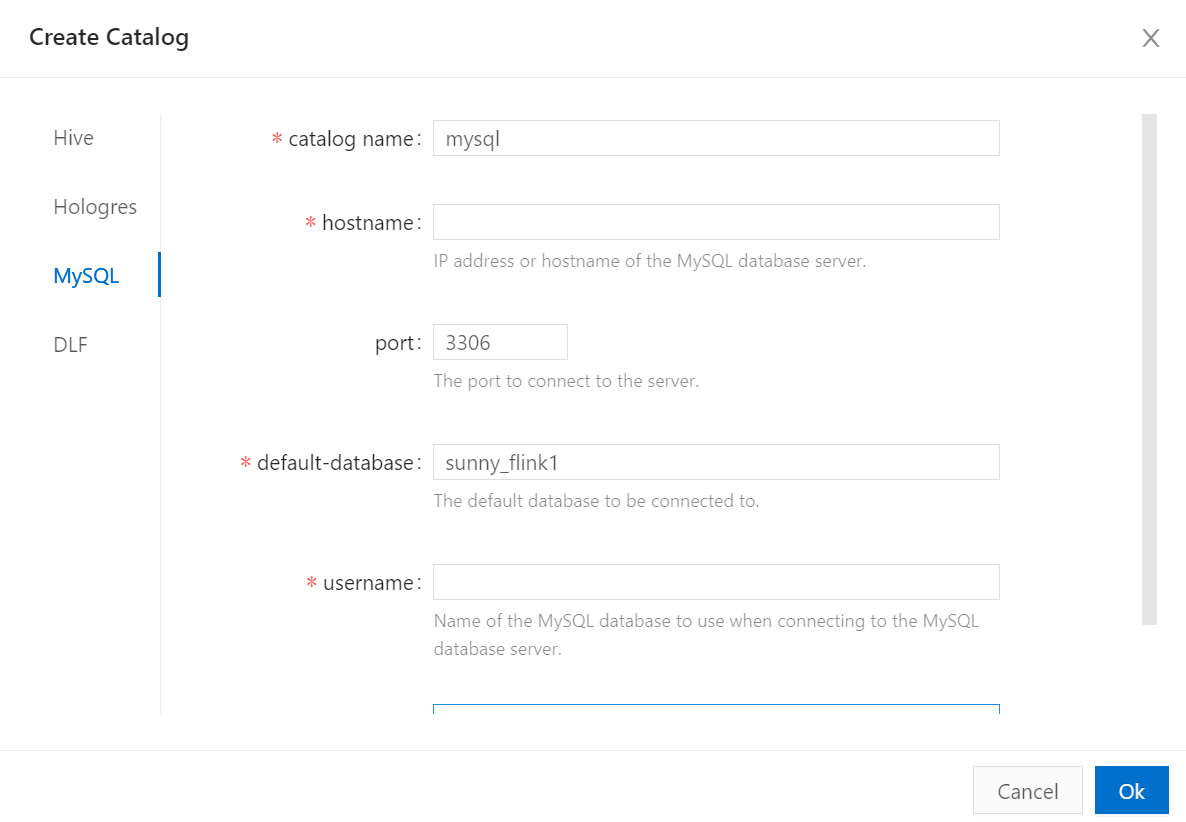
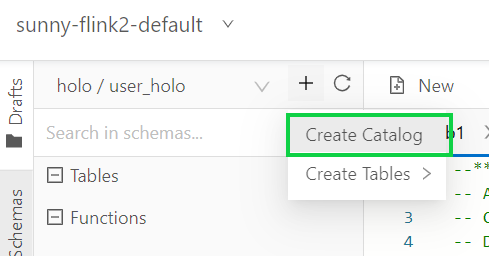
2) Create an ApsaraDB RDS for MySQL catalog named mysql.
For more information, see Configure a MySQL catalog.
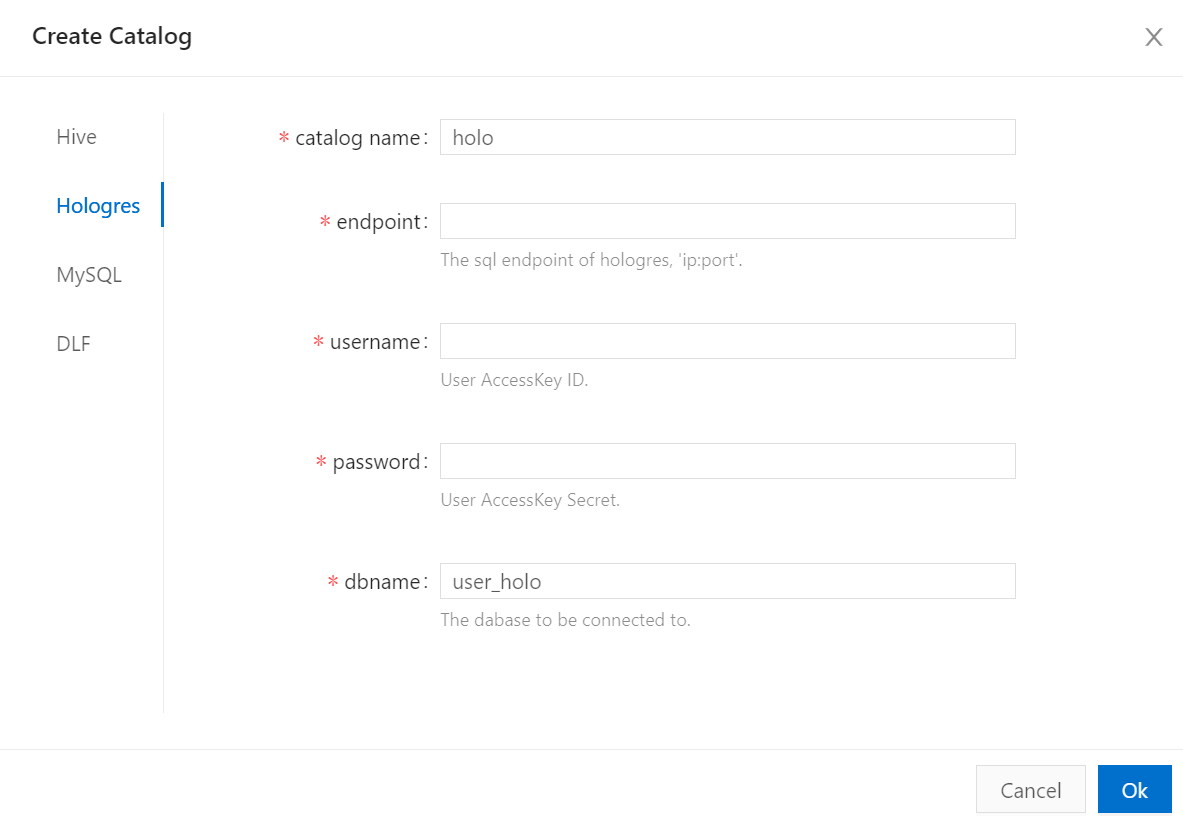
3) Create a Hologres catalog named holo.
For more information, see Create a Hologres catalog.
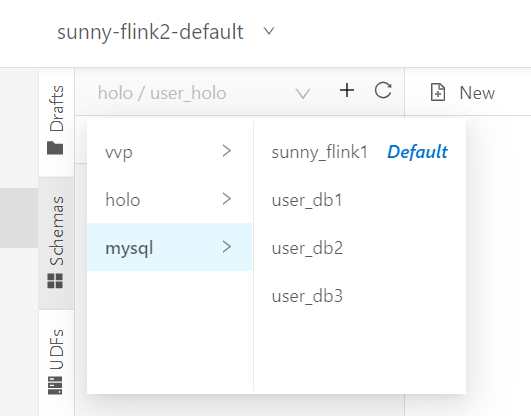
4) On the Schemas tab, confirm that they mysql and holo catalogs are created.
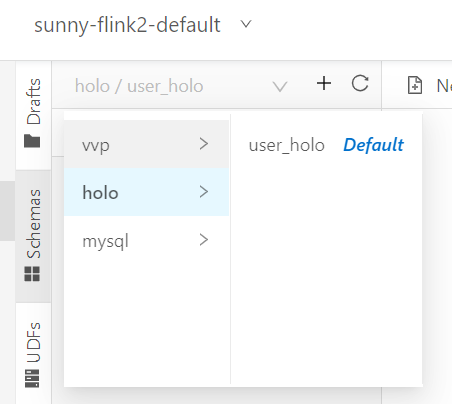
Note: Actually, there is another way to create catalog for destination and source tables, by using SQL create catalog DDL statement.
This section describes how to setup the MySQL CDC connector to run SQL queries against MySQL databases.
In order to setup the MySQL CDC connector, there are two ways:
1) Create MySQL CDC table:
‒ Click draft editor
‒ Click New
2) Create Catalogs for both downstream and upstream storage (ApsaraDB RDS for MySQL and Hologres).
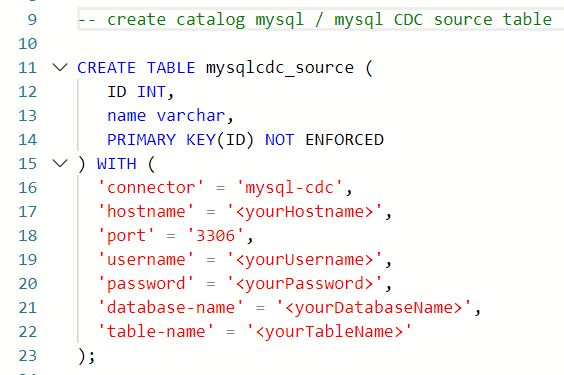
-Create a MySQL CDC source table
Same like MySQL catalog source table, a MySQL CDC source table is a streaming source table of MySQL databases. It reads full historical data from a database and then reads data from binary log files.
Change Data Capture (CDC) connectors capture all changes that are happening in one or more tables. The schema usually has a before and an after record. The Flink CDC connectors can be used directly in Flink in an unbounded mode (streaming), without the need for something like Kafka in the middle.
The MySQL CDC DataStream connector is the source connector that is supported by fully managed Flink. Fully managed Flink uses the MySQL CDC DataStream connector to read full historical data from a MySQL database and then smoothly switches to read data from binary log files. This way, data is not missing and no duplicate data is generated regardless of whether an error occurs. This implements the exactly-once semantics. You can run multiple deployments at the same time to read full data from a MySQL CDC source table by using the MySQL CDC DataStream connector. When the deployments are running, the incremental snapshot algorithm is used to perform lock-free reading and resumable uploads. Click here to learn more about creating MySQL CDC source table.
-Create a Hologres destination table
This section provides the DDL syntax that is used to create a Hologres result table / destination table. 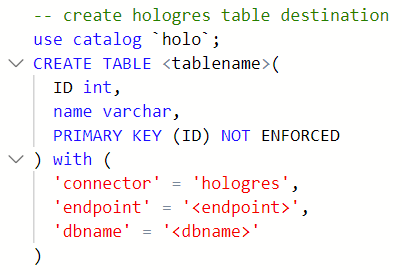
They only have different implementation. (create connection using “Create Catalog feature” or “SQL DDL query”)
Step 2: Create Session cluster
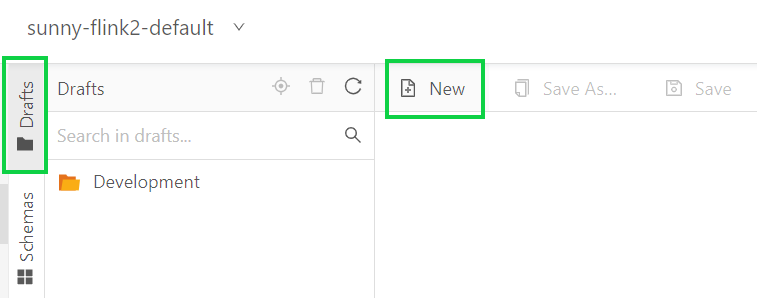
a) In the left-side navigation pane, click Draft Editor.
b) Click New.
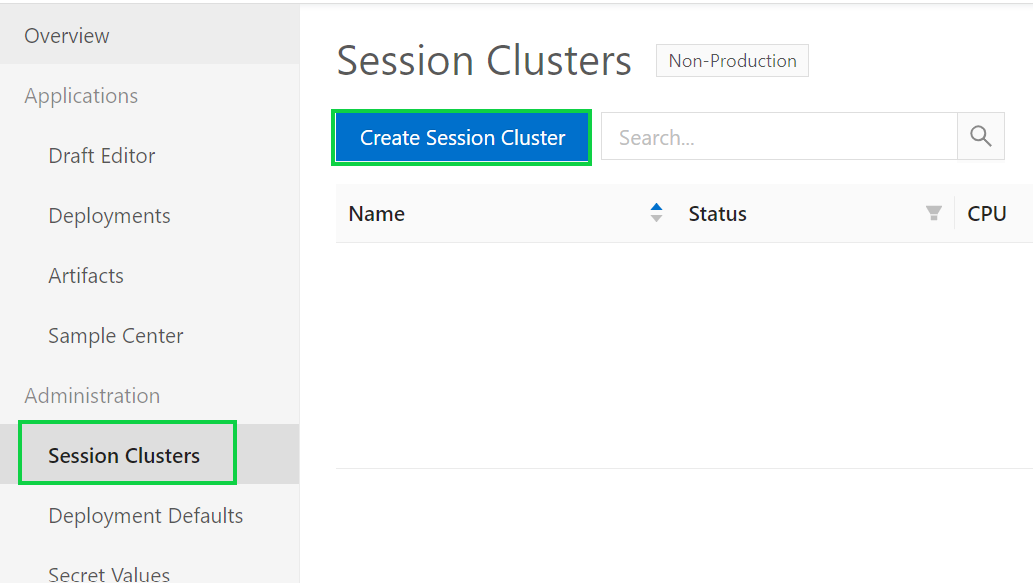
c) In the left-side navigation pane, click Session Cluster and Create Session Cluster to create the deployment target.
d) Specify the required fields and click Create Session Cluster.
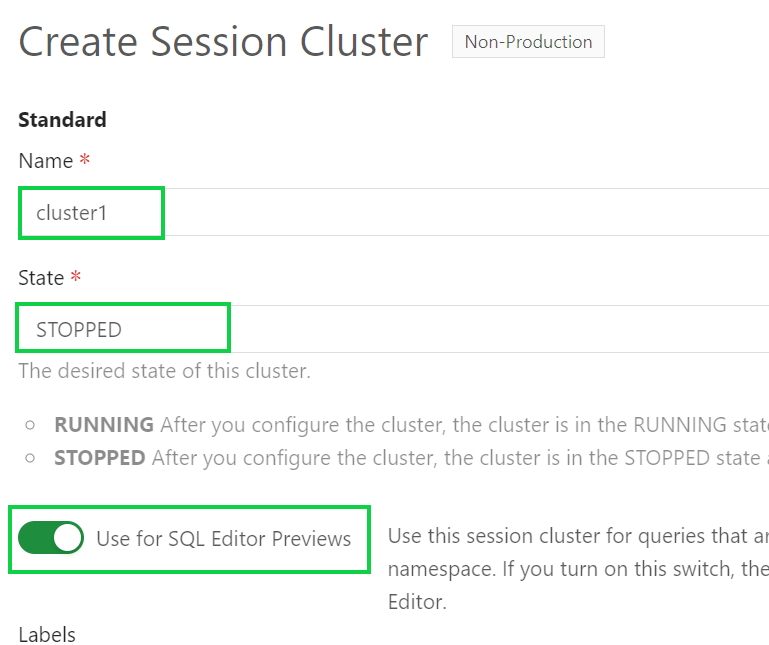
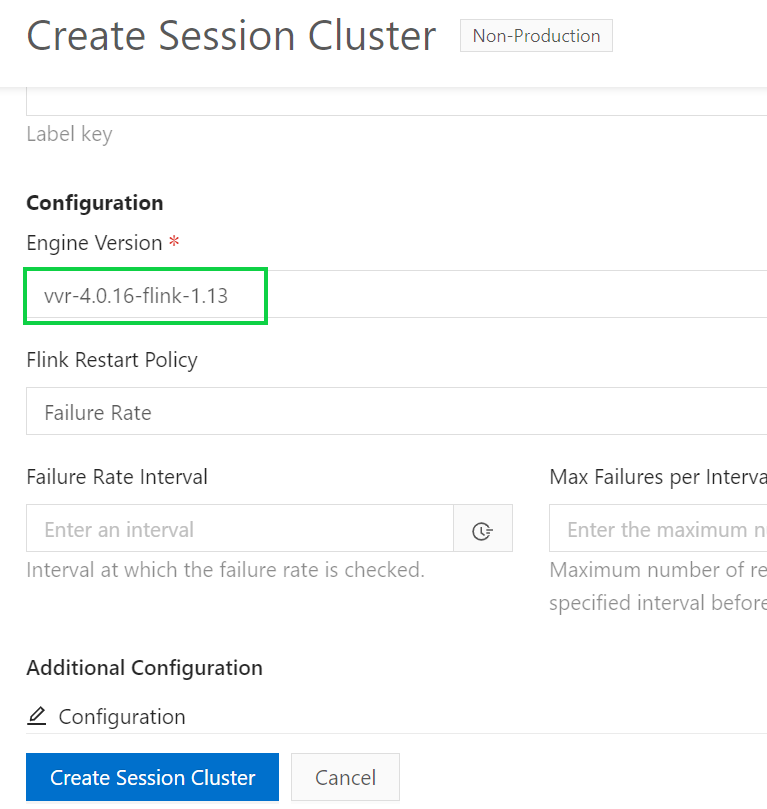
e) you will see the created session cluster after you click Create Session Cluster button. Click Start to run the cluster.


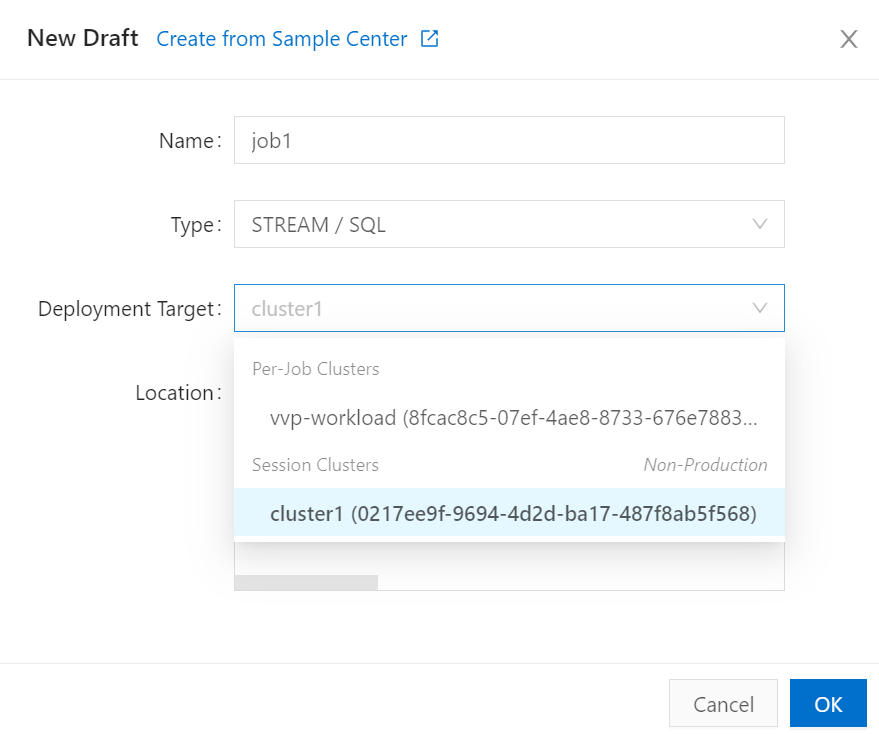
f) Go back to the Draft Editor. In the New Draft dialog box, configure the parameters of the draft. Choose cluster1 that you have created for the Deployment Target.
Step 3: Develop a data synchronization draft
a) Copy the following code of a draft to the code editor
The following sample code shows how to synchronize all tables and merge table user01 to user09 to the user_holo.users table of hologres.
USE CATALOG holo;

BEGIN STATEMENT SET;

-- Synchronize all tables in the tpc_ds database of ApsaraDB RDS for MySQL to the tpc_ds database of Hologres.
CREATE DATABASE IF NOT EXISTS tpc_ds
AS DATABASE mysql.tpc_ds INCLUDING ALL TABLES
/*+ OPTIONS('server-id'='8001-8004') */ ;

-- Synchronize tables user01 to user09 to the my_user.users table of Hologres.
CREATE TABLE IF NOT EXISTS my_user.users
AS TABLE mysql.`user_db[0-9]+`.`user[0-9]+`
/*+ OPTIONS('server-id'='8001-8004') */;
Step 4: Start the deployment
a) In the upper-right corner of the draft editor page, click Publish.
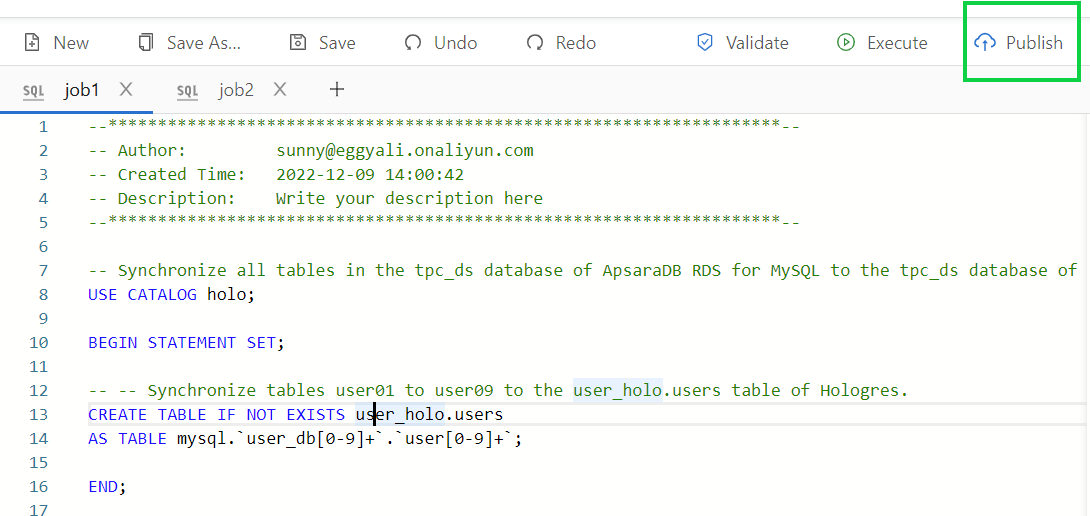
Note: the CREATE TABLE as statement is used to synchronize tables user01 to user09 to a single table in Hologres named users.
However, if you want to synchronize all tables from a single database to Hologres, use CREATE DATABASE instead.
b) Go to the Deployments page, find the desired deployment and click Start in the Actions column.

c) You can view the status and information of the deployment on the Deployments page after the job1 deployment is started. If it says running, this means the deployment is working and the data is being synced.

Step 5: View the full data synchronization result
a) Go to the Hologres console.
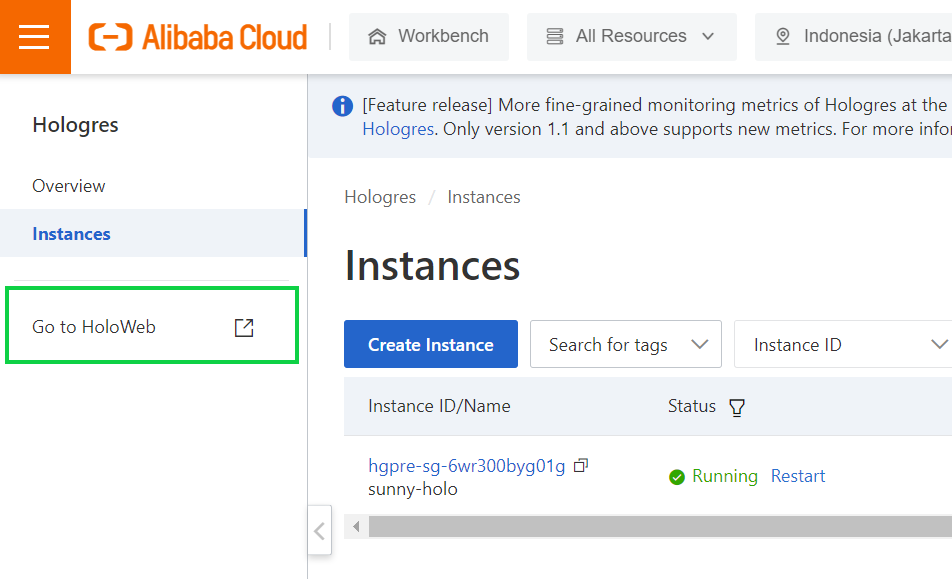
b) In the left-side navigation pane, click Go to HoloWeb. On the
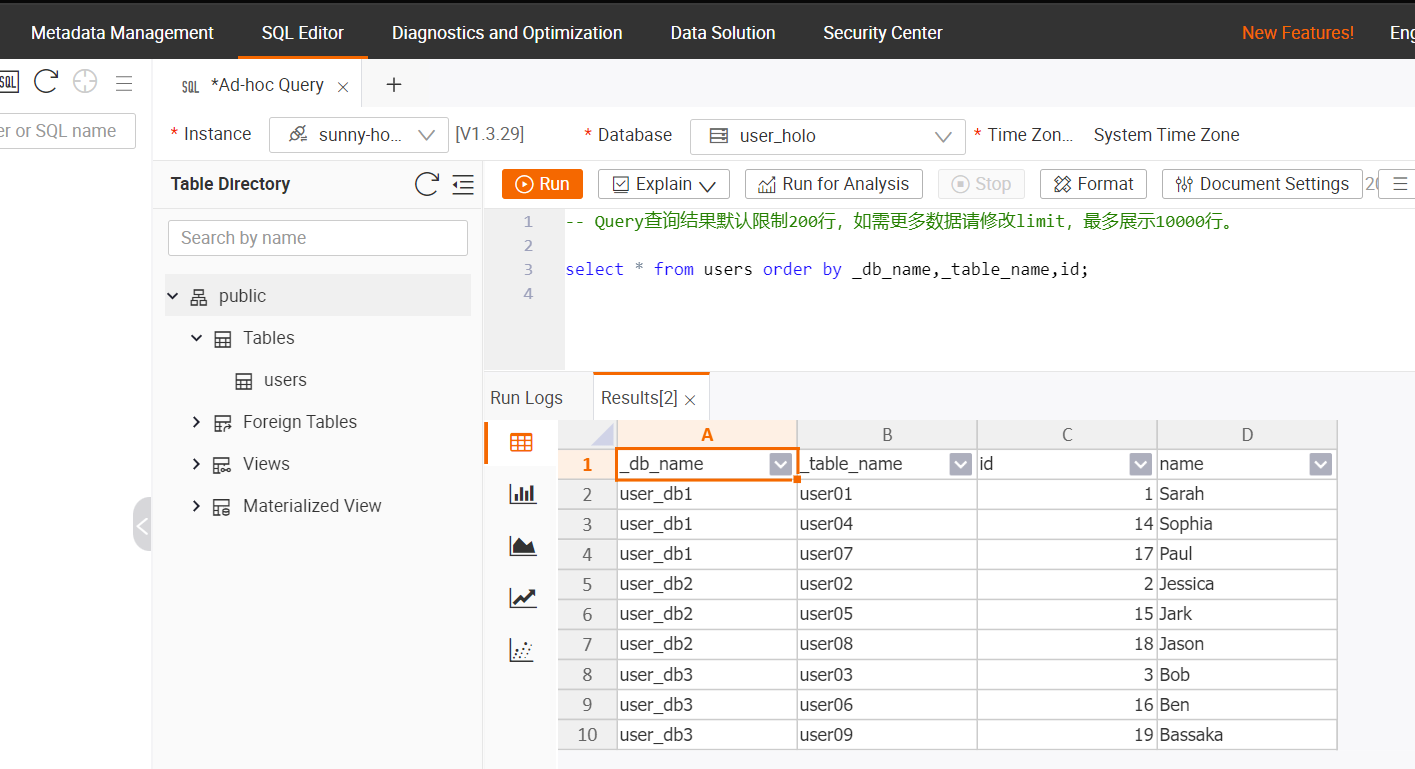
Metadata Management page of HoloWeb, view the merge tables in the user_holo database of the Hologres instance.
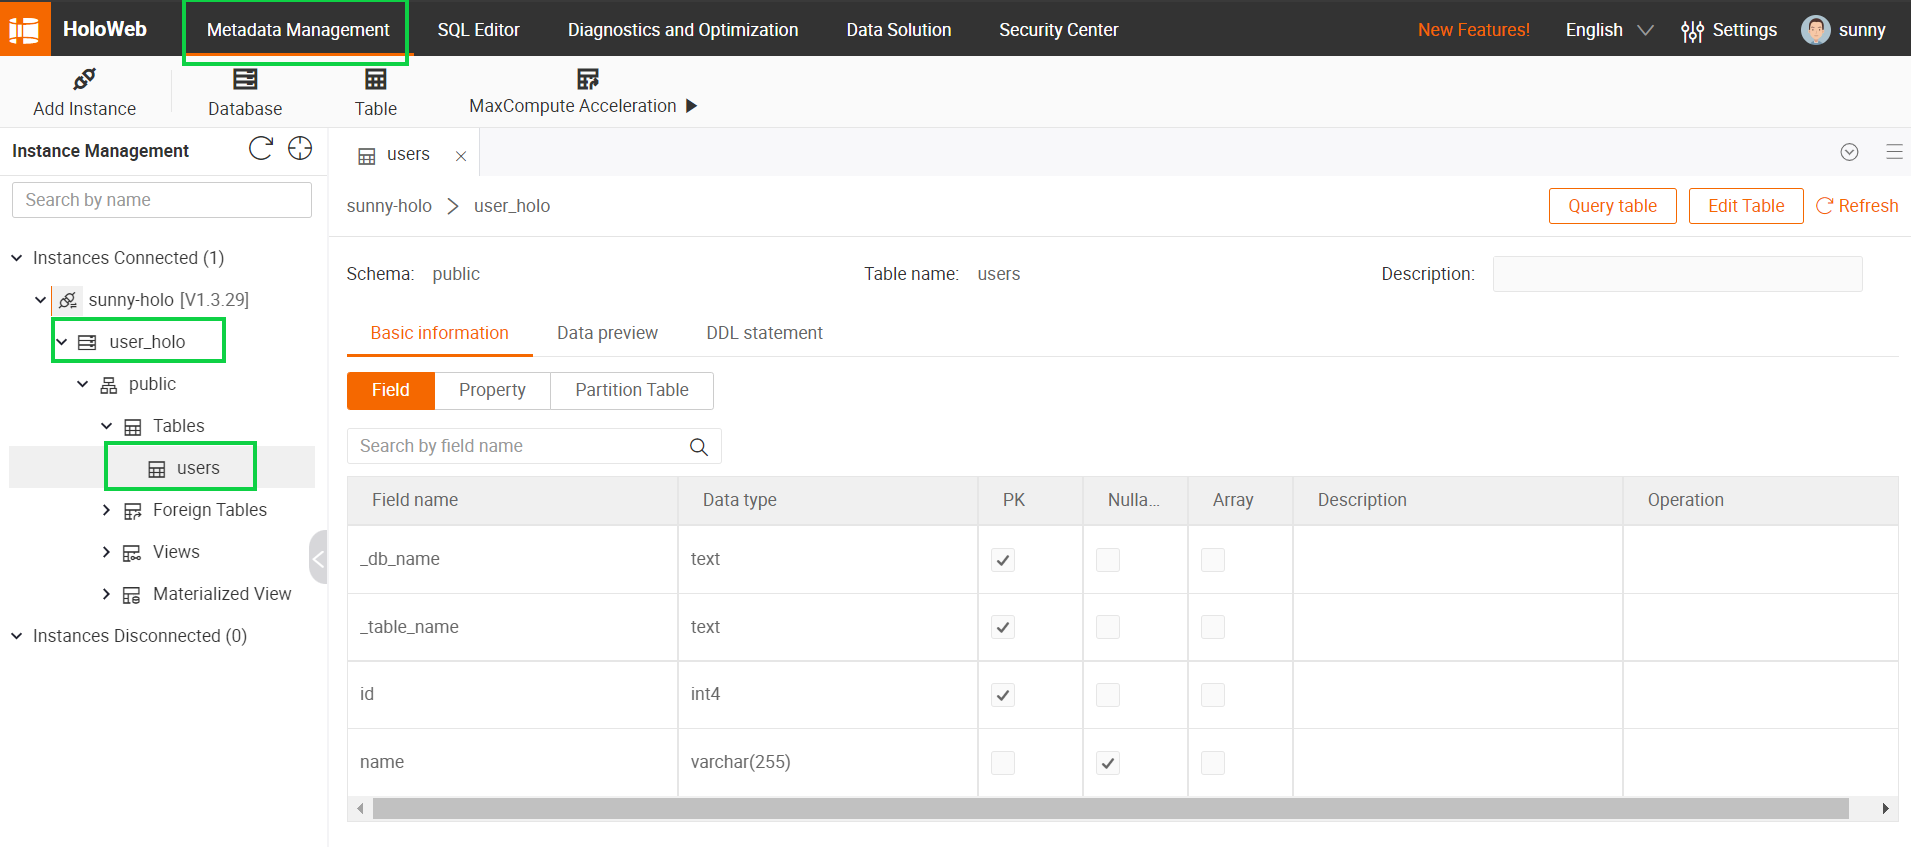
c) To check whether it’s fully synchronized, in the upper right corner of the users tab, click Query table.

d) Enter the following command and click Run.
select * from users order by _db_name,_table_name,id;
e) We can see the data queried in the output section.
Step 6: View the incremental synchronization result
Let's make some changes in MySQL databases, and then the data in Hologres table users will also change in real time.
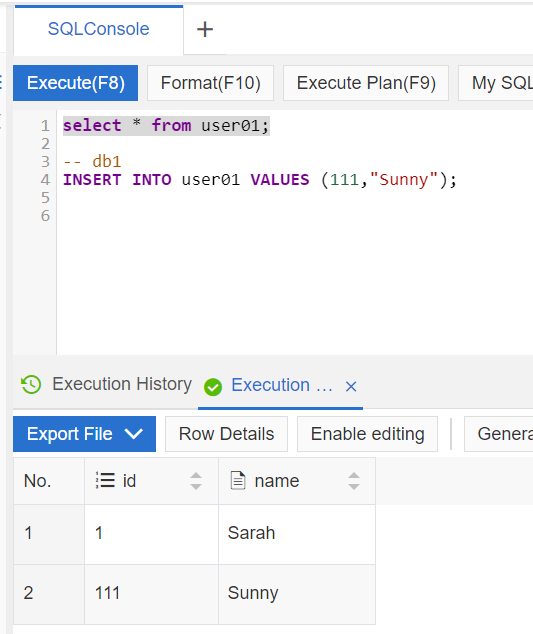
a) Go to the DMS console, Click Log On to Database button on the right side.

b) Insert a new user in table db_1.user01
INSERT INTO user_01 VALUES (111,"Sunny");
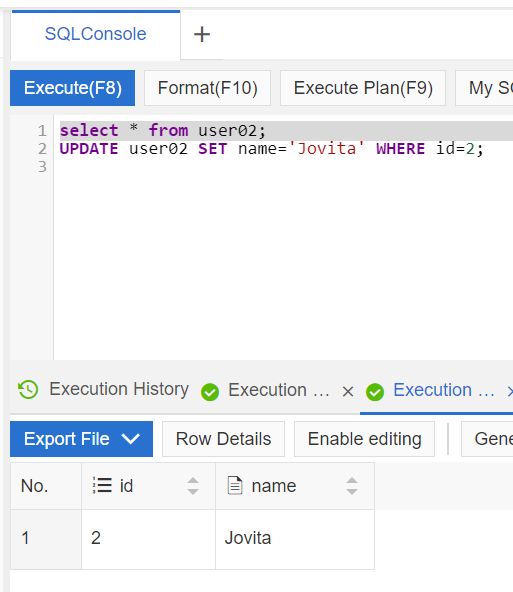
c) Update a user in table user02
UPDATE user02 SET name='Jovita' WHERE id=2;
d) After executing each step, we can query the table users using select * from users in Hologres to see the changes.
The final query result is as follows:
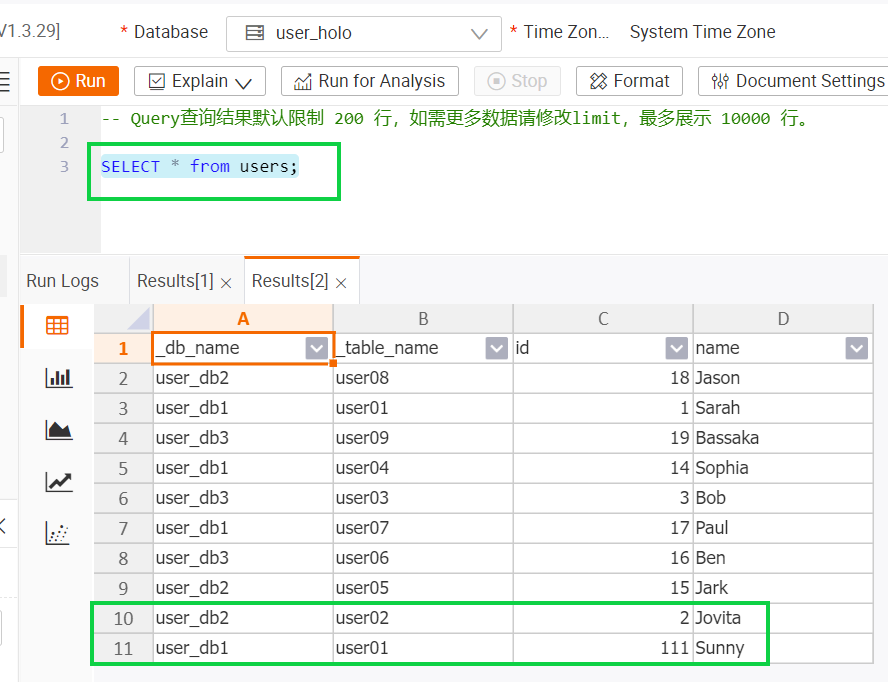
From the latest result in Hologres, we can see that there is a new record of (user_db1, user01, 111) and the name of (user_db2, user02, 2) has been updated to Jovita. The results are precisely the same with the changes we made in MySQL. This indicates that the processing period from MySQL to Hologres are unquestionably realtime.
AIRec Deployment on Alibaba Cloud: Step-by-Step Instructions and Troubleshooting
115 posts | 21 followers
FollowApache Flink Community - August 1, 2025
Apache Flink Community - March 31, 2025
Data Geek - May 11, 2024
Apache Flink Community - February 27, 2025
Alibaba Cloud Native Community - April 2, 2024
Apache Flink Community - June 6, 2025
115 posts | 21 followers
Follow Realtime Compute for Apache Flink
Realtime Compute for Apache Flink offers a highly integrated platform for real-time data processing, which optimizes the computing of Apache Flink.
Learn More MaxCompute
Conduct large-scale data warehousing with MaxCompute
Learn More Hologres
A real-time data warehouse for serving and analytics which is compatible with PostgreSQL.
Learn More Data Lake Analytics
A premium, serverless, and interactive analytics service
Learn MoreMore Posts by Alibaba Cloud Indonesia