當需精確防護特定攻擊(如惡意調用、惡意請求、高頻掃描)時,可使用自訂規則,通過靈活的匹配條件和規則動作,構建個人化防護策略。
關鍵概念
自訂規則:Web核心防護中的防護模組之一。啟用此模組前必須建立防護模板,系統支援建立多個防護模板。
防護模板:防護模板是防護規則的集合,用於定義具體的規則內容和作用範圍。其由以下三部分組成:模板類型、防護規則、生效對象。
模板類型:防護模板建立時需指定類型,且建立後不可更改。模板類型分為以下兩種:
模板類型
說明
適用情境
預設防護模板
模板建立時,預設對所有防護對象和對象組生效,後續新增的對象也自動生效。
支援手動將特定對象排除(設定為“未生效”)。
在自訂規則模組下,僅能建立一個預設防護模板。
部署通用的、需全域執行的防護規則。
自訂防護模板
必須手動指定其生效的防護對象或對象組。
針對特定業務(如登入、支付介面)部署精細化的防護規則。
防護規則:定義具體的檢測邏輯和響應措施。一個防護模板可包含多條防護規則,每條規則由以下三部分組成:
匹配條件:定義檢測的請求特徵(如請求路徑、用戶端 IP 位址等)。
防護類型:支援兩種檢測維度,分別為访问控制和频率控制。
規則動作:定義命中規則後的處置措施,規則動作的優先順序從高到低依次為:攔截、嚴格滑塊、滑塊、JS 驗證、觀察。
說明當一個請求同時命中同一防護模組中的多條規則,且這些規則的規則動作相同時,則最終匹配到的規則是隨機生效的。
生效對象:指定防護模板的應用目標。通過生效對象設定,將防護規則應用到指定的防護對象或防護對象組。一個防護對象或對象組可以關聯多個防護模板。
防護對象:每個接入 WAF 的網域名稱或雲產品執行個體,系統會為其自動建立一個防護對象。
防護對象組:可將多個防護對象加入一個防護對象組,以便集中管理。
操作步驟
執行以下步驟前,請確保已存在防護對象(已將Web業務接入WAF),若尚未將業務接入,請參見接入概述。
登入Web Application Firewall3.0控制台。在頂部功能表列,選擇WAF執行個體的資源群組和地區(中国内地、非中国内地),在左側導覽列,選擇。
步驟一:配置防護模板類型
在Web 核心防护頁面下方自定义规则地區,單擊新建模板。在新建模板面板,完成以下配置。
模板名称:為該模板設定一個名稱。
是否设置为默认模板:自訂規則模組僅能設定一個預設範本,且僅能在建立模板時設定。
是:無需設定生效对象,模板建立時,預設對所有防護對象和對象組生效,後續新增的對象也自動生效。支援手動將特定對象排除(設定為“未生效”)。
否:需要設定生效对象,手動指定其生效的防護對象或對象組。
步驟二:在防護模板中添加防護規則
在规则配置地區,單擊新建规则,完成以下配置。
规则名称:為該規則設定一個名稱。
匹配条件:設定該規則要匹配的請求特徵。通過單擊新增条件添加一個條件。每個條件由匹配字段、逻辑符和匹配内容組成。配置樣本如下:
說明若規則包含多個條件,則請求必須滿足所有條件(邏輯與關係),才能命中該規則。關於匹配欄位和邏輯符的詳細說明,請參見匹配條件說明。
匹配字段
逻辑符
匹配内容
說明
URI Path
包含
/login.php當請求的路徑包含
/login.php時,則請求命中該規則。IP
屬於
192.1.XX.XX當用戶端IP為
192.1.XX.XX時,則請求命中該規則。防护类型:支援访问控制與频率控制兩種類型。
访问控制:適用於對特定類型的請求執行精確管控的情境。
频率控制:適用於基於訪問頻率的情境(如防刷、防暴力破解)。僅訂用帳戶企業版、旗艦版和隨用隨付版支援此功能。
存取控制
配置存取控制規則,對符合特定條件的單次請求執行指定操作。
頻率控制
配置頻率控制規則,限制用戶端的過度訪問。
頻率檢測條件:當單個统计对象在指定的统计时长(秒)內命中規則的次數超過設定的阈值(次)時,觸發黑名單處置。
配置項
說明
统计对象
選擇請求頻率的統計對象。可選項:
IP:統計同一個IP發起請求的頻率。
自定义header:基於自訂要求標頭(如
Referer)的值進行分組,統計在指定時間段內,每組相同要求標頭值所對應的請求頻率。自定义参数:統計URL中包含指定參數的請求頻率。例如,若參數為
user_id,WAF將統計具有相同user_id值的請求頻率。自定义cookie:統計在指定時間段內,HTTP請求中包含特定Cookie的頻率。例如,當自訂Cookie名稱為 User 時,將統計在該時間段內每個 User 值的出現次數。
Session:WAF通過在響應中設定名為
acw_tc的Cookie來建立會話標識,並基於該Cookie的值統計用戶端請求頻率。账号:統計同一個帳號發起請求的頻率。需要在防护对象版面設定账号提取配置後,才能配置此項,詳細資料,請參見配置防護對象和防護對象組。
统计时长(秒)
設定統計周期。單位:秒。
阈值(次)
設定在统计时长(秒)內,允許统计对象命中匹配条件的最大次數。
響應碼檢測條件:當响应码的響應数量或比例(%)超過設定的閾值時,觸發黑名單處置。啟用響應碼檢測後,統計對象需同時滿足頻率檢測條件和響應碼特徵條件,才會觸發黑名單處置。
配置項
說明
响应码
設定需要統計的響應碼。
数量
設定在統計時間長度內,允許指定的响应码在請求響應中出現的最大次數。
比例(%)
設定在統計時間長度內,允許指定的响应码在請求響應中的最大佔比。
黑名單處置條件:將命中上述檢測條件的統計對象加入黑名單,在黑名单超时时间內,對來自該對象黑名单生效范围內的請求執行规则动作中定義的處置。
配置項
說明
黑名单生效范围
設定黑名單處置的生效範圍。可選值:
仅作用于当前规则的匹配条件:表示只處置滿足當前規則匹配条件的請求。
作用于整个防护对象:表示對該統計對象(如IP)發起的,訪問當前防護對象的所有請求執行處置動作。
黑名单超时时间
設定黑名單處置的生效時間長度。單位:秒。取值範圍:60~86400。
规则动作:選擇當請求命中該規則時,要執行的防護動作。
配置項
說明
JS验证
WAF向用戶端返回一段JavaScript驗證代碼,標準瀏覽器將自動執行該代碼。若用戶端正常執行完成,則WAF在一段時間(預設30分鐘)內允許存取該用戶端的所有請求,否則攔截請求。
拦截
攔截命中規則的請求,並向發起請求的用戶端返回攔截響應頁面。
說明WAF預設使用統一的攔截響應頁面,也可以通過自訂響應功能,自訂攔截響應頁面。
观察
不攔截命中規則的請求,僅通過日誌記錄請求命中的情況。在試運行規則時,可以先通過观察模式分析WAF日誌,以確認未產生誤攔截,再將其調整為其他規則動作。
滑块
WAF向用戶端返回滑動驗證頁面。若用戶端成功完成滑動驗證,則WAF在一段時間(預設30分鐘)內允許存取該用戶端的所有請求,否則攔截請求。
严格滑块
WAF向用戶端返回滑動驗證頁面。若用戶端成功完成滑動驗證,則允許存取該請求;否則攔截請求。在此模式下,用戶端每次命中該規則的請求均需進行滑動驗證。
說明僅隨用隨付執行個體以及訂用帳戶企業版和旗艦版執行個體支援滑块驗證。
JS验证或滑块驗證僅適用於同步請求。對於XMLHttpRequest、Fetch方法等非同步請求,必須注入Web SDK,否則無法正常運行。具體操作,請參見Bot管理的JS校正和滑塊驗證功能。
啟用JS验证或滑块後,用戶端通過驗證時,WAF將在回應標頭中通過Set-Cookie 設定名為
acw_sc__v2(JS驗證)或acw_sc__v3(滑塊驗證)的 Cookie。用戶端在後續請求中會在 Cookie 頭中攜帶該標識。
高级设置(可選):僅訂用帳戶企業版、旗艦版和隨用隨付版支援如下進階功能。
配置項
說明
规则灰度
配置規則針對不同維度對象的生效比例。
開啟規則灰階後,還需要設定维度和灰度比例。维度包括:IP、自定义Header、自定义参数、自定义Cookie、Session。
說明規則灰階根據配置的维度生效,而非對請求按比例隨機生效規則。例如,當维度為IP且灰度比例為10%時,WAF將選擇約10%的IP地址;被選中的IP地址,其所有請求均應用該規則,而非對所有請求按10%的比例隨機應用。
生效模式
永久生效(預設):防護模板開啟時,規則永久生效。
按时间段生效:防護規則僅在指定的一段時間內生效。
按周期生效:防護規則僅在指定的時間周期內生效。
步驟三:設定防護模板生效對象
在生效对象地區,選擇要應用於該模板的防護對象和防護對象組。
模板的生效方式取決於在步驟一的配置:
設定為預設防護模板:無需設定生效對象,模板建立時,預設對所有防護對象和對象組生效,後續新增的對象也自動生效。支援手動將特定對象排除(設定為“未生效”)。
未設為預設防護模板:需要手動設定生效的防護對象和防護對象組。
模板建立時與建立完成後,均支援手動調整防護對象或防護對象組生效狀態。
防護規則配置樣本
以下配置樣本僅供參考。在生產環境部署前,您必須根據實際業務流量和攻擊特徵進行調整。直接複製並應用以下樣本可能導致正常業務中斷或防護無效。
限制管理後台僅允許指定IP訪問
攔截所有對 /wp-admin 路徑的訪問請求,僅允許來自管理員 IP 位址192.1.XX.XX 的請求通過。
匹配条件:
匹配字段為
IP、逻辑符為不屬於、匹配内容為管理員的白名單IP192.1.XX.XX。匹配字段為
URI、逻辑符為包含、匹配内容為不希望被訪問的網頁路徑/wp-admin。
防护类型:访问控制。
规则动作:拦截。
屏蔽惡意爬蟲和掃描器訪問
攔截User-Agent(UA)欄位中包含bot的HTTP請求。
通過分析WAF日誌,可識別異常流量的UA特徵。部分惡意流量的UA欄位包含bot、nmap、sqlmap等特徵字串。
匹配条件:匹配字段為
User-Agent、逻辑符為包含、匹配内容為UA特徵bot。防护类型:访问控制。
规则动作:拦截。
為網站頁面啟用人機驗證
對除API介面以外的頁面進行JS驗證,此處以所有API介面URI均包含/api 字串為例。
針對靜態頁面,可以設定JS驗證或滑塊驗證規則,以確保請求來源為可執行 JavaScript 的標準瀏覽器。此類驗證僅適用於同步請求,不適用於XMLHttpRequest、Fetch方法等非同步請求。
匹配条件:匹配字段為
URI、逻辑符為不包含、匹配内容為/api。防护类型:访问控制。
规则动作:JS驗證或滑塊。
API介面限流
對除example.com/api/pay介面外的所有介面啟用頻率控制,此處以所有API介面URI均包含/api 字串為例。
匹配条件:
匹配字段為
URI、逻辑符為不等於、匹配内容為/api/pay。匹配字段為
URI、逻辑符為包含、匹配内容為/api。
防护类型:频率控制。
统计对象:IP。
统计时长(秒):10。
阈值(次):5。
黑名单生效范围:仅作用于当前规则的匹配条件。
黑名单超时时间:1800。
规则动作:拦截。
應用於生產環境
為避免影響正常業務,請勿在生產環境直接建立並啟用攔截動作的防護規則。建議遵循以下流程進行部署。
分析請求特徵:使用WAF安全報表與日誌,識別正常業務請求與惡意攻擊的特徵(如 IP、User-Agent、Header、URI 等)。如需計劃配置頻率控制規則,還需確定正常業務的請求頻率基準。
配置白名單:在建立自訂規則模板前,建議建立白名單規則,將可信IP加入白名單,防止可信請求被新規則誤攔截。
灰階測試:自訂規則建立完成後,可以使用以下三種方式,在部署到生產環境前進行觀察測試。
將規則應用於非生產環境進行測試。
將规则动作設定為观察。
在高级设置中開啟规则灰度。
分析測試結果:運行一段時間後,觀察安全報表與日誌,查看命中規則的請求是否存在誤判。
應用至生產環境:確認誤判率在可接受範圍內後,將規則動作調整為目標動作,並應用於生產環境。
持續監控與最佳化:持續關注安全報表與日誌,根據業務變化和實際防護效果,動態調整和最佳化規則。
相關操作
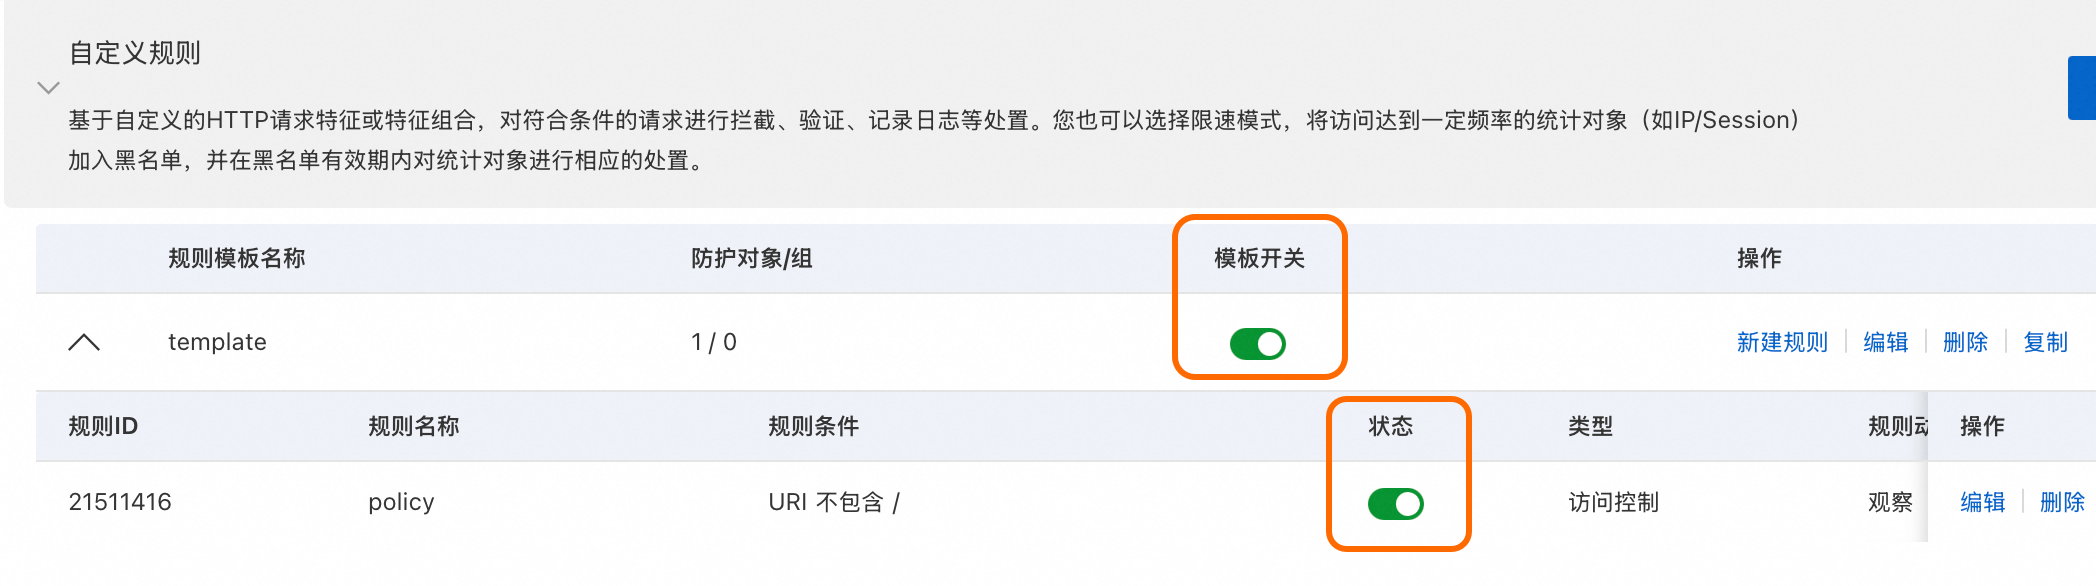
管理防護模板
建立的防護模板預設開啟,可以在防護模板列表執行如下操作:
查看模板關聯的防护对象/组的數量。
通過模板开关,開啟或關閉模板。
為該模板新建规则。
编辑、删除或复制防護模板。
單擊防護模板名稱左側的
 表徵圖,查看該防護模板包含的規則資訊。
管理防護規則
建立的規則預設開啟。可以在規則列表執行如下操作:
查看规则ID、规则条件等資訊。
通過状态開關,開啟或關閉規則。
编辑或删除規則。
配額與限制
僅隨用隨付執行個體、訂用帳戶企業版和旗艦版執行個體支援滑块驗證、频率控制與高级设置功能。
單個防護規則最多可添加5個匹配条件。
常見問題
為什麼配置的規則不生效?
若配置的規則未按預期生效,請按以下順序檢查:
模板開關:確認防護模板以及規則狀態均為開啟狀態。
生效對象:確認防護模板的生效對象為已生效。

規則配置:確認防護規則的配置,重點關注匹配條件的正確性,確保請求能夠匹配。
其他規則:確認是否配置了其他防護規則或防護模組,例如白名單規則會提前允許存取請求。
雲產品接入方式下,多個網域名稱解析指向了一個雲產品執行個體,如何配置頻率控制?
頻率控制規則按照防護對象維度來限制同一統計對象的請求頻率。若一個雲產品執行個體包含多個網域名稱的流量,則統計訪問頻率時將對所有網域名稱的訪問量進行匯總統計。若只需限制對某個網域名稱的訪問頻率,可以選擇以下兩種方式之一進行配置:
將網域名稱添加為WAF的防護對象,並為該網域名稱對象應用頻率控制規則。更多資訊,請參見配置防護對象和防護對象組。
在頻率控制規則的匹配条件中,通過Host欄位定義要限制訪問頻率的網域名稱。
配置自訂規則匹配欄位Body Parameter後為何不生效?
可能原因是填寫的匹配內容長度過短,使用Body Parameter欄位時請確保匹配內容長度>=5個字元,否則流量無法被檢測。