All Products
Search
Document Center

Web Application Firewall:What if the WAF log capacity has reached the upper limit

更新時間:Oct 08, 2024

Web Application Firewall (WAF) logs are essential tools for recording and analyzing network traffic and security events. They are crucial for identifying potential threats, conducting security audits, and ensuring compliance. However, when the log storage usage reaches the upper limit, logs cannot be recorded, which affects the ability to monitor security and respond to events. This topic describes common solutions for when the log storage usage reaches the upper limit.

Background information

WAF logs record all access requests to web applications and the firewall's responses. These logs contain detailed information about attack detection, filtering, and blocking. Sufficient log storage capacity ensures that all security events are fully recorded, helping administrators perform detailed analysis and audits. If the log storage usage reaches the upper limit, the following impacts may occur:

  • Log loss

    When the log usage reaches the upper limit, new log cannot be recorded, resulting in the loss of important security event information.

  • Inability to detect security threats in a timely manner

    If you have other security analysis services rely on WAF logs and new logs cannot be recorded, potential security threats may not be detected and responded to in a timely manner, increasing security risks.

  • Compliance issues

    Certain industries and regulations require enterprises to retain logs for auditing. When the log usage reaches the upper limit, new logs cannot be recorded, which may lead to compliance issues.

Methods

When the WAF log usage reaches the upper limit, the following four methods are commonly used:

  • Upgrade log storage capacity

    Upgrading log storage capacity is the most direct solution. By configuring larger storage space, you can ensure that WAF has enough capacity to record all security events and network traffic. For more information, see Upgrade log storage space.

  • Fine-grained configuration to reduce storage space usage

    By configuring log recording policies based on the importance of different businesses, you can reduce storage space usage. For example, for non-critical businesses, only attack logs and required fields, or a small number of optional fields are recorded. For more information, see Fine-grained configuration to reduce storage space usage.

  • Reduce log storage duration

    Optimizing log storage duration is also an effective method. Based on business needs, shortening the log retention period can reduce storage space usage. For example, reducing the log retention period from 30 days to 7 days can save a significant amount of storage space without losing critical data. For more information, see Reduce log storage duration.

  • Reduce log index fields

    Disabling the "Auto-update index" feature and deleting unnecessary field indexes can significantly reduce index space usage. Although indexes help with quick query and analysis of logs, they also consume a lot of storage space. By optimizing index configuration, you can reduce storage space usage while ensuring query efficiency. For more information, see Reduce log index fields.

Upgrade log storage space

Important

Only subscription instances of Pro, Enterprise, and Ultimate editions support viewing and upgrading log storage capacity. Pay-as-you-go instances are billed based on actual usage, and the fees are settled by Simple Log Service, so there is no capacity limit and no need to set log capacity separately.

  1. Log on to the Web Application Firewall 3.0 console, In the left navigation bar, select Detection and Response > Log Service, and click Upgrade Storage in the upper-right corner. image

  2. Select a larger Log Storage Capacity specification and complete the purchase.

Fine-grained configuration to reduce storage space usage

The settings of LogShipper supports fine-grained field configuration and log storage class settings for individual protected objects. If specific fields and log storage classes are configured for a protected object, the priority of the configured fields is higher than the default field settings.

  1. Log on to the Web Application Firewall 3.0 console, In the left navigation bar, select Detection and Response > Log Service, and click Log Configuration > Delivery Settings in the upper-right corner.

  2. In the Delivery Settings tab, click Field Settings in the Field of Delivery to Simple Log Service column for the protected object, and complete the configurations as shown in the table below.

    Parameter

    Description

    Required Fields

    Required fields are always included in WAF logs. You cannot modify the required fields.

    Optional Fields

    Optional fields are included in WAF logs based on your settings. WAF logs include the optional fields that you enable.

    Note

    The storage usage of WAF logs increases with the number of optional fields that you enable. If you have sufficient log storage capacity, we recommend that you enable more optional fields to analyze logs in a more comprehensive manner.

    Log Type

    Valid values are Full Log, Block Log, and Block and Monitor Logs. You can select a value based on your log storage capacity. We recommend that you select a value that balances your monitoring requirements and requirements for storage cost control.

    • Full Log: All requests are recorded, including normal requests, suspicious requests, and blocked attack requests. If you require comprehensive audit and analysis, we recommend that you select this value.

    • Block Log: Only attack requests that are blocked by WAF are recorded. If you are concerned about security events and want to prevent less important logs from occupying log storage, we recommend that you select this value.

    • Block and Monitor Logs: Requests that are marked as suspicious by WAF and attack requests that are blocked are recorded. If you want to monitor potential threats and reduce log storage usage, we recommend that you select this value.

    For non-critical businesses, you only need to record attack logs and required fields, or a small number of optional fields, to reduce storage space usage. After configuring the LogShipper fields, click OK. When you see the The operation is successful message, the current configuration has taken effect for the individual protected object.

Reduce log storage duration

  1. Log on to the Web Application Firewall 3.0 console, In the left navigation bar, select Detection and Response > Log Service, and click Storage Duration in the upper-right corner to enter the Simple Log Service console. image

  2. In the Logstore Attributes panel, click Modify in the upper-right corner, reduce the Data Retention Period, and click Save.

    Important
    • When adjusting the log retention period, ensure that it complies with relevant regulations and compliance requirements to avoid compliance issues due to insufficient data retention.

    • When the log retention period reaches the number of days set, the logs that exceed the period are automatically deleted.

    image

Reduce log index fields

  1. Log on to the Simple Log Service console, in the Project list area, click the target Project that starts withwafng. image

  2. In the left navigation bar, click Log Storageimage, and in the Logstore list, click the target Logstore.

    image

  3. In the query and analysis page of the Logstore, select Index Attributes > Attributes. image

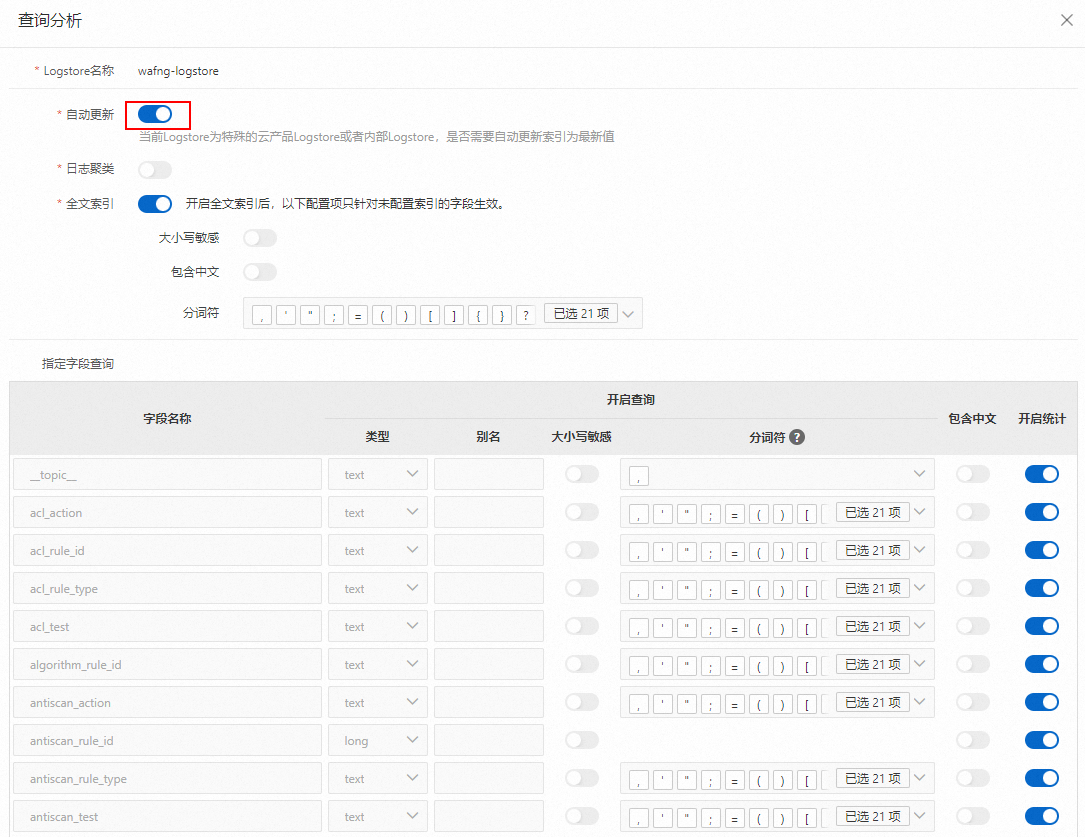
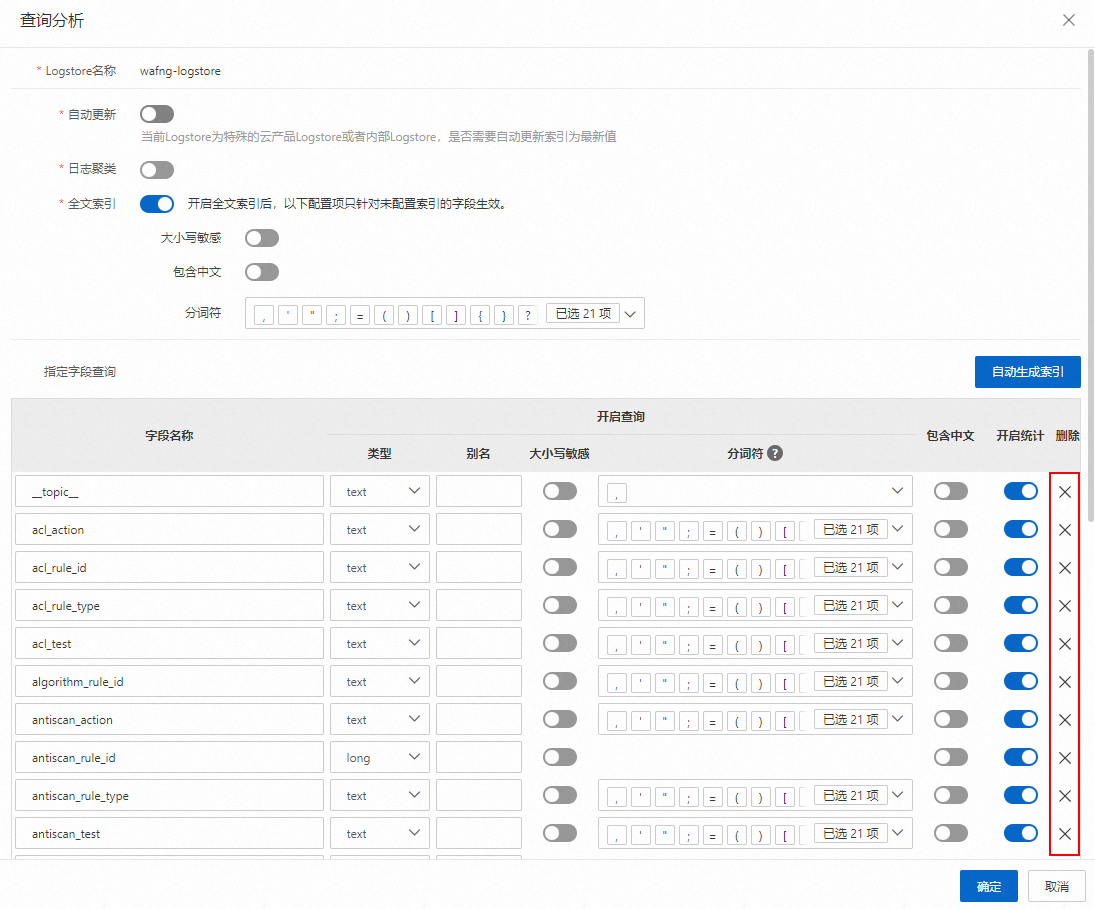
  4. In the Search & Analysis panel, disable the Auto-update switch.

    When the current Logstore is a special Logstore for a cloud product or an internal Logstore, the index Auto-update switch is enabled by default. In this case, the Field Search area is disabled.

    Warning

    If you have configured custom reports and alerts in Simple Log Service, deleting the indexes of the exclusive Logstore for the WAF product may affect the custom reports and alerts.

    image

  5. Delete indexes. After disabling the Auto-update switch, you can delete unnecessary field indexes in the Field Search area. After deleting the indexes, click OK. image