本文介紹如何使用Data Transmission Service,跨阿里雲帳號遷移MongoDB執行個體。DTS支援全量資料移轉和增量資料移轉,同時使用這兩種遷移類型可以實現在不停服的情況下,平滑地完成資料庫的遷移。
前提條件
源執行個體類型為單節點執行個體或複本集執行個體。如果源執行個體為分區叢集執行個體,請使用MongoDB內建的工具進行遷移,詳細資料,請參見使用MongoDB工具將自建資料庫遷移至分區叢集執行個體。
說明使用DTS遷移單節點執行個體時,不支援增量資料移轉,詳情資訊,請參見遷移類型說明。
已在目標地區中建立了目標執行個體,詳情資訊,請參見建立單節點執行個體、棄置站台集執行個體或建立分區叢集執行個體。
說明建議目標執行個體的儲存空間比源執行個體的已使用儲存空間大10%。
注意事項
- DTS在執行全量資料移轉時將佔用源庫和目標庫一定的資源,可能會導致資料庫伺服器負載上升。如果資料庫業務量較大或伺服器規格較低,可能會加重資料庫壓力,甚至導致資料庫服務不可用。建議您在執行資料移轉前謹慎評估,在業務低峰期執行資料移轉。
- 單節點執行個體不支援使用DTS執行增量資料移轉,為保障資料一致性,全量資料移轉期間請勿在源執行個體中寫入新的資料。
- MongoDB執行個體支援的版本與儲存引擎請參見版本及儲存引擎,如需跨版本或跨引擎遷移,請提前確認相容性。
- 如果您的資料庫小版本到期或者不在維護列表內,當執行執行個體版本升級、資料移轉、變更執行個體配置、按備份點將備份資料恢複至建立執行個體、按時間點將備份資料恢複至建立執行個體或恢複ApsaraDB for MongoDB單個或多個資料庫等操作時,為保證提供更出色的效能和穩定性,系統會預設將您的資料庫小版本升級至最新版。
- 由於DTS寫入資料的邏輯為並發寫入,所以會導致目標端佔用的儲存空間比源端大5%~10%。
- 請確保目標端MongoDB沒有與源端相同的主鍵(預設為_id),否則會導致資料丟失。若目標端有與源端相同的主鍵,請在不影響業務的前提條件下清空目標端的相關資料(刪掉目標端中與源端相同_id的文檔)。
費用說明
| 遷移類型 | 鏈路配置費用 | 公網流量費用 |
| 全量資料移轉 | 不收費。 | 僅當通過公網將資料移轉出阿里雲時收費,詳情請參見DTS產品定價。 |
| 增量資料移轉 | 收費,詳情請參見DTS產品定價。 |
遷移類型說明
| 遷移類型 | 說明 |
| 全量資料移轉 | 將源MongoDB資料庫遷移對象的存量資料全部遷移到目標MongoDB資料庫中。 說明 支援遷移database、collection和index。 |
| 增量資料移轉 | 在全量遷移的基礎上,將源MongoDB資料庫的累加式更新資料同步到目標MongoDB資料庫中。 說明
|
資料庫帳號的許可權要求
遷移資料來源 | 全量資料移轉 | 增量資料移轉 |
源MongoDB執行個體 | 待遷移庫的read許可權 | 待遷移庫、admin庫和local庫的read許可權 |
目標MongoDB執行個體 | 目標庫的readWrite許可權 | 目標庫的readWrite許可權 |
資料庫帳號建立及授權方法,請參見使用DMS管理MongoDB資料庫使用者。
準備工作
使用源執行個體所屬的阿里雲帳號登入MongoDB管理主控台,詳細資料,請參見MongoDB管理主控台。
為源執行個體申請公網串連地址,詳細資料,請參見申請公網串連地址。
將DTS伺服器的IP位址區段加入至源執行個體的白名單中,詳細資料,請參見修改白名單。
說明根據目標執行個體的地區資訊,選擇需要添加的IP位址區段,詳細資料,請參見遷移、同步或訂閱本機資料庫時需添加的IP白名單。
例如,源執行個體的地區為杭州,目標執行個體的地區為深圳,那麼需要將深圳地區的DTS IP位址區段加入至源執行個體的白名單中。
操作步驟
登入MongoDB管理主控台。
根據執行個體類型,在左側導覽列,單擊複本集執行個體列表或分區叢集執行個體列表。
在頁面左上方,選擇執行個體所在的資源群組和地區。
單擊目標執行個體ID或目標執行個體所在行操作列的管理。
在目標執行個體頁面右上方,單擊遷移MongoDB資料庫。
在建立遷移任務頁面,根據頁面資訊完成遷移任務配置。
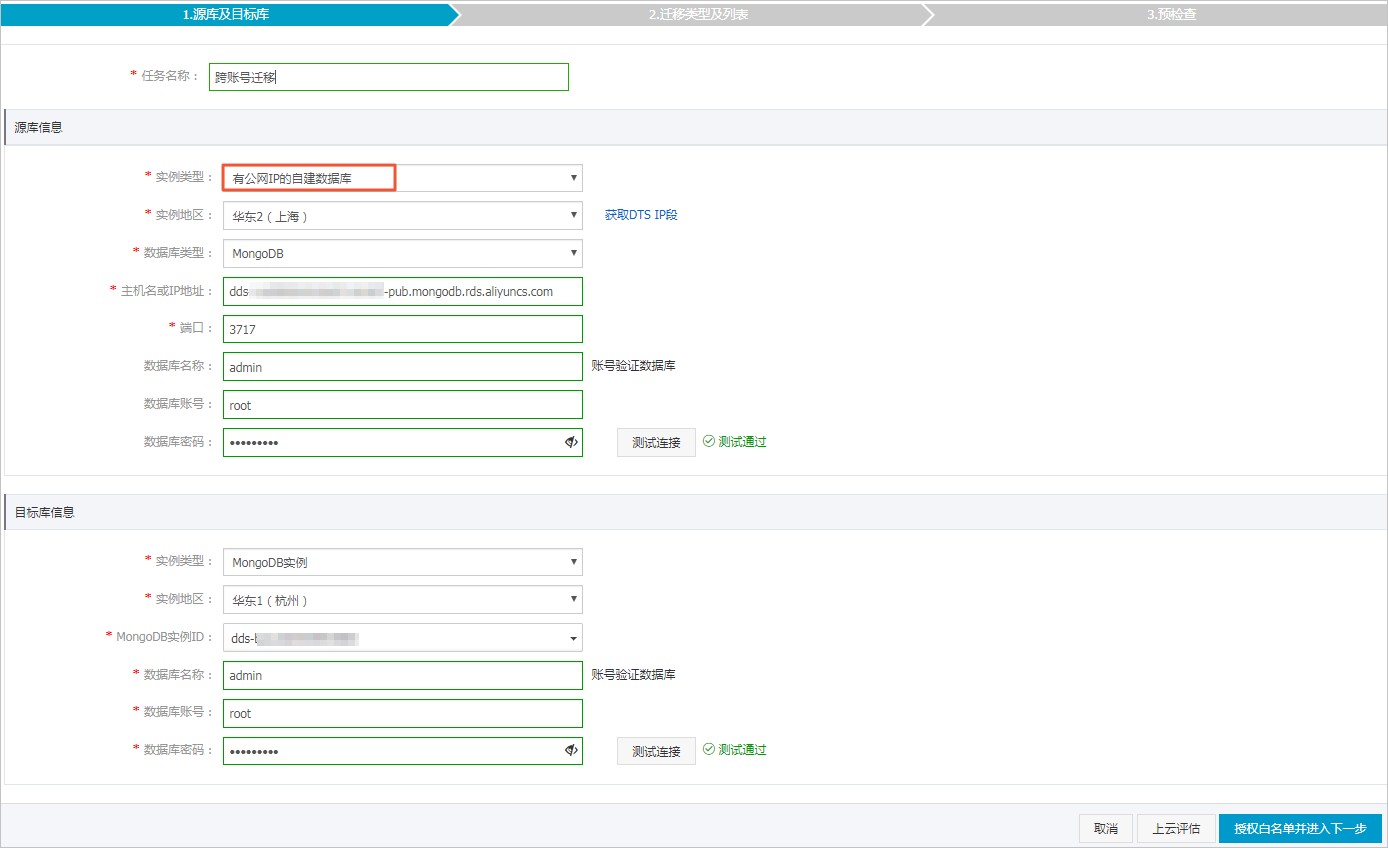
設定以下參數,配置源庫及目標庫資訊。
類別
配置
說明
無
任務名稱
DTS會自動產生一個任務名稱,建議配置具有業務意義的名稱(無唯一性要求),便於後續識別。
源庫資訊
執行個體類型
選擇有公網IP的自建資料庫。
執行個體地區
選擇源執行個體所在地區。
資料庫類型
選擇MongoDB。
主機名稱或IP地址
填入源執行個體的公網串連地址中的網域名稱資訊。例如:dds-bp1b47357f218e74****-pub.mongodb.rds.aliyuncs.com。
連接埠
填入源執行個體的服務連接埠3717。
資料庫名稱
填入鑒權資料庫名,即資料庫帳號所屬的資料庫。
說明如果使用的資料庫帳號為root,那麼對應的資料庫名稱即為admin。
資料庫帳號
填入源MongoDB執行個體的資料庫帳號,許可權要求請參見資料庫帳號的許可權要求。
資料庫密碼
填入該資料庫帳號的密碼。
說明源庫資訊填寫完畢後,您可以單擊資料庫密碼後的測試連接來驗證填入的源庫資訊是否正確。源庫資訊填寫正確則提示測試通過,如提示測試失敗,單擊測試失敗後的診斷,根據提示調整填寫的源庫資訊。
串連方式
Data Transmission Service串連源執行個體的方式。根據需求選擇非加密串連或SSL安全連線。如果設定為SSL安全連線,您需要提前開啟源執行個體的SSL加密功能。
說明SSL安全連線當前僅支援MongoDB Atlas版本。
選擇SSL安全連線會顯著增加CPU消耗。
目標庫資訊
執行個體類型
選擇MongoDB執行個體。
執行個體地區
選擇目標MongoDB執行個體所屬地區。
MongoDB執行個體ID
選擇目標MongoDB執行個體ID。
資料庫名稱
填入鑒權資料庫名,即資料庫帳號所屬的資料庫。
說明如果使用的資料庫帳號為root,那麼對應的資料庫名稱即為admin。
資料庫帳號
填入目標MongoDB執行個體的資料庫帳號,許可權要求請參見資料庫帳號的許可權要求。
資料庫密碼
填入該資料庫帳號的密碼。
說明目標庫資訊填寫完畢後,您可以單擊資料庫密碼後的測試連接來驗證填入的目標庫資訊是否正確。目標庫資訊填寫正確則提示測試通過,如提示測試失敗,單擊測試失敗後的診斷,根據提示調整填寫的目標庫資訊。
配置完成後,單擊頁面下方的授權白名單並進入下一步。
如果源或目標資料庫是阿里雲資料庫執行個體(例如RDS MySQL、ApsaraDB for MongoDB等),DTS會自動將對應地區DTS服務的IP地址添加到阿里雲資料庫執行個體的白名單;如果源或目標資料庫是ECS上的自建資料庫,DTS會自動將對應地區DTS服務的IP地址添到ECS的安全規則中,您還需確保自建資料庫沒有限制ECS的訪問(若資料庫是叢集部署在多個ECS執行個體,您需要手動將DTS服務對應地區的IP地址添到其餘每個ECS的安全規則中);如果源或目標資料庫是IDC自建資料庫或其他雲資料庫,則需要您手動添加對應地區DTS服務的IP地址,以允許來自DTS伺服器的訪問。DTS服務的IP地址,請參見DTS伺服器的IP位址區段。
警告DTS自動添加或您手動添加DTS服務的公網IP位址區段可能會存在安全風險,一旦使用本產品代表您已理解和確認其中可能存在的安全風險,並且需要您做好基本的安全防護,包括但不限於加強帳號密碼強度防範、限制各網段開放的連接埠號碼、內部各API使用鑒權方式通訊、定期檢查並限制不需要的網段,或者使用通過內網(專線/VPN網關/智能網關)的方式接入。
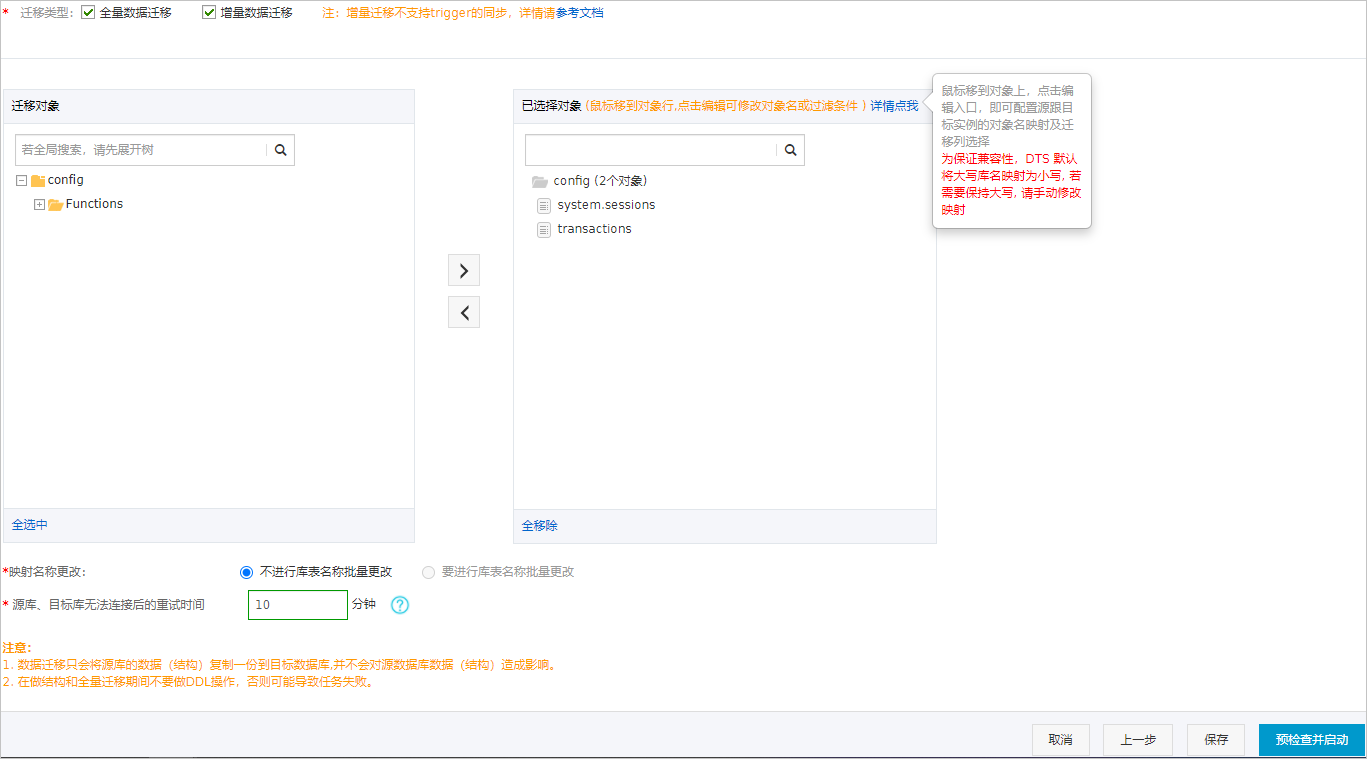
設定以下參數,選擇遷移對象及遷移類型。
配置
說明
遷移類型
建議同時勾選全量遷移和增量遷移,以保證遷移資料的一致性。
只勾選全量遷移:全量遷移過程中,源執行個體有資料更新時,更新資料不一定能夠被遷移至目標執行個體。
只勾選增量遷移;
遷移任務啟動後,DTS只遷移源執行個體產生的增量資料。
增量遷移不支援trigger的同步,具體請參見源庫存在觸發器時如何配置同步作業。
說明使用DTS遷移單節點執行個體時,不支援增量資料移轉。
如果未勾選增量資料移轉,為保障資料一致性,全量資料移轉期間請勿在源執行個體中寫入新的資料。
遷移對象
選擇遷移對象,方法如下:
從遷移對象列表中,選擇待遷移的對象。
單擊
 將其移動至已選擇對象列表中。
說明不支援遷移admin和local資料庫。
遷移對象選擇的粒度為database、collection或function。
預設情況下,遷移完成後,遷移對象的名稱保持不變。如果您需要改變遷移對象在目標資料庫中的名稱,可使用對象名映射功能,詳情請參見庫表列映射。
映射名稱更改
如需改變遷移對象在目標執行個體中的名稱,請使用對象名映射功能,詳情請參見庫表列映射。
源、目標庫無法串連重試時間
預設重試12小時,您也可以自訂重試時間。如果DTS在設定的時間內重新串連上源、目標庫,遷移任務將自動回復。否則,遷移任務將失敗。
說明由於串連重試期間,DTS將收取任務運行費用,建議您根據業務需要自訂重試時間,或者在源和目標庫執行個體釋放後儘快釋放DTS執行個體。
- 上述配置完成後,單擊頁面右下角的預檢查並啟動。說明
在遷移任務正式啟動之前,會先進行預檢查。只有預檢查通過後,才能成功啟動遷移任務。
如果預檢查失敗,請單擊失敗檢查項後的查看詳情,並根據提示修複後重新進行預檢查。
如果預檢查產生警告:
對於不可以忽略的檢查項,請單擊失敗檢查項後的查看詳情,並根據提示修複後重新進行預檢查。
對於可以忽略無需修複的檢查項,您可以依次單擊點擊確認警示詳情、確認屏蔽、確定、重新進行預檢查,跳過警示檢查項重新進行預檢查。如果選擇屏蔽警示檢查項,可能會導致資料不一致等問題,給業務帶來風險。
- 預檢查通過後,單擊下一步。
- 在購買配置確認頁面,選擇鏈路規格,並勾選資料轉送(隨用隨付)服務條款。
- 單擊立即購買並啟動,遷移任務正式開始。
- 查看遷移任務進展。
- 全量資料移轉
請勿手動結束遷移任務,否則可能會導致資料不完整。您只需等待遷移任務完成即可,遷移任務會自動結束。
- 增量資料移轉
遷移任務不會自動結束,需要手動結束遷移任務。
- 觀察遷移任務的進度變更為增量遷移,並顯示為無延遲狀態時,將源庫停寫幾分鐘,此時增量遷移的狀態可能會顯示延遲的時間。
- 等待遷移任務的增量遷移再次進入無延遲狀態,手動結束遷移任務。

- 全量資料移轉
- 將業務切換至目標MongoDB執行個體。
後續操作
根據業務需求確認是否需要釋放源執行個體。
- 源執行個體付費類型為隨用隨付時,請參見釋放執行個體。
- 源執行個體付費類型為訂用帳戶時,不支援釋放。
更多資訊
當目標執行個體為分區叢集執行個體時,您可以根據業務需要設定資料分區,詳情資訊,請參見設定資料分區以充分利用Shard效能。