本文將向您詳細介紹將訊息推送服務接入 iOS 用戶端的接入流程。
前提條件
您已 基於已有工程且使用 CocoaPods 接入 方式將工程接入到 mPaaS。
操作步驟
要使用訊息推送服務,您需要完成以下接入步驟:
在完成 基於已有工程且使用 CocoaPods 接入 的接入方式接入 mPaaS 後,在 Podfile 檔案中,使用
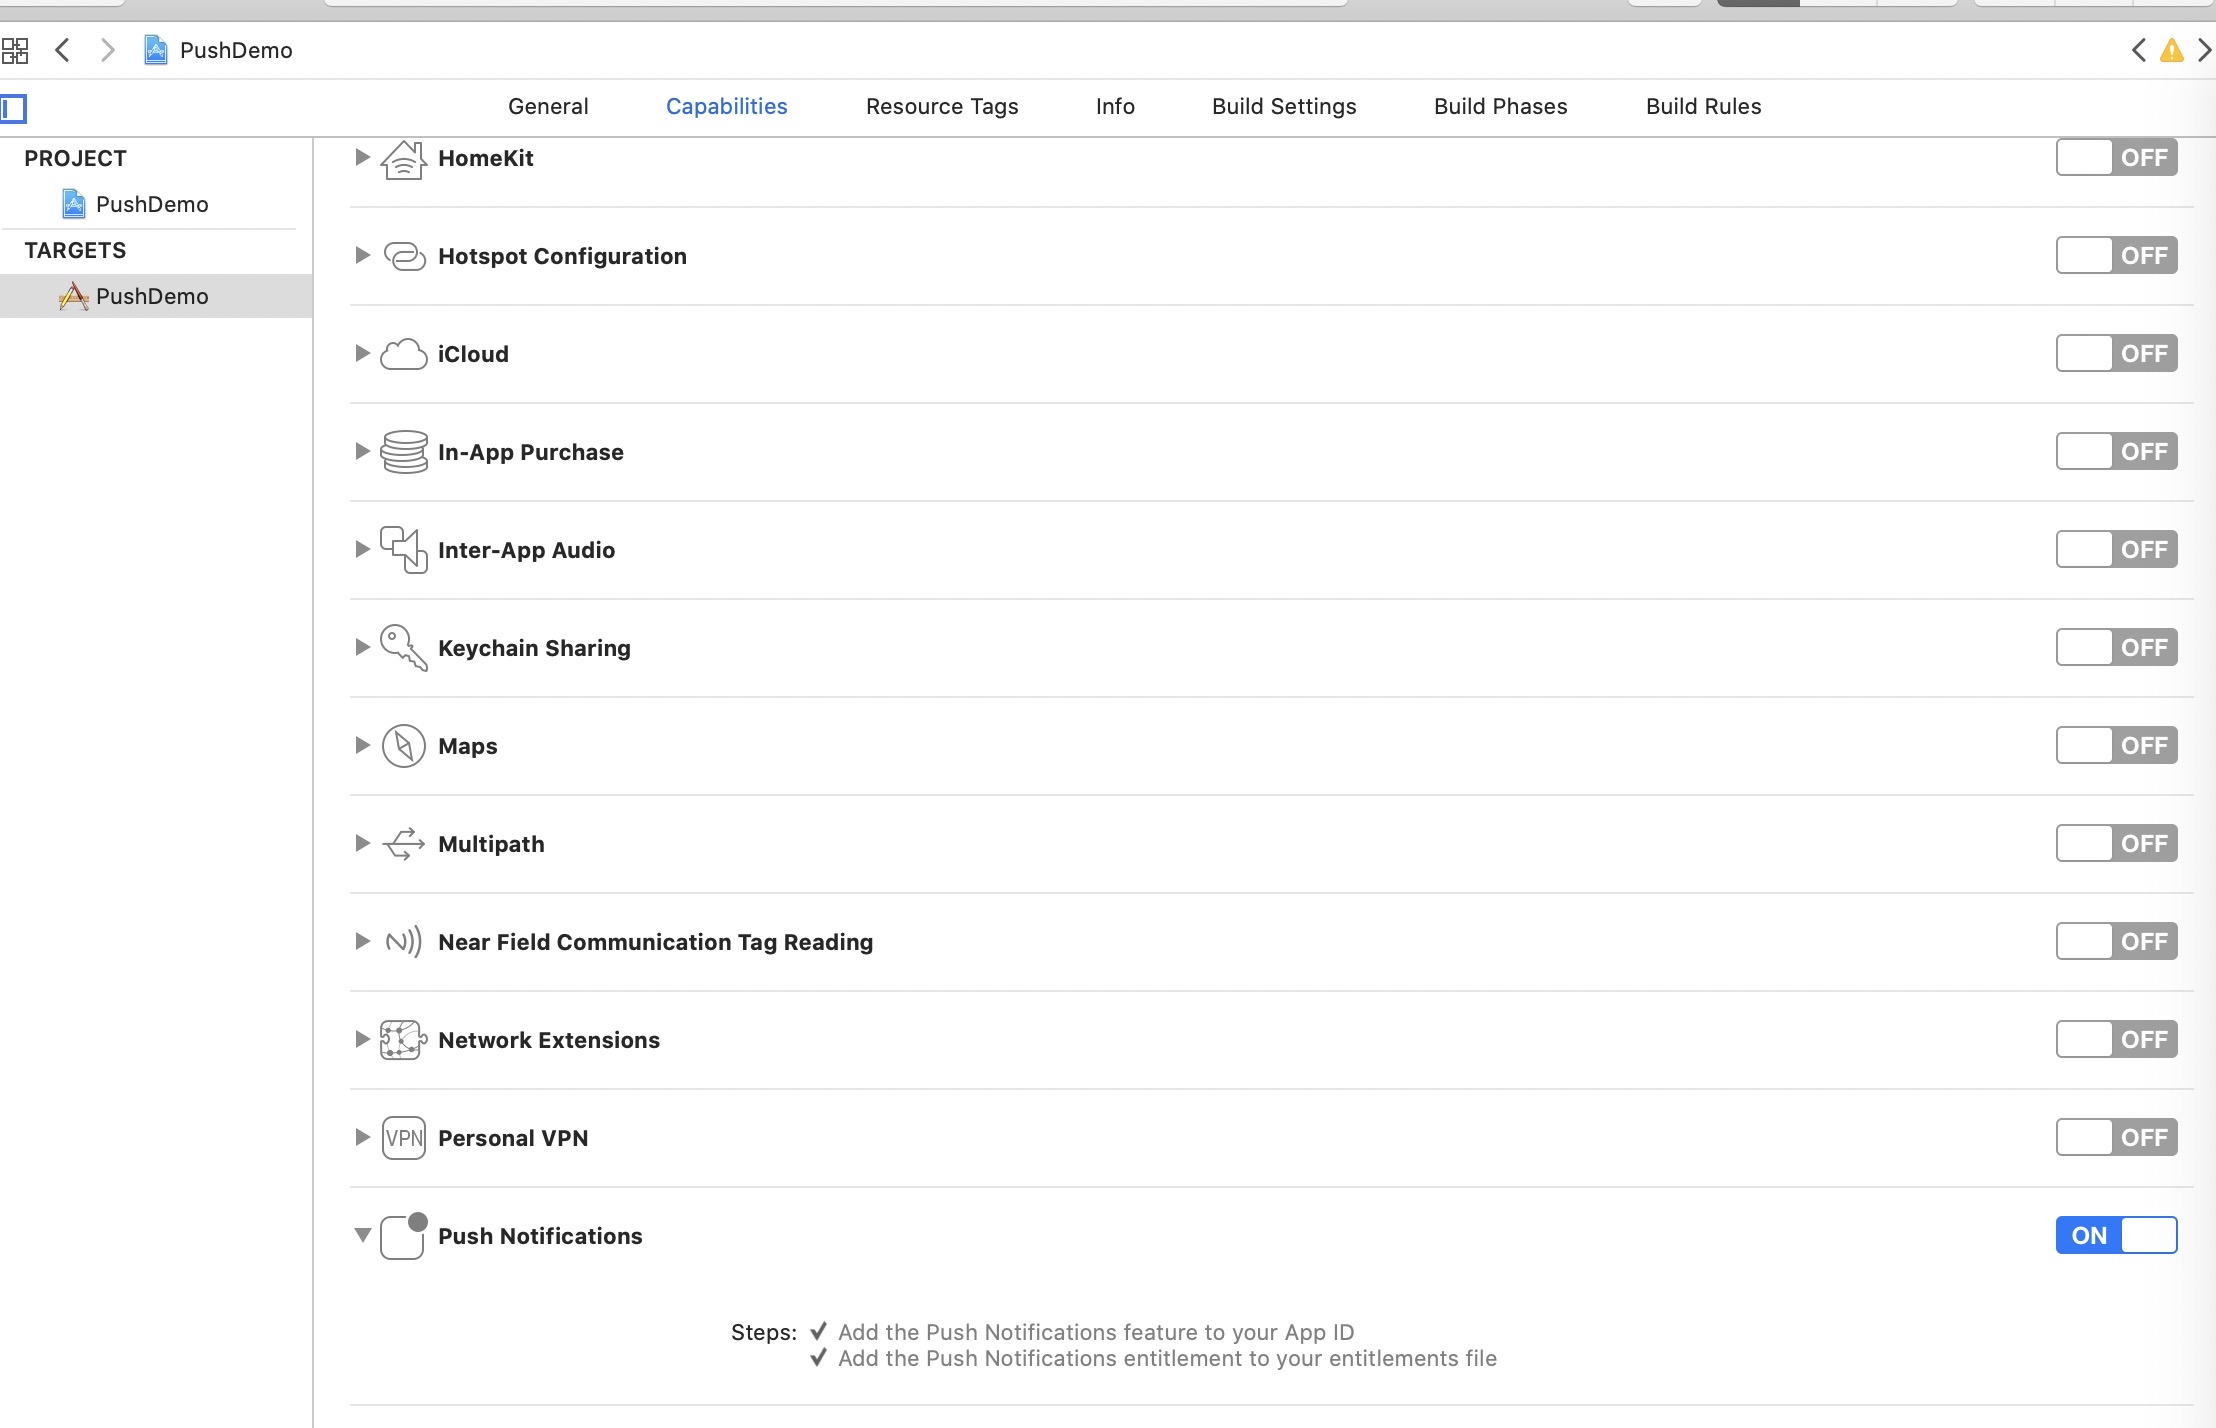
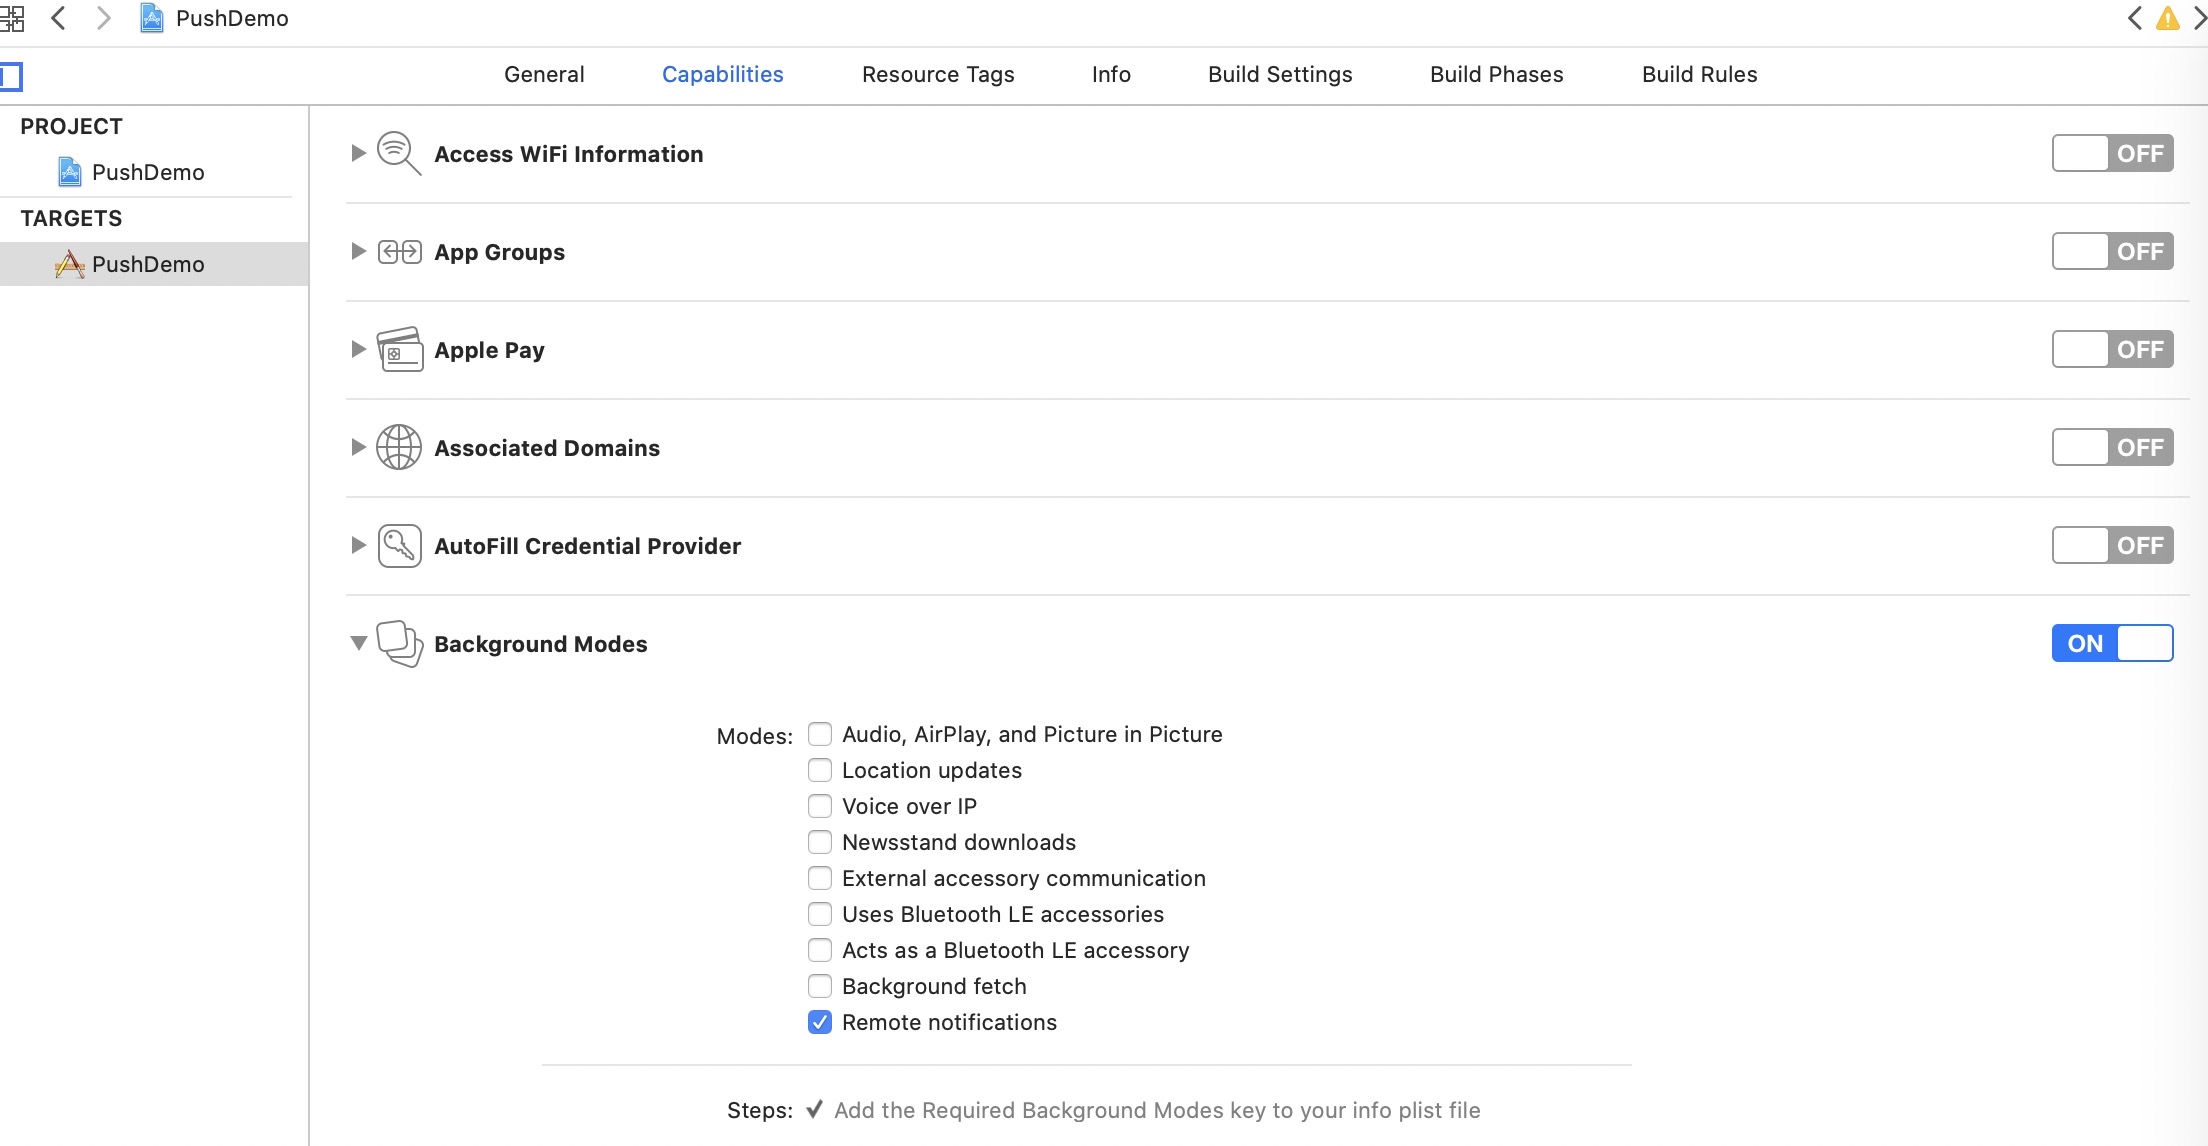
mPaaS_pod "mPaaS_Push"添加訊息推送組件依賴,然後執行pod install完成訊息推送 SDK 接入。配置工程。需要在工程的 TARGETS 設定中開啟以下兩項配置:
Capabilities > Push Notifications
Capabilities > Background Modes > Remote notifications
使用 SDK。
在基於已有工程且使用 CocoaPods 接入 iOS 用戶端的情況下,您需要完成以下操作。
註冊 deviceToken(非必需)。
訊息推送 SDK 在應用啟動完成時,會自動請求註冊 deviceToken,一般情況下您無需請求註冊 deviceToken。但是當特殊情況下(比如啟動時有隱私管控,阻止一切網路請求時)您需要在管控授權後,再次觸發註冊 deviceToken,範例程式碼如下:
- (void)registerRemoteNotification
{
    // 註冊推送
    if ([[[UIDevice currentDevice] systemVersion] floatValue] >= 10.0) {// 10.0+
        UNUserNotificationCenter* center = [UNUserNotificationCenter currentNotificationCenter];
        center.delegate = self;
        [center getNotificationSettingsWithCompletionHandler:^(UNNotificationSettings * _Nonnull settings) {

                [center requestAuthorizationWithOptions:(UNAuthorizationOptionAlert|UNAuthorizationOptionSound|UNAuthorizationOptionBadge)
                                      completionHandler:^(BOOL granted, NSError * _Nullable error) {
                    // Enable or disable features based on authorization.
                    if (granted) {
                        dispatch_async(dispatch_get_main_queue(), ^{
                            [[UIApplication sharedApplication] registerForRemoteNotifications];
                        });
                    }
                }];

        }];
    } else {// 8.0,9.0
        UIUserNotificationSettings *settings = [UIUserNotificationSettings settingsForTypes:(UIUserNotificationTypeBadge                                                                                         |UIUserNotificationTypeSound|UIUserNotificationTypeAlert) categories:nil];
        [[UIApplication sharedApplication] registerUserNotificationSettings:settings];
        [[UIApplication sharedApplication] registerForRemoteNotifications];
    }
}
擷取 deviceToken 並綁定 userId。
mPaaS 提供的訊息推送 SDK 中封裝了向 APNs 伺服器註冊的邏輯,在程式啟動後,Push SDK 自動向 APNs 伺服器註冊。您可在註冊成功的回調方法中擷取 APNs 下發的 deviceToken,然後調用
PushService的介面方法,上報綁定 userId 至Alibaba Cloud Mobile Push核心。// import <PushService/PushService.h> - (void)application:(UIApplication *)application didRegisterForRemoteNotificationsWithDeviceToken:(NSData *)deviceToken { [[PushService sharedService] setDeviceToken:deviceToken]; [[PushService sharedService] pushBindWithUserId:@"your userid(需替換)" completion:^(NSException *error) { }]; }訊息推送 SDK 同時提供瞭解綁的介面
- (void)pushUnBindWithUserId:(NSString *)userId completion:(void (^)(NSException *error))completion;,用於解除裝置的 deviceToken 與當前應用的 userId 的綁定。如在使用者切換帳號後,可以調用解除綁定介面。接收推送的訊息。
用戶端收到推送的訊息後,如果使用者點擊查看,系統將啟動相應應用。可在
AppDelegate的回調方法中完成收到 push 訊息後的邏輯處理。在 iOS 10 以下系統中,通知欄訊息或靜默訊息的處理方法如下:
  // iOS 10 以下 Push 冷啟動處理
  - (BOOL)application:(UIApplication *)application didFinishLaunchingWithOptions:(NSDictionary *)launchOptions {
  NSDictionary *userInfo = [launchOptions objectForKey: UIApplicationLaunchOptionsRemoteNotificationKey];
  if ([[[UIDevice currentDevice] systemVersion] doubleValue] < 10.0) {
      // iOS 10 以下 Push 冷啟動處理
  }

  return YES;
}

  // App 在前台時,普通推送的處理方法;App 在前台或後台時,靜默推送的處理方法;iOS 10 以下系統,通知欄訊息處理方法
  - (void)application:(UIApplication *)application didReceiveRemoteNotification:(NSDictionary *)userInfo fetchCompletionHandler:(void (^)(UIBackgroundFetchResult result))completionHandler
  {
      //處理接受到的訊息
  }
在 iOS 10 及以上系統中,您需要實現以下代理方法來監聽通知欄訊息:
  // 註冊 UNUserNotificationCenter delegate
  if ([[[UIDevice currentDevice] systemVersion] doubleValue] >= 10.0) {
          UNUserNotificationCenter* center = [UNUserNotificationCenter currentNotificationCenter];
          center.delegate = self;
    }

   //應用處於前台時的遠程推送接收
  - (void)userNotificationCenter:(UNUserNotificationCenter *)center willPresentNotification:(UNNotification *)notification withCompletionHandler:(void (^)(UNNotificationPresentationOptions options))completionHandler
  {
      NSDictionary *userInfo = notification.request.content.userInfo;

      if([notification.request.trigger isKindOfClass:[UNPushNotificationTrigger class]]) {
          //應用處於前台時的遠程推送接收

      } else {
          //應用處於前台時的本地推送接收

      }
      completionHandler(UNNotificationPresentationOptionNone);
  }

  //應用處於後台或者活冷啟動時遠程推送接收
  - (void)userNotificationCenter:(UNUserNotificationCenter *)center didReceiveNotificationResponse:(UNNotificationResponse *)response withCompletionHandler:(void(^)(void))completionHandler
  {
      NSDictionary *userInfo = response.notification.request.content.userInfo;

      if([response.notification.request.trigger isKindOfClass:[UNPushNotificationTrigger class]]) {
          //應用處於後台或者活冷啟動時遠程推送接收

      } else {
          //應用處於前台時的本地推送接收

      }
      completionHandler();

  }
統計訊息的開啟率。
為了統計訊息在用戶端的開啟率,您需要在 App 訊息被使用者開啟時,調用
PushService的pushOpenLogReport介面(10.1.32 及以上版本可用)上報訊息開啟事件。該事件上報後,您可以在 mPaaS 控制台中的 訊息推送 > 概覽 頁面中查看訊息開啟率的統計資料。/** * 開啟推送訊息的上報介面,用於統計推送訊息的開啟率 * @param userInfo 訊息的 userInfo * @return */ - (void)pushOpenLogReport:(NSDictionary *)userInfo;
配置推送認證。
要使用 mPaaS 訊息推送控制台推送訊息,您需要在控制台中配置 APNs 推送認證。該認證必須是與用戶端簽名對應的推送認證,否則用戶端會收不到推送訊息。有關詳細的配置說明,查看 配置 iOS 推送通道。
後續操作
在 mPaaS 訊息推送控制台配置完 APNs 認證後,可以按裝置維度嚮應用推送訊息。訊息推送服務使用蘋果的 APNs 服務向用戶端推送訊息,更多資訊請參見 蘋果及國外安卓裝置推送流程。
上報使用者識別碼 並由服務端綁定使用者和裝置後,可以按使用者維度嚮應用推送訊息。
程式碼範例
點擊此處 下載範例程式碼包。
相關連結
Live Activity 訊息推送
iOS 在 16.1 版本中推出了一個新功能:Live Activity(即時活動)。該功能可以將即時活動展示在鎖定畫面上,協助使用者從鎖定的螢幕即時獲知各種活動的進展。在主工程中,可以使用 ActivityKit 架構來開啟、更新、結束即時活動。其中,更新和結束即時活動還可以使用遠程推送來實現。在 widget extension 中,可以使用 SwiftUI 和 WidgetKit 來建立 Live Activity 的介面。其中,Live Activity 遠程推送更新功能,不支援 .p12 認證,因此需要使用者配置 .p8 認證。
同一個專案中可以同時開啟多個 Live Activity,不同的 Live Activity,其 token 是不同的。
Live Activity 蘋果官方文檔
Live Activity 使用限制
只能在 iOS 16.1 版本以上的系統上運行。
只支援 iPhone 裝置,不支援 iPadOS,macOS,tvOS,watchOS。
單個 Live Activity 最多可運行 8 個小時,超過 8 小時系統會自動停止 Live Activity 的運行,但是不會立即從螢幕上被移除。
停止運行超過 4 小時後系統會自動將其從螢幕上移除。
資源檔尺寸需符合要求,詳情請參見 蘋果開發人員文檔。
推送的內容不能超過 4KB。
接入用戶端
配置工程支援 Live Activity
在主工程的
Info.plist檔案中添加一個索引值對,key 為NSSupportsLiveActivities,值為YES。
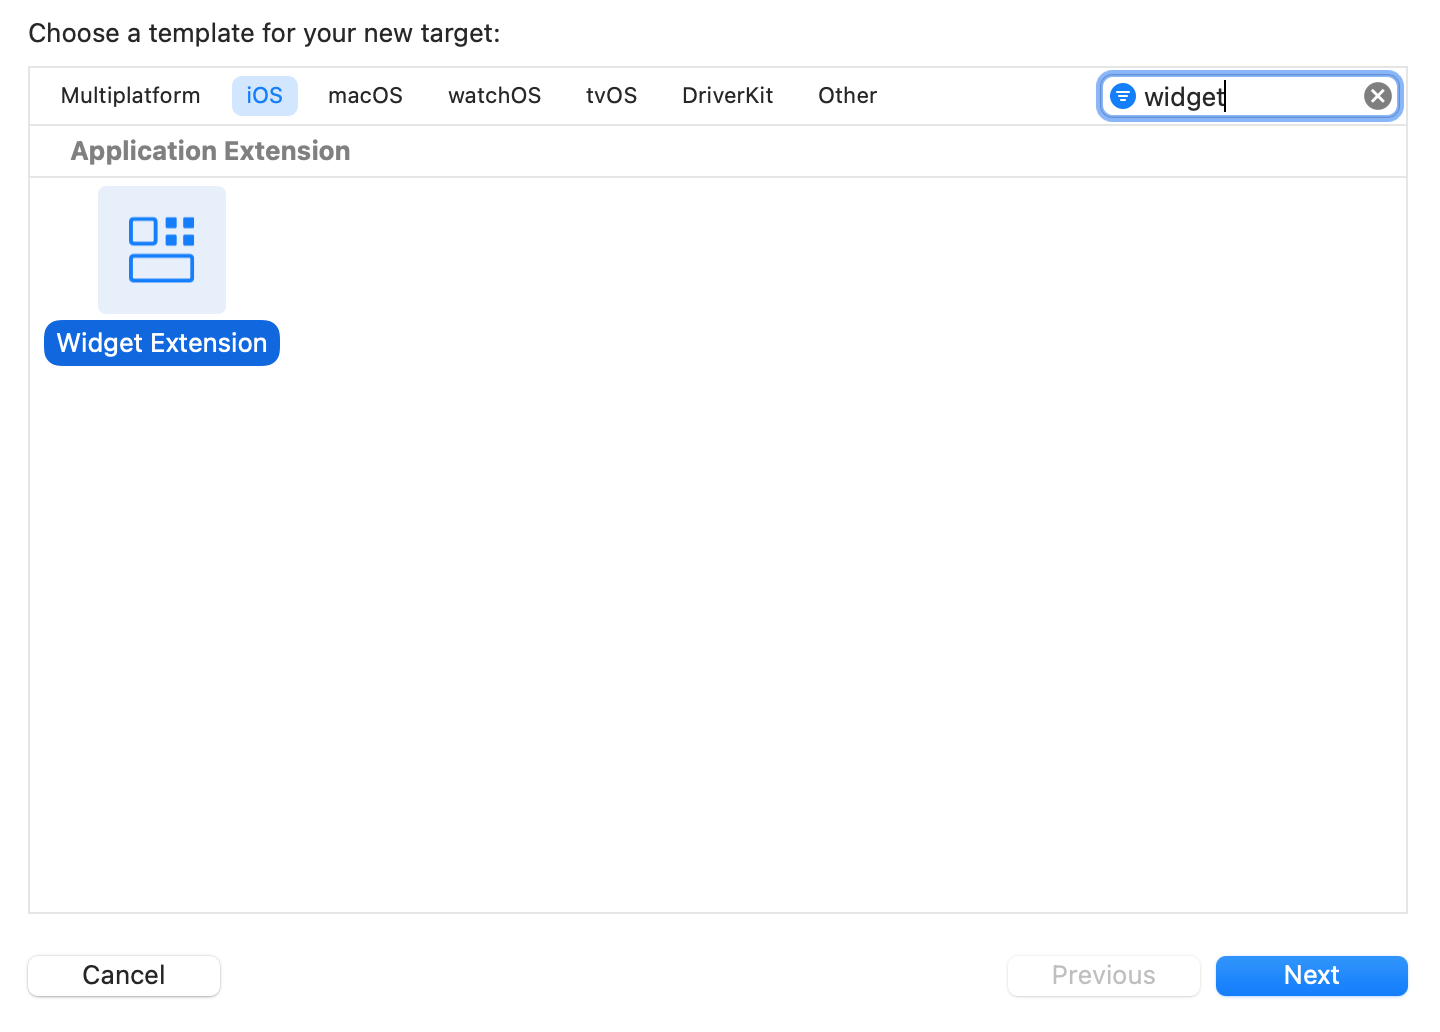
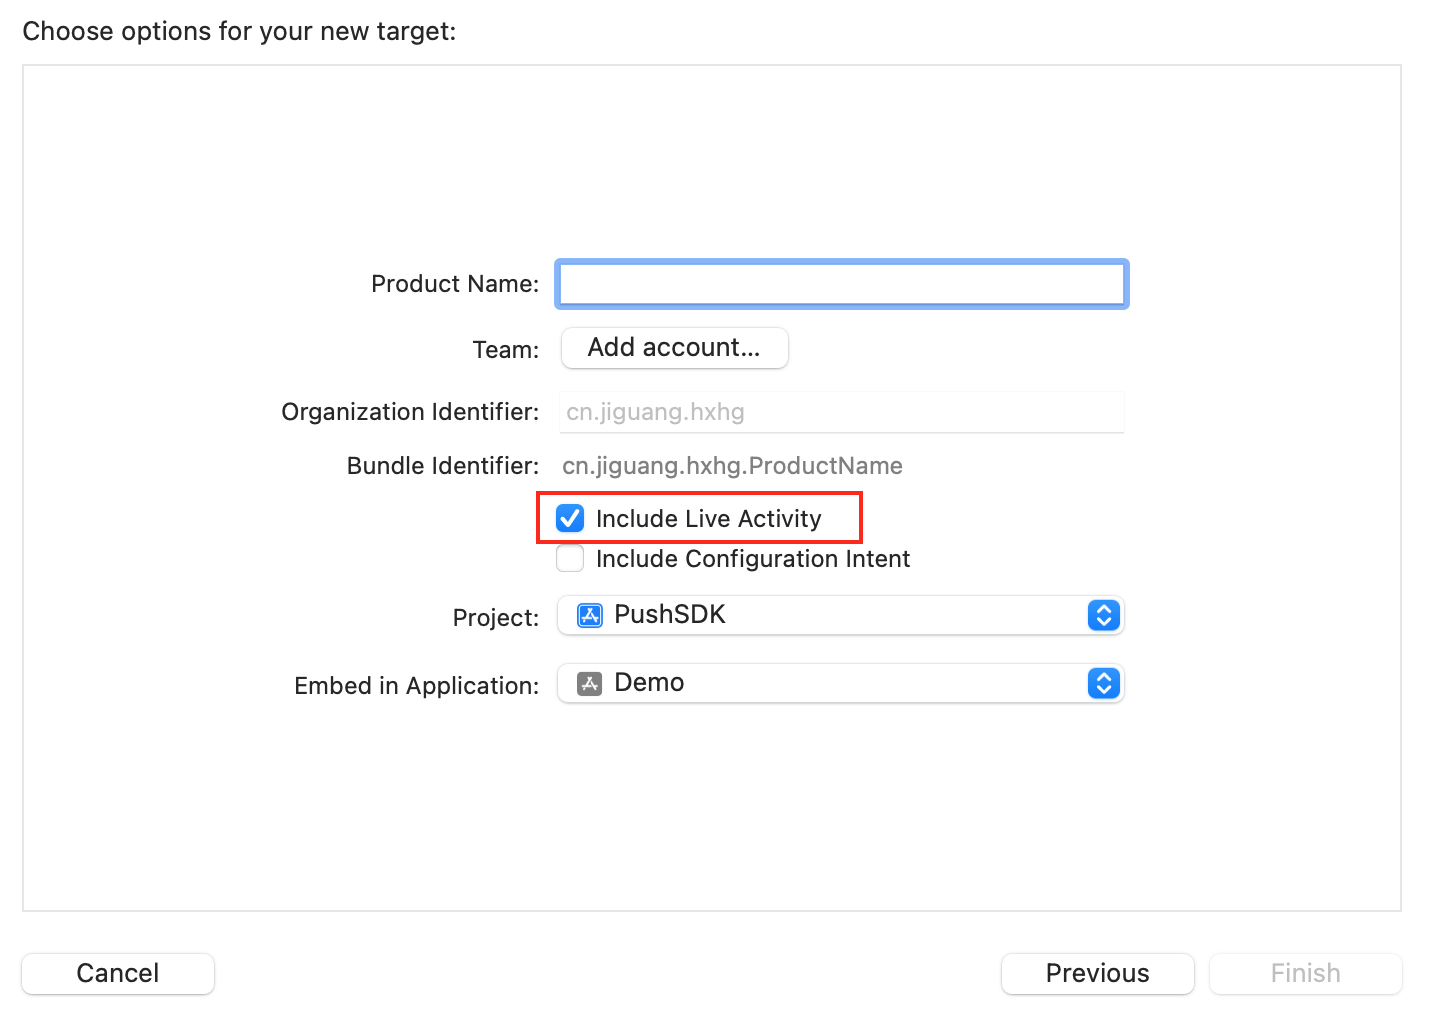
建立 Widget Extension,如果專案中已有,可跳過此步驟。
代碼實現
建立 model。
在主工程代碼裡建立一個 swift 檔案,在其中定義
ActivityAttributes以及Activity.ContentState。以下代碼為範例程式碼,請按照實際業務編寫。
import SwiftUI
import ActivityKit

struct PizzaDeliveryAttributes: ActivityAttributes {
    public typealias PizzaDeliveryStatus = ContentState

    public struct ContentState: Codable, Hashable {
        var driverName: String
        var estimatedDeliveryTime: ClosedRange<Date>

        init(driverName: String, estimatedDeliveryTime: ClosedRange<Date>) {
            self.driverName = driverName
            self.estimatedDeliveryTime = estimatedDeliveryTime
        }
        init(from decoder: Decoder) throws {
            let container: KeyedDecodingContainer<PizzaDeliveryAttributes.ContentState.CodingKeys> = try decoder.container(keyedBy: PizzaDeliveryAttributes.ContentState.CodingKeys.self)
            self.driverName = try container.decode(String.self, forKey: PizzaDeliveryAttributes.ContentState.CodingKeys.driverName)
            if let deliveryTime = try? container.decode(TimeInterval.self, forKey: PizzaDeliveryAttributes.ContentState.CodingKeys.estimatedDeliveryTime) {
                self.estimatedDeliveryTime = Date()...Date().addingTimeInterval(deliveryTime * 60)
            } else if let deliveryTime = try? container.decode(String.self, forKey: PizzaDeliveryAttributes.ContentState.CodingKeys.estimatedDeliveryTime) {
                self.estimatedDeliveryTime = Date()...Date().addingTimeInterval(TimeInterval.init(deliveryTime)! * 60)
            } else {
                self.estimatedDeliveryTime = try container.decode(ClosedRange<Date>.self, forKey: PizzaDeliveryAttributes.ContentState.CodingKeys.estimatedDeliveryTime)
            }
        }
    }

    var numberOfPizzas: Int
    var totalAmount: String
}
主工程 target 和 Activity 都要選上。
收到的推送訊息由系統處理,開發人員不能攔截。
ContentState中為可以動態更新的資料,推送 Live Activity 通知時,動態更新的參數名和類型要和ContentState裡配置的對應上。如果有些資料需要經過加工,需要重寫
ActivityAttributes.ContentState的decoder方法。
建立介面。
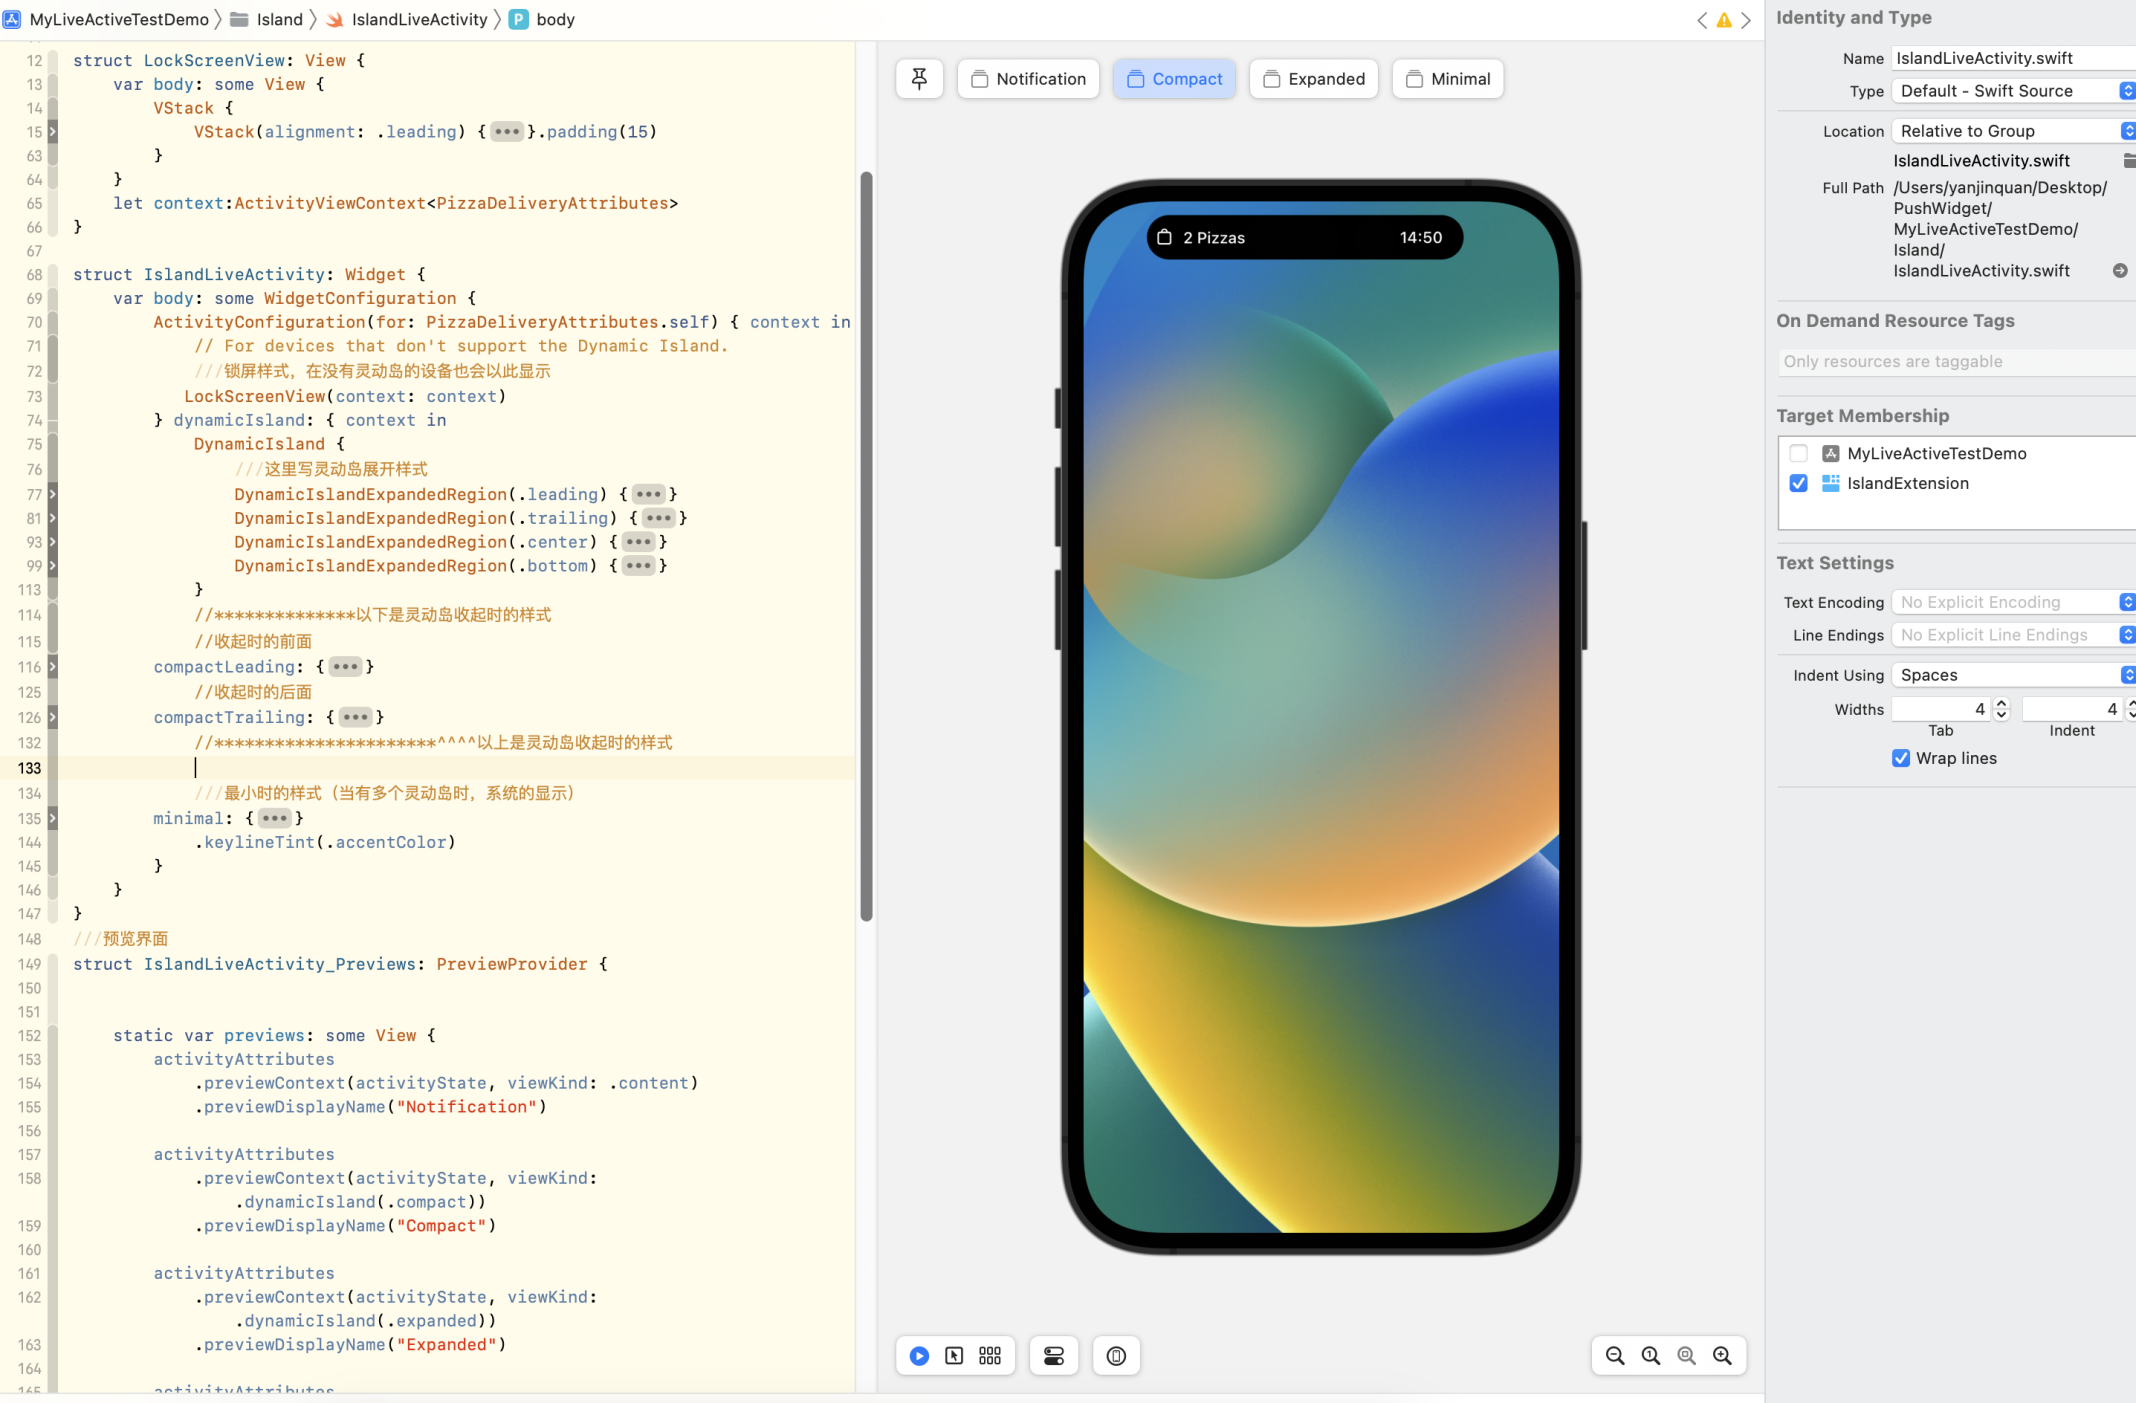
在 Widget Extension 中建立即時活動的介面。建立 Widget 並返回一個
Activity Configuration。具體 UI 請按照自己的業務編寫。
使用 WidgetBundle。
如果目標 App 既支援小工具也支援即時活動,請使用 WidgetBundle。
import WidgetKit
import SwiftUI

@main
structIslandBundle: WidgetBundle {
varbody: someWidget {
Island()
IslandLiveActivity()
}
}
開啟即時活動。
func startDeliveryPizza() {
    let pizzaDeliveryAttributes = PizzaDeliveryAttributes(numberOfPizzas: 1, totalAmount:"$99")
    let initialContentState = PizzaDeliveryAttributes.PizzaDeliveryStatus(driverName: "TIM", estimatedDeliveryTime: Date()...Date().addingTimeInterval(15 * 60))
    do {
        let deliveryActivity = try Activity<PizzaDeliveryAttributes>.request(
            attributes: pizzaDeliveryAttributes,
            contentState: initialContentState,
            pushType: .token)
    } catch (let error) {
        print("Error requesting pizza delivery Live Activity \(error.localizedDescription)")
    }
}
提交 Token。
開啟即時活動成功後,通過
pushTokenUpdates方法拿到系統返回的 Live Activity 的推送 Token。 調用 PushService 的liveActivityBindWithActivityId:pushToken:filter:completion:方法上報。在上報 Token 的同時,需要將該即時活動的標識一起上報。即時活動推送時需要用到該標識,伺服器根據該標識確認推送目標。該即時活動的標識請自訂,不同 Live Activity,其 id 不同(如果唯一會導致推送出現問題),同一個 Live Activity,在 Token 更新時不要更換 id。
說明ActivityKit 為 swift 語言架構,且不支援直接 OC 調用,使用該架構 API 的時候,請在 swift 檔案裡面調用。由於 MPPushSDK 是 OC 語言,涉及到 swift 調用 OC,需要建立橋接檔案。並在橋接檔案裡匯入:
#import <MPPushSDK/MPPushSDK.h>。let liveactivityId = UserDefaults.standard.string(forKey: "pushTokenUpdates_id") ?? "defloutliveactivityId" Task { for await tokenData in deliveryActivity.pushTokenUpdates { let newToken = tokenData.map { String(format: "%02x", $0) }.joined() PushService.shared().liveActivityBind(withActivityId: liveactivityId, pushToken: newToken, filter: .call) { excpt in guard let excpt = excpt else { ///上報成功 return } if "callRepeat" == excpt.reason { ///重複調用,請忽略 print("pushTokenUpdates_id——重複調用") } else { ///上報失敗 } } } }上報成功後,則可以使用即時活動的標識推送更新。
說明由於 iPhone 的
pushTokenUpdates會同時被調用兩次,即在多個 Live Activity 的情境中,新建立 Live Activity 時之前的LiveActivity pushTokenUpdates又會被重新喚醒一次,所以 SDK 提供了過濾功能,並由參數 filter 控制:filter 為
MPPushServiceLiveActivityFilterAbandon時,SDK 會自動直接拋棄重複的調用,不給回調。filter 為
MPPushServiceLiveActivityFilterCall時,SDK 會自動過濾掉本次請求,給失敗回調(callRepeat),此時error.reason為@"callRepeat",請忽略。filter 為
MPPushServiceLiveActivityFilterReRefuse時,SDK 內部不做過濾。重複地調用相同的 activityId,相同的 pushToken 時,如果上報失敗,用戶端重新上報不會被認為是相同的調用。
下面是
MPPushServiceLiveActivityFilterType的定義:typedef NS_ENUM(NSInteger, MPPushServiceLiveActivityFilterType){ MPPushServiceLiveActivityFilterAbandon,//直接拋棄,不給回調 MPPushServiceLiveActivityFilterCall,//過濾掉本次請求,給失敗回調(callRepeat) MPPushServiceLiveActivityFilterRefuse//不做過濾 };