您可以通過Function Compute控制台、SDK或Serverless Devs來體驗GPU執行個體的最佳實務。本文以Python語言為例,說明如何使用Serverless Devs開發工具或通過控制台,將原始映像經過函數代碼處理,實現風格合成以及對象檢測。
應用情境與優勢
傳統的面向人工智慧應用的GPU基礎設施,通常會面臨著建設周期長、營運複雜度高、叢集利用率低和成本較高等問題。Function Compute的GPU執行個體將這些問題從使用者側轉移至雲廠商側,讓您無需關心底層GPU基礎設施,完全聚焦於業務本身,極大地簡化了業務的實現路徑。
在不同的應用情境下,Function Compute提供的GPU執行個體與CPU相比所具備的優勢如下。
成本優先的AI應用情境
提供彈性預留模式,從而按需為客戶保留GPU工作執行個體,對比自建GPU叢集擁有較大成本優勢。
提供GPU共用虛擬化,支援以1/2、獨佔方式使用GPU,允許業務以更精細化的方式配置GPU執行個體。
效率優先的AI應用情境
屏蔽營運GPU叢集的繁重負擔(驅動/CUDA版本管理、機器運行管理、GPU壞卡管理),使得開發人員專註於代碼開發、聚焦營運目標的達成。
GPU執行個體的更多資訊,請參見執行個體類型及使用模式。
神經風格遷移教程
神經風格遷移是一種產生技術,主要用來合成兩張映像,即從其中一張映像提取內容,另一張映像提取風格,以合成一張新映像。本樣本通過使用TensorFlow Hub預置模型,完成任意映像的風格合成。
合成效果
內容映像 | 風格映像 | 合成映像 |
|
|
|


前提條件
通用
使用GPU執行個體過程中,為了確保您的業務正常進行,請加入DingTalk使用者群(DingTalk群號:11721331),並提供以下資訊。
組織名稱,例如您所在的公司名稱。
您的阿里雲帳號ID。
您期望使用GPU執行個體的地區,例如華南1(深圳)。
連絡方式,例如您的手機號、郵箱或DingTalk帳號等。
將需處理的音視頻資源上傳至在GPU執行個體所在地區的OSS Bucket中,且您對該Bucket中的檔案有讀寫權限。具體步驟,請參見控制台上傳檔案。許可權相關說明,請參見修改儲存空間讀寫權限。
僅適用於通過ServerlessDevs部署GPU應用
在GPU執行個體所在地區,完成以下操作:
建立Container Registry的企業版執行個體或個人版執行個體,推薦您建立企業版執行個體。具體操作步驟,請參見建立企業版執行個體。
建立命名空間鏡像倉庫。具體操作步驟,請參見步驟二:建立命名空間和步驟三:建立鏡像倉庫。
通過ServerlessDevs部署GPU應用
建立專案。
s init devsapp/start-fc-custom-container-event-python3.9 -d fc-gpu-prj建立的專案目錄如下所示。
fc-gpu-prj
├── code
│   ├── app.py        # 函數代碼
│   └── Dockerfile    # Dockerfile:將代碼打包成鏡像的Dockerfile
├── README.md
└── s.yaml            # 專案配置:包含了鏡像如何部署在Function Compute
進入專案所在目錄。
cd fc-gpu-prj按實際情況修改目錄檔案的參數配置。
編輯s.yaml檔案。
YAML檔案的參數詳解,請參見YAML規範。
edition: 1.0.0 name: container-demo access: default vars: region: cn-shenzhen services: customContainer-demo: component: devsapp/fc props: region: ${vars.region} service: name: tgpu_tf_service internetAccess: true function: name: tgpu_tf_func description: test gpu for tensorflow handler: not-used timeout: 600 caPort: 9000 instanceType: fc.gpu.tesla.1 gpuMemorySize: 8192 cpu: 4 memorySize: 16384 diskSize: 512 runtime: custom-container customContainerConfig: # 1. 請檢查阿里雲ACR容器鏡像倉庫已提前建立相應的命名空間(namespace:demo)與倉庫(repo:gpu-tf-style-transfer_s)。 # 2. 後續更新函數時,請修改此處的tag,由v0.1修改為v0.2後,重新執行s build && s deploy。 image: registry.cn-shenzhen.aliyuncs.com/demo/gpu-tf-style-transfer_s:v0.1 codeUri: ./code triggers: - name: httpTrigger type: http config: authType: anonymous methods: - GET編輯app.py檔案。
樣本如下:
# -*- coding: utf-8 -*- # python2 and python3 from __future__ import print_function from http.server import HTTPServer, BaseHTTPRequestHandler from tensorflow import keras from tensorflow.keras import layers from tensorflow.keras.models import Sequential import json import sys import logging import os import matplotlib.pyplot as plt import matplotlib as mpl import numpy as np import os import PIL import tensorflow as tf import pathlib import urllib.request import random class Resquest(BaseHTTPRequestHandler): def upload(self, url, path): print("enter upload:", url) headers = { 'Content-Type': 'application/octet-stream', 'Content-Length': os.stat(path).st_size, } req = urllib.request.Request(url, open(path, 'rb'), headers=headers, method='PUT') urllib.request.urlopen(req) def tensor_to_image(self, tensor): tensor = tensor*255 tensor = np.array(tensor, dtype=np.uint8) if np.ndim(tensor)>3: assert tensor.shape[0] == 1 tensor = tensor[0] return PIL.Image.fromarray(tensor) def load_img(self, path_to_img): max_dim = 512 img = tf.io.read_file(path_to_img) img = tf.image.decode_image(img, channels=3) img = tf.image.convert_image_dtype(img, tf.float32) shape = tf.cast(tf.shape(img)[:-1], tf.float32) long_dim = max(shape) scale = max_dim / long_dim new_shape = tf.cast(shape * scale, tf.int32) img = tf.image.resize(img, new_shape) img = img[tf.newaxis, :] return img def do_style_transfer(self): mpl.rcParams['figure.figsize'] = (12,12) mpl.rcParams['axes.grid'] = False # 需替換為您個人阿里雲帳號下的OSS,且您有可讀寫的許可權。 # 此處是讀取您儲存在OSS Bucket中的內容和樣式圖片。 content_path = tf.keras.utils.get_file(str(random.randint(0,100000000)) + ".jpg", 'https://your_public_oss/c1.png') style_path = tf.keras.utils.get_file(str(random.randint(0,100000000)) + ".jpg",'https://your_public_oss/c2.png') content_image = self.load_img(content_path) style_image = self.load_img(style_path) print("load image ok") import tensorflow_hub as hub hub_model = hub.load('https://hub.tensorflow.google.cn/google/magenta/arbitrary-image-stylization-v1-256/2') #可以將hub模型打包至鏡像載入,加快處理速度 #hub_model = hub.load('/usr/src/app/style_transfer_model') stylized_image = hub_model(tf.constant(content_image), tf.constant(style_image))[0] print("load model ok") path = "/tmp/" + str(random.randint(0,100000000)) + ".png" self.tensor_to_image(stylized_image).save(path) print("generate stylized image ok") # 需替換為您個人阿里雲帳號下的OSS,且您有可讀寫的許可權。 # 此處是將最後合成的圖片儲存至您的OSS Bucket。 self.upload("https://your_public_oss/stylized-image.png" ,path) return "transfer ok" def style_transfer(self): msg = self.do_style_transfer() data = {"result": msg} self.send_response(200) self.send_header("Content-type", "application/json") self.end_headers() self.wfile.write(json.dumps(data).encode()) def pong(self): data = {"function":"tf_style_transfer"} self.send_response(200) self.send_header('Content-type', 'application/json') self.end_headers() self.wfile.write(json.dumps(data).encode()) def dispatch(self): mode = self.headers.get('RUN-MODE') if mode == "ping": self.pong() elif mode == "normal": self.style_transfer() else: self.pong() def do_GET(self): self.dispatch() def do_POST(self): self.dispatch() if __name__ == "__main__": host = ("0.0.0.0", 9000) server = HTTPServer(host, Resquest) print("Starting server, listen at: %s:%s" % host) server.serve_forever()編輯Dockerfile檔案。
樣本如下:
FROM registry.cn-shanghai.aliyuncs.com/serverless_devs/tensorflow:2.7.0-gpu
WORKDIR /usr/src/app
RUN apt-get update
RUN apt-get install -y python3
RUN apt-get install -y python3-pip
RUN pip3 install matplotlib
RUN pip install tensorflow_hub
COPY . .
CMD [ "python3", "-u", "/usr/src/app/app.py" ]
EXPOSE 9000
構建鏡像。
s build --dockerfile ./code/Dockerfile部署代碼至Function Compute。
s deploy說明服務名稱和函數名稱不變,重複執行以上命令時,請選擇本地配置,即
use local。配置預留模式的執行個體。
s provision put --target 1 --qualifier LATEST查詢預留模式的執行個體是否就緒。
s provision get --qualifier LATEST如果查詢到
current參數為1,則說明GPU執行個體的預留模式已就緒,樣本如下。[2022-06-21 11:53:19] [INFO] [FC] - Getting provision: tgpu_tf_service.LATEST/tgpu_tf_func helloworld: serviceName: tgpu_tf_service functionName: tgpu_tf_func qualifier: LATEST resource: 188077086902****#tgpu_tf_service#LATEST#tgpu_tf_func target: 1 current: 1 scheduledActions: (empty array) targetTrackingPolicies: (empty array) currentError: alwaysAllocateCPU: true調用函數。
查看線上函數版本
s invoke
FC Invoke Result:
{"function": "tf_style_transfer"}
執行風格遷移
s invoke -e '{"method":"GET","headers":{"RUN-MODE":"normal"}}'
generate stylized image ok
enter upload: https://your_public_oss/stylized-image.png  # 可以下載此檔案查看合成結果
FC Invoke Result:
{"result": "transfer ok"}
釋放GPU執行個體。
s provision put --target 0 --qualifier LATEST
通過Function Compute控制台部署GPU應用
部署鏡像。
建Container Registry的企業版執行個體或個人版執行個體。
推薦您建立企業版執行個體。具體操作步驟,請參見建立企業版執行個體。
建立命名空間和鏡像倉庫。
具體操作步驟,請參見步驟二:建立命名空間和步驟三:建立鏡像倉庫。
在Container Registry控制台,根據介面提示完成Docker相關操作步驟。然後將上述樣本app.py和Dockerfile推送至執行個體鏡像倉庫,檔案資訊,請參見通過ServerlessDevs部署GPU應用時/code目錄中的app.py和Dockerfile。

建立服務。具體操作步驟,請參見建立服務。
建立函數。具體操作步驟,請參見建立Custom Container函數。
說明執行個體類型選擇GPU執行個體,請求處理常式類型選擇處理 HTTP 要求。
修改函數的執行逾時時間。
單擊目標服務下目標函數右側操作列的配置。
在環境資訊地區,修改執行逾時時間,然後單擊儲存。

說明CPU轉碼耗時會超過預設的60s,因此建議您修改執行逾時時間為較大的值。
配置GPU預留執行個體。
在函數詳情頁面,單擊彈性管理頁簽,然後單擊建立規則。
在建立Auto Scaling限制規則頁面,按需配置參數,預留GPU執行個體,然後單擊建立。
關於配置預留執行個體的具體操作,請參見配置Auto Scaling規則。
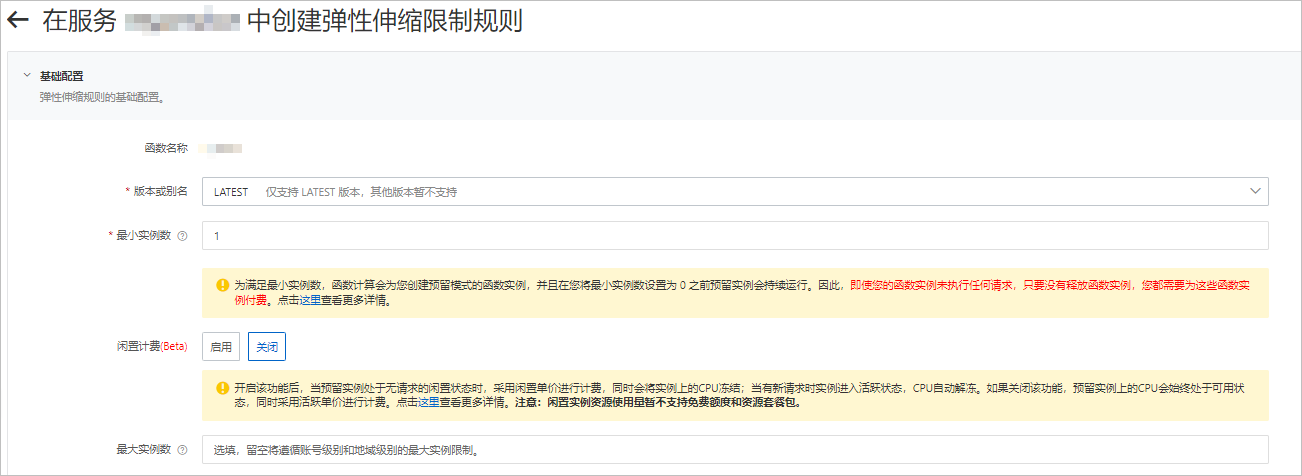
配置完成後,您可以在規則列表查看預留的GPU執行個體是否就緒。即當前預留執行個體數是否為設定的預留執行個體數。
使用cURL測試函數。
在函數詳情頁面,單擊觸發器管理頁簽,查看觸發器的配置資訊,擷取觸發器的訪問地址。
在命令列執行如下命令,調用GPU函數。
查看線上函數版本
curl -v "https://tgpu-ff-console-tgpu-ff-console-ajezot****.cn-shenzhen.fcapp.run"
{"function": "trans_gpu"}
執行風格遷移
curl "https://tgpu-fu-console-tgpu-se-console-zpjido****.cn-shenzhen.fcapp.run" -H 'RUN-MODE: normal'
{"result": "transfer ok"}
結果驗證
您可通過在瀏覽器中訪問以下網域名稱,查看經過風格合成處理後的圖片:
https://cri-zbtsehbrr8******-registry.oss-cn-shenzhen.aliyuncs.com/stylized-image.png本網域名稱僅為樣本,需以實際情況為準。
對象檢測教程
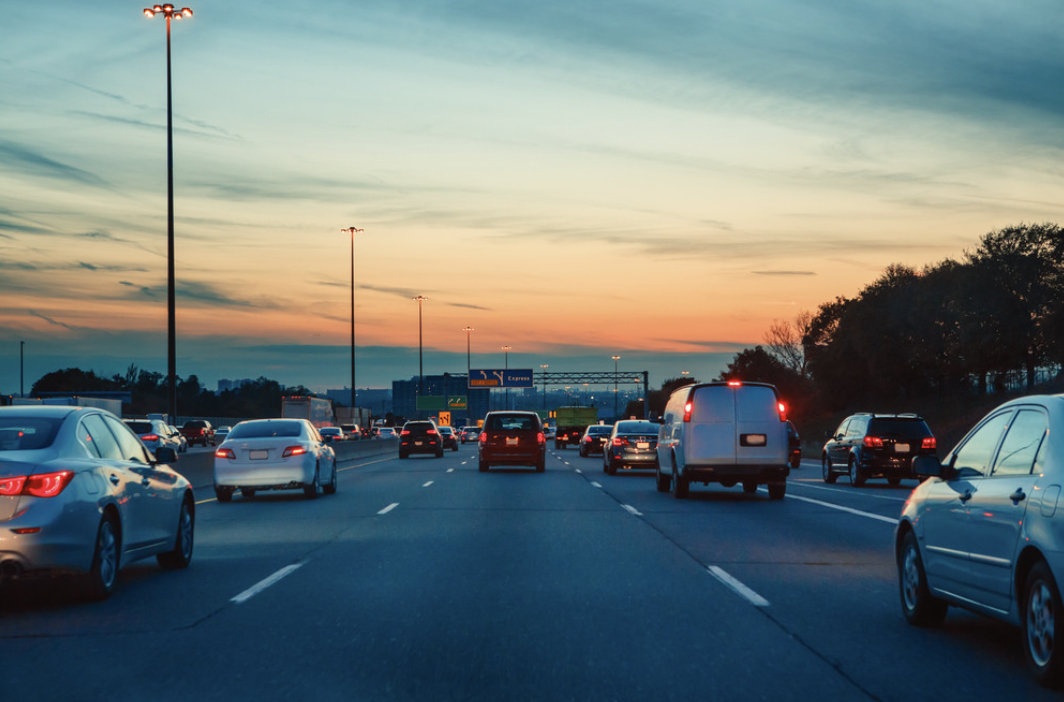
當多個對象同時出現時,需要使用對象檢測技術針對感興趣的對象構建矩形邊框,並持續跟蹤。對象檢測應用通常用於大量不同類型對象的標記、識別。本樣本通過使用OpenCV DNN,完成多個物件檢測功能。
檢測效果
如下表所示,左列為需檢測對象的原圖,右列為經過OpenCV DNN處理後的對象檢測結果圖。結果圖中會顯示檢測到的對象名稱和準確率。
原始圖片 | 識別對象 |
|
|

前提條件
使用GPU執行個體過程中,為了確保您的業務正常進行,請加入DingTalk使用者群(DingTalk群號:11721331),並提供以下資訊。
組織名稱,例如您所在的公司名稱。
您的阿里雲帳號ID。
您期望使用GPU執行個體的地區,例如華南1(深圳)。
連絡方式,例如您的手機號、郵箱或DingTalk帳號等。
在GPU執行個體所在地區,完成以下操作:
建立Container Registry的企業版執行個體或個人版執行個體,推薦您建立企業版執行個體。具體操作步驟,請參見建立企業版執行個體。
建立命名空間鏡像倉庫。具體操作步驟,請參見步驟二:建立命名空間和步驟三:建立鏡像倉庫。
編譯OpenCV。
OpenCV需要自行編譯以使用GPU加速,編譯方式如下:
(推薦)通過Docker使用已編譯好的OpenCV。下載地址:opencv-cuda-docker和cuda-opencv
自行編譯。具體步驟,請參見官網編譯手冊。
將需處理的音視頻資源上傳至在GPU執行個體所在地區的OSS Bucket中,且您對該Bucket中的檔案有讀寫權限。具體步驟,請參見控制台上傳檔案。許可權相關說明,請參見修改儲存空間讀寫權限。
操作步驟
建立專案。
s init devsapp/start-fc-custom-container-event-python3.9 -d fc-gpu-prj建立的專案目錄如下所示。
fc-gpu-prj
├── code
│   ├── app.py        # 函數代碼
│   └── Dockerfile    # Dockerfile:將代碼打包成鏡像的Dockerfile
├── README.md
└── s.yaml            # 專案配置:包含了鏡像如何部署在Function Compute
進入專案所在目錄。
cd fc-gpu-prj按實際情況修改目錄檔案的參數配置。
編輯s.yaml檔案。
YAML檔案的參數詳解,請參見YAML規範。
edition: 1.0.0 name: container-demo access: default vars: region: cn-shenzhen services: customContainer-demo: component: devsapp/fc props: region: ${vars.region} service: name: tgpu_object_detect_service internetAccess: true function: name: tgpu_object_detect_func description: test gpu for opencv handler: not-used timeout: 600 caPort: 9000 memorySize: 16384 gpuMemorySize: 8192 instanceType: fc.gpu.tesla.1 runtime: custom-container customContainerConfig: # 1. 請檢查阿里雲ACR容器鏡像倉庫已提前建立相應的命名空間(namespace:demo)與倉庫(repo:gpu-transcoding_s)。 # 2. 後續更新函數時,請修改此處的tag,由v0.1修改為v0.2後,重新執行s build && s deploy。 image: registry.cn-shenzhen.aliyuncs.com/demo/gpu-object-detect_s:v0.1 codeUri: ./code triggers: - name: httpTrigger type: http config: authType: anonymous methods: - GET編輯app.py檔案。
樣本如下:
# -*- coding: utf-8 -*- # python2 and python3 from __future__ import print_function from http.server import HTTPServer, BaseHTTPRequestHandler import json import sys import logging import os import numpy as np import cv2 import urllib.request class Resquest(BaseHTTPRequestHandler): def download(self, url, path): print("enter download:", url) f = urllib.request.urlopen(url) with open(path, "wb") as local_file: local_file.write(f.read()) def upload(self, url, path): print("enter upload:", url) headers = { 'Content-Type': 'application/octet-stream', 'Content-Length': os.stat(path).st_size, } req = urllib.request.Request(url, open(path, 'rb'), headers=headers, method='PUT') urllib.request.urlopen(req) def core(self): CLASSES = ["background", "aeroplane", "bicycle", "bird", "boat", "bottle", "bus", "car", "cat", "chair", "cow", "diningtable", "dog", "horse", "motorbike", "person", "pottedplant", "sheep", "sofa", "train", "tvmonitor"] COLORS = np.random.uniform(0, 255, size=(len(CLASSES), 3)) print("[INFO] loading model...") prototxt = "/usr/src/app/m.prototxt.txt" model = "/usr/src/app/m.caffemodel" net = cv2.dnn.readNetFromCaffe(prototxt, model) msg = "" mode = "" if not cv2.cuda.getCudaEnabledDeviceCount(): msg = "No CUDA-capable device is detected |" else: msg = "CUDA-capable device supported |" net.setPreferableBackend(cv2.dnn.DNN_BACKEND_CUDA) net.setPreferableTarget(cv2.dnn.DNN_TARGET_CUDA) path = "/tmp/target.png" # 需替換為您個人阿里雲帳號下的OSS,且您有可讀寫的許可權。此處是讀取您儲存在OSS Bucket中的圖片。 self.download("https://your_public_oss/a.png", path) image = cv2.imread(path) (h, w) = image.shape[:2] blob = cv2.dnn.blobFromImage(cv2.resize(image, (300, 300)), 0.007843, (300, 300), 127.5) print("[INFO] computing object detections...") net.setInput(blob) detections = net.forward() # loop over the detections for i in np.arange(0, detections.shape[2]): confidence = detections[0, 0, i, 2] if confidence > 0.2: idx = int(detections[0, 0, i, 1]) box = detections[0, 0, i, 3:7] * np.array([w, h, w, h]) (startX, startY, endX, endY) = box.astype("int") cv2.rectangle(image, (startX, startY), (endX, endY), COLORS[idx], 2) x = startX + 10 if startY - 15 < 15 else startX y = startY - 15 if startY - 15 > 15 else startY + 20 label = "{}: {:.2f}%".format(CLASSES[idx], confidence * 100) cv2.putText(image, label, (x, y), cv2.FONT_HERSHEY_SIMPLEX, 0.5, COLORS[idx], 2) print("[INFO] {}".format(label)) cv2.imwrite(path, image) # 需替換為您個人阿里雲帳號下的OSS,且您有可讀寫的許可權。此處是讀取您儲存在OSS Bucket中的圖片。 self.upload("https://your_public_oss/target.jpg", path) msg = msg + " process image ok!" data = {'result': msg} self.send_response(200) self.send_header('Content-type', 'application/json') self.end_headers() self.wfile.write(json.dumps(data).encode()) def pong(self): data = {"function":"object-detection"} self.send_response(200) self.send_header('Content-type', 'application/json') self.end_headers() self.wfile.write(json.dumps(data).encode()) def dispatch(self): mode = self.headers.get('RUN-MODE') if mode == "ping": self.pong() elif mode == "normal": self.core() else: self.pong() def do_GET(self): self.dispatch() def do_POST(self): self.dispatch() if __name__ == '__main__': host = ('0.0.0.0', 9000) server = HTTPServer(host, Resquest) print("Starting server, listen at: %s:%s" % host) server.serve_forever()編輯Dockerfile檔案。
樣本如下:
FROM registry.cn-shanghai.aliyuncs.com/serverless_devs/opencv-cuda:cuda-10.2-opencv-4.2
WORKDIR /usr/src/app
RUN sed -i s@/archive.ubuntu.com/@/mirrors.aliyun.com/@g /etc/apt/sources.list
RUN apt-get clean
RUN apt-get update --fix-missing
RUN apt-get install -y build-essential
RUN apt-get install -y python3
COPY . .
CMD [ "python3", "-u", "/usr/src/app/app.py" ]
EXPOSE 9000
下載以下檔案,並存放至/code目錄下。
構建鏡像。
s build --dockerfile ./code/Dockerfile部署代碼至Function Compute。
s deploy說明服務名稱和函數名稱不變,重複執行以上命令時,請選擇本地配置,即
use local。配置預留模式的執行個體。
s provision put --target 1 --qualifier LATEST查詢預留模式的執行個體是否就緒。
s provision put --target 1 --qualifier LATEST如果查詢到
current參數為1,則說明GPU執行個體的預留模式已就緒,樣本如下。[2021-12-07 02:20:55] [INFO] [S-CLI] - Start ... [2021-12-07 02:20:55] [INFO] [FC] - Getting provision: tgpu_object_detect_service.LATEST/tgpu_object_detect_func customContainer-demo: serviceName: tgpu_object_detect_service functionName: tgpu_object_detect_func qualifier: LATEST resource: 188077086902****#tgpu_object_detect_service#LATEST#tgpu_object_detect_func target: 1 current: 1 scheduledActions: (empty array) targetTrackingPolicies: (empty array)調用函數。
查看線上函數版本
s invoke
FC Invoke Result:
{"result": "CUDA-capable device supported | process image ok!"}
執行對象識別
s invoke -e '{"method":"GET","headers":{"RUN-MODE":"normal"}}'
enter upload: https://your_public_oss/target.jpg # 可以下載此檔案查看推理結果
FC Invoke Result:
{"result": "CUDA-capable device supported | process image ok!"}
釋放GPU執行個體。
s provision put --target 0 --qualifier LATEST
結果驗證
您可通過在瀏覽器中訪問以下網域名稱,查看目標識別處理後的圖片:
https://cri-zbtsehbrr8******-registry.oss-cn-shenzhen.aliyuncs.com/target2.jpg本網域名稱僅為樣本,需以實際情況為準。