當您的業務資料存放區在MongoDB中,並且需要進行語義分析和大圖展示時,可藉助Elasticsearch實現全文檢索搜尋、語義分析、可視化展示等。本文介紹如何通過Monstache將MongoDB資料即時同步至Elasticsearch,並對資料進行分析及展示。
背景資訊
本文以解析及統計熱門電影資料為例,提供的解決方案可以協助您完成以下需求:
通過Monstache快速同步及訂閱全量或增量資料。
將MongoDB資料即時同步至高版本Elasticsearch。
解讀Monstache常用配置參數,應用於更多的業務情境。
方案優勢
MongoDB、Elasticsearch及Monstache服務部署在Virtual Private Cloud(Virtual Private Cloud)內,所有資料私網通訊,高速且安全。
Monstache基於MongoDB的oplog實現即時資料同步及訂閱,支援MongoDB與高版本Elasticsearch之間的資料同步,同時支援MongoDB的變更流和彙總管道功能,並且擁有豐富的特性。
Monstache不僅支援虛刪除和硬刪除,還支援資料庫刪除和集合刪除,能夠確保Elasticsearch端即時與源端資料保持一致。
操作流程
準備同一專用網路下的阿里雲MongoDB執行個體、Elasticsearch執行個體和ECS執行個體。其中ECS執行個體用來安裝Monstache。
說明請準備版本相容的Monstache工具、Elasticsearch和MongoDB執行個體,版本相容性詳情請參見Monstache version。
在ECS執行個體中安裝Monstache,用來將MongoDB中的資料同步至Elasticsearch。安裝前需要先配置Go環境變數。
修改預設的Monstache設定檔,在設定檔中指定MongoDB和Elasticsearch的訪問地址、待同步的集合、Elasticsearch的使用者名稱和密碼等參數。配置完成後,運行Monstache服務,即可將MongoDB中的資料即時同步至Elasticsearch中。
分別在MongoDB資料庫中添加、更新、刪除資料,驗證資料是否即時同步。
在Kibana控制台中,分析資料並使用Pie圖展示分析結果。
步驟一:環境準備
建立Elasticsearch執行個體,並開啟執行個體的自動建立索引功能。
具體操作步驟請參見建立Elasticsearch執行個體和配置YML參數。本文使用的執行個體版本為通用商業版6.7。
建立阿里雲MongoDB執行個體,並準備測試資料。
具體操作步驟請參見MongoDB快速入門。本文以4.2版本的複本集MongoDB執行個體為例,部分資料如下。
 重要
重要MongoDB執行個體必須是複本集或分區集架構,不支援單節點架構。
建立ECS執行個體。
具體操作步驟請參見自訂購買執行個體。該ECS執行個體用來安裝Monstache,需要與Elasticsearch執行個體在同一專用網路下,且選擇Linux作業系統。
步驟二:搭建Monstache環境
串連ECS執行個體。
具體操作請參見通過密碼或密鑰認證登入Linux執行個體。
說明本文檔以普通使用者權限為例。
安裝Go,並配置環境變數。
說明由於Monstache資料同步依賴於Go語言,因此需要先在ECS中準備Go環境。
下載Go安裝包並解壓。
wget https://dl.google.com/go/go1.14.4.linux-amd64.tar.gz
tar -xzf go1.14.4.linux-amd64.tar.gz
配置環境變數。
使用
vim ~/.bash_profile命令開啟環境變數設定檔,並將如下內容寫入該檔案中。其中GOPROXY用來指定阿里雲Go模組代理。export GOROOT=/home/test1/go export GOPATH=/home/go/ export PATH=$PATH:$GOROOT/bin:$GOPATH/bin export GOPROXY=https://mirrors.aliyun.com/goproxy/應用環境變數配置。
source ~/.bash_profile
安裝Monstache。
從Git庫中下載安裝包。
git clone https://github.com/rwynn/monstache.git說明如果出現
git: command not found的錯誤提示,需要先執行sudo yum install -y git命令安裝Git。進入monstache目錄。
cd monstache切換版本。
本文以rel5版本為例。
git checkout rel5安裝Monstache。
sudo go install查看Monstache版本。
monstache -v執行成功後,預期結果如下。
5.5.5
步驟三:配置即時同步任務
Monstache配置使用TOML格式,預設情況下,Monstache會使用預設連接埠串連本地主機上的Elasticsearch和MongoDB,並追蹤MongoDB oplog。在Monstache運行期間,MongoDB的任何更改都會同步到Elasticsearch中。
由於本文使用阿里雲MongoDB和Elasticsearch,並且需要指定同步對象(mydb資料庫中的hotmovies和col集合),因此要修改預設的Monstache設定檔。修改方式如下:
進入Monstache安裝目錄,建立並編輯設定檔。
cd monstache
vim config.toml
參考以下樣本,修改設定檔。
簡單的配置樣本如下,詳細配置請參見Monstache Usage。
# connection settings

# connect to MongoDB using the following URL
mongo-url = "mongodb://<your_mongodb_user>:<your_mongodb_password>@dds-bp1aadcc629******.mongodb.rds.aliyuncs.com:3717"
# connect to the Elasticsearch REST API at the following node URLs
elasticsearch-urls = ["http://es-cn-mp91kzb8m00******.elasticsearch.aliyuncs.com:9200"]

# frequently required settings

# if you need to seed an index from a collection and not just listen and sync changes events
# you can copy entire collections or views from MongoDB to Elasticsearch
direct-read-namespaces = ["mydb.hotmovies","mydb.col"]

# if you want to use MongoDB change streams instead of legacy oplog tailing use change-stream-namespaces
# change streams require at least MongoDB API 3.6+
# if you have MongoDB 4+ you can listen for changes to an entire database or entire deployment
# in this case you usually don't need regexes in your config to filter collections unless you target the deployment.
# to listen to an entire db use only the database name.  For a deployment use an empty string.
#change-stream-namespaces = ["mydb.col"]

# additional settings

# if you don't want to listen for changes to all collections in MongoDB but only a few
# e.g. only listen for inserts, updates, deletes, and drops from mydb.mycollection
# this setting does not initiate a copy, it is only a filter on the change event listener
#namespace-regex = '^mydb\.col$'
# compress requests to Elasticsearch
#gzip = true
# generate indexing statistics
#stats = true
# index statistics into Elasticsearch
#index-stats = true
# use the following PEM file for connections to MongoDB
#mongo-pem-file = "/path/to/mongoCert.pem"
# disable PEM validation
#mongo-validate-pem-file = false
# use the following user name for Elasticsearch basic auth
elasticsearch-user = "elastic"
# use the following password for Elasticsearch basic auth
elasticsearch-password = "<your_es_password>"
# use 4 go routines concurrently pushing documents to Elasticsearch
elasticsearch-max-conns = 4
# use the following PEM file to connections to Elasticsearch
#elasticsearch-pem-file = "/path/to/elasticCert.pem"
# validate connections to Elasticsearch
#elastic-validate-pem-file = true
# propagate dropped collections in MongoDB as index deletes in Elasticsearch
dropped-collections = true
# propagate dropped databases in MongoDB as index deletes in Elasticsearch
dropped-databases = true
# do not start processing at the beginning of the MongoDB oplog
# if you set the replay to true you may see version conflict messages
# in the log if you had synced previously. This just means that you are replaying old docs which are already
# in Elasticsearch with a newer version. Elasticsearch is preventing the old docs from overwriting new ones.
#replay = false
# resume processing from a timestamp saved in a previous run
resume = true
# do not validate that progress timestamps have been saved
#resume-write-unsafe = false
# override the name under which resume state is saved
#resume-name = "default"
# use a custom resume strategy (tokens) instead of the default strategy (timestamps)
# tokens work with MongoDB API 3.6+ while timestamps work only with MongoDB API 4.0+
resume-strategy = 0
# exclude documents whose namespace matches the following pattern
#namespace-exclude-regex = '^mydb\.ignorecollection$'
# turn on indexing of GridFS file content
#index-files = true
# turn on search result highlighting of GridFS content
#file-highlighting = true
# index GridFS files inserted into the following collections
#file-namespaces = ["users.fs.files"]
# print detailed information including request traces
verbose = true
# enable clustering mode
cluster-name = 'es-cn-mp91kzb8m00******'
# do not exit after full-sync, rather continue tailing the oplog
#exit-after-direct-reads = false
[[mapping]]
namespace = "mydb.hotmovies"
index = "hotmovies"
type = "movies"

[[mapping]]
namespace = "mydb.col"
index = "mydbcol"
type = "collection"
參數
說明
mongo-url
MongoDB執行個體的主節點訪問地址,可在執行個體的基本資料頁面擷取。其中
<your_mongodb_user>為您使用的MongoDB執行個體的資料庫帳號,<your_mongodb_password>為對應資料庫帳號的密碼。擷取前需配置MongoDB執行個體的白名單,即在白名單中添加安裝Monstache的ECS執行個體的內網IP地址,詳情請參見設定白名單。
elasticsearch-urls
Elasticsearch執行個體的訪問地址,格式為
http://<Elasticsearch執行個體的私網地址>:9200。Elasticsearch執行個體的私網地址可在執行個體的基本資料頁面擷取,詳情請參見查看執行個體的基本資料。direct-read-namespaces
指定待同步的集合,詳情請參見direct-read-namespaces。本文同步的資料集為mydb資料庫下的hotmovies和col集合。
change-stream-namespaces
如果要使用MongoDB變更流功能,需要指定此參數。啟用此參數後,oplog追蹤會被設定為無效,詳情請參見change-stream-namespaces。
namespace-regex
通過Regex指定需要監聽的集合。此設定可以用來監控符合Regex的集合中資料的變化。
elasticsearch-user
訪問Elasticsearch執行個體的使用者名稱,預設為elastic。
重要實際業務中不建議使用elastic使用者,這樣會降低系統安全性。建議使用自建使用者,並給予自建使用者指派相應的角色和許可權,詳情請參見通過Elasticsearch X-Pack角色管理實現使用者權限管控。
elasticsearch-password
對應使用者的密碼。elastic使用者的密碼在建立執行個體時指定,如果忘記可進行重設,重設密碼的注意事項和操作步驟請參見重設執行個體訪問密碼。
elasticsearch-max-conns
定義串連Elasticsearch的線程數。預設為4,即使用4個Go線程同時將資料同步到Elasticsearch。
dropped-collections
預設為true,表示當刪除MongoDB集合時,會同時刪除Elasticsearch中對應的索引。
dropped-databases
預設為true,表示當刪除MongoDB資料庫時,會同時刪除Elasticsearch中對應的索引。
resume
預設為false。設定為true,Monstache會將已成功同步到Elasticsearch的MongoDB操作的時間戳記寫入monstache.monstache集合中。當Monstache因為意外停止時,可通過該時間戳記恢複同步任務,避免資料丟失。如果指定了cluster-name,該參數將自動開啟,詳情請參見resume。
resume-strategy
指定恢複策略。僅當resume為true時生效,詳情請參見resume-strategy。
verbose
預設為false,表示不啟用調試日誌。
cluster-name
指定叢集名稱。指定後,Monstache將進入高可用模式,叢集名稱相同的進程將進行協調,詳情請參見cluster-name。
mapping
指定Elasticsearch索引映射。預設情況下,資料從MongoDB同步到Elasticsearch時,索引會自動對應為
資料庫名.集合名。如果需要修改索引名稱,可通過該參數設定,詳情請參見Index Mapping。說明Monstache支援豐富的參數配置,以上配置僅使用了部分參數完成資料即時同步,如果您有更複雜的同步需求,請參見Monstache config和Advanced進行配置。
運行Monstache。
monstache -f config.toml說明通過-f參數,您可以顯式運行Monstache,系統會列印所有調試日誌(包括對Elasticsearch的請求追蹤)。
步驟四:驗證資料同步結果
分別進入MongoDB的DMS控制台和Elasticsearch執行個體的Kibana控制台,查看同步前後對應文檔的數量。
說明登入DMS控制台的方法請參見通過DMS串連MongoDB複本集執行個體。
登入Kibana控制台的方法請參見登入Kibana控制台。
MongoDB
db.hotmovies.find().count()預期結果如下。
[
10000
]
Elasticsearch
GET hotmovies/_count預期結果如下。通過以下結果可以看到同步前後的文檔的數量都為10000條。
{
  "count" : 10000,
  "_shards" : {
    "total" : 5,
    "successful" : 5,
    "skipped" : 0,
    "failed" : 0
  }
}
在MongoDB資料庫中插入資料,查看該資料是否同步到Elasticsearch執行個體中。
MongoDB
db.hotmovies.insert({id: 11003,title: "乘風破浪的程式媛",overview: "一群IT高智商女人,如何打破傳統逆序IT精英",original_language:"cn",release_date:"2020-06-17",popularity:67.654,vote_count:65487,vote_average:9.9})
db.hotmovies.insert({id: 11004,title: "英姿颯爽的程式猿",overview: "一群IT高智商man,如何打破傳統逆序IT精英",original_language:"cn",release_date:"2020-06-15",popularity:77.654,vote_count:85487,vote_average:11.9})
Elasticsearch
GET hotmovies/_search
{
  "query": {
    "bool": {
      "should": [
        {"term":{"id":"11003"}},
        {"term":{"id":"11004"}}
      ]
    }
  }
}
預期結果如下。

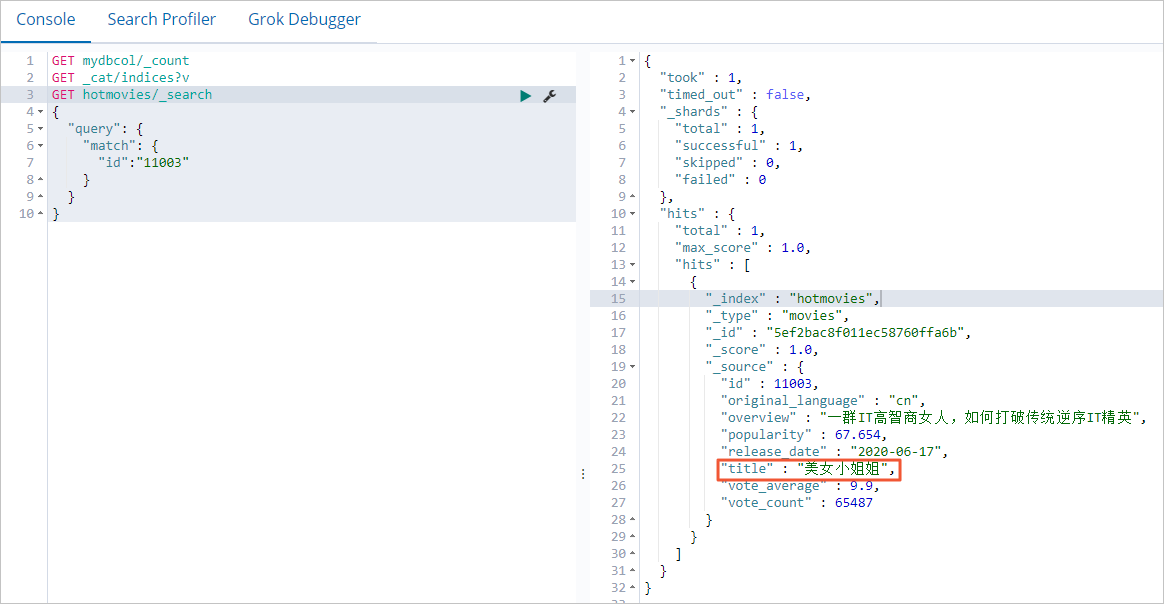
在MongoDB資料庫中更新資料,查看Elasticsearch執行個體中對應的資料是否會同步更新。
MongoDB
db.hotmovies.update({'title':'乘風破浪的程式媛'},{$set:{'title':'美女小姐姐'}})Elasticsearch
GET hotmovies/_search
{
  "query": {
    "match": {
      "id":"11003"
    }
  }
}
預期結果如下。
在MongoDB資料庫中刪除資料,查看Elasticsearch執行個體中對應的資料是否會同步刪除。
MongoDB
db.hotmovies.remove({id: 11003})
db.hotmovies.remove({id: 11004})
Elasticsearch
GET hotmovies/_search
{
  "query": {
    "bool": {
      "should": [
        {"term":{"id":"11003"}},
        {"term":{"id":"11004"}}
      ]
    }
  }
}
預期結果如下。

步驟五:通過Kibana分析並展示資料
- 登入目標Elasticsearch執行個體的Kibana控制台,根據頁面提示進入Kibana首頁。登入Kibana控制台的具體操作,請參見登入Kibana控制台。說明 本文以Elasticsearch 6.7.0版本為例,其他版本操作可能略有差別,請以實際介面為準。
建立索引模式。
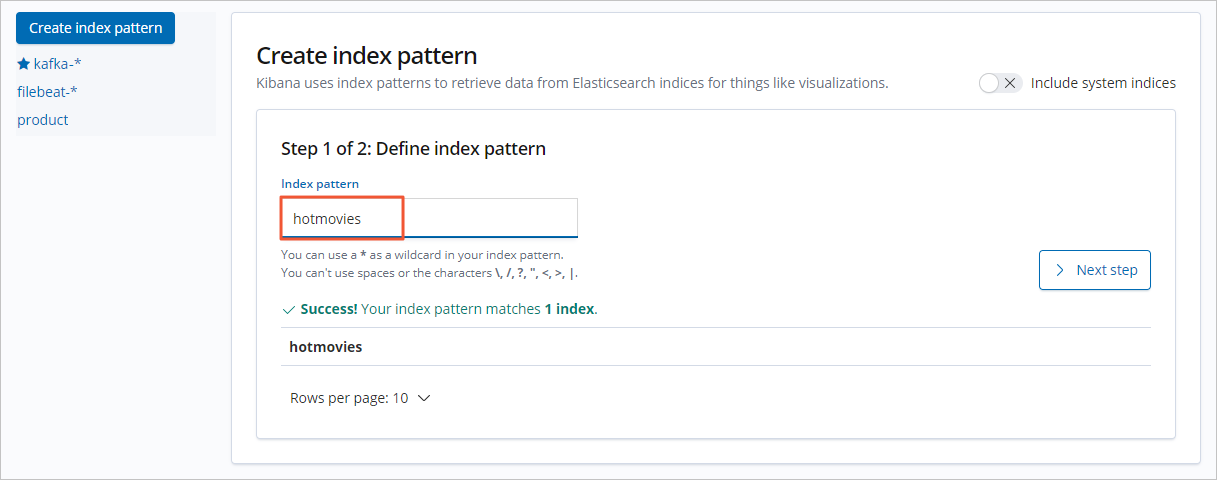
- 在左側導覽列,單擊Management。
- 在Kibana地區,單擊Index Patterns。
- 單擊Create index pattern。
- 輸入Index pattern名稱,單擊Next step。
從Time Filter field name中,選擇時間過濾器欄位名(本文選擇I don't want to use the Time Filter)。
- 單擊Create index pattern。
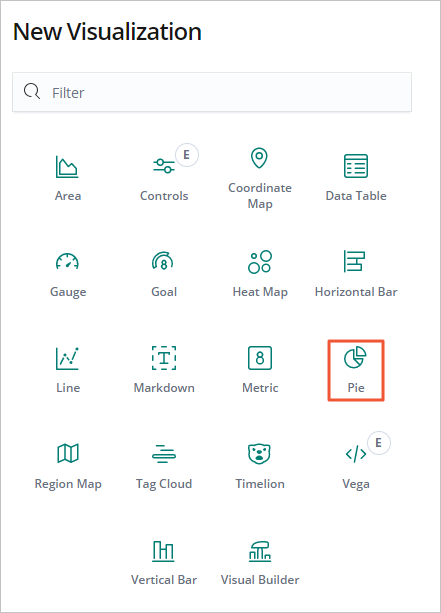
配置Kibana大圖。
本文以配置最受歡迎的Top10電影的Pie圖為例,操作步驟如下:
在左側導覽列,單擊Visualize。
在搜尋方塊右側,單擊+。
在New Visualization對話方塊中,單擊Pie。
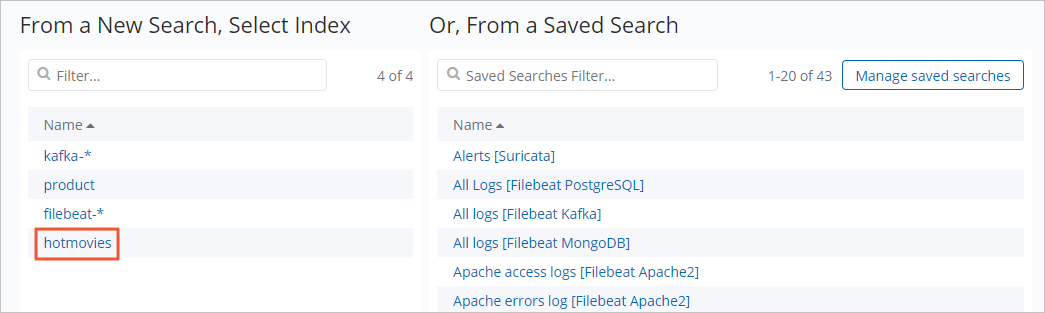
單擊hotmovies索引模式。
按照下圖配置Metrics和Buckets。

單擊
 表徵圖,應用配置,查看資料展示結果。
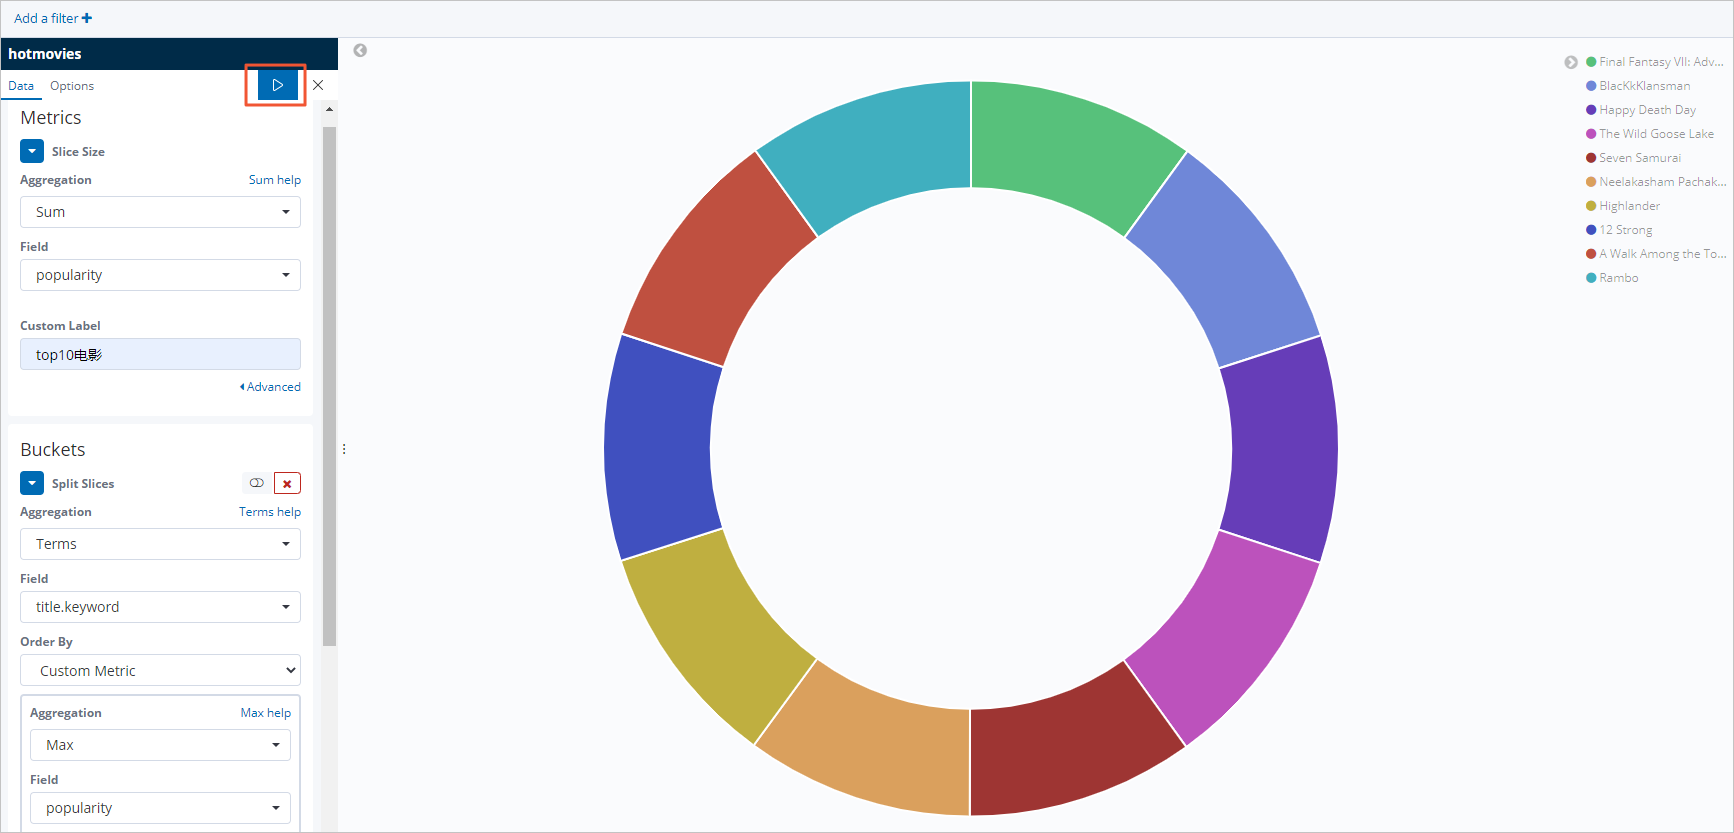
常見問題
問題
Elasticsearch執行個體開啟高可用、高並發功能後,資料有丟失現象,如何排查?
解決方案
查看Elasticsearch叢集的整體情況是否正常:
正常:需要排查Monstache服務的問題,詳細資料請參見Monstache官網。
不正常:參見常見問題,排查Elasticsearch叢集的問題。同時降低並發數,觀察資料是否正常。