All Products
Search
Document Center

Enterprise Distributed Application Service:Use the EDAS console to roll back applications deployed in ECS clusters

更新時間:Aug 16, 2023

If an error occurs when you update an application in Enterprise Distributed Application Service (EDAS) or the application cannot work properly after an update, you can roll back the application, resolve the issue, and then update the application again.

Background information

  • Rollback during an update: If an error occurs when you perform an at-a-time release, phased release, or canary release, you can stop and roll back the application.

  • Rollback after an update: If the application cannot work properly after an at-a-time release, phased release, or canary release is complete, you can roll back the application by deploying a historical version.

Rollback during an update

If an error occurs when you update an application, you can stop and roll back the application. To update an application, you can perform an at-a-time release, phased release, or canary release. The following sections describe how to roll back an application during the update process.

  • Roll back an application during an at-a-time release

    For more information about how to perform an at-a-time release, see Use the EDAS console to update an application deployed in an ECS cluster.

    After the at-a-time release is started, the Change Details page appears. In the upper-right corner of the Change Details page, click Stop Change.

  • Roll back an application during a phased release

    For more information about how to perform a phased release, see Release an application in phases in the EDAS console.

    After the phased release is started, the Change Details page appears. The rollback method varies based on the phased release mode.

    • Roll back an application during an automatic phased release

      In this scenario, you do not need to manually trigger the release of the next phase. The application is automatically released in the next phase after the specified interval. You can verify the new version of the application during the interval. If you find an issue or exception, you may want to stop the update and roll back the application. In this case, click Stop Change in the upper-right corner of the Change Details page.

    • Roll back an application during a manual phased release

      In this scenario, you must manually start the release of the next phase. Before you start the release of the next phase, you can verify the new version of the application. If you find an issue or exception, you can click Stop Change in the upper-right corner of the Change Details page.

  • Roll back an application during a canary release

    For more information about how to perform a canary release, see Release an application in canary mode in an ECS cluster in the EDAS console.

    After the canary release is started, the Change Details page appears. During a canary release, you must manually trigger the release of the next phase. If you find an issue or exception when you verify the new version, you can click Stop Change in the upper-right corner of the Change Details page.

Rollback after an update

If the application cannot work properly after an update, you can roll back the application by deploying a historical version.

  1. Log on to the EDAS console.

  2. In the left-side navigation pane, choose Application Management > Applications.

  3. On the Applications page, select a region in the top navigation bar and select a microservices namespace from the Microservices Namespace drop-down list. From the Cluster Type drop-down list, select ECS Clusters. Then, click the name of the application that you want to manage in the application list.

  4. On the Basic Information page, click Roll back in the upper-right corner.

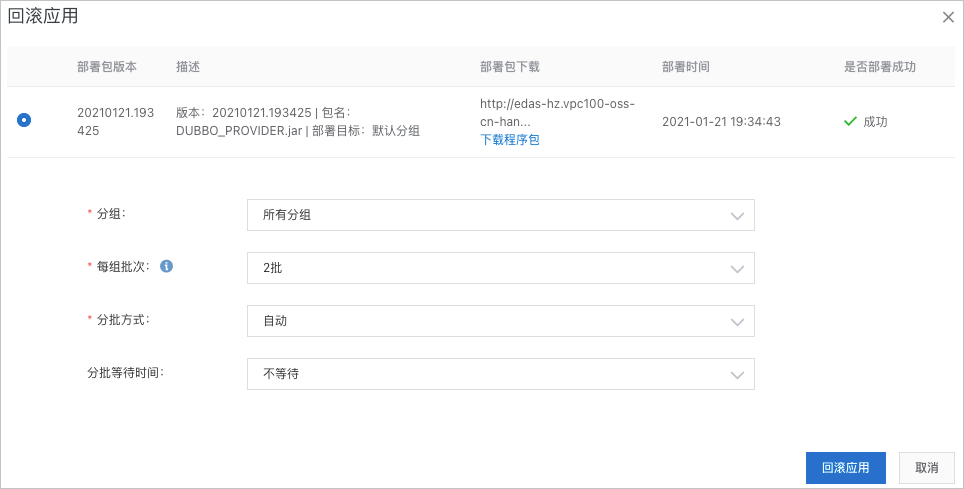
  5. In the Roll back dialog box, select a historical version in the Deployment Package Version column, configure the parameters, and then click Roll back.

    发布后回滚

    Parameter

    Description

    Group

    The instance group in which you want to roll back the application on the specified instances.

    • If the current application has only one group, select All Groups from the drop-down list. The maximum number of instances of the current application is displayed in the parenthesis next to All Groups. The drop-down list also displays Default Group, which is the same as All Groups.

    • If the current application has multiple groups, select a group as needed.

      Note

      If you select All Groups, the application is rolled back on all instances in all groups of the application based on the setting of the Batches per Group parameter.

    Batches per Group

    The number of phases in which the application is released to the specified instances in the group. The minimum number of instances in a single phase is 1. The default value is 2 Batches. You can configure this parameter based on your business requirements.

    Batch Mode

    The method that is used to perform the release of the next phase. Valid values: Automatic and Manual.

    • Automatic: The application is automatically released in the next phase based on the setting of the Wait Time Before Next Batch parameter.

    • Manual: The application is manually released in the next phase.

    Wait Time Before Next Batch

    The interval between the release of two phases. Unit: minutes. You can select an interval from the drop-down list based on your business requirements.

Verify the result

  1. View change records.

    1. On the application details page, click Change Records in the left-side navigation pane.

    2. On the Change Records page, check whether the value in the Change Status column is Success.

      • If the value is Success, the application is rolled back.

      • If the value is Execute failed, the application fails to be rolled back. You can click View in the Actions column to view the change details and troubleshoot issues.

  2. View application details.

    1. On the application details page, click Basic Information in the left-side navigation pane.

    2. On the Basic Information page, click the Basic Information tab. In the Application Information section of the Basic Information tab, check whether the Deployment Package parameter indicates the latest deployment package.

    3. On the Basic Information page, click the Instance Information tab. On the Instance Information tab, check whether the value of the Running Status parameter is Normal for each instance in the specified group.