本文為您提供Shibboleth與雲SSO進行單點登入(SSO登入)的樣本。
準備工作
安裝Shibboleth、Tomcat和LDAP Server。
本文中涉及的Shibboleth配置部分屬於建議,僅用於協助理解阿里雲SSO登入的端到端配置流程,阿里雲不提供Shibboleth配置的諮詢服務。
步驟一:在阿里雲擷取SAML服務提供者中繼資料
登入雲SSO控制台。
在左側導覽列,單擊設定。
在SSO登入地區,下載服務提供者(SP)中繼資料檔案,並另存到
/opt/shibboleth-idp/metadata/aliyun-cloudsso-metadata.xml。同時,儲存服務提供者(SP)的
Entity ID,以便在後續配置中使用。
步驟二:將阿里雲註冊到Shibboleth
配置/opt/shibboleth-idp/conf/metadata-providers.xml,指定步驟一:在阿里雲擷取SAML服務提供者中繼資料擷取的中繼資料檔案,將阿里雲註冊到Shibboleth。
<!--
    <MetadataProvider id="LocalMetadata"  xsi:type="FilesystemMetadataProvider" metadataFile="PATH_TO_YOUR_METADATA"/>
-->

<!-- 找到上方注釋代碼,替換為下方代碼 -->

<MetadataProvider id="AliyunMetadata" xsi:type="FilesystemMetadataProvider" metadataFile="%{idp.home}/metadata/aliyun-cloudsso-metadata.xml"/>步驟三:配置Shibboleth返回的使用者屬性
修改
/opt/shibboleth/conf/services.xml。原版使用的是
attribute-resolver.xml設定檔,包含的配置資訊不夠,需要啟動完整版的配置,將其替換為attribute-resolver-full.xml。<value>%{idp.home}/conf/attribute-resolver.xml</value> <!-- 找到上方代碼,替換為下方代碼 --> <value>%{idp.home}/conf/attribute-resolver-full.xml</value>修改
/opt/shibboleth/conf/attribute-resolver-full.xml。在該檔案中配置使用者資訊中返回的屬性。本樣本中選擇
mail欄位作為返回屬性。<!-- ========================================== --> <!-- Attribute Definitions --> <!-- ========================================== --> <!-- Schema: Core schema attributes--> <!-- 找到上方注釋代碼,在後面加入下方代碼 --> <AttributeDefinition xsi:type="Simple" id="mail"> <InputDataConnector ref="myLDAP" attributeNames="mail" /> <AttributeEncoder xsi:type="SAML1String" name="urn:mace:dir:attribute-def:mail" encodeType="false" /> <AttributeEncoder xsi:type="SAML2String" name="urn:oid:0.9.2342.19200300.100.1.3" friendlyName="mail" encodeType="false" /> </AttributeDefinition>在該檔案中讀取
/opt/shibboleth/conf/ldap.properties中配置的資訊,進行IDAP串連的建立。<!-- Example LDAP Connector --> <!-- <DataConnector id="myLDAP" xsi:type="LDAPDirectory" ldapURL="%{idp.attribute.resolver.LDAP.ldapURL}" baseDN="%{idp.attribute.resolver.LDAP.baseDN}" principal="%{idp.attribute.resolver.LDAP.bindDN}" principalCredential="%{idp.attribute.resolver.LDAP.bindDNCredential}" useStartTLS="%{idp.attribute.resolver.LDAP.useStartTLS:true}" ...省略... </DataConnector> --> <!-- 找到上方範例程式碼,將其替換為下方代碼 --> <DataConnector id="myLDAP" xsi:type="LDAPDirectory" ldapURL="%{idp.attribute.resolver.LDAP.ldapURL}" baseDN="%{idp.attribute.resolver.LDAP.baseDN}" principal="%{idp.attribute.resolver.LDAP.bindDN}" principalCredential="%{idp.attribute.resolver.LDAP.bindDNCredential}" useStartTLS="%{idp.attribute.resolver.LDAP.useStartTLS}" connectTimeout="%{idp.attribute.resolver.LDAP.connectTimeout}" responseTimeout="%{idp.attribute.resolver.LDAP.responseTimeout}"> <FilterTemplate> <![CDATA[ %{idp.attribute.resolver.LDAP.searchFilter} ]]> </FilterTemplate> </DataConnector>
修改
/opt/shibboleth/conf/attribute-filter.xml,添加屬性過濾器。將
PolicyRequirementRule標籤中的value屬性替換為步驟一:在阿里雲擷取SAML服務提供者中繼資料中的阿里雲entityID。<AttributeFilterPolicyGroup id="ShibbolethFilterPolicy" xmlns="urn:mace:shibboleth:2.0:afp" xmlns:xsi="http://www.w3.org/2001/XMLSchema-instance" xsi:schemaLocation="urn:mace:shibboleth:2.0:afp http://shibboleth.net/schema/idp/shibboleth-afp.xsd"> <!-- 找到上方代碼,在後面加入下方代碼 --> <AttributeFilterPolicy id="aliyun"> <PolicyRequirementRule xsi:type="Requester" value="[entityID]" /> <AttributeRule attributeID="mail"> <PermitValueRule xsi:type="ANY" /> </AttributeRule> </AttributeFilterPolicy>
步驟四:配置SAML響應的NameID
修改
/opt/shibboleth/conf/relying-party.xml,為阿里雲建立NameID的配置。將
bean標籤中的relyingPartyIds屬性替換為步驟一:在阿里雲擷取SAML服務提供者中繼資料中的阿里雲entityID。<!-- Override example that identifies a single RP by name and configures it for SAML 2 SSO without encryption. This is a common "vendor" scenario. --> <!-- <bean parent="RelyingPartyByName" c:relyingPartyIds="https://sp.example.org"> <property name="profileConfigurations"> <list> <bean parent="SAML2.SSO" p:encryptAssertions="false" /> </list> </property> </bean> --> <!-- 找到上方注釋代碼,替換為下方代碼 --> <bean parent="RelyingPartyByName" c:relyingPartyIds="[entityID]"> <property name="profileConfigurations"> <list> <bean parent="SAML2.SSO" p:encryptAssertions="false" p:nameIDFormatPrecedence="urn:oasis:names:tc:SAML:1.1:nameid-format:emailAddress" /> </list> </property> </bean>修改
/opt/shibboleth/conf/saml-nameid.xml,配置NameID的產生方式。<!-- 找到下方兩處代碼,將其注釋取消,使之生效 --> <bean parent="shibboleth.SAML2AttributeSourcedGenerator" p:omitQualifiers="true" p:format="urn:oasis:names:tc:SAML:1.1:nameid-format:emailAddress" p:attributeSourceIds="#{ {'mail'} }" /> <bean parent="shibboleth.SAML1AttributeSourcedGenerator" p:omitQualifiers="true" p:format="urn:oasis:names:tc:SAML:1.1:nameid-format:emailAddress" p:attributeSourceIds="#{ {'mail'} }" />修改
/opt/shibboleth/conf/saml-nameid.properties,配置NameID的相關屬性。idp.nameid.saml2.default = urn:oasis:names:tc:SAML:1.1:nameid-format:emailAddress idp.persistentId.useUnfilteredAttributes = true idp.persistentId.encoding = BASE32
步驟五:在Shibboleth擷取SAML IdP中繼資料
重啟Tomcat,使前面的配置生效。
訪問
https://<您的伺服器位址>/idp/shibboleth,將中繼資料檔案儲存到本地。
步驟六:在雲SSO啟用SSO登入
在雲SSO的左側導覽列,單擊設定。
在SSO登入地區,單擊配置身份供應商資訊。
在配置身份供應商資訊對話方塊,選擇上傳中繼資料文檔。
單擊上傳檔案,上傳從步驟五:在Shibboleth擷取SAML IdP中繼資料擷取的IdP中繼資料檔案。
開啟SSO登入開關,啟用SSO登入。
說明啟用SSO登入後,使用者名稱和密碼登入將自動禁用,即雲SSO使用者將不能通過使用者名稱和密碼登入。而且,SSO登入是一個全域功能,啟用後,所有使用者都需要SSO登入。
步驟七:在雲SSO建立使用者
在雲SSO建立與Shibboleth中的同名使用者。
在雲SSO的左側導覽列,選擇。
在使用者頁面,單擊建立使用者。
在建立使用者面板,輸入使用者名稱。
本樣本中,使用者名稱為
testUser@testdomain.alicloud.com。設定使用者狀態為已啟用。
單擊關閉。
(可選)步驟八:為使用者授權
如果您計劃使用者SSO登入後訪問資來源目錄指定成員帳號中的指定資源,您還需要建立訪問配置,並為使用者在RD帳號上授權。
驗證結果
完成上述配置後,您可以從阿里雲或Shibboleth發起SSO登入。
從阿里雲側發起登入
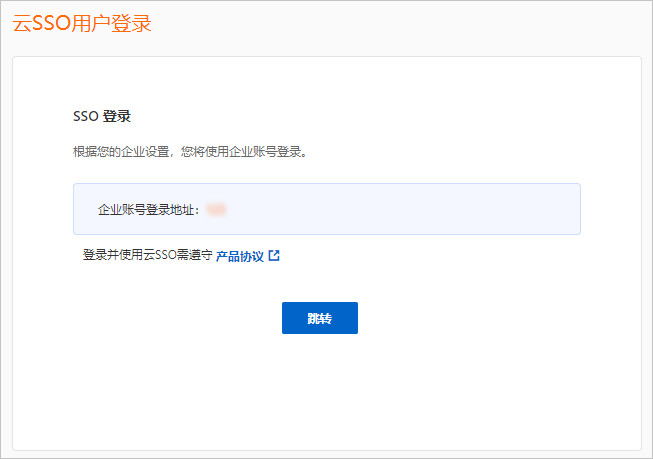
在雲SSO控制台的概覽頁,複製使用者登入地址。
使用新的瀏覽器開啟複製的使用者登入地址。
單擊跳轉,系統會自動跳轉到Shibboleth的登入頁面。
在Shibboleth的登入介面,輸入使用者名稱(testUser)和密碼,單擊登入。
系統將自動SSO登入並重新導向到雲SSO使用者門戶。
訪問RD帳號中有許可權的資源。
從Shibboleth側發起登入
訪問
https://<您的伺服器位址>/idp/profile/SAML2/Unsolicited/SSO?providerId=<entityID>。該連結中的
<entityID>為步驟一:在阿里雲擷取SAML服務提供者中繼資料中的阿里雲entityID。在Shibboleth的登入介面,輸入使用者名稱(testUser)和密碼,單擊登入。
系統將自動SSO登入並重新導向到雲SSO使用者門戶。
訪問RD帳號中有許可權的資源。
常見問題
結果驗證時如果遇到問題,您可以查看/opt/shibboleth-idp/logs/idp-process.log,通過日誌分析問題原因。常見問題如下:
Shibboleth使用者名稱密碼正確,但是登入後提示異常。
查看/opt/shibboleth-idp/logs/idp-process.log中的報錯資訊,如果是與ValidateUsernamePassword錯誤有關,則重點檢查IDAP的串連配置和部署情況,重點查看是否將注釋去除,且不能輸入多餘空格。
登入後無響應,提示unable to connect to the ldap。
檢查ldap.properties和attribute-resolver-full.xml檔案中IDAP串連的相關配置。
登入後轉跳阿里雲,提示The NameID is missing。
檢查步驟三:配置Shibboleth返回的使用者屬性中是否正確將使用者資訊中的mail映射為屬性,檢查步驟四:配置SAML響應的NameID中NameID配置是否正確。
訪問https://<您的伺服器位址>/idp/profile/SAML2/Unsolicited/SSO?providerId=<entityID>時提示Unsupported Request。
檢查entityId是否配置正確。metadata檔案夾下的中繼資料、attribute-filter.xml和relying-party.xml三處中的entityId必須保持一致。
登入後轉跳阿里雲,提示The response signature is invalid。
重新將Shibboleth的中繼資料檔案上傳到阿里雲。