Argo Rollouts是Kubernetes控制器和CRD集合,ASM整合Argo Rollouts提供更強大的金絲雀部署能力。當您需要在Kubernetes環境中更新應用並降低發布風險時,可以在ASM中使用Argo Rollouts實現金絲雀發布。通過逐步分批次地向使用者推送新版本並即時觀測其效能表現,有效控制風險,確保服務穩定性和使用者體驗,從而實現在保證商務持續性的前提下順利完成版本迭代。
前提條件
已建立ASM執行個體,且版本為1.12.4.50及以上。具體操作,請參見建立ASM執行個體。
已添加叢集到ASM執行個體。具體操作,請參見添加叢集到ASM執行個體。
已通過kubectl串連ASM執行個體。具體操作,請參見通過控制面kubectl訪問Istio資源。
準備工作
安裝Argo Rollout
安裝Argo Rollout的操作步驟如下,更多資訊,請參見Argo Rollouts。
執行以下命令,安裝Argo Rollout服務端。
kubectl create namespace argo-rollouts
kubectl apply -n argo-rollouts -f https://github.com/argoproj/argo-rollouts/releases/latest/download/install.yaml
執行以下命令,安裝Kubectl Argo Rollout外掛程式。
安裝Kubectl Argo Rollout外掛程式,方便您通過kubectl進行管理。
brew install argoproj/tap/kubectl-argo-rollouts
啟用ASM的資料面KubeAPI訪問能力
登入ASM控制台,在左側導覽列,選擇。
在網格管理頁面,單擊目標執行個體名稱,然後在左側導覽列,選擇。
在啟用資料面KubeAPI訪問右側,單擊啟用。

在彈出框中,單擊確認。
金絲雀發布
本文以建立穩定版本和金絲雀版本為例,逐步將流量切換為金絲雀版本,實現基於流量比例的發布策略。關於金絲雀發布的更多資訊,請參見配置金絲雀發布。
步驟一:建立Rollout和Service應用
建立Rollout。
使用以下內容,建立rollout.yaml檔案。
strategy欄位定義發布策略,部分參數說明如下:setWeight:設定流量的權重。pause:若未配置duration,表示需要手動更新;配置duration,表示等待duration時間進行自動更新。
執行以下命令,將Rollout部署到叢集。
kubectl apply -f rollout.yaml
建立Service。
使用以下內容,建立service.yaml檔案。
apiVersion: v1
kind: Service
metadata:
  name: istio-rollout-canary
spec:
  ports:
  - port: 80
    targetPort: http
    protocol: TCP
    name: http
  selector:
    app: istio-rollout

---
apiVersion: v1
kind: Service
metadata:
  name: istio-rollout-stable
spec:
  ports:
  - port: 80
    targetPort: http
    protocol: TCP
    name: http
  selector:
    app: istio-rollout
執行以下命令,將Service部署到叢集。
kubectl apply -f service.yaml
步驟二:建立Istio相關資源
建立虛擬服務VirtualService。
由於啟用了ASM的資料面KubeAPI訪問能力,您可以通過資料面的KubeConfig訪問ASM中的VirtualService、Gateway、DestinationRule等Istio資源,也可以通過ASM控制台或者ASM KubeConfig建立Istio資源。
使用以下內容,建立istio-rollout-vsvc.yaml檔案。
apiVersion: networking.istio.io/v1alpha3
kind: VirtualService
metadata:
  name: istio-rollout-vsvc
spec:
  gateways:
    - istio-rollout-gateway
  hosts:
    - '*'
  http:
    - match:
        - uri:
            prefix: /
      name: primary
      route:
        - destination:
            host: istio-rollout-stable
          weight: 100
        - destination:
            host: istio-rollout-canary
執行以下命令,部署istio-rollout-vsvc。
kubectl apply -f istio-rollout-vsvc.yaml
建立網關規則Gateway。
使用以下內容,建立istio-rollout-gateway.yaml檔案。
apiVersion: networking.istio.io/v1beta1
kind: Gateway
metadata:
  name: istio-rollout-gateway
spec:
  selector:
    istio: ingressgateway
  servers:
    - hosts:
        - '*'
      port:
        name: http
        number: 80
        protocol: HTTP
執行以下命令,部署istio-rollout-gateway。
kubectl apply -f istio-rollout-gateway.yaml
步驟三:建立ASM網關
建立連接埠為80的ASM網關,作為測試訪問的入口。
登入ASM控制台,在左側導覽列,選擇。
在網格管理頁面,單擊目標執行個體名稱,然後在左側導覽列,選擇。
在入口網關頁面,單擊建立。設定網關的基本資料,然後單擊建立。
部分配置項說明如下,關於配置項的更多資訊,請參見建立入口網關。
配置項
說明
名稱
本文以ingressgateway為例。
網關類型
選擇南北向-入口網關類型。
連接埠映射
單擊添加連接埠,在新增連接埠行中,配置協議為HTTP,服務連接埠為80。
步驟四:查看Rollout狀態
執行以下命令,查看Rollout的狀態。
kubectl argo rollouts get rollout istio-rollout預期輸出:
kubectl argo rollouts get rollout istio-rollout
Name:            istio-rollout
Namespace:       default
Status:          ✔ Healthy
Strategy:        Canary
  Step:          18/18
  SetWeight:     100
  ActualWeight:  100
Images:          argoproj/rollouts-demo:blue (stable)
Replicas:
  Desired:       1
  Current:       1
  Updated:       1
  Ready:         1
  Available:     1

NAME                                       KIND        STATUS     AGE  INFO
⟳ istio-rollout                            Rollout     ✔ Healthy  52s
└──# revision:1
   └──⧉ istio-rollout-7f96d86486           ReplicaSet  ✔ Healthy  52s  stable
      └──□ istio-rollout-7f96d86486-vpqvb  Pod         ✔ Running  52s  ready:2/2
步驟五:測試Rollout初始狀態
擷取ASM網關的IP地址。
登入ASM控制台,在左側導覽列,選擇。
在網格管理頁面,單擊目標執行個體名稱,然後在左側導覽列,選擇。
擷取目標網關的服務地址。
在瀏覽器訪問http://{ASM網關IP}/。
訪問效果如下所示,此介面會並發調用http://{ASM網關IP}/color,將擷取到顏色資訊填充到方格中。在Rollout istio-rollout中,指定的顏色為
blue,並且未進行金絲雀發布,因此顯示顏色為藍色。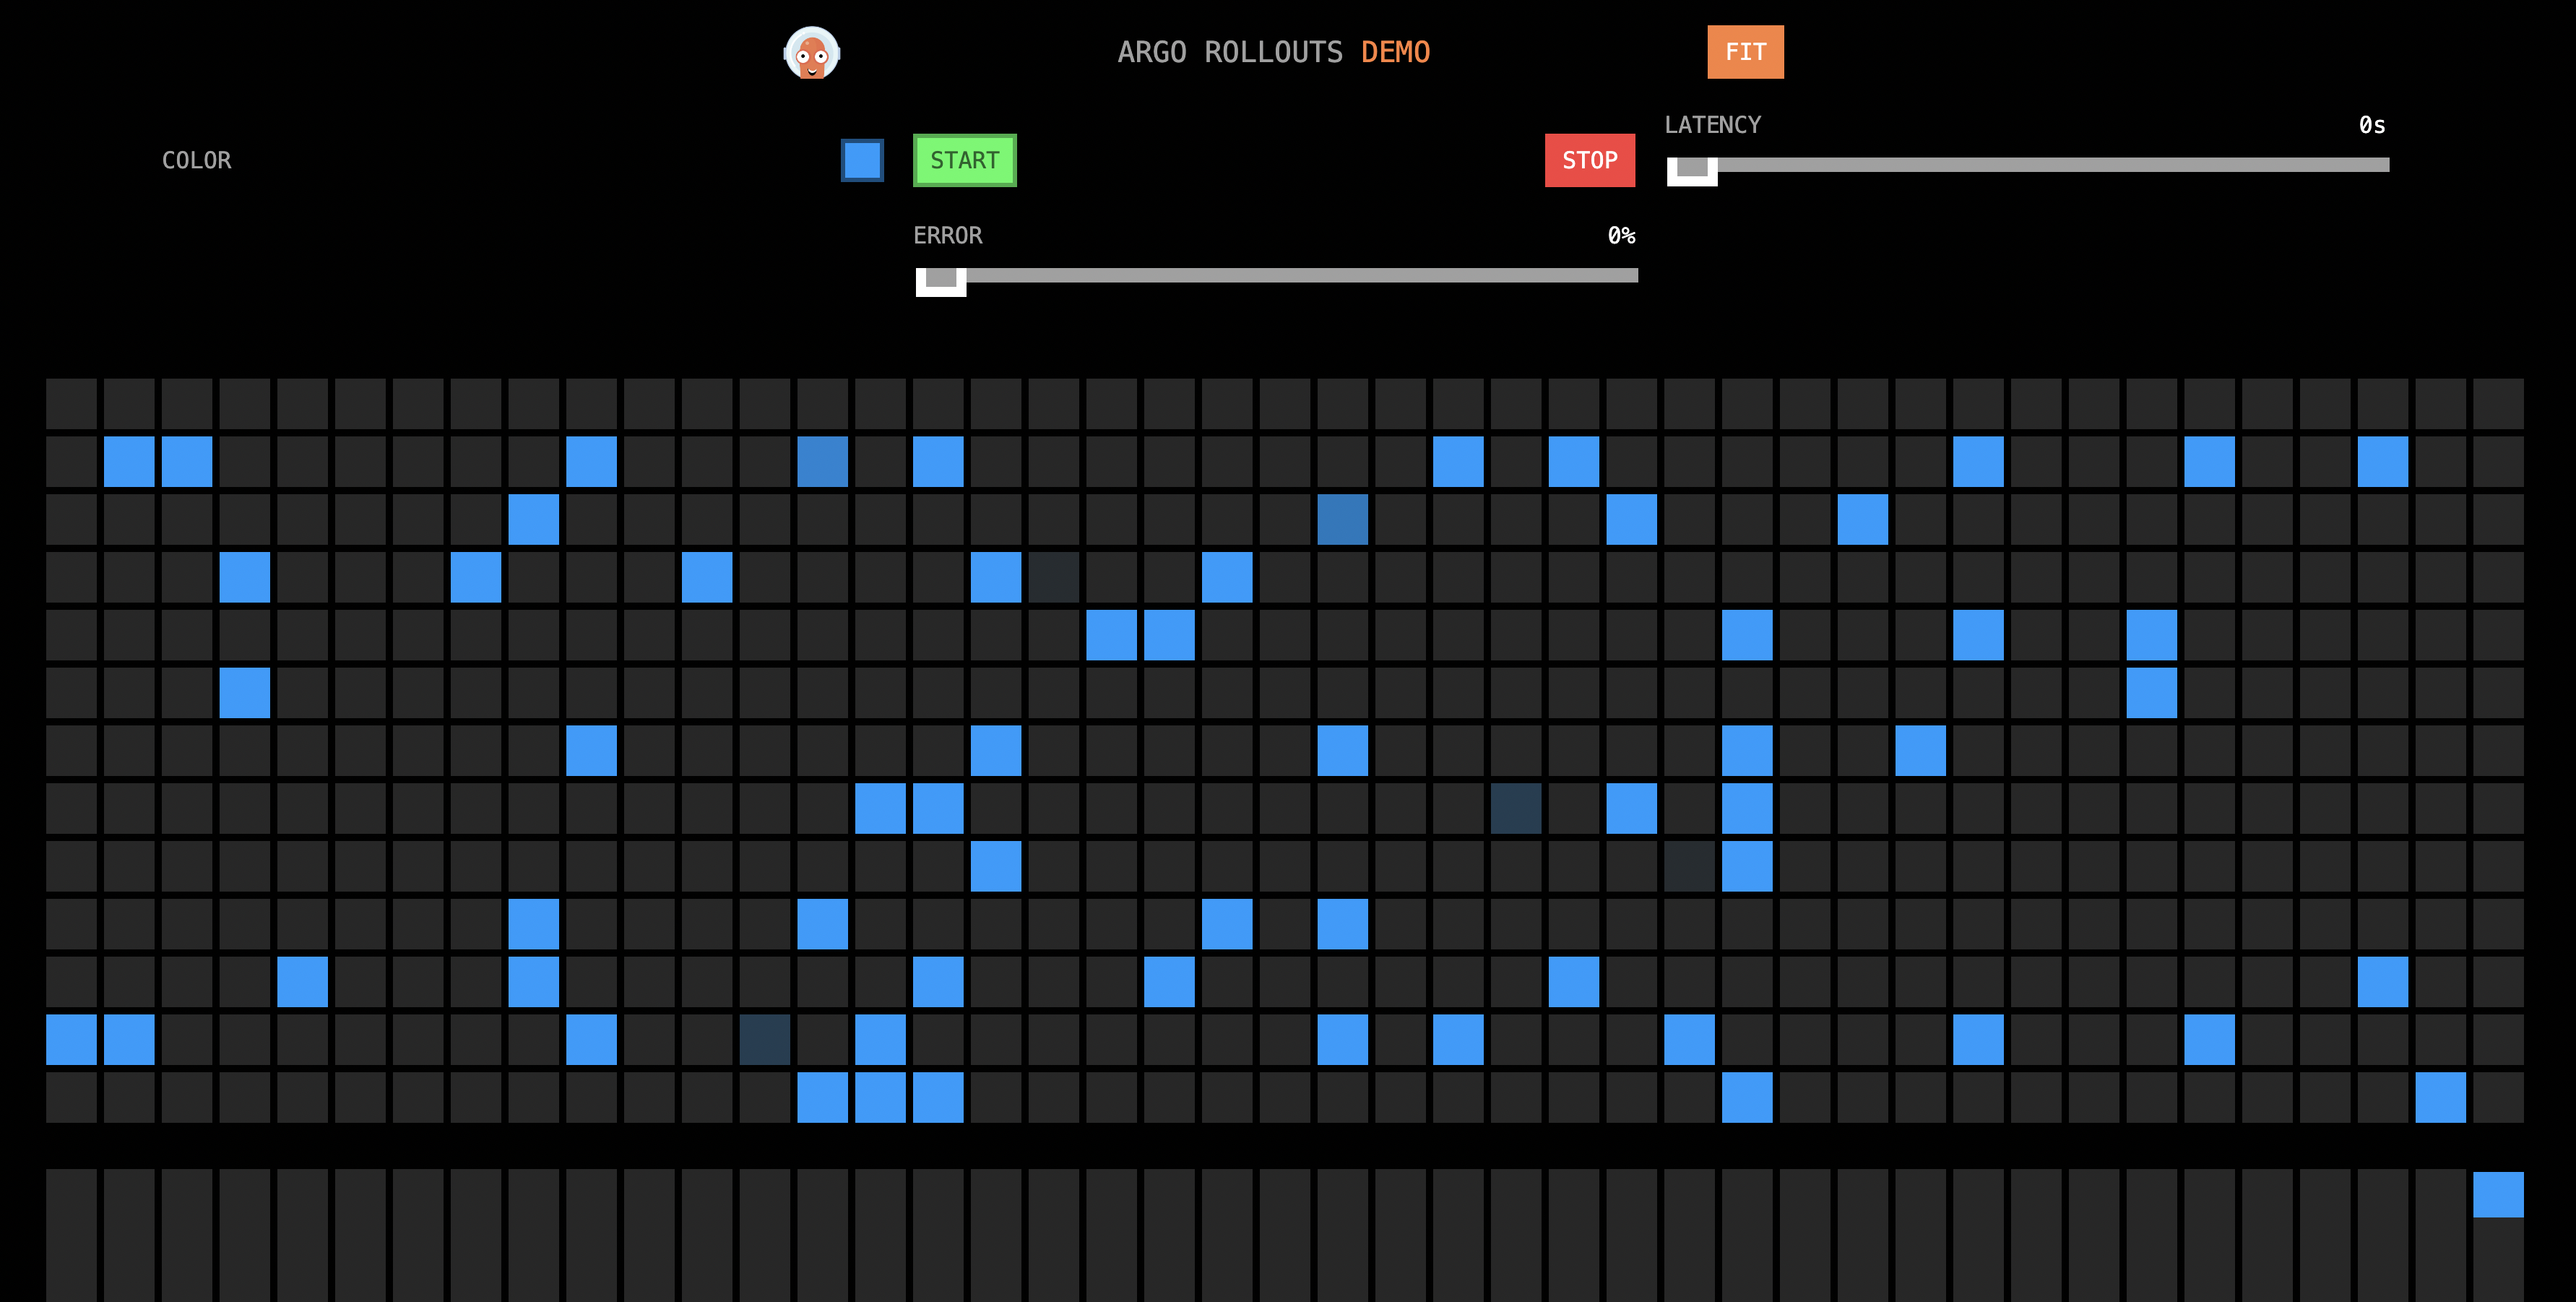
步驟六:變換
本文以黃色代表金絲雀版本,將http://{ASM網關IP}/網頁中的方格顏色從藍色逐漸層為黃色,實現金絲雀發布。
更新鏡像版本。
執行以下命令,更新鏡像版本。
kubectl argo rollouts set image istio-rollout "*=argoproj/istio-rollout:yellow"查看容器的鏡像版本。
登入Container Service管理主控台,在左側導覽列單擊叢集。
在叢集列表頁面,單擊目的地組群名稱,然後在左側導覽列,選擇。
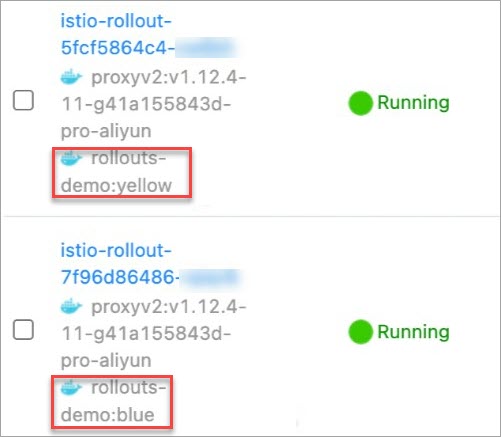
在名稱列下,查看目標容器的鏡像版本。
如下圖所示,Yellow版本(金絲雀版本)的Pod已被建立,但Blue版本(穩定版)的Pod依然存在。
在瀏覽器訪問http://{ASM網關IP}/。
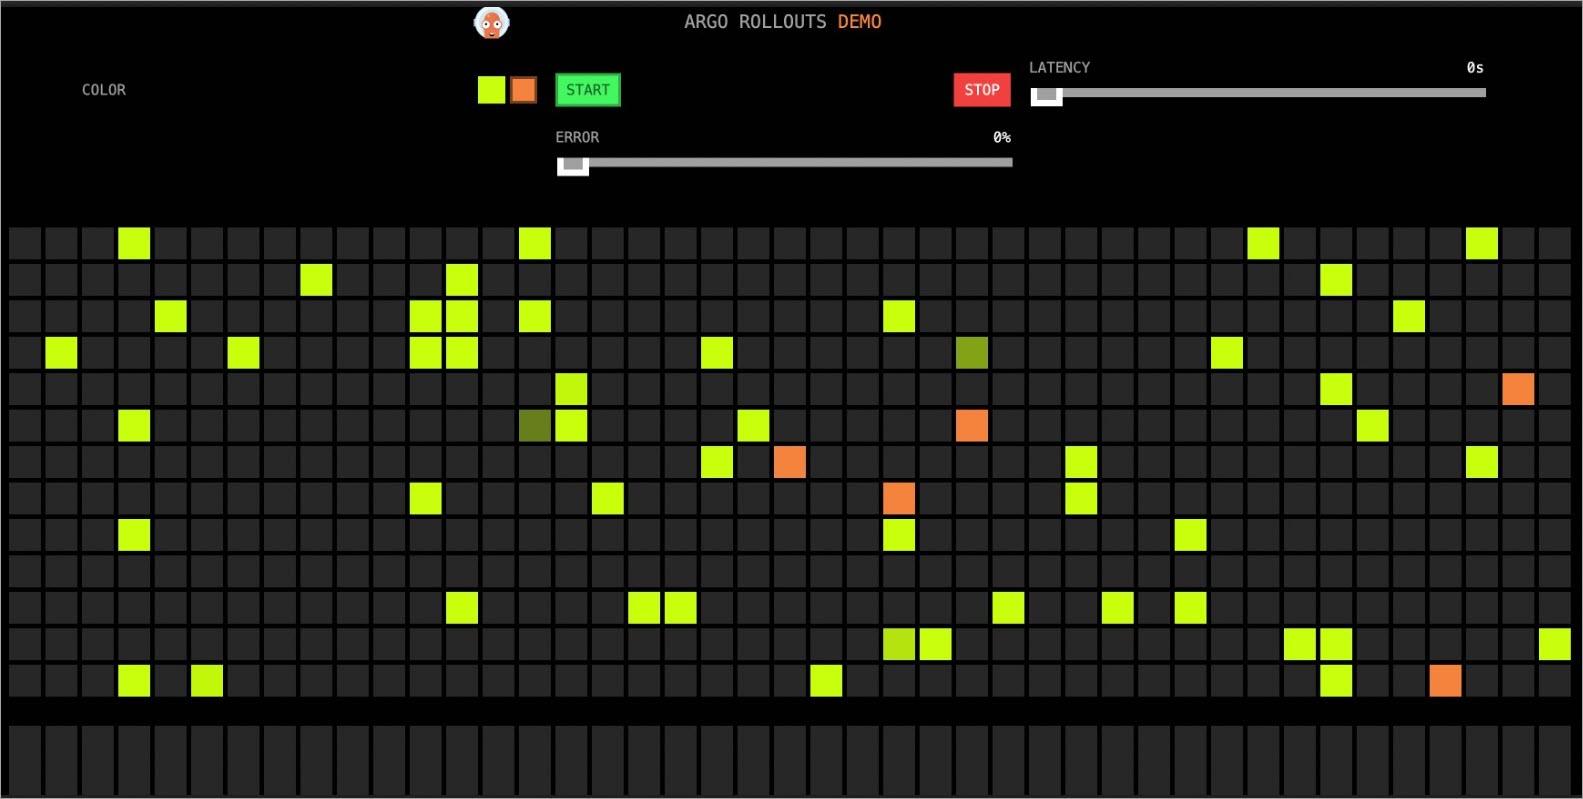
訪問效果如下所示,有10%的方格被變成了黃色。
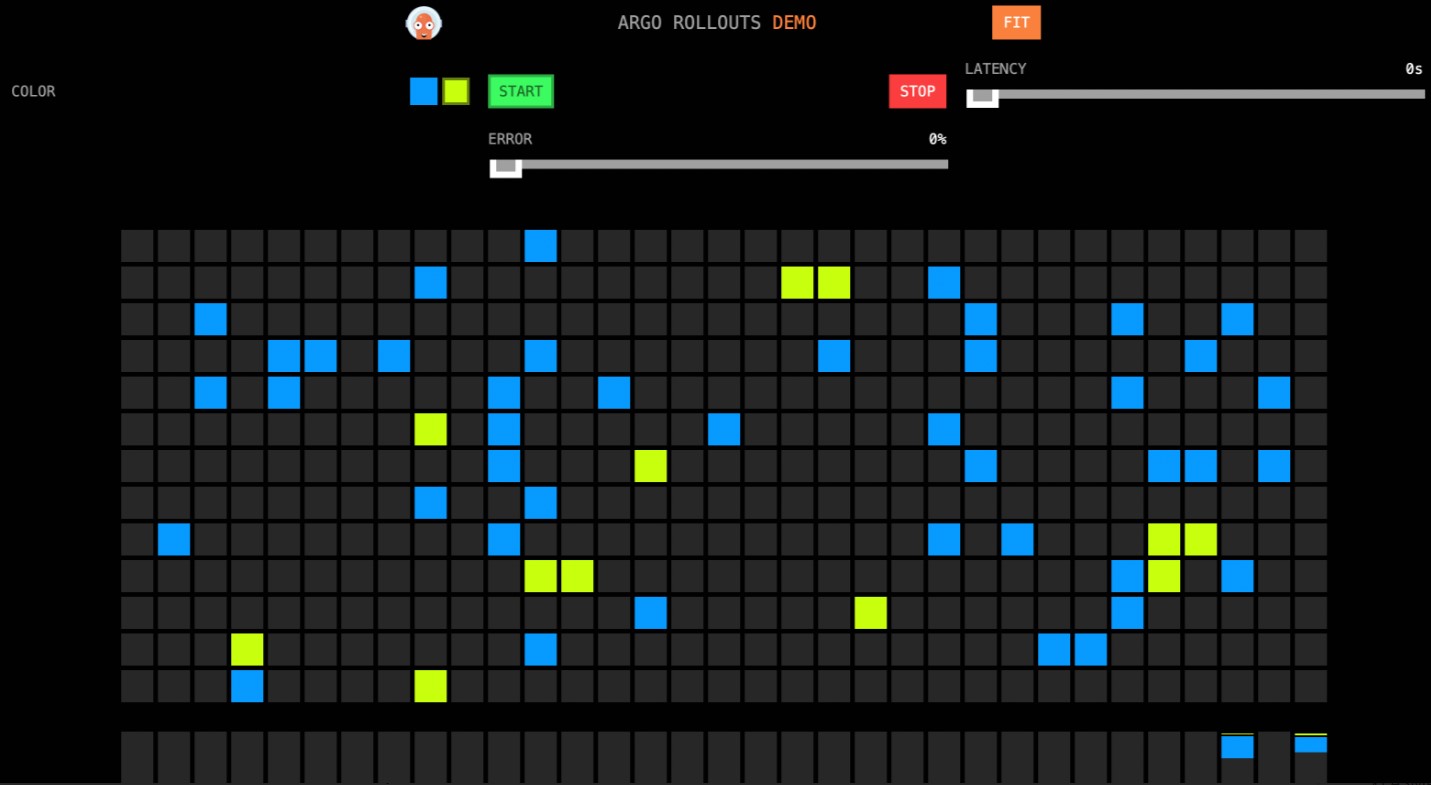 在服務網格ASM中,由於配置的虛擬服務VirtualService的權重發生了變化,Stable(藍色)的權重從100變為90,Sanary(黃色,即金絲雀版本),權重從0變為10。虛擬服務VirtualService的權重由Rollout控制,開始建立Rollout的第一個Step的
setWeight中設定了金絲雀版本的權重為10,在開始滾動時,Argo Rollout的控制器會修改Rollout中配置的VirtualService的權重。pause設定為空白,表示需要人工卡點確認,才進到下一階段。繼續金絲雀發布。
執行以下命令,繼續金絲雀發布。
kubectl argo rollouts promote istio-rollout在瀏覽器訪問http://{ASM網關IP}/。
訪問效果如下所示,VirtualService中的權重會根據Rollout中的配置繼續調整。由於步驟1中設定了
pause時間,會等待一段時間後自動調整。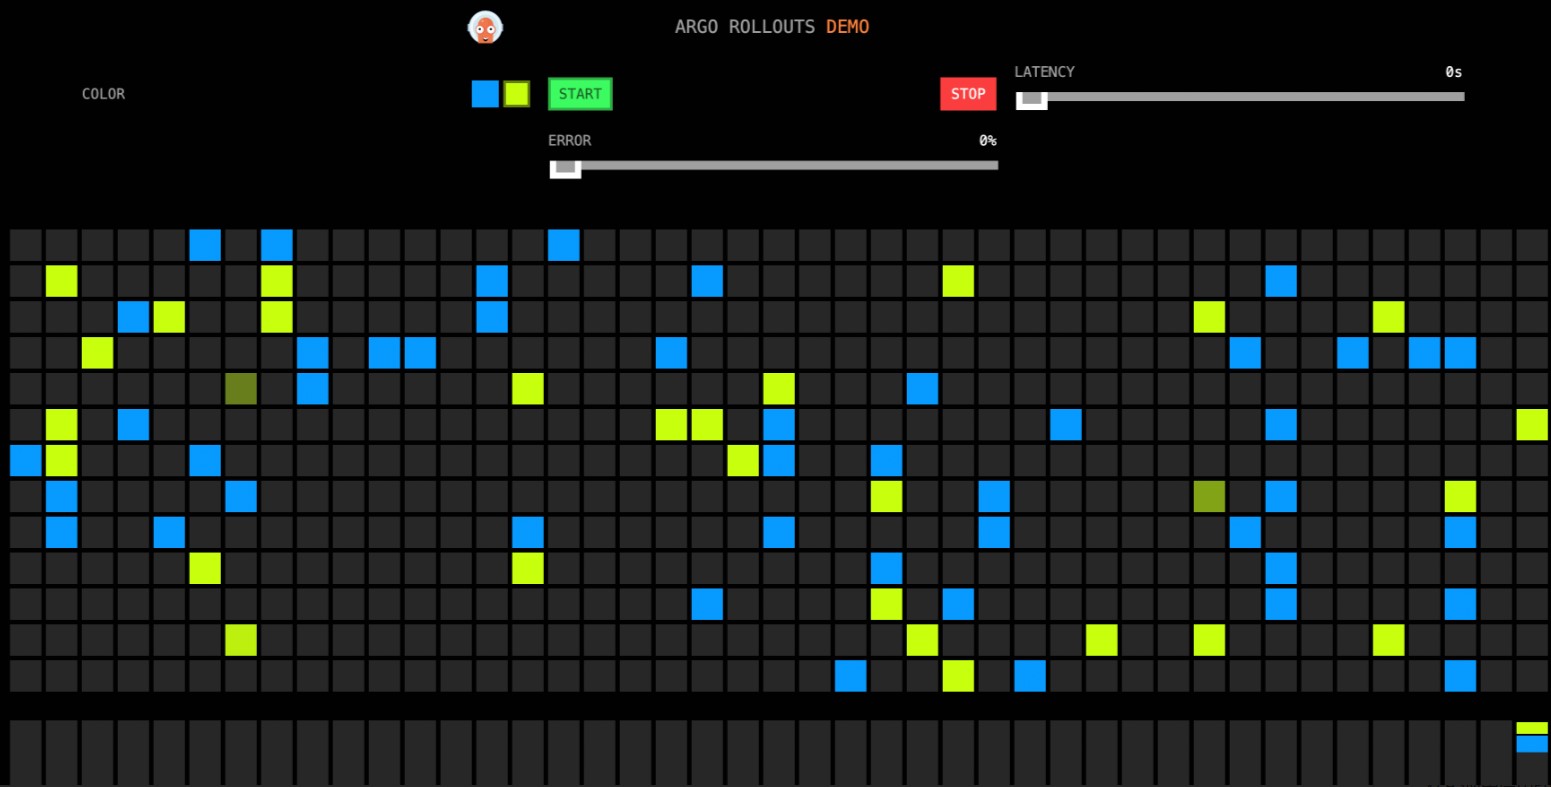
金絲雀發布成功。
等待一段時間後,在瀏覽器訪問http://{ASM網關IP}/,查看頁面效果。
訪問效果如下所示,所有的顏色塊都變為了黃色。

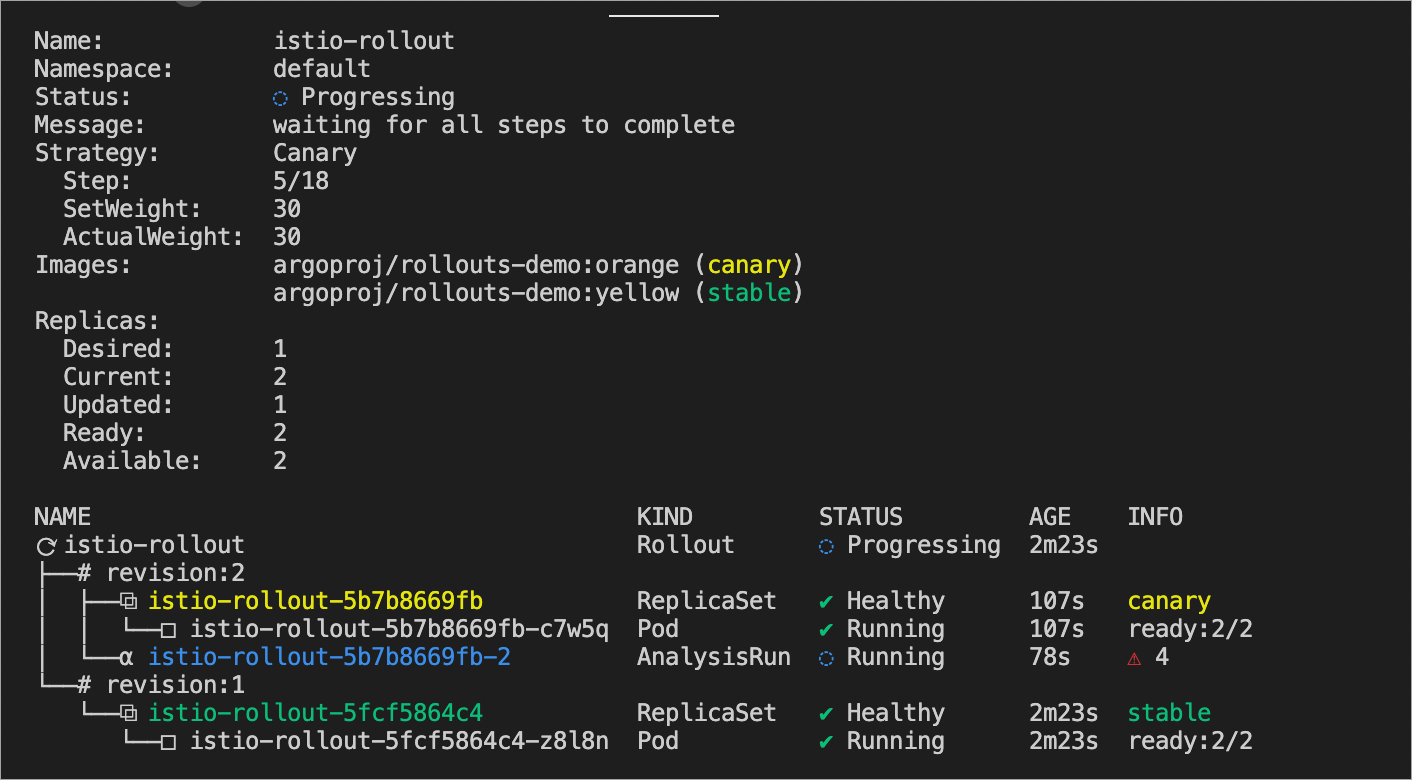
執行以下命令,查看Rollout狀態。
kubectl argo rollouts get rollout istio-rollout --watch預期輸出:
Name:            istio-rollout
Namespace:       default
Status:          ✔ Healthy
Strategy:        Canary
  Step:          18/18
  SetWeight:     100
  ActualWeight:  100
Images:          argoproj/rollouts-demo:yellow (stable)
Replicas:
  Desired:       1
  Current:       1
  Updated:       1
  Ready:         1
  Available:     1

NAME                                       KIND        STATUS        AGE  INFO
⟳ istio-rollout                            Rollout     ✔ Healthy     48m
├──# revision:4
│  └──⧉ istio-rollout-5fcf5864c4           ReplicaSet  ✔ Healthy     27m  stable
│     └──□ istio-rollout-5fcf5864c4-vw6kh  Pod         ✔ Running     26m  ready:2/2
├──# revision:3
│  └──⧉ istio-rollout-897cb5b6d            ReplicaSet  • ScaledDown  27m
└──# revision:1
   └──⧉ istio-rollout-7f96d86486           ReplicaSet  • ScaledDown  48m
由預期輸出得到,Stabel的Image更新為
yellow。
使用Prometheus實現自動復原
在金絲雀過程中可以手動執行kubectl argo rollouts abort istio-rollout命令進行復原,回退到Stable版本。您還可以使用Prometheus監控系統,對金絲雀中的應用健康狀態進行監控,當監控指標異常時,自動復原到Stable版本,並標記為降級。
在ASM中啟用Prometheus。具體操作,請參見整合可觀測監控Prometheus版實現網格監控或整合自建Prometheus實現網格監控。
配置Argo AnalysisTemplate。
使用以下YAML內容,建立istio-success-rate.yaml檔案。
配置AnalysisTemplate的
address為ASM的Prometheus地址。apiVersion: argoproj.io/v1alpha1 kind: AnalysisTemplate metadata: name: istio-success-rate spec: args: - name: service - name: namespace metrics: - name: success-rate initialDelay: 60s interval: 20s successCondition: result[0] > 0.90 provider: prometheus: address: http://xxx.aliyuncs.com:9090/api/v1/prometheus/ query: >+ sum(irate(istio_requests_total{ reporter="source", destination_service=~"{{args.service}}.{{args.namespace}}.svc.cluster.local", response_code!~"5.*"}[40s]) ) / sum(irate(istio_requests_total{ reporter="source", destination_service=~"{{args.service}}.{{args.namespace}}.svc.cluster.local"}[40s]) )執行以下命令,部署Argo AnalysisTemplate。
kubectl apply -f istio-success-rate.yaml
為Rollout關聯Analysis。
使用以下YAML內容,建立rollout.yaml檔案。
在
strategy中配置analysis,從第二步開啟使用Analysis進行監控,自動復原。初始Image為Yellow(黃色)。執行以下命令,更新Rollout。
kubectl apply -f rollout.yaml
執行以下命令,更新鏡像版本。
kubectl argo rollouts set image istio-rollout "*=argoproj/rollouts-demo:orange"在瀏覽器訪問http://{ASM網關IP}/,訪問效果如下所示:
人工卡點確認。
執行以下命令,繼續金絲雀發布。
執行命令後,將進入到後續的自動金絲雀狀態,並且從第二步開始,會結合Prometheus監控,如果金絲雀版本錯誤率高於90%,則觸發復原。
kubectl argo rollouts promote istio-rollout執行以下命令,查看監控服務狀態。
kubectl argo rollouts get rollout istio-rollout --watch預期輸出:
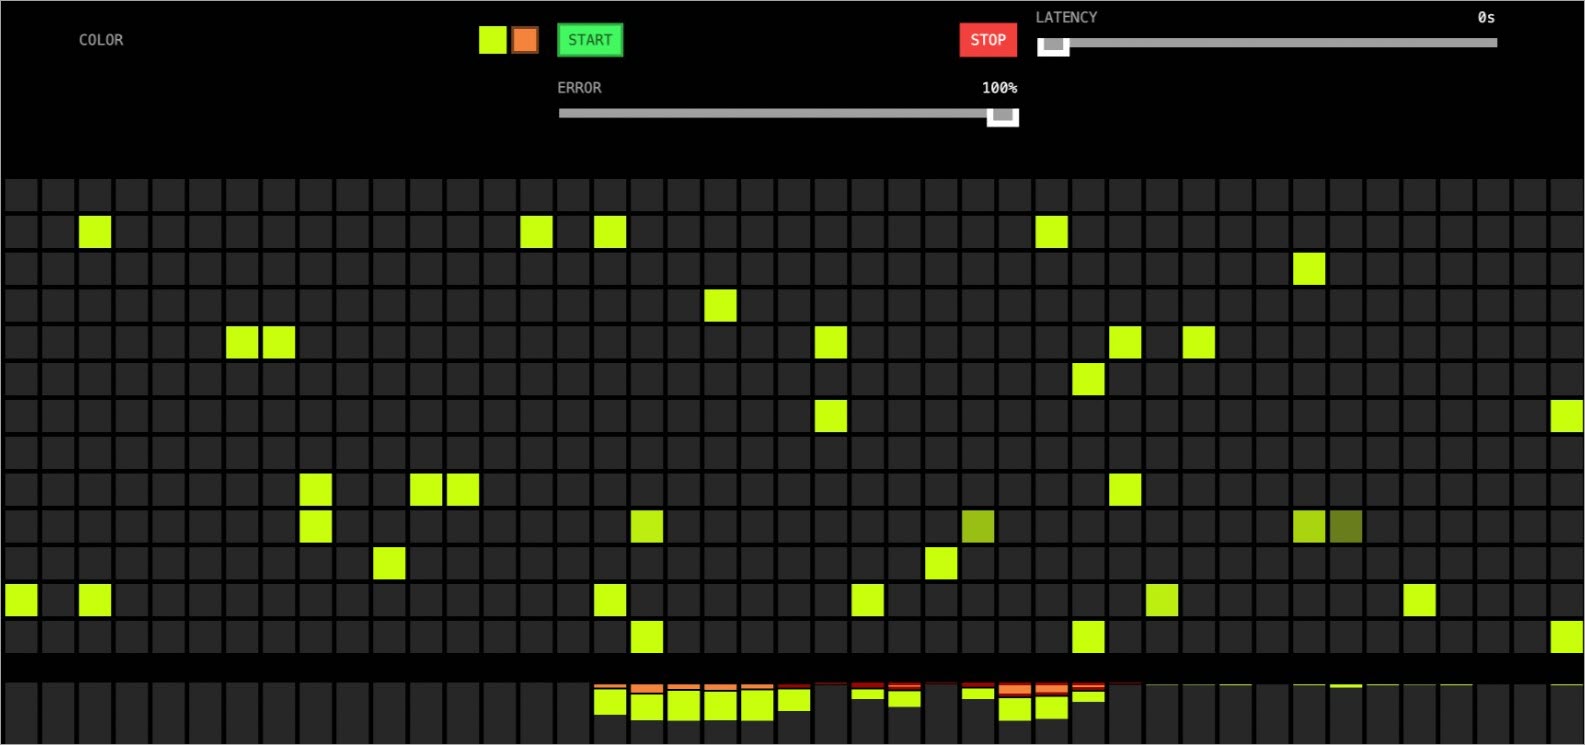
設定Error。
在後續漸進式發布中,您可以手動設定Error,調整金絲雀版本的錯誤率。移動Error至100%後,所有的金絲雀版本(橙色)都有一個紅框,表示錯誤。等待片刻後,將自動切換回只有黃色的版本(穩定版)。
圖 1. 金絲雀中
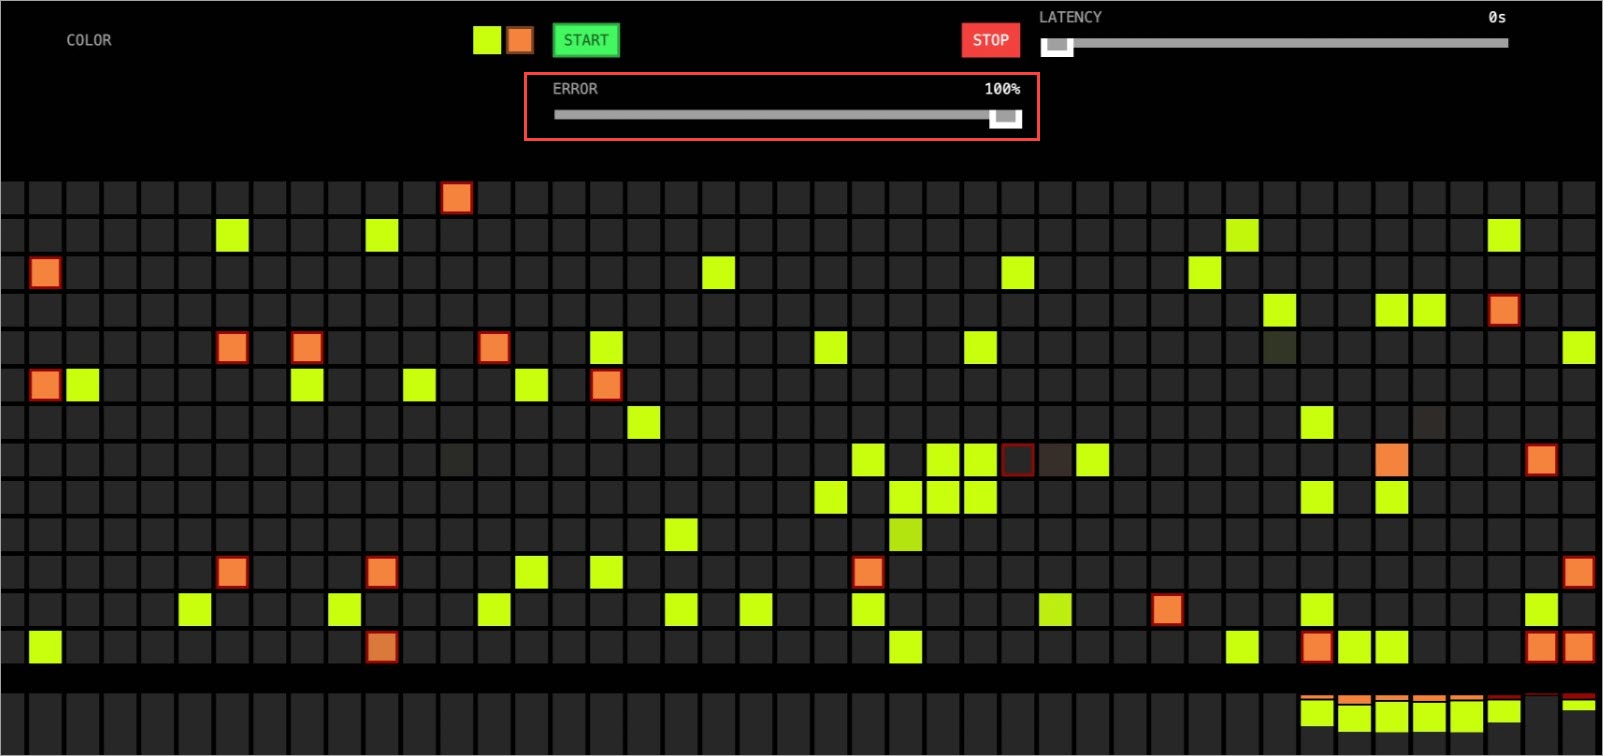
圖 2. 自動復原到穩定版