全部產品
Search
文件中心

Alibaba Cloud Service Mesh:基於eRDMA加速服務網格Pod間的網路效能

更新時間:Oct 09, 2024

Alibaba Cloud Linux 3提供的共用記憶體通訊(Shared Memory Communication)是一種相容socket層、使用遠程記憶體直接存取(RDMA)技術的高效能核心網路通訊協定棧,能夠顯著最佳化網路通訊效能。然而,在原生ECS環境中使用SMC技術最佳化網路效能時,使用者需要謹慎維護SMC白名單以及容器網路命名空間中的配置,以防止SMC非預期降級到TCP。ASM為使用者提供了可控的網路環境(叢集內)SMC最佳化能力,能夠自動最佳化服務網格Pod間的流量,使用者無需關心具體的SMC配置。

前提條件

已添加叢集到ASM執行個體

使用限制

說明

ASM啟用SMC網路效能最佳化當前處於beta階段。

操作步驟

步驟一:節點環境初始化

SMC利用eRDMA網卡加速網路效能,在啟用之前需要對節點進行相應的初始化準備。

  1. 升級Alibaba Cloud Linux 3系統核心為5.10.134-16.3及以上。

    說明

    特定版本核心的已知問題以及修複方式可見於已知問題小節。

    1. 使用uname -r查看當前核心版本,若核心版本為5.10.134-16.3及以上,則無需額外操作,跳過核心升級步驟。

      $ uname -r
      5.10.134-16.3.al8.x86_64
    2. 查看可安裝核心版本

      $ sudo yum search kernel --showduplicates | grep kernel-5.10
      Last metadata expiration check: 3:01:27 ago on Tue 09 Apr 2024 07:40:15 AM CST.
      kernel-5.10.134-15.1.al8.x86_64 : The Linux kernel, based on version 5.10.134, heavily modified with backports
      kernel-5.10.134-15.2.al8.x86_64 : The Linux kernel, based on version 5.10.134, heavily modified with backports
      kernel-5.10.134-15.al8.x86_64 : The Linux kernel, based on version 5.10.134, heavily modified with backports
      kernel-5.10.134-16.1.al8.x86_64 : The Linux kernel, based on version 5.10.134, heavily modified with backports
      kernel-5.10.134-16.2.al8.x86_64 : The Linux kernel, based on version 5.10.134, heavily modified with backports
      kernel-5.10.134-16.3.al8.x86_64 : The Linux kernel, based on version 5.10.134, heavily modified with backports
      kernel-5.10.134-16.al8.x86_64 : The Linux kernel, based on version 5.10.134, heavily modified with backports
      [...]
    3. 安裝最新版本核心或安裝指定版本核心

      1. 安裝最新版本核心:

        $ sudo yum update kernel
      2. 或安裝指定核心版本,以 kernel-5.10.134-16.3.al8.x86_64 版本為例:

        $ sudo yum install kernel-5.10.134-16.3.al8.x86_64
    4. 重啟節點。系統重新啟動後使用uname -r檢查核心是否已升級至預期版本。

  2. 為ACK網路外掛程式Terway配置彈性網卡白名單,防止其納管即將添加的輔助eRDMA網卡。操作步驟請參見為彈性網卡(ENI)配置白名單

  3. 為叢集內各節點建立和綁定一塊輔助eRDMA網卡,具體操作參見為已有執行個體配置eRDMA

    說明

    只需完成輔助eRDMA網卡的建立和綁定步驟即可。在此情境下,輔助eRDMA網卡需要和主網卡處在同一子網內。配置輔助eRDMA網卡方式請參見下一步驟。

  4. 配置節點上的輔助eRDMA網卡

    1. 將下述指令碼存放於節點的任意目錄下。為指令碼添加可執行許可權:sudo chmod +x asm_erdma_eth_config.sh

      asm_erdma_eth_config.sh

      #!/bin/bash
      
      #
      # Params
      #
      mode=
      mac=
      ipv4=
      mask=
      gateway=
      state=  # UP/DOWN
      
      #
      # Functions
      #
      function find_erdma_eth
      {
              echo "$(rdma link show | awk '{print $NF}')"
      }
      
      function get_erdma_eth_info
      {
              e=$1
              echo "Find ethernet device with erdma: $e"
      
              # UP/DOWN
              ip link show $e | grep -q "state UP" && state="UP" || state="DOWN"
      
              # MAC address
              mac=$(ip a show dev $e | grep ether | awk '{print $2}')
      
              # IPv4 address
              ipv4=$(curl --silent --show-error --connect-timeout 5 \
                      http://100.100.100.200/latest/meta-data/network/interfaces/macs/"$mac"/primary-ip-address \
                      2>&1)
              if [ $? -ne 0 ]; then
                      echo "failed to retrieve $e IPv4 address. Error: $ipv4"
                      exit 1
              fi
      
              # Mask
              mask=$(curl --silent --show-error --connect-timeout 5 \
                      http://100.100.100.200/latest/meta-data/network/interfaces/macs/"$mac"/netmask \
                      2>&1)
              if [ $? -ne 0 ]; then
                      echo "failed to retrieve $e network mask. Error: $mask"
                      exit 1
              fi
      
              # Gateway
              gateway=$(curl --silent --show-error --connect-timeout 5 \
                      http://100.100.100.200/latest/meta-data/network/interfaces/macs/"$mac"/gateway \
                      2>&1)
              if [ $? -ne 0 ]; then
                      echo "failed to retrieve $e gateway. Error: $mask"
                      exit 1
              fi
              echo "- state <$state>, IPv4 <$ipv4>, mask <$mask>, gateway <$gateway>"
      }
      
      function set_erdma_eth
      {
              local eths=()
      
              # find all eths with erdma
              eths=$(find_erdma_eth)
              if [ ${#eths[@]} -eq 0 ]; then
                      echo "Can't find ethernet device with erdma capability"
                      exit 1
              fi
      
              for e in ${eths[@]}
              do
                      if [[ $e == "eth0" ]]; then
                              echo "Skip eth0, no need to configure."
                              continue
                      fi
                      get_erdma_eth_info $e
                      echo "Config.."
      
                      # Enable
                      if [ "$state" == "DOWN" ]; then
                              ip link set $e up 1>/dev/null 2>&1
                              if ip link show $e | grep -q "state UP" ; then
                                      echo "- successed to set $e UP"
                              else
                                      echo "- failed to set $e UP"
                                      exit 1
                              fi
                      else
                              echo "- $e has been activated, nothing to do."
                      fi
      
                      # Set IP & mask
                      if ! ip addr show $e | grep -q "inet\b"; then
                              local eth0_metric=$(ip route | grep "dev eth0 proto kernel scope link" \
                                                      | awk '/metric/ {print $NF}')
                              ip addr add $ipv4/$mask dev $e metric $((eth0_metric + 1)) 1>/dev/null 2>&1
                              if [ $? -eq 0 ]; then
                                      echo "- successed to configure $e IPv4/mask and direct route"
                              else
                                      echo "- failed to configure $e IPv4/mask and direct route"
                              fi
                      else
                              echo "- $e has been configured with IPv4(s), nothing to do."
                      fi
      
                      echo "Complete all configurations of $e"
              done
      }
      
      function reset_erdma_eth
      {
              local eths=()
      
              # Find all eths with erdma
              eths=$(find_erdma_eth)
              if [ ${#eths[@]} -eq 0 ]; then
                      echo "Can't find ethernet device with erdma capability"
                      exit 1
              fi
      
              for e in ${eths[@]}
              do
                      if [[ $e == "eth0" ]]; then
                              echo "Skip eth0, no need to configure."
                              continue
                      fi
                      get_erdma_eth_info $e
                      echo "Reset.."
      
                      # Remove IPv4
                      ip addr flush dev $e scope global 1>/dev/null 2>&1
                      if [ $? -eq 0 ]; then
                              echo "- successed to flush $e IPv4(s)"
                      else
                              echo "- failed to flush $e IPv4(s)"
                      fi
      
                      # Disable
                      ip link set $e down 1>/dev/null 2>&1
                      if [ $? -eq 0 ]; then
                              echo "- successed to set $e DOWN"
                      else
                              echo "- failed to set $e DOWN"
                      fi
                      echo "Complete all resets of $e"
              done
      }
      
      print_help() {
              echo "Usage: $0 [option]"
              echo "Options:"
              echo "  -s            Enable eRDMA-cap Eth and configure its IPv4"
              echo "  -r            Disable eRDMA-cap Eth and remove all its IPv4"
              echo "  -h, --help    Show this help message"
      }
      
      while [ "$1" != "" ]; do
              case $1 in
                      -s)
                              set_erdma_eth
                              exit 0
                              ;;
                      -r)
                              reset_erdma_eth
                              exit 0
                              ;;
                      -h | --help)
                              print_help
                              exit 0
                              ;;
                      *)
                              echo "Invalid option: $1"
                              print_help
                              exit 1
                              ;;
              esac
              shift
      done
      
      if [ -z "$1" ]; then
              print_help
              exit 1
      fi
      說明

      此指令碼僅在當前上下文中用於輔助eRDMA網卡配置,不適用於其他網卡配置情境。

    2. 執行sudo ./asm_erdma_eth_config.sh -s將新添加的輔助eRDMA網卡狀態設定為UP,並為其配置IPv4地址。預計輸出類似如下內容:

      $ sudo ./asm_erdma_eth_config.sh -s
      Find ethernet device with erdma: eth2
      - state <DOWN>, IPv4 <192.168.x.x>, mask <255.255.255.0>, gateway <192.168.x.x>
      Config..
      - successed to set eth2 UP
      - successed to configure eth2 IPv4/mask and direct route
      Complete all configurations of eth2
    3. (可選)上述配置輔助eRDMA網卡的步驟在每次重啟節點後需要再次執行。若希望重啟節點時自動執行配置,可按如下方式建立對應的systemd service。

      1. 在節點/etc/systemd/system目錄下添加如下asm_erdma_eth_config.service檔案,將其中的/path/to/asm_erdma_eth_config.sh更換為節點上asm_erdma_eth_config.sh指令碼的實際路徑。

        asm_erdma_eth_config.service

        [Unit]
        Description=Run asm_erdma_eth_config.sh script after network is up
        Wants=network-online.target
        After=network-online.target
        
        [Service]
        Type=oneshot
        ExecStart=/bin/sh /path/to/asm_erdma_eth_config.sh -s
        RemainAfterExit=yes
        
        [Install]
        WantedBy=multi-user.target
      2. 啟用asm_erdma_eth_config.service。

        sudo systemctl daemon-reload
        sudo systemctl enable asm_erdma_eth_config.service

        此後在節點啟動時將自動執行網卡配置。節點啟動後可通過sudo systemctl status asm_erdma_eth_config.service查看asm_erdma_eth_config.service狀態,預期狀態為active,輸出類似如下。

        # sudo systemctl status asm_erdma_eth_config.service
        ● asm_erdma_eth_config.service - Run asm_erdma_eth_config.sh script after network is up
           Loaded: loaded (/etc/systemd/system/asm_erdma_eth_config.service; enabled; vendor preset: enabled)
           Active: active (exited) since [time]
         Main PID: 1689 (code=exited, status=0/SUCCESS)
            Tasks: 0 (limit: 403123)
           Memory: 0B
           CGroup: /system.slice/asm_erdma_eth_config.service
        
        [time] <hostname> sh[1689]: Find ethernet device with erdma: eth2
        [time] <hostname> systemd[1]: Starting Run asm_erdma_eth_config.sh script after network is up...
        [time] <hostname> sh[1689]: - state <DOWN>, IPv4 <192.168.x.x>, mask <255.255.255.0>, gateway <192.168.x.x>
        [time] <hostname> sh[1689]: Config..
        [time] <hostname> sh[1689]: - successed to set eth2 UP
        [time] <hostname> sh[1689]: - successed to configure eth2 IPv4/mask and direct route
        [time] <hostname> sh[1689]: Complete all configurations of eth2
        [time] <hostname> systemd[1]: Started Run asm_erdma_eth_config.sh script after network is up.
      3. 相反,若不再需要asm_erdma_eth_config.service,可通過sudo systemctl disable asm_erdma_eth_config.service移除。

步驟二:部署測試應用

  1. 為測試使用的default命名空間啟用自動注入,具體請參見啟用自動注入

  2. 使用以下內容,建立fortioserver.yaml檔案。

    展開查看fortioserver.yaml

    ---
    apiVersion: v1
    kind: Service
    metadata:
      name: fortioserver
    spec:
      ports:
      - name: http-echo
        port: 8080
        protocol: TCP
      - name: tcp-echoa
        port: 8078
        protocol: TCP
      - name: grpc-ping
        port: 8079
        protocol: TCP
      selector:
        app: fortioserver
      type: ClusterIP
    ---
    apiVersion: apps/v1
    kind: Deployment
    metadata:
      labels:
        app: fortioserver
      name: fortioserver
    spec:
      replicas: 1
      selector:
        matchLabels:
          app: fortioserver
      template:
        metadata:
          labels:
            app: fortioserver
          annotations:
            sidecar.istio.io/inject: "true"
            sidecar.istio.io/proxyCPULimit: 2000m
            proxy.istio.io/config: |
              concurrency: 2 
        spec:
          shareProcessNamespace: true
          containers:
          - name: captured
            image: fortio/fortio:latest_release
            ports:
            - containerPort: 8080
              protocol: TCP
            - containerPort: 8078
              protocol: TCP
            - containerPort: 8079
              protocol: TCP
          - name: anolis
            securityContext:
              runAsUser: 0
            image: openanolis/anolisos:latest
            args:
            - /bin/sleep
            - 3650d
    ---
    apiVersion: v1
    kind: Service
    metadata:
      annotations:
          service.beta.kubernetes.io/alibaba-cloud-loadbalancer-health-check-switch: "off"
      name: fortioclient
    spec:
      ports:
      - name: http-report
        port: 8080
        protocol: TCP
      selector:
        app: fortioclient
      type: LoadBalancer
    ---
    apiVersion: apps/v1
    kind: Deployment
    metadata:
      labels:
        app: fortioclient
      name: fortioclient
    spec:
      replicas: 1
      selector:
        matchLabels:
          app: fortioclient
      template:
        metadata:
          annotations:
            sidecar.istio.io/inject: "true"
            sidecar.istio.io/proxyCPULimit: 4000m
            proxy.istio.io/config: |
               concurrency: 4
          labels:
            app: fortioclient
        spec:
          shareProcessNamespace: true
          affinity:
            podAntiAffinity:
              requiredDuringSchedulingIgnoredDuringExecution:
              - labelSelector:
                  matchExpressions:
                  - key: app
                    operator: In
                    values:
                    - fortioserver
                topologyKey: "kubernetes.io/hostname"
          containers:
          - name: captured
            volumeMounts:
            - name: shared-data
              mountPath: /var/lib/fortio
            image: fortio/fortio:latest_release
            ports:
            - containerPort: 8080
              protocol: TCP
          - name: anolis
            securityContext:
              runAsUser: 0
            image: openanolis/anolisos:latest
            args:
            - /bin/sleep
            - 3650d
          volumes:
          - name: shared-data
            emptyDir: {}
    
  3. 使用ACK叢集的KubeConfig,執行以下命令,部署測試應用。

    kubectl apply -f fortioserver.yaml
  4. 執行以下命令,查看測試應用的狀態。

    kubectl get pods | grep fortio

    預期輸出:

    NAME                            READY   STATUS    RESTARTS      
    fortioclient-8569b98544-9qqbj   3/3     Running   0
    fortioserver-7cd5c46c49-mwbtq   3/3     Running   0

    預期輸出表明兩個應用均正常啟動。

步驟三:在基礎環境運行測試,查看基準測試結果

fortio應用啟動後,會暴露8080連接埠監聽,訪問該連接埠將開啟fortio應用的控制台頁面。為了產生測試流量,可以將fortioclient的連接埠映射到當前所用機器,在當前所用機器上開啟fortio的控制台頁面。

  1. 使用ACK叢集的KubeConfig,執行以下命令,將fortio用戶端的Service監聽的8080連接埠映射到本地的8080連接埠。

    kubectl port-forward service/fortioclient 8080:8080
  2. 在瀏覽器中輸入http://localhost:8080/fortio地址,訪問fortio用戶端控制台,並修改相關配置。

    image

    請按照下表修改頁面上的參數。

    參數

    樣本值

    URL

    http://fortioserver:8080/echo

    QPS

    100000

    Duration

    30s

    Threads/Simultaneous connections

    64

    Payload

    填寫以下字串(128 Byte):

    xhsyL4ELNoUUbC3WEyvaz0qoHcNYUh0j2YHJTpltJueyXlSgf7xkGqc5RcSJBtqUENNjVHNnGXmoMyILWsrZL1O2uordH6nLE7fY6h5TfTJCZtff3Wib8YgzASha8T8g

  3. 配置完成後,在頁面下方,單擊Start開始測試,等待進度條結束,測試完畢。

    image

    測試回合完畢後,頁面將給出本次測試的結果。下圖僅供參考,測試結果請以實際環境為準。

    image

    頁面輸出的測試結果橫座標為請求的Latency,觀察直條圖在橫座標上的分布可以得出請求延遲的分布情況,紫色曲線為在不同回應時間範圍內完成的請求數量。縱座標為完成的請求數。同時,圖表頂部給出了P50/P75/P90/P99/P99.9的請求Latency資料。得到基礎環境資料後,需要為應用啟用SMC,準備進行SMC加速後的效能驗證。

步驟四:為ASM執行個體和工作負載啟用SMC加速

  1. 使用服務網格的KubeConfig編輯網格配置,添加"smcEnabled: true",以啟用SMC加速功能。

    $ kubectl edit asmmeshconfig
    
    apiVersion: istio.alibabacloud.com/v1beta1
    kind: ASMMeshConfig
    metadata:
      name: default
    spec:
      ambientConfiguration:
        redirectMode: ""
        waypoint: {}
        ztunnel: {}
      cniConfiguration:
        enabled: true
        repair: {}
      smcEnabled: true
  2. 使用ACK叢集的KubeConfig,執行以下命令,修改fortioserver和fortioclient的Deployment,為Pod添加Annotation。

    為網格執行個體啟用加速後,還需要進一步為工作負載啟用加速,通過為Pod添加Key為smc.asm.alibabacloud.com/enabled,值設定為true的Annotation,可以為工作負載啟用SMC加速,您需要同時為需要最佳化的兩端工作負載均啟用加速

    1. 編輯fortioclient的Deployment定義。

      $ kubectl edit deployment fortioclient
      
      apiVersion: apps/v1
      kind: Deployment
      metadata:
        ......
        name: fortioclient
      spec:
        ......
        template:
          metadata:
            ......
            annotations:
              smc.asm.alibabacloud.com/enabled: "true"
              
    2. 編輯fortioserver的Deployment定義。

      $ kubectl edit deployment fortioserver
      
      apiVersion: apps/v1
      kind: Deployment
      metadata:
        ......
        name: fortioserver
      spec:
        ......
        template:
          metadata:
            ......
            annotations:
              smc.asm.alibabacloud.com/enabled: "true"
              

步驟五:加速後環境運行測試,查看啟用最佳化後的測試結果

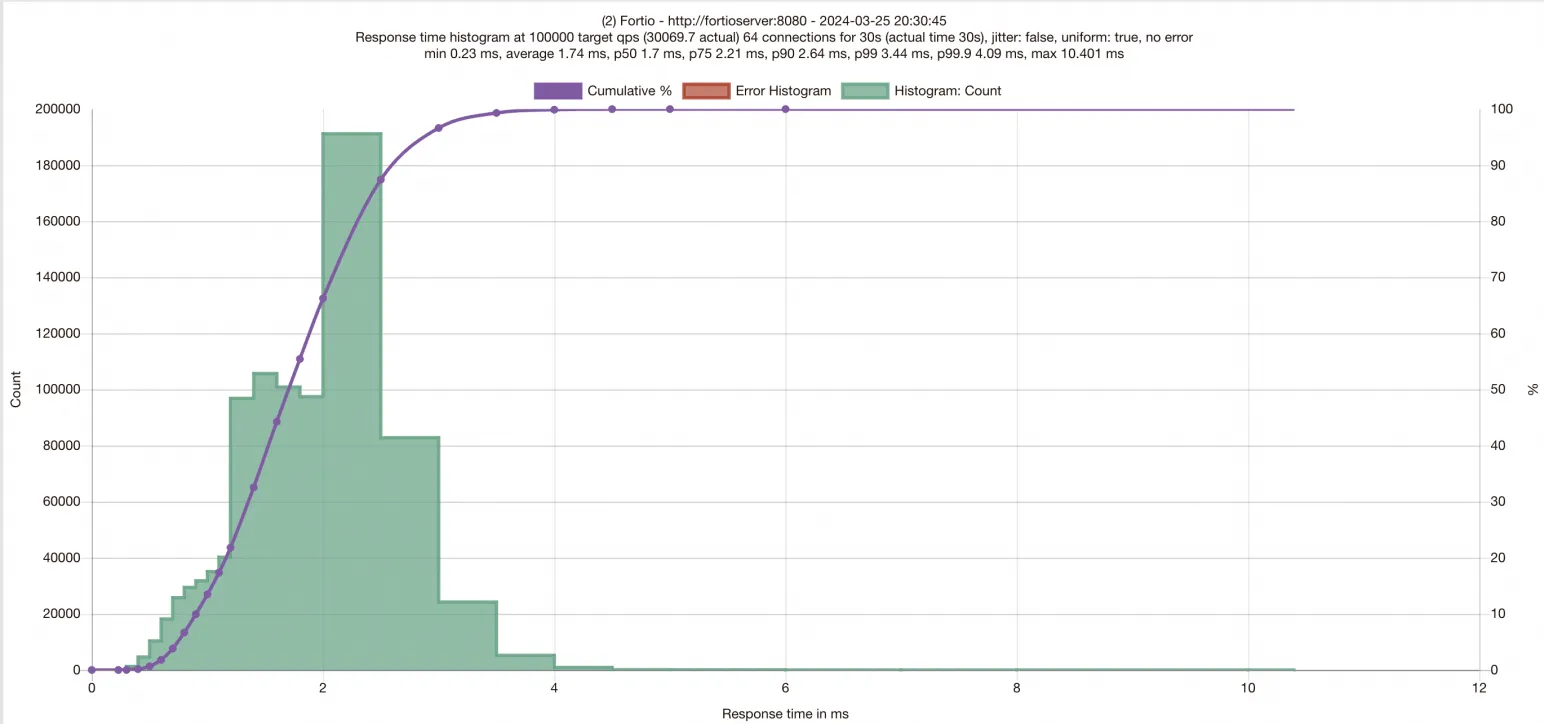
由於修改Deployment將使工作負載重啟,因此您需要參考步驟三重新進行fortioclient連接埠映射,再次發起測試,等待測試結束查看結果。
image

與加速前的結果對比,可以看到啟用ASM SMC加速後,延遲下降,QPS明顯提升。

已知問題

  1. 使用Alibaba Cloud Linux 3系統5.10.134-16.3版本核心啟用SMC加速後,重啟POD時系統報告類似unregister_netdevice: waiting for eth* to become free. Usage count = *錯誤資訊。POD無法成功刪除。

    此問題是由於smc核心模組未正確釋放網路介面的引用計數。可通過啟用如下熱補丁,修複此已知問題。其餘更高版本可忽略此步驟。更多核心熱補丁操作詳見核心熱補丁操作說明

    $ sudo yum install kernel-hotfix-16664924-5.10.134-16.3