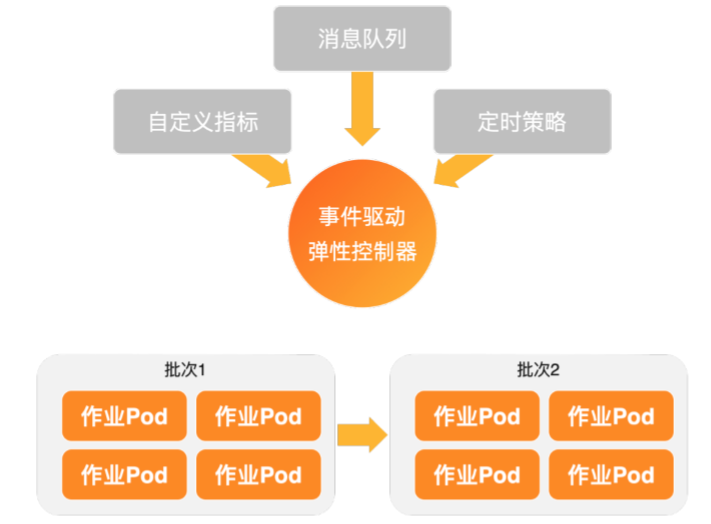
在處理離線作業、流式資料等事件驅動型業務時,傳統的基於CPU、記憶體利用率的HPA可能響應不夠及時。ack-keda能夠通過監控各類事件來源(如訊息佇列、資料庫等)的積壓情況,在秒級內自動建立和Job或Deployment,並在任務完成後自動縮容至零,從而實現高效、即時的資源調度和成本最佳化。
工作原理
ack-keda是ACK整合的增強版KEDA(Kubernetes-based Event-driven Autoscaling),其核心原理是引入Scaler來充當事件來源與應用之間的橋樑。

監控事件來源:
Scaler負責串連到一個外來事件源(如MongoDB),並周期性地查詢指定指標(如滿足特定條件的文檔數量)。驅動應用伸縮:
當
Scaler檢測到事件積壓(例如,查詢到有待處理的資料),ack-keda會根據預設規則,快速伸縮ScaledJob或ScaledObject所關聯的目標工作負載(如建立新Job或增加Deployment的Pod副本數)。當事件處理完畢,
Scaler檢測到事件積壓消失,ack-keda會自動將工作負載縮容,對於Job任務則自動清理已完成的資源,有效避免資源浪費和中繼資料堆積。
核心優勢:
豐富的事件來源支援:支援Kafka、MySQL、PostgreSQL、RabbitMQ、MongoDB等資料來源。詳見RabbitMQ Queue。
靈活的並發控制:通過
maxReplicaCount等參數可控制任務的最大並發數,防止下遊系統被突發流量衝垮。中繼資料自動清理:
ScaledJob在任務完成後會自動清理已完成的Job及其Pod,避免中繼資料堆積對API Server造成壓力。
本文以一個類比的視頻轉碼情境為例。當有新的轉碼任務(一條"state":"waiting"的記錄)插入MongoDB資料庫時,ack-keda會自動建立一個Job Pod來執行轉碼任務,並在完成後修改資料狀態為"state":"finished"。Job完成後,中繼資料將自動清理,降低對API Server的壓力。
步驟一:部署ack-keda
在ACK叢集列表頁面,單擊目的地組群名稱,在叢集詳情頁左側導覽列,選擇。
單擊建立,按照頁面提示定位並選擇ack-keda,選擇最新Chart 版本,完成組件的安裝。
步驟二:部署基於MongoDB事件來源驅動彈性樣本
1. 建立樣本命名空間
本樣本將使用mongodb命名空間部署資料庫,使用mongodb-test命名空間部署Auto Scaling相關配置。
kubectl create ns mongodb
kubectl create ns mongodb-test
2. 部署MongoDB
如已有MongoDB服務,可跳過。
建立mongoDB.yaml。
重要此MongoDB服務僅用於功能示範,不具備高可用性,請勿用於生產環境。
apiVersion: apps/v1
kind: Deployment
metadata:
  name: mongodb
  namespace: mongodb
spec:
  replicas: 1
  selector:
    matchLabels:
      name: mongodb
  template:
    metadata:
      labels:
        name: mongodb
    spec:
      containers:
      - name: mongodb
        image: registry-cn-shanghai.ack.aliyuncs.com/acs/mongo:v5.0.0
        imagePullPolicy: IfNotPresent
        ports:
        - containerPort: 27017
          name: mongodb
          protocol: TCP
---
kind: Service
apiVersion: v1
metadata:
  name: mongodb-svc
  namespace: mongodb
spec:
  type: ClusterIP
  ports:
  - name: mongodb
    port: 27017
    targetPort: 27017
    protocol: TCP
  selector:
    name: mongodb
部署Mongo DB。
kubectl apply -f mongoDB.yaml
3. 初始化MongoDB資料庫
擷取MongoDB Pod名稱。
MONGO_POD_NAME=$(kubectl get pods -n mongodb -l name=mongodb -o jsonpath='{.items[0].metadata.name}')
echo "MongoDB Pod name is: $MONGO_POD_NAME"
在
test資料庫中建立使用者test_user並建立test_collection。# 建立使用者 kubectl exec -n mongodb ${MONGO_POD_NAME} -- mongo --eval 'db.createUser({ user:"test_user",pwd:"test_password",roles:[{ role:"readWrite", db: "test"}]})' # 驗證使用者 kubectl exec -n mongodb ${MONGO_POD_NAME} -- mongo --eval 'db.auth("test_user","test_password")' # 建立Collection kubectl exec -n mongodb ${MONGO_POD_NAME} -- mongo test --eval 'db.createCollection("test_collection")'
4. 配置TriggerAuthentication和ScaledJob
ack-keda通過TriggerAuthentication資源來安全地管理事件來源的串連憑證。ScaledJob是ack-keda的核心資源,用於定義伸縮規則、輪詢間隔以及待執行的Job工作範本。
建立auth.yaml,部署TriggerAuthentication。
例如對於MongoDB事件來源,TriggerAuthentication中的
secretTargetRef欄位會將指定Secret中的串連方式讀取到ack-keda中,完成對MongoDB的登入認證。apiVersion: keda.sh/v1alpha1 kind: TriggerAuthentication metadata: name: mongodb-trigger namespace: mongodb-test spec: secretTargetRef: - parameter: connectionString name: mongodb-secret key: connect --- apiVersion: v1 kind: Secret metadata: name: mongodb-secret namespace: mongodb-test type: Opaque data: connect: bW9uZ29kYjovL3Rlc3RfdXNlcjp0ZXN0X3Bhc3N3b3JkQG1vbmdvZGItc3ZjLm1vbmdvZGIuc3ZjLmNsdXN0ZXIubG9jYWw6MjcwMTcvdGVzdA==部署TriggerAuthentication。
kubectl apply -f auth.yaml部署ScaledJob。
ScaledJob主要用於配置Job模板以及指定查詢的資料庫及查詢運算式等。以下樣本配置的是從test資料庫中的test_collection中,查詢滿足
{"type":"mp4","state":"waiting"}的待轉碼資料。建立scaledJob.yaml。
apiVersion: keda.sh/v1alpha1 kind: ScaledJob metadata: name: mongodb-job namespace: mongodb-test spec: jobTargetRef: # Job模板配置 template: spec: containers: - name: mongo-update image: registry-cn-shanghai.ack.aliyuncs.com/acs/mongo-update:v6 args: - --dataBase=test - --collection=test_collection - --operation=updateMany - --update={"$set":{"state":"finished"}} env: - name: MONGODB_CONNECTION_STRING value: mongodb://test_user:test_password@mongodb-svc.mongodb.svc.cluster.local:27017/test imagePullPolicy: IfNotPresent restartPolicy: Never backoffLimit: 1 pollingInterval: 15 maxReplicaCount: 5 successfulJobsHistoryLimit: 0 failedJobsHistoryLimit: 10 triggers: - type: mongodb metadata: dbName: test # 要查詢的資料庫 collection: test_collection # 要查詢的collection query: '{"type":"mp4","state":"waiting"}' # 會對查詢轉碼類型為mp4且狀態是waiting的資料拉起job進行處理 queryValue: "1" authenticationRef: name: mongodb-triggerquery:配置資料條目。當ack-keda查詢到Mongo資料庫中有滿足該條件的資料條目時,將啟動Job資源。部署ScaledJob。
kubectl apply -f scaledJob.yaml
步驟三:類比事件並觸發Auto Scaling
向
mongodb命名空間中的MongoDB插入5條待處理的資料,類比新任務的到來。MONGO_POD_NAME=$(kubectl get pods -n mongodb -l name=mongodb -o jsonpath='{.items[0].metadata.name}') # 插入5條待轉碼資料 kubectl exec -n mongodb ${MONGO_POD_NAME} -- mongo test --eval 'db.test_collection.insert([ {"type":"mp4","state":"waiting","createTimeStamp":"1610352740","fileName":"My Love"}, {"type":"mp4","state":"waiting","createTimeStamp":"1610350740","fileName":"Harker"}, {"type":"mp4","state":"waiting","createTimeStamp":"1610152940","fileName":"The World"}, {"type":"mp4","state":"waiting","createTimeStamp":"1610390740","fileName":"Mother"}, {"type":"mp4","state":"waiting","createTimeStamp":"1610344740","fileName":"Jagger"} ])'驗證彈性效果。
持續觀察mongodb-test命名空間下的Job資源。
watch kubectl get job -n mongodb-test預期輸出中,系統會建立5個Job,並在任務執行完畢後被自動清理。
NAME                STATUS     COMPLETIONS   DURATION   AGE
mongodb-job-4wxgx   Complete   1/1           3s         10s
mongodb-job-9bs8r   Complete   1/1           3s         10s
mongodb-job-p6pnb   Complete   1/1           3s         10s
mongodb-job-pshkv   Complete   1/1           4s         10s
mongodb-job-t6fs8   Complete   1/1           4s         10s
查詢資料庫中的資料狀態。
MONGO_POD_NAME=$(kubectl get pods -n mongodb -l name=mongodb -o jsonpath='{.items[0].metadata.name}')
kubectl exec -n mongodb ${MONGO_POD_NAME} -- mongo test --eval 'db.test_collection.find({"type":"mp4"}).pretty()'
預期輸出中,所有記錄的
state欄位都已從waiting更新為finished。