このトピックでは、strongSwan デバイスを Alibaba Cloud 上の Elastic Compute Service (ECS) インスタンスに接続する方法について説明します。
strongSwan は、構成が容易で、主要な Linux ディストリビューションにデプロイできる、オープンソースの IPsec ベースの VPN ソリューションです。 strongSwan を使用して、Alibaba Cloud との IPsec 接続を確立できます。
この例では、デュアルトンネルモードの VPN ゲートウェイを使用して、IPsec 接続を確立します。 VPN ゲートウェイがシングルトンネルモードのみをサポートしている場合は、このトピックの「シングルトンネルを使用するように strongSwan デバイスを構成する」セクションを参照してください。
シナリオ
次のシナリオは例です。オンプレミスゲートウェイで strongSwan を構成して、Alibaba Cloud へのデュアルトンネル IPsec 接続を確立できます。

サブネット化
データセンター側
プライベート CIDR ブロック: 172.16.0.0/16
strongSwan デバイス
NIC eth0: 172.16.20.80; NAT マッピングされたインターネット出口 1: 120.XX.XX.202
(オプション) NIC eth1: 172.16.21.248; NAT マッピングされたインターネット出口 47.XX.XX.127
説明NAT が使用されていないシナリオの詳細については、「NIC にパブリック IP アドレスが割り当てられている strongSwan デバイスを構成するにはどうすればよいですか?」を参照してください。
このトピックでは、単一出口 strongSwan デバイスとデュアル出口 strongSwan デバイスの構成例を示します。いずれかのデバイスを使用して、Alibaba Cloud への IPsec 接続を確立できます。
Alibaba Cloud 側
VPC CIDR ブロック: 192.168.0.0/16
vSwitch 1 CIDR ブロック: 192.168.10.0/24
vSwitch 2 CIDR ブロック: 192.168.10.0/24
vSwitch 3 CIDR ブロック: 192.168.40.0/24
vSwitch 4 CIDR ブロック: 192.168.50.0/24
vSwitch 5 CIDR ブロック: 192.168.55.0/24
VPN ゲートウェイ
IPsec アドレス 1: 47.XX.XX.151
IPsec アドレス 2: 47.XX.XX.87
説明VPN ゲートウェイを作成すると、システムは自動的に 2 つの IPsec アドレスを VPN ゲートウェイに割り当てます。
BGP IP アドレス
静的ルーティングに加えて、このトピックでは、BGP 動的ルーティングを使用する IPsec 接続を確立するように strongSwan デバイスを構成する方法についても説明します。 BGP 動的ルーティングを使用しない場合は、このセクションをスキップしてください。次の表に、BGP 動的ルーティングの CIDR ブロックを示します。
リソース | トンネル | BGP トンネル CIDR ブロック | BGP IP アドレス | BGP ローカル ASN |
VPN ゲートウェイ | トンネル 1 | 169.254.10.0/30 説明 VPN ゲートウェイでは、各トンネルの CIDR ブロックは一意である必要があります。 | 169.254.10.1 | 65535 |
トンネル 2 | 169.254.20.0/30 | 169.254.20.1 | ||
strongSwan デバイス | トンネル 1 | 169.254.10.0/30 | 169.254.10.2 | 65530 |
トンネル 2 | 169.254.20.0/30 | 169.254.20.2 |
VPN 構成
2 つのトンネルは同じ構成を使用します。 Alibaba Cloud と strongSwan デバイスの VPN 構成は、各トンネルで同じである必要があります。
事前共有鍵: ChangeMe***
IKE 構成
IKE バージョン: ikev2
ネゴシエーションモード: main
暗号化アルゴリズム: aes
認証アルゴリズム: sha1
DH グループ: group2
SA ライフタイム (秒): 86400
IPsec 構成:
暗号化アルゴリズム: aes
認証アルゴリズム: sha1
DH グループ: group2
SA ライフタイム (秒): 86400
Alibaba Cloud での準備
インターネット出口の数とルーティング方法に基づいて、Alibaba Cloud での構成を完了します。
2 つの出口と BGP 動的ルーティング
VPC をデュアルトンネルモードでデータセンターに接続し、BGP 動的ルーティングを有効にする注:カスタマーゲートウェイを作成するIPsec 接続を作成するヒント:を参照して、「VPN ゲートウェイの作成」、「カスタマーゲートウェイの作成」、「IPsec 接続の作成」、および「BGP 自動ルートアドバタイズメントの有効化」の手順を完了します。
strongSwan デバイスには 2 つのインターネット出口 IP アドレスがあります。したがって、2 つのカスタマーゲートウェイを作成する必要があります。
IPsec 接続を作成するときは、出口 1 にはトンネル 1 を、出口 2 にはトンネル 2 を選択します。この例では、宛先ルーティングモードが選択されています。
2 つの出口と静的ルーティング
VPC をデュアルトンネルモードでデータセンターに接続する/wp-json/wp/v2/commentsヒント:"Hello, World!"VPN ゲートウェイルーティングを設定するを参照して、「VPN ゲートウェイの作成」、「カスタマーゲートウェイの作成」、「IPsec 接続の作成」、および「VPN ゲートウェイルーティングの構成」の手順を完了します。
strongSwan デバイスには 2 つのインターネット出口 IP アドレスがあります。したがって、2 つのカスタマーゲートウェイを作成する必要があります。
IPsec 接続を作成するときは、出口 1 にはトンネル 1 を、出口 2 にはトンネル 2 を選択します。この例では、宛先ルーティングモードが選択されています。
1 つの出口と BGP 動的ルーティング
デュアルトンネルモードで VPC をデータセンターに接続し、BGP 動的ルーティングを有効にするを参照して、[VPN ゲートウェイの作成]、[カスタマーゲートウェイの作成]、[IPsec 接続の作成]、[BGP 自動ルート広告の有効化] の手順を完了します。
strongSwan デバイスには 1 つのインターネット出口 IP アドレスしかありません。したがって、1 つのカスタマーゲートウェイを作成するだけで済みます。
IPsec 接続を作成するときは、同じカスタマーゲートウェイの 2 つのトンネルを選択します。この例では、宛先ルーティングモードが選択されています。
1 つの出口と静的ルーティング
VPC をデュアルトンネルモードでデータセンターに接続するVPN ゲートウェイを作成するカスタマーゲートウェイを作成するIPsec 接続を作成するVPN ゲートウェイルーティングを設定するを参照して、「VPN ゲートウェイの作成」、「カスタマーゲートウェイの作成」、「IPsec 接続の作成」、および「VPN ゲートウェイルーティングの構成」の手順を完了します。
strongSwan デバイスには 1 つのインターネット出口 IP アドレスしかありません。したがって、1 つのカスタマーゲートウェイを作成するだけで済みます。
IPsec 接続を作成するときは、保護されたデータフローを構成します。同じカスタマーゲートウェイの 2 つのトンネルを選択します。
ローカル CIDR ブロックには、VPC の CIDR ブロック (192.168.0.0/16) を入力します。
ピア CIDR ブロックには、データセンターの CIDR ブロック (172.16.0.0/16) を入力します。
IPsec 接続が転送ルーターに関連付けられているシナリオでは、この方法は推奨されません。 BGP 動的ルーティングを使用することをお勧めします。
[strongSwan デバイス]を構成する
次の例では、CentOS Stream 9 64 ビットを実行する strongSwan デバイスを使用します。他のオペレーティングシステムの詳細については、strongSwan ドキュメントを参照してください。
1. 許可ファイアウォールポリシーを構成する
UDP ポート 500 および UDP ポート 4500 で ESP (IP プロトコル 50) の許可ポリシーを構成します。
iptables -I INPUT -p 50 -j ACCEPT
iptables -I INPUT -p udp --dport 500 -j ACCEPT
iptables -I INPUT -p udp --dport 4500 -j ACCEPT
2. トラフィック転送を有効にする
echo 1 > /proc/sys/net/ipv4/ip_forward上記のコマンドは一時的なコマンドです。 strongSwan デバイスを再起動した後、コマンドを再度実行する必要があります。 strongSwan デバイスのトラフィック転送を永続的に有効にするには、次の手順を実行します。
3. strongSwan をインストールする
dnf install epel-release -y
dnf install strongswan-5.9.10 -y
4. トンネルを構成する
2 つの出口 - 静的ルーティングと BGP 動的ルーティング
デュアル出口は XFRM インターフェースに基づいています。 XFRM インターフェースを使用するには、strongSwan バージョンが 5.8.0 以後、Linux カーネルバージョンが 4.19 以後、iproute2 バージョンが 5.1.0 以後である必要があり、カーネルは XFRM モジュールをサポートしている必要があります。 lsmod | grep xfrm が表示されない場合、XFRM インターフェースはサポートされていません。詳細については、Linux 上の XFRM インターフェースを参照してください。
IPsec アドレス 1 からのアクセスが eth0 を経由し、IPsec アドレス 2 からのアクセスが eth1 を経由するようにルートを構成します。
ip route add 47.XX.XX.151 via 172.16.20.253 dev eth0  #172.16.20.253 は eth0 のプライベートゲートウェイアドレスです。
ip route add 47.XX.XX.87 via 172.16.21.253 dev eth1   #172.16.20.253 は eth1 のプライベートゲートウェイアドレスです。
次の 2 つの IPsec アドレスに ping できることを確認します。
ping 47.XX.XX.151
ping 47.XX.XX.87
IPsec トンネルを確立するための 2 つの仮想ネットワークインターフェースを作成します。
ip link add ipsec0 type xfrm dev eth0 if_id 42 # トンネル 1 の XFRM 仮想ネットワークインターフェースを作成します。インターフェース ID は 42、パブリックインターフェース eth0 は基盤となるインターフェースです。 ip link add ipsec1 type xfrm dev eth1 if_id 43 # トンネル 2 の XFRM 仮想ネットワークインターフェースを作成します。インターフェース ID は 43、パブリックインターフェース eth1 は基盤となるインターフェースです。 ip link set ipsec0 up # トンネル 1 の XFRM 仮想ネットワークインターフェースを起動します。 ip link set ipsec1 up # トンネル 2 の XFRM 仮想ネットワークインターフェースを起動します。重要仮想ネットワークインターフェースを作成するための上記の構成は一時的な構成です。 strongSwan デバイスを再起動した後、構成を再度追加し、
sudo systemctl restart strongswan;swanctl --load-allコマンドを実行する必要があります。コマンドには root 権限が必要です。システム起動時に実行されるスクリプトを構成して、strongSwan デバイスの再起動後に仮想ネットワークインターフェースを自動的に作成するには、次の手順を実行します。strongSwan 構成ファイルを修正します。
元の strongSwan 構成ファイルをバックアップします。
mv /etc/strongswan/swanctl/swanctl.conf /etc/strongswan/swanctl/swanctl.conf.bakstrongSwan 構成ファイルを作成します。
vi /etc/strongswan/swanctl/swanctl.conf詳細については、「WordPress REST API ハンドブック」をご参照ください。
重要静的ルートを使用する予定の場合は、構成ファイルで
updown = /root/connect_1.shコマンドとupdown = /root/connect_2.shコマンドを有効にします。connections { vco1 { // IPsec-VPN トンネル 1 の VPN 構成。 version = 2 // IKE バージョン。Alibaba Cloud でトンネル 1 に構成されているものと同じである必要があります。値 2 は IKEv2 を示します。 local_addrs = 172.16.20.80 // 最初のローカル NIC の IP アドレス。 remote_addrs = 47.XX.XX.151 // トンネル 1 のリモートアドレスを、Alibaba Cloud 上のトンネル 1 の VPN ゲートウェイアドレス(IPsec アドレス 1)に設定します。 dpd_delay = 10 rekey_time = 84600 // トンネル 1 の SA ライフタイム。Alibaba Cloud 上のトンネル 1 の IKE 構成で指定されているものと同じである必要があります。 over_time = 1800 proposals = aes-sha1-modp1024 // トンネル 1 の暗号化アルゴリズム、認証アルゴリズム、および DH グループ。Alibaba Cloud 上のトンネル 1 の IKE 構成で指定されているものと同じである必要があります。group2 の値は modp1024 を示します。 encap = yes local { auth = psk // データセンターの認証アルゴリズムを PSK に設定します。 id = 120.XX.XX.202 // 最初のローカル出口のパブリック IP アドレス。この値は、トンネル 1 の RemoteId と同じである必要があります。 } remote { auth = psk // VPC の認証アルゴリズムを PSK に設定します。 id = 47.XX.XX.151 // Alibaba Cloud 側の IPsec アドレス 1。この値は、トンネル 1 の LocalId と同じである必要があります。 } children { vco_child1 { local_ts = 0.0.0.0/0 // Alibaba Cloud 上の宛先ベースルートモードの保護対象データフローの CIDR ブロックを 0.0.0.0/0 に指定します。 remote_ts = 0.0.0.0/0 // Alibaba Cloud 上の宛先ベースルートモードの保護対象データフローの CIDR ブロックを 0.0.0.0/0 に指定します。 mode = tunnel rekey_time = 85500 life_time = 86400 // トンネル 1 の SA ライフタイム。Alibaba Cloud 上のトンネル 1 の IPsec 構成で指定されているものと同じである必要があります。 dpd_action = restart start_action = start close_action = start esp_proposals = aes-sha1-modp1024 // トンネル 1 の暗号化アルゴリズム、認証アルゴリズム、および DH グループ。Alibaba Cloud 上のトンネル 1 の IPsec 構成で指定されているものと同じである必要があります。group2 の値は modp1024 を示します。 if_id_out = 42 // トンネル 1 の XFRM 仮想ネットワークインターフェースを、トンネル 1 の出口ポートと入口ポートとして使用することを指定します。 if_id_in = 42 //updown = /root/connect_1.sh // /root/connect_1.sh スクリプトを実行して、トンネル 1 の UP/DOWN ステータスに基づいてルーティングを構成します。このパラメーターは、静的ルーティングを使用する場合にのみ必要です。 } } } vco2 { // IPsec-VPN トンネル 2 の VPN 構成。 version = 2 // IKE バージョン。Alibaba Cloud でトンネル 2 に構成されているものと同じである必要があります。値 2 は IKEv2 を示します。 local_addrs = 172.16.21.248 // 2 番目のローカル NIC の IP アドレス。 remote_addrs = 47.XX.XX.127 // トンネル 2 のリモートアドレスを、Alibaba Cloud 上のトンネル 2 の VPN ゲートウェイアドレス(IPsec アドレス 2)に設定します。 dpd_delay = 10 rekey_time = 84600 // トンネル 2 の SA ライフサイクル。Alibaba Cloud 上のトンネル 2 の IKE 構成で指定されているものと同じである必要があります。 over_time = 1800 // proposals = aes-sha1-modp1024 // トンネル 2 の暗号化アルゴリズム、認証アルゴリズム、および DH グループ。Alibaba Cloud 上のトンネル 2 の IKE 構成で指定されているものと同じである必要があります。group2 の値は modp1024 を示します。 encap = yes local { auth = psk // データセンターの認証アルゴリズムを PSK に設定します。 id = 47.XX.XX.87 // 2 番目のローカル出口のパブリック IP アドレス。この値は、トンネル 2 の RemoteId と同じである必要があります。 } remote { auth = psk // VPC の認証アルゴリズムを PSK に設定します。 id = 47.XX.XX.127 // Alibaba Cloud 側の IPsec アドレス 2。この値は、トンネル 2 の LocalId と同じである必要があります。 } children { vco_child2 { local_ts = 0.0.0.0/0 // Alibaba Cloud 上の宛先ベースルートモードの保護対象データフローの CIDR ブロックを 0.0.0.0/0 に指定します。 remote_ts = 0.0.0.0/0 // Alibaba Cloud 上の宛先ベースルートモードの保護対象データフローの CIDR ブロックを 0.0.0.0/0 に指定します。 mode = tunnel rekey_time = 85500 life_time = 86400 // トンネル 2 の SA ライフタイム。Alibaba Cloud 上のトンネル 1 の IPsec 構成で指定されているものと同じである必要があります。 dpd_action = restart start_action = start close_action = start esp_proposals = aes-sha1-modp1024 // トンネル 2 の暗号化アルゴリズム、認証アルゴリズム、および DH グループ。Alibaba Cloud 上のトンネル 2 の IPsec 構成で指定されているものと同じである必要があります。group2 の値は modp1024 を示します。 if_id_out = 43 // トンネル 2 の XFRM 仮想ネットワークインターフェースを、トンネル 2 の出口ポートと入口ポートとして使用することを指定します。 if_id_in = 43 //updown = /root/connect_2.sh // /root/connect_2.sh スクリプトを実行して、トンネル 2 の UP/DOWN ステータスに基づいてルーティングを構成します。このパラメーターは、静的ルーティングを使用する場合にのみ必要です。 } } } } secrets { ike-vco1 { secret = ChangeMe*** // トンネル 1 の PSK。Alibaba Cloud でトンネル 1 に構成されているものと同じである必要があります。 } ike-vco2 { secret = ChangeMe*** // トンネル 2 の PSK。Alibaba Cloud でトンネル 2 に構成されているものと同じである必要があります。 } }
WordPress の使い方については、WordPress の使い方 をご覧ください。
sudo systemctl restart strongswan
swanctl --load-all
// すべての swanctl セキュリティアソシエーションを表示します。
watch swanctl --list-sas
ヒント: ブラウザの開発者ツールを使用して、REST API のレスポンスを確認できます。

ルートを構成します。
必要に応じてルーティングメソッドを選択します。
BGP 動的ルーティング
説明strongSwan デバイスの再起動後、BGP 構成を再度追加します。
次のコマンドを実行して、BGP IP アドレスを構成します。
ip address add 169.254.10.2/30 dev ipsec0
ip address add 169.254.20.2/30 dev ipsec1
frr をインストールします。
yum install -y frrvi /etc/frr/daemonsコマンドを実行して、BGP 動的ルーティングを有効にします。iを押して、編集モードに入ります。yesに bgpd パラメーターの値を変更して、BGP 動的ルーティングを有効にします。Escを押して終了し、:wqと入力して変更を保存します。frr 機能を実行します。
systemctl enable frr
systemctl restart frr
BGP 構成を追加します。
次のコマンドを実行して、構成インターフェイスにアクセスします。
vtysh次のコマンドを実行して、構成モードに入ります。
config terminalBGP 構成を追加します。
次のコマンドを実行して、以下のアドレスを実際のアドレスに置き換えます。
「169.254.10.1」と「169.254.20.1」を、Alibaba Cloud 側の実際のトンネル BGP IP アドレスに置き換えます。
「65535」を、VPN ゲートウェイの実際の BGP ASN に置き換えます。
「172.16.20.0/24」と「172.16.21.0/24」を、データセンターの実際の CIDR ブロックに置き換えます。
route-map allow-all permit 1
exit

router bgp 65530
 bgp router-id 169.254.10.2
 neighbor 169.254.10.1 remote-as 65535
 neighbor 169.254.10.1 timers 10 30
 neighbor 169.254.20.1 remote-as 65535
 neighbor 169.254.20.1 timers 10 30

 address-family ipv4 unicast
  network 172.16.20.0/24
  network 172.16.21.0/24
  neighbor 169.254.10.1 soft-reconfiguration inbound
  neighbor 169.254.10.1 route-map allow-all in
  neighbor 169.254.10.1 route-map allow-all out
  neighbor 169.254.20.1 soft-reconfiguration inbound
  neighbor 169.254.20.1 route-map allow-all in
  neighbor 169.254.20.1 route-map allow-all out
  maximum-paths 32
 exit-address-family
exit
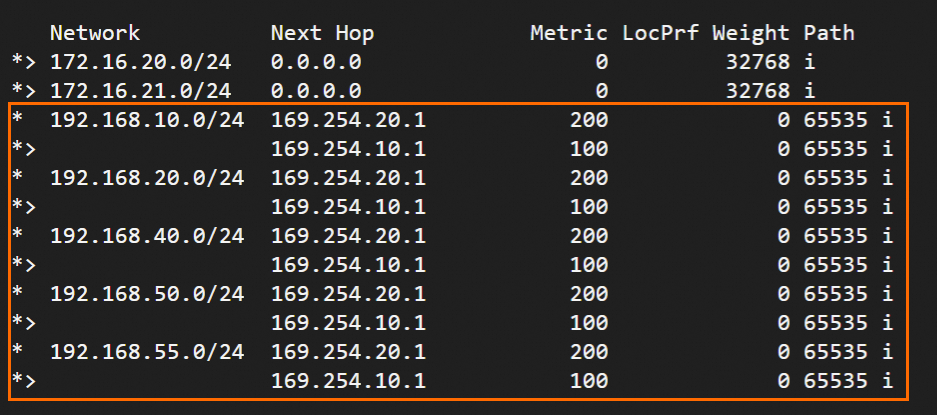
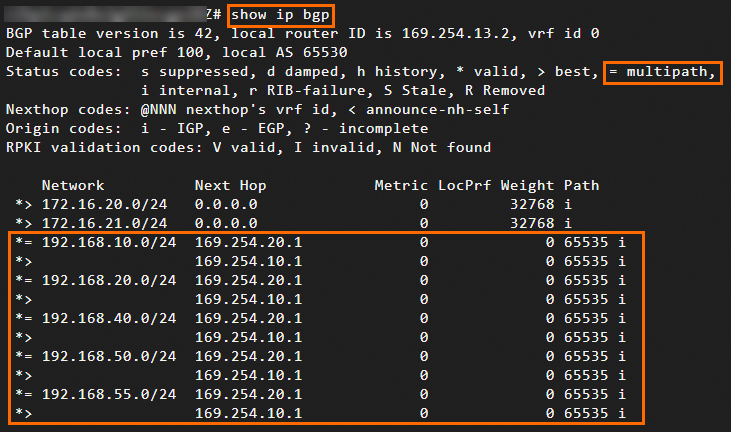
exitを実行して終了し、show ip bgpを実行して BGP ルートを表示します。strongSwan デバイスは VPC からルートを学習しました。データセンターと VPC は通信できます。

静的ルーティング
strongSwan 用の 2 つのスクリプトを作成し、トラフィックを転送するルートを構成します。
/root/connect_1.sh を作成および編集します。
vi /root/connect_1.sh次のスクリプトを追加して保存します。
#!/usr/bin/env bash
if [ x"$PLUTO_VERB" == "xup-client" ]; then
	echo "ip route add 192.168.0.0/16 dev ipsec0" >> /root/vpn_route.log;ip route add 192.168.0.0/16 dev ipsec0 metric 100
elif [ x"$PLUTO_VERB" == "xdown-client" ]; then
	echo "ip route del 192.168.0.0/16 dev ipsec0" >> /root/vpn_route.log;ip route del 192.168.0.0/16 dev ipsec0 metric 100
fi
スクリプトの目的: トンネル 1 のステータスが UP の場合、CIDR ブロックが 192.168.0.0/16 の VPC にデータセンターからトラフィックを送信するルートを、トンネル 1 の XFRM 仮想ネットワークインターフェイス経由で追加します。さらに、このルートのメトリック値を 100 に設定して、トンネル 2 の XFRM 仮想ネットワークインターフェイスを指すルートよりも高い優先順位を割り当てます。トンネル 1 のステータスが DOWN の場合は、ルートを撤回します。
/root/connect_2.sh を作成および編集します。
vi /root/connect_2.sh次のスクリプトを追加して保存します。
#!/usr/bin/env bash
if [ x"$PLUTO_VERB" == "xup-client" ]; then
	echo "ip route add 192.168.0.0/16 dev ipsec1" >> /root/vpn_route.log;ip route add 192.168.0.0/16 dev ipsec1 metric 101
elif [ x"$PLUTO_VERB" == "xdown-client" ]; then
	echo "ip route del 192.168.0.0/16 dev ipsec1" >> /root/vpn_route.log;ip route del 192.168.0.0/16 dev ipsec1 metric 101
fi
スクリプトの目的: トンネル 2 のステータスが UP の場合、CIDR ブロックが 192.168.0.0/16 の VPC にデータセンターからトラフィックを送信するルートを、トンネル 2 の XFRM 仮想ネットワークインターフェイス経由で追加します。さらに、このルートのメトリック値を 101 に設定して、トンネル 1 の XFRM 仮想ネットワークインターフェイスを指すルートよりも低い優先順位を割り当てます。トンネル 2 のステータスが DOWN の場合は、ルートを撤回します。
次のコマンドを実行して、スクリプトを実行可能にします。
sudo chmod +x /root/connect_1.sh
sudo chmod +x /root/connect_2.sh
strongSwan プロセスを再起動します。
sudo systemctl restart strongswan次のコマンドを実行して、構成ファイルの変更が有効になっているかどうかを確認します。
route -n
1 つの出口 - BGP 動的ルーティング
BGP 動的ルーティングは XFRM インターフェースに基づいています。XFRM インターフェースを使用するには、strongSwan のバージョンが 5.8.0 以降、Linux カーネルのバージョンが 4.19 以降、iproute2 のバージョンが 5.1.0 以降である必要があり、カーネルが XFRM モジュールをサポートしている必要があります。lsmod | grep xfrm が表示されない場合、XFRM インターフェースはサポートされていません。詳細については、「Linux 上の XFRM インターフェース」をご参照ください。
IPsec-VPN トンネルを確立するために、2 つの仮想ネットワークインターフェースを作成します。
ip link add ipsec0 type xfrm dev eth0 if_id 42 # インターフェース ID 42、パブリックインターフェース eth0 を基盤となるインターフェースとして、トンネル 1 用の XFRM 仮想ネットワークインターフェースを作成します。 ip link add ipsec1 type xfrm dev eth0 if_id 43 # インターフェース ID 43、パブリックインターフェース eth0 を基盤となるインターフェースとして、トンネル 2 用の XFRM 仮想ネットワークインターフェースを作成します。 ip link set ipsec0 up # トンネル 1 用の XFRM 仮想ネットワークインターフェースを起動します。 ip link set ipsec1 up # トンネル 2 用の XFRM 仮想ネットワークインターフェースを起動します。重要仮想ネットワークインターフェースを作成するための前述の構成は一時的な構成です。 strongSwan デバイスを再起動した後、構成を再度追加し、
sudo systemctl restart strongswan;swanctl --load-allコマンドを実行する必要があります。コマンドには root 権限が必要です。 strongSwan デバイスの再起動後に仮想ネットワークインターフェースを自動的に作成するためにシステム起動時に実行されるスクリプトを構成する場合は、次の手順を実行します。strongSwan 構成ファイルを修正します。
元の strongSwan 構成ファイルをバックアップします。
mv /etc/strongswan/swanctl/swanctl.conf /etc/strongswan/swanctl/swanctl.conf.bakstrongSwan 構成ファイルを作成します。
vi /etc/strongswan/swanctl/swanctl.conf例に基づいて次の構成を追加して保存します。
connections {
   vco1 {                            # IPsec-VPN トンネル 1 の VPN 構成。
      version = 2                    # IKE バージョン。Alibaba Cloud 上のトンネル 1 に構成されているものと同じである必要があります。値 2 は IKEv2 を示します。
      local_addrs  = 172.16.20.80    # eth0 のプライベート IP アドレス。
      remote_addrs = 47.XX.XX.151    # トンネル 1 のリモートアドレスを、Alibaba Cloud 上のトンネル 1 の VPN ゲートウェイアドレス(IPsec アドレス 1)に設定します。
      dpd_delay = 10
      rekey_time = 84600             # トンネル 1 の SA ライフタイム。Alibaba Cloud 上のトンネル 1 の IKE 構成で指定されているものと同じである必要があります。
      over_time = 1800
      proposals = aes-sha1-modp1024  # トンネル 1 の暗号化アルゴリズム、認証アルゴリズム、および DH グループ。Alibaba Cloud 上のトンネル 1 の IKE 構成で指定されているものと同じである必要があります。値 group2 は modp1024 を示します。
      encap = yes

      local {
         auth = psk                  # データセンターの認証アルゴリズムを PSK に設定します。
         id = 120.XX.XX.202          # eth0 のインターネット出口の IP アドレス。この値は、トンネル 1 の RemoteId と同じである必要があります。
      }
      remote {
         auth = psk                  # VPC の認証アルゴリズムを PSK に設定します。
         id = 47.XX.XX.151           # Alibaba Cloud 側の IPsec アドレス 1。この値は、トンネル 1 の LocalId と同じである必要があります。
      }
      children {
         vco_child1 {
            local_ts  = 0.0.0.0/0    # Alibaba Cloud 上の宛先ベースのルートモードの保護されたデータフローの CIDR ブロックを 0.0.0.0/0 に指定します。
            remote_ts = 0.0.0.0/0    # Alibaba Cloud 上の宛先ベースのルートモードの保護されたデータフローの CIDR ブロックを 0.0.0.0/0 に指定します。
            mode = tunnel
            rekey_time = 85500
            life_time = 86400        # トンネル 1 の SA ライフタイム。Alibaba Cloud 上のトンネル 1 の IPsec 構成で指定されているものと同じである必要があります。
            dpd_action = restart
            start_action = start
            close_action = start
            esp_proposals = aes-sha1-modp1024   # トンネル 1 の暗号化アルゴリズム、認証アルゴリズム、および DH グループ。Alibaba Cloud 上のトンネル 1 の IPsec 構成で指定されているものと同じである必要があります。値 group2 は modp1024 を示します。

            if_id_out = 42           # トンネル 1 の XFRM 仮想ネットワークインターフェースを、トンネル 1 の出口ポートと入口ポートとして使用することを指定します。
            if_id_in = 42
         }
      }
   }
  vco2 {                             # IPsec-VPN トンネル 2 の VPN 構成。
      version = 2                    # IKE バージョン。Alibaba Cloud 上のトンネル 2 に構成されているものと同じである必要があります。値 2 は IKEv2 を示します。
      local_addrs  = 172.16.20.80    # eth0 のプライベート IP アドレス。
      remote_addrs = 47.XX.XX.87     # トンネル 2 のリモートアドレスを、Alibaba Cloud 上のトンネル 2 の VPN ゲートウェイアドレス(IPsec アドレス 2)に設定します。
      dpd_delay = 10
      rekey_time = 84600             # トンネル 2 の SA ライフサイクル。Alibaba Cloud 上のトンネル 2 の IKE 構成で指定されているものと同じである必要があります。
      over_time = 1800               #
      proposals = aes-sha1-modp1024  # トンネル 2 の暗号化アルゴリズム、認証アルゴリズム、および DH グループ。Alibaba Cloud 上のトンネル 2 の IKE 構成で指定されているものと同じである必要があります。値 group2 は modp1024 を示します。
      encap = yes

      local {
         auth = psk                  # データセンターの認証アルゴリズムを PSK に設定します。
         id = 120.XX.XX.202          # eth0 のインターネット出口の IP アドレス。この値は、トンネル 2 の RemoteId と同じである必要があります。
      }
      remote {
         auth = psk                  # VPC の認証アルゴリズムを PSK に設定します。
         id = 47.XX.XX.87            # Alibaba Cloud 側の IPsec アドレス 2。この値は、トンネル 2 の LocalId と同じである必要があります。
      }
      children {
         vco_child2 {
            local_ts  = 0.0.0.0/0    # Alibaba Cloud 上の宛先ベースのルートモードの保護されたデータフローの CIDR ブロックを 0.0.0.0/0 に指定します。
            remote_ts = 0.0.0.0/0    # Alibaba Cloud 上の宛先ベースのルートモードの保護されたデータフローの CIDR ブロックを 0.0.0.0/0 に指定します。
            mode = tunnel
            rekey_time = 85500
            life_time = 86400        # トンネル 2 の SA ライフタイム。Alibaba Cloud 上のトンネル 1 の IPsec 構成で指定されているものと同じである必要があります。
            dpd_action = restart
            start_action = start
            close_action = start
            esp_proposals = aes-sha1-modp1024     # トンネル 2 の暗号化アルゴリズム、認証アルゴリズム、および DH グループ。Alibaba Cloud 上のトンネル 2 の IPsec 構成で指定されているものと同じである必要があります。値 group2 は modp1024 を示します。
            if_id_out = 43           # トンネル 2 の XFRM 仮想ネットワークインターフェースを、トンネル 2 の出口ポートと入口ポートとして使用することを指定します。
            if_id_in = 43

         }
      }
   }
}

secrets {
   ike-vco1 {
      secret = ChangeMe***            # トンネル 1 の PSK。Alibaba Cloud 上のトンネル 1 に構成されているものと同じである必要があります。
   }
   ike-vco2 {
      secret = ChangeMe***            # トンネル 2 の PSK。Alibaba Cloud 上のトンネル 2 に構成されているものと同じである必要があります。
   }
}
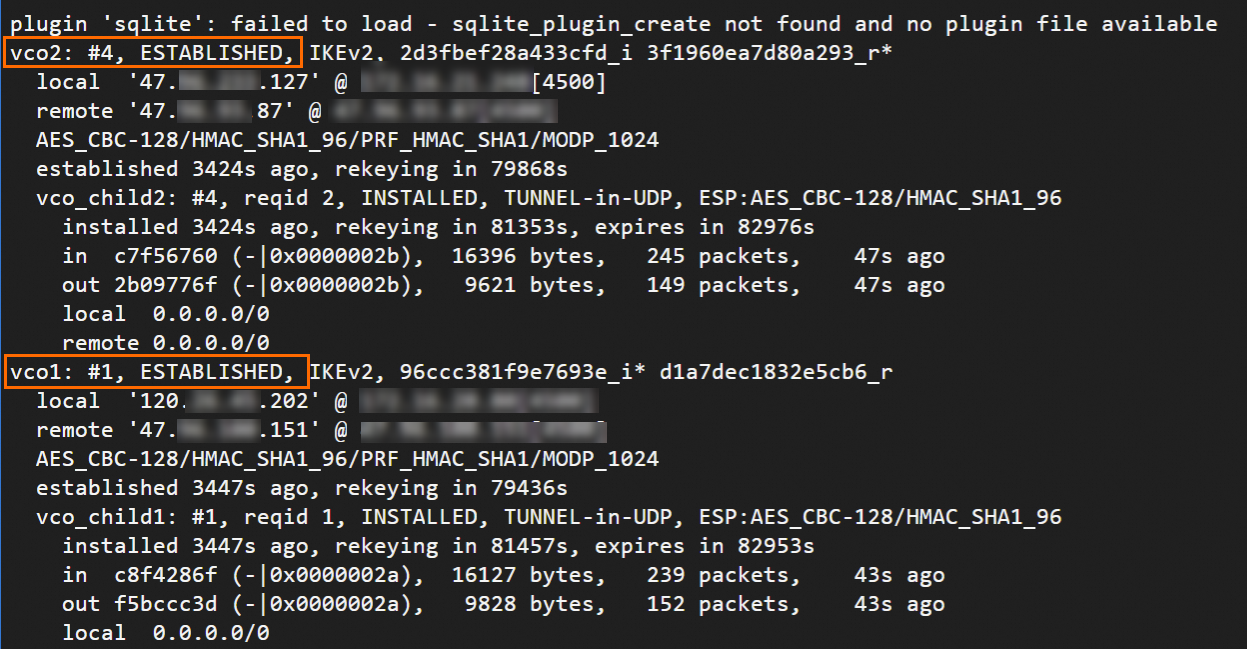
strongSwan プロセスを再起動し、トンネル [ステータス] を表示します。
sudo systemctl restart strongswan
swanctl --load-all
watch swanctl --list-sas
次の図では、strongSwan デバイスと VPN ゲートウェイは IPsec-VPN 接続を介して接続されています。それらが通信できるように、ルーティングを構成する必要があります。

BGP 動的ルーティングを構成します。
説明strongSwan デバイスの再起動後、BGP 構成を再度追加します。
次のコマンドを実行して、BGP IP アドレスを構成します。
ip address add 169.254.10.2/30 dev ipsec0
ip address add 169.254.20.2/30 dev ipsec1
frr をインストールします。
yum install -y frrvi /etc/frr/daemonsコマンドを実行して、BGP 動的ルーティングを有効にします。iヒント: を押して、[編集モード] に入ります。 パラメーターの値をyesに変更して、BGP 動的ルーティングを有効にします。Escを押して終了し、:wqと入力して変更を保存します。frr 機能を実行します。
systemctl enable frr
systemctl restart frr
BGP 構成を追加します。
次のコマンドを実行して、構成インターフェースにアクセスします。
vtysh次のコマンドを実行して、構成モードに入ります。
config terminalBGP 構成を追加します。
次のコマンドを実行して、次のアドレスを実際のアドレスに置き換えます。
「169.254.10.1」と「169.254.20.1」を、Alibaba Cloud 側の実際のトンネル BGP IP アドレスに置き換えます。
「65535」を、VPN ゲートウェイの実際の BGP ASN に置き換えます。
「172.16.20.0/24」と「172.16.21.0/24」を、データセンターの実際の CIDR ブロックに置き換えます。
route-map allow-all permit 1
exit

router bgp 65530
 bgp router-id 169.254.10.2
 neighbor 169.254.10.1 remote-as 65535
 neighbor 169.254.10.1 timers 10 30
 neighbor 169.254.20.1 remote-as 65535
 neighbor 169.254.20.1 timers 10 30

 address-family ipv4 unicast
  network 172.16.20.0/24
  network 172.16.21.0/24
  neighbor 169.254.10.1 soft-reconfiguration inbound
  neighbor 169.254.10.1 route-map allow-all in
  neighbor 169.254.10.1 route-map allow-all out
  neighbor 169.254.20.1 soft-reconfiguration inbound
  neighbor 169.254.20.1 route-map allow-all in
  neighbor 169.254.20.1 route-map allow-all out
  maximum-paths 32
 exit-address-family
exit
exitを実行して終了し、show ip bgpを実行して BGP ルートを表示します。strongSwan デバイスは VPC からルートを学習しました。データセンターと VPC は通信できます。

1 つの出口 - 静的ルーティングと BGP 動的ルーティング
このメソッドを使用し、Alibaba Cloud 上のアクティブなトンネルがダウンした場合、トラフィックはスタンバイ トンネルに自動的にフェイルオーバーされます。これにより、サービス中断が発生する可能性があります。 /proc/net/xfrm_stat ファイル内の XfrmInTmplMismatch の値を確認することで、トラフィックがスタンバイ トンネルにフェイルオーバーされたかどうかを判断できます。 また、/etc/strongswan/swanctl/swanctl.conf ファイル内のスタンバイ トンネルの priority 値を変更して、データセンターからクラウドへのトラフィックをスタンバイ トンネル経由で優先的にルーティングすることもできます。
元の strongSwan 構成ファイルをバックアップします。
mv /etc/strongswan/swanctl/swanctl.conf /etc/strongswan/swanctl/swanctl.conf.bakstrongSwan 構成ファイルを作成します。
vi /etc/strongswan/swanctl/swanctl.conf例 セクションに基づいて、次の構成を追加して保存します。
connections {
   vco1 {                            # IPsec-VPN トンネル 1 の VPN 構成。
      version = 2                    # IKE バージョン。Alibaba Cloud 上のトンネル 1 に構成されているものと同じである必要があります。値 2 は IKEv2 を示します。
      local_addrs  = 172.16.20.80      # eth0 のプライベート IP アドレス。
      remote_addrs = 47.XX.XX.151      # トンネル 1 のリモートアドレスを、Alibaba Cloud 上のトンネル 1 の VPN ゲートウェイアドレス(IPsec アドレス 1)に設定します。
      dpd_delay = 10
      rekey_time = 84600             # トンネル 1 の SA ライフタイム。Alibaba Cloud 上のトンネル 1 の IKE 構成で指定されているものと同じである必要があります。
      over_time = 1800
      proposals = aes-sha1-modp1024  # トンネル 1 の暗号化アルゴリズム、認証アルゴリズム、および DH グループ。Alibaba Cloud 上のトンネル 1 の IKE 構成で指定されているものと同じである必要があります。値 group2 は modp1024 を示します。
      encap = yes

      local {
         auth = psk                   # データセンターの認証アルゴリズムを PSK に設定します。
         id = 120.XX.XX.202            # ローカルインターネット出口の IP アドレス。この値は、トンネル 1 の RemoteId と同じである必要があります。
      }
      remote {
         auth = psk                  # VPC の認証アルゴリズムを PSK に設定します。
         id = 120.XX.XX.202            # Alibaba Cloud 側の IPsec アドレス 1。この値は、トンネル 1 の LocalId と同じである必要があります。
      }
      children {
         vco_child1 {
            local_ts  = 172.16.0.0/16   # ローカルで保護されたデータフロー。データセンターのプライベート CIDR ブロック(172.16.0.0/16)を入力します。
            remote_ts = 192.168.0.0/16  # Alibaba Cloud 側で保護されたデータフロー。VPC CIDR ブロック(192.168.0.0/16)を入力します。
            mode = tunnel
            rekey_time = 85500
            life_time = 86400        # トンネル 1 の SA ライフタイム。Alibaba Cloud 上のトンネル 1 の IPsec 構成で指定されているものと同じである必要があります。
            dpd_action = restart
            start_action = start
            close_action = start
            esp_proposals = aes-sha1-modp1024   # トンネル 1 の暗号化アルゴリズム、認証アルゴリズム、および DH グループ。Alibaba Cloud 上のトンネル 1 の IPsec 構成で指定されているものと同じである必要があります。値 group2 は modp1024 を示します。
            priority = 1                        # トンネル 1 の優先度。トンネル 1 を優先します。
         }
      }
   }
  vco2 {                             # IPsec-VPN トンネル 2 の VPN 構成。
      version = 2                    # IKE バージョン。Alibaba Cloud 上のトンネル 2 に構成されているものと同じである必要があります。値 2 は IKEv2 を示します。
      local_addrs  = 172.16.20.80    # eth0 のプライベート IP アドレス。
      remote_addrs = 47.XX.XX.87     # トンネル 2 のリモートアドレスを、Alibaba Cloud 上のトンネル 2 の VPN ゲートウェイアドレス(IPsec アドレス 2)に設定します。
      dpd_delay = 10
      rekey_time = 84600             # トンネル 2 の SA ライフタイム。Alibaba Cloud 上のトンネル 2 の IKE 構成で指定されているものと同じである必要があります。
      over_time = 1800
      proposals = aes-sha1-modp1024  # トンネル 2 の暗号化アルゴリズム、認証アルゴリズム、および DH グループ。Alibaba Cloud 上のトンネル 2 の IKE 構成で指定されているものと同じである必要があります。値 group2 は modp1024 を示します。
      encap = yes

      local {
         auth = psk                  # データセンターの認証アルゴリズムを PSK に設定します。
         id = 120.XX.XX.202          # ローカルインターネット出口のパブリック IP アドレス。この値は、トンネル 2 の RemoteId と同じである必要があります。
      }
      remote {
         auth = psk                  # VPC の認証アルゴリズムを PSK に設定します。
         id = 47.XX.XX.87            # Alibaba Cloud 側の IPsec アドレス 2。この値は、トンネル 2 の LocalId と同じである必要があります。
      }
      children {
         vco_child2 {
            local_ts  = 172.16.0.0/16     # ローカルで保護されたデータフロー。データセンターのプライベート CIDR ブロック(172.16.0.0/16)を入力します。
            remote_ts =  192.168.0.0/16   # Alibaba Cloud 側で保護されたデータフロー。VPC CIDR ブロック(192.168.0.0/16)を入力します。
            mode = tunnel
            rekey_time = 85500
            life_time = 86400        # トンネル 2 の SA ライフタイム。Alibaba Cloud 上のトンネル 2 の IPsec 構成で指定されているものと同じである必要があります。
            dpd_action = restart
            start_action = start
            close_action = start
            esp_proposals = aes-sha1-modp1024     # トンネル 2 の暗号化アルゴリズム、認証アルゴリズム、および DH グループ。Alibaba Cloud 上のトンネル 2 の IPsec 構成で指定されているものと同じである必要があります。値 group2 は modp1024 を示します。
            priority = 2                          # トンネル 2 の優先度。トンネル 1 より低くなります。
         }
      }
   }
}

secrets {
   ike-vco1 {
      secret = ChangeMe***            # トンネル 1 の PSK。Alibaba Cloud 上のトンネル 1 に構成されているものと同じである必要があります。
   }
   ike-vco2 {
      secret = ChangeMe***            # トンネル 2 の PSK。Alibaba Cloud 上のトンネル 2 に構成されているものと同じである必要があります。
   }
}
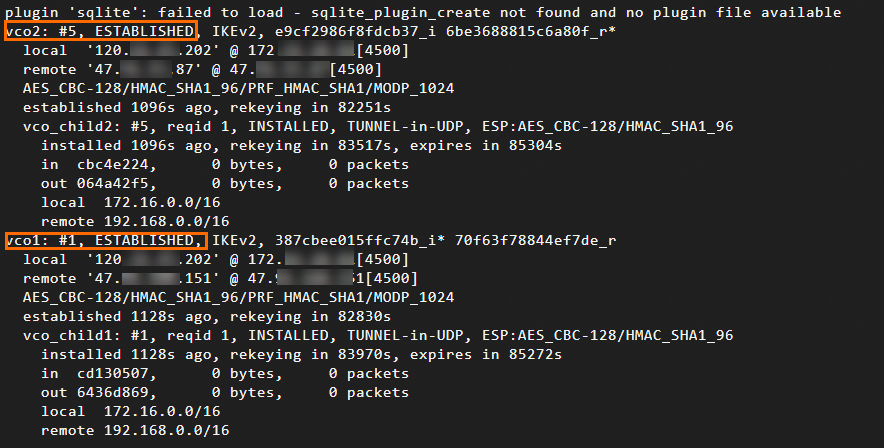
strongSwan プロセスを再起動し、トンネルステータスを表示します。
sudo systemctl restart strongswan
swanctl --load-all
watch swanctl --list-sas
次の図では、strongSwan デバイスと VPN ゲートウェイが IPsec 接続を介して接続されています。データセンターと VPC は通信できます。

5. 接続性と高可用性をテストする。
詳細については、「投稿の更新」をご参照ください。
データセンターのクライアントから VPC 内の ECS インスタンスに
pingを実行した後にエコー応答パケットが返された場合、接続は確立されています。ping <VPC 内の ECS インスタンスの IP アドレス>IPsec-VPN 接続の高可用性をテストします。
接続が確立されている場合は、アクティブなトンネルを閉じます。
アクティブなトンネルの事前共有鍵を変更することで、アクティブなトンネルを閉じることができます。トンネルの両側で異なる事前共有鍵を使用すると、アクティブなトンネルは閉じられます。
アクティブなトンネルが閉じられた後、
pingコマンドを実行して接続性を確認できます。pingを ECS インスタンスに実行した後にエコー応答パケットが返された場合、これはアクティブなトンネルがダウンした後にスタンバイ トンネルが引き継いだことを示します。
よくある質問
IPsec 接続が転送ルータに関連付けられている場合、strongSwan デバイスをどのように構成すればよいですか?
前の手順を参照して、strongSwan デバイスを構成します。 BGP 動的ルーティングを使用することをお勧めします。 strongSwan デバイスで VPC から学習したルートを表示できます。 IPsec 接続の 2 つのトンネルは、ECMP ルーティングに使用されます。 
strongSwan を使用して作成された IPsec 接続で IKEv1 はサポートされていますか?
はい。VPN ゲートウェイは、VPC の異なるゾーンにデプロイされている Elastic Compute Service (ECS) インスタンスのトラフィックを転送できます。
IKEv1 を使用するには、/etc/strongswan/swanctl/swanctl.conf ファイルを構成するときに version = 1 を指定します。
保護されたデータフローを指定するにはどうすればよいですか?
保護されたデータフローを指定するには、/etc/strongswan/swanctl/swanctl.conf ファイルを構成するときに、次のコードブロックに示すように CIDR ブロックを追加します。 Alibaba Cloud 側の IPsec 接続に対して保護されたデータフローが指定されていることを確認してください。
データセンター側または Alibaba Cloud 側で複数の CIDR ブロックを指定する必要がある場合、strongSwan デバイスと Alibaba Cloud 側の IPsec 接続は IKEv2 を使用する必要があります。
children {
         vco_child1 {
            local_ts  = 192.168.20.0/24,192.168.50.0/24    // データセンターの CIDR ブロック。
            remote_ts = 10.0.0.0/16    // VPC の CIDR ブロック。
         }
}
NIC にパブリック IP アドレスが割り当てられている strongSwan デバイスを構成するにはどうすればよいですか?
このような非 NAT シナリオでは、strongSwan デバイスで表示される IP アドレスはパブリック IP アドレスです。 /etc/strongswan/swanctl/swanctl.conf ファイルの各トンネルの local_addrs フィールドを対応するパブリック IP アドレスに変更する必要があります。
connections {
   vco1 {
      local_addrs  = 1.1.XX.XX     // strongSwan デバイスの NIC に割り当てられたパブリック IP アドレス。
   }
}
シングルトンネルモードを構成するにはどうすればよいですか?
VPN ゲートウェイがシングルトンネル IPsec 接続のみをサポートしている場合は、VPN ゲートウェイをスペックアップしてデュアルトンネルモードを有効にすることをお勧めします。 デュアルトンネルモードの IPsec 接続は、ゾーン間のディザスタリカバリをサポートしています。 これにより、ネットワークの高可用性が効果的に向上します。 詳細については、「VPN ゲートウェイをスペックアップしてデュアルトンネルモードを有効にする」をご参照ください。

