このトピックでは、テーブルの作成時にデータソースとして Object Storage Service (OSS) + API を選択する方法について説明します。
プロセスは、次の 2 つのステップで構成されます。
OSS をアクティブにする
OSS + API データソースを追加する
ステップ 1:OSS をアクティブにする
1. サービスをアクティブにする
OSS をアクティブにします。 OSS と OpenSearch サービスが同じリージョンにあることを確認してください。
2. バケットを作成する
ファイルを OSS にアップロードする前に、ファイルを保存するバケットを作成します。 詳細については、「バケットを作成する」をご参照ください。
OSS 管理コンソール > バケット > バケットの作成 に移動します。
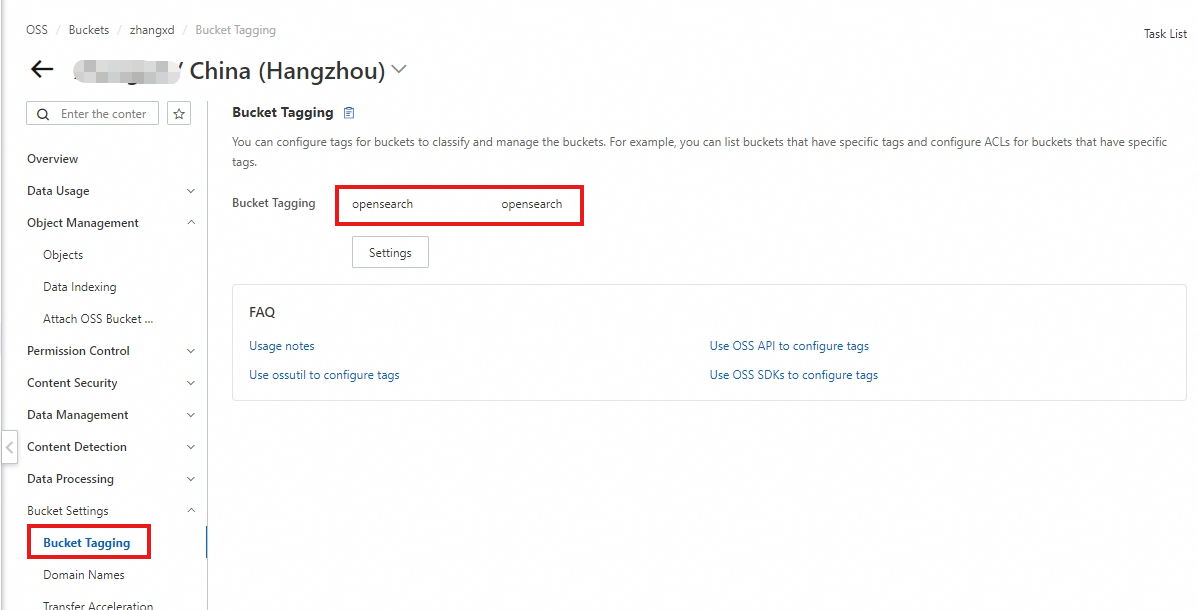
バケットを作成したら、バケットに OpenSearch タグを追加します。
バケット設定 > バケットタグ > タグの作成 に移動します。
3. OSS 形式を設定する
A. OSS ファイル形式
ファイルがインデックス構築のデータソースとして使用できるように、次のことを確認してください。
ファイルは UTF-8 でエンコードされています。
ファイルデータは HA3 形式または JSON 形式に変換されます。
I. JSON 形式の構成
1 行に 1 つの JSON データ。
'\n' で改行します。 1 つの JSON 内に存在することはできません。
ディレクトリの下に他のファイルはありません。
JSON のタイプは文字列です。 インデックスの構築中に、スキーマによって変換されます。
例:
{"field_double": ["100.0", "221.123", "500.3333333"], "field_int32": ["100", "200", "300"], "title": "Huawei Mate 9 Kirin 960 chip Leica dual camera", "color": "Red", "empty_int32": "", "price": "3599", "CMD": "add", "nid": "1", "gather_cn_str": "", "desc": ["str1", "str2", "str3"], "brand": "Huawei", "size": "5.9","__subdocs__":[{"sub_pk":"100","sub_field1":"200","sub_field2":["100","200","300"]},{"sub_pk":"200","sub_field1":"200","sub_field2":["100","200","300"]}]}
{"field_double": ["100.0", "221.123", "500.3333333", "100.0", "221.123", "500.3333333"], "field_int32": ["100", "200", "300", "100", "200", "300"], "title": "Huawei/Huawei P10 Plus full network phone", "color": "Blue", "empty_int32": "", "price": "4388", "CMD": "add", "nid": "2", "gather_cn_str": "colorBlue", "desc": ["str1", "str2", "str3", "str1", "str2", "str3"], "brand": "Huawei", "size": "5.5","__subdocs__":[{"sub_pk":"100","sub_field1":"200","sub_field2":["100","200","300"]},{"sub_pk":"200","sub_field1":"200","sub_field2":["100","200","300"]}]}
Ii. HA3 形式の構成
standard_sample.data という名前の完全なデータファイルを例にとります。
CMD=add^_
PK=12345321^_
url=http://www.aliyun.com/index.html^_
title=Alibaba Cloud Computing Co., Ltd.^_
body=xxxxxx xxx^_
time=3123423421^_
multi_value_field=1234^]324^]342^_
bidwords=mp3^\price=35.8^Ptime=13867236221^]mp4^\price=32.8^Ptime=13867236221^_
^^
CMD=delete^_
PK=12345321^_CMD=add^_
PK=12345321^_
url=http://www.aliyun.com/index.html^_
title=Alibaba Cloud Computing Co., Ltd.^_
body=xxxxxx xxx^_
time=3123423421^_
multi_value_field=1234^]324^]342^_
bidwords=mp3^\price=35.8^Ptime=13867236221^]mp4^\price=32.8^Ptime=13867236221^_
^^
CMD=delete^_
PK=12345321^_
ファイル区切り記号の定義:上記のデータファイルには、add と delete の 2 つのコマンドが含まれています。 各コマンドは複数の行で構成され、各行はキーと値のペアです。 コマンドは '^^\n' で区切られ、キーと値のペアは '^_\n' で区切られ、複数の値は '^]' で区切られます。 次の表に、ファイル区切り記号を示します。
C++ エンコーディング | ASCII ASCII 16 進数 | 説明 | (emacs/vi) での表示形式 | emacs での入力方法 | vi での入力方法 |
"\x1F\n" | 1F0A | キーと値の区切り記号 | ^_ (改行が続く) | C-q C-7 | C-v C-7 |
"\x1E\n" | 1E0A | コマンド区切り記号 | ^^ (改行が続く) | C-q C-6 | C-v C-6 |
"\x1D" | 1D | 複数値の区切り記号 | ^] | C-q C-5 | C-v C-5 |
"\x1C" | 1C | セクション重みフラグ | ^\ | C-q C-4 | C-v C-4 |
"\x1D" | 1D | セクション区切り記号 | ^] | C-q C-5 | C-v C-5 |
"\x03" | 03 | サブドキュメントフィールド区切り記号 | ^C | C-q C-c | C-v C-c |
コマンド形式の定義
追加コマンド:インデックスに新しいコンテンツを追加するために使用します。 追加コマンドの最初の行は CMD=add でなければならず、その後にドキュメントのフィールドが続きます。 フィールドの順序は、スキーマのフィールドの順序と同じにすることができます。 すべてのフィールドをフィールドに指定する必要があります。
CMD=add^_
PK=12345321^_
url=http://www.aliyun.com/index.html^_
title=Alibaba Cloud Computing Co., Ltd.^_
body=xxxxxx xxx^_
time=3123423421^_
multi_value_field=1234^]324^]342^_
bidwords=mp3^\price=35.8^Ptime=13867236221^]mp4^\price=32.8^Ptime=13867236221^_
^^CMD=add^_
PK=12345321^_
url=http://www.aliyun.com/index.html^_
title=Alibaba Cloud Computing Co., Ltd.^_
body=xxxxxx xxx^_
time=3123423421^_
multi_value_field=1234^]324^]342^_
bidwords=mp3^\price=35.8^Ptime=13867236221^]mp4^\price=32.8^Ptime=13867236221^_
^^
削除コマンド:インデックスから指定されたコンテンツを削除するために使用します。 削除コマンドの最初の行は CMD=delete でなければならず、その後にインデックススキーマでプライマリキーとして定義されたフィールドとパーティションハッシュに使用されるフィールドが続きます。 2 つのフィールドが同じ場合は、1 つのフィールドのみを表示する必要があります。
CMD=delete^_
PK=12345321^_
^^CMD=delete^_
PK=12345321^_
^^
B. バケットにファイルをアップロードする
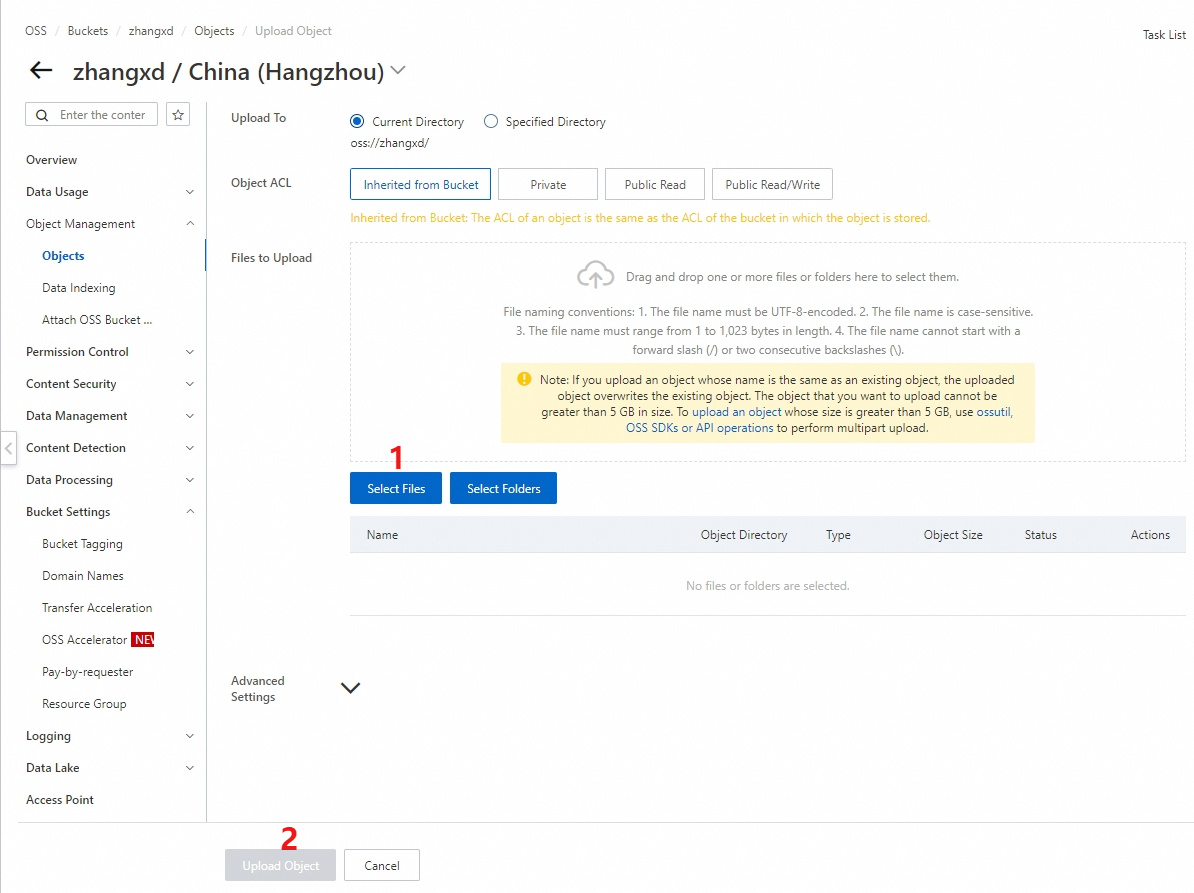
バケットのコントロールページに戻ります。 左側のナビゲーションウィンドウで、オブジェクト管理 → オブジェクト → [オブジェクトのアップロード] を選択します。
[オブジェクトのアップロード] セクションで、ファイルをスキャンする方法を選択します。 アップロードするコンテンツを選択し、[オブジェクトのアップロード] をクリックしてファイルのアップロードを完了します。
ステップ 2:OSS + API データソースを追加する
インスタンスを購入する:詳細については、「Vector Search Edition インスタンスを購入する」をご参照ください。
1. 基本的なテーブル情報
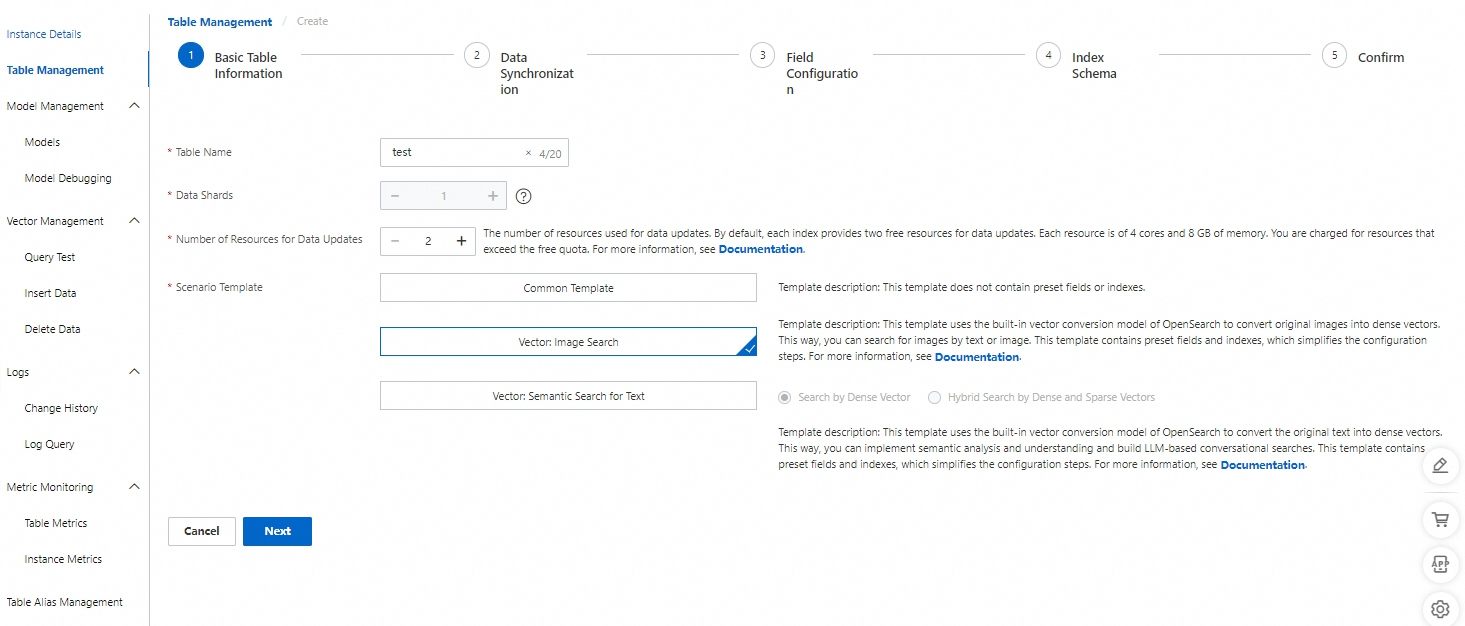
[インスタンスリスト] で Vector Search Edition インスタンスを見つけます。 [アクション] 列で、[管理] をクリックします。 左側のナビゲーションウィンドウで、[テーブル管理] > [テーブルの追加] を選択します。
基本的なテーブル情報を入力したら、[次へ] をクリックします。
説明:
テーブル名:テーブル名をカスタマイズします。
データシャードの数:正の整数を入力します(最大:256)。 これは、フルビルド速度と単一クエリのパフォーマンスを向上させるために使用されます。
データ更新リソースの数:データ更新に使用されるリソースの数。 各インデックスはデフォルトで 2 つの無料の 4 コア 8 GB 更新リソースを提供します。 無料枠を超えるリソースは有料になります。 詳細については、Vector Search Edition 国際サイト課金ドキュメント をご参照ください。
シナリオテンプレート:3 つのテンプレートが利用可能です。1. 一般テンプレート、2. ベクター:画像検索テンプレート、3. ベクター:テキストセマンティック検索テンプレート。
2. データ同期
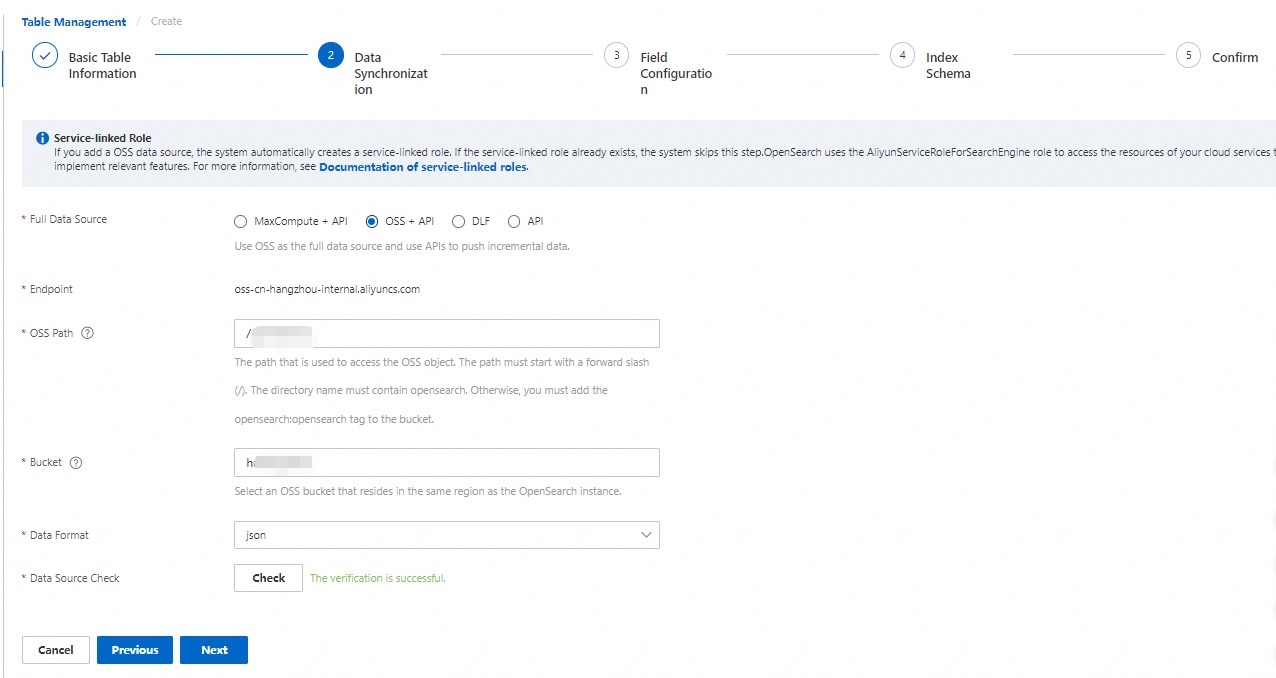
[フルデータソース] に「Object Storage Service (OSS) + API」を選択し、その他の構成を完了します。 [データソースの検証] 後、[次へ] をクリックします。
説明:
[OSS パス]:OSS ファイルにアクセスするためのパス。 / で始まり、?、=、& 文字を含めることはできません。 ファイルをルートディレクトリに配置することはできません。 フォルダに配置してから、パスを入力する必要があります。
[OSS バケット]:OSS バケットの名前。
[データ形式]:転送されるファイルは HA3 または JSON 形式である必要があります。 そうしないと、ファイルデータを正常に転送できません。
[データソースの検証]:検証後、次のステップに進むことができます。
3. フィールド構成
Vector Search Edition は、シナリオテンプレートに基づいて関連フィールドをプリセットし、フルデータソースからフィールドを自動的にインポートします。 [フィールド構成] と [データ前処理 - 構成] 設定を完了したら、[次へ] をクリックします。
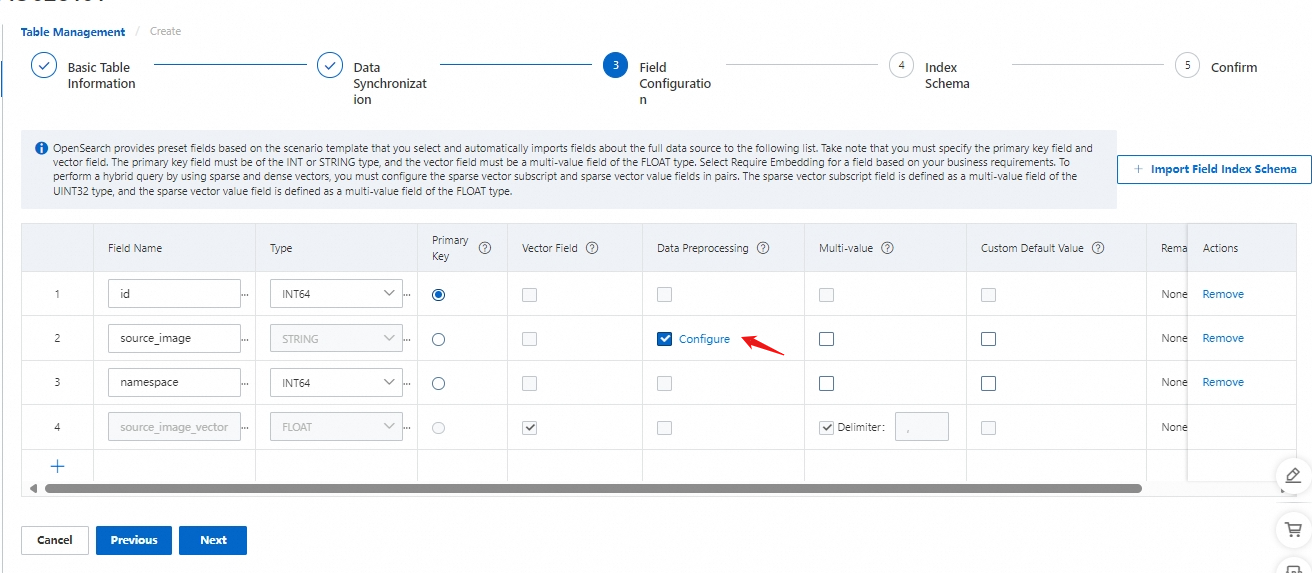
フィールドの意味:
id (プライマリキー)
source_image (ソースイメージ)
namespace (名前空間)
source_image_vector (ソースイメージベクター)
説明:
プライマリキーフィールドとベクターフィールドは必須です。 プライマリキーフィールドの場合、[タイプ] パラメーターを整数型、または STRING 型に設定します。 [プライマリキー] 列のオプションボタンを選択します。 ベクターフィールドの場合、[タイプ] パラメーターを FLOAT に設定し、[ベクターフィールド] 列のチェックボックスを選択します。
ベクターフィールドは、デフォルトでは複数値 FLOAT タイプです。 複数値の区切り記号はデフォルトの区切り記号としてコンマを使用しますが、カスタムの複数値の区切り記号を入力することもできます。
データにフィールドがないか空の場合、システムはデフォルト値を自動的に補完します。 数値型の場合、デフォルト値は 0 です。 STRING 型の場合、デフォルト値は空の文字列です。 デフォルト値をカスタマイズできます。
データ前処理が必要 - 構成:[構成] をクリックして、source_image フィールドのデータ前処理構成インターフェイスを入力します。
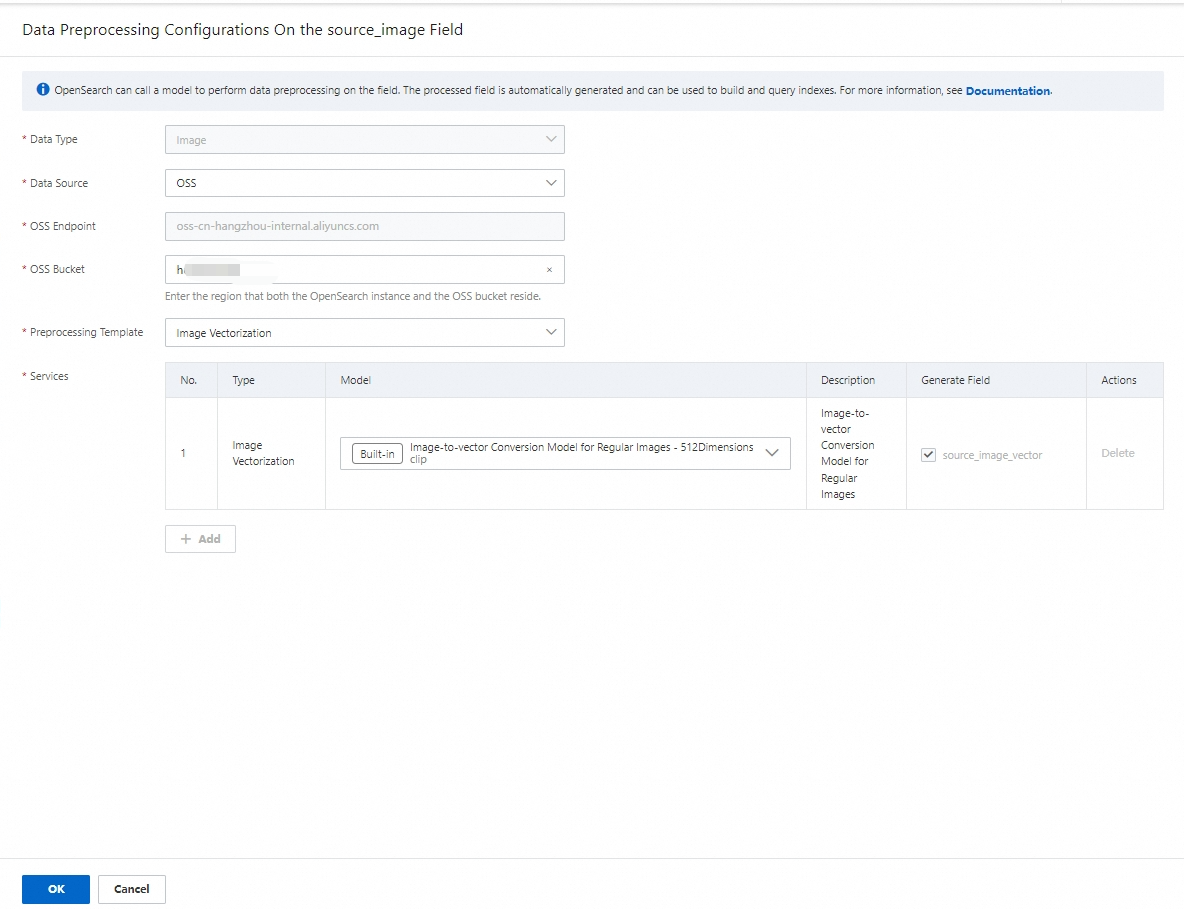
データソース:オプションは、OSS オブジェクトストレージと Base64 エンコーディングです。 この例では、OSS オブジェクトストレージを選択します。
OSS オブジェクトストレージ:OSS パスを入力する必要があります。これは、画像を OSS のフォルダに保存し、OSS から直接インポートすることを意味します。
Base64 エンコーディング:これは、最初に画像をエンコードしてからデータベースに保存するか、API メソッドを使用して直接送信する必要があることを意味します。
前処理テンプレート:前処理されるデータのタイプ (テキストまたは画像) に基づいて、異なるテンプレートが表示されます。 この例では画像データを前処理しているため、前処理テンプレートは (1. 画像のベクトル化、2. OCR 画像テキスト認識、3. OCR 画像テキスト認識 + 画像のベクトル化) です。 このデモでは、[画像のベクトル化] 前処理テンプレートを選択します。
サービスリスト:
前処理テンプレートを選択すると、テンプレートの下にサービスリストが表示されます。 テンプレートで使用されているモデルのタイプを表示します。
利用可能なモデルソース:
組み込みモデル:これらのモデルは種類と数が少ないですが、無料で呼び出すことができます。
カスタムモデル: ユーザーは、Vector Search Edition ページの [モデルリスト] > [カスタムモデル] で [モデルの追加] 操作を行うことで、ニーズに応じてモデルをカスタマイズできます。詳細については、「カスタムモデル」をご参照ください。
4. インデックススキーマ
インデックススキーマを構成し、[次へ] をクリックします。
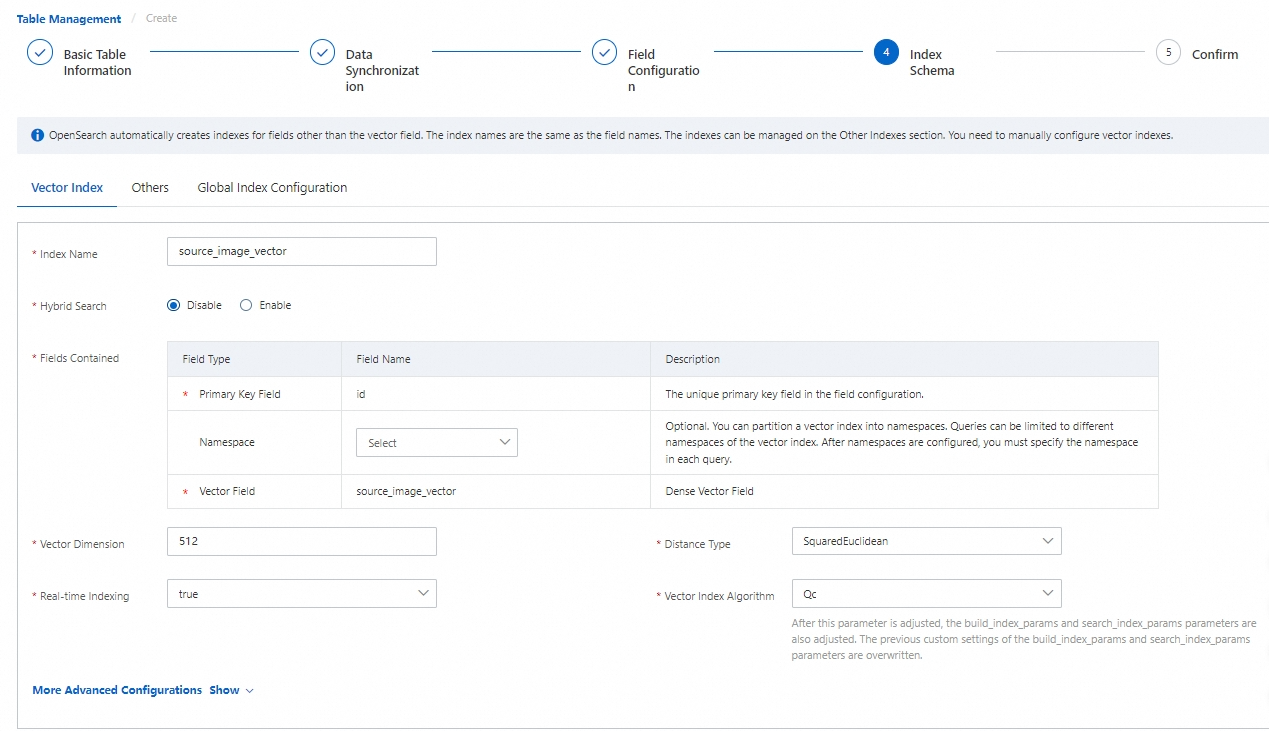
説明:
含まれるフィールド:プライマリキーフィールドとベクターフィールドを入力する必要があります。 名前空間フィールドはオプションで、空のままにすることができます。
要件に基づいて、ベクター次元、リアルタイムインデックス作成、距離タイプ、およびベクターインデックスアルゴリズムを構成します。
[詳細設定]:デフォルトパラメータを直接使用するか、要件に応じて調整します。 詳細については、「一般的なベクターインデックス構成」をご参照ください。 [インデックススキーマ] ページの設定を完了したら、[次へ] をクリックして [作成の確認] ページに進みます。
5. 確認
[確認] をクリックします。 2 分間待ちます。 [インスタンスリスト] ページに戻ります。 インスタンスの状態が「[通常]」になったら、[アクション - クエリテスト] から後続の検索とテストに進みます。