Virtual Private Cloud (VPC) トポロジーは、リソース トポロジーとルート トポロジーに分類されます。VPC トポロジーは、VPC にデプロイされたリソースエンティティ間のルートと相関のトポロジーを表示します。VPC トポロジーでは、関連するネットワークインスタンスの基本情報を表示し、これらのインスタンスを分析し、到達可能性を分析できます。
リソース トポロジー
VPC リソース トポロジーは、VPC にデプロイされたさまざまなリソースエンティティ間の関係を表示します。VPC リソース トポロジーは、プライベートネットワークアクセス、インターネット経由の通信、ネットワーク間の通信、ユーザーネットワークアクセスなど、複数のシナリオに適用されます。VPC トポロジーは、シナリオに基づいて VPC ネットワークを可視化します。
左側のナビゲーションウィンドウで、 を選択します。
[VPC トポロジー] ページで、[リージョン] と [VPC ID] を選択し、[トポロジーの生成] をクリックします。次に、VPC のリソース トポロジーを表示します。
[設定] セクションでは、以下の操作を実行できます:
[色の反転] を選択して、エンティティアイコンの色を変更します。
[インスタンス ID を表示] を選択して、エンティティアイコンの下にインスタンス ID を表示します。
[リージョン区切り線] を選択して、リソース トポロジーをリージョン別に表示します。
VPC のリージョン内のゾーンを選択して、そのゾーンのリソース トポロジーを表示します。
リソースエンティティをクリックして、エンティティツールバーで インスタンスの分析 や 到達可能性の分析 などの操作を実行します。
ルート トポロジー
VPC ルート トポロジーは、リアルタイムのルーティング構成に基づいて VPC 内のルートを表示します。これらのルートは、インターネットアクセスやネットワーク間の通信に使用されます。
VPC ルート トポロジーは、vSwitch、ルートテーブル、およびネクストホップエンティティで構成されます。次の表に、VPC ルート トポロジーに表示できるネクストホップエンティティのタイプを示します。
ネクストホップタイプ | 関連操作 |
IPv4 ゲートウェイ | |
NAT ゲートウェイ | |
VPC ピアリング接続。ネクストホップ接続は VPC ピアリング接続を示し、ネクストホップエンティティはピア VPC を示します。 | |
トランジットルーター | |
VPN ゲートウェイ | |
Elastic Compute Service (ECS) インスタンス | |
Elastic Network Interface (ENI) | |
ルーターインターフェイス (仮想ボーダールータへ) | |
ルーターインターフェイス (VPC へ) |
NIS コンソールにログインします。
左側のナビゲーションウィンドウで、 を選択します。
[VPC トポロジー] ページで、[リージョン] と [VPC ID] を選択し、[トポロジーの生成] をクリックします。
[ルートトポロジー] をクリックして、各ノードを接続するパスを表示します。
説明ルート トポロジーでは、エンティティは次のルールに従って集約されます。
デフォルトでは、複数の vSwitch が同じルートテーブルに関連付けられている場合、ゾーン内の vSwitch は集約されます。
デフォルトでは、同じタイプのネクストホップエンティティの数が 1 より大きい場合、それらは集約されます。エンティティコレクションを展開し、特定のエンティティをクリックしてルーティング状況を表示できます。
表示される内容は、選択したエンティティによって異なります。
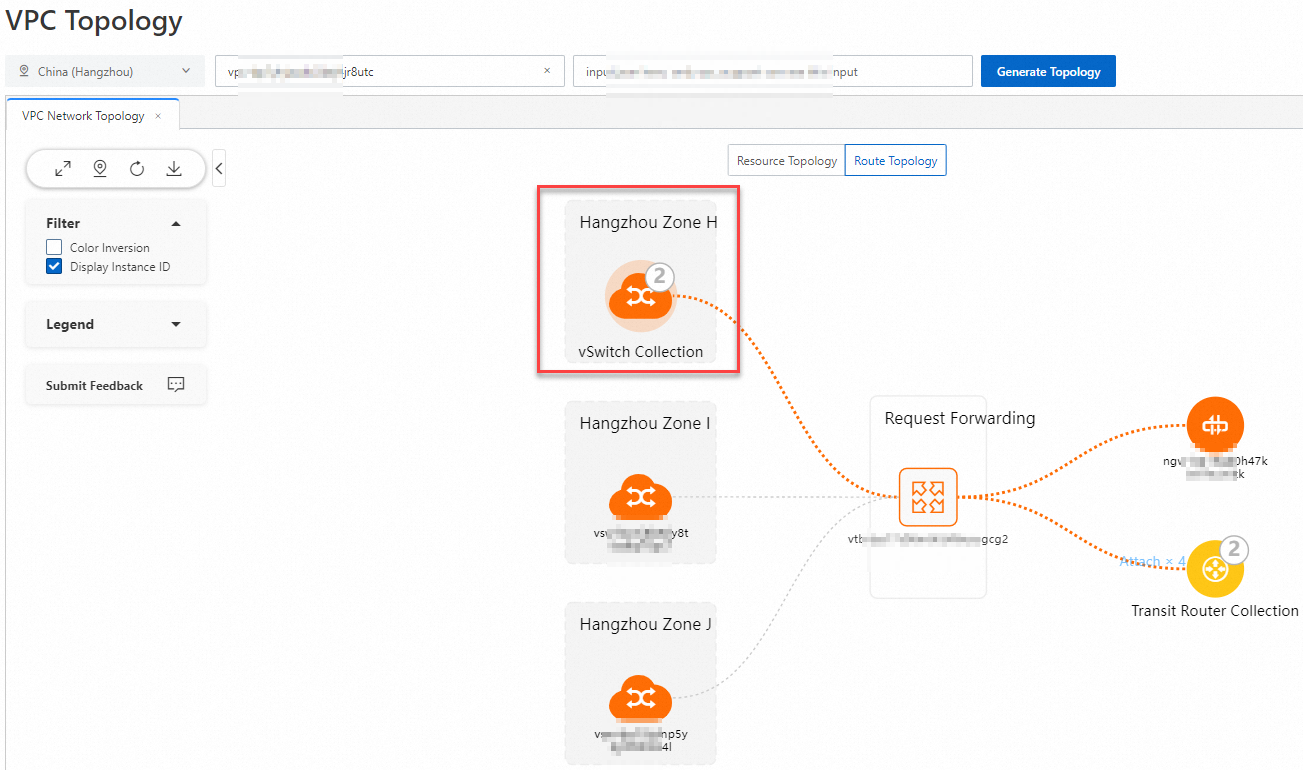
vSwitch: ポインターを vSwitch に移動すると、vSwitch に関連付けられたルートテーブルと、ネクストホップへのすべての到達可能なパスを表示できます。
ルートテーブル: ポインターをルートテーブルに移動すると、そのルートテーブルに関連付けられているすべての vSwitch と、有効になっているすべてのルートを表示できます。
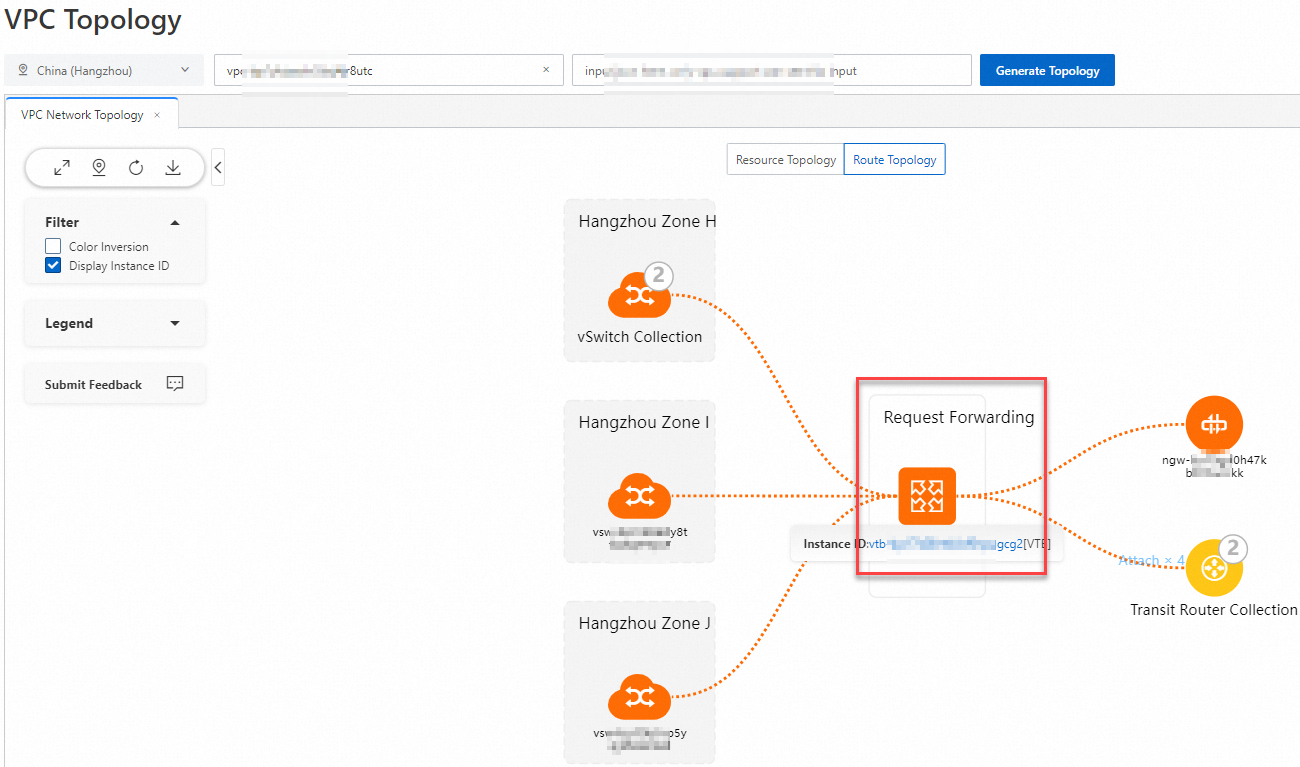
ネクストホップエンティティ: ポインターをネクストホップエンティティに移動すると、そのネクストホップエンティティにトラフィックがルーティングされるすべての vSwitch を表示できます。ネクストホップエンティティをクリックすると、そのネクストホップエンティティからのトラフィックの宛先となるすべての CIDR ブロックを表示できます。ネクストホップエンティティがコレクションモードの場合、コレクションをクリックしてエンティティリストを表示し、エンティティツールバーをクリックして インスタンスの分析 や トラフィックの分析 などの操作を実行できます。
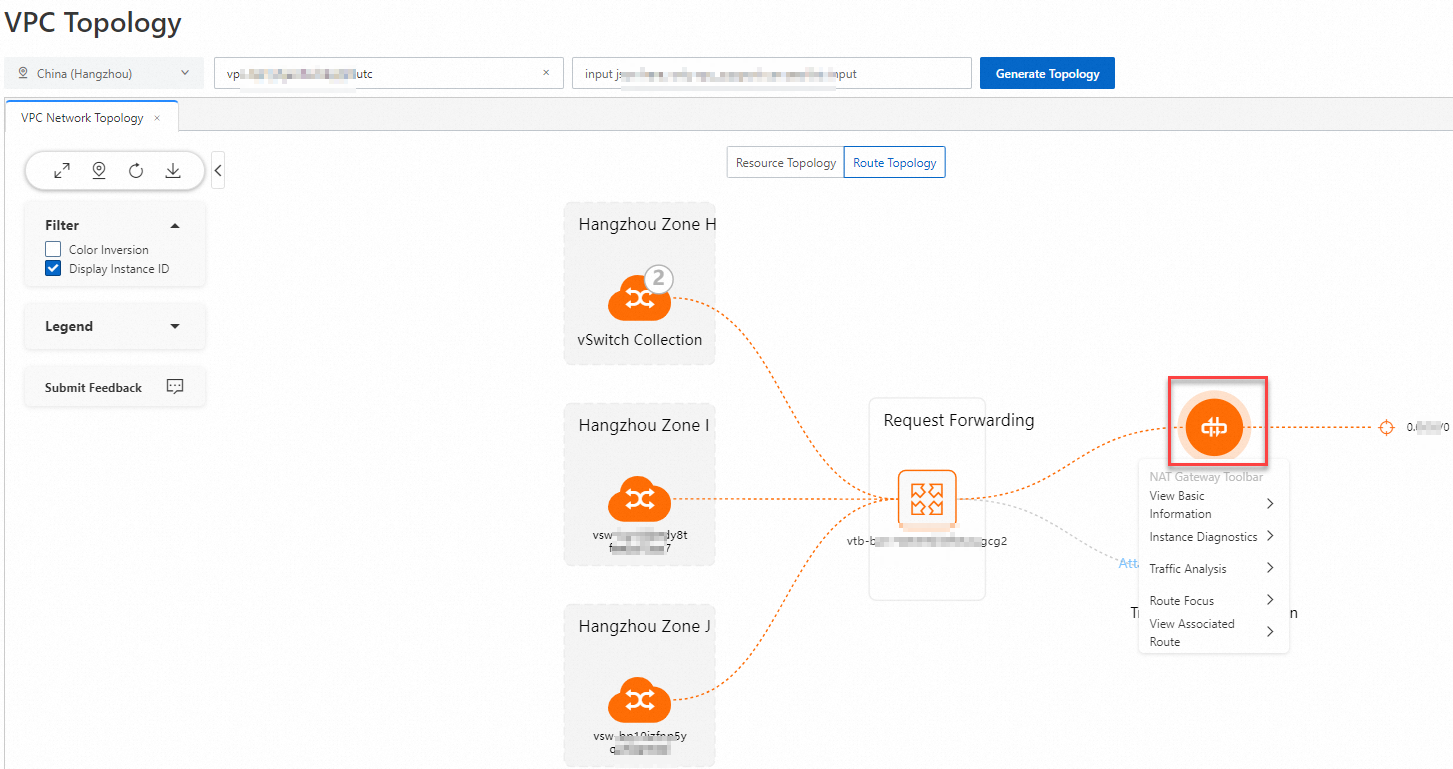
エンティティツールバーの使用
VPC トポロジーでは、エンティティのツールバーを使用して、基本情報の表示、到達可能性の分析、インスタンスの分析、トラフィックの分析、vSwitch サブネットトポロジーの表示、ルートの表示、関連ルートの表示、Cloud Enterprise Network (CEN) トポロジーの表示などの操作を実行できます。
基本情報の表示
[VPC トポロジー] ページで、エンティティをクリックします。エンティティツールバーで [基本情報の表示] をクリックします。すると、エンティティの [名前]、[ID]、[リージョン] を表示できます。
ルートの表示
ルートフォーカス機能を使用すると、特定のネクストホップエンティティに関連付けられているすべてのルートを表示できます。
[VPC トポロジー] ページの [ルートトポロジー] タブで、ネクストホップエンティティのエンティティツールバーにある [ルートフォーカス] をクリックしてルートを表示します。

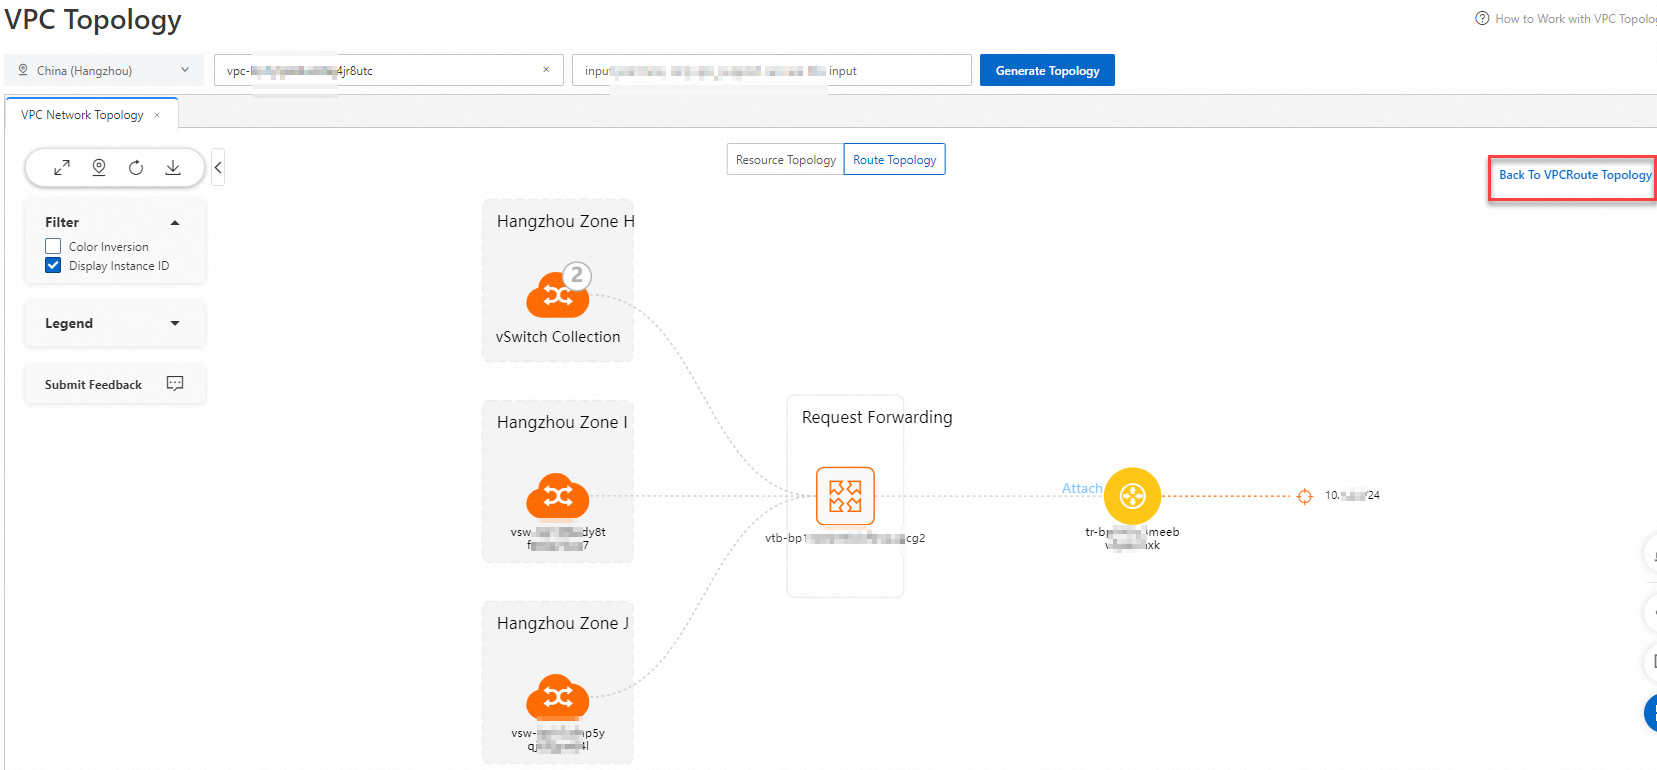
VPC のグローバルルートトポロジーを表示する場合は、ページの右上隅にある [VPC ルートトポロジーに戻る] をクリックします。
関連ルートの表示
[VPC トポロジー] ページの [ルートトポロジー] タブで、表示したいネクストホップエンティティのツールバーにある [関連ルートの表示] をクリックします。すると、そのネクストホップエンティティに関連付けられているルートに関する情報を表示できます。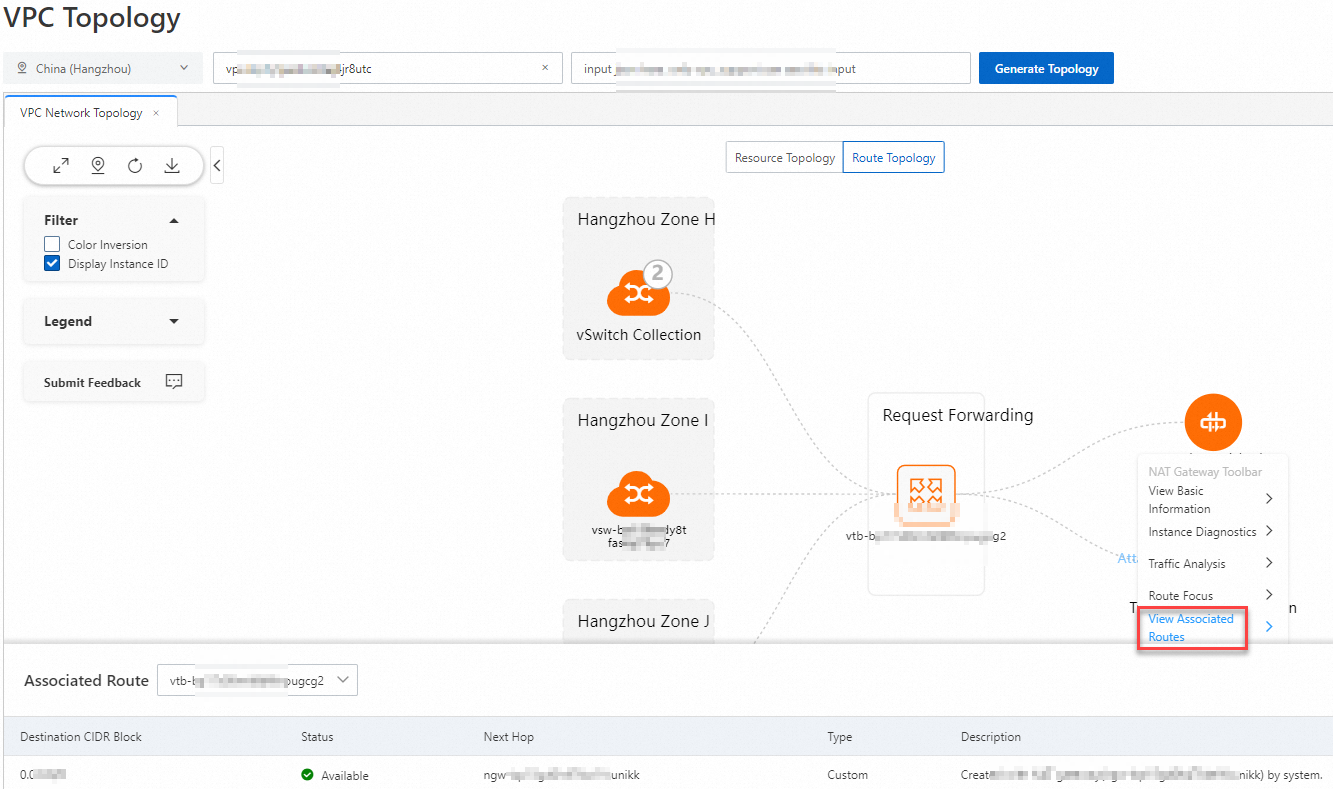
到達可能性の分析
到達可能性アナライザ機能を使用すると、ソースと宛先間のネットワーク接続を検出できます。次のセクションでは、vSwitch から別のリソースエンティティへのパスの到達可能性を分析する方法の例を示します。
[VPC トポロジー] ページで、vSwitch をクリックし、エンティティツールバーで [到達可能性アナライザ] をクリックします。すると、[分析の開始] ページにリダイレクトされます。[分析の開始] ページでは、デフォルトで vSwitch がソースとして指定されており、ビジネス要件に基づいて宛先パラメーターやその他のパラメーターを指定する必要があります。次に、[分析の開始] をクリックして到達可能性を分析します。詳細については、「到達可能性アナライザの操作」をご参照ください。
![]() アイコンは vSwitch コレクションを示します。このアイコンをクリックし、表示されるダイアログボックスにエンティティ ID を入力して、目的のエンティティを検索します。vSwitch をクリックし、エンティティツールバーで [到達可能性アナライザ] をクリックします。
アイコンは vSwitch コレクションを示します。このアイコンをクリックし、表示されるダイアログボックスにエンティティ ID を入力して、目的のエンティティを検索します。vSwitch をクリックし、エンティティツールバーで [到達可能性アナライザ] をクリックします。
インスタンスの分析
インスタンス診断機能を使用すると、インスタンスの構成とステータスを確認し、診断レポートを生成し、問題の修正方法に関する提案を提供できます。次のセクションでは、パブリック NAT ゲートウェイを分析する方法の例を示します。
[VPC トポロジー] ページで、パブリック NAT ゲートウェイをクリックし、エンティティツールバーで [インスタンス診断] をクリックします。[インスタンス診断] ページにリダイレクトされ、診断が自動的に実行されます。詳細については、「インスタンス診断の操作」をご参照ください。
トラフィックの分析
トラフィック分析機能を使用すると、ネットワークトラフィックをリアルタイムでモニターし、履歴トラフィックを追跡できます。次のセクションでは、Elastic IP アドレス (EIP) のトラフィックを分析する方法の例を示します。
[VPC トポロジー] ページで、EIP をクリックし、エンティティツールバーで [トラフィック分析] をクリックします。EIP のトラフィックを表示するエンティティモニタリングページの [トラフィック統計] タブにリダイレクトされます。詳細については、「インターネットトラフィック分析機能の操作」をご参照ください。
vSwitch サブネットトポロジーの表示
vSwitch サブネットトポロジーを使用すると、vSwitch のリソース トポロジーを展開できます。
[VPC トポロジー] ページで、vSwitch をクリックし、エンティティツールバーで [VSW サブネットトポロジーの表示] をクリックします。次に、vSwitch のリソース トポロジーを表示します。
VPC のグローバルリソーストポロジーを表示する場合は、ページの右上隅にある [VPC ネットワークトポロジーに戻る] をクリックします。
CEN トポロジーの表示
[VPC トポロジー] ページの [ルートトポロジー] タブで、ネクストホップエンティティがトランジットルーターの場合、トランジットルーターのツールバーで [CEN トポロジーの表示] をクリックします。すると、自動的に [CEN トポロジー] ページにリダイレクトされ、CEN トポロジーが生成されます。詳細については、「CEN トポロジーの操作」をご参照ください。