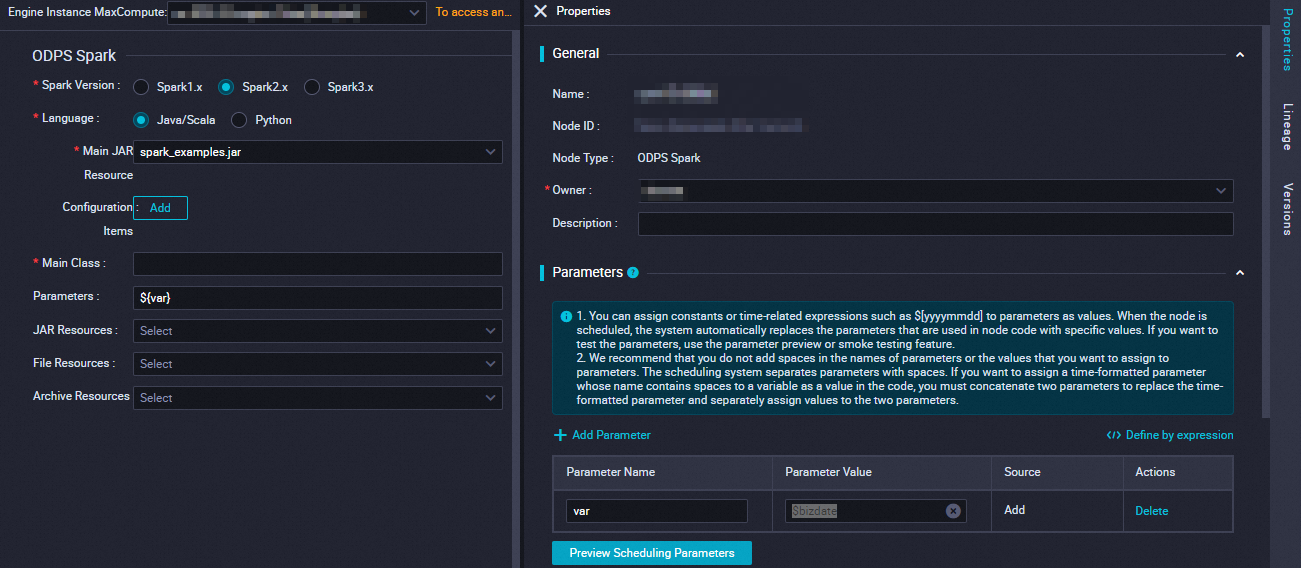
MaxComputeタスクでSparkをローカルモードまたはクラスターモードで実行できます。 また、DataWorksのクラスターモードでMaxComputeタスクでオフラインSparkを実行し、タスクを他のタイプのノードと統合してスケジューリングすることもできます。 このトピックでは、DataWorksでSpark on MaxComputeタスクを設定およびスケジュールする方法について説明します。
前提条件
ODPS Sparkノードが作成されます。 詳細については、「ODPSノードの作成と管理」をご参照ください。
制限事項
Spark 3.Xバージョンを使用するODPS Sparkノードをコミットしたときにエラーが報告された場合、 チケットを起票
し、テクニカルサポートに連絡して、ノードの実行に使用されるスケジューリング専用リソースグループのバージョンを更新します。
背景情報
Spark on MaxComputeは、MaxComputeが提供するコンピューティングサービスで、オープンソースのSparkと互換性があります。 Spark on MaxComputeは、統合コンピューティングリソースとデータセット権限システムに基づくSparkコンピューティングフレームワークを提供します。 MaxComputeのSparkでは、好みの開発方法を使用してSparkタスクを送信および実行できます。 MaxComputeのSparkは、さまざまなデータ処理および分析要件を満たすことができます。 DataWorksでは、ODPS Sparkノードを使用して、MaxComputeタスクでSparkをスケジュールおよび実行し、MaxComputeタスクでSparkを他のタイプのタスクと統合できます。
MaxComputeのSparkを使用すると、Java、Scala、またはPythonを使用してタスクを開発し、ローカルモードまたはクラスターモードでタスクを実行できます。 Spark on MaxComputeでは、DataWorksのクラスターモードでMaxComputeタスクでSparkをオフラインで実行することもできます。 MaxComputeタスクでのSparkの実行モードの詳細については、「実行モード」をご参照ください。
準備
ODPS Sparkノードを使用すると、Java、Scala、またはPythonを使用して、MaxComputeタスクでオフラインSparkを開発および実行できます。 オフラインSpark on MaxComputeタスクの開発に必要な操作とパラメーターは、使用するプログラミング言語によって異なります。 ビジネス要件に基づいてプログラミング言語を選択できます。
Java/Scala
ODPS SparkノードでJavaまたはScalaコードを実行する前に、オンプレミスのマシンでSpark on MaxComputeタスクのコードの開発を完了し、そのコードをMaxComputeリソースとしてDataWorksにアップロードする必要があります。 次の手順を実行する必要があります。
開発環境を準備します。
使用するオペレーティングシステムに基づいて、Spark on MaxComputeタスクを実行する開発環境を準備する必要があります。 詳細については、「Linux開発環境の設定」または「Windows開発環境の設定」をご参照ください。
JavaまたはScalaコードを開発します。
ODPS SparkノードでJavaまたはScalaコードを実行する前に、オンプレミスのマシンまたは準備された開発環境で、Spark on MaxComputeタスクのコードの開発を完了する必要があります。 MaxComputeでSparkが提供するサンプルプロジェクトテンプレートを使用することを推奨します。
開発したコードをパッケージ化し、DataWorksにアップロードします。
コードが開発されたら、コードをパッケージ化し、パッケージをMaxComputeリソースとしてDataWorksにアップロードする必要があります。 詳細については、「MaxComputeリソースの作成と使用」をご参照ください。
プログラミング言語: Python (デフォルトのPython環境を使用)
DataWorksでは、DataWorksでPythonリソースにオンラインでコードを記述し、ODPS Sparkノードを使用してコードをコミットして実行することで、PySparkタスクを開発できます。 DataWorksでPythonリソースを作成する方法と、PySparkを使用してMaxComputeアプリケーションでSparkを開発するための例については、「MaxComputeリソースの作成と使用」および「PySparkを使用してMaxComputeアプリケーションでSparkを開発する」をご参照ください。
DataWorksが提供するデフォルトのPython環境を使用して、コードを開発できます。 デフォルトのPython環境でサポートされているサードパーティのパッケージがPySparkタスクの要件を満たせない場合は、プログラミング言語: Python (カスタムPython環境を使用) を参照して、カスタムPython環境を準備できます。 PyODPS 2ノードまたはPyODPS 3ノードを使用することもできます。これらは、開発のためにより多くのPythonリソースをサポートします。
プログラミング言語: Python (カスタムPython環境を使用する)
デフォルトのPython環境がビジネス要件を満たせない場合は、次の手順を実行してカスタムPython環境を準備し、Spark on MaxComputeタスクを実行できます。
オンプレミスのマシンでPython環境を準備します。
ビジネス要件に基づいてPython環境を構成するには、PySpark Pythonバージョンとサポートされている依存関係を参照してください。
Python環境のコードをパッケージ化し、パッケージをDataWorksにアップロードします。
Python環境のコードをZIP形式でパッケージ化し、そのパッケージをMaxComputeリソースとしてDataWorksにアップロードする必要があります。 これにより、環境でSpark on MaxComputeタスクを実行できます。 詳細については、「MaxComputeリソースの作成と使用」をご参照ください。
说明のパラメータ
DataWorksのクラスターモードで、MaxComputeタスクでオフラインSparkを実行できます。 このモードでは、カスタムアプリケーションのエントリポイントとしてMainメソッドを指定する必要があります。 MainがSuccessまたはFail状態になると、Sparkタスクは終了します。 spark-defaults.confファイルの設定項目をODPS Sparkノードの設定に追加する必要があります。 たとえば、executorsの数、メモリサイズ、spark.hadoop.odps.ru ntime.end.pointなどの設定項目を追加する必要があります。
spark-defaults.confファイルをアップロードする必要はありません。 代わりに、spark-defaults.confファイルの設定項目をODPS Sparkノードの設定に1つずつ追加する必要があります。

パラメーター | 説明 | spark-submitコマンド |
Sparkバージョン | Sparkのバージョン。 有効な値: Spark1.x、Spark2.x、およびSpark3.x。 説明 Spark 3.Xバージョンを使用するODPS Sparkノードをコミットしたときにエラーが報告された場合、 チケットを起票 し、テクニカルサポートに連絡して、ノードの実行に使用されるスケジューリング専用リソースグループのバージョンを更新します。 | なし |
Language | プログラミング言語。 有効な値: Java/ScalaおよびPython。 ビジネス要件に基づいてプログラミング言語を選択できます。 | なし |
主なJARリソース | メインのJARまたはPythonリソースファイル。 必要なリソースファイルをDataWorksにアップロードし、事前にリソースファイルをコミットする必要があります。 詳細については、「MaxComputeリソースの作成と使用」をご参照ください。 |
|
構成アイテム | Spark on MaxComputeタスクを送信するために必要な設定項目。
|
|
メインクラス | メインクラスの名前。 このパラメーターは、Languageパラメーターを |
|
Parameters | ビジネス要件に基づいてパラメーターを追加できます。 複数ある場合は、パラメーターをスペースで区切ります。 DataWorksでは、${Variable name} 形式でスケジューリングパラメーターを追加できます。 パラメーターを追加したら、右側のナビゲーションウィンドウで [プロパティ] タブをクリックし、[スケジューリングパラメーター] セクションで関連する変数に値を割り当てる必要があります。 説明 サポートされているスケジューリングパラメーターの形式については、「サポートされているスケジューリングパラメーターの形式」をご参照ください。 |
|
その他のリソース | 次のタイプのリソースもサポートされています。 ビジネス要件に基づいて、次のタイプのリソースを選択できます。
必要なリソースファイルをDataWorksにアップロードし、事前にリソースファイルをコミットする必要があります。 詳細については、「MaxComputeリソースの作成と使用」をご参照ください。 | さまざまなタイプのリソースのコマンド:
|
単純なコード編集の例
このセクションでは、ODPS Sparkノードを使用してSpark on MaxComputeタスクを開発する方法の簡単な例を示します。 この例では、Spark on MaxComputeタスクを開発して、文字列を数字に変換できるかどうかを判断します。
リソースを作成します。
DataWorksコンソールのDataStudioページで、spark_is_number.pyという名前のPythonリソースを作成します。 詳細については、「MaxComputeリソースの作成と使用」をご参照ください。 サンプルコード:
# -*- coding: utf-8 -*-
import sys
from pyspark.sql import SparkSession

try:
    # for python 2
    reload(sys)
    sys.setdefaultencoding('utf8')
except:
    # python 3 not needed
    pass

if __name__ == '__main__':
    spark = SparkSession.builder\
        .appName("spark sql")\
        .config("spark.sql.broadcastTimeout", 20 * 60)\
        .config("spark.sql.crossJoin.enabled", True)\
        .config("odps.exec.dynamic.partition.mode", "nonstrict")\
        .config("spark.sql.catalogImplementation", "odps")\
        .getOrCreate()

def is_number(s):
    try:
        float(s)
        return True
    except ValueError:
        pass

    try:
        import unicodedata
        unicodedata.numeric(s)
        return True
    except (TypeError, ValueError):
        pass

    return False

print(is_number('foo'))
print(is_number('1'))
print(is_number('1.3'))
print(is_number('-1.37'))
print(is_number('1e3'))
リソースを保存してコミットします。
作成されたODPS Sparkノードで、このトピックの [パラメーターの説明] セクションを参照して、Spark on MaxComputeタスクのパラメーターとスケジューリングプロパティを設定し、ノードを保存してコミットします。
パラメーター
説明
Sparkバージョン
Spark2.xを選択します。
言語
[Python] を選択します。
主要なPythonリソース
作成したPythonリソースspark_is_number.py。
開発環境のオペレーションセンターに移動し、ODPS Sparkノードのデータをバックフィルします。 詳細については、「データの埋め戻しとデータバックフィルインスタンスの表示 (新バージョン) 」をご参照ください。
説明DataWorksは、DataStudioでODPS Sparkノードを実行するためのエントリポイントを提供しません。 開発環境のオペレーションセンターでODPS Sparkノードを実行する必要があります。
結果を表示します。
データバックフィルインスタンスが正常に実行された後、生成された実行ログで [追跡URL] をクリックして結果を表示します。 次の情報が返されます。
False
True
True
True
True
高度なコード編集の例
他のシナリオでのMaxComputeタスクでのSparkの開発の詳細については、以下のトピックを参照してください。
次のステップ
Spark on MaxComputeタスクの開発が完了したら、次の操作を実行できます。
スケジューリングプロパティの設定: ノードの定期的なスケジューリングのプロパティを設定できます。 システムが定期的にタスクをスケジュールして実行する場合は、再実行設定やスケジューリングの依存関係など、ノードの項目を構成する必要があります。 詳細については、「スケジュール」をご参照ください。
ノードのデバッグ: ノードのコードをデバッグおよびテストして、コードロジックが期待どおりかどうかを確認できます。 詳細については、「デバッグ手順」をご参照ください。
ノードのデプロイ: すべての開発操作が完了したら、ノードをデプロイできます。 ノードがデプロイされた後、システムはノードのスケジューリングプロパティに基づいてノードを定期的にスケジュールします。 詳細については、「ノードのデプロイ」をご参照ください。
Sparkタスクの診断を有効にする: MaxComputeはLogviewツールとSpark Web UIを提供します。 Sparkタスクのログを表示して、タスクが送信され、期待どおりに実行されているかどうかを確認できます。