このトピックでは、MavenまたはServerless Devsを使用してJavaランタイムでプログラムをコンパイルし、プログラムをZIPまたはJARファイルとしてパッケージ化する方法について説明します。 コードをコンパイルしてパッケージ化した後、Function ComputeコンソールまたはServerless Devsを使用してコードパッケージをアップロードできます。
Javaランタイムの依存関係ライブラリ
コードパッケージを作成して配置するには、関数コードと依存関係ライブラリをZIPファイルまたはJARファイルとしてコンパイルしてパッケージ化する必要があります。
Function Computeは、Javaランタイムに次の依存関係ライブラリを提供します。
com.aliyun:fc-java-core: リクエストハンドラーで使用されるハンドラーインターフェイスやコンテキストオブジェクトなどの情報を定義します。
com.aliyun:fc-java-events: 一般的なイベントソースのイベントタイプを提供します。
Maven中央リポジトリを使用して、上記の依存関係を取得できます。 上記の依存関係ライブラリを取得したら、pom.xmlファイルに追加します。 次のサンプルコードに例を示します。
<!-- https://mvnrepository.com/artifact/com.aliyun.fc.runtime/fc-java-core -->
<dependency>
    <groupId>com.aliyun.fc.runtime</groupId>
    <artifactId>fc-java-core</artifactId>
    <version>1.4.1</version>
</dependency>

<!-- https://mvnrepository.com/artifact/com.aliyun.fc.runtime/fc-java-event -->
<dependency>
    <groupId>com.aliyun.fc.runtime</groupId>
    <artifactId>fc-java-event</artifactId>
    <version>1.2.0</version>
</dependency>依存関係パッケージが大きすぎる場合は、依存関係をレイヤーにパッケージ化して、コードパッケージのサイズを減らすことができます。 詳細については、「カスタムレイヤーの作成」をご参照ください。
Mavenを使用したコードパッケージのコンパイルとデプロイ
あなたが始める前に
JavaとMavenがインストールされています。 Javaの詳細については、Java公式Webサイトをご覧ください。 Mavenの詳細については、「Apache Mavenのインストール」をご参照ください。
手順
Javaプロジェクトを作成します。 次のサンプルコードは、App.javaファイルのパスを提供します。
src/main/java/example/App.java次のサンプルコードをApp.javaファイルに追加します。詳細なサンプルコードについては、「イベントハンドラー」、「HTTPハンドラー」、または「コンテキスト」をご参照ください。
package example; import com.aliyun.fc.runtime.Context; import com.aliyun.fc.runtime.StreamRequestHandler; import java.io.IOException; import java.io.InputStream; import java.io.OutputStream; public class App implements StreamRequestHandler { @Override public void handleRequest(InputStream inputStream, OutputStream outputStream, Context context) throws IOException { outputStream.write(new String("hello world").getBytes()); } }pom.xmlファイルで、
ビルドを設定します。 サンプルコード:<build> <plugins> <plugin> <groupId>org.apache.maven.plugins</groupId> <artifactId>maven-shade-plugin</artifactId> <version>3.2.1</version> <executions> <execution> <phase>package</phase> <goals> <goal>shade</goal> </goals> <configuration> <filters> <filter> <artifact>*:*</artifact> <excludes> <exclude>META-INF/*.SF</exclude> <exclude>META-INF/*.DSA</exclude> <exclude>META-INF/*.RSA</exclude> </excludes> </filter> </filters> </configuration> </execution> </executions> </plugin> </plugins> </build>説明Apache Maven ShadeまたはApache Mavenアセンブリを使用できます。 上記の例では、例としてApache Maven Shadeを使用しています。
CLIを開き、プロジェクトのルートディレクトリに切り替えて、
mvnクリーンパッケージコマンドを実行してパッケージングを実行します。サンプルコード:
[INFO] Scanning for projects...
 ...  ....   ....
[INFO] --------------------------< example:example >---------------------------
[INFO] Building java-example 1.0-SNAPSHOT
[INFO] --------------------------------[ jar ]---------------------------------
 ...  ....   ....
[INFO] ------------------------------------------------------------------------
[INFO] BUILD SUCCESS
[INFO] ------------------------------------------------------------------------
[INFO] Total time:  11.681 s
[INFO] Finished at: 2020-03-26T15:55:05+08:00
[INFO] ------------------------------------------------------------------------
コンパイルが失敗した場合は、エラーメッセージに基づいてコードを変更します。
コンパイルが成功すると、コンパイルされたJARファイルはプロジェクトフォルダーのtargetディレクトリにあり、pom.xmlのartifactIdフィールドとversionフィールドに従ってHelloFCJava-1.0-SNAPSHOT.jarという名前になります。
重要macOSおよびLinuxオペレーティングシステムの場合は、圧縮前にコードファイルが読み取り可能で実行可能であることを確認してください。
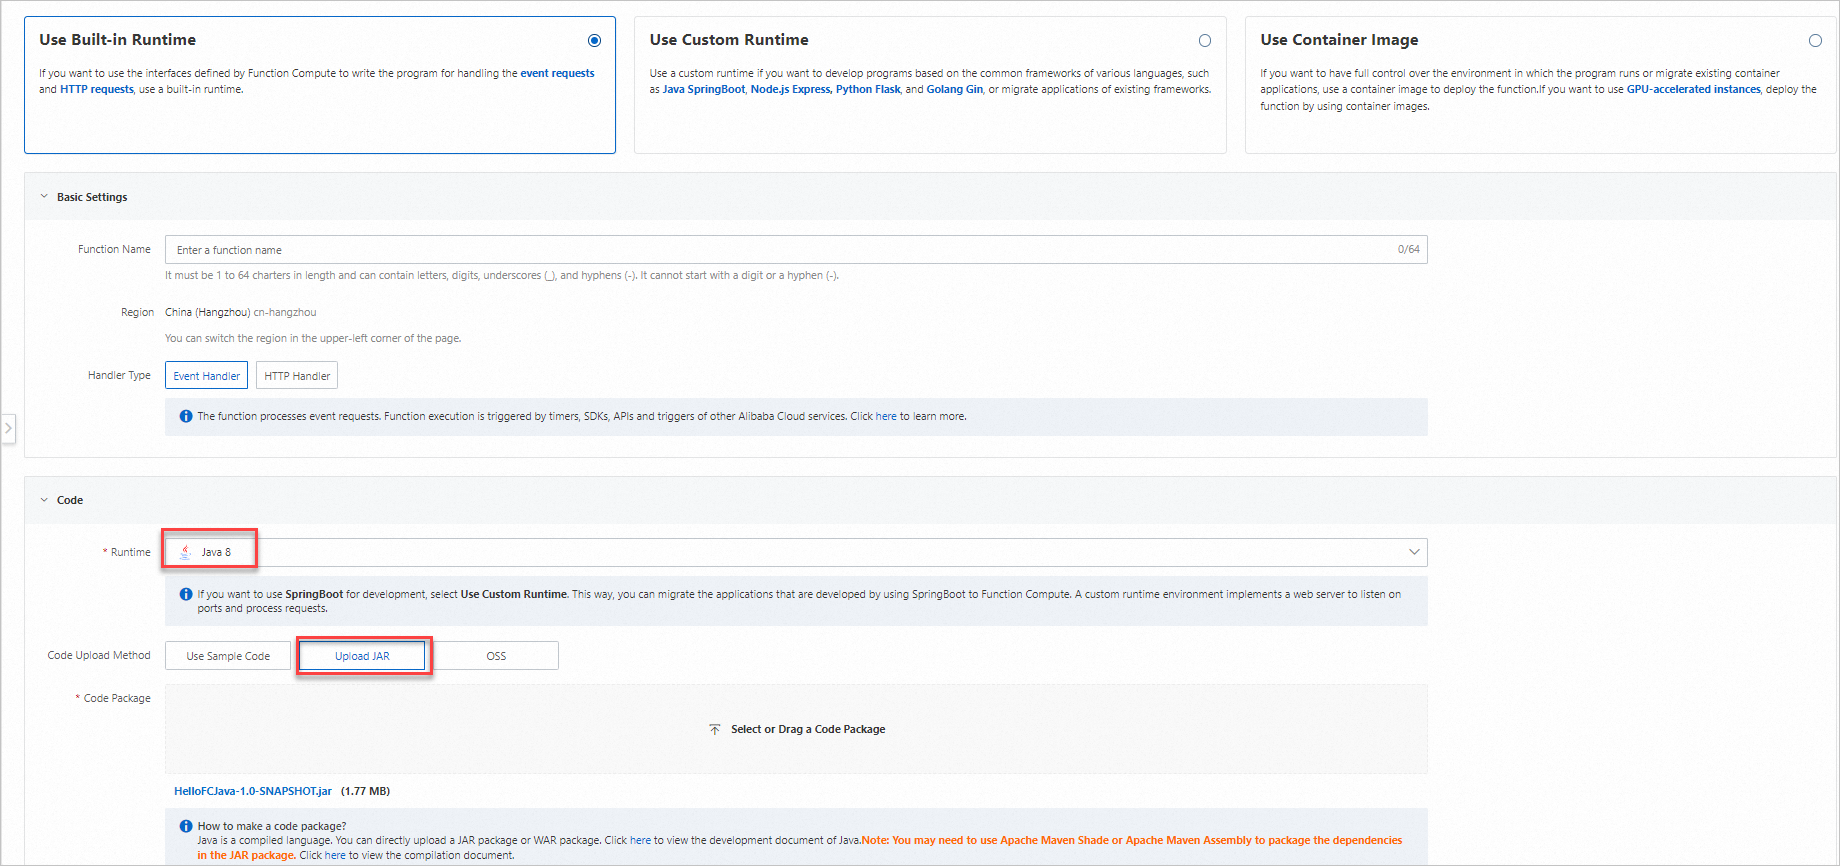
Function Computeコンソールコードパッケージをアップロードします。
[設定] タブで、[ハンドラー] の値を確認します。 ハンドラーは、
[パッケージ名].[クラス名]::[メソッド名]形式に従う必要があります。 たとえば、パッケージ名がexample、クラス名がApp、メソッド名がhandleRequestの場合、ハンドラーはexample.App::handleRequestのように設定できます。 有効でない場合は、[変更] をクリックしてハンドラーを変更できます。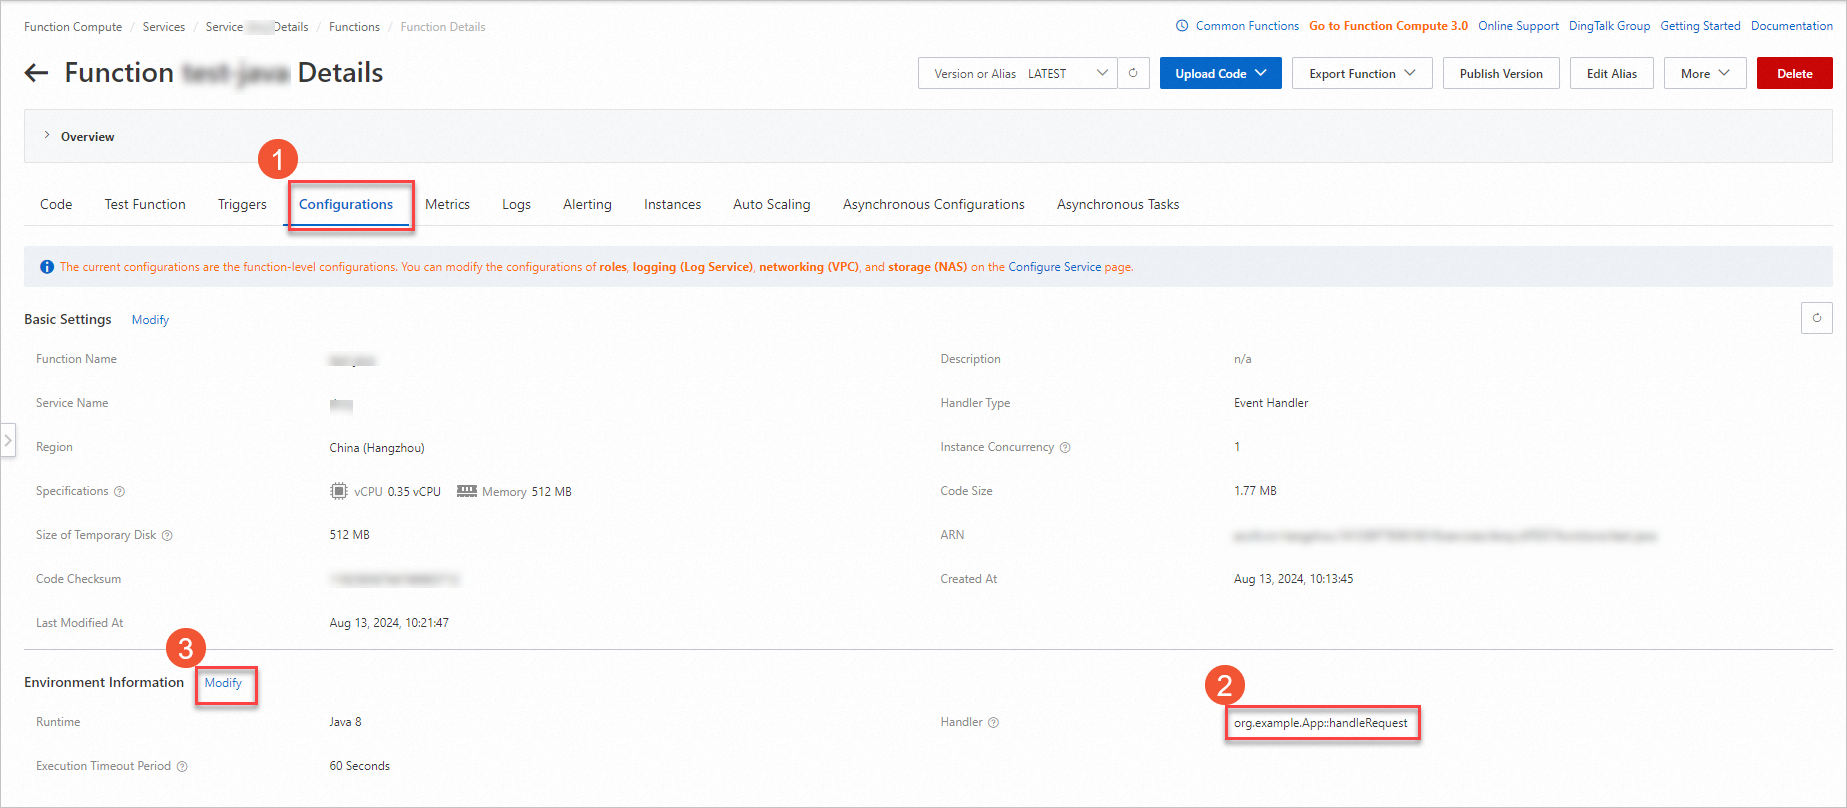
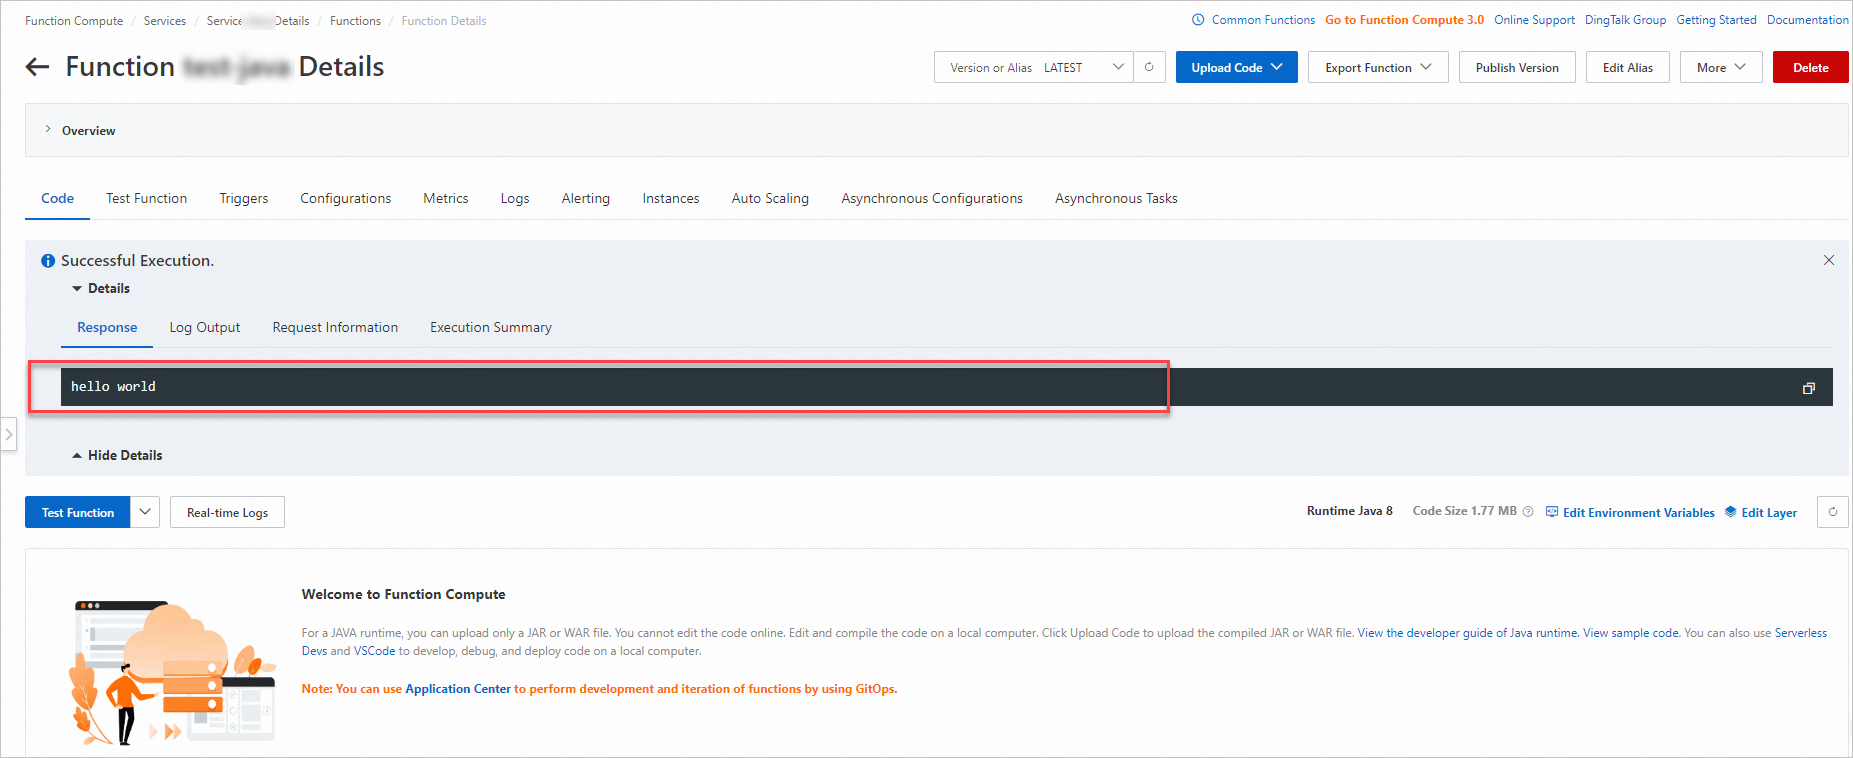
On theコードタブをクリックします。テスト機能関数をテストします。
Serverless Devsを使用したコードパッケージのコンパイルとデプロイ
あなたが始める前に
手順
次のコマンドを実行して、プロジェクトを初期化します。
s init devsapp/start-fc-event-java8 -d start-fc-event-java8s init devsapp/start-fc-event-java8: イベントハンドラーテンプレートに基づいてプロジェクトを初期化します。-d start-fc-event-java8: 指定したディレクトリにプロジェクトファイルを出力します。
コマンドを実行した後、リージョン、サービス名、および関数名を選択し、プロンプトに従ってキーを設定します。
説明プロンプトに従って
s initコマンドを実行してテンプレートを選択することもできます。次のコマンドを実行して、プロジェクトディレクトリに移動します。
cd start-fc-event-java8次のコマンドを実行して、プロジェクトをデプロイします。
s deployこのコマンドを実行すると、
pre-deployコマンドが最初に実行されます。pre-deployコマンドを実行すると、mvn packageコマンドを使用してコンパイルとパッケージングが実行されます。 その後、コードパッケージがアップロードされ、デプロイされます。 サンプルコマンド出力:[2022-04-07 12:00:09] [INFO] [S-CORE] - Start the pre-action [2022-04-07 12:00:09] [INFO] [S-CORE] - Action: mvn package [INFO] Scanning for projects... [INFO] [INFO] ------------------------< example:HelloFCJava >------------------------- [INFO] Building HelloFCJava 1.0-SNAPSHOT [INFO] --------------------------------[ jar ]--------------------------------- ...... [INFO] ------------------------------------------------------------------------ [INFO] BUILD SUCCESS [INFO] ------------------------------------------------------------------------ [INFO] Total time: 3.617 s [INFO] Finished at: 2022-04-07T20:00:14+08:00 [INFO] ------------------------------------------------------------------------ [2022-04-07 12:00:14] [INFO] [S-CORE] - End the pre-action Checking Service, Function (0.64s) Creating Service, Function (0.71s) Tips for next step ====================== * Display information of the deployed resource: s info * Display metrics: s metrics * Display logs: s logs * Invoke remote function: s invoke * Remove Service: s remove service * Remove Function: s remove function * Remove Trigger: s remove trigger * Remove CustomDomain: s remove domain helloworld: region: cn-hangzhou service: name: hello-world-service function: name: start-fc-event-java8 runtime: java8 handler: example.App::handleRequest memorySize: 128 timeout: 60s invokeコマンドを実行してテストを実行します。サンプルコマンド出力:
➜ start-fc-event-java8 s invoke
========= FC invoke Logs begin =========
FC Initialize Start RequestId: b246c3bf-06bc-49e5-92b8-xxxxxxxx
FC Initialize End RequestId: b246c3bf-06bc-49e5-92b8-xxxxxxxx
FC Invoke Start RequestId: b246c3bf-06bc-49e5-92b8-xxxxxxxx
FC Invoke End RequestId: b246c3bf-06bc-49e5-92b8-xxxxxxxx

Duration: 7.27 ms, Billed Duration: 8 ms, Memory Size: 128 MB, Max Memory Used: 65.75 MB
========= FC invoke Logs end =========

FC Invoke Result:
hello world


End of method: invoke