ソースコードの構築、イメージのプッシュからアプリケーションの展開までの自動操作を実装する場合は、Jenkinsを使用して、イメージの継続的統合または継続的配信 (CI/CD) パイプラインを作成できます。 ソースコードをGitLabにコミットすると、Container Registryは自動的にソースコードを使用してイメージをビルドします。 次に、Container Service for Kubernetes (ACK) がイメージをプルしてアプリケーションをデプロイし、Container Registryがイベント通知をDingTalkグループに送信します。
前提条件
Git、GitLab、Jenkinsがインストールされています。
説明GitLabにはJDK11の代わりにJDK8がインストールされています。 一部のGitLabプラグインはJDK11で実行できません。
ACR Enterprise Editionインスタンスが作成され、インスタンスのインターネットアクセスが有効になっています。 詳細については、「Container Registry Enterprise Editionインスタンスの作成」および「インターネット経由のアクセスの設定」をご参照ください。
Container Registry Enterprise EditionのAdvanced Editionインスタンスと同じリージョンに存在するACKクラスターが作成されます。 詳細については、「ACK管理クラスターの作成」をご参照ください。
DingTalkチャットボットが作成されます。 DingTalkチャットボットのwebhook URLとシークレットトークンが記録されます。 詳細については、「手順1: DingTalkチャットボットの作成」をご参照ください。
Container Registryのパイプライン機能を使用するには、インスタンスをAdvanced Editionにアップグレードする必要があります。 詳細については、「」をご参照ください。
Jenkinsを使用して画像のCIパイプラインを作成する
ソースコードをGitLabにコミットすると、Container Registryは自動的にソースコードを使用してイメージをビルドします。 イメージをスキャンすると、Container Registryは自動的にイベント通知をDingTalkグループに送信します。
GitLabでプロジェクトを作成します。
GitLabにログインします。
GitLabコンソールの上部のナビゲーションバーで、.
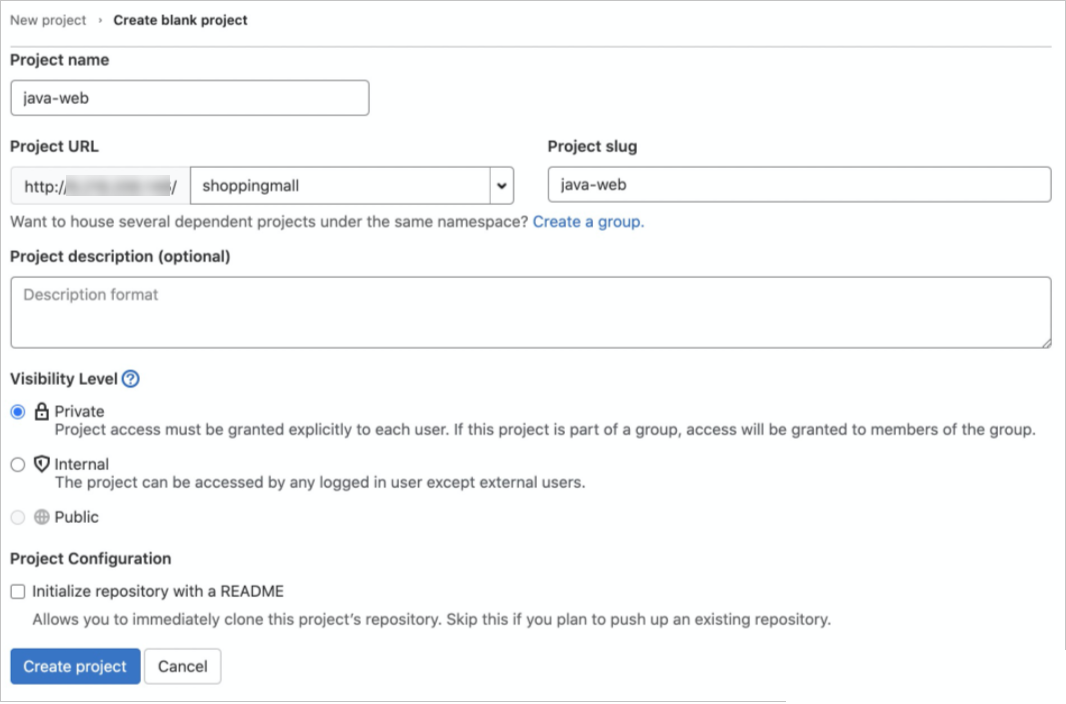
On theプロジェクトページをクリックします。新しいプロジェクト右上隅をクリックし、空白プロジェクトの作成.
On the空白プロジェクトの作成ページを設定し、プロジェクト名,プロジェクトURLとプロジェクトスラッグパラメータ, set可視性レベルへプライベートをクリックし、プロジェクトの作成.

作成Dockerfile,pom.xml,DemoApplication.java、およびHelloController.javaオンプレミスコンピュータ上のファイル。
Dockerfile
FROM registry.cn-hangzhou.aliyuncs.com/public-toolbox/maven:3.8.3-openjdk-8-aliyun AS build
COPY src /home/app/src
COPY pom.xml /home/app
RUN ["/usr/local/bin/mvn-entrypoint.sh","mvn","-f","/home/app/pom.xml","clean","package","-Dmaven.test.skip=true"]

FROM registry.cn-hangzhou.aliyuncs.com/public-toolbox/openjdk:8-jdk-alpine
COPY --from=build /home/app/target/demo-0.0.1-SNAPSHOT.jar /usr/local/lib/demo-0.0.1-SNAPSHOT.jar
EXPOSE 8080
ENTRYPOINT ["java","-jar","/usr/local/lib/demo-0.0.1-SNAPSHOT.jar"]
pom.xml
<?xml version="1.0" encoding="UTF-8"?>
<project xmlns="http://maven.apache.org/POM/4.0.0" xmlns:xsi="http://www.w3.org/2001/XMLSchema-instance"
    xsi:schemaLocation="http://maven.apache.org/POM/4.0.0 https://maven.apache.org/xsd/maven-4.0.0.xsd">
    <modelVersion>4.0.0</modelVersion>
    <parent>
        <groupId>org.springframework.boot</groupId>
        <artifactId>spring-boot-starter-parent</artifactId>
        <version>2.6.1</version>
        <relativePath/> <!-- lookup parent from repository -->
    </parent>
    <groupId>com.example</groupId>
    <artifactId>demo</artifactId>
    <version>0.0.1-SNAPSHOT</version>
    <name>demo</name>
    <description>Demo project for Spring Boot</description>
    <properties>
        <java.version>1.8</java.version>
    </properties>
    <dependencies>
        <dependency>
            <groupId>org.springframework.boot</groupId>
            <artifactId>spring-boot-starter-freemarker</artifactId>
        </dependency>
        <dependency>
            <groupId>org.springframework.boot</groupId>
            <artifactId>spring-boot-starter-web</artifactId>
        </dependency>

        <dependency>
            <groupId>org.projectlombok</groupId>
            <artifactId>lombok</artifactId>
            <optional>true</optional>
        </dependency>
        <dependency>
            <groupId>org.springframework.boot</groupId>
            <artifactId>spring-boot-starter-test</artifactId>
            <scope>test</scope>
        </dependency>
        <dependency>
            <groupId>org.apache.logging.log4j</groupId>
            <artifactId>log4j-core</artifactId>
            <version>2.13.2</version>
        </dependency>
    </dependencies>

    <build>
        <plugins>
            <plugin>
                <groupId>org.springframework.boot</groupId>
                <artifactId>spring-boot-maven-plugin</artifactId>
                <configuration>
                    <excludes>
                        <exclude>
                            <groupId>org.projectlombok</groupId>
                            <artifactId>lombok</artifactId>
                        </exclude>
                    </excludes>
                </configuration>
            </plugin>
        </plugins>
    </build>

</project>
DemoApplication.java
package com.example.demo;

import org.springframework.boot.SpringApplication;
import org.springframework.boot.autoconfigure.SpringBootApplication;

import java.util.TimeZone;

@SpringBootApplication
public class DemoApplication {

    public static void main(String[] args) {
        TimeZone.setDefault(TimeZone.getTimeZone("Asia/Shanghai"));
        SpringApplication.run(DemoApplication.class, args);
    }

}
HelloController.java
package com.example.demo;

import lombok.extern.slf4j.Slf4j;
import org.springframework.web.bind.annotation.RequestMapping;
import org.springframework.web.bind.annotation.RestController;

import javax.servlet.http.HttpServletRequest;
import java.text.SimpleDateFormat;
import java.util.Date;

@RestController
@Slf4j
public class HelloController {

    @RequestMapping({"/hello", "/"})
    public String hello(HttpServletRequest request) {
        return "Hello World at " + new SimpleDateFormat("yyyy-MM-dd HH:mm:ss").format(new Date());
    }
}
次のコマンドを実行して、ビルドファイルをGitLabにアップロードします。
cd java-web  # Go to the directory where the building file resides.
git remote set-url origin http://8.218.20*.***/shoppingmall/java-web.git
git push origin master
* [new branch]      master -> master
Jenkinsでイメージをビルドするパイプラインを作成します。
JenkinsでGitLabのSecure Shell (SSH) キーペアを設定します。
Jenkins にログインします。
Jenkinsダッシュボードの左側のナビゲーションウィンドウで、[Jenkinsの管理] をクリックします。
[セキュリティ] セクションで、[資格情報の管理] をクリックします。
[Jenkinsにスコープされたストア] セクションで、[ストア] 列の [Jenkins] をクリックし、[グローバル認証情報] をクリックします。
左側のナビゲーションウィンドウで、[資格情報の追加] をクリックします。
Kindパラメーターを [SSH Username with private key] に設定し、[Description] パラメーターと [Username] パラメーターの値を入力し、[enter directly] を選択し、[OK] をクリックします。
[グローバル資格情報] ページで、資格情報のIDが自動的に生成されます。 IDを記録します。
パイプラインを作成します。
Jenkinsダッシュボードの左側のナビゲーションウィンドウで、[新しい項目] をクリックします。
パイプラインの名前を入力し、[パイプライン] を選択し、[OK] をクリックします。
[ビルドトリガー] タブをクリックし、[変更がGitLabにプッシュされたときにビルド] を選択し、[イベントのプッシュ] を選択します。
変更がGitLabにプッシュされたときにビルドの右側にwebhook URLを記録します。
[詳細設定] をクリックし、[シークレットトークン] の右下隅にある [生成] をクリックします。
Jenkinsによって生成された秘密トークンを記録します。
[パイプライン] タブをクリックし、次のテンプレートのパラメーターの値を実際の値に置き換えます。 変更したコンテンツをコードエディターにコピーし、[保存] をクリックします。
def git_auth_id = "6d5a2c06-f0a7-43c8-9b79-37b8c266****" # The ID of the credential.
def git_branch_name = "master" # The name of the branch.
def git_url = "git@172.16.1*.***:shoppingmall/java-web.git" # The address of the GitLab repository.
def acr_url = "s*****-devsecops-registry.cn-hongkong.cr.aliyuncs.com" # The endpoint of the image repository.
def acr_username = "acr_test_*****@test.aliyunid.com" # The username of the container image.
def acr_password = "HelloWorld2021" # The password of the container image.
def acr_namespace = "ns" # The name of the namespace.
def acr_repo_name = "test" # The name of the image repository.
def tag_version = "0.0.1" # The tag of the container image.
node {

    stage('checkout git repo') {
        checkout([$class: 'GitSCM', branches: [[name: "*/${git_branch_name}"]], extensions: [], userRemoteConfigs: [[credentialsId: "${git_auth_id}", url: "${git_url}"]]])
    }
    stage('build image') {
        sh "sudo docker build -t java-web:${tag_version} ."
        sh "sudo docker tag java-web:${tag_version} ${acr_url}/${acr_namespace}/${acr_repo_name}:${tag_version}"
    }
    stage('push image') {
        sh "sudo docker login --username=${acr_username} --password=${acr_password} ${acr_url}"
        sh "sudo docker push ${acr_url}/${acr_namespace}/${acr_repo_name}:${tag_version}"
    }
}
webhook URLをGitLabに追加します。
GitLabにログインします。
[プロジェクト] ページで、作成したプロジェクトの名前をクリックします。
左側のナビゲーションウィンドウで、 を選択します。 webhook URLとシークレットトークンを入力し、[SSL検証の有効化] をクリアし、[webhooksの追加] をクリックします。
イベント通知ルールを作成します。
Container Registryコンソールにログインします。
上部のナビゲーションバーで、リージョンを選択します。
左側のナビゲーションウィンドウで、[インスタンス] をクリックします。
[インスタンス] ページで、管理するEnterprise Editionインスタンスをクリックします。
インスタンスの詳細ページの左側のナビゲーションウィンドウで、.
On theイベントルールタブをクリックします。ルールの作成.
では、イベントスコープルール作成ウィザードのステップで、ルール名パラメーターを設定し、イベントタイプパラメーターを画像がスキャンされます、選択スキャン完了、セット有効範囲へ名前空間名前空間の名前としてnsを選択し、次へ.
では、イベント通知ステップ、セット通知方法へDingTalkDingTalkチャットボットのwebhook URLとシークレットトークンを入力し、保存.
イメージの構築をトリガーします。
次のコマンドを実行し、HelloController.javaファイルのパラメーターの値を実際の値に置き換えます。 GitLabにファイルをコミットして、イメージビルドをトリガーします。
vim java/com/example/demo/HelloController.java # Replace the value of the parameter in the HelloController.java file with your actual value.
git add . && git commit -m 'commit' && git push origin # Commit the file to GitLab.
しばらく待って Container Registry Enterprise Editionインスタンスの詳細ページの左側のナビゲーションウィンドウで、 を選択します。 表示されるページの右側で、テストリポジトリをクリックします。 リポジトリの管理ページの左側のナビゲーションウィンドウで、[タグ] をクリックします。 [タグ] ページに画像が生成されます。
セキュリティスキャンを設定します。
[タグ] ページで、セキュリティスキャンイメージの [アクション] 列に表示されます。
[セキュリティスキャン] ページで、[今すぐスキャン] をクリックします。
イメージがスキャンされると、Container RegistryはDingTalkグループに通知を送信します。
Jenkinsを使用して画像のCDパイプラインを作成する
GitLabでソースコードをコミットすると、Container Registryは自動的にソースコードを使用してイメージをビルドします。 イメージが構築されると、配信チェーンが自動的にトリガーされます。 配信チェーンが実行されると、HTTPリクエストが自動的にJenkinsに送信されます。 次に、アプリケーションをデプロイするためにイメージを再度プルするために、ACKでのデプロイがトリガーされます。
アプリケーションを作成します。
ACKコンソールにログインします。
ACKコンソールの左側のナビゲーションウィンドウで、[クラスター] をクリックします。
[クラスター] ページで、管理するクラスターを見つけ、クラスターの名前をクリックするか、[操作] 列の [詳細] をクリックします。 クラスターの詳細ページが表示されます。
詳細ページの左側のナビゲーションウィンドウで、 を選択します。
On theデプロイメントページをクリックします。YAMLから作成する右上隅にあります。
On the作成ページの値を選択します。名前空間、選択カスタムからサンプルテンプレートドロップダウンリストで、次のコンテンツをテンプレートにコピーし、作成.
説明ACKおよびContainer Registryでシークレットなしでイメージをプルする機能を有効にしない場合は、Container Registryのインターネット機能を介したアクセスを有効にし、イメージタイプをpublicに設定する必要があります。 詳細については、「インターネット経由のアクセスの設定」をご参照ください。
apiVersion: apps/v1
kind: Deployment
metadata:
  creationTimestamp: null
  labels:
    app: demo
  name: demo
spec:
  replicas: 3
  minReadySeconds: 5
  progressDeadlineSeconds: 60
  revisionHistoryLimit: 5
  selector:
    matchLabels:
      app: demo
  strategy:
    rollingUpdate:
      maxUnavailable: 1
    type: RollingUpdate
  template:
    metadata:
      annotations:
        prometheus.io/port: "9797"
        prometheus.io/scrape: "true"
      creationTimestamp: null
      labels:
        app: demo
    spec:
      containers:
      - image: s*****-devsecops-registry.cn-hongkong.cr.aliyuncs.com/ns/test:0.0.1
        imagePullPolicy: Always
        name: demo
        ports:
        - containerPort: 8080
          name: http
          protocol: TCP
        readinessProbe:
          initialDelaySeconds: 5
          tcpSocket:
            port: 8080
          timeoutSeconds: 5
        resources:
          limits:
            cpu: "2"
            memory: 512Mi
          requests:
            cpu: 100m
            memory: 64Mi
status: {}
---
apiVersion: v1
kind: Service
metadata:
  name: demo-svc
spec:
  selector:
    app: demo
  ports:
    - protocol: TCP
      port: 80
      targetPort: 8080
---
apiVersion: extensions/v1beta1
kind: Ingress
metadata:
  name: demo
  labels:
    app: demo
spec:
  rules:
    - host: app.demo.example.com
      http:
        paths:
          - backend:
              serviceName: demo-svc
              servicePort: 80
---
[デプロイメント] ページで、アプリケーションデモの名前をクリックします。 [アクセス方法] タブをクリックします。
[アクセス方法] タブで外部エンドポイントを取得します。
ローカルホストの次の内容を入力します。
<The external endpoint> app.demo.example.com入力app.demo.example.comブラウザのアドレスバーにあります。
 前の図のようにページが表示されると、アプリケーションがデプロイされます。
アプリケーショントリガーを作成します。
[デプロイメント] ページで、アプリケーションデモの名前をクリックします。
アプリケーションの詳細ページで、[トリガー] タブをクリックします。 次に、[トリガーの作成] をクリックします。
では、トリガーの作成ダイアログボックス, setアクションへ再デプロイをクリックし、OK.
[トリガー] タブでwebhook URLを取得します。
パイプラインを作成します。
Jenkinsにログインします。
左側のナビゲーションウィンドウで、新しいアイテム.
パイプラインの名前を入力し、パイプライン.
をクリックし、ビルドトリガータブと選択一般的なWebhookトリガー.
Generic Webhook Triggerセクションでは、HTTPリクエストのwebhook URL (
JENKINS_URL/generic-webhook-trigger/invoke) を取得できます。 この例では、汎用webhookトークンはhelloworld2021に設定されています。 したがって、webhook URLはJENKINS_URL/generic-webhook-trigger/invoke?token=helloworld2021です。[パイプライン] タブをクリックし、次のテンプレートの汎用webhookトークンとwebhook URLを実際の値に置き換えます。 変更したコンテンツをコードエディターにコピーし、[保存] をクリックします。
pipeline {
  agent any
  triggers {
    GenericTrigger(
     genericVariables: [
      [key: 'InstanceId', value: '$.data.InstanceId'],
      [key: 'RepoNamespaceName', value: '$.data.RepoNamespaceName'],
      [key: 'RepoName', value: '$.data.RepoName'],
      [key: 'Tag', value: '$.data.Tag']
     ],
     causeString: 'Triggered on $ref',
     token: 'helloworld2021', # The generic webhook token. Replace the token with your actual value.
     tokenCredentialId: '',
     printContributedVariables: true,
     printPostContent: true,
     silentResponse: false,
     regexpFilterText: '$ref'
    )
  }
  stages {
    stage('Some step') {
      steps {
        sh "echo 'will print post content'"
        sh "echo $InstanceId"
        sh "echo $RepoNamespaceName"
        sh "echo $RepoName"
        sh "echo $Tag"
        sh "echo 'redeploy to ACK or you can deoloy to other platforms use before message'"
        sh "curl 'https://cs.console.aliyun.com/hook/trigger?token=g****' # Replace the webhook URL with your actual value.
        sh "echo 'done'"
      }
    }
  }
}
パイプラインを作成します。 詳細については、「配信チェーンの作成」をご参照ください。
イベント通知ルールを作成します。
Container Registry Enterprise Editionインスタンスの管理ページの左側のナビゲーションウィンドウで、.
On theイベントルールタブをクリックします。ルールの作成.
では、イベントスコープルール作成ウィザードのステップで、ルール名パラメータ, setイベントタイプへ配送チェーンが処理されます、選択成功、セット有効範囲へ名前空間[名前空間] ドロップダウンリストから [ns] を選択し、次へ.
では、イベント通知ステップ、セット通知方法パラメーターをHTTPで取得したwebhook URLを入力します。ステップ3をクリックし、保存.
次のコマンドを実行し、HelloController.javaファイルのパラメーターの値を実際の値に置き換えます。 GitLabにコードをコミットして、イメージビルドをトリガーします。
vim java/com/example/demo/HelloController.java # Replace the value of the parameter in the HelloController.java file with your actual value.
git add . && git commit -m 'add update' && git push origin   # Commit the file to GitLab.
イメージが構築されると、配信チェーンがトリガーされます。 配信チェーンが実行された後、Deployment in ACKがトリガーされ、イメージを再度プルしてアプリケーションをデプロイします。
次のコマンドを実行して、アプリケーションが再デプロイされたかどうかを確認します。
curl app.demo.example.comコマンド出力が変更されると、アプリケーションは再デプロイされます。