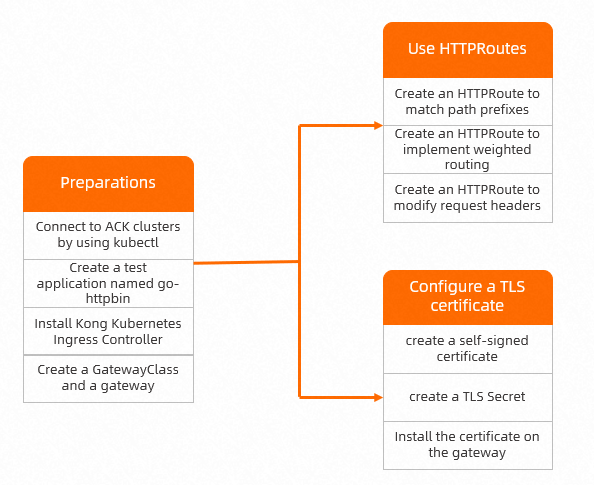
Gateway APIは、Kubernetesでサービスネットワークをモデル化するリソースのコレクションです。 これらのリソースは、表現的で拡張可能な役割指向のインターフェイスを介したサービスネットワークのモデリングを目的としています。 このトピックでは、Gateway APIを使用してサービスにアクセスする方法について説明します。
前提条件
Container Service for Kubernetes (ACK) クラスターのバージョンが1.24以降です。
Gateway APIコンポーネントがインストールされています。 詳細については、「コンポーネントの管理」をご参照ください。
説明既定では、Gateway APIコンポーネントは、バージョンが1.24以降のACKクラスターに自動的にインストールされます。
背景情報
既定では、Gateway APIコンポーネントのカスタムリソース定義 (CRD) は、バージョンが1.24以降のACKクラスターに自動的に作成されます。 gateway APIをサポートするゲートウェイをインストールして、Gateway APIが提供する機能を使用できます。 詳細については、「Gateway API」をご参照ください。
手順

準備
go-httpbinという名前のテストアプリケーションを作成します。
httpbin.yamlという名前のファイルを作成し、次のコンテンツをファイルに追加します。
apiVersion: apps/v1
kind: Deployment
metadata:
  name: go-httpbin
  namespace: default
spec:
  replicas: 1
  selector:
    matchLabels:
      app: go-httpbin
  template:
    metadata:
      labels:
        app: go-httpbin
        version: v1
    spec:
      containers:
        - image: specialyang/go-httpbin:v3
          args:
            - "--port=8090"
            - "--version=v1"
          imagePullPolicy: Always
          name: go-httpbin
          ports:
            - containerPort: 8090
---
apiVersion: v1
kind: Service
metadata:
  name: go-httpbin
  namespace: default
spec:
  ports:
    - port: 80
      targetPort: 8090
      protocol: TCP
  selector:
    app: go-httpbin
次のコマンドを実行して、go-httpbinという名前のアプリケーションを作成します。
kubectl apply -f httpbin.yaml
Kong Kubernetes Ingress Controllerをインストールします。
ACKによってゲートウェイAPIをサポートするコンポーネントは提供されません。 このトピックでは、kubernetes-ingress-controllerゲートウェイを例として使用します。
次のコマンドを実行して、Kong Kubernetes Ingress Controllerをインストールします。
説明Kong Kubernetes Ingress Controllerは、LoadBalancerタイプのkong-proxy Serviceを使用してサービスを公開します。 kong-proxy Service用に作成されたClassic Load Balancer (CLB) インスタンスに対して課金されます。 CLBインスタンスの課金の詳細については、「CLB課金の概要」をご参照ください。
kubectl create -f https://raw.githubusercontent.com/Kong/kubernetes-ingress-controller/v2.8.0/deploy/single/all-in-one-dbless.yamlリソースはkong名前空間で作成されます。
Kong Kubernetes Ingress Controllerがインストールされているかどうかを確認します。
次のコマンドを実行して、サービスのLoadBalancer IPアドレスを照会します。
kubectl get svc -n kong-proxy期待される出力:
NAME         TYPE           CLUSTER-IP      EXTERNAL-IP    PORT(S)                      AGE
kong-proxy   LoadBalancer   172.16.19.238   47.14.**.**  80:31611/TCP,443:30936/TCP     10s
IPアドレスは、出力の
EXTERNAL IPフィールドに表示されます。次のコマンドを実行して、Kong Kubernetes Ingress Controllerにアクセスします。
curl http://<EXTERNAL-IP>期待される出力:
{"message":"no Route matched with those values"}
{"message":"no Route matched with those values"}が返された場合、Kong Kubernetes Ingress Controllerがインストールされています。
GatewayClassとゲートウェイを作成します。
gateway.yamlという名前のファイルを作成し、次のコンテンツをファイルに追加します。
apiVersion: gateway.networking.k8s.io/v1beta1
kind: GatewayClass
metadata:
  name: kong
  annotations:
    konghq.com/gatewayclass-unmanaged: 'true'
spec:
  controllerName: konghq.com/kic-gateway-controller
---
apiVersion: gateway.networking.k8s.io/v1beta1
kind: Gateway
metadata:
  name: kong
spec:
  gatewayClassName: kong
  listeners:
  - name: proxy
    port: 80
    protocol: HTTP
  - name: proxy-ssl
    port: 443
    protocol: HTTPS
次のコマンドを実行して、GatewayClassとゲートウェイを作成します。
kubectl apply -f gateway.yaml次のコマンドを実行して、ゲートウェイのパブリックエンドポイントを照会します。
kubectl get gateway kong期待される出力:
NAME   CLASS   ADDRESS        PROGRAMMED   AGE
kong   kong    47.14.**.**              68s
出力は、GatewayClassとゲートウェイが作成されたことを示します。
HTTPRoutesの使用
HTTPRoutesの使用方法について説明します。
機能1: パスプレフィックスに一致するHTTPRouteを作成する
パスプレフィックスと一致するHTTPRouteを作成できます。 パスプレフィックスがHTTPRouteのルールと一致する要求のみが、アプリケーションにルーティングされます。
demo-route.yamlという名前のファイルを作成し、次の内容をファイルに追加します。
apiVersion: gateway.networking.k8s.io/v1beta1
kind: HTTPRoute
metadata:
  name: demo-route
spec:
  parentRefs: # Reference the Gateway resource.
    - group: gateway.networking.k8s.io
      kind: Gateway
      name: kong
  hostnames:
    - example.com # Set the host to example.com.
  rules:
    - matches: # Create a path prefix match rule.
        - path:
            type: PathPrefix
            value: /
      backendRefs: # Set the backend to a Service named go-httpbin and set the port to 80.
        - kind: Service
          name: go-httpbin
          port: 80
次のコマンドを実行してHTTPRouteを作成します。
kubectl apply -f demo-route.yaml次のコマンドを実行してgo-httpbinアプリケーションにアクセスします。
curl http://example.com/version -- resolv e example.com:80:<EXTERNAL-IP>期待される出力:
version:v1出力は、go-httpbinアプリケーションにアクセスでき、HTTPRouteがパスプレフィックスと一致できることを示します。
特集2: HTTPRouteを作成して重み付けルーティングを実装する
HTTPRouteを作成して、トラフィックを複数のアプリケーションに比率でルーティングできます。
new-nginxおよびold-nginxという名前のテストアプリケーションを作成します。
nginx.yamlという名前のファイルを作成し、次の内容をファイルに追加します。
apiVersion: apps/v1
kind: Deployment
metadata:
  name: old-nginx
spec:
  replicas: 1
  selector:
    matchLabels:
      run: old-nginx
  template:
    metadata:
      labels:
        run: old-nginx
    spec:
      containers:
      - image: registry.cn-hangzhou.aliyuncs.com/acs-sample/old-nginx
        imagePullPolicy: Always
        name: old-nginx
        ports:
        - containerPort: 80
          protocol: TCP
      restartPolicy: Always
---
apiVersion: v1
kind: Service
metadata:
  name: old-nginx
spec:
  ports:
  - port: 80
    protocol: TCP
    targetPort: 80
  selector:
    run: old-nginx
  sessionAffinity: None
  type: NodePort
---
apiVersion: apps/v1
kind: Deployment
metadata:
  name: new-nginx
spec:
  replicas: 1
  selector:
    matchLabels:
      run: new-nginx
  template:
    metadata:
      labels:
        run: new-nginx
    spec:
      containers:
      - image: registry.cn-hangzhou.aliyuncs.com/acs-sample/new-nginx
        imagePullPolicy: Always
        name: new-nginx
        ports:
        - containerPort: 80
          protocol: TCP
      restartPolicy: Always
---
apiVersion: v1
kind: Service
metadata:
  name: new-nginx
spec:
  ports:
  - port: 80
    protocol: TCP
    targetPort: 80
  selector:
    run: new-nginx
  sessionAffinity: None
  type: NodePort
次のコマンドを実行して、new-nginxおよびold-nginxという名前のアプリケーションを作成します。
kubectl apply -f nginx.yaml
HTTPRouteを作成します。
次のコマンドを実行して、demo-weight.yamlという名前のファイルを作成します。
apiVersion: gateway.networking.k8s.io/v1beta1 kind: HTTPRoute metadata: name: demo-weight spec: parentRefs: # Reference the Gateway resource. - group: gateway.networking.k8s.io kind: Gateway name: kong hostnames: - weight.example.com # Set the host to weight.example.com. rules: - matches: # Create a path prefix match rule. - path: type: PathPrefix value: / backendRefs: # Specify the backend and the weight of the backend. The weights are not percentage values. Therefore, the sum of the weights does not need to be 100. - kind: Service name: old-nginx port: 80 weight: 1 # Set the weight of the old-nginx application to 1. - kind: Service name: new-nginx port: 80 weight: 1 # Set the weight of the new-nginx application to 1.weight: アプリケーションにルーティングされるトラフィックの割合。 この例では、old-nginxの重みは1、new-nginxの重みは1です。 これは、トラフィックの50% がold-nginxにルーティングされ、トラフィックの50% がnew-nginxにルーティングされることを示します。
次のコマンドを実行してHTTPRouteを作成します。
kubectl apply -f demo-weight.yaml
次のコマンドを複数回実行して、new-nginxおよびold-nginxアプリケーションにアクセスします。
curl http://weight.example.com/ --resolve weight.example.com:80:<EXTERNAL-IP>期待される出力:
古い
old
new
old
new
old
new
出力は、HTTPRouteがトラフィックをnew-nginxおよびold-nginxアプリケーションに1:1の比率でルーティングすることを示します。
機能3: リクエストヘッダーを変更するHTTPRouteを作成する
HTTPRoutesが提供するフィルターを使用して、リクエストまたはレスポンスのライフサイクル中にリクエストヘッダーを処理できます。 このセクションでは、バックエンドサービスに送信されるリクエストにヘッダーを追加する方法の例を示します。 フィルターの詳細については、「HTTPRoute」をご参照ください。
HTTPRouteを作成します。
次のコマンドを実行して、demo-filter.yamlという名前のファイルを作成します。
apiVersion: gateway.networking.k8s.io/v1beta1
kind: HTTPRoute
metadata:
  name: demo-filter
spec:
  parentRefs: # Reference the Gateway resource.
    - group: gateway.networking.k8s.io
      kind: Gateway
      name: kong
  hostnames:
    - filter.example.com # Set the host to filter.example.com.
  rules:
    - matches: # Create a path prefix match rule.
        - path:
            type: PathPrefix
            value: /
      filters:
        - type: RequestHeaderModifier # Add the my-header: foo header.
          requestHeaderModifier:
            add:
              - name: my-header
                value: foo
      backendRefs: # Set the backend to a Service named go-httpbin and set the port to 80.
        - kind: Service
          name: go-httpbin
          port: 80
次のコマンドを実行してHTTPRouteを作成します。
kubectl apply -f demo-filter.yaml
次のコマンドを実行してgo-httpbinアプリケーションにアクセスします。
curl http://filter.example.com/ -- resolv e filter.example.com:80:<EXTERNAL-IP>期待される出力:
headers: {
    // ...
    "My-Header": [
      "foo"
    ],
    // ...
}
出力には、
My-Header:fooヘッダーが表示されます。これは、ヘッダーがリクエストに追加されたことを示します。
TLS証明書の設定
次のOpenSSLコマンドを実行して、自己署名証明書を作成します。
openssl req -subj '/CN=example.com' -new -newkey rsa:2048 -sha256 \ -days 365 -nodes -x509 -keyout server.key -out server.crt \ -addext "subjectAltName = DNS:example.com" \ -addext "keyUsage = digitalSignature" \ -addext "extendedKeyUsage = serverAuth" 2> /dev/null; openssl x509 -in server.crt -subject -noout証明書ファイルserver.crtと秘密鍵ファイルserver.keyはカレントディレクトリに格納されます。
次のコマンドを実行し、server.crtおよびserver.keyファイルを使用してTLSシークレットを作成します。
kubectl create secret tl s example.com -- key server.key -- cert server.crt期待される出力:
secret/example.com createdゲートウェイに証明書をインストールします。
次のコマンドを実行して、gateway1.yamlという名前のファイルを作成します。
apiVersion: gateway.networking.k8s.io/v1beta1
kind: Gateway
metadata:
  name: kong
spec:
  gatewayClassName: kong
  listeners:
  - name: proxy
    port: 80
    protocol: HTTP
  - name: proxy-ssl
    port: 443
    protocol: HTTPS
    tls: # Configure TLS.
      mode: Terminate
      certificateRefs: # Reference the Secret.
        - kind: Secret
          name: example.com
次のコマンドを実行して、ゲートウェイに証明書をインストールします。
kubectl apply -f gateway1.yaml
次のコマンドを実行して、TLS証明書が設定されているかどうかを確認します。
openssl s_client -servername example.com -connect <EXTERNAL-IP>:443出力には、TLS証明書が設定されていることを示す
CN = example.comが表示されます。