Knative Pod Autoscaler (KPA) は、Knativeが提供するユーザーフレンドリーな自動スケーリング機能です。 ポッドの同時実行と1秒あたりのリクエスト数 (RPS) に基づいてスケーリング条件を設定できます。 デフォルトでは、アクティブなサービスリクエストがない場合、Knativeはポッドの数をゼロに減らし、リソースの使用を最適化します。 KPAを使用して、ゼロにスケールダウンするまでの待機時間などのスケールダウンパラメーターを設定し、ゼロにスケールダウンするかどうかを指定できます。
前提条件
Knativeはクラスターにデプロイされています。 詳細については、「」「Knativeのデプロイ」をご参照ください。
制御ポリシー機能の動作
Knative Servingは、Queue-Proxyという名前のqueue proxyコンテナを各ポッドに挿入します。 コンテナーは、アプリケーションポッドの要求同時実行メトリックをKPAに自動的に報告します。 KPAがメトリックを受信した後、KPAは、同時要求の数と関連するアルゴリズムに基づいて、デプロイ用にプロビジョニングされたポッドの数を自動的に調整します。

アルゴリズム
KPAは、各ポッドが受信したリクエスト (または同時リクエスト) の平均数に基づいてポッドをスケーリングします。 デフォルトでは、KPAは同時リクエストの数に基づいてポッドをスケーリングします。 各ポッドは、最大で100の要求を同時に処理できます。 KPAは、ターゲット利用率 (target-utilization-percentage) アノテーションも導入します。これは、自動スケーリングのターゲット利用率の値を指定します。
同時リクエスト数に基づいてポッドのターゲット数を計算するには、次の式を使用します。ポッド数=同時リクエスト数 /(ポッドの最大同時実行数 × ターゲット使用率)
たとえば、アプリケーションのポッドの最大同時実行性は10に設定され、ターゲット使用率は0.7に設定されます。 100の同時リクエストを受信すると、KPAは次の式に基づいて15個のポッドを作成します: 100/(0.7 × 10) 。
KPAは、きめ細かい自動スケーリングを実行するための安定モードとパニックモードもサポートしています。
安定モード
安定モードでは、KPAは安定ウィンドウ内のポッド間の同時リクエストの平均数をカウントします。 デフォルトの安定ウィンドウは60秒です。 次に、KPAは、負荷を安定したレベルに維持するために、平均同時実行値に基づいてポッドの数を調整します。
パニックモード
パニックモードでは、KPAはパニックウィンドウ内のポッド間の同時リクエストの平均数をカウントします。 デフォルトのパニックウィンドウは6秒です。 パニックウィンドウは、次の式に基づいて計算されます。パニックウィンドウ=安定ウィンドウ × パニックウィンドウのパーセンテージ。 panic-window-percentageの値は0より大きく1より小さく、デフォルトは0.1です。 リクエストバーストが発生し、現在のポッド使用率がパニックウィンドウを超えると、KPAはバーストを処理するポッドの数を増やします。
KPAは、パニックモードで計算されたポッドの数がパニックしきい値を超えているかどうかを確認して、スケーリングを決定します。 パニックしきい値は、次の式に基づいて計算されます。パニックしきい値=パニックしきい値-パーセンテージ /100。 panic-threshold-percentageのデフォルト値は200です。 したがって、デフォルトのパニックしきい値は2です。
パニックモードで計算されたポッド数が現在の準備完了ポッド数の2倍以上の場合、KPAはパニックモードで計算されたポッド数に合わせてアプリケーションをスケーリングします。 それ以外の場合、KPAは安定モードで計算されたポッド数にアプリケーションをスケーリングします。
KPA設定
一部の設定は、注釈を使用してリビジョンレベルで有効にするか、ConfigMapsを介してグローバルに適用できます。 両方のメソッドを同時に使用すると、リビジョンレベルの設定がグローバル設定よりも優先されます。
config-autoscaler
KPAを設定するには、config-autoscalerを設定する必要があります。 デフォルトでは、config-autoscalerが設定されます。 以下の内容は、主要なパラメータについて説明する。
次のコマンドを実行して、config-autoscalerを照会します。
kubectl -n knative-serving describe cm config-autoscaler期待される出力 (デフォルトのconfig-autoscaler ConfigMap):
apiVersion: v1
kind: ConfigMap
metadata:
 name: config-autoscaler
 namespace: knative-serving
data:
# The default maximum concurrency of pods. The default value is 100.
 container-concurrency-target-default: "100"
# The target utilization for concurrency. The default value is 70, which represents 0.7.
 container-concurrency-target-percentage: "70"
# The default requests per second (RPS). The default value is 200.
 requests-per-second-target-default: "200"
# The target burst capacity parameter is used to handle traffic bursts and prevent pod overloading. The current default value is 211, which means that if the target threshold set for the service multiplied by the number of Ready pods is less than 211, routing will be handled through the Activator service.
# The Activator service is used to receive and buffer requests when the target burst capacity is exceeded.
# If the target burst capacity parameter is set to 0, the Activator service is placed in the request path only when the number of pods is scaled to zero.
# If the target burst capacity parameter is set to a value greater than 0 and container-concurrency-target-percentage is set to 100, the Activator service is always used to receive and buffer requests.
# If the target burst capacity parameter is set to -1, the burst capacity is unlimited. All requests are buffered by the Activator service. If you set the target burst capacity parameter to other values, the parameter does not take effect.
# If the value of current number of ready pods × maximum concurrency - target burst capacity - concurrency calculated in panic mode is smaller than 0, the traffic burst exceeds the target burst capacity. In this scenario, the Activator service is placed to buffer requests.
 target-burst-capacity: "211"
# The stable window. The default is 60 seconds.
 stable-window: "60s"
# The panic window percentage. The default is 10, which indicates that the default panic window is 6 seconds (60 × 0.1).
 panic-window-percentage: "10.0"
# The panic threshold percentage. The default is 200.
 panic-threshold-percentage: "200.0"
# The maximum scale up rate, which indicates the maximum ratio of desired pods per scale-out activity. The value is calculated based on the following formula: math.Ceil(MaxScaleUpRate*readyPodsCount).
 max-scale-up-rate: "1000.0"
# The maximum scale down rate. The default is 2, which indicates that pods are scaled to half of the current number during each scale-in activity.
 max-scale-down-rate: "2.0"
# Specifies whether to scale the number of pods to zero. By default, this feature is enabled.
 enable-scale-to-zero: "true"
# The graceful period before the number of pods is scaled to zero. The default is 30 seconds.
 scale-to-zero-grace-period: "30s"
# The retention period of the last pod before the number of pods is scaled to zero. Specify this parameter if the cost for launching pods is high.
 scale-to-zero-pod-retention-period: "0s"
# The type of the autoscaler. The following autoscalers are supported: KPA, Horizontal Pod Autoscaler (HPA), and Advanced Horizontal Pod Autoscaler (AHPA).
 pod-autoscaler-class: "kpa.autoscaling.knative.dev"
# The request capacity of the Activator service.
 activator-capacity: "100.0"
# The number of pods to be initialized when a revision is created. The default is 1.
 initial-scale: "1"
# Specifies whether no pod is initialized when a revision is created. The default is false, which indicates that pods are initialized when a revision is created.
 allow-zero-initial-scale: "false"
# The minimum number of pods kept for a revision. The default is 0, which means that no pod is kept.
 min-scale: "0"
# The maximum number of pods to which a revision can be scaled. The default is 0, which means that the number of pods to which a revision can be scaled is unlimited.
 max-scale: "0"
# The scale down delay. The default is 0, which indicates a scale-in activity is performed immediately.
 scale-down-delay: "0s"
メトリクス
autoscaling.knative.de v/metricアノテーションを使用して、リビジョンのメトリックを設定できます。 異なるオートスケーラーは異なるメトリックをサポートします。
サポートされているメトリック:
"concurrency"、"rps"、"cpu"、"memory"、およびカスタムメトリック。デフォルトのメトリック:
"concurrency"
同時実行メトリックの設定
RPSメトリックの設定
CPUメトリックの設定
メモリメトリックの設定
ターゲットしきい値の設定
autoscaling.knative.de v/targetアノテーションを使用して、リビジョンのターゲットを設定できます。 container-concurrency-target-defaultアノテーションを使用して、ConfigMapでグローバルターゲットを設定することもできます。
リビジョンの設定
apiVersion: serving.knative.dev/v1
kind: Service
metadata:
  name: helloworld-go
  namespace: default
spec:
  template:
    metadata:
      annotations:
        autoscaling.knative.dev/target: "50"
グローバルに設定
apiVersion: v1
kind: ConfigMap
metadata:
 name: config-autoscaler
 namespace: knative-serving
data:
 container-concurrency-target-default: "200"
スケールをゼロに設定する
グローバルスケールをゼロに設定
enable-scale-to-zeroパラメーターは、指定されたKnative Serviceがアイドル状態のときにポッド数をゼロにスケールするかどうかを指定します。 有効な値は "false" と "true" です。
apiVersion: v1
kind: ConfigMap
metadata:
 name: config-autoscaler
 namespace: knative-serving
data:
 enable-scale-to-zero: "false" # If the parameter is set to "false", the scale-to-zero feature is disabled. In this case, when the specified Knative Service is idle, pods are not scaled to zero.
scale-to-zeroのグレースフル期間の設定
scale-to-zero-grace-periodパラメーターは、指定されたKnative Serviceのポッドがゼロにスケーリングされる前のグレースフルピリオドを指定します。
apiVersion: v1
kind: ConfigMap
metadata:
 name: config-autoscaler
 namespace: knative-serving
data:
 scale-to-zero-grace-period: "40s"
scale-to-zeroの保持期間の設定
リビジョンの設定
autoscaling.knative.de v/scale-to-zero-pod-retention-periodアノテーションは、Knativeサービスのポッドがゼロにスケーリングされる前の最後のポッドの保持期間を指定します。
apiVersion: serving.knative.dev/v1
kind: Service
metadata:
  name: helloworld-go
  namespace: default
spec:
  template:
    metadata:
      annotations:
        autoscaling.knative.dev/scale-to-zero-pod-retention-period: "1m5s"
    spec:
      containers:
        - image: registry.cn-hangzhou.aliyuncs.com/knative-sample/helloworld-go:73fbdd56
グローバルに設定
scale-to-zero-pod-retention-periodアノテーションは、Knativeサービスのポッドがゼロにスケーリングされる前の最後のポッドのグローバル保持期間を指定します。
apiVersion: v1
kind: ConfigMap
metadata:
 name: config-autoscaler
 namespace: knative-serving
data:
 scale-to-zero-pod-retention-period: "42s"
同時実行の設定Configure the concurrency
同時実行性は、ポッドが同時に処理できる要求の最大数を示します。 同時実行を設定するには、ソフト同時実行制限、ハード同時実行制限、ターゲット使用率、およびRPSを設定します。
ソフト同時実行制限の設定
ソフト同時実行制限は、厳密に強制された制限ではなく、ターゲット制限です。 いくつかのシナリオでは、特に要求のバーストが発生した場合、値を超えることがある。
リビジョンの設定
apiVersion: serving.knative.dev/v1
kind: Service
metadata:
  name: helloworld-go
  namespace: default
spec:
  template:
    metadata:
      annotations:
        autoscaling.knative.dev/target: "200"
グローバルに設定
apiVersion: v1
kind: ConfigMap
metadata:
 name: config-autoscaler
 namespace: knative-serving
data:
 container-concurrency-target-default: "200" # Specify a concurrency target for a Knative Service.
リビジョンのハード同時実行制限の設定
アプリケーションに特定の同時実行上限がある場合にのみ、ハード同時実行上限を指定することをお勧めします。 ハード同時実行制限を低く設定すると、アプリケーションのスループットと応答遅延に悪影響を及ぼします。
ハード同時実行制限は、厳密に強制される制限です。 ハード同時実行制限に達すると、十分なリソースを使用して要求を処理できるようになるまで、余分な要求はキュープロキシまたはActivatorサービスによってバッファリングされます。
apiVersion: serving.knative.dev/v1
kind: Service
metadata:
  name: helloworld-go
  namespace: default
spec:
  template:
    spec:
      containerConcurrency: 50
ターゲット使用率
ターゲット利用率は、オートスケーラのターゲットの実際の割合を指定します。 ターゲット使用率を使用して、同時実行値を調整することもできます。 目標利用率は、ポッドが動作するホットネスとしても知られている。 これにより、指定されたハード同時実行制限に達する前にオートスケーラがスケールアウトします。
たとえば、containerConcurrencyが10に設定され、ターゲット使用率が70 (パーセンテージ) に設定されている場合、オートスケーラーは、既存のすべてのポッドでの同時リクエストの平均数が7に達するとポッドを作成します。 ポッドが作成された後、ポッドがReady状態になるまでに時間がかかります。 ハード同時実行制限に達する前に、ターゲット使用率を下げて新しいポッドを作成できます。 これにより、コールドスタートによる応答待ち時間を短縮できます。
リビジョンの設定
apiVersion: serving.knative.dev/v1
kind: Service
metadata:
  name: helloworld-go
  namespace: default
spec:
  template:
    metadata:
      annotations:
        autoscaling.knative.dev/target-utilization-percentage: "70" # Configure the target utilization percentage.
    spec:
      containers:
        - image: registry.cn-hangzhou.aliyuncs.com/knative-sample/helloworld-go:73fbdd56
グローバルに設定
apiVersion: v1
kind: ConfigMap
metadata:
 name: config-autoscaler
 namespace: knative-serving
data:
 container-concurrency-target-percentage: "70" # KPA attempts to ensure that the concurrency of each pod does not exceed 70% of the current resources.
RPSの設定
RPSは、1秒間にポッドが処理できる要求の数を指定します。
リビジョンの設定
apiVersion: serving.knative.dev/v1
kind: Service
metadata:
  name: helloworld-go
  namespace: default
spec:
  template:
    metadata:
      annotations:
        autoscaling.knative.dev/target: "150"
        autoscaling.knative.dev/metric: "rps" # The number of pods is adjusted based on the RPS value.
    spec:
      containers:
        - image: registry.cn-hangzhou.aliyuncs.com/knative-sample/helloworld-go:73fbdd56
グローバルに設定
apiVersion: v1
kind: ConfigMap
metadata:
 name: config-autoscaler
 namespace: knative-serving
data:
 requests-per-second-target-default: "150"
シナリオ1: 同時実行ターゲットを設定して自動スケーリングを有効にする
この例では、同時実行ターゲットを設定してKPAで自動スケーリングを実行できるようにする方法を示します。
Knativeのデプロイ方法の詳細については、「ACKクラスターにKnativeをデプロイする」および「ACKサーバーレスクラスターにKnativeをデプロイする」をご参照ください。
次のYAMLテンプレートを使用して、autoscale-go.yamlという名前のファイルを作成し、そのファイルをクラスターにデプロイします。
apiVersion: serving.knative.dev/v1
kind: Service
metadata:
  name: autoscale-go
  namespace: default
spec:
  template:
    metadata:
      labels:
        app: autoscale-go
      annotations:
        autoscaling.knative.dev/target: "10" # Set the concurrency target to 10.
    spec:
      containers:
        - image: registry.cn-hangzhou.aliyuncs.com/knative-sample/autoscale-go:0.1
kubectl apply -f autoscale-go.yamlIngressゲートウェイを取得します。
ALB
次のコマンドを実行してIngressゲートウェイを取得します。
kubectl get albconfig knative-internet期待される出力:
NAME               ALBID                    DNSNAME                                              PORT&PROTOCOL   CERTID   AGE
knative-internet   alb-hvd8nngl0lsdra15g0   alb-hvd8nng******.cn-beijing.alb.aliyuncs.com                            2
MSE
次のコマンドを実行して、Ingressゲートウェイを取得します。
kubectl -n knative-serving get ing stats-ingress期待される出力:
NAME            CLASS                  HOSTS   ADDRESS                         PORTS   AGE
stats-ingress   knative-ingressclass   *       101.201.XX.XX,192.168.XX.XX   80      15d
ASM
次のコマンドを実行して、Ingressゲートウェイを取得します。
kubectl get svc istio-ingressgateway --namespace istio-system --output jsonpath="{.status.loadBalancer.ingress[*]['ip']}"期待される出力:
121.XX.XX.XXクーリエ
次のコマンドを実行して、Ingressゲートウェイを取得します。
kubectl -n knative-serving get svc kourier期待される出力:
NAME      TYPE           CLUSTER-IP    EXTERNAL-IP      PORT(S)                      AGE
kourier   LoadBalancer   10.0.XX.XX    39.104.XX.XX     80:31133/TCP,443:32515/TCP   49m
ロードテストツールを使用して、30秒以内に50の同時リクエストをアプリケーションに送信します。
説明heyの詳細については、「hey」をご参照ください。
hey -z 30s -c 50 -host "autoscale-go.default.example.com" "http://121.199.XXX.XXX" # 121.199.XXX.XXX is the IP address of the Ingress gateway.期待される出力:

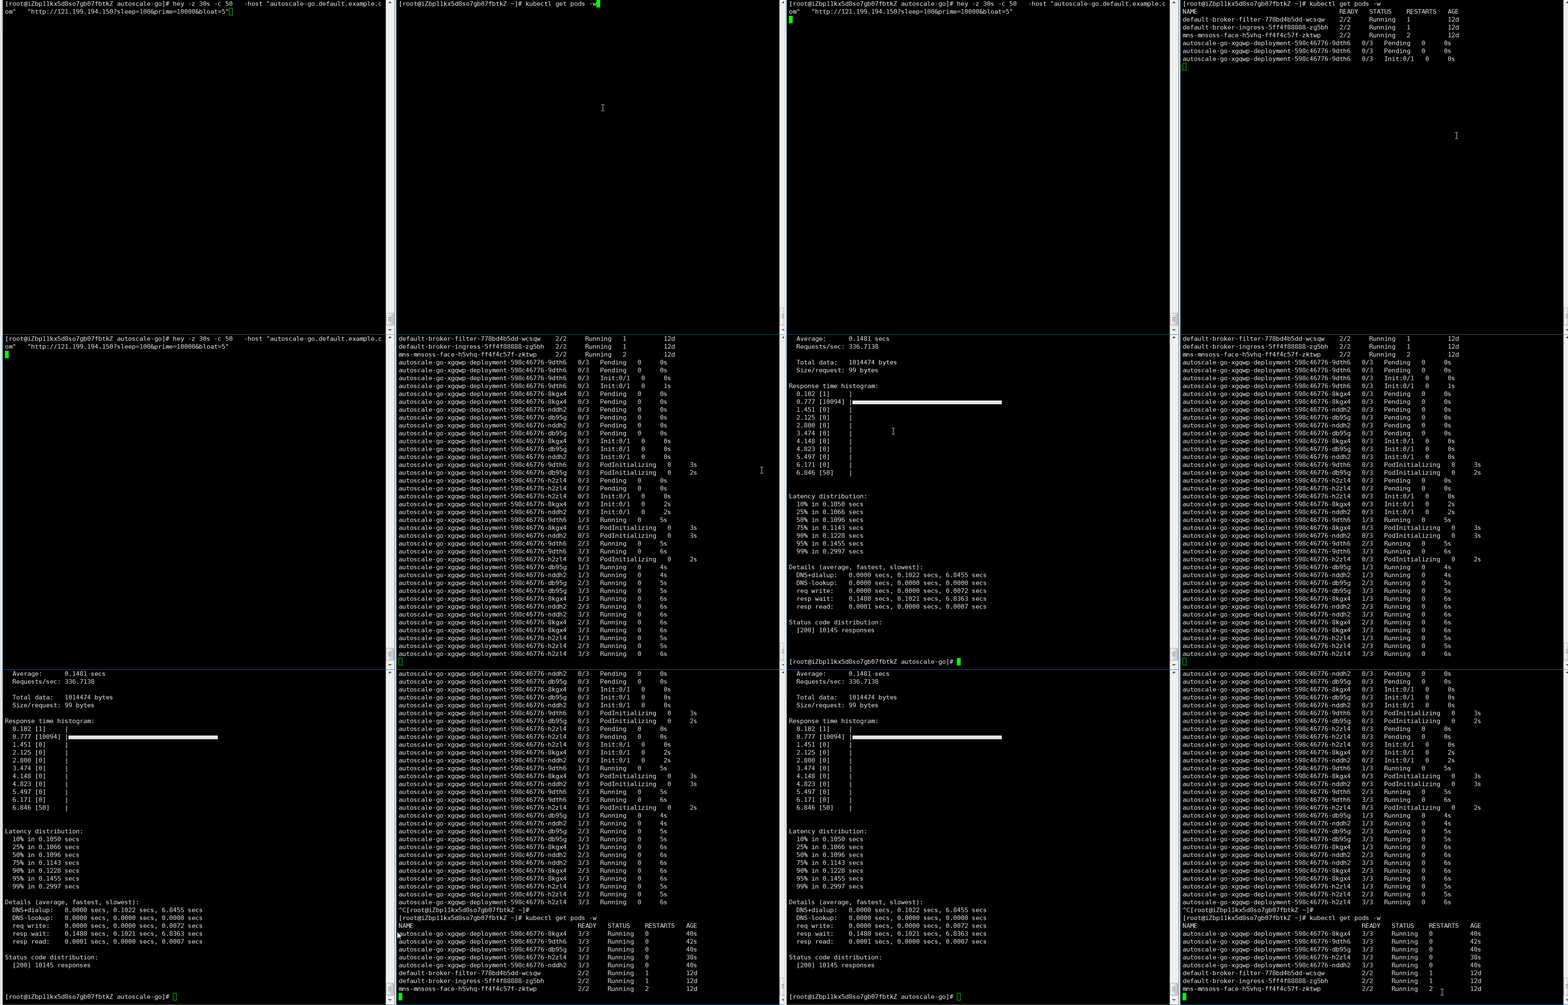
出力は、予想通りに5つのポッドが追加されたことを示します。
シナリオ2: スケール境界を設定して自動スケーリングを有効にする
スケール境界は、アプリケーションにプロビジョニングできるポッドの最小数と最大数を制御します。 この例では、スケール境界を設定して自動スケーリングを有効にする方法を示します。
Knativeのデプロイ方法の詳細については、「ACKクラスターにKnativeをデプロイする」および「ACKサーバーレスクラスターにKnativeをデプロイする」をご参照ください。
次のYAMLテンプレートを使用して、autoscale-go.yamlという名前のファイルを作成し、そのファイルをクラスターにデプロイします。
このYAMLテンプレートは、同時実行ターゲットを10、
最小スケールを1、最大スケールを3に設定します。apiVersion: serving.knative.dev/v1 kind: Service metadata: name: autoscale-go namespace: default spec: template: metadata: labels: app: autoscale-go annotations: autoscaling.knative.dev/target: "10" autoscaling.knative.dev/min-scale: "1" autoscaling.knative.dev/max-scale: "3" spec: containers: - image: registry.cn-hangzhou.aliyuncs.com/knative-sample/autoscale-go:0.1kubectl apply -f autoscale-go.yamlIngressゲートウェイを取得します。
ALB
次のコマンドを実行してIngressゲートウェイを取得します。
kubectl get albconfig knative-internet期待される出力:
NAME               ALBID                    DNSNAME                                              PORT&PROTOCOL   CERTID   AGE
knative-internet   alb-hvd8nngl0lsdra15g0   alb-hvd8nng******.cn-beijing.alb.aliyuncs.com                            2
MSE
次のコマンドを実行して、Ingressゲートウェイを取得します。
kubectl -n knative-serving get ing stats-ingress期待される出力:
NAME            CLASS                  HOSTS   ADDRESS                         PORTS   AGE
stats-ingress   knative-ingressclass   *       101.201.XX.XX,192.168.XX.XX   80      15d
ASM
次のコマンドを実行して、Ingressゲートウェイを取得します。
kubectl get svc istio-ingressgateway --namespace istio-system --output jsonpath="{.status.loadBalancer.ingress[*]['ip']}"期待される出力:
121.XX.XX.XXクーリエ
次のコマンドを実行して、Ingressゲートウェイを取得します。
kubectl -n knative-serving get svc kourier期待される出力:
NAME      TYPE           CLUSTER-IP    EXTERNAL-IP      PORT(S)                      AGE
kourier   LoadBalancer   10.0.XX.XX    39.104.XX.XX     80:31133/TCP,443:32515/TCP   49m
ロードテストツールを使用して、30秒以内に50の同時リクエストをアプリケーションに送信します。
説明heyの詳細については、「hey」をご参照ください。
hey -z 30s -c 50 -host "autoscale-go.default.example.com" "http://121.199.XXX.XXX" # 121.199.XXX.XXX is the IP address of the Ingress gateway.期待される出力:

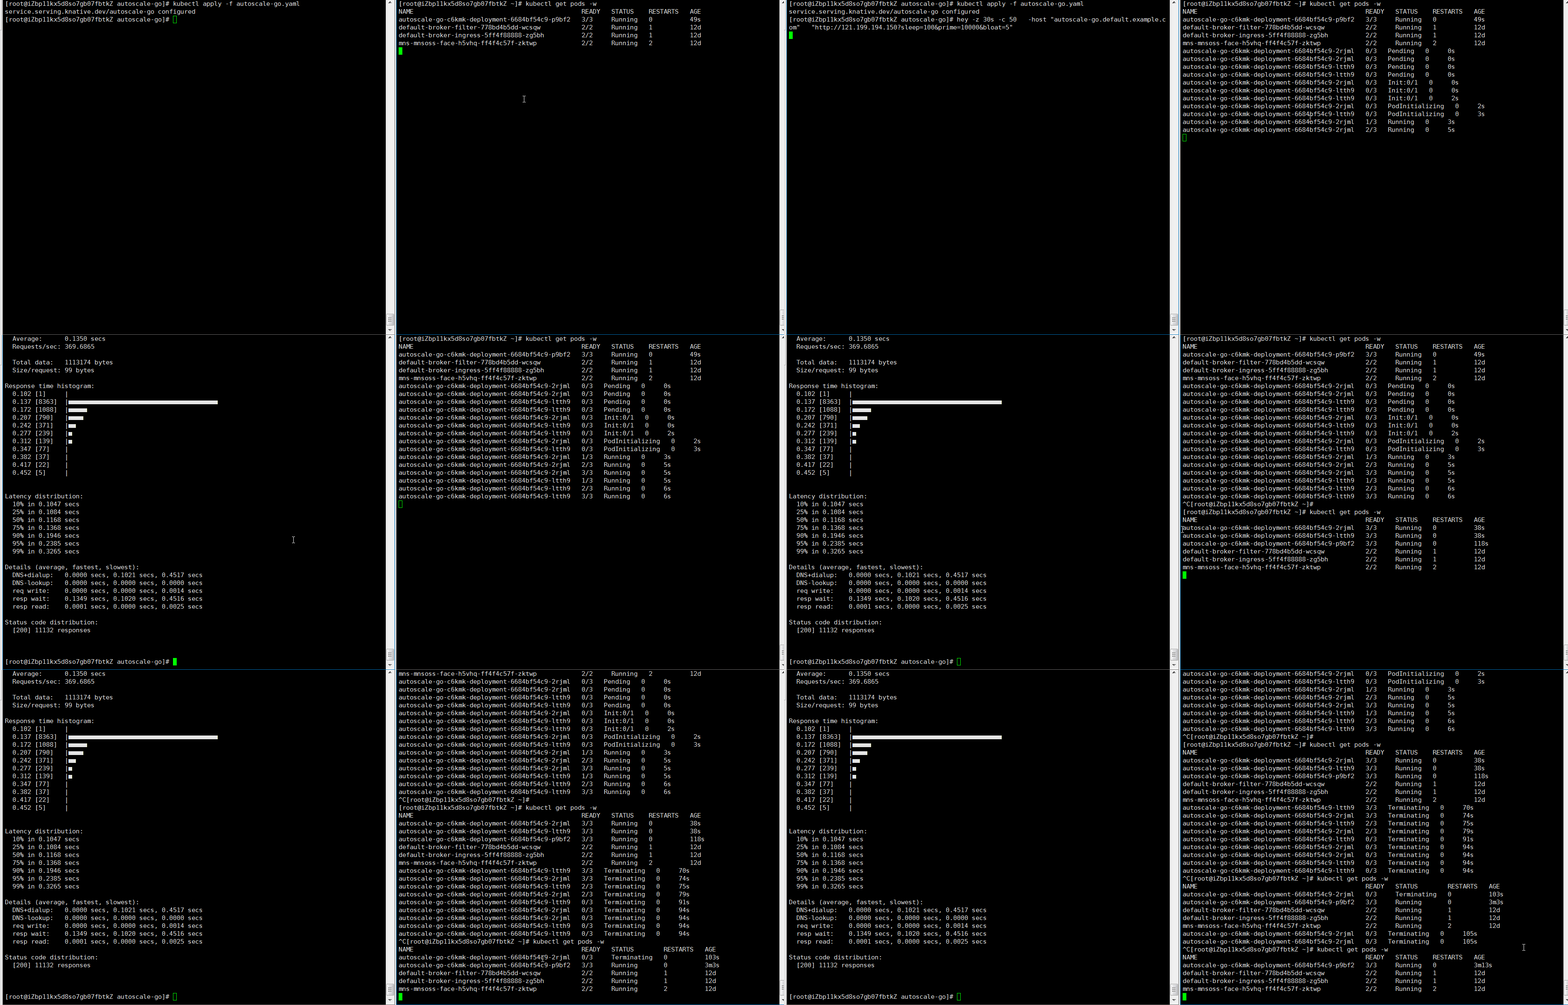
最大で3つのポッドが追加されます。 トラフィックがアプリケーションに流れない場合、1つのポッドが予約されます。