If your large enterprise has deployed multiple Virtual Private Clouds (VPCs) on Alibaba Cloud, you need to connect them to your on-premises data center. You can use an IPsec-VPN connection to securely connect your on-premises data center to Alibaba Cloud. Binding the IPsec-VPN connection to a Transit Router enables full connectivity between your on-premises data center and multiple VPCs, whether they are in the same or different regions.
Prerequisites
Public IP: When the IPsec connection uses the public network type and is bound to a transit router, your on-premises gateway must have a public IP address.
In regions that support dual-tunnel mode, we recommend either two public IPs on the same gateway or two gateways each with one public IP.
Protocol: The on-premises gateway must support IKEv1 or IKEv2.
No overlapping CIDRs: The CIDR blocks used for connectivity between your on-premises data center and the VPCs must not overlap.
Use case
This tutorial uses the following scenario as an example. An enterprise has created VPC1 in the Thailand (Bangkok) region and VPC2 in the Philippines (Manila) region. Business services are deployed on Elastic Compute Service (ECS) instances within VPC1 and VPC2.

CIDR block planning
Ensure that CIDR blocks used for connectivity among the on-premises data center, VPC1, and VPC2 do not overlap.
Use BGP dynamic routing when you create the IPsec-VPN connection. If you use static routing, ensure your on-premises gateway supports static ECMP routing to prevent asymmetric routing and ensure traffic is properly load-balanced over both tunnels. This tutorial uses BGP dynamic routing as an example.
Resource | CIDR | IP address |
On-premises data center | 192.168.55.0/24 (to communicate with VPCs) | Server: 192.168.55.65 |
On-premises gateway | N/A | GigabitEthernet0/0: public IP 120.XX.XX.104; GigabitEthernet0/2: public IP 121.XX.XX.3; GigabitEthernet0/1: 192.168.55.217 (to data center) |
VPC1 | 192.168.0.0/16; vSwitch1: 192.168.66.0/24; vSwitch2: 192.168.20.0/24 | ECS1: 192.168.66.193 |
VPC2 | 10.0.0.0/16; vSwitch1: 10.0.10.0/24; vSwitch2: 10.0.20.0/24 | ECS2: 10.0.20.61 |
BGP tunnel CIDRs must be /30 subnets within 169.254.0.0/16, and must not be 169.254.0.0/30, 169.254.1.0/30, 169.254.2.0/30, 169.254.3.0/30, 169.254.4.0/30, 169.254.5.0/30, 169.254.6.0/30, or 169.254.169.252/30. The two tunnels of one IPsec connection must use different tunnel CIDRs.
Resource | Tunnel | BGP tunnel CIDR | BGP IP | Local ASN |
IPsec connection | Tunnel 1 | 169.254.10.0/30 | 169.254.10.1 | 65535 |
Tunnel 2 | 169.254.20.0/30 | 169.254.20.1 | 65535 | |
On-premises gateway | Tunnel 1 | 169.254.10.0/30 | 169.254.10.2 | 65530 |
Tunnel 2 | 169.254.20.0/30 | 169.254.20.2 | 65530 |
Procedure
Step 1: Create a CEN instance and Transit Routers
Before creating the IPsec-VPN connection, create a Cloud Enterprise Network (CEN) instance and transit router instances under it.
Create a CEN instance. Use the default settings.
Create one transit router in Philippines (Manila) and one in Thailand (Bangkok). See Create a TR.
Use default settings for the Philippines (Manila) transit router (it will connect VPC2).
For the Thailand (Bangkok) transit router (it will connect VPC1 and the on-premises data center), configure Transit Router CIDR for the IPsec-VPN connection; keep other settings default.
Create the transit router in the Alibaba Cloud region closest to your on-premises data center.
This topic uses Transit Router CIDR *10.10.10.0/24*. It must not overlap with CIDRs used for connectivity (on-premises, VPC1, VPC2).
Step 2: Create an IPsec-VPN connection
Create a customer gateway. Register your on-premises gateway's public IPs with Alibaba Cloud by creating customer gateways. Only registered public IPs can be used to establish IPsec-VPN connections.
Log on to the VPN Gateway console.
In the left sidebar, choose > Customer Gateway.
Select the region in the top menu bar. The customer gateway region must be the same as the transit router region.
On the Customer Gateway page, click Create Customer Gateway.
In the Create Customer Gateway panel, create two customer gateways to register the two public IPs of your on-premises gateway. Then, click OK. For more options, see Customer gateway.
Name
IP address
AS number
Customer Gateway 1
*120.XX.XX.104* (first public IP)
*65530* (required when using BGP)
Customer Gateway 2
*121.XX.XX.3* (second public IP)
*65530*
Create an IPsec-VPN connection.
In the left sidebar, choose > IPsec Connection.
Click Bind to CEN.
On the Create IPsec Connection (CEN) page, configure the connection and click OK:
Setting
Value
Name
*IPsec-connection-1* (example)
Region
The region of the transit router to bind
Gateway type
Public
Bind to CEN
Current account
CEN instance
The CEN instance created in Step 1; the transit router and its CIDR in this region are shown
Route mode
Destination-based (recommended for BGP)
Effective immediately
Yes (default)
Tunnel 1
Customer gateway
Customer Gateway 1
Pre-shared key
*fddsFF111* (must match the on-premises gateway)
Encryption
IKE DH group: group14; IPsec DH group: group14; keep other defaults
Tunnel 2
Customer gateway
Customer Gateway 2
Pre-shared key
*fddsFF222*
Encryption
Same as Tunnel 1 (IKE and IPsec DH group: group14)
Advanced
Use default (all options enabled)
ImportantThe IPsec-VPN connection and the peer gateway device must use the same pre-shared key. Otherwise, the system cannot establish an IPsec-VPN connection.
In the Create successful dialog, click Cancel.
Stay on the IPsec Connection page, find the new connection, and in the Actions column click Download Configuration. The configuration is for the on-premises gateway.
Copy and save the configuration for use when configuring your on-premises gateway.
Configure the on-premises gateway. After creating the IPsec connection, add the VPN configuration on your on-premises gateway so it can establish the IPsec-VPN connection with Alibaba Cloud. The following example uses a Cisco ASA.
NoteReplace interface names, IPs, and keys with your values. IKE and IPsec algorithms, DH group, and SA lifetime must match the Alibaba Cloud IPsec connection (only one value per setting is supported on Alibaba Cloud).
Enter configuration mode.
ciscoasa> enable
Password: ********
ciscoasa# configure terminal
ciscoasa(config)#
Verify interface and route configuration.Example (adjust to your environment):
ciscoasa(config)# show running-config interface
!
interface GigabitEthernet0/0
 nameif outside1
 security-level 0
 ip address 120.XX.XX.104 255.255.255.255
!
interface GigabitEthernet0/1
 nameif private
 security-level 100
 ip address 192.168.55.217 255.255.255.0
!
interface GigabitEthernet0/2
 nameif outside2
 security-level 0
 ip address 121.XX.XX.3 255.255.255.255
!
route outside1 121.XX.XX.170 255.255.255.255 192.XX.XX.172   # Route to Alibaba Cloud tunnel 1
route outside2 121.XX.XX.232 255.255.255.255 192.XX.XX.158   # Route to Alibaba Cloud tunnel 2
route private 192.168.55.0 255.255.255.0 192.168.55.216      # Route to data center
Enable IKEv2 on public interfaces
crypto ikev2 enable outside1
crypto ikev2 enable outside2
Create IKEv2 policy (match Alibaba Cloud: encryption, integrity, DH group, lifetime)
crypto ikev2 policy 10
 encryption aes
 integrity sha
 group 14
 prf sha
 lifetime seconds 86400
Create IPsec proposal and profile (match Alibaba Cloud IPsec phase)
crypto ipsec ikev2 ipsec-proposal ALIYUN-PROPOSAL
 protocol esp encryption aes
 protocol esp integrity sha-1
crypto ipsec profile ALIYUN-PROFILE
 set ikev2 ipsec-proposal ALIYUN-PROPOSAL
 set ikev2 local-identity address
 set pfs group14
 set security-association lifetime seconds 86400
 set security-association lifetime kilobytes unlimited
Create tunnel groups (pre-shared keys must match Alibaba Cloud)
tunnel-group 121.XX.XX.170 type ipsec-l2l
tunnel-group 121.XX.XX.170 ipsec-attributes
 ikev2 remote-authentication pre-shared-key fddsFF111****
 ikev2 local-authentication pre-shared-key fddsFF111****
!
tunnel-group 121.XX.XX.232 type ipsec-l2l
tunnel-group 121.XX.XX.232 ipsec-attributes
 ikev2 remote-authentication pre-shared-key fddsFF222****
 ikev2 local-authentication pre-shared-key fddsFF222****
!
Create tunnel interfaces
interface Tunnel1
 nameif ALIYUN1
 ip address 169.254.10.2 255.255.255.252
 tunnel source interface outside1
 tunnel destination 121.XX.XX.170
 tunnel mode ipsec ipv4
 tunnel protection ipsec profile ALIYUN-PROFILE
 no shutdown
!
interface Tunnel2
 nameif ALIYUN2
 ip address 169.254.20.2 255.255.255.252
 tunnel source interface outside2
 tunnel destination 121.XX.XX.232
 tunnel mode ipsec ipv4
 tunnel protection ipsec profile ALIYUN-PROFILE
 no shutdown
!
After this, the IPsec-VPN connection can be established. Check the connection status on the IPsec connection details page in the console. If the connection fails, see IPsec-VPN self-service diagnostics.
Configure routing. After the IPsec-VPN connection is up, add BGP (or static) routes so traffic can flow between the on-premises data center and the cloud. We recommend BGP. If you use static routing, your on-premises gateway must support static ECMP; otherwise traffic from the data center to the cloud may not use ECMP as expected.
BGP dynamic routing
On the on-premises gateway, configure BGP (example):
router bgp 65530
 address-family ipv4 unicast
  neighbor 169.254.10.1 remote-as 65535
  neighbor 169.254.10.1 ebgp-multihop 255
  neighbor 169.254.10.1 activate
  neighbor 169.254.20.1 remote-as 65535
  neighbor 169.254.20.1 ebgp-multihop 255
  neighbor 169.254.20.1 activate
  network 192.168.55.0 mask 255.255.255.0
  maximum-paths 5
 exit-address-family
Add routing as needed so clients in the data center can reach cloud resources via the gateway.
On Alibaba Cloud, enable BGP for the IPsec connection:
In the left sidebar, choose > IPsec Connection.
Click the IPsec connection ID.
In Basic Information, turn on Enable BGP and in the BGP Configuration dialog box, configure the settings and click OK. See BGP configurations for details.
Setting
Value
Local ASN
*65535*
Tunnel 1
Tunnel CIDR: *169.254.10.0/30*; Local BGP IP: *169.254.10.1*
Tunnel 2
Tunnel CIDR: *169.254.20.0/30*; Local BGP IP: *169.254.20.1*
After BGP is established, routes are exchanged automatically between the on-premises network and the transit router.

Static routing (optional)
On the on-premises gateway: Add static routes to VPC CIDRs (e.g. 10.0.0.0/16 and 192.168.66.0/24) with next hops via tunnel 1 and tunnel 2 for ECMP. Refer to your vendor documentation for exact commands.
On Alibaba Cloud: Add a destination-based route on the IPsec connection for *192.168.55.0/24* with next hop the IPsec connection. See Configure destination-based routes.
Step 3: Achieve full connectivity between the on-premises data center and VPCs
Create VPC connections. Attach VPC1 and VPC2 to the transit routers so that the on-premises data center, VPC1, and VPC2 can all communicate.
Log on to the CEN console.
Open the CEN instance, go to , find the Philippines (Manila) transit router, and in Actions click Create Network Instance Connection.
On the Connect Network Instance page, create the VPC2 connection (instance type: VPC; region: Philippines (Manila); connection name: VPC2-connection; select VPC2; select vSwitches with available IPs). Click Create.
Repeat for the Thailand (Bangkok) transit router to create the VPC1 connection (region: Thailand (Bangkok); connection name: VPC1-connection; select VPC1). Ensure each selected vSwitch has at least one free IP. See Create a VPC connection (Enterprise Edition transit router)and Create and manage vSwitches. After this, the on-premises data center and VPC1 (same region as the IPsec-attached transit router) can communicate. VPC2 is in a different region, so you need a cross-region connection.
Create a cross-region connection.
In the CEN instance, go to , and click Set Cross-Region Bandwidth.
Create a cross-region connection: Instance type: Cross-region connection; Region: Thailand (Bangkok); Peer region: Philippines (Manila); Bandwidth billing: Pay-by-data-transfer (billed by CDT); set Bandwidth (Mbps); keep Default link type (e.g. Gold) and Advanced as default. Click Create.
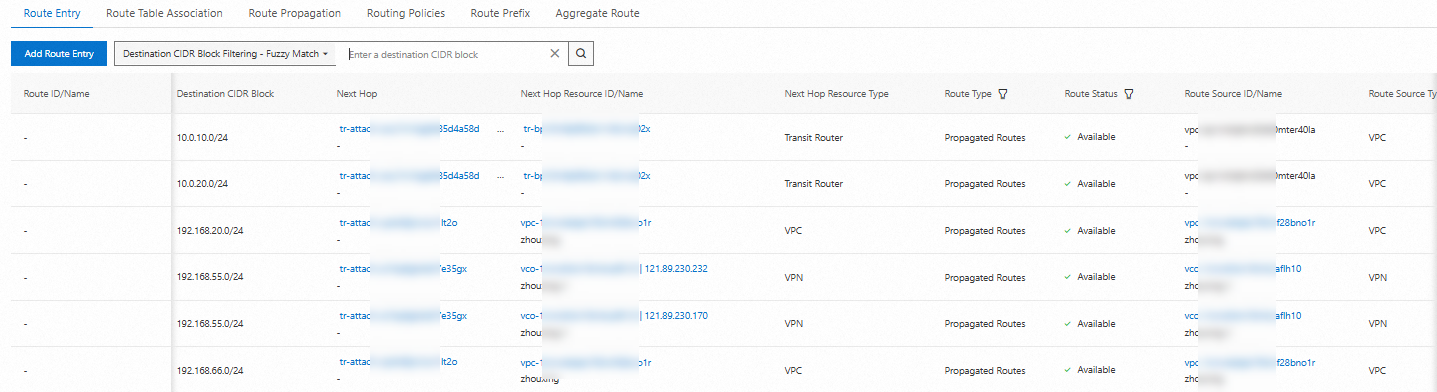
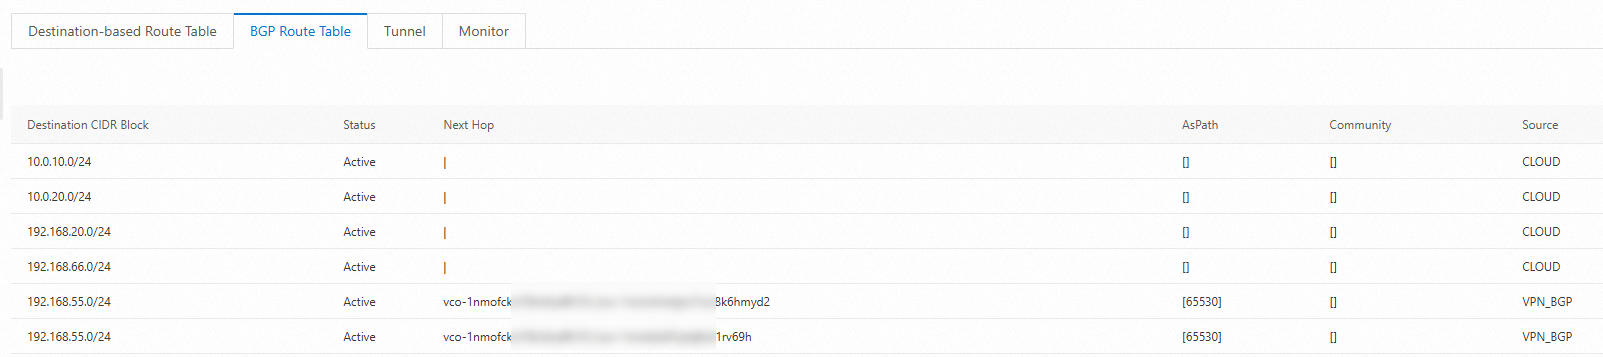
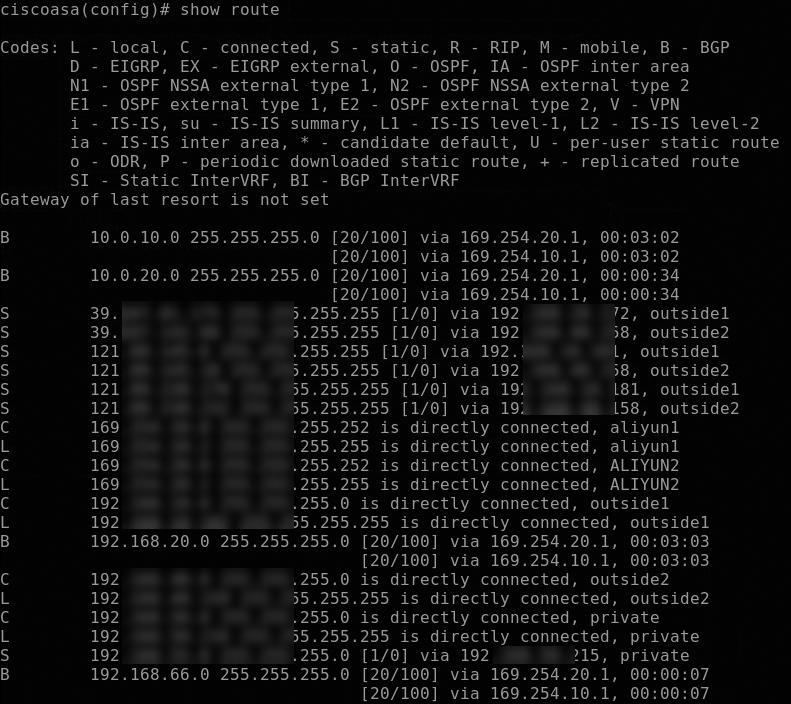
After VPC and cross-region connections are created, the transit router propagates and learns routes according to Advanced settings. The on-premises data center, VPC1, and VPC2 can communicate. You can check the route tables on the transit router, the IPsec connection, and the on-premises gateway.
Route table of the Transit Router in the Thailand (Bangkok) region
BGP route table of the IPsec connection
Routes on the on-premises data center
Test network connectivity. After the above steps, the on-premises data center, VPC1, and VPC2 can communicate. This section describes how to test connectivity and IPsec-VPN high availability.
NoteBefore the test, make sure that you understand the security group rules applied to the ECS instance in the VPC and the access control list (ACL) rules applied to the data center. Make sure that the rules allow mutual access between the VPC and the data center. For more information about ECS security group rules, see View security group rules and Add a security group rule.
Test network connectivity.
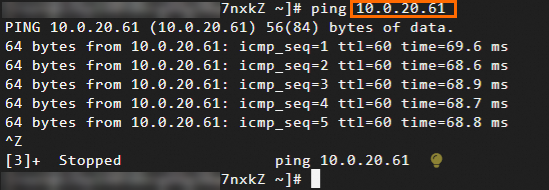
Log on to a client in the on-premises data center.
Run
ping <ECS IP address>to ECS1 (VPC1) and ECS2 (VPC2). If you receive replies, the data center can reach both VPCs.
Log on to ECS1 in VPC1. See Connect to an ECS instance.
Run
ping <ECS2 IP address>. If you receive replies, VPC1 and VPC2 can communicate.
Log on to ECS1 in VPC1.
Run:
ping <on-premises server IP> -c 10000to generate continuous traffic.Break one tunnel (e.g. change the pre-shared key for that tunnel on the IPsec connection or on the gateway so they no longer match).
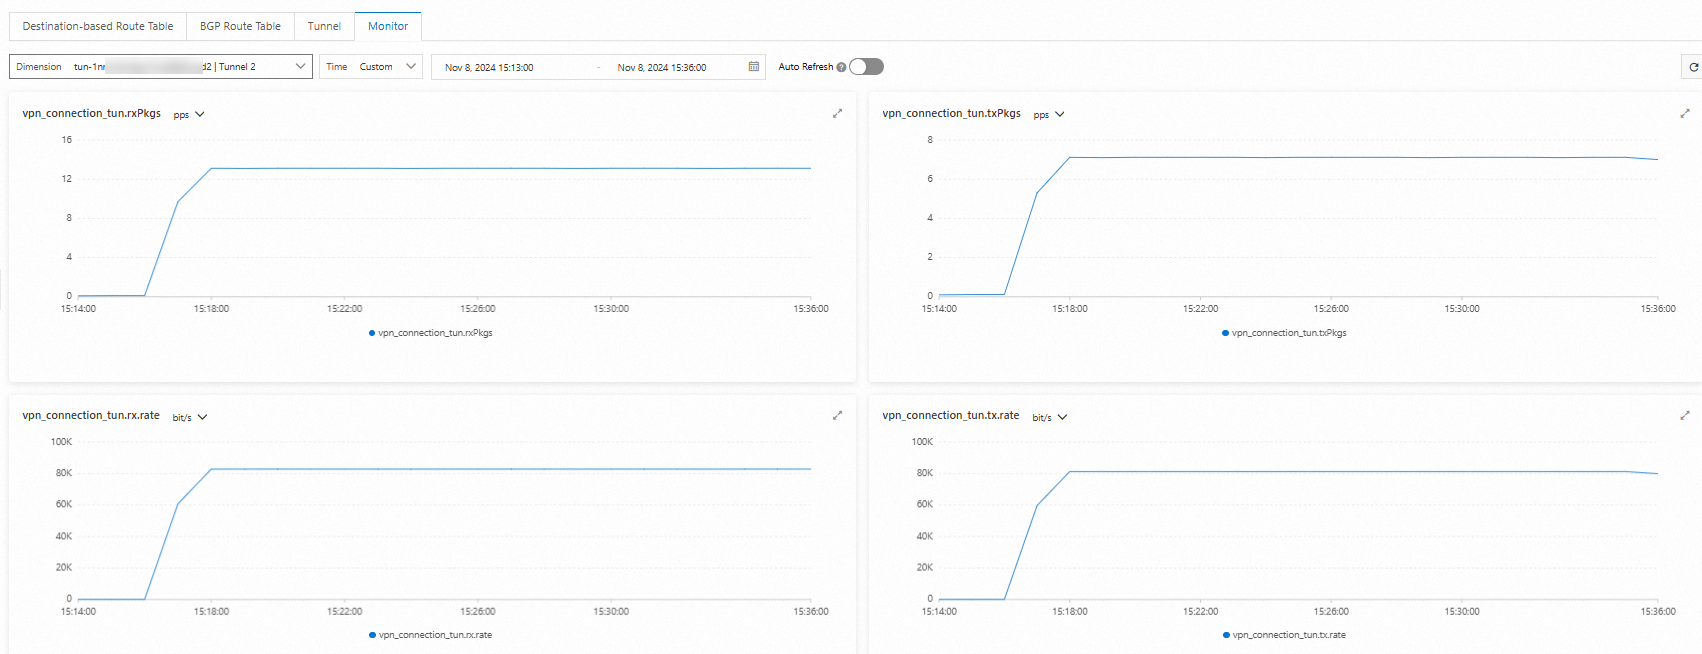
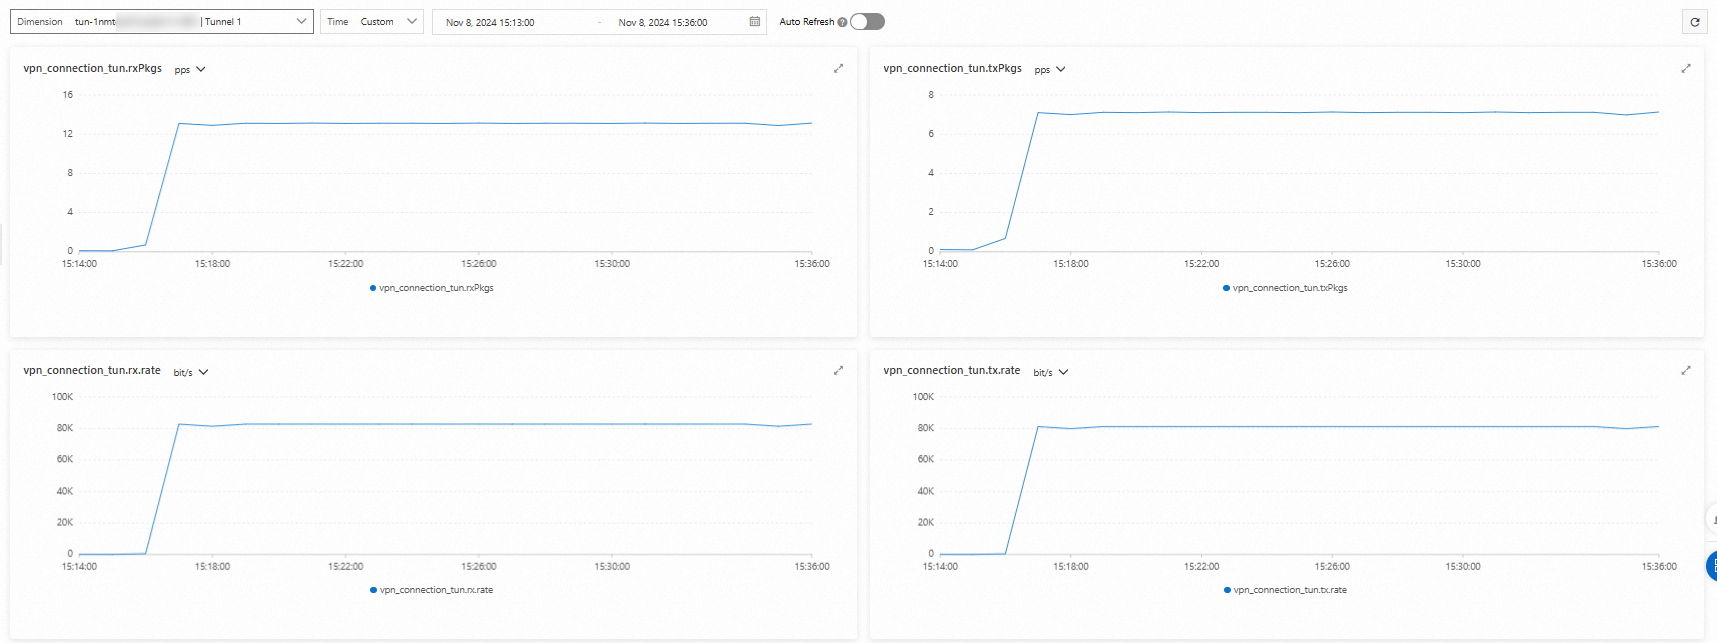
You should see a brief interruption, then traffic should continue over the other tunnel. On the IPsec connection details page, open the Monitoring tab to view per-tunnel traffic. See Monitor IPsec-VPN connections.
Test high availability.
Log on to ECS1 in VPC1.
Run:
ping <on-premises server IP> -c 10000to generate continuous traffic.Break one tunnel (e.g. change the pre-shared key for that tunnel on the IPsec connection or on the gateway so they no longer match).
You should see a brief interruption, then traffic should continue over the other tunnel. On the IPsec connection details page, open the Monitoring tab to view per-tunnel traffic. See Monitor IPsec-VPN connections.
Channel 1
Channel 2