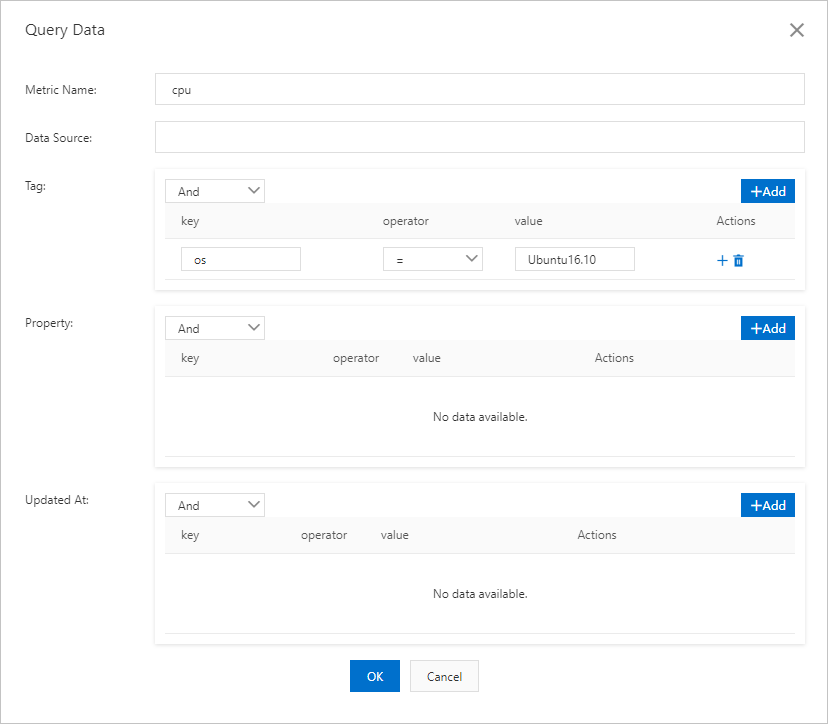
You can access Tablestore by using the Tablestore console, the Tablestore CLI, or Tablestore SDKs. To use the TimeSeries model in the Tablestore console, you must activate Tablestore first. After Tablestore is activated, you can use the Tablestore console to create an instance for the TimeSeries model, create a time series table, read data from and write data to the table, and use SQL to query data.
Prerequisites
Obtain the logon information of the Alibaba Cloud account or (RAM user that is used to log on to Tablestore.
If you have not created an Alibaba Cloud account, create one on the Alibaba Cloud official website.
To use Tablestore as a RAM user, you must create a RAM user by using your Alibaba Cloud account and grant the RAM user the permissions to access Tablestore. For more information, see Use a RAM policy to grant permissions to a RAM user.
Usage notes
The TimeSeries model is supported in the following regions: China (Hangzhou), China (Shanghai), China (Beijing), China (Zhangjiakou), China (Ulanqab), China (Shenzhen), China (Chengdu), China (Hong Kong), Japan (Tokyo), Malaysia (Kuala Lumpur), Germany (Frankfurt), Indonesia (Jakarta), UK (London), US (Silicon Valley), US (Virginia), SAU (Riyadh - Partner Region), and Singapore.
Step 1: Activate Tablestore
If Tablestore is activated, skip this step. You must activate Tablestore only once. You are not charged when you activate Tablestore.
Log on to the Tablestore product page.
Click Get it Free.
On the Table Store (Pay-As-You-Go) page, click Buy Now.
On the Confirm Order page, select I have read and agree to Table Store (Pay-As-You-Go) Agreement of Service and click Activate Now.
After you activate Tablestore, click Console to go to the Tablestore console.
You can also click Console in the upper-right corner of the homepage of the Alibaba Cloud official website. Click the
 icon. In the left-side navigation pane, choose to go to the Tablestore console.
Step 2: Create an instance for the TimeSeries model
You cannot change the instance type after the instance is created.
Each Alibaba Cloud account can create up to 10 instances. The name of an instance must be unique within the region in which the instance resides.
If the Create Instance for TimeSeries Model button is not available in a region that supports the TimeSeries model, click Create Instance. For more information, see Create an instance.
Log on to the Tablestore console.
In the top navigation bar, select a resource group and a region.
On the Overview page, click Create Instance for TimeSeries Model.
In the Create Instance for TimeSeries Model dialog box, configure the Instance Type and Instance Name parameters. The Instance Description parameter is optional.
NoteFor more information about the naming conventions for instances and how to select an instance type, see Instances.
Click OK.
Step 3: Create a time series table
Create a time series table to store time series data.
Go to the Instance Management page.
Log on to the Tablestore console.
In the top navigation bar, select a resource group and a region.
On the Overview page, find the instance that you want to manage. Click the instance name or click Manage Instance in the Actions column.
In the lower part of the Instance Details tab, click the Time Series Tables tab.
On the Time Series Tables tab, click Create Time Series Table.
NoteYou can also click Generate Demo with One Click to create a test table with sample data for a quick start. When you create a time series table, the system performs some initialization operations. Therefore, you need to wait for dozens of seconds until the time series are displayed.
In the Create Time Series Table dialog box, configure the parameters that are described in the following table.
Parameter
Description
Name
The name of the time series table, which is used to uniquely identify the time series table in an instance.
The name must be 1 to 128 characters in length and can contain letters, digits, and underscores (_). The name must start with a letter or an underscore (_).
The name of a time series table cannot be the same as the name of an existing data table.
Time to Live
The retention period of the data in the time series table. Unit: seconds. If the system detects that the difference between the current time and the time column that is passed to the table exceeds the specified time to live (TTL) value, the system automatically deletes the expired data.
ImportantIn the time series table, the system determines the time when the data is generated based on the time column that is passed to the table, not the time when the data is written to the table.
The value of this parameter must be -1 or a value that is greater than or equal to 86400. A value of -1 indicates that the data never expires. A value of 86400 indicates one day.
Click OK.
After the time series table is created, you can view the time series table on the Time Series Tables tab. If the time series table is not displayed in the list of time series tables, click the
 icon to refresh the list.
Step 4: Write data to the time series table
Write time series data to the time series table in the Tablestore console. Time series data consists of metadata and data. If you do not create metadata before you write the time series data, the system automatically extracts the metadata from the written data.
On the Time Series Tables tab, click the name of the time series table that you want to manage, and then click the Query Data tab. You can also click Manage Data in the Actions column that corresponds to the time series table.
Optional. Create a time series.
On the Query Data tab, click Add Time Series.
In the Add Time Series dialog box, configure the metadata of the time series.
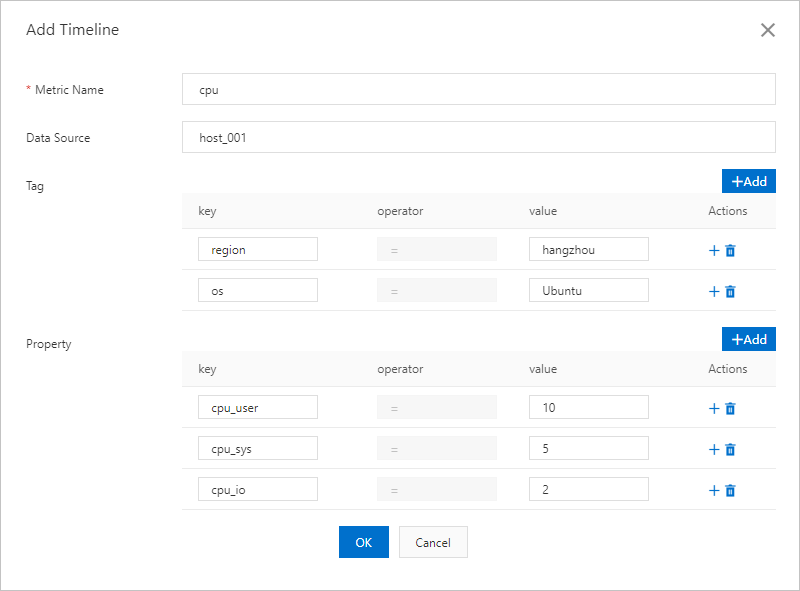
The following table describes the parameters.
Parameter
Description
Metric Name
The name of a physical quantity or metric for the data in the time series. Example: cpu or net, which specifies that the CPU utilization or network usage is recorded in the time series.
Data Source
The identifier of the data source for the time series. This parameter can be left empty.
Tag
The tag of the time series. You can customize multiple key-value pairs of the STRING type.
Property
The property column of the time series, which is used to record some property information of the time series.
Click OK.
Insert data.
Click Insert Data.
In the Insert Data dialog box, configure the Time and Attribute Column parameters.
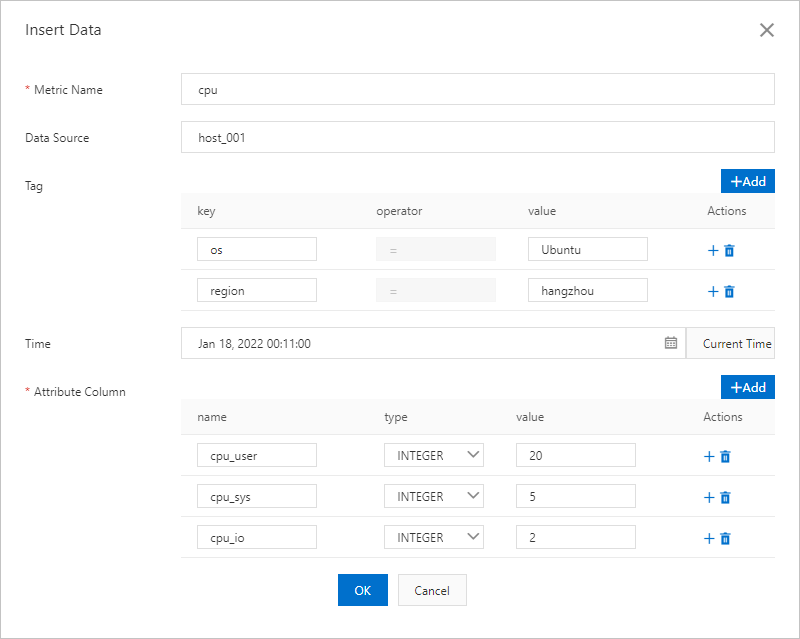
Click OK.
Step 5: Query time series data
If you want to query the data of a specific time series in the specified time range but you are not sure about the information about the time series, you can specify multiple conditions to retrieve all the time series that meet the specified conditions. If you are sure about the information about the time series whose data you want to query, you can bypass the time series retrieval step and dive straight into the query.
(Optional) Retrieve a time series
To query the data of a specific time series, perform the following steps:
On the Query Data tab, find the time series that you want to manage and click Query Data in the Actions column.
Select Time Range or Microsecond Timestamp from the Search Method drop-down list, specify the time, and then click Search.
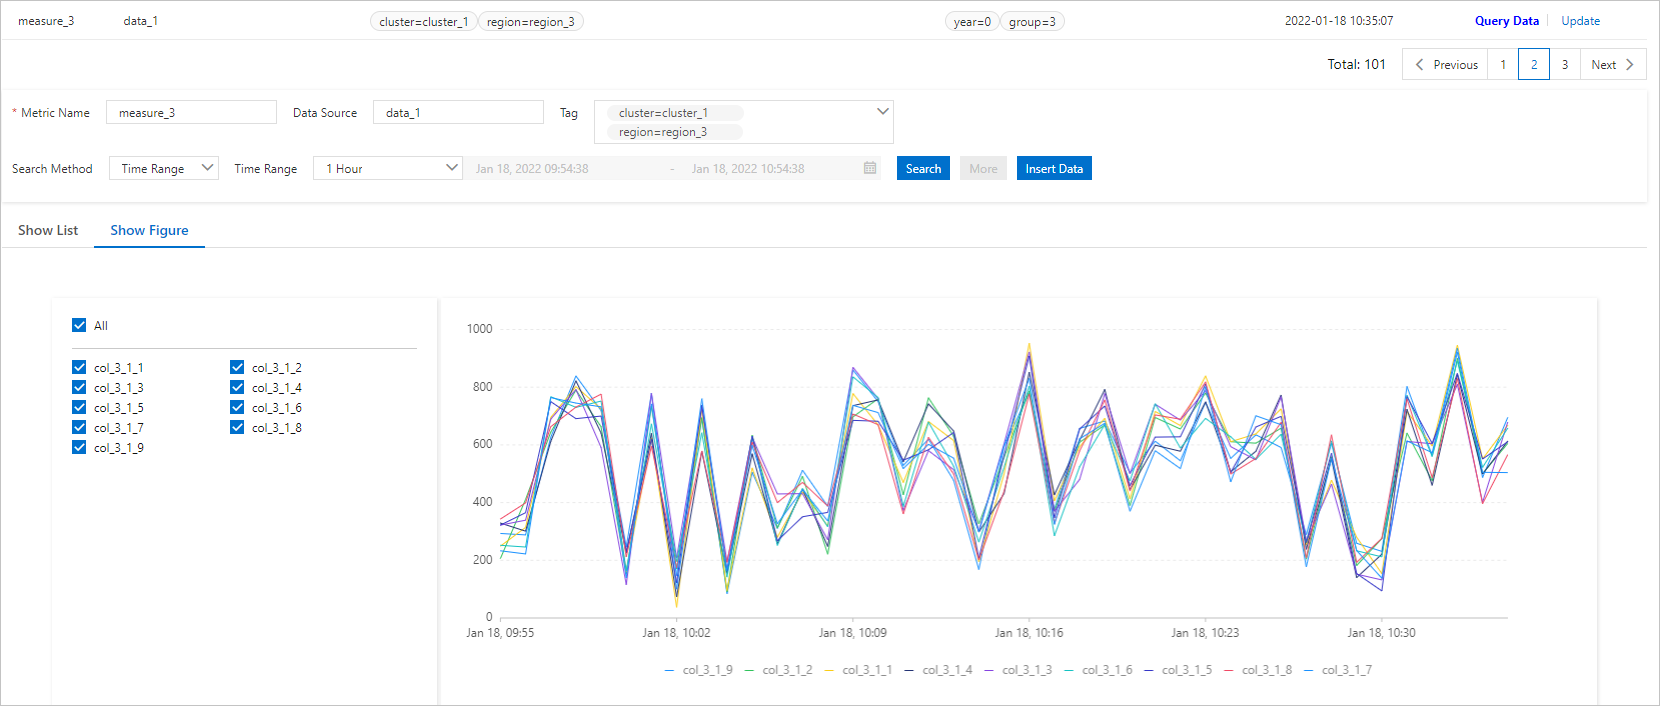
The data that meets the conditions is displayed on the Query Data tab. The query results can be displayed in a list or figure.
Example of displaying results in a list
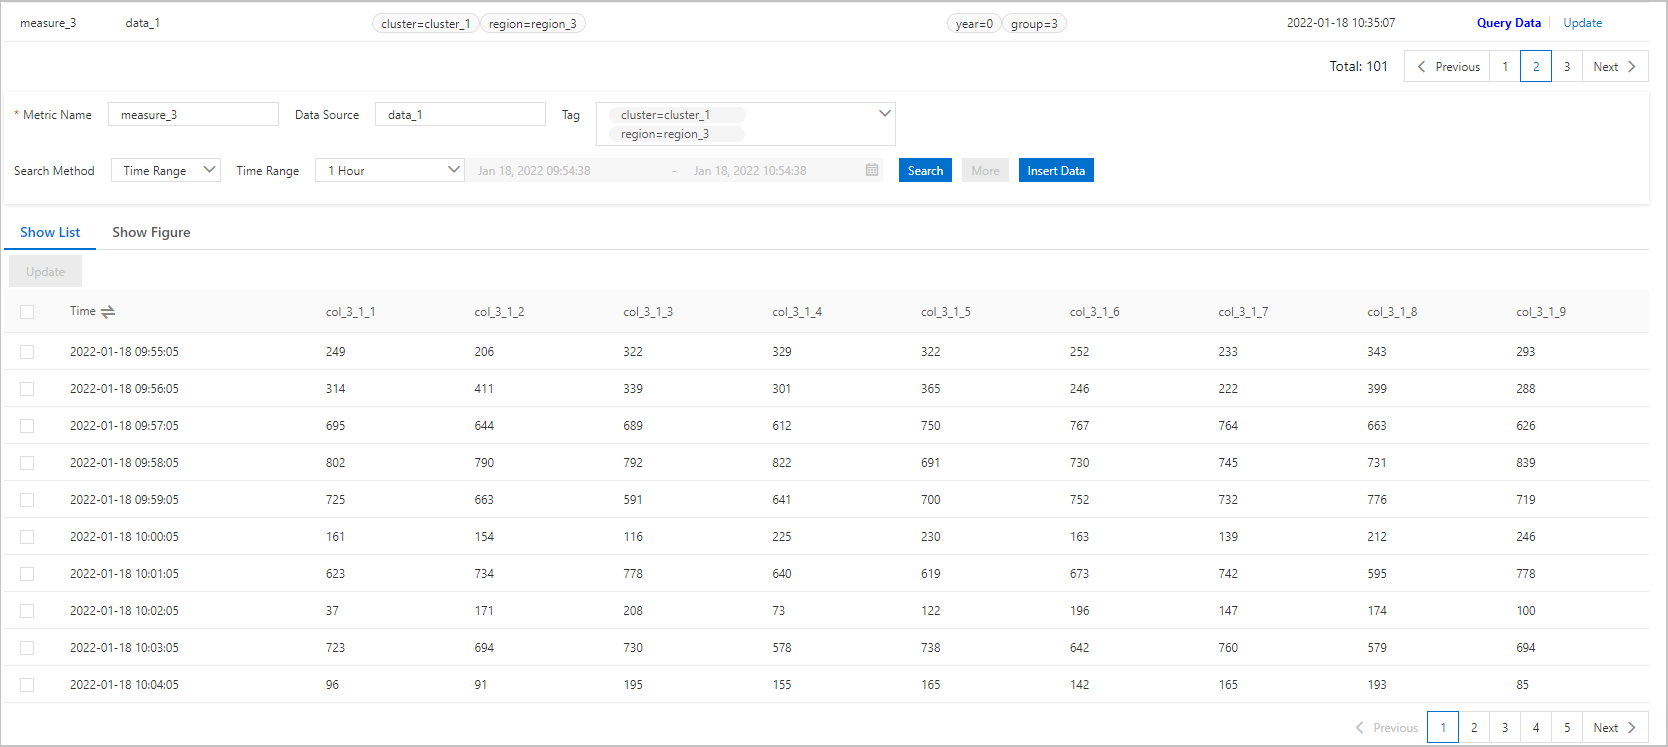
Example of displaying results in a figure
NoteDifferent colors in the figure represent different data columns. If you move the pointer over the data trend line, the values of the corresponding data columns are displayed. You can also select or clear specific data columns to display the required data columns.
Step 6: Use SQL to query data
SQL queries are compatible with the query syntax of MySQL. After you create a time series table and create a mapping table for the time series table in SQL, you can execute SQL statements to access data in the table.
You can create three types of mapping tables for a time series table to query data by executing the corresponding SQL statement. For more information, see Use SQL to query time series data.
On the Overview page, click the name of the instance that you want to manage or click Manage Instance in the Actions column.
On the Query by Executing SQL Statement tab, select a mapping table to query data based on your business requirements.
To retrieve a time series, select a mapping table for metadata of time series and execute the SELECT statement to query the time series.
For example, if you want to query the time series whose metric type is basic_metric by using the
timeseries_table::metamapping table for time series metadata, execute the following SQL statement:SELECT * FROM `timeseries_table::meta` WHERE _m_name = "basic_metric" LIMIT 100;To query time series data by using a mapping table in the single-value model, select the mapping table in the single-value model and execute the SELECT statement to query time series data that meets the query conditions.
For example, if you want to query data in the time series whose metric type is basic_metric by using the
timeseries_tablemapping table in the single-value model, execute the following SQL statement:SELECT * FROM timeseries_table WHERE _m_name = "basic_metric" LIMIT 10;To query time series data by using a mapping table in the multi-value model, create a mapping table in the multi-value model and execute the SELECT statement to query time series data that meets the query conditions.
NoteFor more information about how to create a mapping table in the multi-value model, see Create mapping tables in the multi-value model for time series tables.
For example, if you want to query information about the metrics in the time series whose cpu value is greater than 20.0 by using the
timeseries_table::muti_modelmapping table in the multi-value model, execute the following SQL statement:SELECT cpu,memory,disktop FROM `timeseries_table::muti_model` WHERE cpu > 20.0 LIMIT 10;
References
You can also get started with the TimeSeries model by using the Tablestore CLI. For more information, see Use the TimeSeries model in the Tablestore CLI.
For more information about the limits of and procedure for using the TimeSeries model in actual business scenarios, see Overview and Use the TimeSeries model by using Tablestore SDKs. For more information about how to select a cost-effective billing method based on your business characteristics, see Recommended solutions.
For more information about the operations that you can perform on the TimeSeries model in the Tablestore console, see Use the TimeSeries model in the Tablestore console.
