After you connect Tablestore to Data Management (DMS), you can manage and use Tablestore in DMS. Specifically, you can add Tablestore instances to DMS and execute SQL statements in DMS to query Tablestore data. You can also export Tablestore data that meets specific conditions to an on-premises computer based on your business requirements.
Background information
Database Management (DMS) is a one-stop data management platform that allows you to manage data throughout its lifecycle. You can use DMS to manage global data assets, govern data, design and develop databases, integrate data, develop data, and consume data. The preceding features allow enterprises to mine value from data in an efficient and secure manner and help enterprises undergo digital transformation. For more information, see What is DMS?.
Scenarios
After you connect Tablestore to DMS, you can process and analyze Tablestore data in DMS in an efficient manner in various big data scenarios. The following items describe common scenarios:
Large-scale data storage and analysis
Tablestore provides high throughput and can store large amounts of data. You can query and process Tablestore data in DMS by executing SQL statements. This way, you can perform big data analysis. For example, you can analyze logs and user behavior.
Data import and export
You can use DMS to load data from external sources to Tablestore or export data from Tablestore to other systems.
Data forwarding and integration
You can use DMS to easily forward data from other data sources to Tablestore or forward Tablestore data to data warehouses, message queues, or other online or offline analysis systems. DMS allows you to construct complex data architectures, such as data lakes and data mid-end, which helps perform efficient data integration and utilization.
Real-time data monitoring and alerting
You can use the monitoring and notification features of DMS to configure monitoring and alerting rules for mission-critical Tablestore metrics. This way, you can be notified of data exceptions and system performance issues and handle the exceptions and issues at the earliest opportunity. This ensures business continuity and stability.
Usage notes
You can use DMS to access Tablestore instances only over the classic network. Make sure that access to the Tablestore instance over the classic network is allowed in the network access control list (ACL) of the Tablestore instance. For more information, see Network ACL.
Procedure
After you connect Tablestore to DMS, you can use the SQL query feature to query and analyze Tablestore data.
You can connect Tablestore to DMS only if you use the Wide Column model or TimeSeries model.
Prerequisites
A Resource Access Management (RAM) user for which an AccessKey pair is created is created. The AliyunOTSFullAccess policy is attached to the RAM user to grant the RAM user the permissions to manage Tablestore and the AliyunDMSFullAccess policy is attached to the RAM user to grant the RAM user the permissions to manage DMS. For more information, see Use the AccessKey pair of a RAM user to access Tablestore.
Specific resources are created based on the Tablestore data model that you use.
If you use the Wide Column model, a data table is created and data is written to the data table. For more information, see Operations on a data table and Write data.
If you use the TimeSeries model, a time series table is created and data is written to the time series table. For more information, see Operations on time series tables and Write time series data.
The following operations are performed in the DMS console:
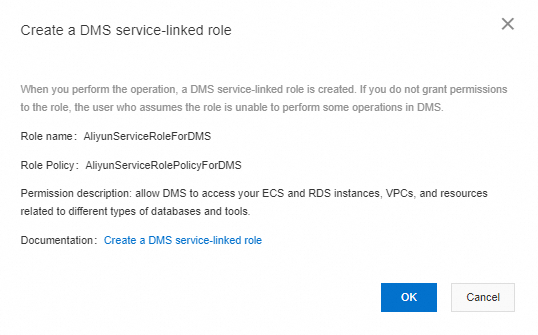
If it is the first time you use DMS, the DMS service-linked role AliyunServiceRoleForDMS is created.
The AliyunServiceRoleForDMS service-linked role allows DMS to access your Elastic Compute Service (ECS) instances, virtual private clouds (VPCs), RDS instances, and resources related to various databases and tools. For more information, see Service-linked role of DMS.
A system role that has permissions to perform SQL operations is configured for the user. For more information, see System roles.
NoteBy default, a RAM user of an Alibaba Cloud account that is added to the DMS tenant assumes the regular user role.
The regular user role can apply for database-related permissions and query and modify data and table schemas. The regular user role can be assumed by the developers, test engineers, product engineers, operations engineers, and data analysts of enterprises.
We recommend that you use the simple mode of the DMS console.
Step 1: Add a Tablestore instance to DMS
Perform the following steps to add a Tablestore instance to DMS:
Log on to the DMS console V5.0.
In the left-side navigation pane of the Home page of the DMS console, click the
 icon next to Database Instances. Note
You can also enter Instance Management in the search box of the Home page of the DMS console. In the search results, click Instance Management to go to the Instances page. Click New to add a Tablestore instance.
In the Add Instance dialog box, specify the Tablestore instance that you want to add.
On the Alibaba Cloud tab of the Data Source section, click Tablestore in the NoSQL Databases field.
In the Basic Information section, configure the parameters to specify basic information about the Tablestore instance. The following table describes the parameters.
Parameter
Description
Database Type
The type of the database instance. Select Tablestore.
Instance Region
The region in which the database instance resides.
Other primary accounts
If you want to add a database instance that belongs to another Alibaba Cloud account, click Cross-Alibaba Cloud account instances and select the Alibaba Cloud account.
NoteIf the Alibaba Cloud account is not included in the drop-down list, you can click Add User to add the Alibaba Cloud account that is used to purchase the database instance. For more information, see Manage users.
Instance ID
The ID of the instance.
Security hosting
Specifies whether to enable security hosting for the instance. Valid values:
Enable: enables security hosting for the instance. This prevents users from having direct access to the database account and password and ensures permission management at the granularity of instances, databases, tables, and rows. For more information, see Security hosting.
Disable: disables security hosting for the instance. The database account and password are required each time you log on to the database when the logon session times out. This may affect the use of the database instance. We recommend that you do not set the Security hosting parameter to Disable.
AccessKey ID
The AccessKey pair of the RAM user. The first time you add a database instance, you must specify the AccessKey pair of the RAM user if you set the Security hosting parameter to Enable.
AccessKey Secret
Advanced Feature Pack
Select Stable Change or Security Collaboration based on your business requirements. If you do not select Stable Change or Security Collaboration, the instance is in the Flexible Management mode. For more information, see Control modes.
The Security Collaboration mode supports all features of the Stable Change mode and provides the DevOps feature to help you specify a custom R&D process and review process.
The Stable Change mode provides solutions, such as lock-free changes and SQL review, to allow databases to run in a more stable manner.
Security Rules
This parameter is available only if you set the Advanced Feature Pack parameter to Security Collaboration.
You can select the default security rule or custom security rules to manage the database in a fine-grained manner. For more information, see Manage security rules.
(Optional) In the Advanced Information section, configure the parameters to specify advanced features, such as the environment type, instance name, and query timeout period, based on your business requirements. The following table describes the parameters.
Parameter
Description
Environment Type.
The type of the environment in which you want to deploy the database instance. For more information, see Change the environment type.
Instance Name
The name of the instance that you want to display in DMS. By default, DMS automatically synchronizes the name of the Tablestore instance from Tablestore to DMS.
If you want to specify a custom name for the Tablestore instance in DMS, you can clear Automatically Synchronize Instance Name and specify a custom name.
DBA
The database administrator (DBA) of the database instance. The DBA can grant permissions to users.
Query Timeout(s)
The timeout period for the execution of an SQL query statement. If the amount of time required to execute an SQL query statement is longer than the specified timeout period, the execution of the query statement is terminated to protect the database.
Export Timeout(s)
The timeout period for the execution of an SQL export statement. If the amount of time required to execute an SQL export statement is longer than the specified timeout period, the execution of the export statement is terminated to protect the database.
Test the database connectivity.
Click Test Connection to test the connectivity of the database.
If the database passes the connectivity test, click OK.
Click Submit.
Authorize hosting.
If security hosting is enabled for the instance, the system prompts you to configure hosting authorization. You can configure hosting authorization based on your business requirements. If other users want to use the instance, the users must request for permissions from you or the owner of the instance.
In the Note dialog box, click Authorize Now.
In the Permission Authorization dialog box, configure the Authorized Person, Permission, and Validity period parameters.
Click OK.
Step 2: Query Tablestore data by using SQL statements in DMS
Tablestore supports data storage models, such as the Wide Column and TimeSeries models. The SQL query operations vary based on the model of your instance. You must perform SQL query operations based on the model of your instance.
The SQL query feature that you can use to query Tablestore data on the SQL Console page of DMS is the same as the SQL query feature that is supported by Tablestore. For more information, see SQL features.
Execute SQL statements to query data in an instance of the Wide Column model
Go to the SQL Console page.
NoteYou can go to the SQL Console page by performing the following operations: click Database Instances in the left-side navigation pane of the Home page of the DMS console and double-click the Tablestore instance that you added to DMS.
Log on to the DMS console V5.0.
In the left-side navigation pane of the Home page of the DMS console, move the pointer over the
 icon and click SQL Console.
 In the Select Database dialog box, select the Tablestore instance that you added to DMS.
DMS automatically displays the SQL mapping table that you created in Tablestore.
Create a mapping table for a table and execute SQL statements.
If you already created a mapping table for the table, skip this step.
ImportantWhen you create a mapping table for a table, make sure that the data types of the fields in the mapping table match the data types of the fields in the table. For more information, see Data type mappings in SQL.
Write the SQL statements that you want to execute to create a mapping table on the SQL Console page. For more information, see Create a mapping table for a table.
When you create a mapping table for a table, make sure that the mapping table has the same name and primary key columns as the table.
NoteIf you created a search index for the table, you can create a mapping table for the search index. This way, you can execute SQL statements to query data by using the search index. For more information, see Create mapping tables for search indexes.
The following sample code provides an example on how to create a mapping table for a table named test_table.
CREATE TABLE `test_table` (
    `pk` VARCHAR(1024),
    `long_value` BIGINT(20),
    `double_value` DOUBLE,
    `string_value` MEDIUMTEXT,
    `bool_value` BOOL,
    PRIMARY KEY(`pk`)
);
After you select the complete SQL statement, click Execute(F8) or click the
 icon next to the first line of the SQL statement to execute the SQL statement.
 The execution result is displayed on the Execution History tab of the SQL editor.
Execute SQL statements to query data in the table.
On the SQL Console page, write SELECT statements to query data. For more information, see Query data.
The following sample code provides an example on how to query data in the test_table table and obtain up to 20 rows of data.
SELECT `pk`, `long_value`, `double_value`, `string_value`, `bool_value` FROM test_table LIMIT 20;After you select the SQL statement, click Execute(F8) or click the
icon next to the first line of the SQL statement to execute the SQL statement. The execution result is displayed on the Execution History tab of the SQL editor.
On the Execution History tab of the SQL editor, move the pointer over Export File and select the result set that you want to export. DMS downloads the result set to your computer or generates an INSERT statement for the result set.
NoteOn the Execution History tab, you can view the execution history of SQL statements, such as the execution time, SQL statement, and status. If an SQL statement fails to be executed, you can troubleshoot the issue based on the cause provided in the Remarks column.
Execute SQL statements to query data in an instance of the TimeSeries model
Go to the SQL Console page.
NoteYou can go to the SQL Console page by performing the following operations: click Database Instances in the left-side navigation pane of the Home page of the DMS console and double-click the Tablestore instance that you added to DMS.
Log on to the DMS console V5.0.
In the left-side navigation pane of the Home page of the DMS console, move the pointer over the
icon and click SQL Console. In the Select Database dialog box, select the Tablestore instance that you added to DMS.
DMS automatically displays the SQL mapping table that you created in Tablestore.
Create a mapping table for a table and execute SQL statements.
After you create a time series table, the system automatically creates a mapping table in the single-value model and a mapping table for time series metadata for the time series table. The name of the mapping table in the single-value model is the same as the name of the time series table. The name of the mapping table for time series metadata is obtained by concatenating the name of the time series table with
::meta.If you want to use a mapping table in the multi-value model to query time series data in the time series table, you must create a mapping table in the multi-value model. If you do not want to use a mapping table in the multi-value model to query time series data, you do not need to create a mapping table in the multi-value model.
ImportantWhen you create a mapping table for a table, make sure that the data types of the fields in the mapping table match the data types of the fields in the table. For more information, see Data type mappings in SQL. For more information about the data types of fields in the mapping tables for a time series table, see Mapping tables for a time series table in SQL.
Write the SQL statements that you want to execute to create a mapping table on the SQL Console page. For more information, see Mapping tables for a time series table in SQL.
In this example, a mapping table in the multi-value model named
timeseries_table::muti_modelis created to query time series data in the time series whose metric names are cpu, memory, and disktop. Sample SQL statement:CREATE TABLE `timeseries_table::muti_model` ( `_m_name` VARCHAR(1024), `_data_source` VARCHAR(1024), `_tags` VARCHAR(1024), `_time` BIGINT(20), `cpu` DOUBLE(10), `memory` DOUBLE(10), `disktop` DOUBLE(10), PRIMARY KEY(`_m_name`,`_data_source`,`_tags`,`_time`) );After you select the complete SQL statement, click Execute(F8) or click the
icon next to the first line of the SQL statement to execute the SQL statement. The execution result is displayed on the Execution History tab of the SQL editor.
Execute SQL statements to query data in the table.
On the SQL Console page, write SELECT statements to query data. For more information, see SQL examples.
Query data by using a mapping table in the single-value model
The following sample code provides an example on how to query data in the time series whose metric name is basic_metric in the time series table:
SELECT * FROM timeseries_table WHERE _m_name = "basic_metric" LIMIT 10;Query data by using a mapping table for time series metadata
The following sample code provides an example on how to query the time series whose metric name is basic_metric by using the mapping table for time series metadata:
SELECT * FROM `timeseries_table::meta` WHERE _m_name = "basic_metric" LIMIT 100;Query data by using a mapping table in the multi-value model
The following sample code provides an example on how to query information about the metrics in the time series whose cpu value is greater than 20.0 by using the mapping table in the multi-value model.
SELECT cpu,memory,disktop FROM `timeseries_table::muti_model` WHERE cpu > 20.0 LIMIT 10;
After you select the SQL statement, click Execute(F8) or click the
icon next to the first line of the SQL statement to execute the SQL statement. The execution result is displayed on the Execution History tab of the SQL editor.
On the Execution History tab of the SQL editor, move the pointer over Export File and select the result set that you want to export. DMS downloads the result set to your computer or generates an INSERT statement for the result set.
NoteOn the Execution History tab, you can view the execution history of SQL statements, such as the execution time, SQL statement, and status. If an SQL statement fails to be executed, you can troubleshoot the issue based on the cause provided in the Remarks column.
Billing rules
Tablestore fees
When you execute SQL statements in DMS to access Tablestore resources, no fees are generated for the SQL statements. However, if operations such as table scans or index queries are performed during the execution of the SQL statements, fees are generated for the operations. For more information, see Billable items of SQL query.
Other resource fees
When you use DMS, you are charged if the instance is in the Stable Change or Security Collaboration mode. If the instance is in the Flexible Management mode, you are not charged. For more information, see Pricing.
References
You can also execute SQL statements to query data in the Tablestore console or Tablestore CLI or by using Tablestore SDKs, Java Database Connectivity (JDBC), or Tablestore driver for Go. For more information, see Usage method of SQL query.
You can also connect a Tablestore instance to DataWorks and then execute SQL statements to query and analyze Tablestore data. For more information, see Connect a Tablestore instance to DataWorks.
You can use computing engines, such as MaxCompute, Spark, Hive, HadoopMR, Function Compute, Realtime Compute for Apache Flink, and PrestoDB, to compute and analyze data in tables. For more information, see Overview.
If you want to accelerate data queries and computing by executing SQL statements, you can create a secondary index or a search index. For more information, see Index selection policy and Computing pushdown.